
The Warhammer 40,000 universe is a massive place, and the “Narrative Forge” hobby articles encourage thinking outside the box (literally) when putting models together and stretching yourself out in the hobby. They aim to make hobbyists and players comfortable growing beyond imitating the models they see in their Codexes and playing the rulebook missions, and serve as a source of inspiration for anyone wanting to forge new experiences in the hobby. This week, Robert “TheChirurgeon” Jones is continuing his multi-part series on creating and running campaigns. This week, he’s talking about Tree Narrative Campaigns.
In our last article, we explored building and running a Linear Narrative campaign. Today we’re looking at Tree Narrative Campaigns, the more complicated, choice-driven brother of Linear Narrative campaigns.
Tree Narrative Campaigns
Like Linear Narrative campaigns, Tree campaigns have a set story line, but unlike linear campaigns, they offer branching paths and missions as players advance the campaign and different things happen. The goal is to allow players some control over where things go and how everything plays out while still working with a defined narrative. You aren’t quite letting games dictate everything.
Why Run a Tree Campaign?
There are a lot of reasons to recommend a Tree campaign:
- Clearly defined end and goals. Like with Linear Narrative, Tree campaigns run a predetermined number of games, and have a condition for determining the campaign winner. That means you can tell a complete story and then move on to the next one. It’s pretty common for campaigns to not have an ending; choosing a Narrative Campaigns can help ensure yours isn’t one of them.
- Very easy to run. And also as with Linear Narrative campaigns, all the work is in set-up; Once you’ve built the story and your framework, you can sit back and let the campaign run its course without having to manage a bunch of additional campaign rules and campaign turns. This also means it’s easy for you to play in your own campaign without having to worry about staying impartial.
- Players control the narrative. Whether players win or lose (and how they do it) matters, changing the path through the campaign story and the missions they’ll play. This can be pretty exciting, even though it creates a lot of additional work prior to the campaign.
- Better connection between story and game outcomes. Because games dictate the narrative direction and mission flows, it’s easier to see how games and their outcomes reflect and impact the story. There’s less chance of one player winning every game only to “eke out a narrow win as the defender valiantly escapes” because that’s what you wrote ahead of time or because that’s the historical outcome.
- Works well with two teams. Like with Linear narrative campaigns, you want to have two players or teams for an ideal tree campaign, but tree campaigns work much better for teams that have more players. You can have the winning side’s games determine the branching path, allowing many players to duke it out over the outcome, so long as everyone playing is representing a single “side” or choice of outcome. This also allows for players to easily switch teams mid-campaign.
Consider a Tree Campaign if: You have two players or can easily put people into two teams and you want to plan something a little more complicated. Or if you’ve run a linear narrative campaign and want to try planning something a little more complicated, and have time to plan out a branching narrative. Most of the lessons we can learn about Linear Narrative campaigns and building rewards for winning in those missions can be applied to Tree campaigns, we just need to think more about how to handle the paths we’ll create and how to represent one side taking the lead in the narrative.
Before You Start: What’s Out There
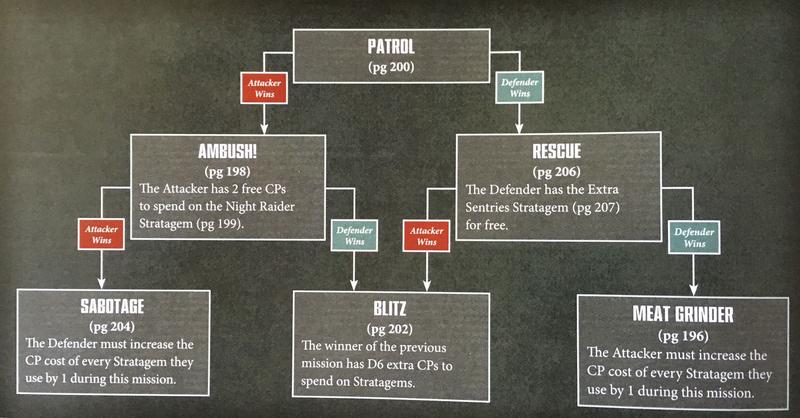
We’re in mostly uncharted territory here, friends! There aren’t a lot of Tree campaigns out there for us to draw from. There’s a simple one in the back of the Warhammer 40,000 core rulebook, which we’ve shown above. So we’re going to plan our own and I’m going to draw out how this process might work.
For this, I’ve enlisted the help of our resident curmudgeon and games reviewer, Jonathan “Crion” Bernhardt, who has agreed to help write some narrative and backstory elements for our campaign.
The Aventide Campaign
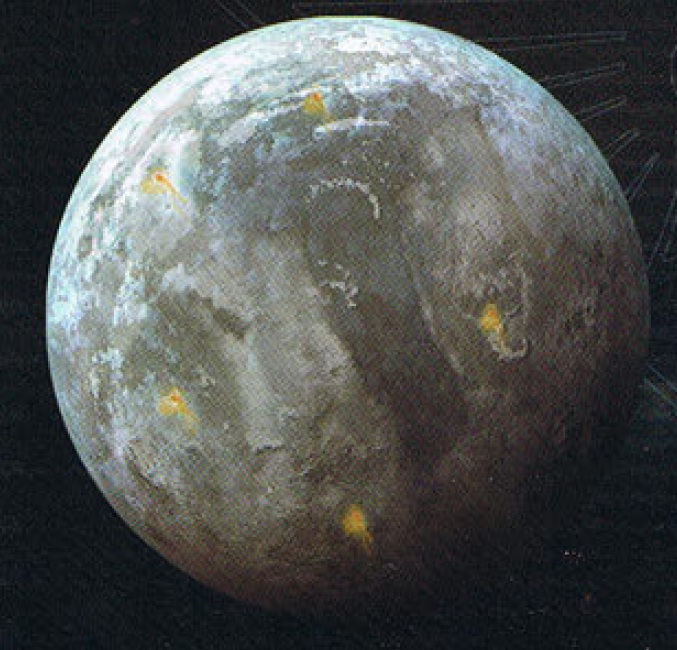
The planet of Aventide is dying. Rich natural resources enticed her multiple, competing suitors to dig too greedily and too deep, and the nature of those resources was so unstable that strip-mining operations were bound to destabilize the planet’s core. This world once belonged to the Imperium of Man, before the Horus Heresy, and vast stockpiles of mined riches remain for the taking in old, still-gleaming vaults — but now, the final two factions battling for control of the planet are on a time limit. They must loot as much as they can from the ruins, while countermanding each other. And as they amass greater and greater wealth for their transports to haul off-planet, Aventide grows more and more unstable…
The Setting
The campaign begins with the two armies or factions fighting to secure a landing zone on some of the planet’s remaining stable platforms. Then they move on to the great geothermal mines, which are still mostly safe but can be hazardous to stay around for too long — but they want to sack the storehouses on-site to steal their wealth. Depending on how these battles unfold, they may either progress to an abandoned urban center, looking to unlock the vaults so they can take everything, or further destabilize the planet, creating a mad race to grab everything they can before it comes apart. The final maps of the campaign may be battles waged across the face of the forgotten hoard itself.
The Tree
We’ve built a tree that branches in a few different places and goes beyond a simple 3-round structure to represent a more full narrative. Basically, both armies land on the planet around the same time and have to secure a landing zone. Then they’ll dog each other at each step along the way, fighting over vital resources and clues to the location of the hoard and access codes to enter. Of course, if things go pear-shaped early on they may find themselves fighting to get off the planet with their lives.
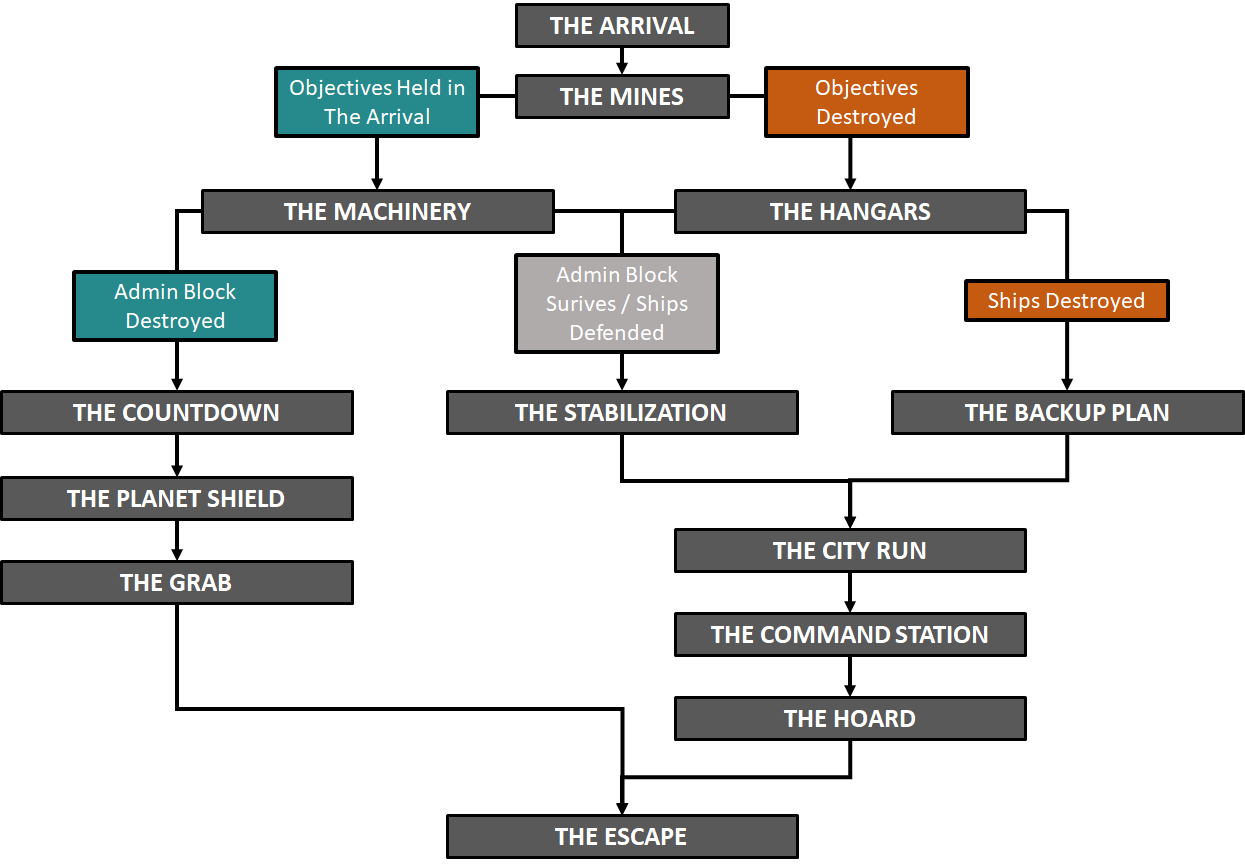
Let’s talk about the different rounds and missions in this tree. At this point we’re going to sketch things out using broad strokes, then we’ll come back and fill them in later. I’ve chosen to create a couple of branches in the story, but will have things loosely line back up in parts, to prevent this from getting too out of hand. The wider you go when you create a tree like this, the more likely it is that you’ll never see that particular branch, so you want to make sure that if you’re doing a lot of work to create custom content (like we might), that your tree is relatively tight, so the work isn’t going to waste. If you’re just writing a sentence or two for each node and using all preexisting missions though, then go as wide as you can handle.
As you build the narrative, try to avoid “one side runs away with it” storylines. Or if you do, find creative ways to build in the desperation of one side. Give them a series of advantageous guerilla warfare-style missions and the opportunity for a comeback. As we’ll see later, “The Grab” mission pictured above gives the player who is behind an opportunity to catch up, as do “The Hoard” and “the Escape.”
The Rounds
1. THE ARRIVAL: Aventide is ripe for the taking, even as it bursts. Both forces have sent ahead advance teams to capture a key mega-mining facility on the planet’s surface, one of the few functional/stable landing platforms.
Mission Concept: The goal here is to have players taking control of drop forces duking it out over a key landing zone. This can be a straightforward battle for several key objective markers that signify control of the DZ, plus points scored for having more units remaining. Objectives can either be taken and held or destroyed — this branches the plot. The mission should use Reserves rules to represent units dropping in from orbit to support the effort, but otherwise can be Eternal War: Cleanse and Control.
2. THE MINES: Massive geothermal mining extractors, still fully-automated, run as the world itself burns. Both factions must rush to secure the extractors and ensure the last and richest of their spoils are diverted to them.
Mission Concept: A series of objective markers with “on/off” switches — whoever holds them last determines who’s getting the resource benefit (read: Campaign Victory points). Battlezone: geothermal mines, includes lots of geysers/explosive gas. Winner of round 1 gets +1 to their Reserves rolls.
3A. THE MACHINERY: As the battle for the planet continues, the factions open a second front in the administration section of the mega-mine, battling to seize control of the vast automated lock-loaders and cruster drills that crack Aventide’s mantle and core. If one faction is too close to victory, the other side can destroy the administration block instead — but it will send the mega-mine, and perhaps the entire planet, into a death spiral.
Mission Concept: A series of objective markers representing key machinery parts, plus a fortification (also an objective marker) representing the administration block. The Admin block is crucial to operating the machinery and holds important security codes but if one player chooses, they can destroy the admin block, jump-starting the planet’s death spiral.
3B. THE HANGARS: So much of the mega-mine’s LZ was destroyed in the first contact between the two factions that secondary transport and egress needs to be secured before the resources themselves. Both factions rush to take and hold the great space-freighters still berthed in the facility’s hangars — or destroy them to prevent their opponent from seizing them, and cannibalize them to their own ends.
Mission Concept: Tally up campaign victory points so far. The player in the lead is the defender on this mission, attempting to protect a bunch of key dropships (with profiles, probably 3 to 5) from the Attacker. If the Defender can save two or more, they pull out the win. If not, then neither side is left holding the resources necessary to get their spoils off the planet.
4A. THE COUNTDOWN: Too much damage has been done to the mega-mine and to Aventide itself. The planet is dying. Both factions must scramble to recover whatever they can from the ruins as the ground breaks apart around them as they prepare to withdraw, possibly consuming the greedy and the reckless whole.
Mission Concept: This is a mission begging to use the Volcanic Eruption battlezone from Vigilus, where lava is spreading across the battlefield. Create a series of objective markers to extract from, and once the lava hits them, they’re gone. Whoever finishes with the most wins.
4B. THE STABILIZATION: Much of the mega-mine has been destroyed in the fighting, but at least the resources already mined haven’t gone critical, and enough infrastructure remains to make the mine worth preserving. The defender, who is whichever player has secured the upper hand so far, must protect the mine reserves from the attacking player, who, no longer able to secure them for themselves, must destroy them.
Mission Concept: A straightforward Stronghold Assault here, or something along those lines. Defending a fortified position from a foe laying siege. I’m thinking Bunker Assault is the mission to use, possibly with a slight twist.
4C. THE BACKUP PLAN: The dropships are all gone, but there’s still a Dark Age teleportarium near the mega-mine facility. This massive wonder was not the two armies’ first priority mainly because they’re unsure if they’ll even be able to use it — but now it’s worth the risk.
Mission Concept: The Teleportarium is on a chunk of the planet that has broken off and begun to drift, forcing players to compete for it on a giant asteroid in low-oxygen, low-gravity conditions. This is an old-fashioned King of the Hill-type mission, being the last one holding the ground when time runs out. In this mission, holding the teleportarium allows units to teleport in reinforcements or shoot units around the table.
5A. THE PLANET SHIELD: The destabilization of Aventide’s core has tripped failsafe protocols in the ancient Golden Age machines governing the world. Whether intentional or due to the corruption of the ages, a great planetary shield has encased the dying world, trapping both factions there. Whichever faction captures the control facility will be able to turn it off…and then turn it back on again once they escape, trapping their foes in the doomsday blast.
Mission Concept: Destroy the shield defenses (automated turrets) and turn off the shield itself. This mission incorporates a series of automated defenses (Vengeance Weapon batteries) that will fire at the closest units on approach, and a trio of objectives to capture on the other side of the defenses to capture. Players score VPs for holding the objectives at the end of the game.
5B. THE CITY RUN: A vast freight-hauling monstrosity runs the length of the ruined urban expanse, still functioning even now, if you can seize the controls. Both factions compete to take command of the ancient wonder and move their armies faster towards the city center, but the tower is protected by an automated defense system.
Mission Concept: One central objective for the control tower, hold that at the end of the mission to win. This mission is played using the Cities of Death Rules in an urban center. Also in play: A security station that controls the automated defense system, and is protected by automated Vengeance Weapon batteries. If a player held the admin block at the end of mission three, they can give a code scrambler to a single unit that prevents the weapon batteries from shooting at them. The winner of round 4 gets the first turn.
6A. THE GRAB: With the capture of the planetary shield administration, one faction has gained the upper hand over the other — but the tide can still turn, or at least be temporarily beaten back. The faction behind in points stages a daring raid on the faction ahead as they declare victory, hoping to loot and steal from their rival’s rear lines to make up for the strategic setback.
Mission Concept: A Zone Mortalis mission. Whichever player is lagging behind sends a kill team to attack and kill their foes and steal any resources they’ve captured so far, evening the score. Could be a boarding action or a base invasion. Defender has door control and is tasked with protecting a stash of mined supplies. The Attacker steals 1 campaign VP from the defender for each objective they can control at the end of the game (max 3).
6B. THE COMMAND STATION: A savvy commander could turn the air defense system off the proper way, but the easier way is to raze it to the ground. What’s most important, though, is finding the codes and coordinates that will let them access the Emperor’s Hoard. One faction arrives first and must defend the station against their attackers, who want to deny them their valuable data.
Mission Concept: The winner of mission 4 is the defender here, tasked with protecting an important data terminal that has the location and codes for entry into the Emperor’s Hoard, a massive vault containing mineral wealth, unsent tithes, and dark age technology. The mission is The Relic, but played using the Cities of Death battlezone rules in an urban setting, and the Defenders can start with a single unit at mid-table in control of the Relic.
7B. THE EMPEROR’S HOARD: The door to the Emperor’s Hoard has been breached, and the looters who were victorious at the Command Station are in first — but their foes are nipping at their heels. Both factions must grab what they can before it’s time to go.
Mission Concept: The winner of round 5 gets the first turn. A number of loot/hoard objective markers are placed on the table. The goal is to capture as many as possible before oncoming lava/geothermal fissures/whatever destroy the battlefield and force a retreat. Each one is worth a campaign victory point. The game uses the Geothermal Eruption battlezone from Vigilus.
7A. and 8B. THE ESCAPE: …And it’s time to go. Each army must defend their transports as they take off and leave Aventide behind, and capture anything they can from their opponents on the way out.
Mission Concept: Two specified Landing Zones on far ends of the table. Transports arrive on turn 3 and leave on the game’s last turn–the game uses variable game length to represent the possibility of the planet destabilizing faster. The goal is to be in the specified zone and get as many units off the table as possible with loot markers, and possibly destroy your opponent’s transport. Each player starts mission 7 with all the hoard markers they ended up with in mission 6 and must assign them to units to carry. When a unit dies, it drops its hoard markers and another unit may pick them up. The transports are super-heavy vehicles that take some work to bring down. The winner of the prior mission can choose to re-roll the first variable game length roll.
Campaign Victory Points
Because this campaign is all about securing loot, it uses a campaign victory point system to determine the winner and who is in the lead. Generally, winning each round is worth 1 Campaign Victory Point, but specific missions may open up opportunities to gain (or steal) more during the campaign. The winner at the end is the player who has scored the most Campaign Victory Points. If a mission refers to a player “in the lead,” it is the player with the most CVPs. If both players are tied, then the player in the lead is the one who won in the previous round.
Custom Missions
While I’ve tried to mostly interweave existing missions and battlezones into the Tree campaign we’ve created — and you could certainly fill this out with only existing missions, there are plenty of choices that will get you most of the way there — there are a few that cry out for individual attention, and so we’ll need to create some custom missions for them. Creating custom missions can be fun and rewarding, but it’s also a lot of work, and a little beyond the scope of this article. So we’ll take a detour from our weekly campaigns write-up to talk about how to create good custom missions.
Next Time: Creating Custom Missions
Hopefully this was enough to get you inspired and thinking about creating your own Tree Narrative campaign. They can be a real blast to play and plan, and they don’t get enough love in existing materials. We’ve still got more to cover on other campaign types, but next week we’re going to continue down the thread started here for the Aventide Campaign and explore how to create your own missions, including what makes a good custom mission.
As always, if you have any questions, comments, feedback, or stories about running your own tree narrative campaigns, we’d love to hear it! Leave us a note in the comments below or shoot us an email at contact@goonhammer.com.
