
Most of our writers and readers are into competitive play, or at least attempted competitive play, but many people also eschew that and just want to smash models around and don’t care so much about their win-loss record. This one is for you. I’ll let them take it from here.
Hi! Our names are Norman, Joe, and Rocco. All three of us love Warhammer 40,000, as well as a variety of other tabletop games. Like a lot of folks, we made heavy use of Goonhammer resources when we were starting out in the hobby. As we got more experienced, we found that we didn’t necessarily like going as hard as the folks in the competitive community. We mostly prefer casual play.
When we say ‘casual play’, we’re really referring to any 40k game where you’re much more interested in seeing what kind of cool stuff the little plastic rambos/bugs/funguses/spikey lads end up doing on the table as opposed to trying to determine which of you is the superior player. This is your classic Beerhammer or Yardhammer, or even a friendly local RTT. There are a lot of great articles on this site already about how to get started in 40k and how to improve yourself as a hobbyist, a player, and a member of the community, but what if your goal is less to become a better 40k player and more about finding new and interesting ways to play toy soldiers with your friends? That’s really what we’re here to talk about.
The Beauty of Casual Play or: How I Learned to Stop Worrying and Love the Bloodthirster
Why do we love casual play so much? It’s probably fair to say that we’ve all seen a bias toward matched play, and GT missions specifically, in our hobby community. A lot of players seem to see those game modes as the most balanced and therefore “official”, or “only”, way to play the game, and it often rubs off on those new to the hobby. This is (in our sort-of humble opinions) the wrong way to think about it. Yes, matched play is designed more with balanced gameplay in mind, but that just means it’s (hopefully) better tuned to measure each player’s skills at playing with the tools available – which, as we discussed above, isn’t necessarily the point of casual games.
Narrative/Open play is less about skill and more about throwing curveballs to keep the game interesting, and just having fun with your dudes/dudettes. You’ll run into missions and scenarios that are just bad for your list, but you and your opponent can veto these bad scenarios and try again, because the whole point is for both of you to have fun. The Warhammer Police aren’t going to show up at your door and hit you over the head with a dice tower about fudging some rules. That isn’t to say that you can’t play a casual game using the GT missions – it’s just that those missions are designed in a way that encourages you to build certain kinds of lists or play the game a certain way, which may not be exactly what you are most interested in doing.
In the interest of highlighting some of the things you can do in casual games, a few weeks ago Joe and Norman played a mission using the Maelstrom of War beta rules. We used tuned-down versions of the lists that we might run for GT missions. There was laughter, tears, a fair bit of good-natured trash talk, and at the end of the day we had all learned a valuable lesson about the dangers of oversized fishing equipment.
The Lists
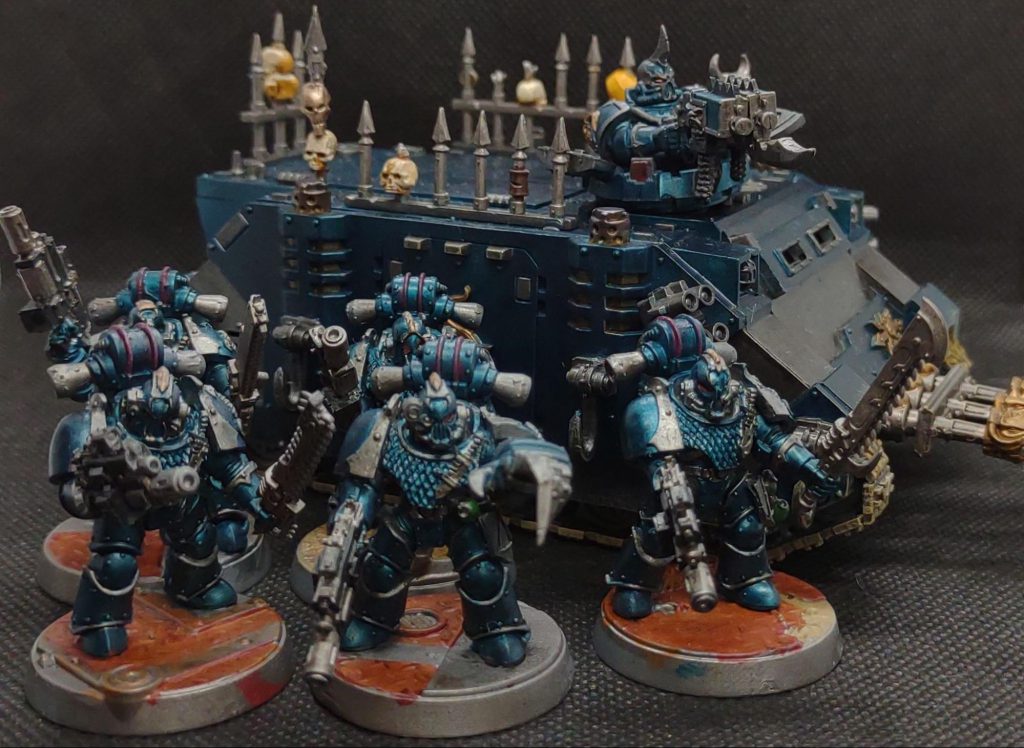
Norman’s Chaos Knights ++ Super-Heavy Detachment 0CP (Chaos – Chaos Knights) [109 PL, 7CP, 2,000pts] ++ + Configuration + Dread Household: Custom Household, Harrying Packs, Pinpoint Cruelty + Stratagems + Corrupted Heirlooms [-1CP]: One model Daemonic Ammunition [-1CP] Tyrannical Court [-1CP]: One model + Lord of War + Knight Rampager [21 PL, 415pts]: 2. Warp-rage, 5. Eager for the Kill, 5. Single-minded Hatred, 6. Arch-Fiend, Character (Tyrannical Court), Corrupted Heirloom, Dreadblade, Pacts and Damnations, The Gauntlet of Ascension Knight Tyrant [32 PL, -2CP, 625pts]: 1. Infernal Quest, Character (Traitoris Lance), Conflagration cannon and Thundercoil harpoon, 2x Twin siegebreaker cannons, Two Shieldbreaker missiles, Veil of Medrengard, Vow of Dominance, Warlord War Dogs [24 PL, 405pts] . War Dog: Heavy stubber, Thermal spear and Reaper chain-cleaver . War Dog: Heavy stubber, Thermal spear and Reaper chain-cleaver . War Dog: Heavy stubber, Thermal spear and Reaper chain-cleaver War Dogs [24 PL, 420pts] . War Dog: Meltagun, Thermal spear and Reaper chain-cleaver . War Dog: Meltagun, Thermal spear and Reaper chain-cleaver . War Dog: Meltagun, Thermal spear and Reaper chain-cleaver War Dogs [8 PL, 135pts] . War Dog: Heavy stubber, Thermal spear and Reaper chain-cleaver ++ Total: [109 PL, 7CP, 2,000pts] ++
GREGNOTE: I should point out here that this game happened before the latest Balance Dataslate was released, so Norman didn’t have Objective Secured on his Armigers. Owned.
Norman: This list is a tweaked version of my custom household (named House Gloam) that I run in more serious games. The custom traits are Harrying Packs so my War Dogs don’t get tied up as easily, and Pinpoint Cruelty so that my variable-damage weapons are hopefully a bit less at the mercy of the dice. Usually I take a single large knight in the form of a Magaera and a couple of Lightning Lock War Dogs, but for this game I decided I wanted to do a hyper aggressive build and play with some combos that looked fun.
This list wants to do one thing: get into my opponent’s deployment zone and bully them until they aren’t alive anymore. There is no backline support. There is no counter punch. Just knights running as fast as they can to shoot/punch/harpoon stuff. The rampager is set up specifically to attempt a turn 1 charge using the Full Tilt stratagem, and for maximum juice I decided to make him a Dreadblade. Meanwhile the Tyrant is my staying power, with the Veil of Medrengard and the Vow of Dominance making him a seriously tanky lad. Giving him Objective Secured via Infernal Quest gives me a smidge of board control. Also he has a giant harpoon that does 10 damage and is AP-6. He rules, and I love him very much.
Joe’s Grey Knights ++ Battalion Detachment 0CP (Imperium – Grey Knights) [107 PL, 9CP, 2,000pts] ++ + Configuration + Brotherhood: Swordbearers + Stratagems + Armoury of Titan [-1CP]: 1 Additional Relic + HQ + Brotherhood Techmarine [6 PL, -1CP, 95pts]: 3: Sanctuary, 3: Unyielding Anvil, Aetheric Conduit, Boltgun, Heroism’s Favour, Omnissian Power Axe, Shield of Humanity, Servo Arms Grand Master in Nemesis Dreadknight [11 PL, -1CP, 235pts]: 1: Gate of Infinity, 2: Empyric Amplification, 2: Hammer of Righteousness, 4: First to the Fray, Dreadfist, Dreadknight teleporter, Exemplar of the Silver Host, Gatling Psilencer, Heavy Psycannon, Nemesis Greatsword, Servant of the Throne, Sigil of Exigence, Warlord + Troops + Brotherhood Terminator Squad [12 PL, 210pts] . Grey Knight Terminator Justicar . . Nemesis Force Sword . 4x Terminator (Sword): 4x Nemesis Force Sword, 4x Storm Bolter Brotherhood Terminator Squad [12 PL, 210pts] . Grey Knight Terminator Justicar . . Nemesis Force Sword . 4x Terminator (Sword): 4x Nemesis Force Sword, 4x Storm Bolter Brotherhood Terminator Squad [12 PL, 210pts] . Grey Knight Terminator Justicar . . Nemesis Force Sword . 4x Terminator (Sword): 4x Nemesis Force Sword, 4x Storm Bolter + Elites + Dreadnought [7 PL, 135pts]: Multi-melta . Dreadnought Combat Weapon . . Storm Bolter Dreadnought [7 PL, 135pts]: Multi-melta . Dreadnought Combat Weapon . . Storm Bolter Dreadnought [7 PL, 135pts]: Multi-melta . Dreadnought Combat Weapon . . Storm Bolter + Heavy Support + Land Raider [15 PL, 265pts] Nemesis Dreadknight [9 PL, 185pts]: Dreadfist, Dreadknight teleporter, Gatling Psilencer, Heavy Psycannon, Nemesis Greatsword Nemesis Dreadknight [9 PL, 185pts]: Dreadfist, Dreadknight teleporter, Gatling Psilencer, Heavy Psycannon, Nemesis Greatsword ++ Total: [107 PL, 9CP, 2,000pts] ++
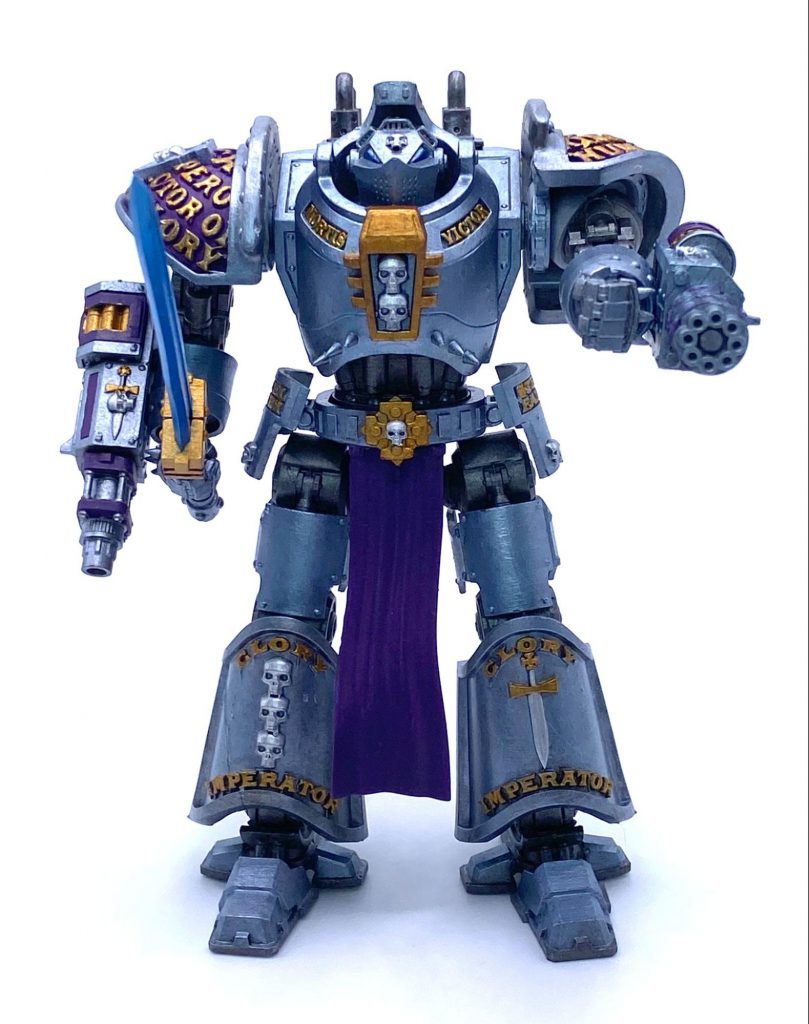
Joe: This is, as one friend put it, “a fluffy Swordbearers list”. Since the moment GW revealed the Swordbearers brotherhood for Grey Knights, I knew I would have to run some kind of almost-all-vehicle list at some point. I avoided Venerable Dreadnoughts, since they aren’t part of any Brotherhood and therefore didn’t fit the theme. Terminators have always felt like the iconic GK infantry choice to me, and since they’re not in a great spot for competitive play this was a good opportunity to not care about that and take some anyway
The general idea is to run one squad of terminators up the table in the Land Raider while pushing on one side of the board with the trio of Dreadnoughts and the Techmarine and applying any needed pressure elsewhere via the Dreadknights. The other squads of Terminators can either sit in my deployment zone or be deployed into teleport strike. It’s very light on bodies to hold points but since we were playing Maelstrom, that was less of an issue than it would be in a GT mission – at least, if you get the right objectives. The more important idea, if I’m being honest, is “hell yeah lots of vehicles”. GREGNOTE: hell yeah.
Deployment and pregame stuff
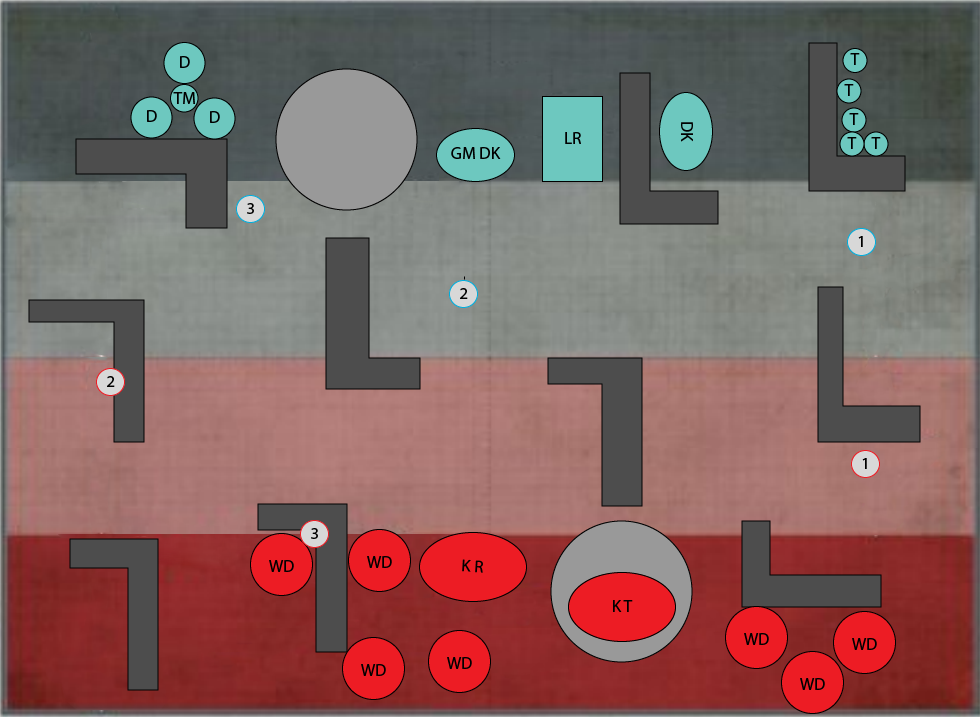
For the uninitiated, Maelstrom of War is a game mode where your objectives are randomly determined. There are six tables to roll from, and you select three at the start of the game (with the exception of one mission where all six are in play).
The mission we played, Subterfuge and Interference, had us each roll for four objectives at the start of the battle round. Your opponent gets to sabotage one, which removes it, and you keep the other three. All of the Maelstrom missions use the same number of objective markers, varying only based on the size of the game. Since we were playing a Strike Force game, we had six, and each got to place three.
Norman: I put as many objective markers as I could out in the open because I knew that’s where I wanted to be fighting. As for Maelstrom categories, I took the one that wants me to be in my opponent’s territory (Raid), the one for killing big stuff (Brought Low), and the one for taking stuff from my opponent (Territory Seizure). I wasn’t planning on holding any ground, only stealing it from Joe all game.
I won the attacker/defender roll off and picked defender so I could deny Joe all the sneaky objectives he so thoughtfully set up.
Joe: As Norman alluded to, I put my objectives out much more conservatively in the hopes of being able to hang back and shoot up the War Dogs a bit in my first turn. I picked categories that leaned into staying in my deployment zone (Holding the Line), killing big stuff (Brought Low), and characters doing cool stuff (Heroic Deeds). I figured maybe my GMNDK could do something fun with that last category and the others just seemed like obvious picks for this matchup. Unfortunately Norman swapping the deployment zones on me put my home objectives out in the open, but it was a nice idea in theory! Oh, and I put one terminator squad in the Land Raider and another squad and one dreadknight in deep strike.
Turn 1
Norman’s Objectives
- Storm the Line: Get Joe’s objective 2. 5VP (spent a CP to swap to this)
- Lines Breached: Get two units from my army into Joe’s deployment Zone. 5VP
- Outmaneuver: Hold more objective markers than Joe on his side of the board. 5VP
Overwhelm: Hold more objectives than my opponent. 5VP
Joe’s Objectives
- Enemy Repulsed: Have no enemy units in my territory outside engagement range. 5VP (spent a CP to swap to this)
- Overwhelm: Hold more objectives than my opponent. 5VP
- Hold Your Ground: Hold Objective 2 on my side of the board. 5VP
Coordinated Strikes: Have 3 or more units contribute to destroying a vehicle or monster. 5VP
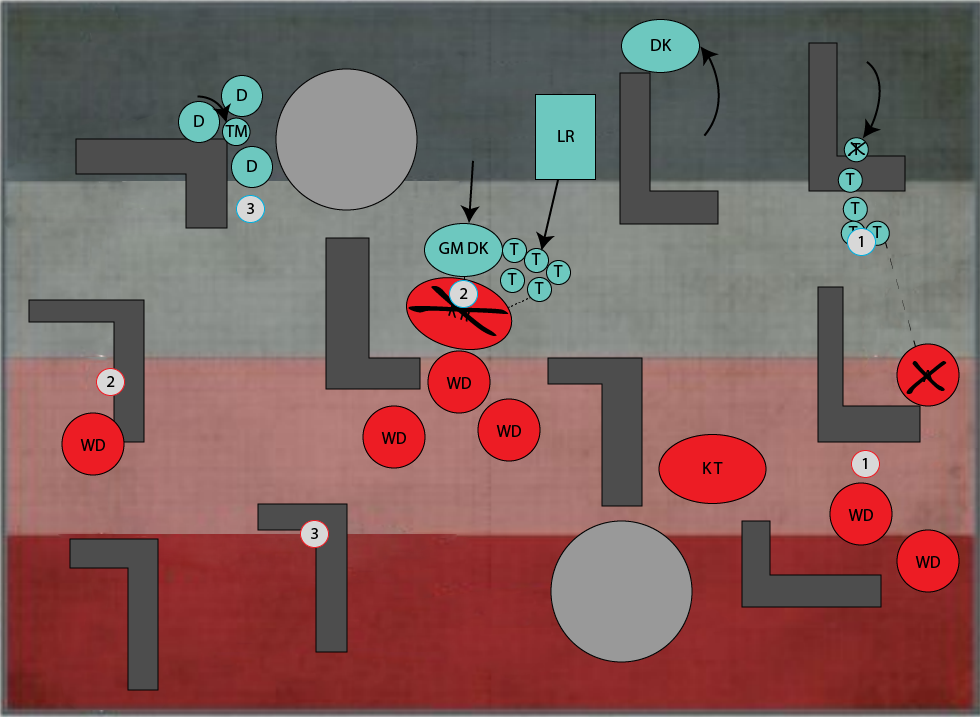
Norman: I won the first turn roll off! In Maelstrom you still get to pick whether you want the first turn or not, and going second can be a good call in Maelstrom missions since you score at the end of the round and you have time to react to things, but I didn’t care about that. All I cared about was shoving my Knight Rampager down Joe’s Grand Master’s throat. So I took the first turn and spent it getting into position.
I had to spend one of my precious CP to reroll an advance on my Rampager in order to get him as close as possible. After the reroll I was just 7 inches away from the Grand Master, which meant I needed to show a 6 on my dice for the charge thanks to his warlord trait. I could practically taste the carnage.
First though, the shooting phase! It, uh, didn’t go super well. First I fired with the big knight tyrant. My shieldbreaker whiffed but the big flamer did a couple wounds. That’s about the end of the good news. The War Dogs got two wounds through on the Land Raider, one of which was saved on a 6. Did you know the land raider has a 2+ save? I didn’t. Meanwhile the Dreadknight shrugged off my other thermal lances like it was nothing. This was all fine though, since the fight phase was where I was gonna do my big damage after my super trivial charge. I would be in Joe’s deployment zone wreaking havoc and the rest of my army was in a good position to hold the objectives I needed.
You can probably guess where this is going. I rolled a 5 on the charge. But I then rerolled it! Into a 3. So the Rampager just stood there. Waiting. Crying. Very much in unfailable charge range of Joe’s Grand Master Dreadknight.
Joe: I was relatively sure the game would be over before it began when Norman managed to get 7” away from my lines with his Rampager right out the gate, but dice are fickle. It was not a good first turn for ol’ Norman. I threw out a couple of smites and got some mortal wound goodness on some of Norman’s units, put hammerhand on one of the terminator squads so I could maybe throw them at a War Dog, and got Empyric Lodestone off on the Rampager. With my trusty Dreadnoughts ready to wound on 3s thanks to the +1 from Lodestone, I unloaded with all three of them into the Rampager. Unfortunately my 6 melta shots did a grand total of…zero damage. Though one of the dreads did get a wound through with his storm bolter, so yay?
That forced me to put a lot more firepower into the Rampager, but I did get it low enough that my GMNDK was able to thoroughly murder it in combat – only for it to explode for D6 mortals to everything within 9 inches. My GMNDK, land raider, and a Terminator squad (who had come out of the land raider in the hopes of being able to charge some War Dogs if I killed the Rampager in shooting) all came out of that missing quite a few wounds. The explosion did also manage to hit three of Norman’s war dogs, but they only got lightly singed.
My hammerhand-ed terminators on the edge of the board did a solid job in combat, killing a War Dog. That War Dog also exploded, which ended up killing a terminator thanks to him failing all three of his Aegis rolls.
At this point we had both had less than stellar turns 1, but there had been lots of explosions and that’s what really matters when you get right down to it. As for scoring, I had somehow managed to score all 3 of my objectives for 15 VP while Norman had scored a big fat 0, so things were starting off well for me on that front.
Turn 2
Norman’s Objectives
- Overwhelming Assault: Hold 2 or more objectives in Joe’s territory. 8VP
- Take and Hold: Hold Joe’s objective 3. 5VP
- Make a Stand: Have my warlord within 6” of the center of the battlefield. 5VP
Coordinated Strikes: Have 3 or more units contribute to destroying a vehicle or monster. 5VP
Joe’s Objectives
- Outmaneuver: Hold more objective markers than Norman on his side of the board. 5VP
- Fall Back Position: Hold objective 3 on my side of the board. 5VP
- Hold Your Ground: Hold objective 2 on my side of the board. 5VP
Tear Down Their Heroes: Kill the unit with the highest PL. 8VP
Norman: Okay fine, so turn 1 didn’t go my way. I didn’t want my Knight Rampager anyway! So what if I spent 4 cp on him to get into combat and 2 on him before the game! I’m not crying, you’re crying!
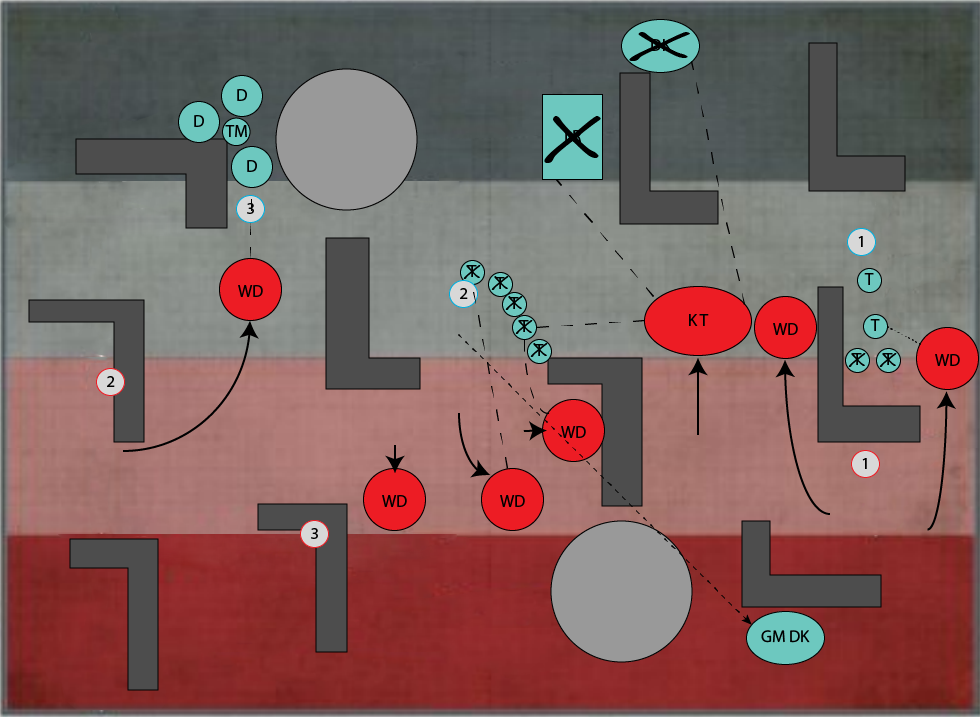
I started by disengaging from the combat in the middle of the board and getting the Tyrant closer to the center to hopefully score me some points. Meanwhile the War Dogs started heading to the flanks for the battlefield to kick Joe’s stuff off his objectives
This shooting phase went a LOT better than the last. First I harpooned the Land Raider, killing it instantly since it was down under 10 wounds from the turn 1 shooting and Rampager explosion. Then the conflagration cannon killed the nearby Dreadknight. It just goes to show, always split your fire. It will literally always pay off. The War Dogs didn’t follow the Tyrant’s example though, and whiffed all their shots into the terminators and dreadnoughts.
Charge and fight phase also mostly went my way. I got the Tyrant into the center of the battlefield by charging the terminators, and charged a War Dog into them as well to back him up. Meanwhile I charged with the War Dog on one side of the board to try and kick the other Terminators off the objective, and charged another War Dog into the Dreadnought trio on the other side to try and steal objective 3. I killed all but one Terminator on the center front and two on the right. The War Dog on objective 3 bounced off the Dreadnought but also didn’t die to its melee attacks, which was nice. The middle Terminator ran to morale though! Which left the center of the battlefield firmly under my control. I only scored 5 points this turn, but I killed half of Joe’s army and removed almost all of his board control.
Joe: So what Norman forgot to mention is that he got exactly enough unsaved wounds on the center Terminators to wipe the entire terminator squad in melee, but I managed to save the last model by command rerolling his save into a 6 (yay invuln!), which was pretty cool. Then he promptly failed morale and ran away. There may be no worse feeling in a Grey Knights game than having a Terminator Justicar fail morale on a 5 because his Leadership is inexplicably the same as a Scout Sergeant’s. Pain.
Things weren’t looking good, but I still had my trio of Dreadnoughts on the board and a second Dreadknight coming in from deep strike, so it was salvageable if things went well this turn. I killed the in-combat War Dog with a few smites and some melta from the Dreadnought it was locked in combat with. Since the Tyrant had enough firepower to trivially remove 2-3 of my units every turn just with shooting, I decided to focus on it. Lodestone went off, but the melta from the two dreadnoughts who could shoot it only put 3 wounds on him. Even with +1 to wound, my Dreadknights weren’t able to do anything meaningful through his 4+ invuln. The Dreadnoughts were trapped by their 6” move and the Difficult Ground between them and the Tyrant, and I had used the Sigil to teleport my GMNDK out of harm’s way, which meant no combat for me this turn.
Each of us scored 5 VP in round 2, leaving me still up by 15, but I had concerningly few models left.
Turn 3
Norman’s Objectives
- Coordinated Strikes: Have 3 or more units contribute to destroying a vehicle or monster. 5VP
- Take and Hold: Hold Joe’s objective 3. 5VP
- Slay the Defenders: Kill unit that was in Joe’s territory. 5VP
Dominate: Have a unit outside engagement range in 3 or more table quarters. 5VP
Joe’s Objectives
- Never Give In: Hold objective 1 in my territory. 5VP
- Targets Held: Have Norman control no objectives in my territory. 5VP
- Trading Blows: Have a character kill an enemy character. 5VP
Cut off the head: Kill the enemy warlord. 8VP
Norman: It’s just like Sun Tzu said; “Always kick a man while he’s down”. The objective for this turn was to kill everything I could, starting with those pesky Dreadnoughts. The Knight Tyrant continued to prove his worth, blowing up 2 Dreadnoughts at once, one with a single shot from the harpoon. Shooting robots with even bigger robots using fishing equipment is cool as fuck. The War Dog who tagged along was able to clean up the last one there while the others kicked Terminators to death. At this point I had things pretty well tied up – Joe had no way to score and the War Dogs could get to just about any objective on the board with their 14 inch move.
Joe: I figured I was pretty much out of the game at this point, but wanted to cause some damage on my way out because that’s just the kind of friend I am. I got a few mortals out via smites, then used Gate of Infinity to put my Grand Master 9 inches away from the Tyrant and cast Empyric Amplification on it for +1 damage. After unloading both dreadknights into the Tyrant in the shooting phas
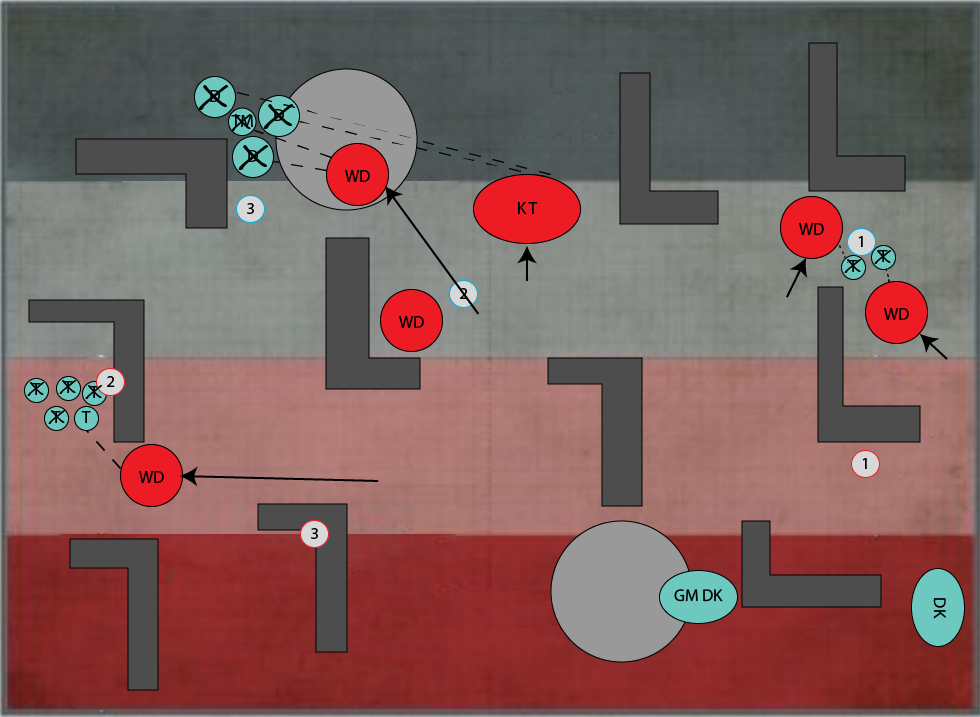
e, the damn thing was left on one wound. I knew charging it was risky due to its Conflagration Cannon being an auto-hitting weapon, but I am not a coward and frankly didn’t have much to lose so I gave it a shot. My Grand Master did manage to weather the conflagration cannon decently well, but then Norman rolled a 6 to hit with the harpoon and I got a 2 on my 4+ invuln, which did 10 wounds and killed the poor Grand Master instantly. At this point with one in-combat terminator and one out-of-position dreadknight left on the board, I decided to concede defeat.
Wrap up
Although the game only lasted three rounds, there were some very cool moments. It’s important to note that just because you’re playing a casual game doesn’t mean you can’t strive to play well – both of us put thought into how our lists would play and tried to make the most of the tools we had at our disposal. The key difference was that the driving factor behind the list design and the tactical choices wasn’t necessarily “this will help me win”. Sometimes it was “this could be cool as hell and I want to see what happens”.
Maelstrom is great for this because you don’t know what your objectives are going to be, so the incentive to build your list and your strategy around the objectives is much lower. This can take some getting used to coming from GT missions, but if you can get into the right headspace it’s a lot of fun. If you haven’t tried it out, or even just haven’t played the mode since the new beta rules came out for 9th edition, maybe give it a try!
Thank you Joe and Norman for showing us new ways to be bad at Warhammer, and Rocco for doing whatever it is you did here? If you want to yell at us for more Casual Content, let us know at contact@goonhammer.com or in the comments below.
