
These other games that aren’t 40k have been having too much fun posting their robits and mechoids without paying homage to the sickest and the coolest battle bots I know; Knights. Knights are a funny thing, it’s a huge kit that represents a single entity that hangs with few of its buds and their younger brother’s mom made them take along in a game that can easily involve upwards of 80 models in some factions. Naturally you want these models to be special with how few of them you’re putting on the table. Luckily the knight kit is incredibly customizable and lets you really make the model your own. But have you ever wanted more?
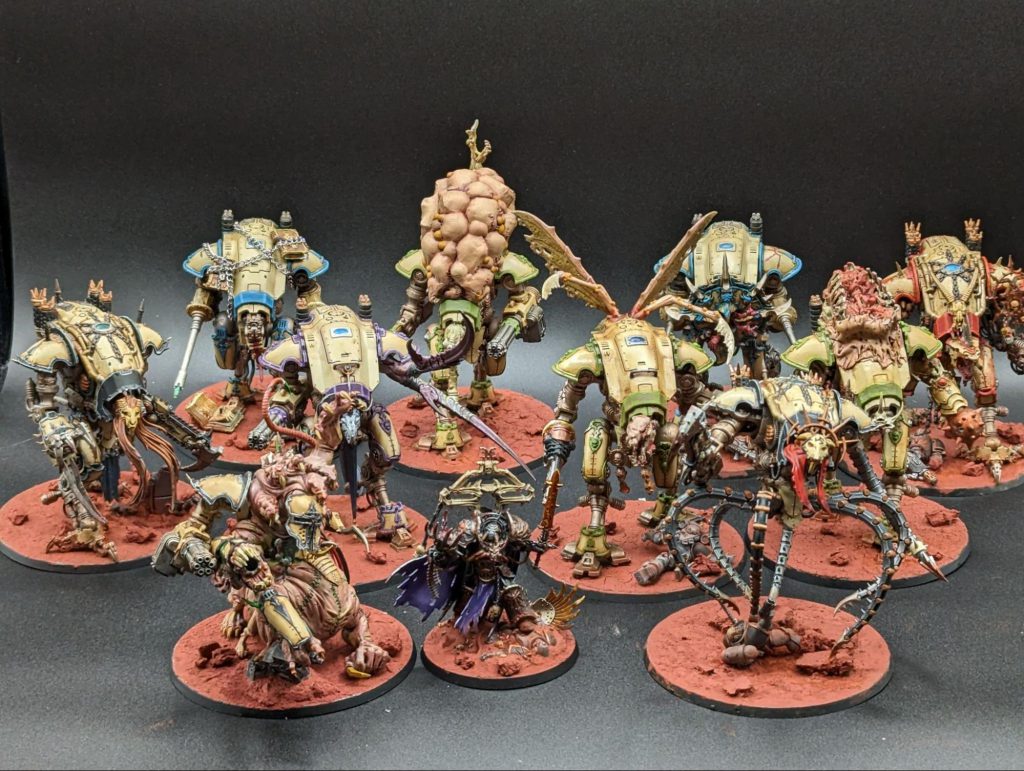
Nothing like the second paragraph to introduce yourself. I’m Norman you may know me as “That guy with those chaos knights” or “That guy who got super mad about Arks of Omen: Vashtorr” or even “Some guy who’s making a lot of presumptions about how many people read the author line under the article title.” A few years ago I started a chaos knights army and after doing some basic greenstuff work I decided that every single model would be a conversion. Since then my collection has grown to over 20 knights, all converted and unique to me and my army. My special little guys have gotten me multiple best painted awards which, as much of the goonhammer staff will tell you (Scott Horas “Heresy” won’t stop talking about it), I didn’t really deserve. More special to me are the strangers who come up to me mid-game and say how much they like my knights. What often can accompany these comments when I talk about the process is “Well I don’t think I can do anything like that”, and the point of this article is to tell you “Yeah bud, it’s super easy and I’m still bad at this.” It all comes down to following the process.
Step 0: Inspiration and Conceptualization
Inspiration can come in many forms. Maybe a bit that you stumbled across while building another kit. Maybe you have lore for your Knight House you want represented on the tabletop. Maybe you promised your buddy a Khorne knight for his birthday months ago and need some content for MECHAHAMMER week and what do you mean it’s April already? For the purposes of this article, I’m gonna use that last one, because I think it’s a really common situation everyone has found themselves in.
Regardless of your inspiration, it will lead you to thinking about what the finished knight should look like. This is, unironically, the most important part of the process. It will inform the themes you want to work towards and will focus you down and away from the blank canvas problem. I started with just “Khorne” and “World Eaters Ally” as my themes. These are pretty broad so I started thinking about what I wanted to try. I had done a skull themed knight a while back, and what else is left in the Khorne design space? Blood, of course!
So now I’m working with blood as one of the themes I want to represent on the model, but I need more. As a World Eaters ally, I wanted it to look bestial, brutal, and generally over-the-top. With those in mind, a more solid image started to come into focus: a knight so thoroughly corrupted by Khorne, that it has been reduced to nothing more than a hulking monster made for slaughter. With those ideas in mind, it was time to find bits.
Note: It’s important through all these steps to ask for feedback. Sometimes you’ll be overly critical of your successes, sometimes you’ll be blind to your failures, and sometimes you’ll just miss stuff. At the end of the day if you show folks what you’re working on and they say “hell yeah”, that means you’re doing something right
Step 1: Sourcing
Ok, you have a vague concept that you want to put on the table. Now it’s time to get materials together to make that happen. You have a few paths here: getting compatible bits, sculpting, and 3d printing. Now 3d printing is all well and good but it’s rarely as easy as “print and glue”, and when it isn’t, resin from a printer generally doesn’t respond well to being cut or clipped. Sculpting takes a ton of practice but will get you the most customized results. You’d be surprised how much you can do as a novice with just some sculpting tools and greenstuff (especially if you’re doing Nurgle conversions). Bits can be pretty expensive but if you leverage your local community you can often find everything you need, and if you’ve been in the hobby for a while, I’m sure you have some relevant stuff.
I’m gonna mostly focus on using bits for conversions since that’s what I used in the example project, and I think sculpting requires its own article. Bits are great for the following reasons:
- Everyone in the hobby has some
- Plastic is really easy to work with
- The art style will be consistent with other Warhammer minis
- They provide an interesting challenge to try and integrate
When I start a knight conversion project, I’ll aim to have 3 things be different about the model, and generally I target at least 2: left arm, right arm, and head. The chaos knight kit has a ton of fantastic detail and character so I try not to cover that up unless I’m confident that the thing I’m replacing it with is at least as impressive or striking. The head is generally a go to for me. By design, the head is designed to be relatively small and of a different color/material as the rest of the knight to draw your eye to it, thereby cementing the knight as a character instead of just a vehicle. Weapons on the other hand are often a great opportunity to hammer home the themes of the knight since it’s how the knight will express itself on the battlefield. The carapace and the base are also good places to focus your efforts since it’s what you and your opponent will often see a lot of when actually playing the game, but the carapace is a lot of space to cover, and usually when I get to the base on a model like this I’m so tired I generally phone it in.
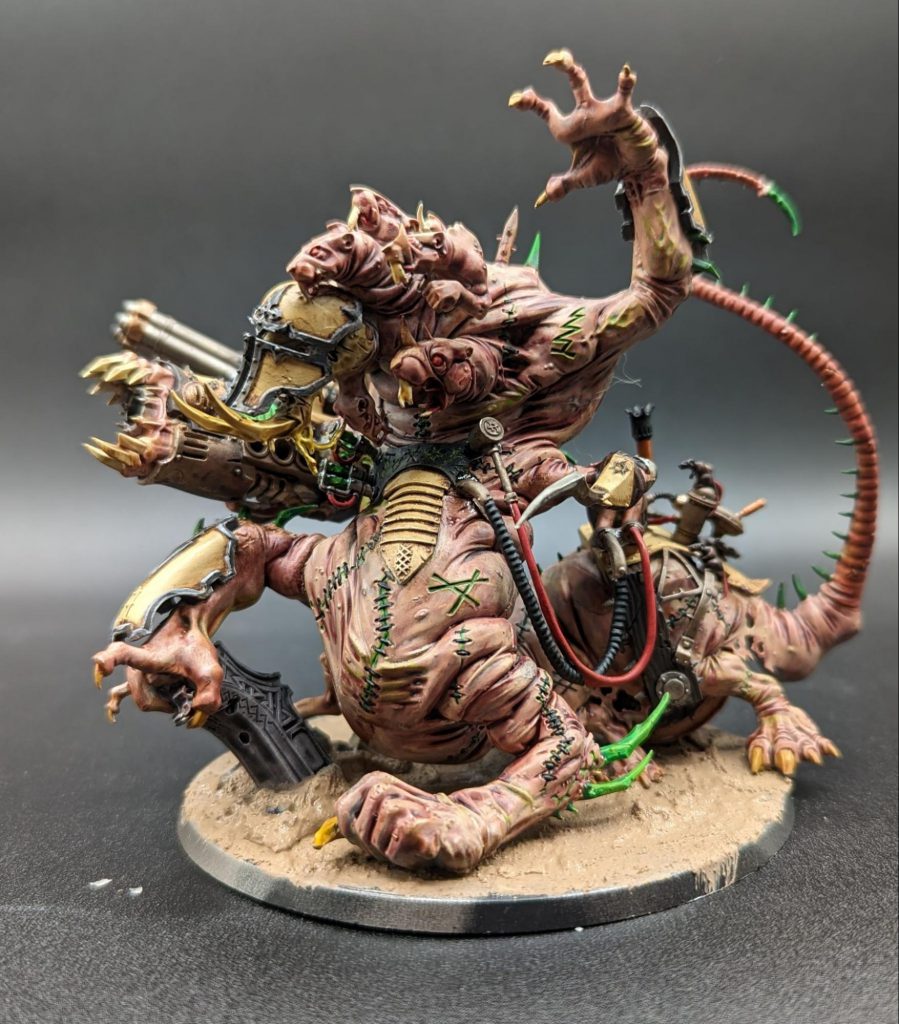
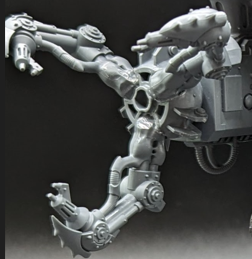
For our example knight, who I’m calling Bloodstoker because I love him, I decided to focus on the head and the two weapons. The loadout is mixed ranged and melee, mostly targeting a facsimile of the Magaera or Styrix but designed to be ambiguous enough that he can be anything. So I needed a claw, some kind of long ranged weapon, and a head. With my themes in mind – bestial, brutal, blood and Khorne – I started hunting for bits.
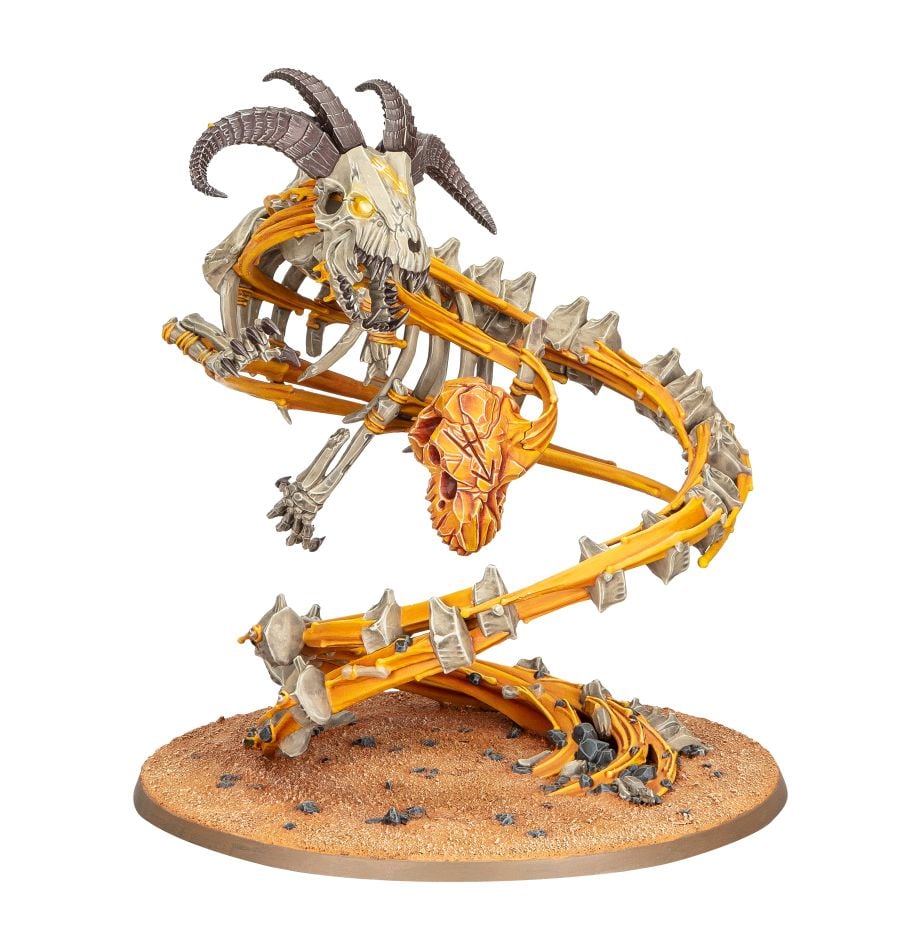
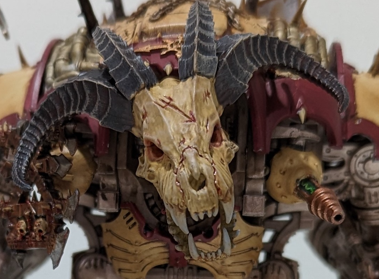
The first thing I did to tackle the “bestial” aspect of things was to start browsing the AoS range. There’s a ton of fantastic sculpts in this range, and a lot of cool huge monsters. Pretty soon I stumbled on the Krondspine kit. The head was exactly what I was looking for. Unfortunately this is a monobuild kit, so no one was gonna have a spare head lying around. That said, I got the knight for a steal at 60 bucks by asking around for rescues so I didn’t mind pulling the trigger on the bits-donor kit. I’ll find a use for a magic spine and those arms elsewhere.
Next, the weapons. Brutal and Khorne were still not really represented on the model. The claw seemed like a good opportunity to tackle the brutal theme, so I sourced a couple of options since there wasn’t anything bespoke that really sold what I was looking for. I wanted it to be chaotic and weird, so I had to get creative. I ended up getting Defiler legs from another rescued kit, extra Maulerfiend tendrils from a friend who built a Forgefiend instead and some thermal cutters from the same kit.
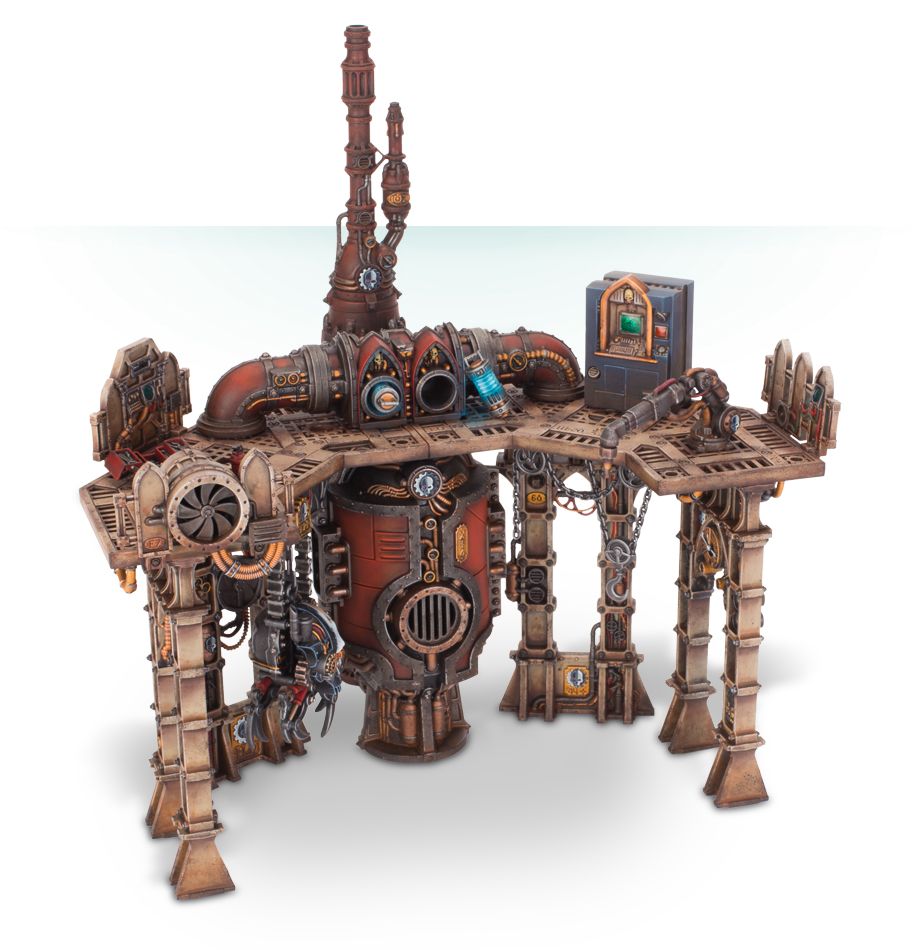
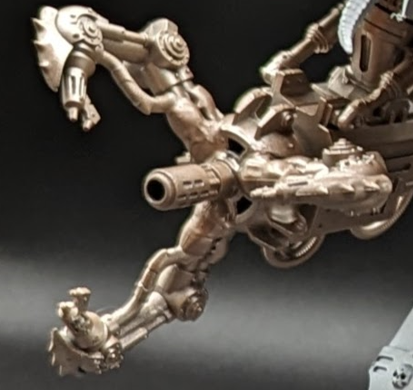
Now for Khorne and blood, I was at a loss. Khorne guns are always hard. The obvious pick is to do some kinda skull gun like the Lord of Skulls, but that wasn’t sparking joy. While looking at the Lord of Skull weaponry, I saw the ichor cannon, a gun that shoots burning blood. With a hearty “hell yeah”, I had my direction. After looking at kits, and tearing apart my bits box, I found a Sacristan Forgeshrine that I’d bought for a display board idea that got abandoned. Its main smokestack was busy and bizarre, with lots of pipes and tubes, perfect for shooting blood long distances. Maybe I should see a professional, but that smokestack just screams “Bloodgun” to me.
Step 2: Sketching
This is the most important part (GREGNOTE: I think you’ve said that about every part so far), and the part that people tend to skip. With such a big model, it’s hard to know how everything will look once it’s all together, so it’s time to start sketching. I don’t mean drawing the model, but temporarily attaching the bits you want to use and seeing how they look in practice. Generally I use blue tack or a bit of superglue to do this – each has downsides. Sometimes blue tack refuses to fully come off, but super glue sometimes leaves behind residue. Scrape it off with a knife.
Let’s check on how I did this step with Bloodstoker. The gun was easy: I sawed off the smokestack at the thickest part and just stuck it to the circular end shield you would use for a Desecrator weapon. I also wanted to try something new, and this stage is where you test those sorts of things. You know how chaos daemon engines and sometimes marines have those flesh… tubes? You know the tubes with the skin on them with rips and tears in them so you can see the tube underneath?
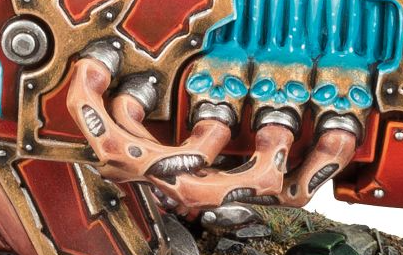
Well anyway I love those stupid things, so I decided to try my hand at making my own. I bought heat-shrink wire covers, cut them up a bit, fit them over some aluminum wire (more on this in a bit), then drilled holes for them on the gun. It sort of worked. While the effect came across, the shape of the wire looked unnatural (and not in a good way), because the shrinking wire covers did NOT like doing curves. This would normally be, as we call it in the kitbashing scene, a “Big Problem”. I had already drilled into the gun, and put random holes all over. This’ll happen sometimes, and it’s fine, you just have to find creative ways around the issue. Since this is Chaos, I figured having some mechandendrites sticking out of it wouldn’t look too out of place. It’s not the most natural looking end result, but I consider the issue resolved. It’s worth noting here that sometimes you just won’t like how something looks at this stage of the process. Nine times out of ten I recommend sticking with it if you like the shape of it, since its hard to fully visualize until its painted.
The head required some support and I decided to try something new with this guy by using load-bearing aluminum wire instead of just an aesthetic piece. It’s sturdy but pliable, which is great for creating snaking wires or armatures to support bits. I drilled into the body of the knight and the spine of the krond….spine and attached the wires there. This one worked like a charm.
The claw illustrates why this process was important. First I tried the defiler claws: they had trim, paneling, and distinct chaos designs, which was ideal for what I was going for. As you can see in the picture, it was way too big. Now would it be a disaster if this was just how I built it? No, but it emphasized parts of the model I didn’t want. I tried maulerfiend tendrils too, but those also were too big and blocked too much of the main body.
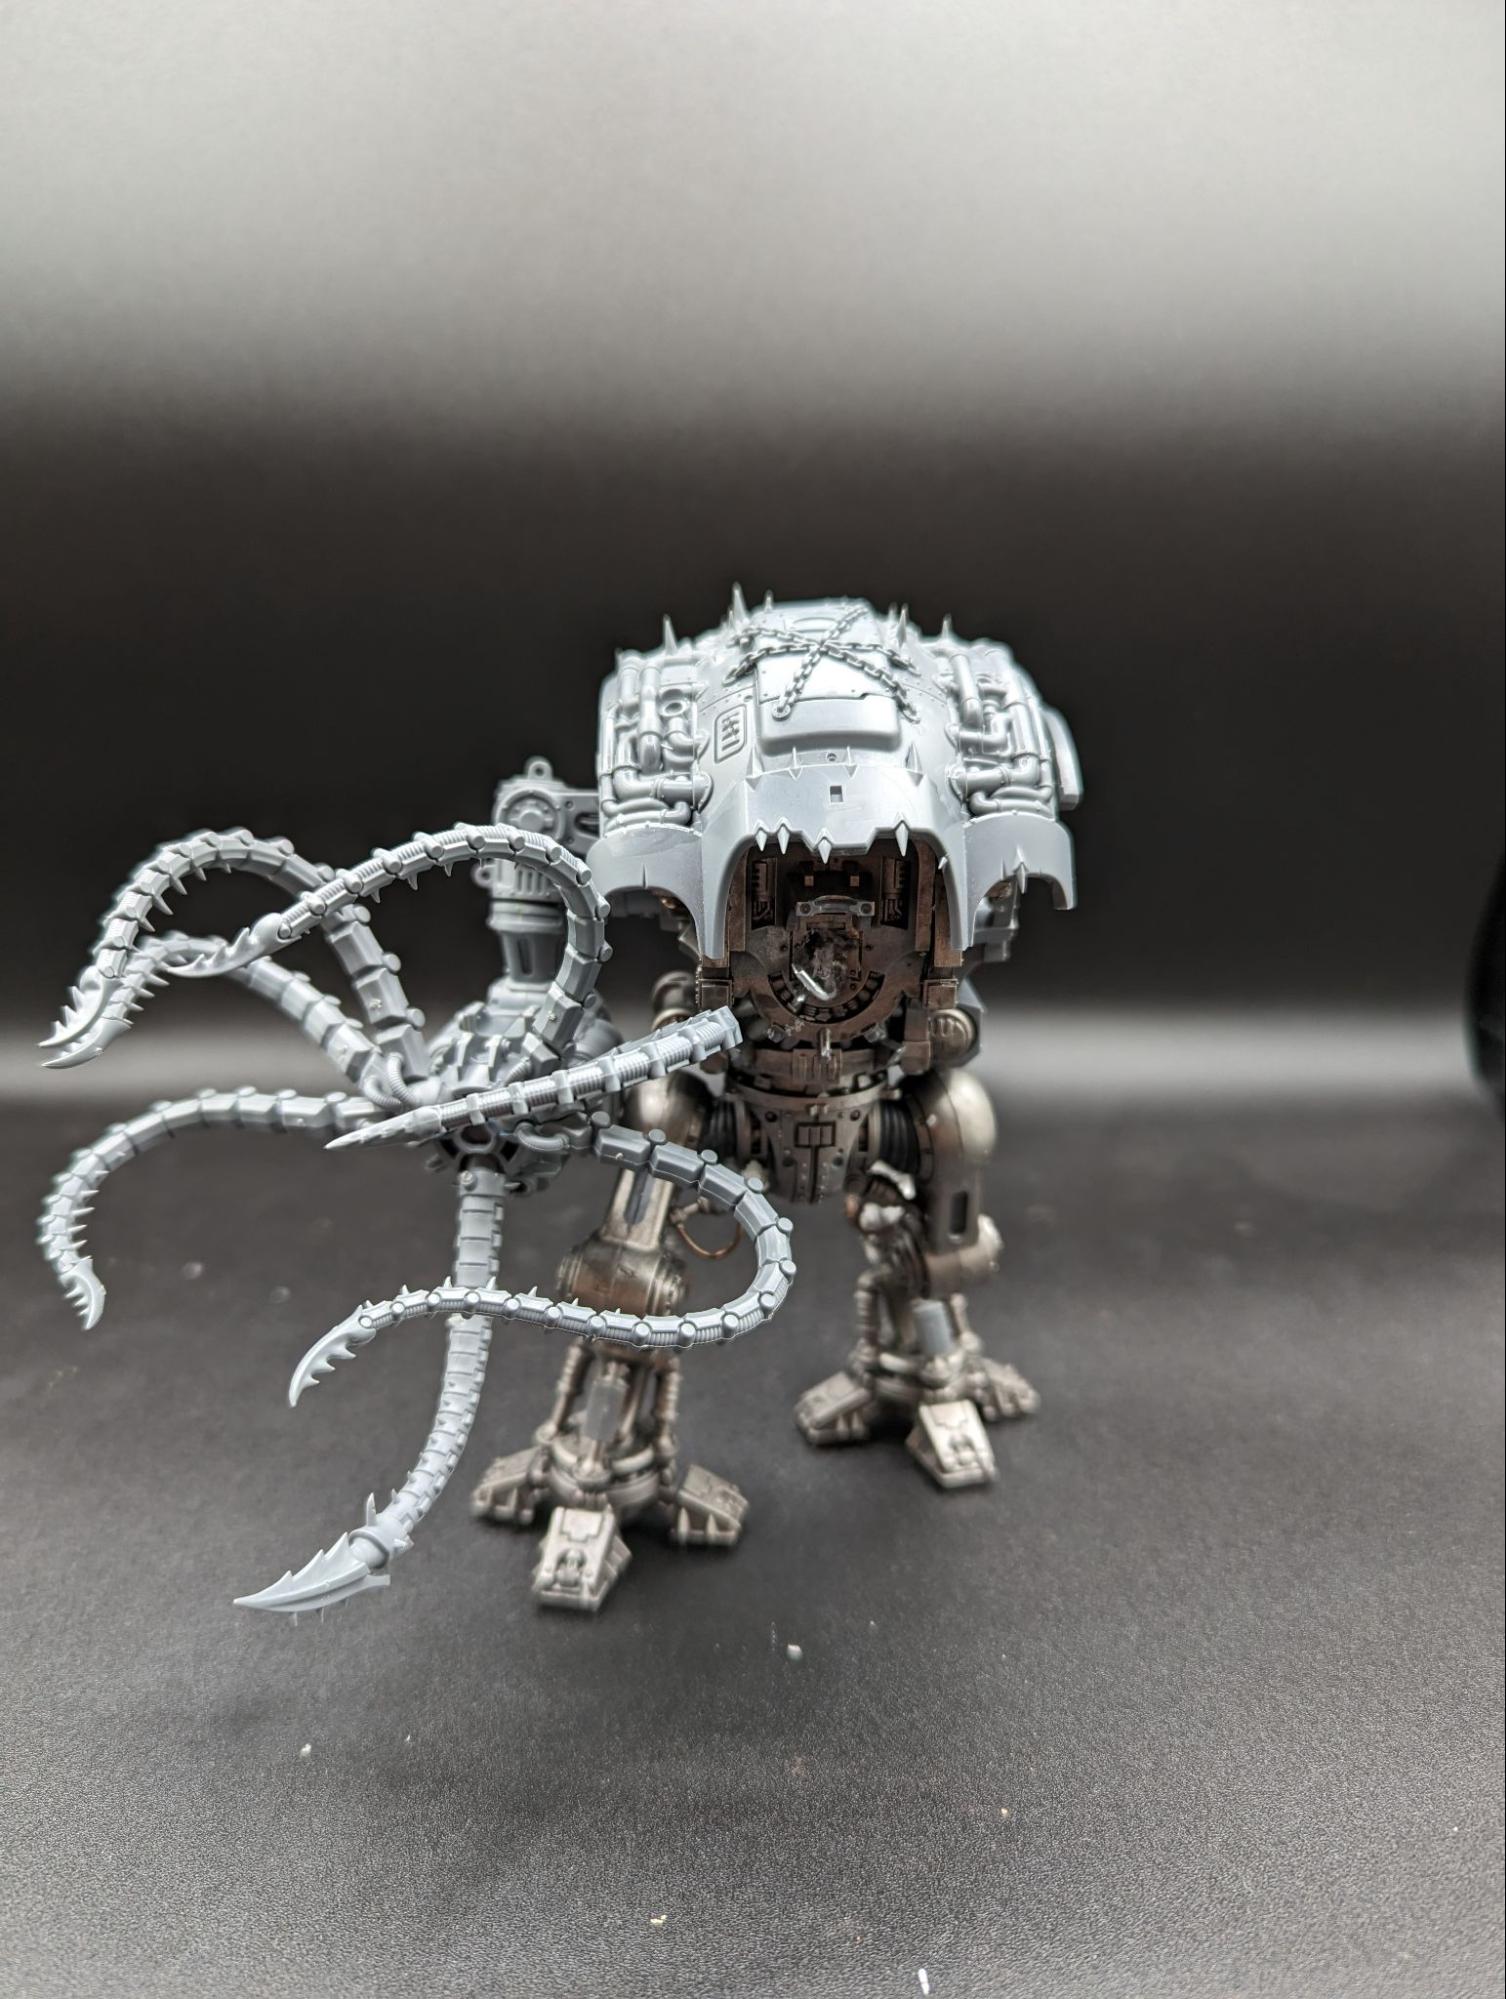
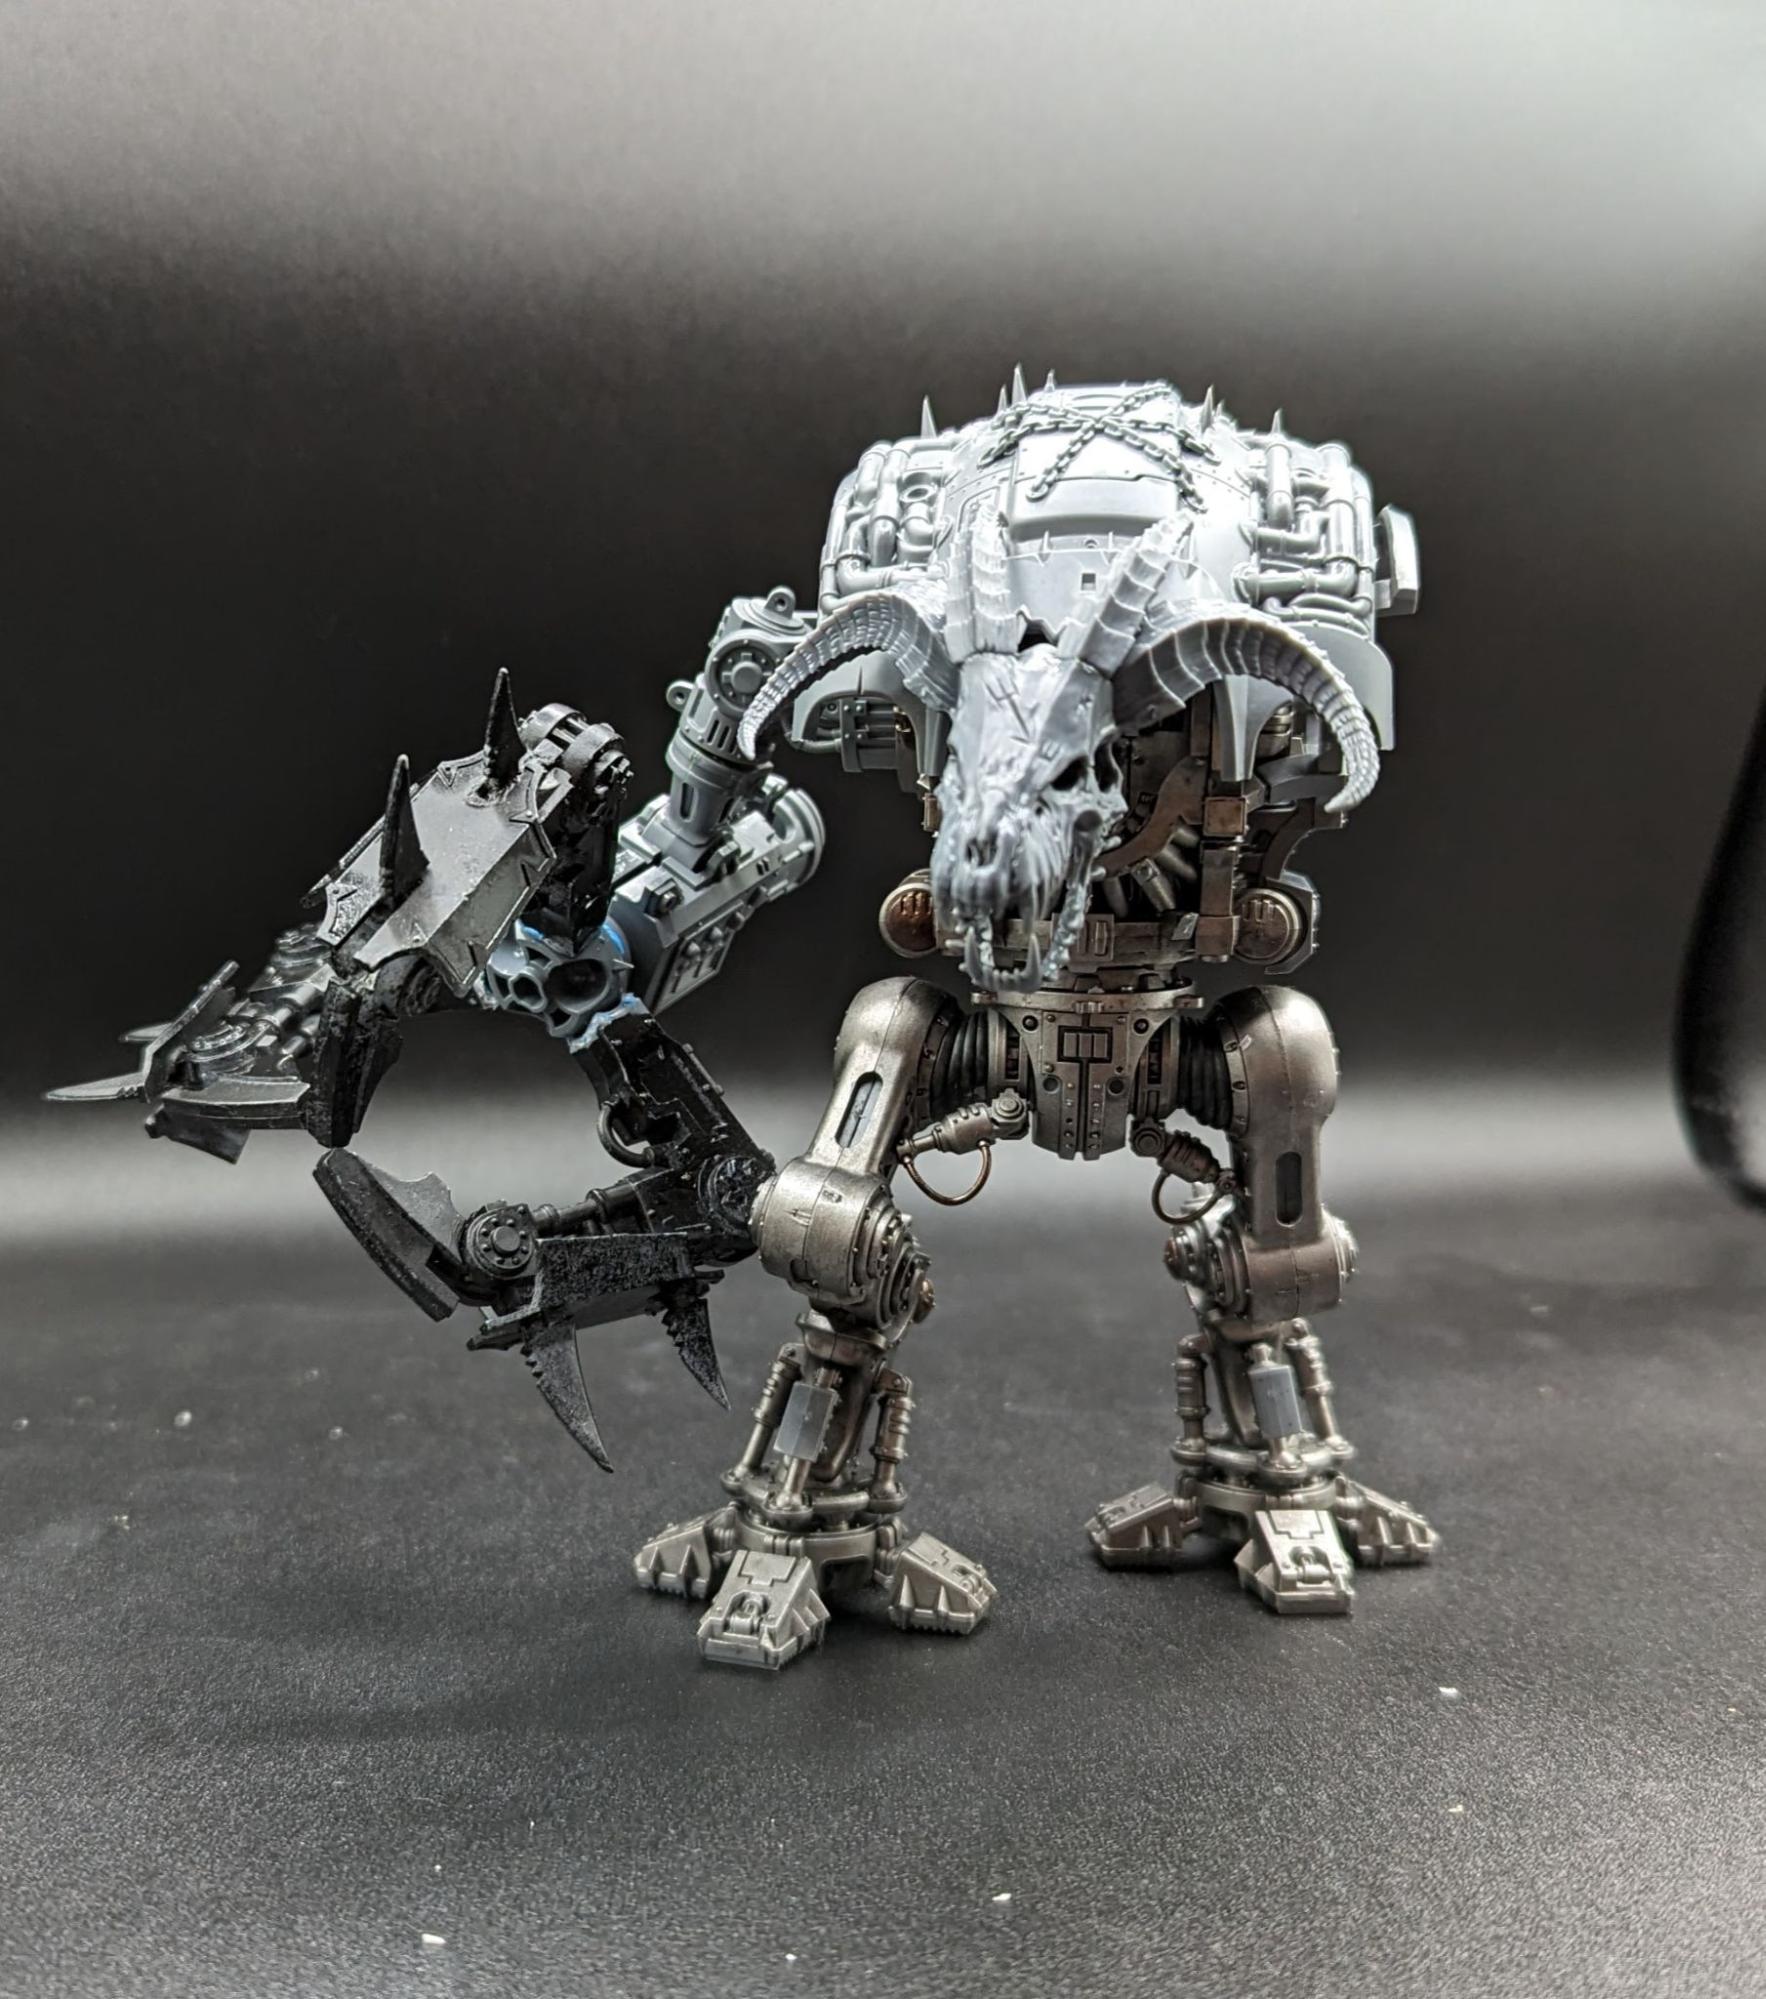
Finally I tried the magma cutters, and with some trimming and shaving it worked like a charm. With that, my funny little guy was all planned out.
Step 3: Assembly
Because we sketched it out first, assembly is mostly about making the connections permanent, and making them look natural. I’ve found, as someone who’s bad at many things, it’s best to avoid green stuff unless you’re working with natural materials or if it’s somewhere you can’t really see or if you’re good at sculpting. That said, nothing competes with two bits that fit well together, and there’s a few tricks to that. First, obviously, is cutting and trimming to make things fit. Second, which I used for the claw here, is sprue goo.
Basically it’s melted sprue. You can make your own with a bottle of plastic glue and some leftover sprue. Add the sprue gradually until it’s a gooey consistency. It’ll dry smooth and can be trimmed/shaved/filed/ just like any other plastic.
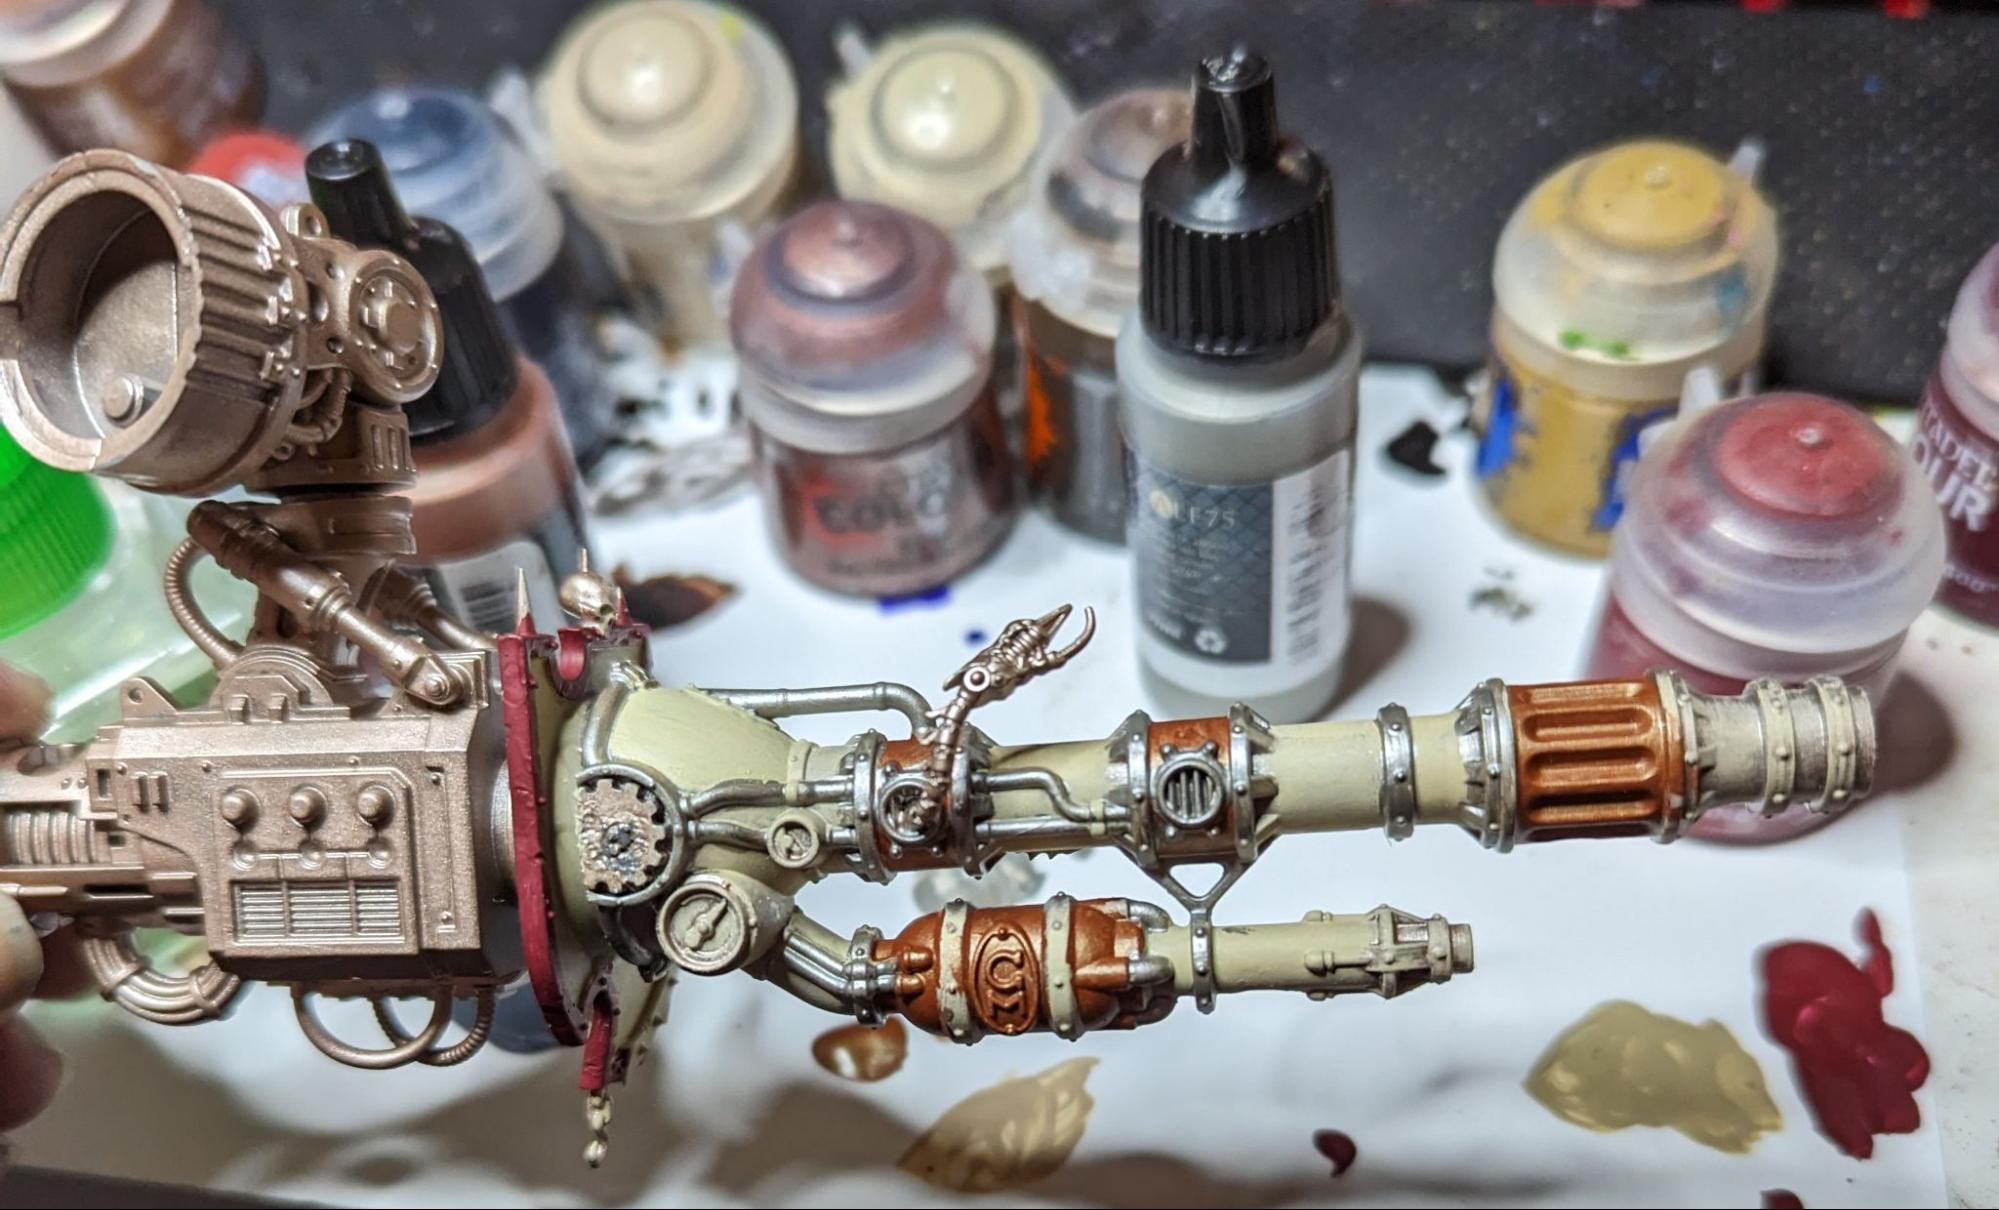
Outside that though, my project’s assembly step was pretty trivial. I decided at this stage to add some helmets to the spikes on the carapace, but besides that I just built the dude in sub assemblies. Normally I actually don’t sub-assemble my knights, because I like to see how it all fits together while I paint (the next section goes into this more). That does mean I have to prime it all the same color, which leads to painting off-white over metallic primer, and I was sick of doing that, so I decided to do it right this time, and prime in sections before assembling at the end.
Step 4: Selling Your Ideas With Paint
Alright, you’re all built, which means you’re done kitbashing, right? Wrong! Well, right actually, but I think painting is where you bring the kitbash to life. Paint will help you hammer home your themes, make parts look cohesive, and draw attention where you want it. In my experience, it’s important that the added pieces, especially if they make up big parts of the model, match the material on the nearby sections on the “normal” parts.
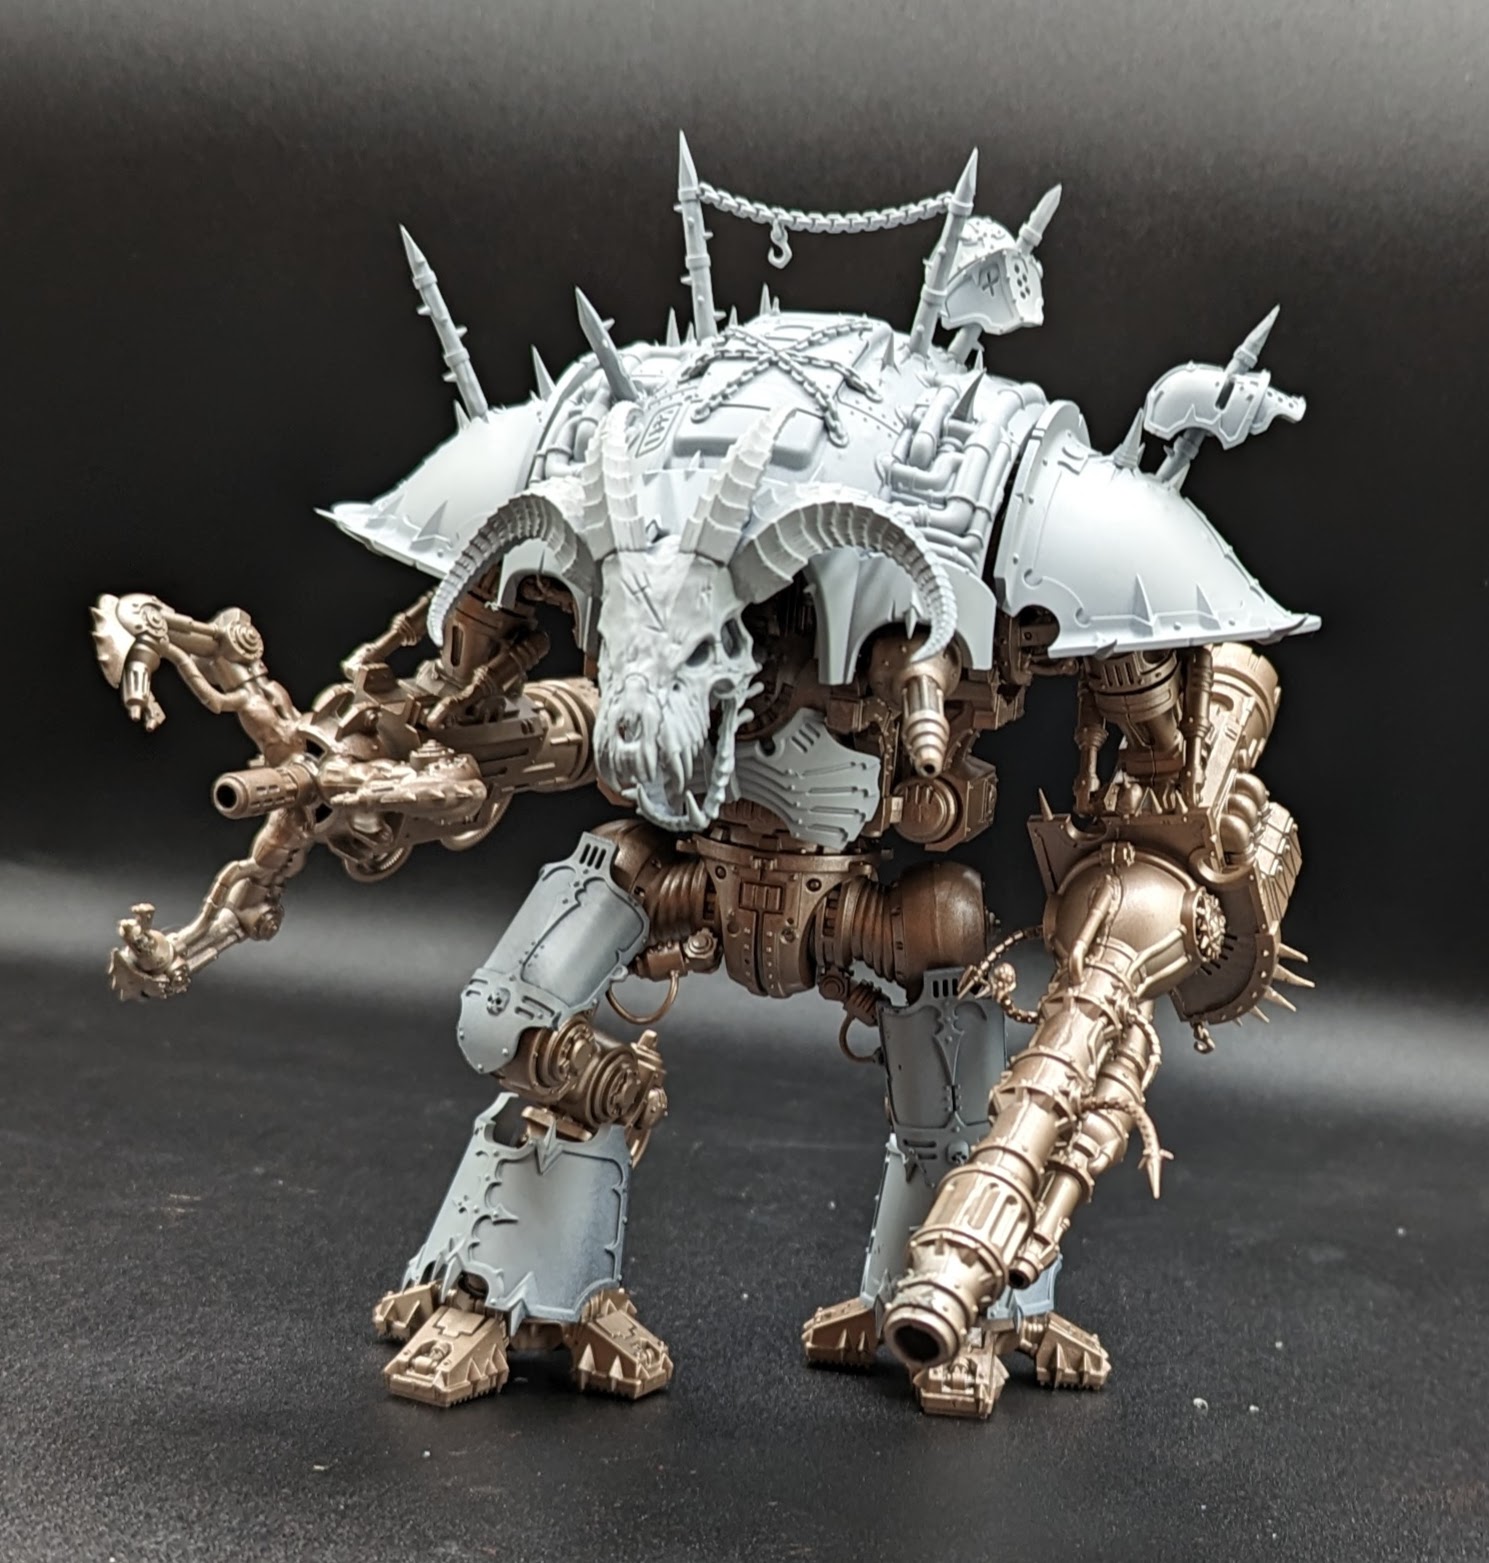
Let’s return to our favorite son, Bloodstoker. First thing to tackle was the gun. While assembly was fine, it looked way different than the rest of the model. So I decided to have the main color on it be the same color as the armor paneling, with various metal accents, to tie it in. This was very much a “it’s gonna look like shit until it’s done” situation but as you can see in the end result, this decision really made the model look cohesive.
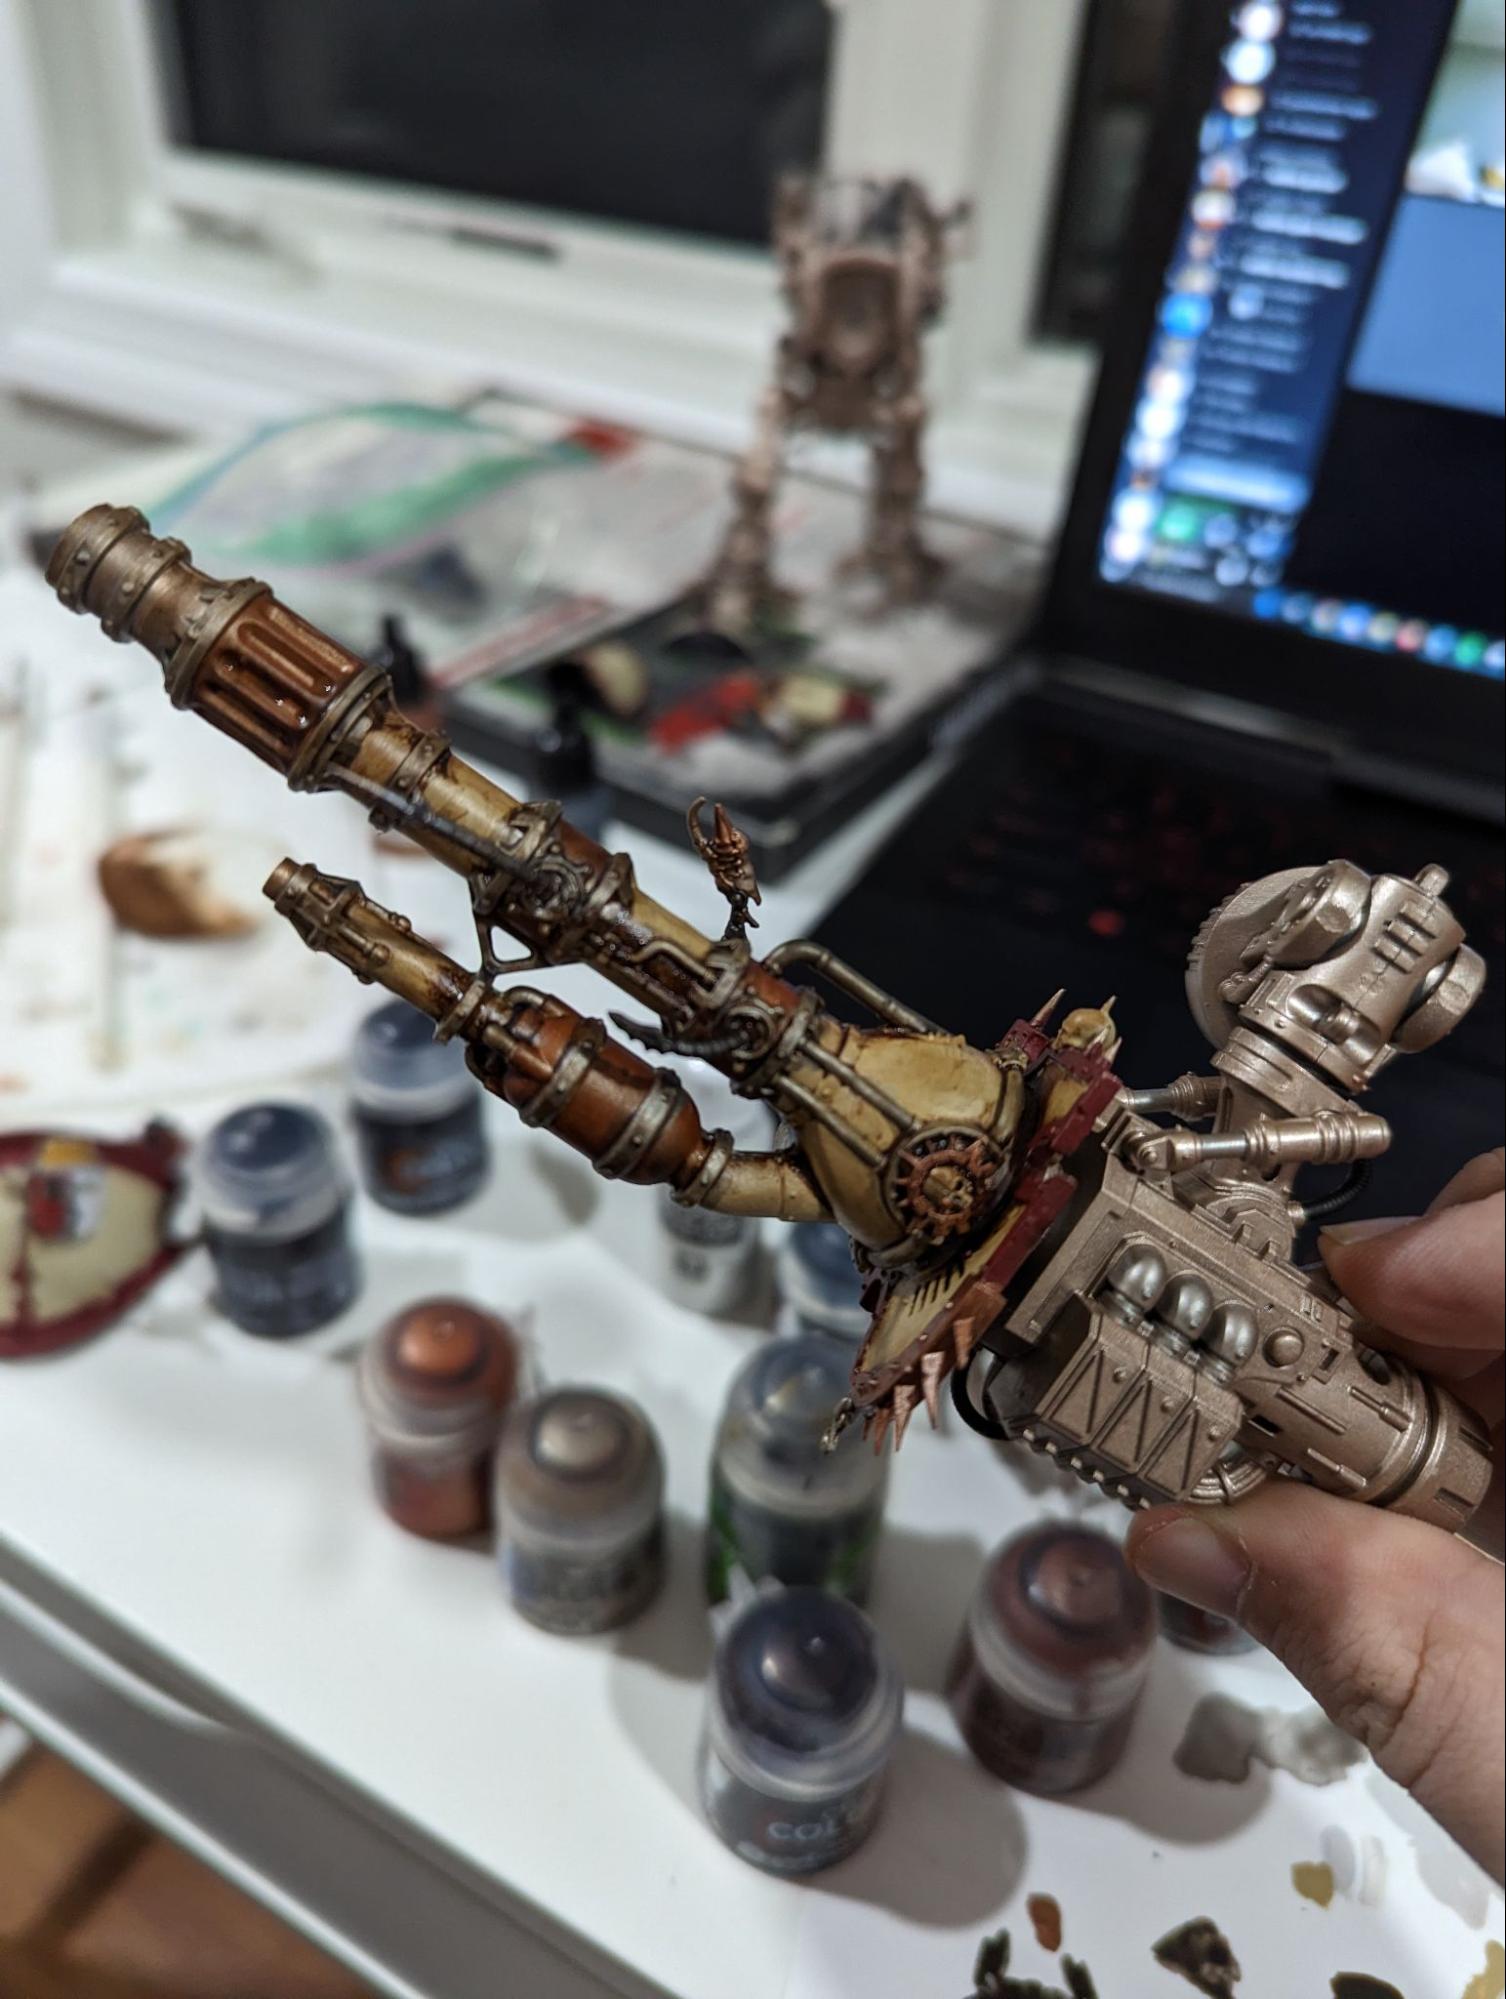
On the flip side the claw kinda just worked with the design language of the knight right off the bat, so I decided to keep the theming minimal. Painting the skin over the sprue goo joins differentiated where the metallic parts ended and the skin began, helping to smooth out the difference between the sculpted part of the claw and the delicious gooey melty plastic.
Next up was the head, which I actually wanted to be quite distinct from the rest of the model. This is some bizarre possessed chaos weirdo thing. It’s made of completely different material as the rest of the knight and I want the eye drawn there. So I just painted it like a skull, and painted the magic bits like blood. I think he came out really well. I’m especially happy with his little horns considering it took 4 different tries to get them right.
Now I’ve painted all my conversion bits, but I don’t really feel I’ve hit all my themes. Specifically I’m referring to the Khorne/blood themes. First step to rectify this is heraldry. I’ve recently started practicing my freehand work, so I used the opportunity to try and make a spiky Khorne symbol, similar to the skullreaper banner from AoS, and a symbol variant I saw in this video. If you want to freehand a Khorne symbol, its pretty easy! First paint an X but have the two parts of the top of the X closer together than the bottom parts. Then draw a horizontal line in the middle of the X. Then connect the bottom of the X with a straight horizontal line. Then have the top of the X…. flanges? Sticks? Come out a bit. Bam, Khorne time.
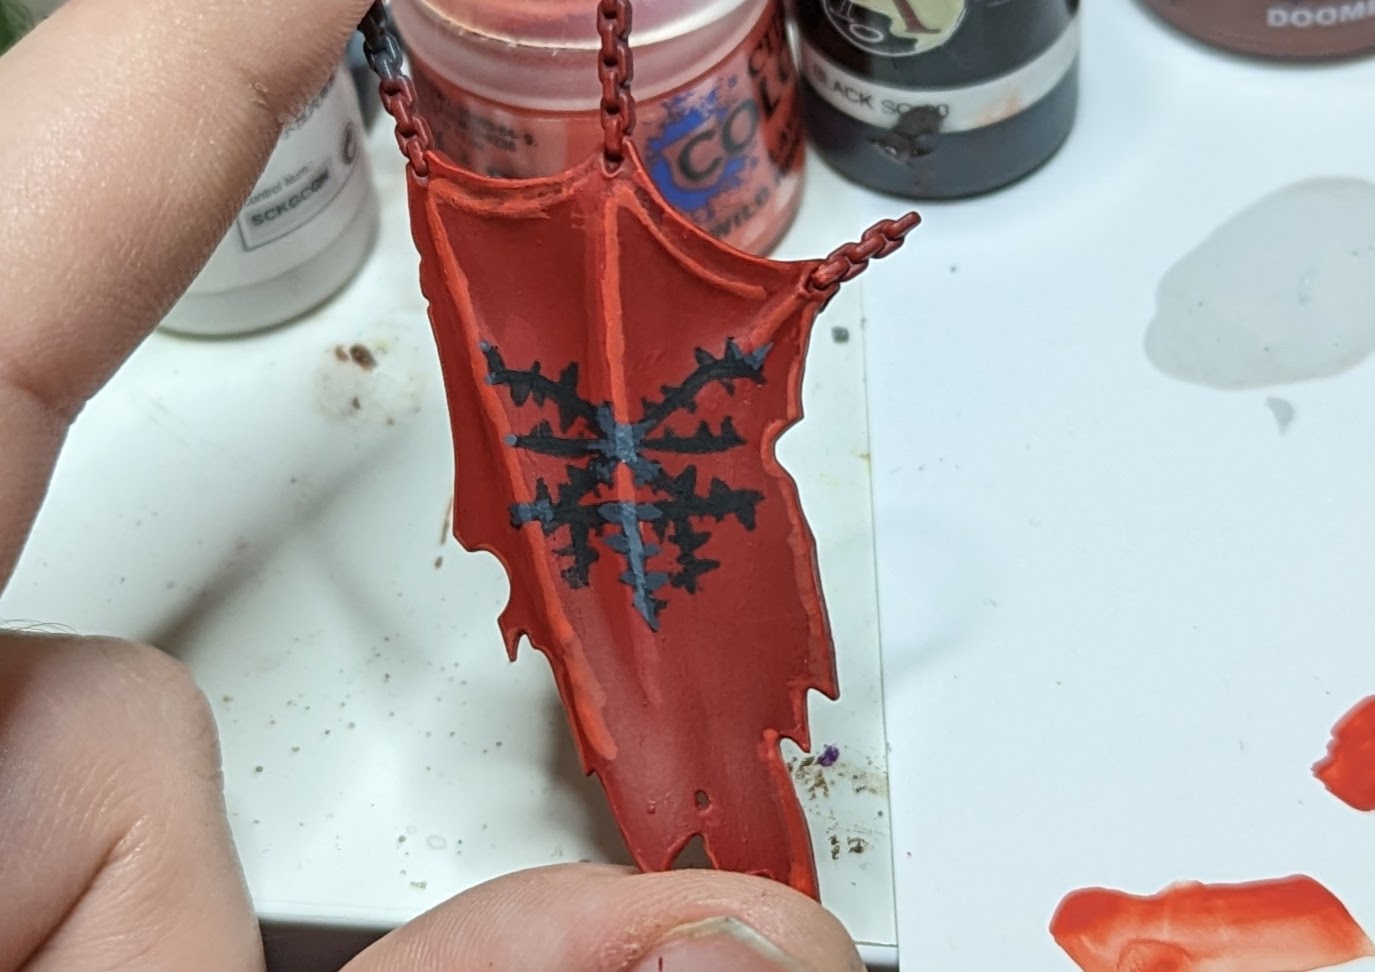
This rocked, but I decided it needed more. My knight was 85% painted at this point and I decided to add another new bit: that skullreaper banner I mentioned before. I liked the idea that this knight’s claim to fame was finding a khornate artifact, and that he based his heraldry around it as it slowly corrupted him. I ripped off the tilting shield, replaced it with this slightly large one, and we were in business.
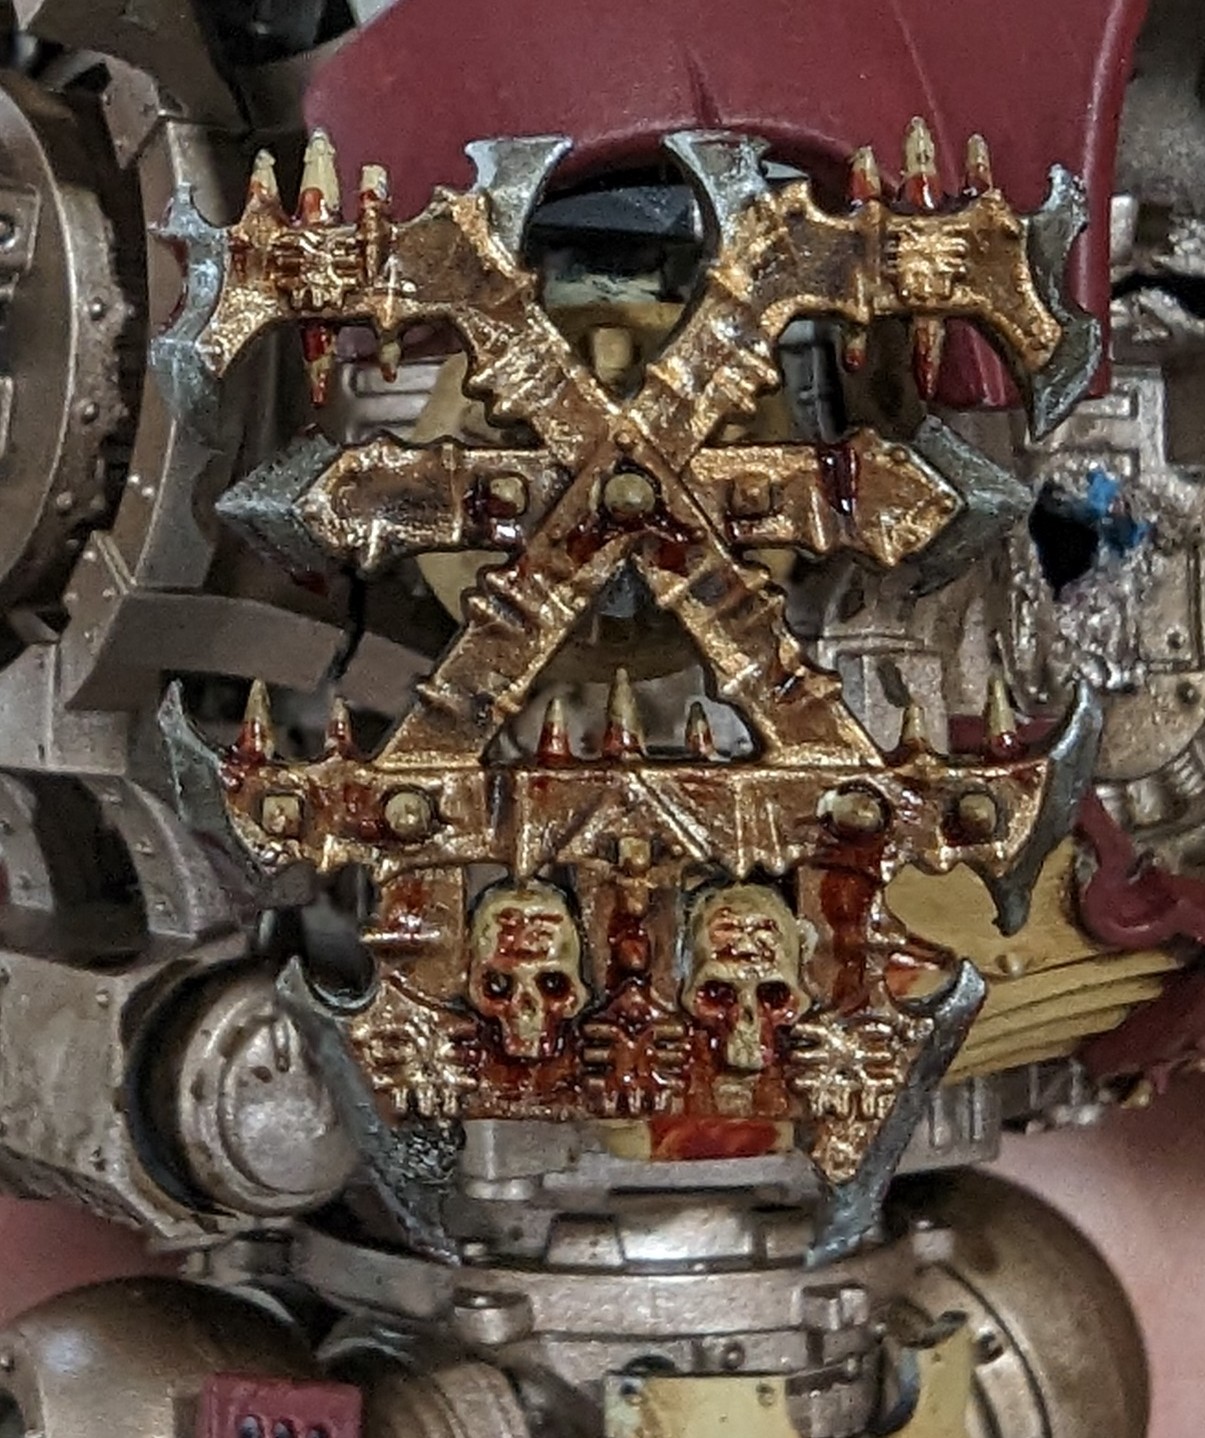
At this point the knight is done, oiled and ready to go (other than highlighting, but I’ll get to that when I’m back from vacation), but honestly, still not Khorney enough. It’s time for some blood effects. I put it everywhere. At the beginning of this project, I bought some water effect paint to try some more drastic stuff, but I lost it, so I’m gonna save it for another project. Generally speaking for blood effects, I believe less is more. If you just slather the whole thing in Blood for the Blood God, I find it just ends up looking like your model had some sort of ketchup party. So I focused on the deepest parts of the model, where blood could feasibly be oozing out, and I think that brings it across the finish line.
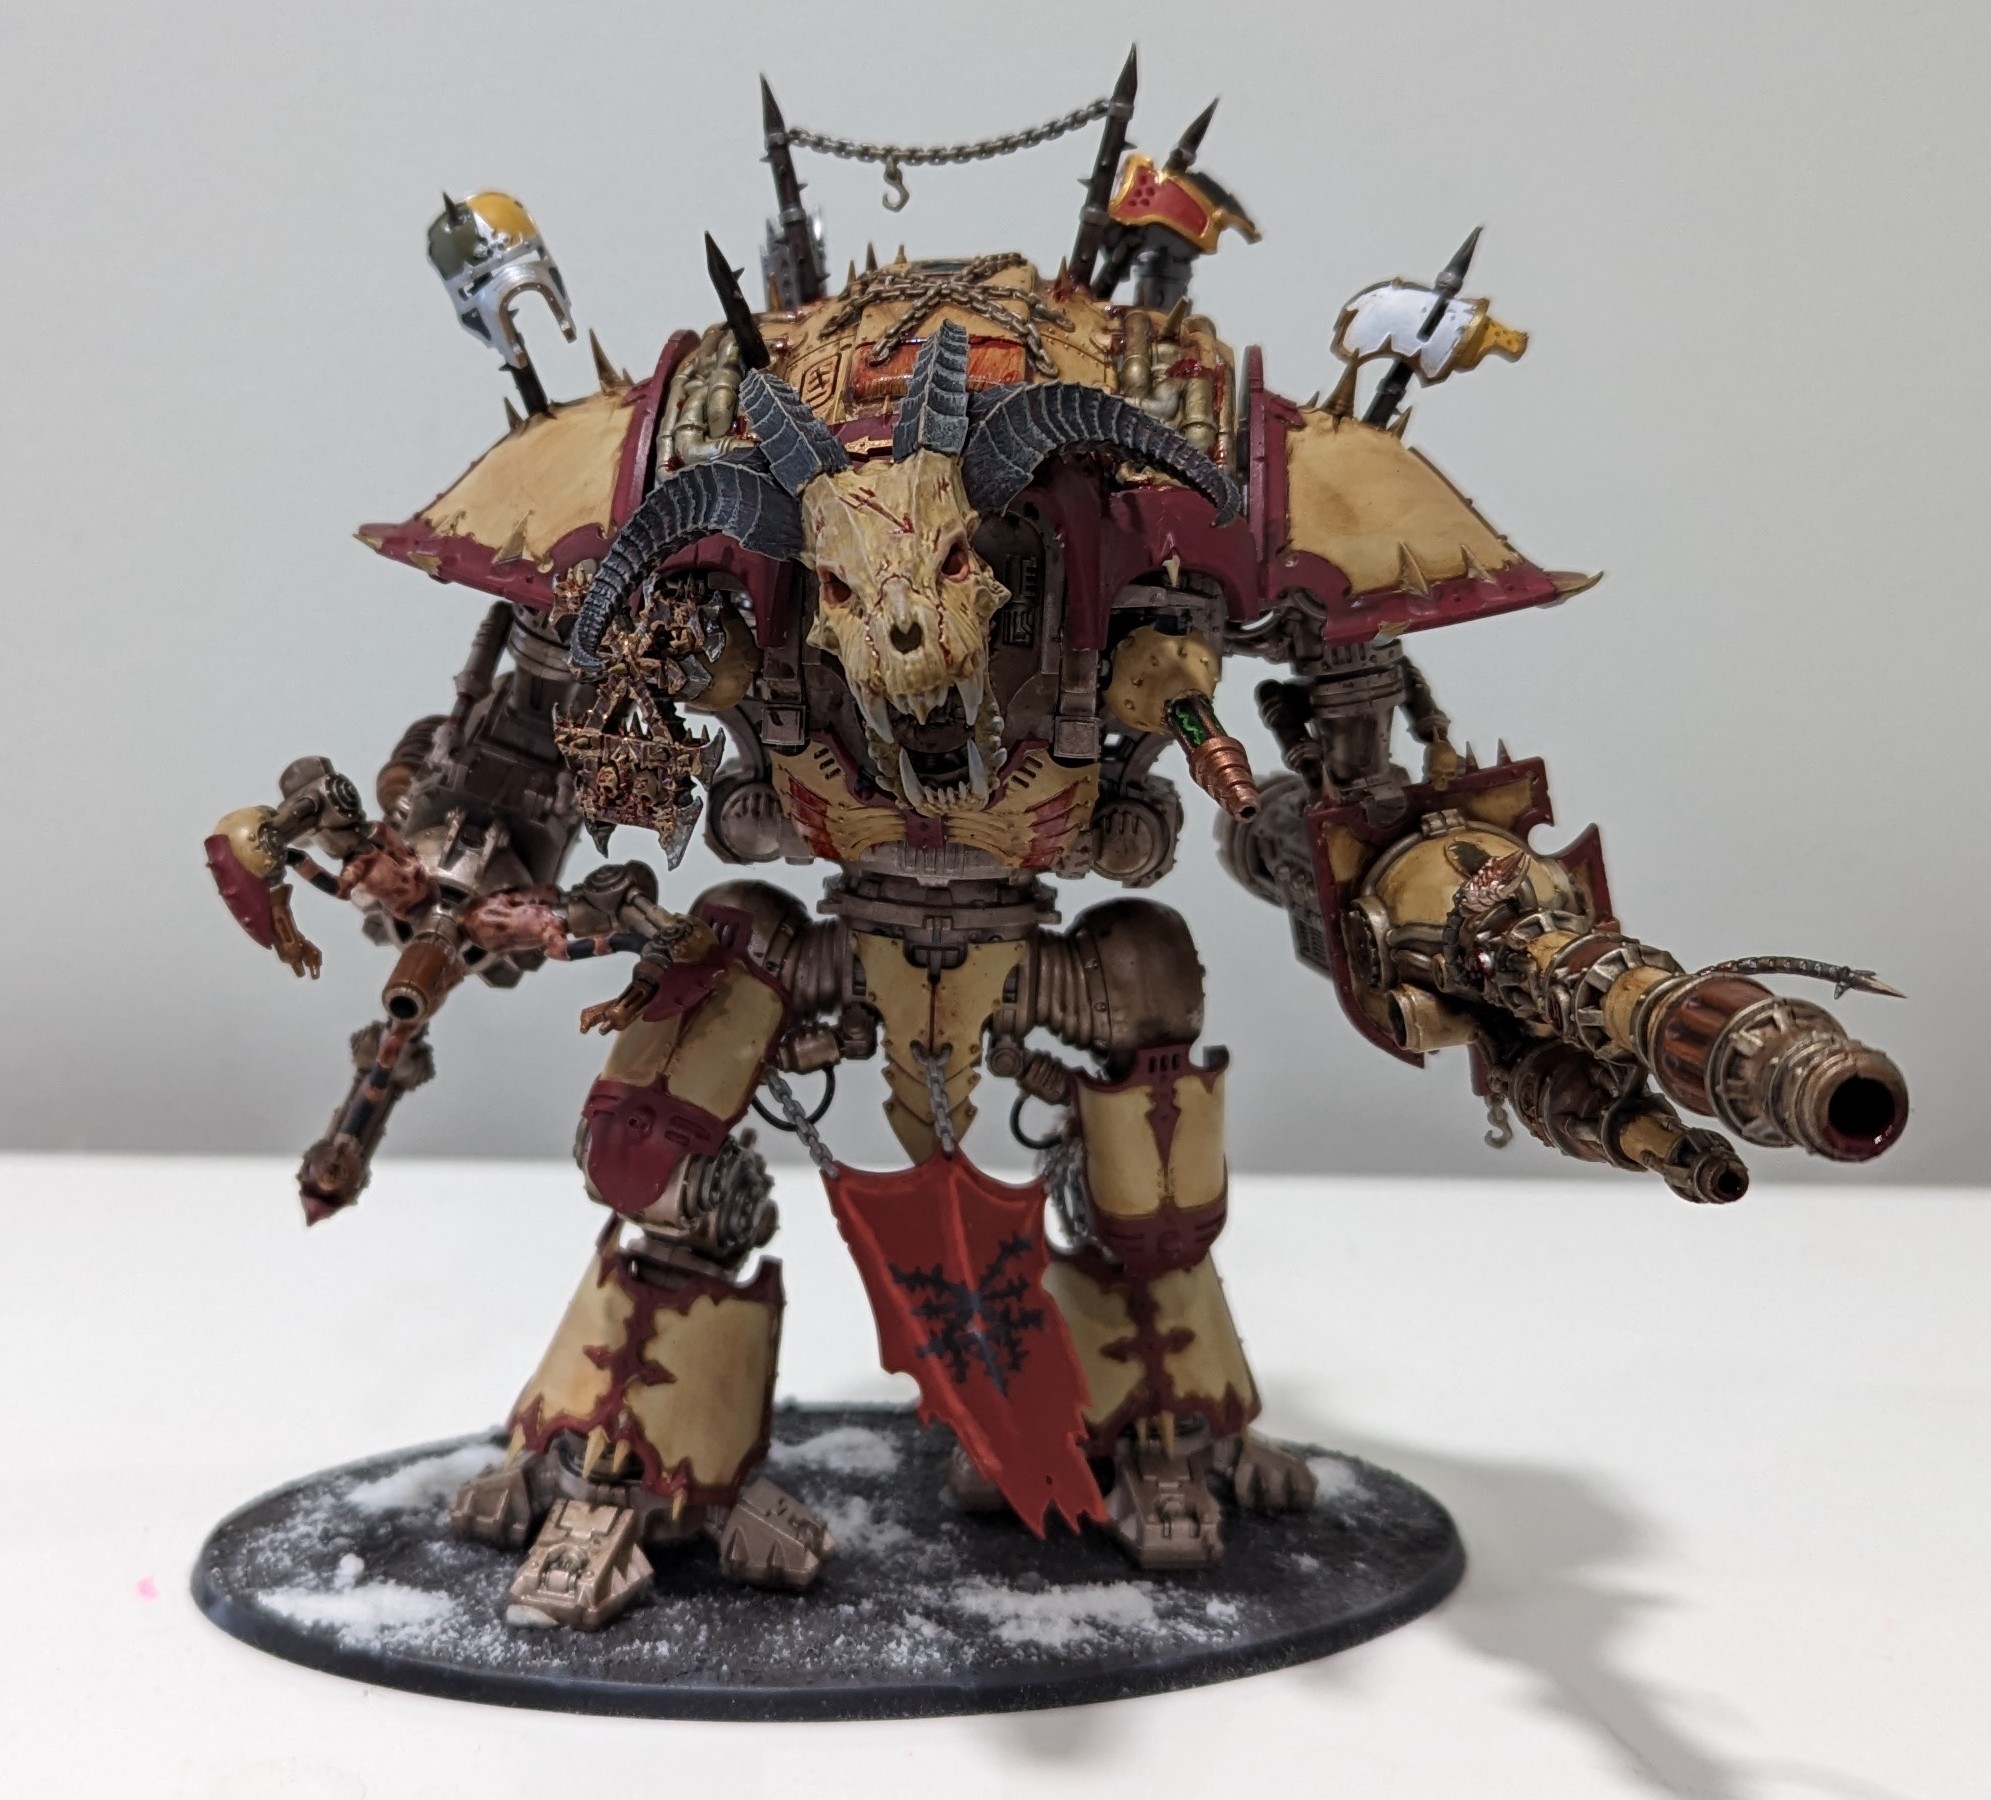
With that, Bloodstoker is done. He’s unique, interesting, and pretty cool. Our themes have come across (for the most part) and while he has flaws he’ll still be quite a presence on the tabletop. There’s plenty I would do differently, but thats just what happens with these projects: you screw up, and learn, and next time you don’t make those mistakes, you make different mistakes instead.
Hopefully you guys can learn from my years of mistakes and make some cool conversions of your own. Feel free to DM me on instagram (@mildnorman_painting) or comment here, or join the Goonhammer Patreon Discord and @ me for feedback on your own weirdos. I love seeing this stuff.
