
This article is part of a sponsored series of articles exploring Freecompany’s Eldfall Chronicles tabletop miniatures game.
Welcome, brave adventurer, to the Empire of Soga! A sprawling, wintry domain host to numerous feudal lords, the people of this faction are hearty martial fighters. The majority of the population have no time for the erudite study of magic, as their harsh environment has left them little option but to scramble to defend themselves and their territory from the monsters and demons that seek to ruin them. That’s not to say that no magic exists in this region; the Empire has aligned itself with the magic-using Kitsune, who use their abilities to perform powerful rituals to defend the land and appease tormented spirits. As you might well assume, this faction is primarily themed around Japanese legend. The region has enough going on that the games developer is currently working on its own game/expansion: Eldfall Chronicles: Northern Wind.
On the tabletop, Empire of Soga models rely on pure skill, brawn, and bravery to get the majority of their work done, along with a couple unique support powers from their spell-casting ally. If you’re looking for a faction whose models can deal huge amounts of direct damage face-to-face and live to tell about it, this is the one for you.
General recruitment strategies
The one downside to a good selection of effective models is that each model is expensive. If you’re just starting out and shooting for a budget of 60pts, you’re likely looking at 3 models total and maybe a few spare points to squeeze in an upgrade or two. The point values for the models is pretty neatly considered: a Clan Champion, Onitaoshi, and Kitsune Spellmaiden is exactly 60pts. If you want to drop the spellcaster for a more durable body, swapping in a Bushi Attendant will bring you to 57pts. If you want to get silly with it you could opt for three Attendants and a Champion, which depending on the matchup isn’t all that terrible and gives you some additional activations but it is a little dry. As the maximum points grow you’ll definitely feel some breathing room, and you might want to consider splashing in one of the other semi-affiliated models available.
Empire of Soga models
As discussed, each of the martial models in this faction are powerful and straight-forward, each being a WARRIOR. This class ability allows its model to switch its attack profile for the rounds active/reactive turns, giving them the ability to attack at full strength while the opponent makes their actions. This can be very useful with appropriate positioning, and will leave players with some tough decisions on when to go on the offense and when to bide their time around a corner.
Bushi Attendant
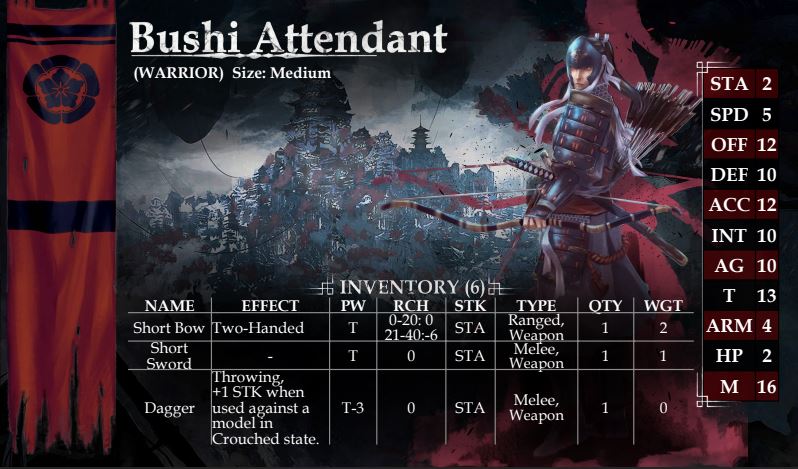 A solid statline but complete lack of abilities/skills makes the unassuming Bushi Attendant seem a tad underwhelming, but this is the only model in the faction that has immediate access to a permanent ranged weapon and as a WARRIOR is a prime example of a model that may be best left tucked neatly into cover to provide defensive fire during their reactions to enemy movement. Alternatively if you can safely draw a bead on multiple models, splitting fire with the Short Bow to draw out reaction activations is a good use of your time. At 13pts this guy is much cheaper than the other options and a good filler infantry/bowman that will likely be outshone by the other models. In an army that’s very “meat and potatoes”, well, someone has to be the potatoes.
Clan Champion
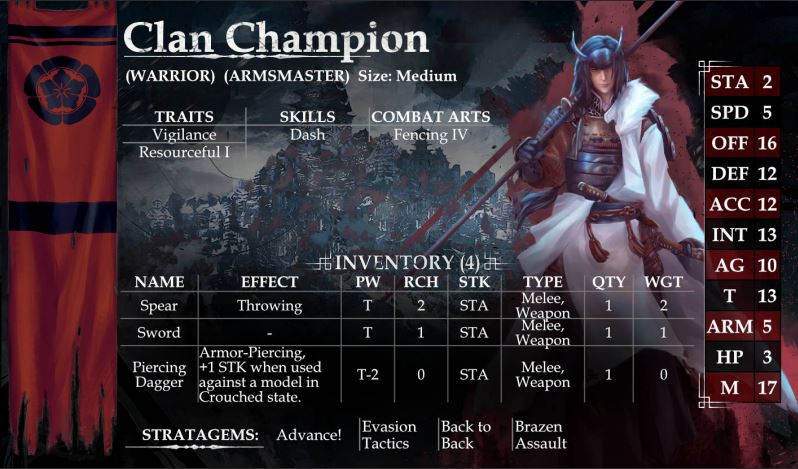
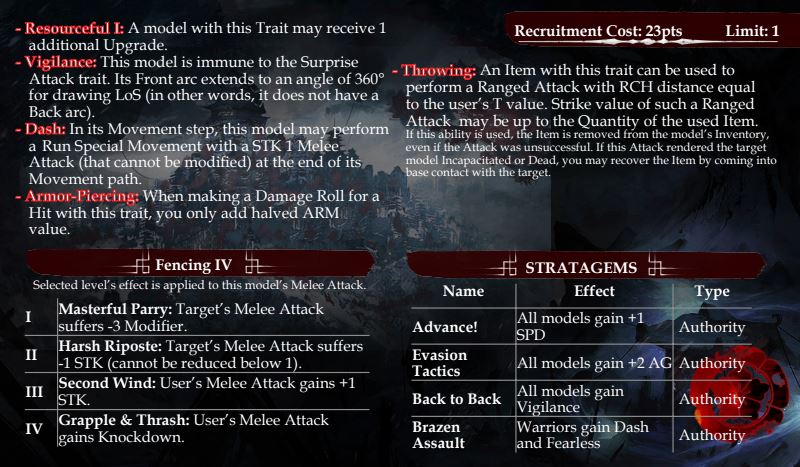
The de facto leader of an Empire of Soga party, the Clan Champion is both a combat monster as well as master tactician. A WARRIOR and an ARMSMASTER, this model is decked out in weapons and armor, but importantly also has a high Intellect which allows them to detect stealth as well resist various magic charms and attacks. At a very healthy HP3, the Clan Champion is not a model to be trifled with but its going to be a balancing act between leveraging their considerable power and keeping them alive to support the rest of the party.
The first thing you’ll notice in the models profile is that they have three different weapons, each of which offer some benefit. The Champions default, the Spear, is has good reach which can allow them to avoid a reactive attack against an enemy with short (0-1″) weapons. Optionally, they can choose to hurl the Spear at a target within 13″ of them. It’s likely not going to be a frequent need, but having a single attack at a distance does give them a bit more threat and can occasionally catch weaker targets (such as a spellcaster on a magic carpet) by surprise. If the Spear is gone, the model can swap to its Sword which is still plenty deadly. Its third weapon, the Piercing Dagger, is a fantastic choice against highly-armored targets, especially if you opt to apply Grapple & Thrash to knock the opponent down before making additional attacks. As all daggers do, a model will get an extra strike against models in the Crouched state which means you get four (2 for Stamina + 1 for ARMSMASTER + 1 for dagger) attack rolls per activation, quartering their armor (Crouched halves armor, Armor-Piercing halves armor again), and a much better chance of having something strike home. Of course, any model that can still react can potentially Dodge and undo Crouched immediately, but exhaust those activations by other means first and you can quickly overpower an opponent.
As you’ll want to keep this model alive as best as possible its a good idea to stick to sure bets for combat; their decent weapon range and the skill Dash makes the Champion ideal for fast opportunistic strikes that give you the movement to end in an ideal location. Vigilance is also super helpful defensively, avoiding Surprise Attacks and allowing you to react to almost anything within LoS without worrying about positioning.
As the leader, the Clan Champion has access to four different Authority Stratagems which will aid your entire party in the ebb and flow of battle, each with a clear use-case. Advance! is a simple movement buff that is ideal for first-turn or late-game movement, but is also just generally useful as a potential threat that can force your opponent to hold back on their model positioning. In turns where you know you’re going to be under heavy attack Evasion Tactics enhances your ever-important Dodge checks and Awareness area. In the event that you’re surrounded by the perfidious rogues of the Coalition of Thenion, Back to Back provides your entire party access to Vigilance. Brazen Assault gives your entire party Dash, potentially striking out and dealing a series of decisive blows to enemies within range after a run, and Fearless which can help you avoid making Panicked checks if your party is below half strength at the start of the turn. Failed Panicked checks can hugely impact the game, so avoiding them completely is great.
Kitsune Spellmaiden
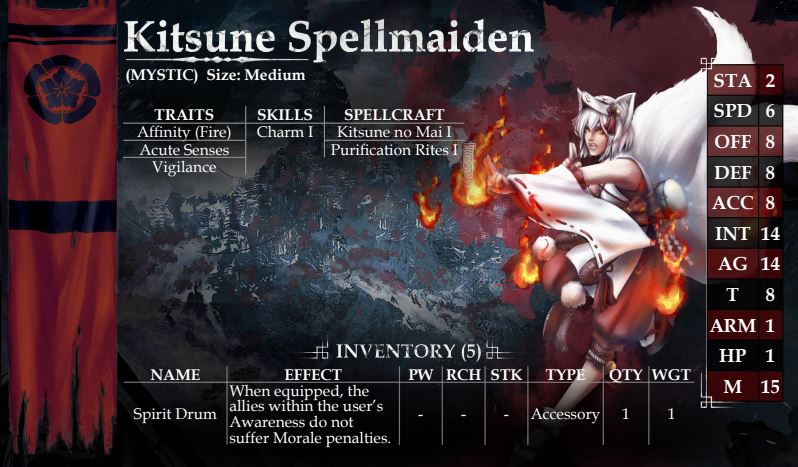
A swift and wily ally, the fox-like Kitsune Spellmaiden provides support in the form of anti-stealth awareness and powerful magic. As is the stereotype with most spellcasters, this model is extremely frail compared to your other fighters and lives or dies by careful positioning, supernatural charm, and good Dodge rolls.
Thankfully, it’s going to be pretty tricky to get a drop on the Spellmaiden, as years of avoiding terrible danger have made them keenly aware of their surroundings. Acute Senses allows the model to make Perceive or Uncover Actions with either Agility or Intellect (whichever is better at the time), extends their Awareness range by 3″, and allows them to Dodge attacks out of LoS with full Agility. Vigilance, as discussed above, means you can draw LoS from anywhere on the model and react accordingly. Lastly, Charm I forces enemy models with LoS to the Spellmaiden to make an Intellect check or lose whatever reaction they might make. Don’t count on it as an asset while planning your moves, but consider it an extra layer of defense while active.
As an added bonus thanks to Spirit Drums models within the Spellmaidens Awareness (generally a huge 17″) don’t modify Morale for any tests, further improving your models chances of avoiding the impacts of Panicked and a few other rules that use that attribute.
Kitsune no Mai spells
Burning Resolve: A 10″ ranged “heal” that allows an exhausted (0AP) model to take another activation. It should be pretty obvious that this is an incredibly powerful ability in the right situations, but don’t let yourself get too excited and overextend your positioning to make something cool happen. Fantastic when applied anywhere, but consider how the extra activation can be applied once you’ve baited out as many enemy reactions as possible to ensure they’re too tired to dodge what’s coming next.
Flare: A short-reach defensive blast that can strike any model within 3″ thanks to Sweep II and potentially inflict multiple wounds due to Burn (2). Hopefully not needed too often, but very handy in you’re surrounded.
Purification Rites
Purification: Eliminates any enchantment, removes many status effects, and automatically inflicts a Wound against Undead* models on a target within 16″. Helpful for clearing debuffs and potentially ruinous against enchanters who are relying on their spells to function.
* Undead have not been seen in the game system at the time of this publication, but its clear they’re shambling this way

Onitaoshi

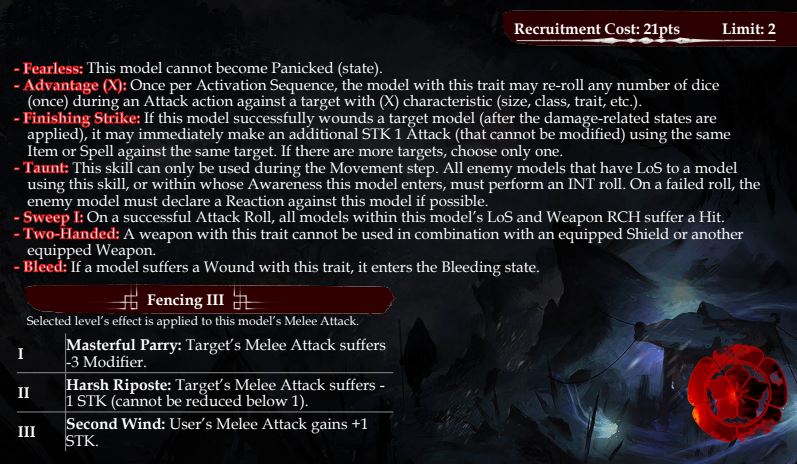
The sword-for-hire of Soga, an Onitaoshi is a powerful skirmisher who is difficult to defeat and will never run in away from a fight (they literally won’t, they have Fearless). Wielding a Greatsword by default, this models wide slashing attacks are capable of hitting all enemy models within LoS and weapon reach thanks to Sweep I. Additionally, if a enemy model is wounded by their swipe they can immediately make a Finishing Strike against one target as a follow-up. Combined with ARMSMASTER and Second Wind, an Onitaoshi with a STK1 weapon can put in 3 strikes plus a follow-up against one target. Just a devastating amount of high-powered hits against any enemies foolish enough to not Dodge out.
As with most models with Taunt, you’ll be tempted to use it to force enemy models to react to their sight. Unlike most models with Taunt, the Onitaoshi is actually durable enough to take some damage in retaliation for the act. Don’t go overboard, but if you selectively draw out activations it will make connecting with hits later in the turn a lot easier.
A couple of the alternate weapon upgrades work well here–the Longhilted Sword adds an additional Strike while reducing reach by 1″ for greater weight of dice behind attacks, potentially against multiple foes, but at a somewhat shorter distance. When it comes to weapon reach, consider that any experienced opponent is going to attempt to limit your chances to hit multiple models. The Heavy Bludgeon option is one of the best dedicated weapons in the game: +2 Power over the Greatsword, swapping out Sweep I and Bleed for Armor-Piercing, Stagger, and Stun. The big sell here is Stagger, which leeches an activation away from any model hit (not wounded) and makes it much more likely the continued hammering will hit home. Just a gloriously powerful single-target setup, including against some of the Sand Kingdoms well-armored summoned monsters since Armor-Piercing is going to negate a lot of defense and Advantage (Large, Huge) lets you re-roll all dice.
Schemes
Headhunt – Score 1VP (up to 3VP) for each enemy model you kill via Deathblow. This eats an activation to do while in base contact with an incapacitated model, but doesn’t require a roll. If you pull this you’ll need to be mindful how you attack a target, as some of your models can put out huge amounts of damage in a single activation and accidentally kill them before they can score this.
Open Aggression – Score 1VP (up to 3VP) for every wound you inflict on enemy models in one selected turn. Depending on the situation it’s possible a single model can score this whole lot for you, but its best planned for a turn where you can commit multiple models to multiple targets.
Pursuit of Glory – Score 1VP (up to 3VP) for every party model who is outside the Awareness range of other party models. This rewards splitting your forces and hopefully maximizing terrain and positioning. The Awareness range for most models is 10″ which is fairly doable, but escaping the Kitsune Spellmaiden can be a little more difficult as a 17″ radius is a good chunk of the board area.
Engetsu Formation – Score 1VP (up to 3VP) for every party model in your Deployment Zone at the end of the game. Your party has a speed buff option and a couple models would probably prefer to lend support from a safe location, so this shouldn’t be awful so long as you still have models standing toward the end.
Fierce as Fire, Immovable as a Mountain – Score 1VP (up to 3VP) for wounding an enemy model as a Reaction. The WARRIOR class comes in clutch here and makes this a winner if your opponent gives you the openings you need.
Stalwart Defender – Score 3VP if no enemy models are in your Deployment Zone at the end of the game. Relatively simple, you’ll just need to be mindful to goaltend a bit while not giving up your intention.
Upgrades
Bujutsu Expertise (3pts) – Grants a model ARMSMASTER class (if it doesn’t already have it) and increases their Fencing combat art by one rank. As most of your models already have ARMSMASTER to start, the primary purpose here is to have your Clan Champion hit Fencing V for Striking the Gaps, which allows its attacks to ignore any enemy armor.
Kyujutsu Expertise (3pts) – Grants a model MARKSMAN class and increases their Archery combat art by one rank. Pretty much only useful on the Bushi Attendant, but very useful when applied properly. The model gets +6″ reach on their ranged attacks and if they do not move get +4 Accuracy to their attacks. If you can post up somewhere, a 20% increase in hit rate is a good investment.
Lucky Charm (3pts) – Great for mitigating a poor roll (for either your model or enemy models targeting that model with an attack) and considering the rarity of re-rolls in this game system and that forcing an opponent to re-roll a success (even a critical) is huge, this upgrade is a steal.
Kassen Buki (2-3pts) – A number of the Empire of Soga upgrades relate to two-handed weapon types: a Lance (2pts), a Longhilted Sword (2pts), a War Bow (3pts), or a Heavy Bludgeon (3pts). Each of these upgrades increase the power and potential hit effects, with the trade off of either reduced range, reduced strikes, or in the case of the lance using both hands instead of one. For the War Bow and Heavy Bludgeon, if you’re into strong dedicated hits these might appeal but in a swingy dice game reducing your dice pool is asking for disappointment.
Traveling Duelist (3pts) – A WARRIOR with this upgrade denies an enemy model access to Fencing levels I, II, or III, which is a significant penalty. Considering you’re not going battling another Fencing user at all times, this is a little pricey.
Seasoned Combatant (2pts) – The model gains Fearless. Not having to bother with Morale tests when you fall below half your starting force can potentially be huge, depending on how close the game this. You can get access to this via the Clan Champion in a pinch (provided they’re still alive), but its worth considering once you’ve grown your party points beyond the recommended starting limit.
Wrap Up
That brings us to the end of our tour of the Empire of Soga core set models/rules! While this article is a intended for a helpful introduction/refresher for the faction and its capabilities, be on the look out for further articles further fleshing out tactics.
If you’re interested in picking up Eldfall Chronicles yourself, you can find it on Freecompany’s store page.
Have any questions or feedback? Drop us a note in the comments below or email us at contact@goonhammer.com.
