
We first took a high level look at the box set for Firefight 2.0 and last week we started a more in-depth review of the rules. This week we continue the Rules review so you can get an idea what Firefight is all about. Check that article out before you read this one – then jump into the Firefight!
Movement
One of the coolest things that makes Firefight easy to get into is coherency is always measured to the unit Leader. We’ve seen this before in recent games and I’m glad to see it making an appearance here. For units with fewer than 10 models on the board, every model must be within 3″ of the leader. For units with more than 10 models, the coherency then goes to 6″.
When you pull models from casualties you pull them to maintain coherency. If for some reason a model is outside coherency when the unit starts it’s activation, you Sprint or Advance as the first action to get back into coherency. It’s easy to play and forgiving.
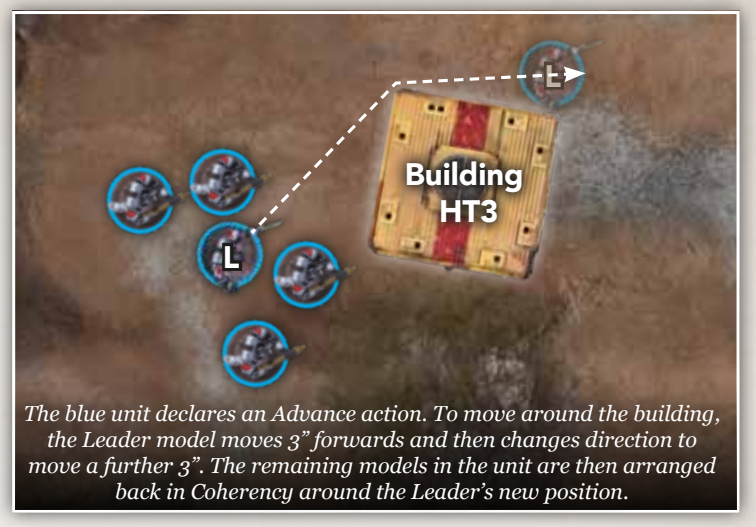
When you move the unit, you move the Leader then move everyone else within coherency. That might mean a model moves more than it’s allowed speed but that’s fine. Unless you’re starting an Assault you don’t move within 1″ of enemies. You can move through friendly units but must end up 1″ outside the friendlies.
Line of Sight and Terrain
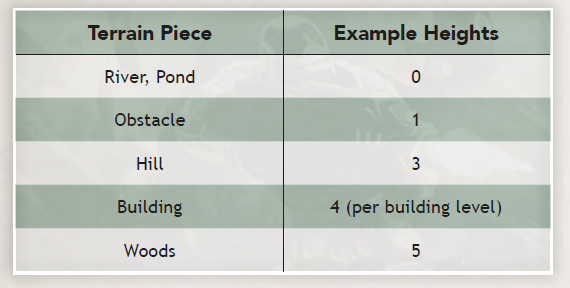
Line of sight is abstracted, with height values and units blocking LOS. Units can see through their own unit when activating, but not through other friendly units or enemy units – that includes the gaps between models. Again we use the Leader’s base to measure LOS – it may look like some models are not able to shoot, but the game mechanics assumes they would pop out and fire then move back. I’ve copied the LOS rules here directly so you can get an idea of how it works:
- If the imaginary line passes over no other unit or terrain feature to the bases of more than 50% of the models in the target unit, then LOS is Clear.
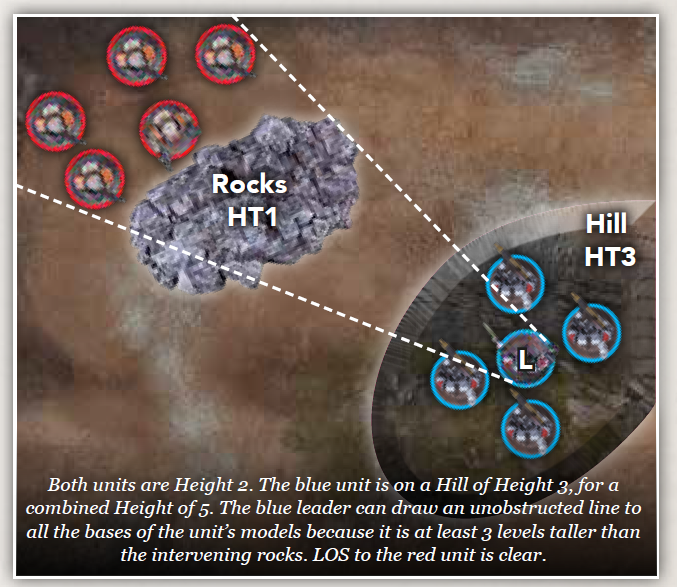
- If either the unit drawing LOS, or the target unit, has a Height at three levels or greater than any other unit or terrain the line crosses, LOS is Clear.
- LOS is Blocked if there is more than 3” of Difficult Terrain of equal or greater height of both units, between the units (even if they are both within the terrain itself).
- If any other units or terrain types in the way are the same Height or greater than both the unit drawing LOS and the target unit, then LOS is Blocked.
Line of Sight can be partially blocked if more than 50% of a unit’s models are behind terrain the blocks LOS, or if the same behind terrain that is shorter than they are. When LOS is partially blocked, the unit is In Cover, a standard game term.
To me this is really easy to use, and I do appreciate a game that gets away from true LOS. I’ve had a lot of uncomfortable exchanges in the past when things come down to a question of true LOS. The only issue I could see here would be remembering what height different things are but I think you could make a cheat sheet and keep it handy to remember.
Buildings have rules for occupancy, large buildings, roofs, entering and exiting, assaults, etc. Difficult terrain slows troops when attempting to Sprint. It is pretty standard stuff as wargames go, and the rules work.
Shooting
Units may Shoot or Blaze Away – the first thing we do is check Line of Sight and Range from our Leader model. If the enemy unit is in Clear or Partially Blocked line of sight we can shoot at them. Then we look at our unit statistics and find how many D8s we’ll need. If a unit has a weapon that is different from others in terms of AP or a special rule, we roll it separately.
Next, we look at the Shoot characteristic of the unit. This is our target. We add or subtract any modifiers necessary – they are listed here so you can see them. 1s always miss, 8s always hit. If for some reason you need higher than an 8, you just half the total number of dice and hit on an 8.

Then you take the hits and roll to damage – you compare against the target’s Armor. So if they’re Armor 5, you need a 5 or better. AP will subtract from this – so AP2 would make that a 3 or better. 8s always pass and 1s always fail. There are no saving throws, you just roll to damage then allocate it to whole models.
I have enjoyed games recently that don’t have a saving throw – it speeds gameplay up and while it can be seen as a lack of interactivity, simply rolling dice doesn’t count as interactivity in my book. Firefight is an alternating activation game, so you’ll get your turn next to shoot guys and remove models.
Units can Blaze Away – so they’re basically shooting as fast as possible, not checking to aim especially well. Only 8s in the case hit, and when they do they can cause damage etc, but if you get at least one hit you’re going to cause the unit to gain a Pin Marker. This is valuable for causing the enemy to not be able to use a unit later in the turn as they wanted to.
To give you an idea of how the rolls go – a unit of ten Marauder Commandos will roll 10 dice when they shoot at a range of 18 inches, looking for 5s to hit and 6s to damage against Enforcers. A unit of five Enforcer Operatives will roll 10 dice, looking for 4s to hit and 5s to damage against Commandos. Commandos do have Resilient (1) so they may force one damage re-roll against their unit.
Assaulting
Units can Advance or Sprint into an assault. You can only assault one unit at a time. You move your leader into contact with the enemy unit the shortest route possible then put all your other troops in coherency in base to base if able. Anyone in coherency is part of the assault.
If you Sprint, then you are considered as Charging. You will receive +1 to hit and fight before the enemy unit. This seems huge! It is possible your Charge will be hindered – if so, you will still fight first but not receive the +1 to hit. Here is a list of how your charge could be hindered:
I like the differentiation here – you can Charge, you’ll still get a bonus if it’s hindered, but it is not as great. It’s not a binary where if it’s hindered you’re just screwed. It takes a Quick to Play system and adds a layer that puts more strategy into the game. Hide behind an Obstacle or terrain and your unit will be harder to assault.
If the unit being charged has not yet activated they can perform a Charge Reaction. There are four charge reactions:
- Suppressive Fire – the unit can Blaze Away, possibly causing damage and a pin
- Evade – if the unit passes a Nerve test, it can make an Advance move Directly Away from the assaulting unit. It is possible the Assaulting unit can still get there and fight, however
- Controlled Fire – a Shoot action with a -1 to hit modifier
- Counter Charge – the unit will fight simultaneously with the assaulting unit.
The only way to perform these Reactions is if your unit has it on the profile. In our box set, Enforcer Operatives have Controlled Fire, Assault Enforcers have Counter Charge, Jetbikes have Evade, and Peacekeepers have Controlled Fire. On the Marauder side the Commandos have Suppressive Fire and Brawlers have Counter Charge.
I like that not everyone has access to every single reaction – it really helps provide some differences in the unit selection stage and when it comes to assaulting you have to remember what your opponents can do.
It is possible an Assault move will fail – the only way, since you can pre-measure, that I can think of this happening is if the enemy Evades, but there may be more chances for that to happen based on special rules or actions.
When you get to the actual dice rolling, all models within Coherency in either unit will fight. If one unit Charged, they fight first – so the enemy unit might have fewer dice when they retaliate. Take dice equal to each models Assault weapon Dice value and add them into a pool. Roll them and anything equal to or above your Assault value (As) will hit. Then roll to Damage exactly the same was as in Shooting. Remove models in B2B first, with the Leader going last.
Units that performed a non-Hindered charge get +1 to hit, and units that are Pinned get -1 to hit. You can see here where Pinning a unit then getting a successful charge off on it could be devastating. Using a Command Point to do a coordinated charge here with one unit shooting, then extra activation, charge, seems good!
The assaulted unit then gets to fight back. If both sides are fighting simultaneously (if one unit Advanced into combat, for instance) then both players roll dice at once.
After both sides have fought, add up all the points of Damage each side caused, including during reactions, and compare. If one unit is still alive but caused less Damage then they are the Loser, and they are marked as Activated, receive a Pin marker, and move 6″ Directly Away from the enemy. If there is a Draw, both units move 3″ Directly Away, are marked as Activated, and gain a Pin.
The winning unit can move 3″ in any direction, but can’t continue on into a new combat. They can also remove a Pin Marker if they have one, which seems huge!
As an example, if a unit of Commandos charges a unit of Enforcer Operatives, the Commandos would fight first, throwing 10 D8s, hitting on 4s, doing damage on 6s. The Enforcers would then get to attack back, with each model rolling one die, hitting on 5s and doing damage on 5s. You can see the balance here – the Enforcers are better at shooting with a better hit roll and more dice, but if they get caught up in combat they fall down a bit.
Overall, I think Assault is very decisive, but not totally shattering. Some of this is very similar to Bolt Action, in terms of activating, charging, hitting and removing models, going first, etc. In BA, though, the loser just dies. In Firefight the unit has the opportunity to continue if they survive. I like the mechanic off giving out Pin markers to losers and I think this could be a really good way to cause meaningful activations and strategy.
We have one more article coming for this in-depth Rules Review – post any comments below and thanks for reading! (Or email us at contact@goonhammer.com.)
