
This is a wide and beautiful hobby we live in. Some people play games as a competitive activity, some people play casual games as an excuse to spend time with their friends, some people just like to collect things, other people paint models up and take them to games as an exercise in showing off their craft and skills. There’s no wrong way to enjoy this hobby (Editor: There is, there absolutely is a wrong way to enjoy wargaming but this is not an editorial piece on gaming culture) but, for today, this article is for everyone who wants to indulge their creative-side and do some modelling, painting and tell a story with Their Dudes.
Why paint a centrepiece model?
You could be an oasis in a desert of soulless, drab, sprue-grey armies. Do you not hunger for compliments from your peers? Is your self-esteem dependent entirely on the opinions of semi-strangers you meet once a year at your national wargaming tournament? Are you so bad at playing the game that you need to compensate by painting your models better than your opponents (Ouch. Self-burn, bro.)?
More importantly, do you have 10+ hours free that you have absolutely no better way to occupy than doing reflection-accurate non-metallic-metal gold on a 28mm figurine’s cod-piece?
Hoo-boy, do I have some fun lined up for you, friend!
Today we’re going to talk about the process for cooking up an army centrepiece model. I’ll be using a recent project of mine as an example but I’ll try to keep the discussion high-level where I can so that you can apply the same ideas and process where possible.
Reasons why centre-piece models are rad and cool
Intimidation Factor: Put your centrepiece on an elevated base. It draws attention to them, helps differentiate them from other models in your army, particularly important for infantry-scale Warlords and other characters. Also, tapping directly into the neanderthal-portions of your brain meats: Taller is Better. Intimidate your opponent with unimaginably tall scenic/elevated bases.
Economy of Effort: Paint your centre-piece well. Pour your heart and soul into this model. This one? This centre-piece. That’s the model your opponents will admire, the model that will cause people to stop in their tracks and compliment your talent. Drink in these compliments, you vain creature you. If your centre-piece is well done then people won’t focus on the rest of your army, so you can take short-cuts and get sloppy with the rest of your army. Save time and effort by helping your adoring public pick the correct model to admire.
Diversionary Tactics: Your opponent, suitably terrified by your majestic Distraction Carnifex, will ignore your far more dangerous pieces in favor of attempting to lay you low by killing your centre-piece model. What I’m trying to say here is that a good centre-piece model will make you win more games (Goonhammer disclaimer: This is not true. Probably.).
Planning your centre-piece model or diorama
Narrative: What’s your centrepiece doing? Leading a charge into a vicious melee? Ripping the skull from a vanquished foe? Riding into war atop a Jetbike, pennants fluttering in the wind? Slumped against a wall, exhausted but ready for the next wave of foes? Standing aloof upon a hill, looking down upon a well executed ambush? Start your centrepiece by composing a story behind your model, what they are doing and how they might be doing it.
Communicating mass, motion or mood: It can be really tempting to assemble a model as soon as you unpack the box. Honestly, for a lot of us that act represents the most efficient reward for your time and effort. Rushing into assembly can result in some less than stellar posing. While the paint job and basing are a big component of making a model look fantastic, I think a centrepiece absolutely starts with assembly/posing.
Figurines are, in reality, static models that don’t move and, as such, one of the greatest things you can do with these is communicate motion, energy and even emotion with a model/diorama. Focusing on this will really help your centrepiece pop.
Motion: As a simple example, take a look at the classic Space Marine sculpts compared to a basic contemporary Troops choice Assault Intercessor:
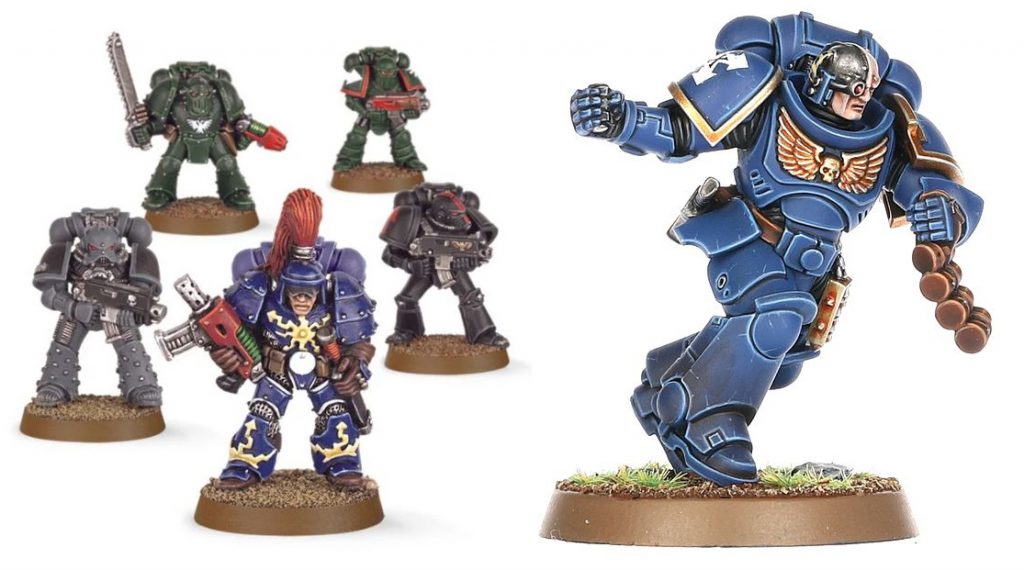
As you can see, the classic sculpts are a lot less dynamic, they have a very two dimensional posing to them (standing straight, gun held at rest). I say two dimensional because they have both height and width but very limited depth, everything is roughly in alignment with the torso (this is because GW’s mould technology back in the day was very limited compared to the wonders they are producing today, so this isn’t a criticism of the creative direction of GW from 30-40 years ago).
Meanwhile, the Intercessor is clearly modelled as if they are doing something exciting. This is far more three-dimensional, as the model has one leg pulled up in front of their torso, the other leg trailing back as they push off the ground and the arms are clearly communicating the dynamism of winding up in anticipation of throwing a grenade.
Sometimes GW does the work for you and cooks up some amazing high-energy sculpts but sometimes it falls to you, humble hobbyist, to get creative and make the magic happen.
Mood: I’m using the examples above to demonstrate what motion looks like in model posing. However, not all models are going to look good in motion.
Think about how your model fights, are they a brawler rushing into melee or a cool, stand-offish type who sits at the back of the battle issuing orders calmly or lobbing missiles downrange with a mildly disinterested demeanour?
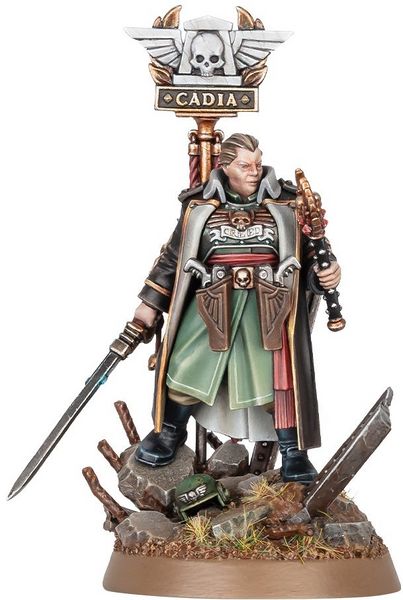
Ursula Creed, for example, wouldn’t look in character if she was doing the ‘running grenade toss’ we saw on the Assault Intercessor, so it’s perfectly acceptable here to have models posed in less dynamic poses, as long as it suits their mood or character. But man, check out Ursula’s base! Those rocks are tactical as fuck and I’m here for it.
When it comes to ‘mood’ you can also look to explore a particular emotion or feeling. Rage, despair, grim determination or even joy. This can be hard with models, as you’re often stuck with the facial features of the models you’re working with but through posing, composition and colour choices you an make it work. It’s hard to pull off but you do it’ll feel amazing.
Example of a Planning Process
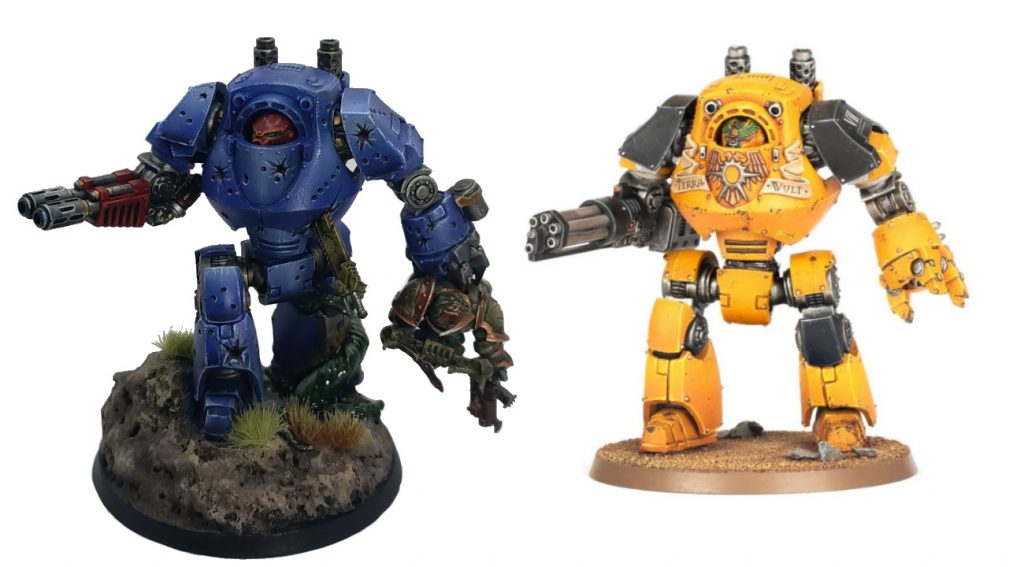
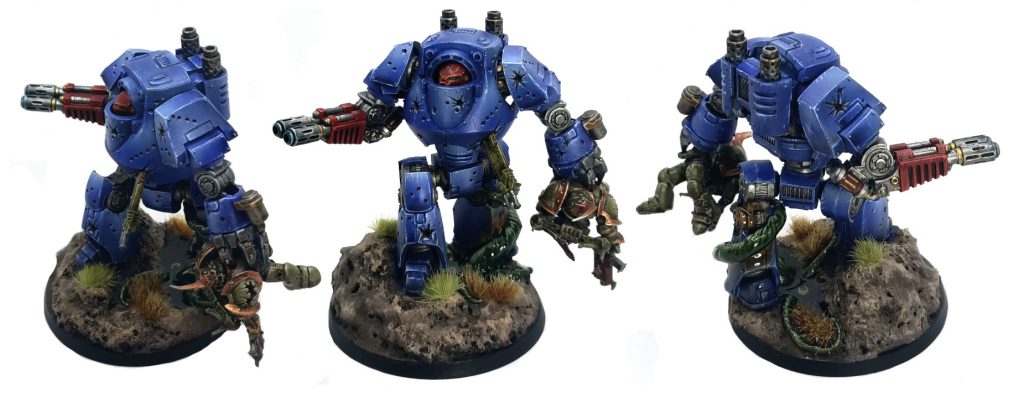
In my example, I wanted to sell the idea that a Dreadnought is both an immensely strong and unstoppable machine of war but also more than just a robot, piloted by a veteran warrior who has adopted the machine as an extension of their otherwise broken body. So, my concept needed to sell a few ideas:
- Covered in absolutely devastating amounts of battle damage but essentially unharmed.
- Possessing an immense strength and firepower, wielding it with the casual confidence of a long-serving veteran.
- Fit in with the rest of my Ultramarines force that, narratively speaking, is the 5th company that fought in the Plague Wars, a nod to Nurgle on the model would be appropriate.
So, in order to communicate this I decided to do a few things:
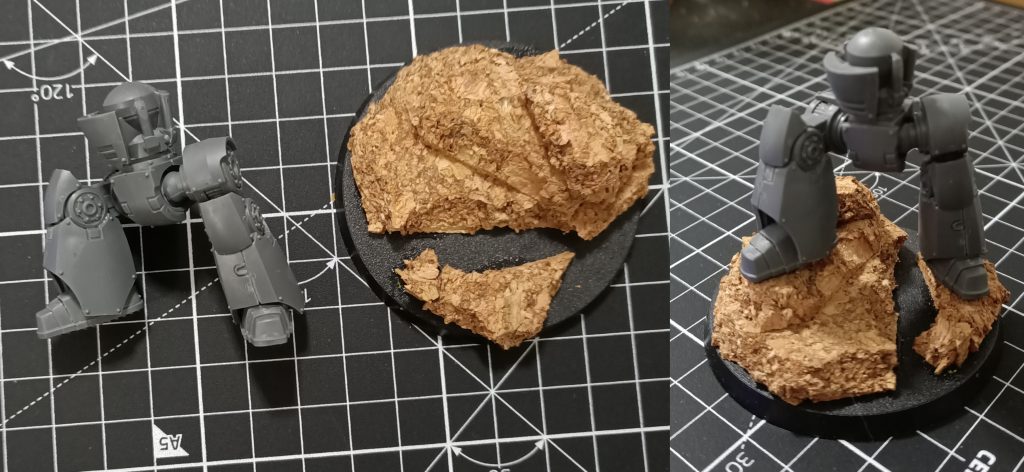
- Jazz up the leg positioning, using some cork of different levels to make it something more interesting than the generic standing pose. A Dreadnought-scale tactical rock, if you will.
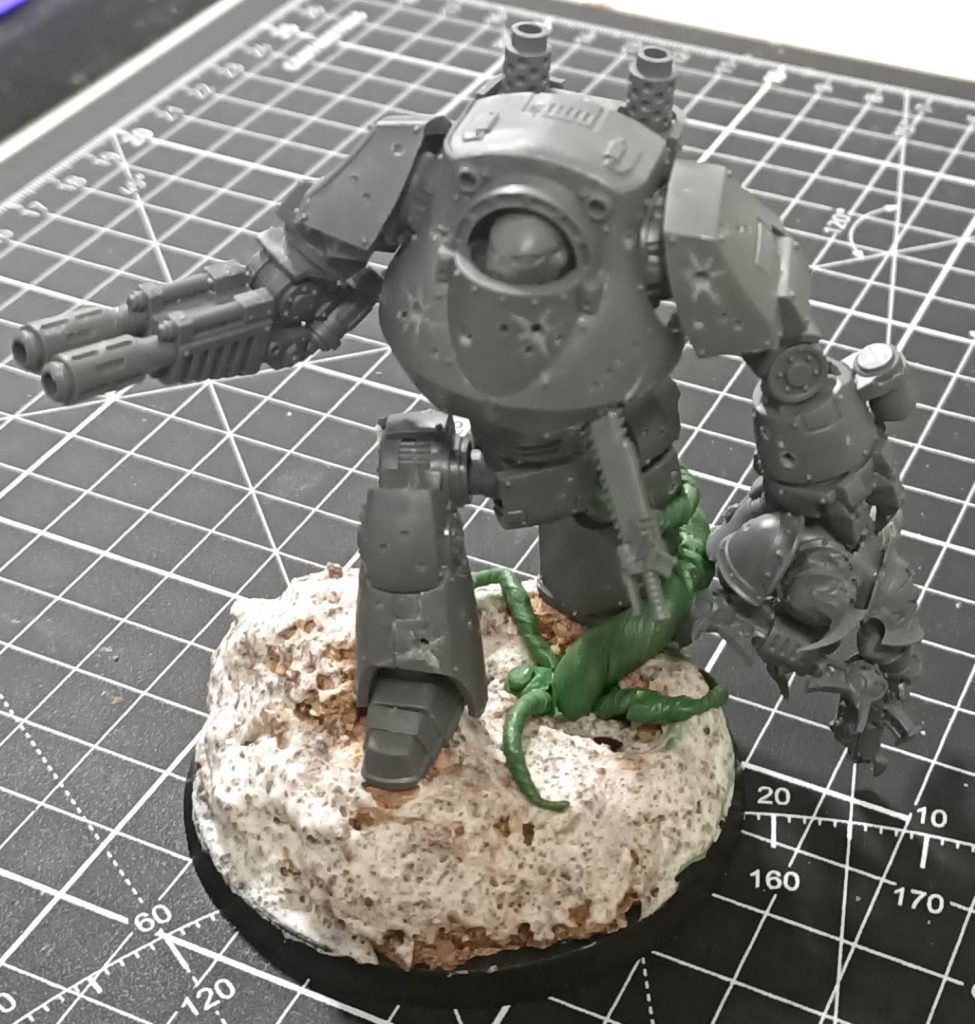
- Pay homage to the classic Dawn of War dreadnought melee animations, where they pick up the enemy and toss them around like rag-dolls, choosing a Nurgle Plague Marine as our victim here. Using the dreadnought’s pose here to communicate that it is comfortably hefting the (dead) weight of the marine.
- Immense battle damage, using both a pin-vice to make real holes and the Trompe-l’œil painting technique to make the battle damage convincing and visually interesting, as well as adding the Plague Marine’s chainsword, stuck in the hull armour as further contributions to the ‘narrative’ of the piece. And, finally;
- As a mid-process inspiration, I modelled a large tentacle rising up from a bog to wrap around the dreadnought’s leg, kraken-style, with a single eye watching from beneath the surface. This was an excuse to add further visual interest to the model, show off some water-effects techniques, as well as paint rust onto the model where Nurgle has caressed it.
Execution
Sub-assembly
Rather than rush ahead and just assemble the entire model in a single sprint, I find it’s very useful to do sub-assemblies, which will then let you perform test-poses with the model before committing to anything. This is especially important when it comes to managing stuff like making a model’s balance look natural, ensuring that the angles that the head and torso are rotating at look believable (and line up with where the gun is pointing, and whatnot). Any point of articulation should be left un-glued as long as you can to ensure that you don’t paint (glue) yourself into a corner. See below.
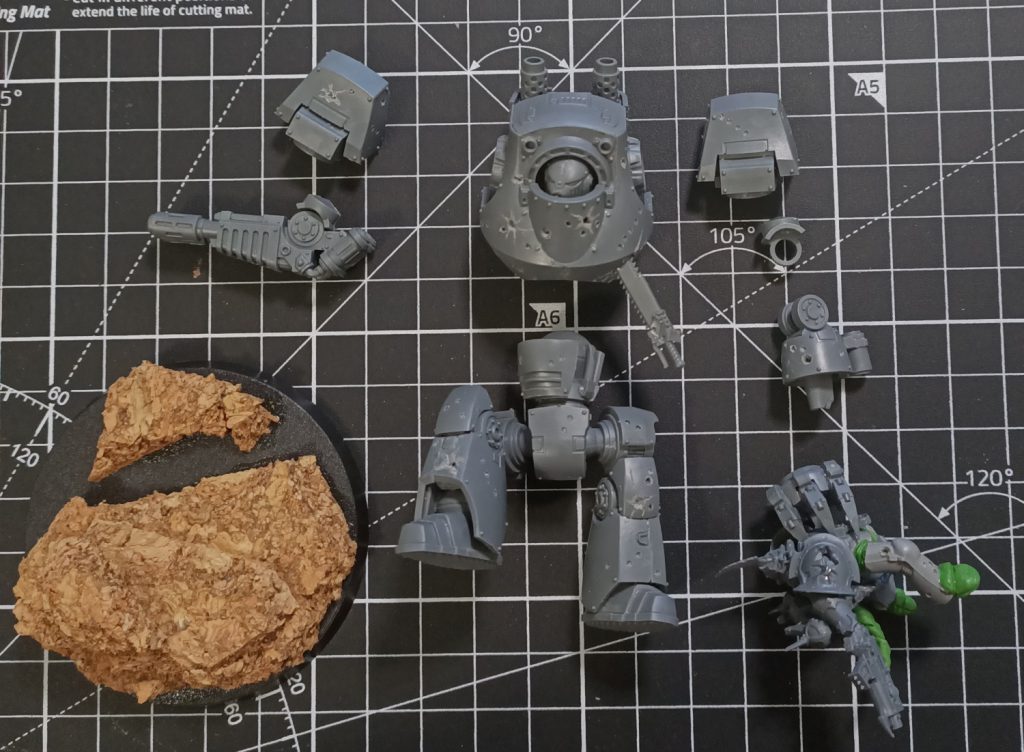
It’s always good to start with the legs/base, as this is the load-bearing part of the model and is an essential part in communicating motion/dynamism as well as, to be perfectly blunt, ensuring the feet sit on the base properly.
Test-Posing
We sub-assemble so we can test pose without restriction. That is what we do. We test and test again.

For example, getting the arm posing just right to communicate the weight of the Plague Marine, as well as ensuring that the marine looks convincingly ‘limp’.

Because I modelled the Plague Marine onto the arm prior to glueing it all together I have to make sure that the arm, when posed, accurately sells the viewer on the idea that the Plague Marine has gone limp. You can also see the amount of excessive work that goes into making a marine look like they aren’t standing anymore. Chop up the hips, repose them, and then hack out the feet and replace them with clown-shoes…make the feet look like they’re dangling. As I note elsewhere, what looks goofy in production will look perfectly fine after a lick of paint.
Battle Damage:
Here, battle damage is generally the combination of three techniques: Physical damage to the model via: 1. Pin-vice for bullet holes, 2. An enthusiastic scoring with a hobby knife, and 3. Trompe-l’œil (making 2D objects appear 3D through painting light sources). Most every scratch, dent or bullet-hole on my piece was done with a mixture of techniques. The physical damage adds a degree of realism to it and a genuine perception of ‘depth’ to the damage, while the Trompe-l’œil helps draw attention to it and helps blend that into the style of painting I use.
The first technique is just taking a pin-vice to the model to make incredibly shallow bullet holes. There’s a couple of ways to tell a story with bullet holes. You can ‘stitch’ them across the model to indicate someone spraying a sustain burst at the model. Alternatively, you can do ‘shot groupings’. The trick is to not making groupings look perfectly balanced, the dreadnought is a moving target so the idea that someone can land a perfect ‘triangle’ of shots onto it might break the audience’s suspension of disbelief, so try and randomise the placement of ‘grouped’ bullet holes. but not too much, either.
The second technique means of battle damage used here is ‘scoring’, which is taking a Stanley knife/box-cutter and carving ‘craters’ into the armour to indicate something like spalling or frangibility. Often I use scoring in combination with larger ‘bullet holes’ to indicate catastrophic damage.
There’s some nuance in the technique, in as much as you score the ‘perimeter’ of the crack/fracture and then slide your knife in from one angle and ‘flick’ the plastic out to give the fracture some depth. This is a balance of desired outcome and personal safety. Hard plastic has the potential to resist scoring and then you get to see your blade slide over it in slow motion and bury itself into your thumb.
The Pro Gamer Move here is to…not do that.
The third technique is using Trompe-l’œil to add depth to the physical damage. As a refresher from an earlier article:
Step 1: Apply your basecoat colour (in this case: Macragge Blue).
Step 2: Use either a dark brown (GW: Mournfang or Gorthor Brown) or a darker shade of your base coat to block out where the bullethole/damage sits.
Step 3: Use black (or near-black, GW: Abaddon Black or Dryad Bark) to trace out the ‘top edges’ of the battle damage (this represents the shadow cast onto the exposed lower layers of the material from the split/damaged upper layer.).
Step 4: Use a highlight of your basecoat colour (in this case: Fenrisian Grey) to trace out the ‘lower edges’ of the battle damage (this represents the points that are catching more light and as such, a sort of highlight).
Step 5: Use very sparing amounts of white (or near white, GW: Corax White or Ulthuan Grey) to indicate any extreme points of highlight on the lower edges of the battle damage.

Basing:
Remember when I said earlier in the piece that it’s vitally important that your models are taller than your opponents? It’s a psychological thing. Intimidation, you see. Arguably also modelling-for-disadvantage but don’t let that stop you. I mean, unless you’re a coward?
Say hello to my good friend: Cork. Easily acquired at your local hardware store in ‘floor tile’ sized servings. Just carve off what you need when you need it.
When I want to work with multiple layers of cork for height I like to use a cheeky custom blend of basing sand, PVA glue and spackle/filler paste (in my case, Selley’s Spakfilla but your local hardware store may have different products) to blend the cork layers together and give them some texture.
The exact ratio of PVA glue, sand and spackle is something you have to tease out for yourself if you choose to follow this technique but as a starting point I’d try to eyeball a 1:1:1 ratio of sand, glue and spackle. I generally mix it up in a spray-can lid because as hobbyists we have a lot of those lying around and, honestly, when it dries it gets almost rock hard and trying to clean that out of any container or vessel I want to use again sounds like a chore…
Just slather that mix all over the cork layers, with the intent of blending the layers together (ie. turn a series of steps into a incline). See below.
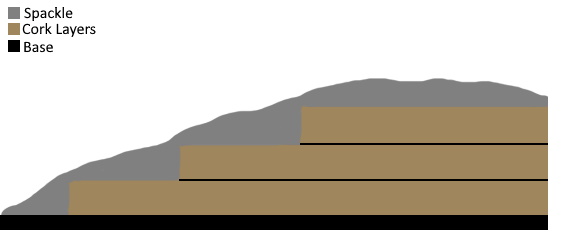
This should be covered in the painting section but I’ll just cover off on basing here. If you’ve got enough sand in your spackle-mix then you’ll have enough texture to be able to neatly dry-brush several successively lighter shades of brown, grey or whatever your preferred basing scheme is onto the base. Then, whatever flock or static grass you feel is appropriate. You don’t want the colour palette on the base distracting people from your lovely centrepiece model, so I’d probably suggest you limit yourself to low-saturation, inoffensive colours like greys, browns, and greens.
Additionally, I’ll also point out the use of green stuff to provide relatively water-tight, thin(-ish) dams for the incoming/inevitable water effects/resin.
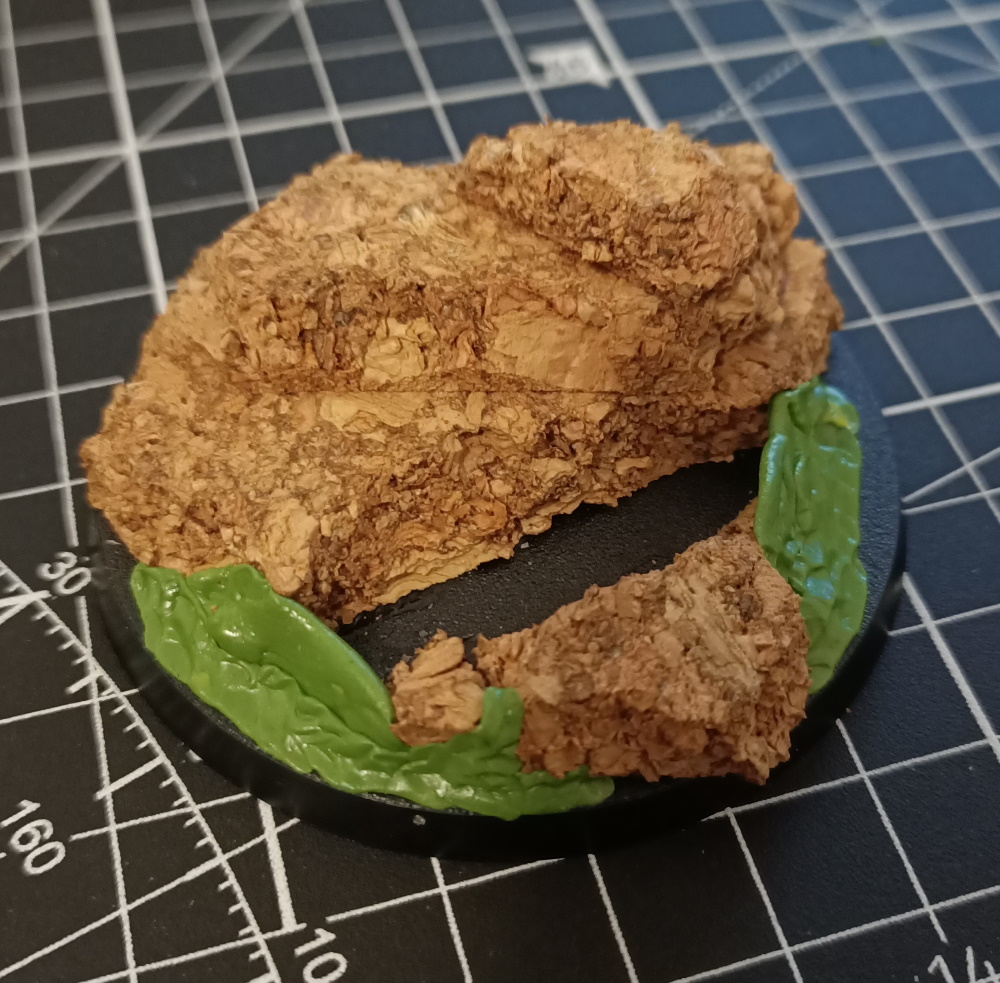
When you’re ‘damming‘ for resin, Tower Defence is the aim of the game: Don’t let anything get through.
Detailing
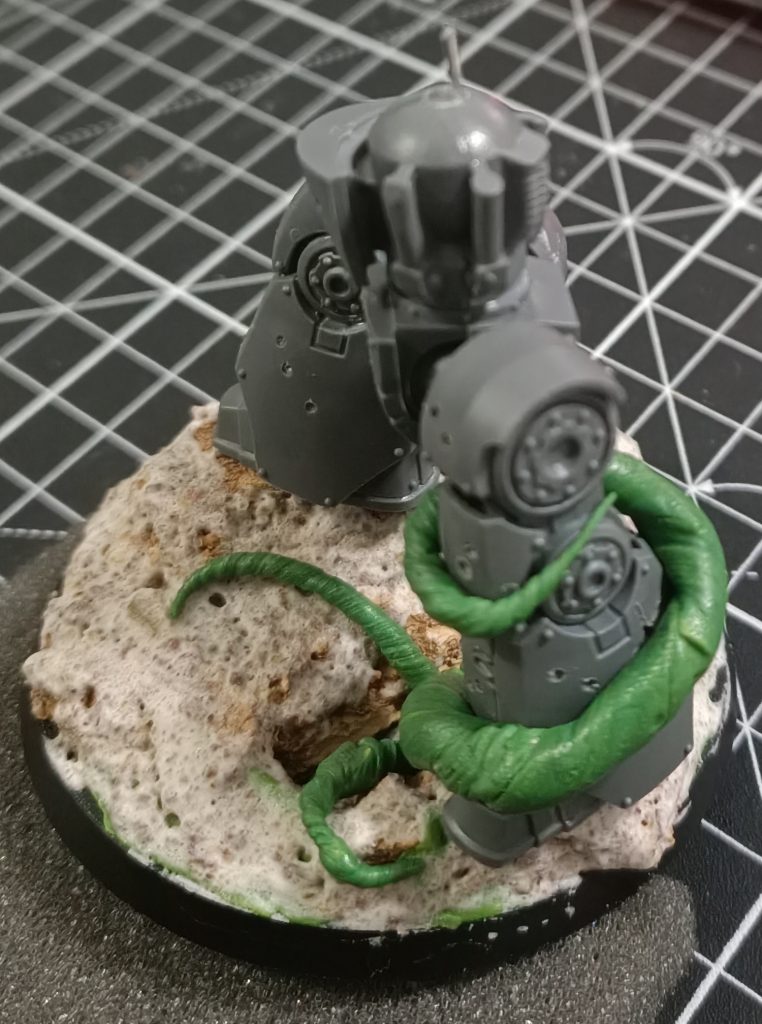
This is the part where we green-stuff a tentacle rising up from the bog and wrapping itself around the Dreadnought’s leg. As you’ll see below the green stuff doesn’t look terribly crash hot at first but your painting will forgive a lot of mistakes. To sculpt tentacles, I usually roll out a little ‘log’ of green stuff, grip one end and then start slowly spinning the other end while also slowly, very slow, teasing that end out. Pulling and stretching it out until you lose tension and it frays down into a single sharp-ish point. Then just wrap it around whatever its intended prey is and call it done. The ‘eye’ is just two circles pressed down on one another and then painted nicely at a later stage.
The tint in the water effects will hide a lot of your work, so don’t be afraid to leave some of the submerged sections less than perfect.
Final Assembly
It’s taken a while to get here but huzzah! Rad pose? Check. Imposing height? Check. Battle Damage? Checkkity-check. Green stuff? Check. Base spackled up and ready to go? Check and check. We are go for launch, Houston.
Painting:
Sorry, I bungled this one up and didn’t include any WIP shots of the paint job. So, we’re going to show the Musterkrux Method here instead of a full rundown of how this was painted:
Actually, let’s try to briefly speak to the stages and techniques used here:
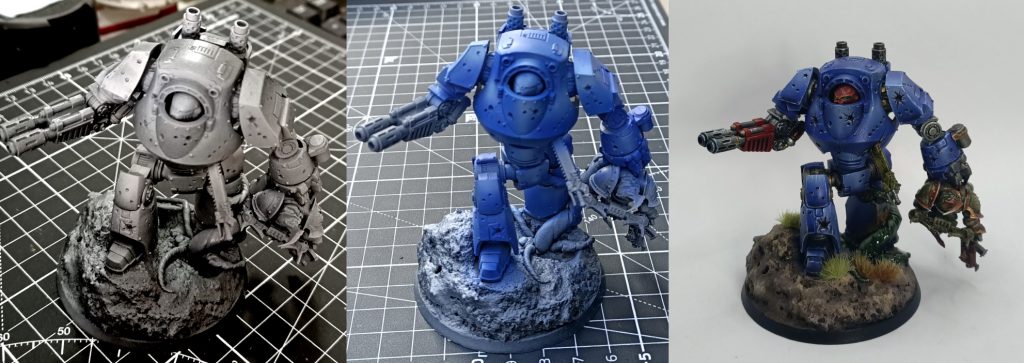
- Zenithal undercoat. This is a bit of a bum-steer because many people (myself included) don’t use zenithal undercoats to their full potential but it’s still a good habit to develop and also looks a lot cooler than either unpainted or single-shade undercoating.
- Airbrush primary colours. I did this in about three coats, Primary blue, blue mixed with a cool grey (2:1 mix), and then a final 1:1 mix of blue and grey.
- Shading. I’m really fond of using GW Contrast paints as shades for other colours. Talassar Blue, brushed onto the model and then ‘worked’ with a second brush (see: Two brush blending), by using the second (non-loaded) brush to stretch the contrast you can easily develop a gradient of coverage from heavy, where the paint originally landed on the model, through to light where your ‘stretch’ ends.
- Highlights. This was mostly edge highlights, generally 1-3 progressions (2:1 mix of blue to grey, 1:1 and then 2:1). This can take time. I also include a degree of my kooky ‘hatching’ technique here to help build up areas of visual interest on the model.
- Trompe-l’œil: This is adding a bit of paint to the scoring and bullet holes on the model. This helps make the battle damage easier to identify on the model as well as making it look more intentional and less like you bought your model secondhand from Freddy Krueger.
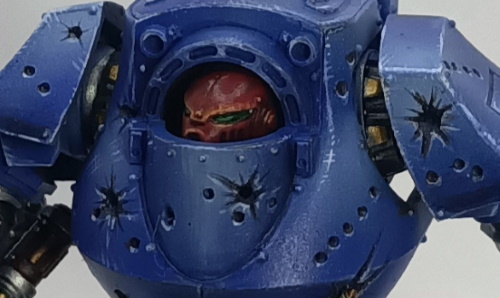
Once again, apologies for the lack of WIP photos. I will, however, quickly talk about colour composition choices for this model, though. Being an Ultramarine dreadnought, the primary colour is, of course, blue. In order to draw attention to certain components of the model I ensured the gun casing and helmet were red. I considered a white helmet to indicate that the marine entombed was a veteran (or even Red-white for a veteran sargent) but felt like a big block of solid red would make a stronger impression.
Additionally, I ensured that the Plague Marine, the Nurgle-Tentacle and the Plague Marine’s chainsword were all painted in a similar green to help indicate that all three component’s were related. By colour-coding the chainsword with the Plague Marine I’ve helped develop the implicit narrative that the Plague Marine had charged into the Dreadnought and buried his sword into the torso before getting swept up and krumped.
It’s a little touch, but my intent was for the outlying red of the gun-casing and helment to catch the audience’s eye first and then draw the audience’s eye over to the green quadrant of the model (ie. the Tentacle, Chainsword and Plague Marine’s armour), at which point they can decipher the story being told there. There’s a particular art form to composition that deliberately pulls the viewer’s attention from one element to another and I’ll be the first to admit I’m no master of this but it’s good to be aware that this concept exists and to think about how you might implement it in your own work in the future.
Water Effects:
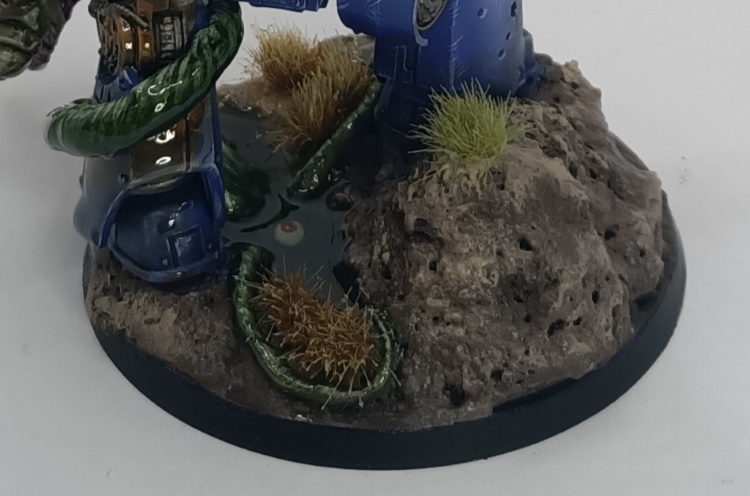
This section is relatively easy as long as you know what you’re doing. Personally, I’ve been using a 2-part epoxy resin that is sold by a local hardware store as a ‘glass finish‘ for kitchen-tops and other surfaces. You get a lot more product for your Hobby-Bucks but the down-side is that it’s a bit more fussy to work with than other resins and it has a tendency to yellow over time, so I find you have to tint the resin with a few drops of ink while mixing up a batch.
There’s a lot to unpack when it comes to working with 2-part epoxy resins but I’ll try to cover off on the critical notes here:
1. This stuff is poison. Don’t fudge around with it, measure it out with plastic cups that you then immediately throw away. Additionally, it can emit noxious fumes when reacting, leave your model somewhere with good airflow and then stay the heck away from it. If you’re not supremely confident that you can interact with materials that can do serious harm to you or those around you, you’re not ready for water effects. This is Goonhammer’s official warning and liability disclaimer to you.
2. Sacrifices need to be made. If this is your first time working with resin, please do a few test runs on models you can afford to lose before you commit to anything important, precious or expensive. If there’s demand for it, I’ll do an article on working with resin and show off what my test-models look like (Pro-Tip: They look bad). The Great Translucent God Epoxzor demands tithe, do not deny them.
3. Measure Six Times, Pour Once. Your margin for error when working with resin is very small. Make sure you get the ratio of components absolutely correct. In my case, it’s a 5:2 ratio (so not quite 2:1). I find the trick to measuring this out is to use balanced kitchen scales to measure the weight (down to the gram) or the components. You’ll have to correct for the weight of the plastic cup holding the components, of course, but you just ‘zero’ the scales with the cup on and you’re good to go. An incorrect ratio will either result in a resin that never cures or one that cures very badly and develops weird artifacts/irregularities.
4. Resin is very, very sneaky. Whatever you’ve done to water/resin-proof the container that is holding your resin is not good enough. Go back and plug every hole and seal every seam. It moves slowly but is relentless in how it squeezes through any and every weakness it can find. As an aside, where ever you leave your project to cure, make sure to check in on it every 5-10 minutes for the first hour or so. What looks like a solid seal immediately on pouring might take the resin a little bit of time to navigate and escape from.
5. Get tinted, yo. As noted earlier, un-tinted resin will likely yellow over time, so I would strongly suggest you tint it with just a few drops of a wash. I use Army Painter Quick Shade but anything should be fine (possibly even GW contrasts but I haven’t tested that, so proceed at your own risk.). You only need a few drops to get a good tint going. I would say that you’re safer proceeding with 2-3 fewer drops of tint/wash than what you might think is appropriate. Heavily tinted resin will trend towards total opacity with any significant depth and you really want that lovely translucency so that people can see whatever you’ve got hidden under the surface.
6. Resin cures slowly. Depending on your brand of resin it might take 6-8 hours to get to ‘touch-dry’ but then another 24-hours to fully cure. This is not something you should embark on if you want to bash out any other work on the model in the near future. I usually do my mixes at early evening, gives me some time to test and check that the pour is going well and then, when satisfied, go to bed and wake up to something that’s touch-dry.
Conclusion and What’s Next
-And there we go.
Building up a centre piece model can take a lot of time but in its own way this is a very rewarding process and if you find you don’t love it, be thankful that you can choose to only put this much effort into a single model and not your entire army.
If you read this guide and are now shaking your head slowly, muttering something about how you could never do this…
Stop it.
You’re an amazing, talented hobbyist and even if you can’t or won’t do something this complicated with your next project, maybe just try implementing one or two advanced techniques and see how that goes? You only get better by stretching and challenging yourself and even the most talented hobbyists started at the bottom.
So, even if you don’t try everything I’ve listed in this guide, why not try 1-2 things you’ve never done before?
What’s next for me, you might be asking (you’re not, but I’m just looking for a segue to talk about me some more)? Well, best beloved, I’m looking at basing up and reposing a Mauler Fiend to be a bit more imposing and dynamic.
Now, I’m done talkin’ and you’re done readin’ so get out there, put your hobby where your mouth is and get creative!
