
In today’s Goonhammer Historicals Marc “Ilor” Renouf talks us through the sometimes complicated world of basing for historicals, with some “helpful” interjections from Edwin “Lupe” Moriarty.
Here at Goonhammer Historicals it is our fervent hope that we’ve piqued your interest in the fun and engaging world of historical wargaming. With a comparatively low cost to collect, a plethora of resources for painting, and fascinating scenarios pulled directly from amazing real-life events, there is much to recommend the genre. We’ll mostly be talking about specific eras and rulesets, but today it’s time to take a deeper dive into a rather peculiar aspect of historical wargaming: basing.
If you’re coming to historical wargames from some other type of popular tabletop wargame like Warhammer 40K or Age of Sigmar or Infinity, you’ll be used to the idea that your figures come with a base on which to mount them. Often, the size and shape of that base is important within the context of the ruleset itself (e.g. for establishing lines-of-sight or determining the number of opponents who can engage in close combat). For some historical games and manufacturers (notably Warlord Games, which shares a sort of “wargaming cultural lineage” with 40K) this practice is also standard.
But with many manufacturers of historical figures – especially for older lines or more esoteric games – the figures don’t actually come with bases. It is up to the player to source their own.
How does that work?
The key reason for this is simple – in historical wargaming there are so many potential rule-sets out there that the manufacturer generally has no idea what game you’re going to be playing with their figures. Yes, Warlord Games would love it if I were playing their Bolt Action rules with their extensive range of WW2 miniatures – and I have – but more often I find myself using them with Too Fat Lardies’ terrific Chain of Command ruleset. Further, unlike the bigger producers like Games Workshop whose lore and miniatures aesthetic is tightly tied to the games which they also publish, many manufacturers of historical figures don’t actually write game rules. This in turn stems from the fact that there are no intellectual property protections on historical designs – you can trademark “Canoptek Tomb Spyder” by name and aesthetic, Greek Hoplite not so much.
Because of this state of affairs, miniature makers are encouraged to keep their products as broadly useful as possible in order to cater to the widest segment of potential customers. And this in turn means not committing to a particular basing strategy, because different games take different approaches to basing figures.
Scale
First, let’s take a moment to talk about an important term; when veterans of historical wargames talk about “scale,” they’re often talking about several different things – sometimes simultaneously! The first refers to the overall size of the miniatures themselves. So when you hear people throw out terms like “6mm” or “1/72”, they’re talking about the size of the figures and/or vehicles. Lots of articles have been written about various miniature scales, what they mean, and how they are calculated, so if you’re curious start here: http://theminiaturespage.com/ref/scales.html. When we’re being more precise in our parlance, we call this “figure-scale.” It’s generally enough to know that the sizes of human figures are often (but not always) expressed as “height from ground to eye level” while vehicles are generally expressed as a fraction of their actual size, and that every fraction has a roughly corresponding height (e.g. 28mm and 1/56 are the same scale).
But another common use of the term “scale” is often more germane to the topic of basing our miniatures, and that’s the size of the units that are to be represented on the tabletop. For instance, is each player controlling a single platoon? A full company? Or are the players’ forces meant to represent entire brigades or divisions in a massive clash? Thus, when someone says, “it’s a platoon-scale game,” they mean that the size of each player’s force represents roughly 30 to 50 men. This is generally referred to as “unit-scale” or “engagement-scale.”
This in turn gets us to another question, which is how many actual people does each figure on the tabletop represent? We call this – you guessed it – “representative-scale.” For smaller unit-scale games (such as Nordic Weasel’s WW2 fireteam-scale game “5 Men at Kursk” or Stand 2 Games’ squad-scale Napoleonic skirmish game “Forager”), each figure can easily represent a single man. But as the forces involved in games get bigger, things get complicated. Unless you’re pimping out a church hall and playing the entire battle of Waterloo at 1-1 representative-scale (where each figure represents a single soldier), you’re generally faced with a choice – have each figure represent multiple men in the unit, or make the miniatures smaller. Or in many cases, both! Representative-scale tends to be fairly tightly coupled with unit-scale owing purely to the impracticality of representing large forces in miniature.
Finally, there’s “ground-scale” which describes how distances on the tabletop represent distances in the real world. For instance, in Chain of Command, the intended ground-scale is 1 foot = 40 yards, or 1/120. This means if you’re playing Chain of Command with 15mm figures, your figure-scale and ground-scale match. The ramifications of having different figure vs ground scales mostly involve how terrain is represented on the tabletop and is outside the scope of this article.
For our purposes, the two most important facets of the term “scale” are going to be figure-scale and unit-scale.
Rulesets
And here’s where it all comes together, because many rule sets have very specific ideas about both figure scale and how those figures should be based. Some very explicitly recommend purchasing miniatures of a particular size such that the figure-scale and ground-scale are the same, but others are less strict. If a game’s basic “unit” is meant to represent a larger group of soldiers – say a regiment – and if that regiment is the smallest unit in the game, then it might make sense to place all of the figures within that unit on a single base for ease of movement during the game (not to mention transport and set-up).
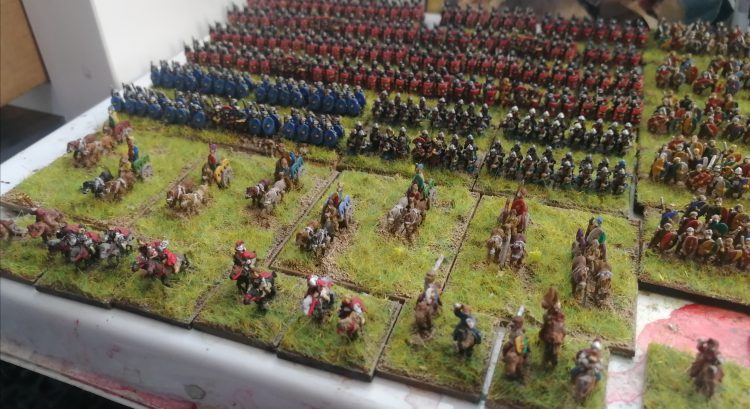
Further, some games (such as Reisswitz Press’ division-scale Napoleonic game “General d’Armee”) care less about the total number of figures on the particular base than they do about the size of the base itself. These games will often use terms like “frontage,” which dictates how wide the unit is when engaging the enemy. This is very common in rulesets for the Ancient and Napoleonic eras, and it’s here where you’ll see players making purely aesthetic choices – if the game you’re playing mandates a unit with a frontage of 40mm and a depth of 20mm, do you want to put two 28mm figures, six 15mm figures, or two dozen 6mm figures on that base? Most of the time, it’s up to the player to decide what they think looks best to really capture the scope of the conflict being represented.
Another key concern is casualty tracking. When your Space Marine or Ork succumbs to the sweet kiss of a Shuriken Catapult, casualty tracking is easy – the figure is simply removed from the table. Many historical wargames use this same model, especially when you’re talking about games played at smaller unit-scales. But for larger unit-scale games, individual casualties may not be tracked at all, or may be indicated using a marker placed next to the unit (think of casualty tracking like tracking lost wounds on big monsters). Old-school historical games with multiple figures per base often used “casualty caps,” which were little rubber hats you’d put over an individual mini’s head to indicate he was a goner.
Thus, when it comes time to order figures for your game, you need to consider what figure-scale the game is designed for and how those figures should be based for convenience and ease of play for the unit-scale the game is emulating. Some rule sets are pickier about these details than others, but don’t worry; you can often have your cake and eat it too.
Tips and tricks
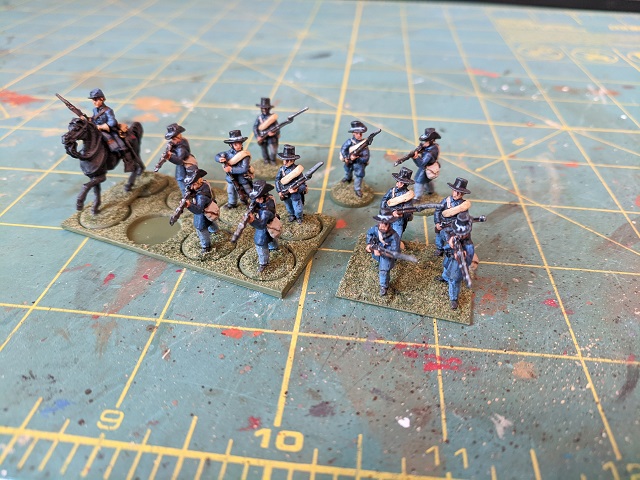
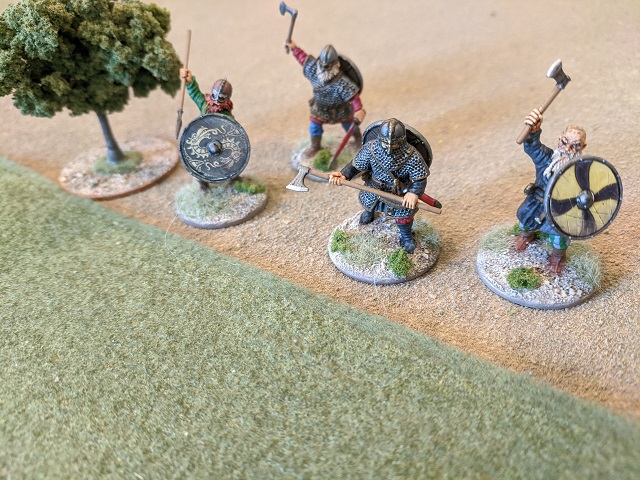
My first foray into historical wargaming was using Gettysburg Soldiers’ eponymously named American Civil War ruleset. That particular game is a 15mm regimental-scale game where each regiment is made up of 6-10 “stands,” each representing roughly 50 men. A stand was generally a 1” square base with three or four figures mounted on it. When one of your regiments took fire and sustained casualties an entire stand would be removed at once.
Years later, I was introduced to Too Fat Lardies’ black-powder era skirmish game “Sharp Practice 2,” which is designed for much smaller forces, roughly company-sized engagements. Though most people who play Sharp Practice 2 do it at 28mm (a figure-scale at which manufacturers like Perry, Victrix, and Calpe make gorgeous miniatures), the rules themselves are flexible enough to allow for a variety of different figure-scales. And since I already had a bunch of 15mm miniatures I’d painted for Gettysburg Soldiers, it seemed like an easy transition…
Except that in Sharp Practice 2, units are comprised of one or more groups of 8 figures, and casualties are tracked by removing individual figures. Now I could have simply substituted a Gettysburg Soldiers “stand” for a single figure in Sharp Practice 2 – and trust me, I was tempted as it would have looked incredible on the tabletop! – but the sheer fact of the matter was that I just didn’t have enough miniatures.
So I did the next best thing, and went with a solution that is becoming increasingly commonplace in historical wargaming…
Sabot basing
Anyone who’s an old-school Warhammer Fantasy Battles player will remember “movement trays.” In that game, figures were individually affixed to square bases and units were generally comprised of big blocks of troops that were ranked up in close files. To make the movement phase easier, players would often create a little tray that was appropriately sized such that the entire unit could be picked up and moved at once.
Sabot bases are simply a more modern interpretation of the same concept. The sabot base is just a frame that is designed to securely hold several individual bases of a particular size and shape in a particular formation. They offer the best of both worlds – you can do individual figure removal if your game calls for it, or remove the entire multi-figure sabot base itself if your rule-set requires that instead.
This allows you to do that thing that really sets historical wargames apart – use the same figures for multiple rule-sets.
With the increasing availability of affordable laser-cutting and 3D-printing, the market has exploded with possible options from which to choose when it comes to sabot bases. In particular, companies like Warbases and Supreme Littleness make fantastic sabot bases for a variety of different figure scales and rule sets. Further, manufacturers are getting really creative, offering handy options like pre-cut slots in the sabot for game markers or pre-cut holes in both the sabots and individual bases for magnets.
Materials
So you’ve looked at your rule-set in more detail and have chosen a figure-scale and basing layout. Now what? Once that breathlessly-anticipated package of figures arrives at your doorstep, where do you begin?
For the absolute lowest barrier to entry in terms of cost, posterboard can be a great solution – especially if you’re working with a game that uses square or rectangular bases. It’s cheap, easy to cut to size using tools you already have around the house, and is rigid enough to be an effective base but thin enough to not look unsightly on the tabletop. A little care must be taken when painting posterboard bases, as if they are not properly primed the water in your paint will cause the layers to warp or delaminate.
A step up from posterboard is sheet styrene. It’s lightweight and available in a variety of thicknesses to suit your tastes. It’s easy to cut and has the added advantage that you can give it a beveled edge if you so desire. It’s more expensive (a pack of four 12” x 12” sheets of 1/16” sheet styrene will generally run less than $15) and is a more specialized item that’s not often stocked at craft stores – though hobby stores or anywhere that sells model trains will typically carry it.
If you want something with even more rigidity, you can step up to 2mm or 3mm MDF. Bases in a dizzying variety of different shapes and sizes are available from different manufacturers, and this is the material of choice for most manufacturers of sabot bases. Additionally, the increasing prevalence of “maker spaces” means that with a little ingenuity and effort, you can rent some time on a laser cutter and make your own bespoke custom bases.
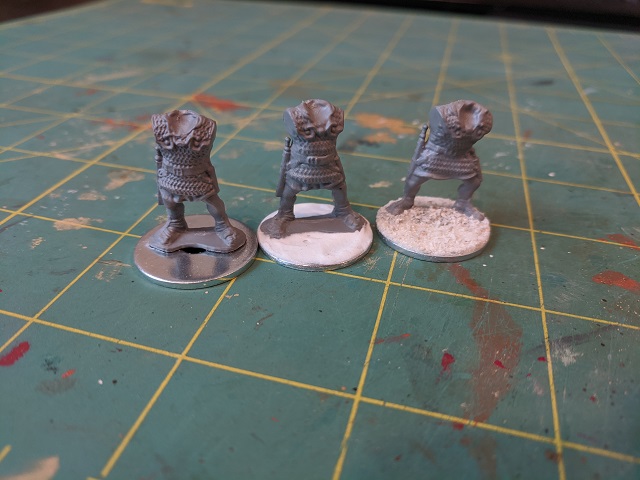
But for my money, I prefer metal bases.
Lupe: Because he is a lunatic. But more seriously, though there are advantages, remember metal bases are made of metal and will have a lot of the same issues as metal miniatures. They’re easier to scrape and damage, and can be awkward to move around.
There are three key reasons for this: first, metal bases are basically indestructible. Second, they provide a certain heft to the miniatures that gives stability on the tabletop. Especially when dealing with plastic miniatures, having a nice heavy metal base can make your models less prone to tipping over, especially on sloped or uneven terrain (which you’re very likely to see on historical game tables). And finally, mounting your figures on steel bases in particular unlocks the wide and wonderful world of magnets.
OK, I’ll just come out and cop to it; I am a compulsive magnetizer. Why decide whether to assemble my Necron flyer as a Night Scythe or a Doom Scythe when with a couple magnets I can have both? Why make the difficult choice of which of the 8 variants of Panzer III to make with my beautiful kit – and whether any of those variants will include additional armor – when I can have them all be interchangeable? This same compulsion extends to bases for me, and I typically affix all of my historical miniatures to steel bases which then stick nicely to storage trays or sabot bases made from magnetic sheet. While not as secure as stashing your entire army in a fortress of foam, for regular transport and actually playing a game using magnets is a huge time-saver, as it’s easy to see your entire force at once.
When sourcing metal bases, you have a couple of options. For square or rectangular bases, you can’t go wrong with Wargame Accessories, which makes bases in a variety of sizes from precision-cut 16-gauge sheet metal. They’re great quality and very reasonably priced.
For metal rounds, you’ve got lots of choices. If you’re lucky enough to live in the UK, your 1pp and 2pp coins actually have a high enough steel content to stick to magnets. Loads of British wargamers use pennies as bases, so much so that many makers of sabot bases size the slots in the sabot to perfectly accommodate the diameters of these coins. In the US, your best options for round steel bases are usually fender washers, available in bulk from any hardware store. They’re a little more expensive than using pennies (the 7/8” fender washers I use for the bulk of my WW2 miniatures cost around 4 cents each), but you can often get them cheaper if you buy in bulk. Take care to get fender washers rather than regular washers – they have a smaller hole which is easier to cover or fill.
Lupe: If this all sounds like hard work, you can just… buy bases. Renedra sell lots of different kinds, and you can even use GW ones for many games.
Base thickness
Another confession here, and this is purely an aesthetic thing, but I hate thick bases – especially for tiny miniatures. When you mount 6mm figures atop 3mm MDF, it looks like your troops are fighting on mobile plateaus, blech!
Lupe: You just don’t understand the grandeur of my plinthed tiny Romans.
Similarly, if you’re using sabot bases made from MDF, they’ll generally come in two layers – the solid bottom piece and the upper sabot piece with the holes cut in it. This effectively doubles your base thickness.
When considering what materials to use for your bases, give some thought to the thickness of the base relative to the size of your miniatures. For example, the sabot bases I’ve made for my 15mm American Civil War figures are made from a bottom layer of magnetic sheet (think refrigerator magnets) and a top layer of heavy-duty card stock. The whole thing is about 1.5mm thick, which does exactly what I need and is unobtrusive on the table top.
Blending your bases
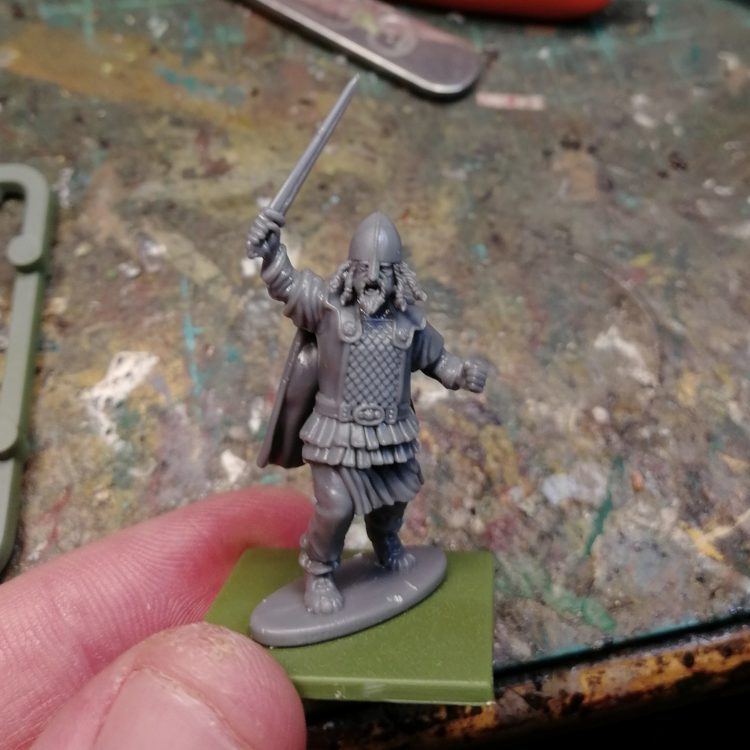
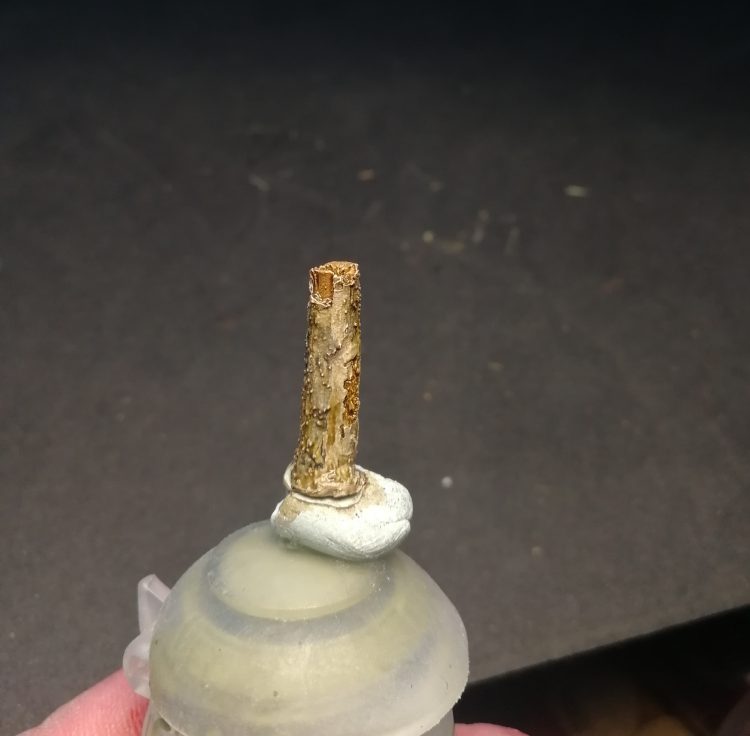
Remember the ubiquitous, green, soft-plastic army men you had as a kid? Remember the plastic tab that connected their feet together and provided a (woefully inadequate) base to keep them upright? Well most historical miniatures have something similar.
Lupe: They’re called integrated or integral bases.
Lupe is hip-deep in the industry and also British so we’ll have to forgive him – I’ve always heard these referred to as “pedestals,” but either way I think you can picture what I’m talking about. It’s actually good that the miniatures have these, because a) it generally gives you plenty of surface area for affixing your figures to whatever base you’ve chosen, and b) if you’re using something like a fender washer it usually covers the hole.
Which reminds me – let’s take a moment to talk about glue. If you’re coming from a game that uses plastic models on plastic bases, you may only have plastic cement. While plastic cement is fantastic for creating a bond between the various pieces of a plastic miniature, it is completely useless for affixing that figure to a non-plastic base. At this point, you’re in the realm of cyanoacrylate glue, often referred to generically as “CA” glue or by one of its older brand names like “Super Glue” or “Loc-Tite.”
Lupe: In the UK everyone calls it Super Glue and trying to ask for CA in a shop will get confused looks.
The sheer profusion of different makers and attributes of cyanoacrylate glue is beyond the scope of this article, but just know that pretty much any brand or thickness will work for attaching figures to bases. Certain ruffians and cretins also swear by hot-glue, claiming it to be more durable over the long haul. I’m not sure it matters much, and so long as your figures are stuck to your bases to your satisfaction you’re in business.
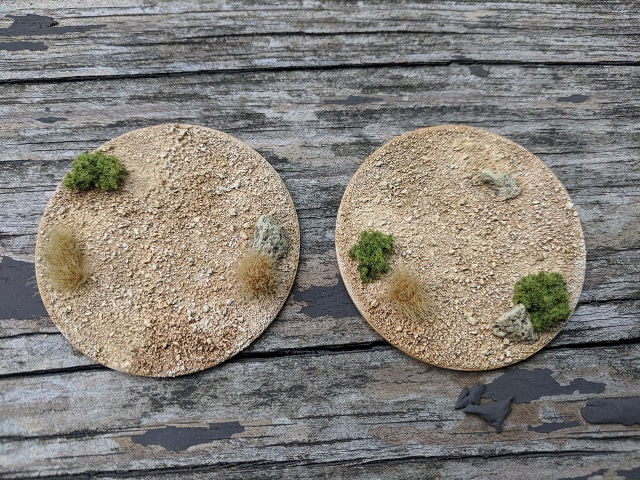
So at this point you’ve glued one or more miniatures to a base of your choosing, and now you’re faced with another choice: do you want to texture your bases to make the pedestals less obvious? Depending on the size and thickness of the pedestal – and on your own personal tastes – you may not need to. But I’m a crazy man who hates having obvious steps on his bases, so I typically take a few extra minutes and apply a little bit of Liquitex Acrylic Texture Paste to blend the pedestal into the top of the base before I apply any grit or sand. Any kind of sculpting putty will do, Polyfilla, ModPodge, etc. I like the acrylic stuff because it’s easy to work with and easy to clean up. It also sands nicely and dries without cracking, which is great.
Distinguished bases
A gameplay element that is very common in historical wargames is having leaders be easily distinguishable on the tabletop. If you’re coming from a game like Warhammer 40K where your warlord is a towering demon-lord with massive wings and a flaming whip, the idea that the only thing that might distinguish an important leader from a basic trooper is the fact that he’s carrying an SMG instead of a rifle might be a bit jarring. And sometimes, it’s not even as obvious as having a different weapon! Especially at smaller figure scales (say 6mm to 15mm) distinguishing these differences from tabletop height can be difficult. If the rules-set you’ve chosen to play takes special note of leaders (and many do), you’ll want some good way to distinguish which models are leaders and which are rank-and-file troops – and a great way to do that is by their basing. For example, for WW2 miniatures I put basic troopers on 7/8” fender washers and NCOs and officers on larger 1” fender washers.
Other folks go the extra mile and use different shaped bases (rounds, ovals, squares, hexagons) to denote various important figure types. Many historical rule-sets – especially for smaller unit scales and later conflicts – don’t mandate a particular base size or shape, so you’re free to choose whatever scheme you’ll find easiest to remember.
You can also use specific scenery elements to help identify important figures, e.g. bushes of a particular color, flowers, or eye catching rocks. Placing these elements such that they’re clearly visible on the back side of the base (i.e. “behind” the mini) will make it easier for you to see what’s what, as unless things are going terribly wrong you’ll most often be looking at your troops from behind as they advance towards the enemy. But it’s sportsmanlike to make these sorts of things fairly obvious from the front too such that you enemy knows immediately when your platoon sergeant is all by himself in the open.

Basing vehicles
The quickest way to start a slap-fight between any two historical wargamers is to bring up the idea of basing vehicles. Some people are all for it. Those people are cretins.
Lupe: I will fight you.
In all seriousness, whether or not you put your vehicles on bases will largely depend on the scales (both figure and unit) at which you’re playing. For small stuff like 6mm “micro-armor,” putting your adorably tiny tanks on bases can make them easier to handle, store, and keep track of.
Lupe: Try not basing pico-armour (3mm scale) tanks. I dare you.
Similarly, if your single miniature tank is actually meant to represent a platoon of several tanks, the size of the base may be important to describe the “footprint” of that unit on the battlefield, and this will largely depend on which ruleset you’re using. Fundamentally, the approach to basing vehicles is exactly the same as basing figures, and everything described herein applies.
But it’s still a crime against humanity.
Lupe: You’re a crime against humanity.
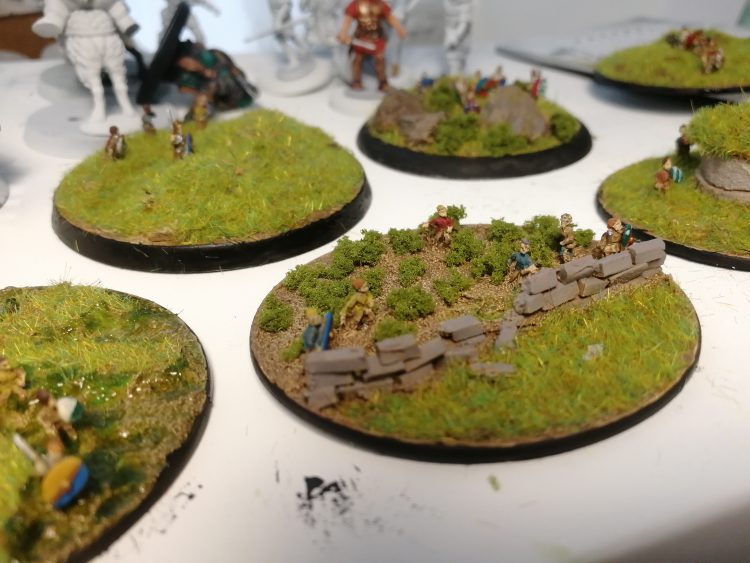
Theme
Just as in sci-fi or fantasy games, bases are a great way to set a theme for your force. Both Astra Militarum troopers of the Valhallan regiments and winter Soviets defending Stalingrad will benefit from bases textured and painted to look like snow and mud. Catachans and WW2 Japanese infantry are both made better with jungle-themed bases. There are tons of tutorial articles and videos out there for how to make great bases, and a little bit of extra effort can really tie your force’s theme together and make your army look stunning on the table. Take a few moments to think about the time and place you’re looking to evoke with your force.
So let’s discuss a few of the more common basing materials and techniques. If you’re an old pro at tabletop wargames, most of this will be stuff you already know. But if you’re new to the scene, hopefully this can get you started.
Texture
The most important thing to keep in mind when choosing basing materials for your historical miniatures is the figure-scale. Rocks that look great as broken rubble for a 28mm WW2 infantryman are going to look like huge boulders to your 6mm Carthaginians. While the first step of most basing schemes involves gluing sand to the top of your base with watered-down white PVA glue (e.g. “Elmer’s” glue), you’ll want to consider varying the kind of sand you use. Fine, powdery “playground sand” is better for smaller figure-scales, and even then I often end up filtering it through a mesh strainer to make it even finer. For coarser stuff with more variability (which folks in the UK often call “sharp sand”), I find that construction sites are the best source. I’m not going to actively encourage you to engage in petty larceny, I’m just going to say that any place where someone is mixing cement might be germane to your interests. Fortunately, even a single hastily-acquired-in-the-dead-of-night quart-sized Ziploc bag full of sand is probably going to last you for years.
Lupe: I can recommend you get sand that has been cleaned and is sterile. For real. I’ve seen people accidentally grow things on their bases.
But for the smaller miniatures, say 10mm scale or less, I find that even fine sand doesn’t look right on the bases when painted. In that case, I’m more likely to simply go straight to finely ground foam flock, available from manufacturers like Woodland Scenics.
Lupe: Whereas I turn to something like Vallejo Texture materials, which can be had in extremely fine grain varieties.
Painting
At some point your basing scheme is almost certain to involve some kind of paint. I cannot stress this enough – do not use high-quality miniatures paint and good brushes when painting bases. Unless you’re going for a really elaborate basing scheme, you’re not looking for subtle blends. You’re looking for coverage, which cheap craft paints will achieve at a fraction of the cost of Citadel or Vallejo paints.
Similarly, sand makes a great starting point because it gives a nice texture at scale and is easy to drybrush when highlighting. But on a microscopic level, sand is incredibly sharp, and it will destroy your brushes in short order. When painting your bases, use cheap or old brushes to which you’re not overly attached.
Lupe: Again this is why I like the Vallejo stuff – it’s resin set, so nice and rubbery and smooth. The other reason you might use proper paints is if your base has more on it than just flattish terrain – I made up little ambush markers for my 6mm Infamy Infamy project, and it meant giving them a little more attention than normal.
Extra effects
My admonition about using cheap materials for basing ends once the basic color and highlight is in place. If you want to go the extra mile, the money you save on paints for your bases can be better spent on “special effects.”
For example, wet, sticky mud is shockingly easy to achieve using something like GW’s Stirland Mud or Stirland Battlemire technical paints. If you’re strapped for cash and feeling adventurous, you can achieve the same effect by mixing dark brown dry pigments with gloss gel acrylic texture paste – likely the same stuff you used to blend your figure’s pedestal into its base. Both of these materials are available in bulk at your local craft store.
Grass effects are very simple using just basic flock, but you might also consider using any of a variety of static grasses available from manufacturers like Woodland Scenics. One tip when using static grass: spray your mini with your final coat of sealer before you apply your static grass, as otherwise the spray can cause the grass to clump together and ruin the effect. Though static grass is designed to be used with an electrostatic applicator (hence the “static” in “static grass”), for bases this isn’t really necessary. A little thinned PVA glue, a quick dunk in a dish of the grass, turning the mini upside down, and giving it a couple of taps is usually sufficient to produce a nice effect. PVA glue dries clear, so unless you get very heavy-handed in your application of static grass the underlying base color can show through. I find that adding a little bit of paint to the PVA glue can darken its color a bit, which gives a nice shading effect to the patch of grass.
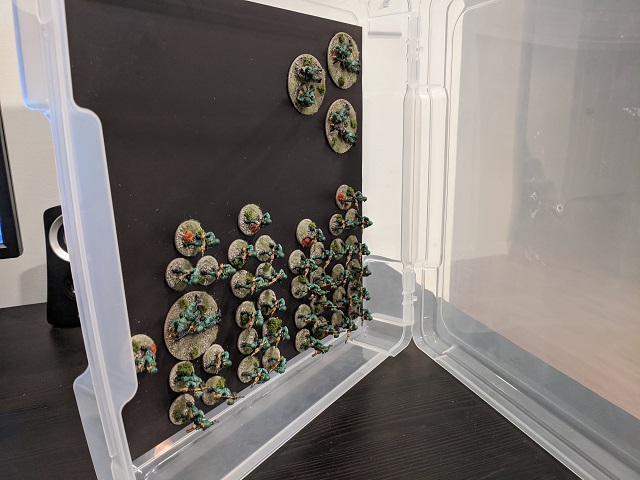
Depending on your desired terrain type, you may also want to check out adhesive-backed grass tufts. These come in a variety of different colors and sizes to accommodate a broad range of figure-scales and terrain types. There are a bunch of different manufacturers, so finding one with good products and reasonable shipping should be relatively easy.
Lupe: If you do have a static grass applicator you can make your own tufts with some waxed paper and PVA blobs. It’s a great way of making lots at a time that are exactly what you want.
Clump foliage, also available from Woodland Scenics is also great for bushes and low-lying scrub. It too comes in a variety of different colors, and since it’s just foam you can cut or tear it to size to fit virtually any figure-scale you like.
For jungle terrain, my go-to source is the pet store; aquarium plants make for fantastic raw materials for jungle bases. A quick coat of paint and a little highlighting can turn cheap plastic plants into perfect foliage. For leaf litter, a 50/50 mixture of loose-leaf green and rooibas teas – available in large quantities at pretty much any grocery store – gives a fantastic effect for very little effort or cost. Be warned, though – these materials work better at larger figure-scales, say 20mm and up.
Lupe: If you’re feeling super fancy, there are resin basing pieces you can buy too. I have a small number but they really do look great.
Snow is much harder, and there are a variety of different ways to approach it. Some people swear by baking powder, other people say it yellows over time. Others swear by “snow flock,” and the hardcore folks out there advocate using crushed glass. Full disclosure, I’ve never done snow bases, so I don’t have any strong opinions on this. I do know that terrain guru Pat Smith’s fantastic “Setting the Scene: Winter Wargaming” book (which I highly recommend picking up if you can find a copy) describes making “snow paste” that is 4 parts Woodland Scenics Soft Flake Snow, 2 parts PVA glue, and 1 part water. His terrain always looks fantastic, so I’ll take his word for it.
Lupe: Snow bases are the devil. I hate them. I recommend asking anyone except me.
And finally, for desert bases I have had good luck using irregular washes (trusty Agrax Earthshade splashed on in a chaotic fashion) and giving a quick, irregular dusting of dry pigments gives a really natural-looking variability to the base. I like MIG and Secret Weapon, but you can buy pigments in bulk from any craft or art supply store. And in a pinch you can create your own by shaving art pastels with coarse-grit sandpaper. If you want your 15mm Arapahoe cavalry to have orange and pink sand reminiscent of the Painted Desert, this is likely your best bet. Also, consider sticking a few larger rocks on there – most desert terrain is actually more rocky than sandy.
I think we’ve covered all our bases
Newcomers to historical wargames are often taken aback by the lack of “standard” basing provided with the models, but you should look upon it not as a limitation and instead as a way to customize your force and tailor it to the kind of games you want to play.
Lupe: One thing that can be overwhelming is when a ruleset says “you choose!” Which isn’t necessarily helpful if you’re new to the game. I’d always recommend searching online and seeing what other folks use, as a place to start. If you’re really stuck, you can always email us!
