Welcome back, Mali-folks! It turns out I did not instantly die upon completing the Faction Focus series, and since I’m still here, I figured I might as well provide you with some more Mal-content. So today we’re going to learn about Gaining Grounds!
This article includes a paid promotion from Wyrd Games.
What the Heck Is Gaining Grounds?
I’m about to tell you, shut up. Don’t interrupt me.
One of Malifaux’s many virtues – one I’ve touched on before – is how balanced the system is. There are a few keywords that are a bit too weak and a couple that are a bit too strong (although the latter tend to be fixed with errata), but for the most part all 54 Masters are competitively viable. As you might imagine, that makes the game eminently suitable for competitive play, and that’s where Gaining Grounds comes in.
GG (as it will be referred to henceforth) is the Malifaux equivalent to 40k’s War Zones or Warmahordes’s Steamroller. Basically, it’s the matched play rules. Updated once a year, usually in springtime, GG contains Strategies and Schemes for tournament organizers to use. It also contains little updates and cleanups to the main rules, tournament formats and guidance, and even things like conversion policy, etiquette, guidelines for scoring painting – everything you need to run a tournament!
We’re currently near the end of GG2, and while it’s still a robust system, a lot of players are looking forward to GG3, if only to inject some novelty into tournaments. Today I’m going to run down the contents of the GG2 packet (available here) and then talk a bit about tournament play.
Strategies and Schemes
I’ve alluded to these before, but I think it’s time to go into a bit more detail. Strategies and Schemes are how you win the game. At the start of the game, you determine one Strategy and a “pool” of five Schemes. Each player then secretly selects two Schemes. Over the course of the game, you can score a total of eight points – four from the Strategy and four from your Schemes. Because of the rigid scoring and fixed game length, Malifaux games result in ties more often than those of other systems. Which is fine. The system is built to handle it.
Strategies
Each game has a Strategy. There’s only one, shared by both players. 40k players, think of the primary objective. There are four Strategies, one associated with each suit. They have a few things in common:
- All Strategies use Strategy Markers. These are 30mm markers that are set up at the start of the game. They have defined traits based on the strategy being used (basically, they’re all impassable, and either Blocking or Concealing depending on the strategy) and cannot be interacted with or removed except under very specific, delineated circumstances.
- No Strategy can be scored on the first turn of the game.
- No Strategy can be scored more than once per turn.
- Players with elementary math skills will realize that means that each Strategy caps at…
- …
- …
- 4 points scored.
As a reminder- the Interact action can be taken by any model that does not have the Insignificant rule, but it cannot be taken if you are engaged or if you have taken the Disengage action this turn… unless you have a rule that says otherwise. The Insignificant rule also entirely prevents a model from being counted at all for Strategies and Schemes, so be aware of that.
Corrupted Ley Lines
This Strategy requires the players to place five markers, one at the center of each table quarter and one in the center of the table. These markers are Blocking and Impassable, and can never be removed, interacted with or in any way altered. (As a side note, if terrain makes it impossible to place a Strategy marker where it should be, move the terrain slightly. You messed up.)
At the start of the game, each player designates one model to carry their lodestone, or as most players call it, the football. The football is intangible; it can’t be stolen or destroyed. Any model within 1″ of a friendly model carrying the football, including the carrier itself, can take the Interact action to pass the football to another model within 6″ of the thrower. While you have the football, you cannot be Placed by friendly or enemy effects. If you die, or are buried, the football automatically passes to the nearest friendly model.
At the end of your turn, if the model carrying the football is in base contact with a strategy marker, that marker is “claimed” for your side. Once claimed, markers can never be unclaimed, and both sides can simultaneously claim a marker. At the end of your turn, you score a point if you have more claimed markers than points you’ve scored. This sounds more complicated than it is: basically, you can only score off each marker once.
This Strategy requires you to carry the football around the table between the five markers. You don’t have to hit all five, because Strategy points cap at 4, but you will necessarily have to go into your opponent’s territory to max out.
Turf War
Again, the same setup: five markers, one in the center of each quarter, one in the middle. This time, there’s no football; instead, we’re playing for keeps. Markers are like stoplights: they can belong to one crew, the other, or be neutral. Red, green, yellow. A model in base contact with a marker can Interact to flip it from red to yellow, or from yellow to green – enemy to neutral, or neutral to friendly. Unlike in Ley Lines, a marker can’t be green to both sides. One team claiming it necessarily means the other loses it.
At the end of your turn, you score- at first, you only need one friendly marker, but once you’ve scored one you need to control two to score your second point, then three to score your third and so on. One wrinkle: when you kill an enemy model (and it has to be you killing it, not hazardous terrain or conditions or anything else), you get to pick either the marker of the table quarter that model was in or the center marker (models in more than one quarter count as being in both) and flip it from enemy to neutral. In other words, from red to yellow. You can’t flip markers from yellow to green by killing – you still have to interact. You can take them away from the enemy this way, but you can’t claim them yourself.
This Strategy, as you might imagine, leads to bloody games. Because both players can’t possibly score 3 points at once (there are only 5 markers), it also tends to produce more decisive games– unlike Ley Lines, where both players could conceivably ignore each other and score a full four points on the Strategy, Turf War is zero-sum.
Break the Line
This time, there are only four Strategy markers. Starting with the Defender, both players alternate placing one on the centerline, at least 6″ from another marker. This time, the markers are impassable but Concealing instead of Blocking– they don’t block line of sight. Any model in base contact with a marker can Interact to place it within 2″ of its prior position (and that’s within, not entirely within, so it’s a bit more than 3″ of displacement).
At the end of each turn, you score one point if you’ve kicked more cans into the enemy’s table half than points you have. Again- you get one point for the first one, but the second point requires two cans, and so on. Like Turf War, this Strategy is also zero sum; kicking a can both takes it away from the enemy and puts it in scoring position for you. However, if you manage to kick a can so far that it’s more than 8″ from the centerline, it’s worth two cans, which means that theoretically both sides could cap at 4 points with two markers each, but in practice 8″ is a long way to go and it’s easier to just kill your opponent and take their cans BY FORCE.
Symbols of Authority
Like Break the Line, but this time each player places FOUR Concealing, Impassable markers. They can be anywhere on your side of the table, outside of your deployment zone and outside of 8″ from another marker. Any model in base contact with an enemy marker can take an Interact action to remove it. At the end of your turn, you score a point if you removed any Strategy markers that turn… so there’s no benefit to removing more than one per turn, and there’s actually a downside since it caps your score at 3.
The simplest Strategy to explain is the hardest to score. Depending on the deployment, markers will be way back in enemy territory, and starting with turn 2, every turn you don’t remove one costs you. This Strategy is very polarizing, with some crews (Zipp, Marcus) being able to score it trivially while others (Ophelia, Lord Cooper) struggle to score it reliably without dipping out of keyword.
Schemes
Along with the Strategy, you will have two Schemes, chosen from a pool of five. Each Scheme starts the game hidden. Starting on turn 2, if you fulfill certain conditions, you can reveal your Scheme and score a point. At the end of the game, if you have fulfilled other conditions, you will also score a point.
You don’t have to reveal the Scheme first to score the endgame condition, but you can’t score two points from a Scheme on the same turn, so if you reveal it on turn 5 that caps your points from that Scheme to 1. Some Schemes require you to secretly pick one or more models at the start of the game– make sure to write them down!
There are 13 schemes, of which five are available in any given game. Remember, any model can Interact at any time to drop a Scheme marker in base contact with itself, or to remove all Scheme markers in base contact with itself. You can do this even if you don’t have a Scheme that requires markers.
Breakthrough
Reveal Condition: At end of turn, if you have a Scheme marker in the enemy’s Deployment Zone along with a friendly model, reveal this and remove the marker. There can be no enemy models within 4″ and line of sight of your model.
Endgame Condition: Have three Scheme markers in the enemy deployment zone.
A Scheme that rewards rapid movement, and forces your opponent to pull back to deny you (either by removing your markers or staying within 4″ of your schemer)
Detonate Charges
Reveal Condition: At end of turn, if you have two Scheme markers within 2″ of a single enemy model, reveal this and remove the markers.
Endgame Condition: Have two Scheme markers within 2″ of a single enemy model.
Pretty simple– you just have to do it twice. However, when you Interact to drop a Scheme Marker, you cannot drop it within 4″ of another Scheme Marker; you can still score this by Interacting twice (due to base width) but it’s easier if you have non-Interact ways to drop a Scheme Marker (of which there are plenty).
Vendetta
At the start of the game, secretly pick a friendly non-Totem model and an enemy non-Leader model with an equal or higher cost.
Reveal Condition: At the end of the turn, if the enemy model is alive and at or below half of its maximum health (you always round up in Malifaux), and the friendly model damaged the enemy model at all this turn (even just for one point), reveal this.
Endgame Condition: The enemy model is dead at the end of the game and the friendly model is alive and has not been Replaced (which happens sometimes, models transforming into other models).
A nice, simple, violent scheme with no mucking around with Markers. It does create list building considerations; if your opponent’s key beater is 9 stones, and nothing in your list costs more than 8, they might not be able to score it.
Assassinate
Reveal Condition: At the end of the turn, if the enemy Master is at half health or less, but alive, reveal this.
Endgame Condition: The enemy Master is dead.
Probably the easiest Scheme in the world to describe! It’s actually got a surprising amount of complexity– first of all, Masters tend to be very hard to remove, and since they don’t get weaker as you hit them and you don’t win the game for killing them, it’s often not worth it to try. Just having this in the pool changes the way you can play.
Claim Jump
At the start of the game, secretly choose a friendly non-Leader model.
Reveal Condition: At the end of the turn, if the chosen model is within 2″ of the center of the board and no enemy model is within 3″ and line of sight of the chosen model, reveal this.
Endgame Condition: If the chosen model has half or more of its maximum life and is within 2″ of the center of the board.
Another positional scheme, this one encourages you to either 1) dominate the center so hard that your opponent can’t afford to throw anything in there, 2) use so much movement control that your opponent can’t put a model near the center, or 3) fake your opponent out hard so they don’t try to contest the center, then suddenly zip in at the end of the turn to score. All three approaches are viable, and all of them require different crews, which makes this a great scheme that produces really complex gameplay.
Hidden Martyrs
At the start of the game, secretly pick two friendly non-Leader models with a combined cost of 13 or less.
Reveal Condition: At the end of the turn, if exactly one of those models is dead, reveal this.
Endgame Condition: One of those is alive, has more than half of its maximum health remaining and is engaged by an enemy model of higher cost.
This scheme produces amazing mindgames. If it’s in the pool, you have to consider what models your opponent is playing recklessly with, and which combinations of those models add up to 13 stones or less.
Death Beds
At the start of the game secretly choose a type of marker other than “Scheme” or “Strategy.” This can be Corpse, Scrap, Pyre, Pit Trap, Ice Pillar, Web, etc.
Reveal Condition: When you kill an enemy model that is within 2″ of a friendly Scheme marker and within 2″ of a marker of the chosen type, reveal this.
Endgame Condition: You have two Scheme markers on the enemy table half, each within 2″ of a different marker of the chosen type.
This one blends killing and scheming, with the caveat that you want a crew who can reliably generate markers of the chosen type. Zipp, Kaeris, Rasputina, and Titania all excel at this Scheme.
Catch and Release
At the start of the game secretly choose a friendly Minion.
Reveal Condition: At the end of the turn, if the chosen model is within 1″ and line of sight of an enemy Master or Henchman and is not engaged by any other enemy models, reveal this.
Endgame Condition: The chosen model is alive, unengaged and on the enemy table half.
Let Them Bleed
Reveal Condition: At the end of the turn, if the two most expensive non-leader enemy models are at half health or less, reveal this. In the case of ties, any applicable model works (so if they have a 9 and two 8s, you score as long as the 9 and either of the 8s is at or below half).
Endgame Condition: The enemy crew has no more than 1 model alive at full health.
Another killy Scheme, complicated by the fact that it punishes you for finishing models off too early (since then they’re not the highest anymore).
Outflank
Reveal Condition: At the end of the turn, if you have two models at the two ends of the centerline (that is, where the centerline meets the board edges) and each model is within 3″ of both the spot where the line meets the edge and a friendly Scheme marker, reveal this.
Endgame Condition: You have two models at the two ends of the centerline and each model is within 3″ of both the spot where the line meets the edge and a friendly Scheme marker.
This one is also quite simple, but deceptively difficult– especially on Corner deployment, those board edges are a long way away, and the fact that you have to commit two models to being this far out of the action and they also have to drop Scheme markers makes this a difficult one to pull off.
Research Mission
Reveal Condition: At the end of the turn, if you have one model within 4″ and line of sight of three different types of marker on the enemy table half, reveal this. The markers have to be on the enemy table half, not necessarily your model (and they don’t have to be wholly on the table half).
Endgame Condition: You have three different friendly models, each within 2″ and line of sight of a different type of marker on the enemy table half.
This one seems very difficult until you realize that Strategy and Scheme markers both count, so as long as you’re not playing Symbols it’s quite easy to score if you can drop a single type of special marker: pianos, underbrush, pyres, and in a pinch, corpses or scrap.
Spread Them Out
Reveal Condition: At the end of the turn, if you have three or more scheme markers on the enemy table half, each more than 10″ away from the other two, reveal this.
Endgame Condition: You have three or more scheme markers on the enemy table half, each more than 10″ away from the other two.
Reminiscent of Outflank, this scheme rewards mobility and the ability to drop markers on command. Unlike Outflank, though, you can actually score this while you’re doing other things– you don’t have to fully commit your models to scheming.
Bait and Switch
At the start of the game, secretly choose an enemy non-leader model.
Reveal Condition: At the end of the turn, if the chosen model is on your half of the table, at least 4″ from the centerline and within 4″ of a friendly Scheme marker, reveal this and remove the marker.
Endgame Condition: No more than 7 Soulstones worth of enemy models are in your deployment zone.
This is a bit of an odd one. The reveal condition is surprisingly hard to score outside of Symbols, since it’s rare that enemy models need to come that far onto your table half. It has one of the easiest endgame conditions there is, though– if your opponent doesn’t know about it you can score it passively without doing anything!
Overall, while there are some clear winners and losers (Outflank is notoriously hard to score, while Research Mission is, depending on the Master, trivially easy), the pool system means both players will almost always have access to two Schemes they can score.
Summon Changes
In order to balance the power of Summoning, GG also applied several changes to summoners and the models they create. Summoned models cannot Interact and are ignore for friendly (but not enemy) Schemes on the turn they arrive.
Summoned models can never Interact with a Strategy marker. If Summoned models turn into other models via the Replace rules, they “remember” that they were Summoned.
Certain Schemes, such as Bait and Switch and Let Them Bleed, ignore enemy Summoned models entirely.
How to Set Up a Game
So now you’re eager to play, right? You’ve got your big list of strategies and schemes, you’ve got an opponent, and you’re ready to flip some cards. How do you actually, you know, get a game started?
The Easy Way
Use the app. Seriously, just use the app. The Malifaux Crew Builder is available for mobile devices and online, and it makes games for you. Check this out:
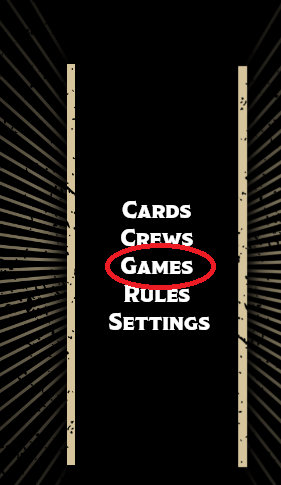
From the main App screen, select Games.
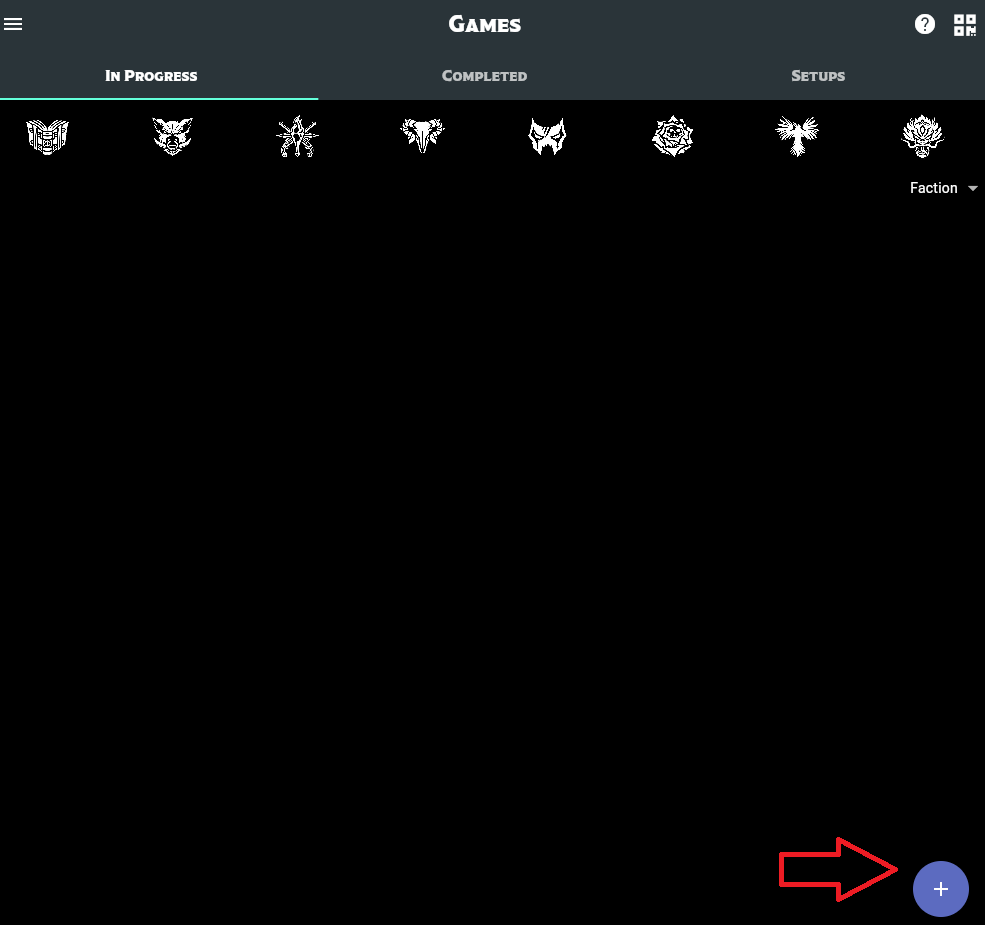
Any active games you have will show on this screen. Since we don’t have any, I’m going to press the plus sign button to create a game. It’ll ask “Network” or “Local;” press “Network.”
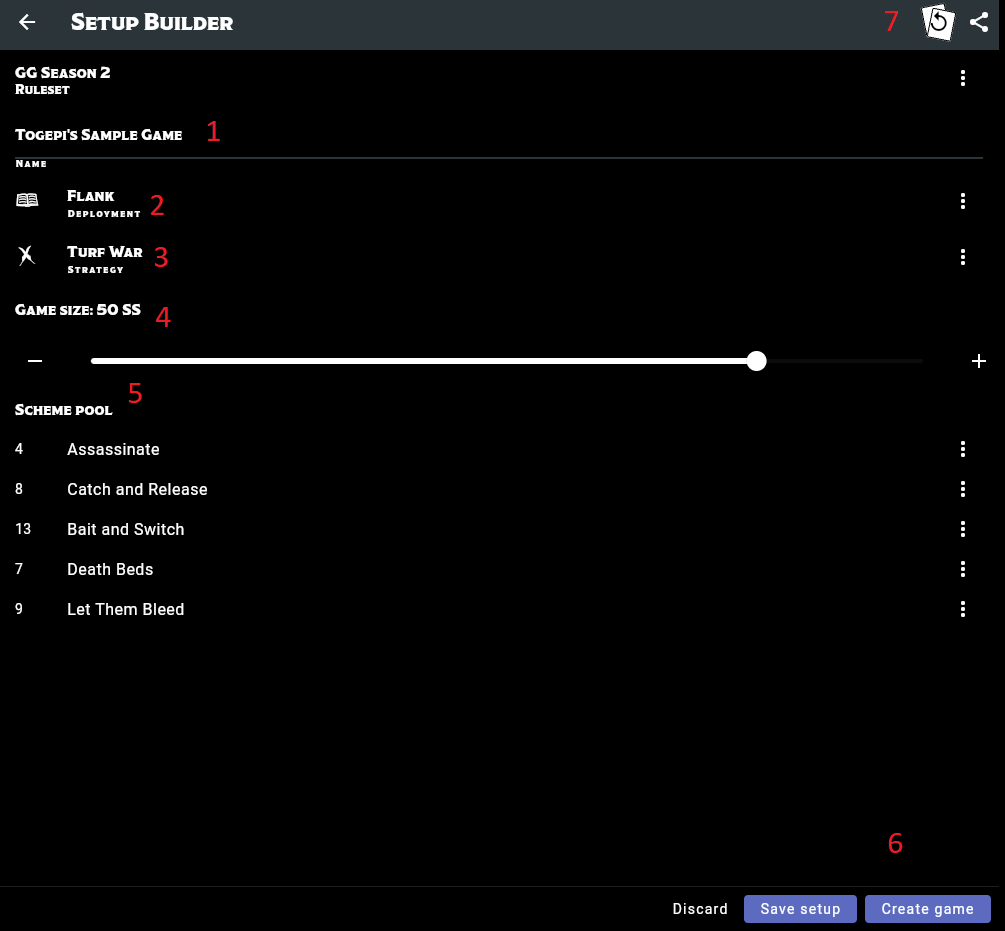
This screen shows the game parameters. By default, when you arrive at this screen all values randomize. You are, of course, free to change any of the parameters for custom ones, but you really don’t have to.
Box 1 is the name of the game. Call it something cool.
Box 2 shows the deployment type. This game has Flank deployment.
Box 3 shows the Strategy. This one is Turf War. Note that deployment type and Strategy both have suits next to them; you can ignore those.
The slider marked 4 lets you adjust game size. It defaults to 50ss, which is the game size for 95% of Malifaux games (and 4.9% of the remaining 5% are Henchman Hardcore games, which are 30ss). But if for some reason you’re playing a different size, you can adjust it here.
The area marked 5 is the scheme pool. Note the 5 schemes already picked. (You can ignore the numbers next to them for now).
When you’re happy with the game, you can hit Save Setup in the region marked 6 to save it for later, or Create Game to create it. There’s no timer on a game once created, so you might as well.
Finally, if you want to totally randomize all the parameters again, hit the little card icon with the circular arrow in area 7. There’s also a button to copy the game setup to the clipboard for export.
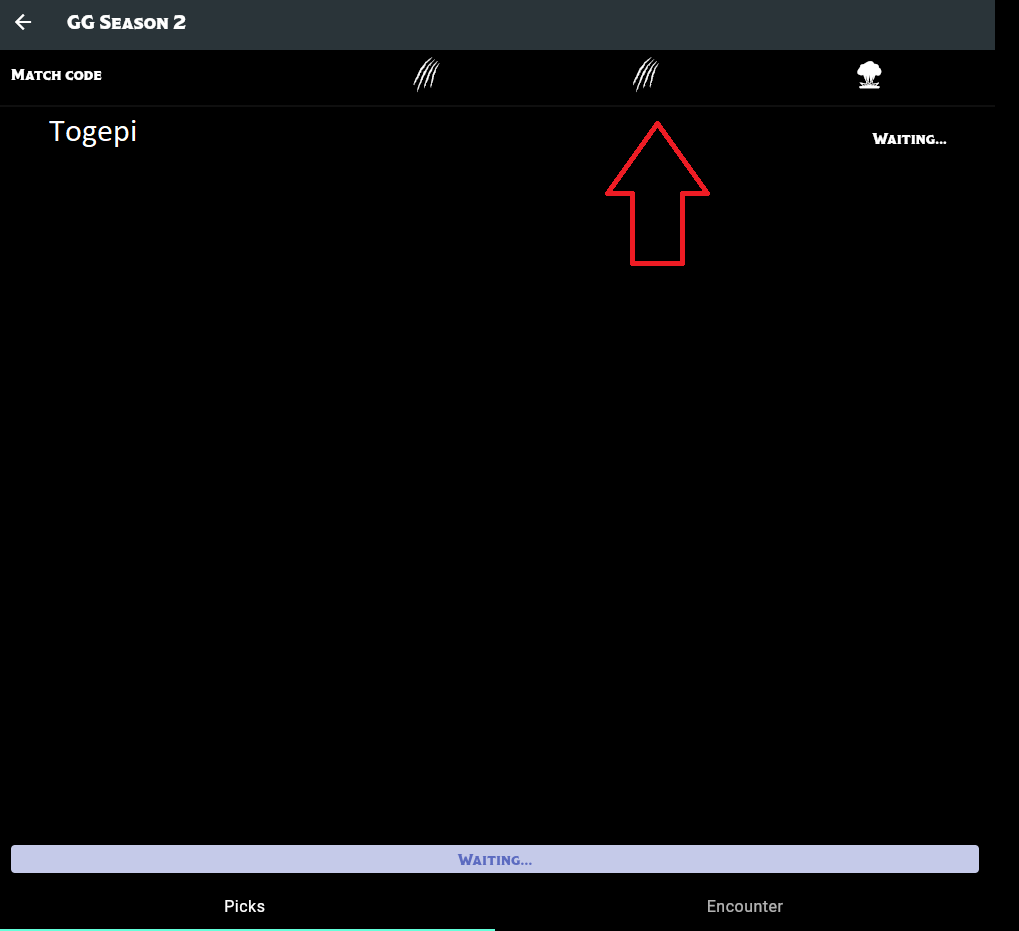 Once the game is created, you can press one more button to generate a code. This is a 3- or 4-symbol code using Malifaux symbols: melee, projectile, blast, shockwave, pulse, the four suits, etc. This game’s code is Melee, Melee, Blast. Anyone else on the app can use the code to join the game, which synchronizes you across devices. And you’re done!
The Hard Way
If you hate the app for some reason, you can do things manually. It’s not that hard, it just takes a little longer.
- First, you determine encounter size and place and define terrain. Get the board set up first! If you know the strategy first, you might tailor your terrain to it. You do want to follow a few general rules of thumb: make sure that the centerpoints of each table quarter and the centerpoint of the table are all reasonable accessible, since you are 50% likely to have to place markers there. Also, don’t screw up any of the potential deployment zones.
- Now both players shuffle their decks and flip their top card (reflipping Jokers). Whoever flips higher is the Attacker. Whoever flips lower is the Defender.
- The Attacker’s suit determines the Strategy: Rams for Corrupted Ley Lines, Tomes for Symbols of Authority, Crows for Turf War and Masks for Break the Line.
- The Defender’s suit determines deployment type.
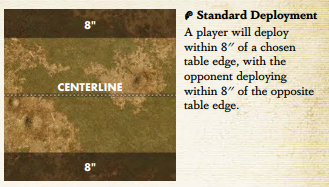
- Rams are Standard deployment, 8″ out from your board edge.

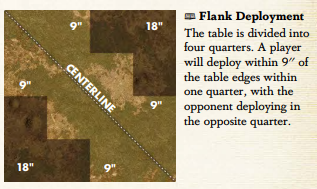
- Tomes are Flank Deployment– L-shaped deployment zones in the corners, each leg running 9″ out from the board edge and 18″ long (so they go to the midpoint of each table half.

- Crows are Corner deployment, an arc 12″ from the table corner.


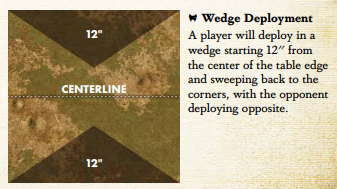
- Masks are Wedge deployment, a triangular deployment zone that comes to a point 12″ from the table edge in the center and slopes away to the back corners of the table.

- Notice that two of the deployment zones create a horizontal centerline (and division of table halves) and the other two create a diagonal one. Deployment zones radically alter how the Strategies and Schemes play!
- Now you reshuffle your decks and the Attacker flips five cards, reflipping Jokers and duplicate numbers. Once you have five different numbers, that’s your Scheme pool. Each Scheme has a number, 1-13; you can see them in the app or the GG document.
And now you’ve generated a game! But honestly, the app is easier.
Pregame Steps
Once a game is generated, you always take certain steps in a certain order. Unlike some other games, crew build is an integral part of a game of Malifaux, and you don’t play the same list in every round of a tournament. This is where owning several Masters comes into play; you can adapt on the fly to the deployment, map, Strategy, Schemes and opponent’s declared faction.
First, you both declare your faction (simultaneously, although it’s better to write it down than count to three and shout it out).
Next, you declare your Leaders, again simultaneously. This can be a Master or a Henchman.
Now, if your crew is led by a Master, you can choose to declare a second Master. You have to pay full freight for them (+1 stone for the Out of Keyword penalty) and you can’t have more than one extra.
Once you know what your opponent’s Master is, you then build a Crew. At this point, you will decide whether you’re using the regular or Title version of any Master you’ve taken. There’s some fun head games and fakeouts available here!
Finally, once you’ve both revealed your crews, you secretly pick two Schemes. Note that you do this after you’ve seen everything your opponent is bringing – so you will know if certain Schemes are doable.
If you’re playing on the app, you can do all of these steps asynchronously; once both players have locked in a faction, the app reveals their selections and lets them lock in a Master, and so on.
Once schemes are picked, the Attacker chooses a deployment zone and divides their crew into two groups (they can be any size). The Defender picks one, and the Attacker deploys everything in that group. Then the Defender deploys their whole crew in the other deployment zone, and finally the Attack deploys their second group. You shuffle up, draw hands, flip for initiative, and you’re off to the races!
Have fun playing!
Tournament Play
Tournament setup is very similar to the setup for an ordinary game, with a few exceptions. First, all of the terrain is set up for you (obviously), and also each round’s Deployment, Strategies and Schemes are set in advance by the TO. Most TOs make a habit of publishing the “pools” (that is, the Schemes, Strategy and Deployment) for every round a week or two in advance so everyone can look at them and plan their attack.
Second, you declare your Faction at the start of the tournament and don’t change it throughout. That step is off the table!
Finally, Wyrd has put forth a variety of game variants for use in tournaments. These range from Bans (after announcing leaders, pick a Keyword from your opponent’s declared faction; they cannot hire any models from that Keyword unless they also share a Keyword with their declared Leader) to Fixed Leaders (declare your Leader at the start of the day and never change it) to Fixed Pool (pick a number of Soulstones; at the start of the event, everyone provides a pool of models whose total cost adds up to that number or less, and aside from Leaders and Totems, can only hire from that pool all day long).
There’s even a team format where all four players play on a single board, which seems crazy to me, but in a fun way. The GG document explicitly contemplates TOs inventing their own restrictions and variants and endorses your ability to do so, so let your imagination run wild!
As you can see, game setup is a huge part of Malifaux, both competitive and casual. It’s one of the really unique things about the game, and I think it adds a lot of strategic depth. It is a bit complex, but the app really simplifies things; it’s one of the best parts of Malifaux, and it makes playing incredibly smooth. I encourage anyone even considering the game to grab it– you can view all the cards and read the core rules there, too.
Finally, I’ve previously alluded to a YouTube channel that was on the precipice of launching, including content for Malifaux (among other games) – it’s now officially launched! You can find a video featuring yours truly and breaking down the recent Malifaux errata here: https://www.youtube.com/watch?v=iFF0H387LQc.
Easter Sale!
If these articles have piqued your interest and you’re thinking of buying into Malifaux, well good news – you’ve chosen the right time to do so! In the same manner that mattress stores reliably unveil their most UNBEATABLE SAVINGS around Memorial Day, as winter yields to spring Wyrd likes to put on their big EASTER SALE!
For the next week-or-so, not only can you get all the cool crews I’ve been posting about on Wyrd’s webstore, you can also buy a bunch of limited-edition and alternate sculpts from past years!
And that’s not all – spend at least $100 and you’ll receive a brand-new, never-before-seen alternate Angelica, being pulled from a hat by a winsome human-sized bunny! It’s not surreal or horrific at all!

In my extremely professional and unbiased opinion, if you’ve been thinking about getting into Malifaux, this should be the kick in the ass you need to take the plunge. These alt models are sweet.
Go do it! What are you waiting for!!!
You can find the Wyrd store here: https://giveusyourmoneypleasethankyou-wyrd.com/shop/
Back to Our Regularly Scheduled Programming
That’s all for now, but never fear, I’ll be back again soon. I think it’s time to talk about the latest and greatest development in Malifaux: the release of the first expansion book of Third Edition, Malifaux Burns, and the launch of Title Masters!
Watch this space!
Have any questions or feedback? Drop us a note in the comments below or email us at contact@goonhammer.com.
