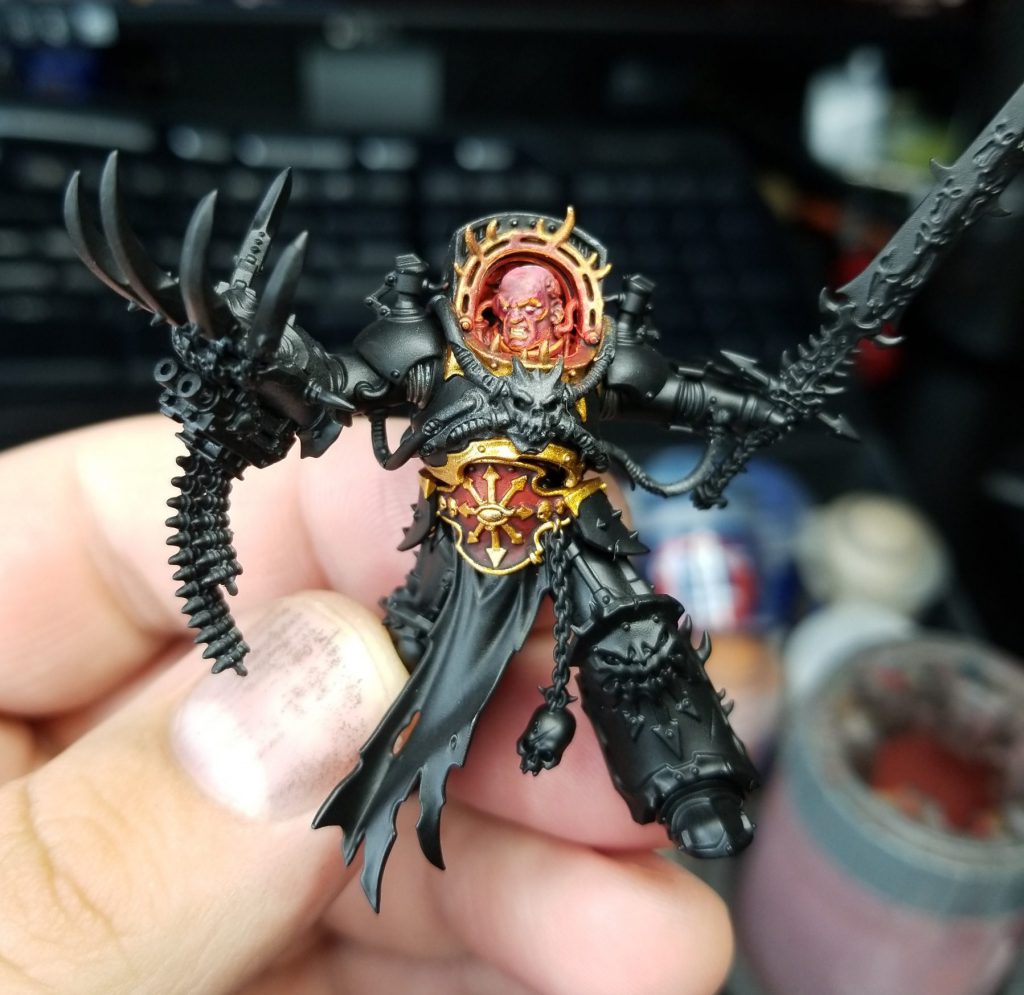
In our How to Paint Everything series, we take a look at different armies of the Warhammer universe, examine their history and heraldry, and look at several different methods for painting them. In this article we’re looking at the Warmaster of Chaos in the 41st Millennium, Abaddon the Despoiler.
Ezekyle Abaddon was the firstborn son of one of the mighty warlords of Cthonia, the planet on which the primarch Horus was originally found. His martial prowess and stature quickly drew the attention of the Luna Wolves space marines legion and Abaddon was inducted into their ranks, after which he rose quickly, taking on the rank of 1st captain of the legion and leader of the feared Justaerin.
When Horus was corrupted by Chaos and turned on the Emperor, Abaddon followed. As first captain of the Sons of Horus he led his brothers in a brutal civil war against the Imperium, culminating in the Siege of Terra, where Horus was ultimately slain by the Emperor. When Horus was slain at the hands of the Emperor, Abaddon fled with his forces into the Eye of Terror.
Following the Horus Heresy the traitor legions splintered into warbands and fell into brutal infighting, during which the body of Horus was stolen by the Emperor’s Children and cloned by Fabius Bile. Leading a group of loyal warriors from varying legions, Abaddon united the fragmented remains of the Sons of Horus under his command, renaming them the Black Legion. They destroyed Bile’s lab on the planet Harmony and Abaddon killed the clone of Horus Bile had made, claiming the Talon of Horus for his own.
Since the formation of the Black Legion, Abaddon has led thirteen incursions into Imperial space, called Black Crusades. On the first of these he acquired a potent daemon weapon, the blade Drach’nyen, an echo of the first murder. On another he seized control of a number of blackstone fortresses. And on the most recent, thirteenth black crusade he destroyed Cadia, creating the massive rift in realspace known as the Cicatrix Maledictum and splitting the Imperium in two.
The Warmaster is a large, complicated model, and absolutely deserved to win GW’s model of the year award for 2019. The model itself comes with several options, allowing you build him with or without his trophy rack, his cape, and to give him a rebreather instead of an exposed face.

I absolutely adore this model and knew from the moment I saw him that I was going to need to spend some extra time on him. As the centerpiece of my Black Legion, I’m still happy with how the model turned out two years later.
Undercoat: I started by priming the model black.
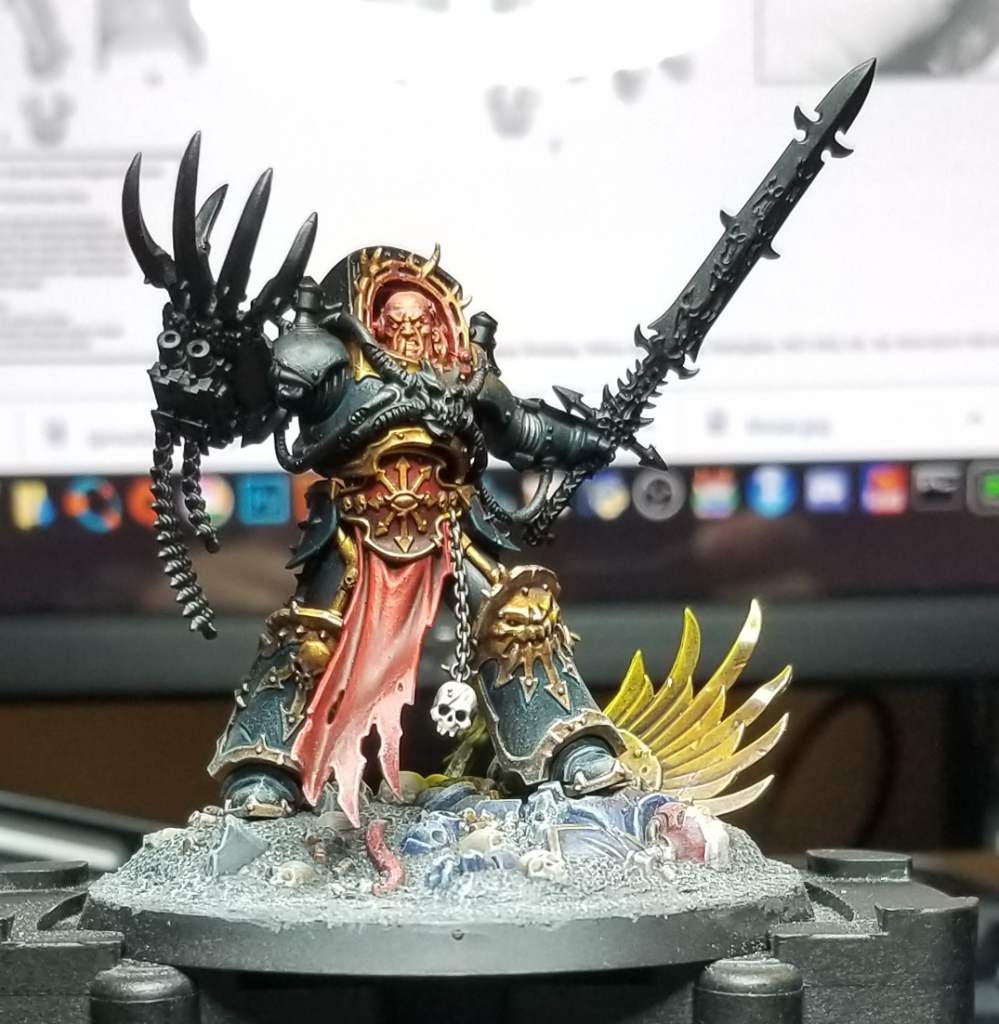
Subassemblies: Abaddon’s got a lot going on and essentially needs to be painted in subassemblies. I assembled Abaddon’s base body, then painted his head and the area around his neck where I wanted to get the reddish/orange under-lit look, then I assembled the chest and shoulder armor around him over that. This was a bit of a pain, but made it easier to paint the recesses around his head. The topknot goes on after all that.
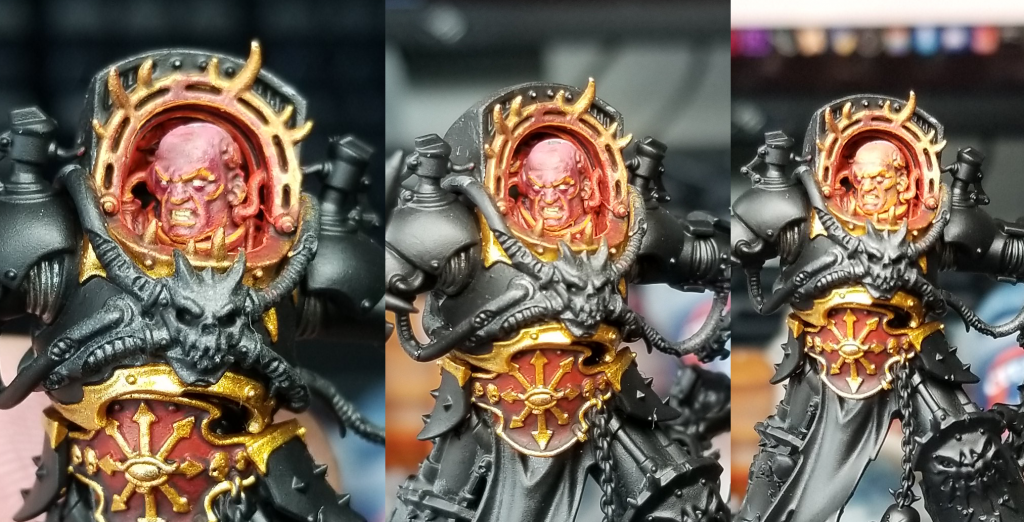
So my big goal here was to achieve the kind of red backlit effect shown in some of the art for Abaddon and Horus. I started by painting the skin with Bugman’s Glow and then shaded it with Carroburg Crimson. Then I further shaded the “recessed” areas with more Carroburg, while working up highlights on the areas closer to the light sources with Fire Dragon Bright and Flash Gitz Yellow. The lightest parts were painted with a 50/50 mix of Flash Gitz and Reaper Pure White, including the teeth and eyes.
The goal here is to make sure the undersides are the parts being highlighted, which is kind of the reverse from how you’d normally do it. Just think about where the light is coming from as you do this. I also did a blend of Evil Sunz Scarlet and Fire Dragon bright into the gold trim surrounding the head.
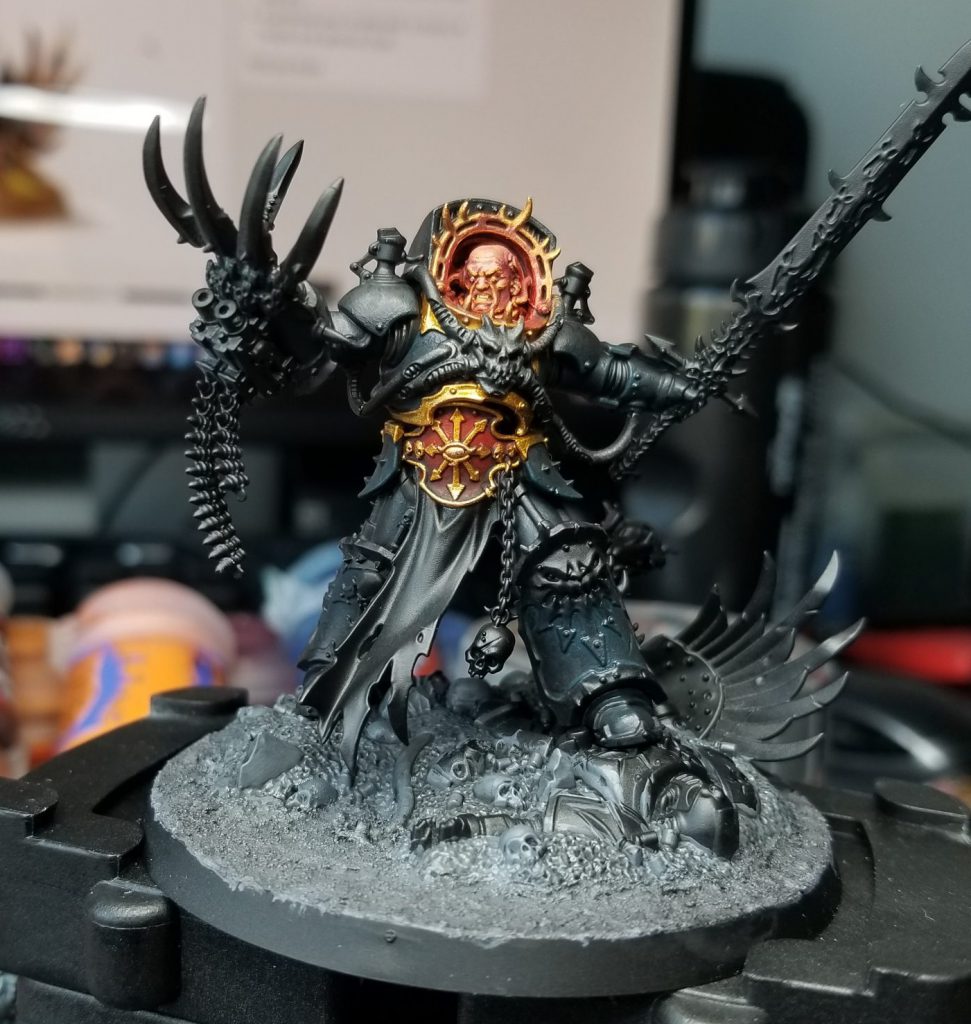
The Armor: Next up is the armor. I need to have actual shading on this and that means using a different color. I started by painting the armor with Abaddon Black, then highlighted that using progressively lighter mixes of Abaddon Black and Incubi Darkness, finishing with something around a 50/50 mix. These days I use Corvus Black instead, but Incubi Darkness gives the armor a richer, colder tone in a lot of ways.
After I lay down these colors I come back and do thin lining around the gold trim using Incubi Darkness and then doing a lighter pass with a mix of Incubi Darkness and Celestra Grey. The goal is to do thin outlines on the arrows and spikier bits of the trim. These days I use Mechanicus Standard Grey instead of Incubi Darkness when I’m doing highlights with Corvus Black.
The Gold Trim here is done with Retributor Armour then shaded with Agrax Earthshade before being highlighted again with Retributor and then edge highlighted in spots with Runefang Steel.
The Belt is done with Mephiston Red and shaded with Carroburg Crimson and Nuln Oil, and highlighted in spots with Evil Sunz Scarlet.
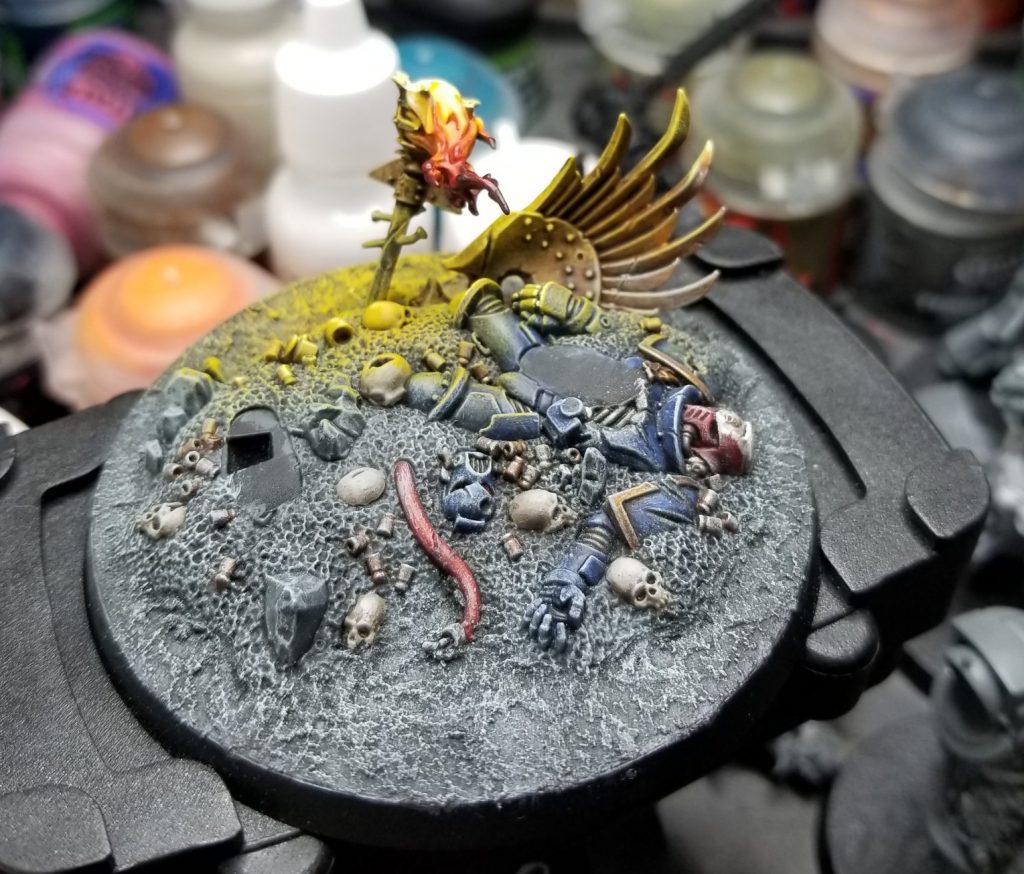
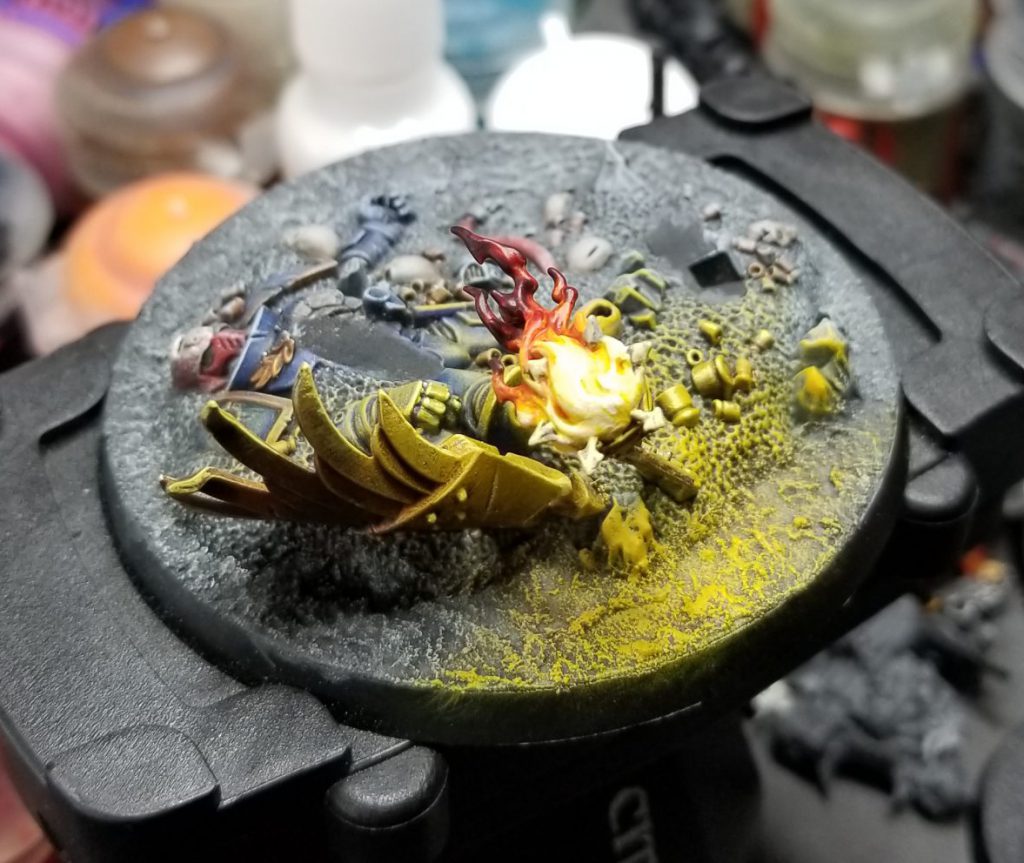
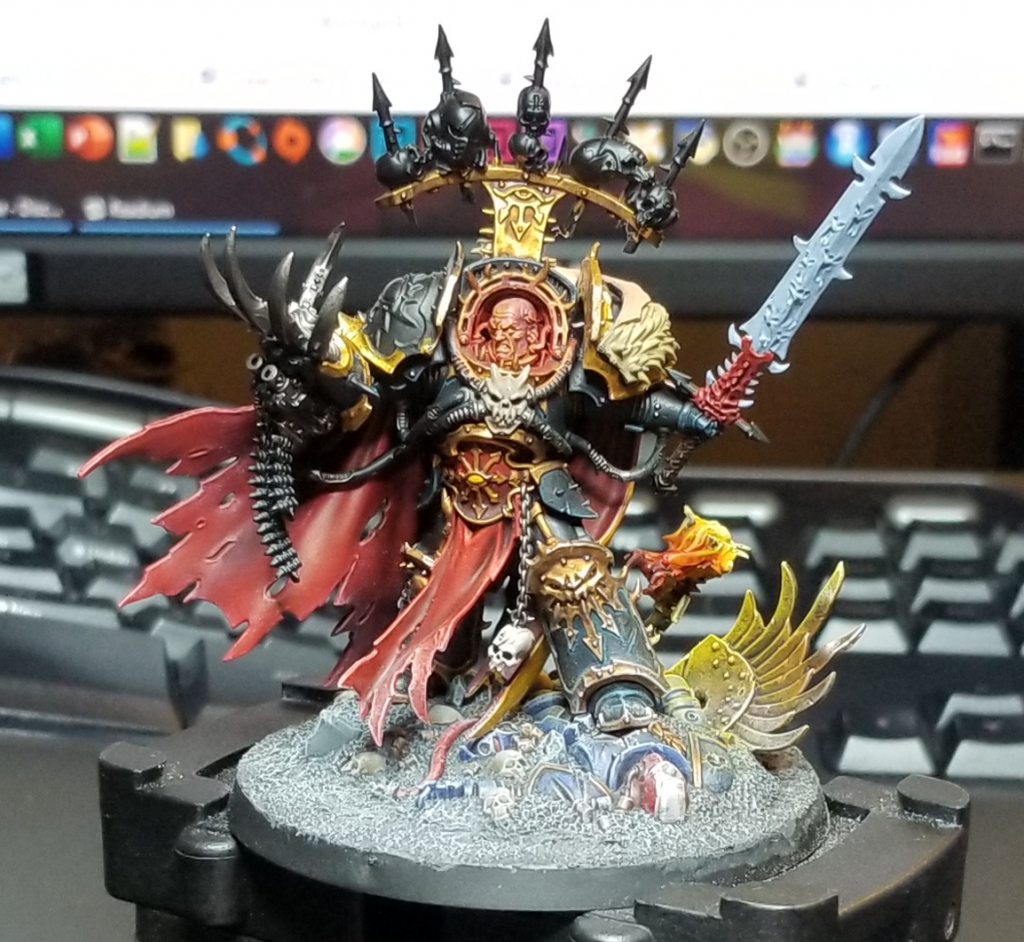
The next major project is starting on the base. I started by laying down a bunch of Astrogranite around the modeled parts of the base. The bulk of the mound is painted in Mechanicus Standard Grey and drybrushed with Celestra Grey, though I’ve also drybrushed teh marine and the rest of the stuff on the base with Celestra Grey as well to make it look covered in dust and ash. The gold wing there is also Retributor washed with Agrax.
The Torch is the next part and a major component of the model as it’ll be where I’m doing a lot of OSL work. I start by painting it Wraithbone, then from here I use contrast paints to color the flame. I use Iyanden Yellow, Fuegan Orange, Blood Angels Red, and Flesh Tearer Red on the torch, working outward from yellow to deep red – the brightest parts of the flame will be yellow/white. I go back and paint the center of the flame with Reaper Pure white and then drybrush the areas around the flame with Flash Gitz Yellow. Something to keep in mind here is to drybrush away from the flame, so you’re leaving areas that are clearly still in shadow and not applying OSL where it shouldn’t be applied.
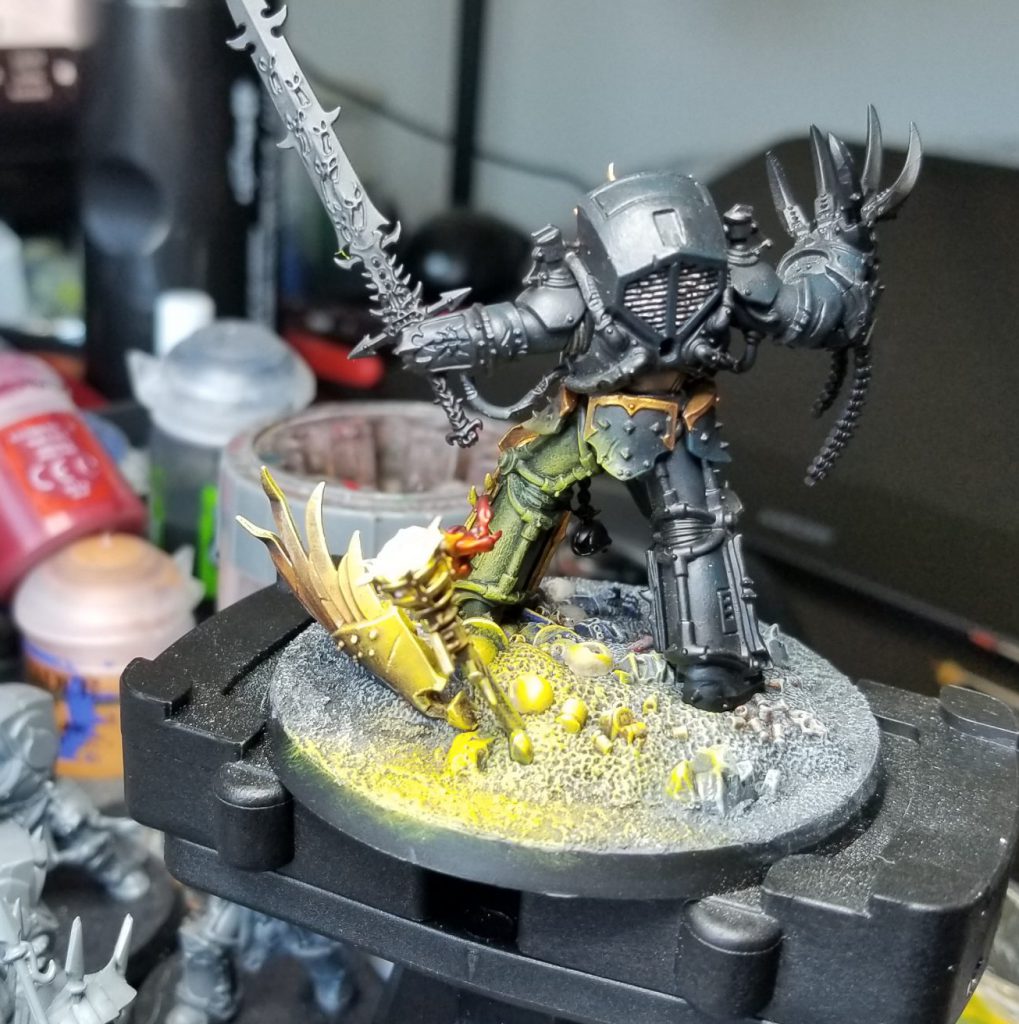
At this point I haven’t glued Abaddon to the base yet but I do need to figure out how I’m going to handle the OSL on the parts of his armor that are next to the flame. I start by drybrushing them with Flash Gitz Yellow, then come back and wet blend them a bit with the Incubi Darkness/Abaddon Black mix to get a more even color gradient.
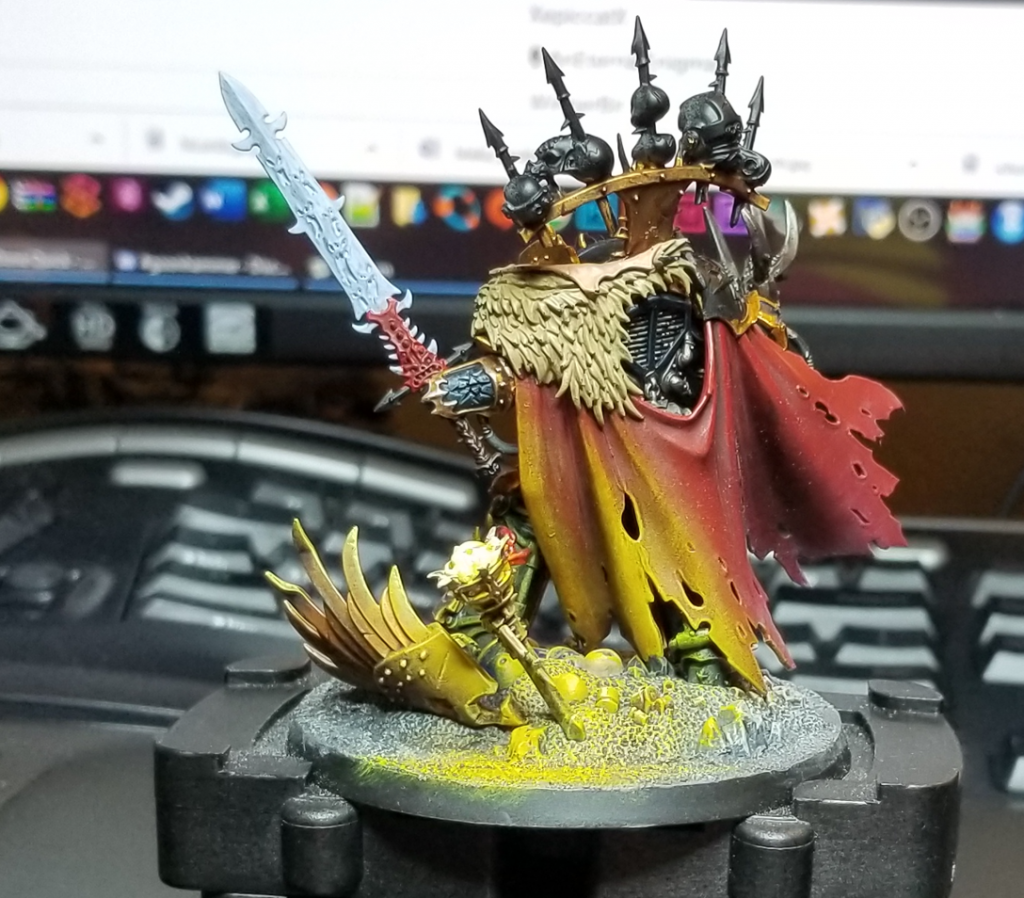
On the other side of the model you don’t see any of this; the lighting effects don’t reach over here, which is what I’m aiming for.
Continued progress. The goal here is to get as much of the model done as possible before adding the shoulder pads and the cloak. For the armor at the joins, I’ll paint that with Leadbelcher, wash it with Nuln Oil, then come back and highlight it with Leadbelcher again later.
Next comes finishing off the bottom half of the model. My bone recipe is to paint the skulls/bones with Rakarth Flesh, wash that with Agrax, then highlight with Rakarth Flesh and Reaper Polished Bone, using a mix of Agrax and Polished bone for shading and smoothing.
The Tabard is a base of Mephiston Red shaded with Khorne Red and Carroburg, and highlighted with Evil Sunz Scarlet.
Once I’ve finished the legs off I drybrush the bottom areas with a light dusting of Celestra Grey. This blends Abaddon into the base and gives him a much more weathered appearance.
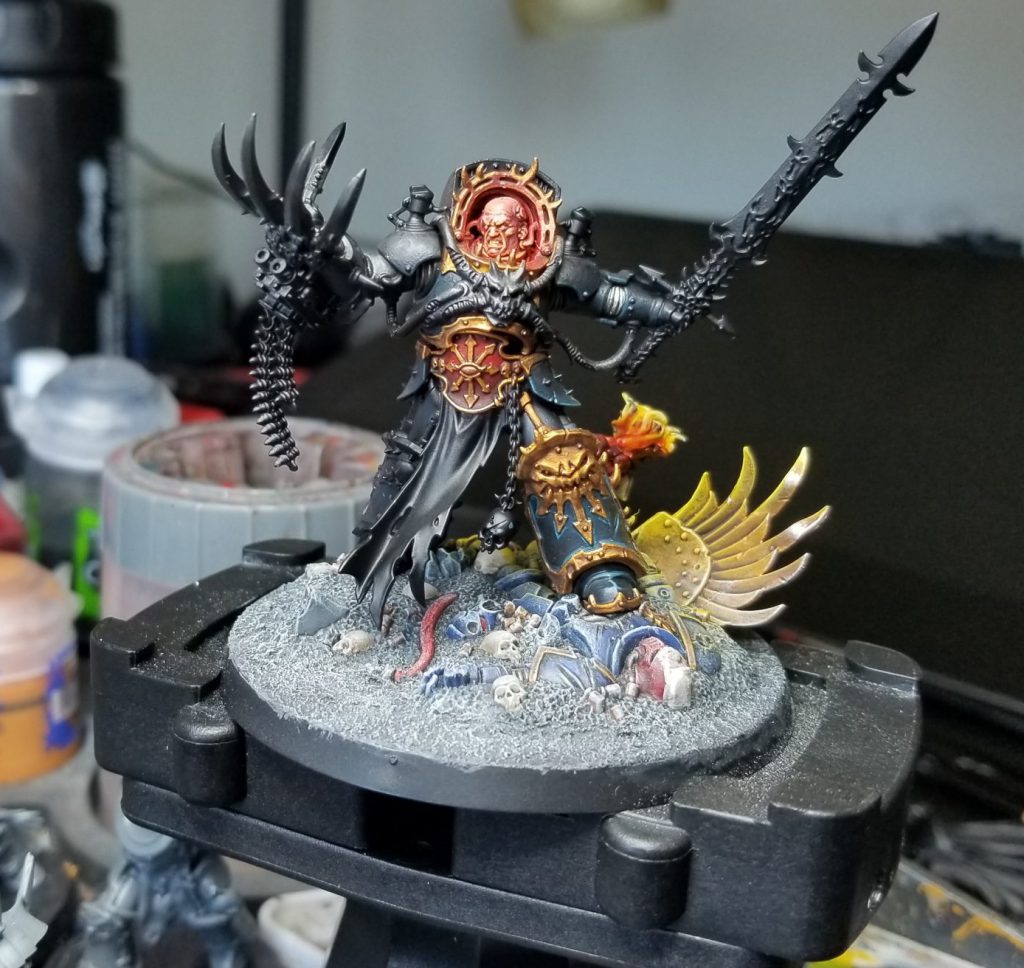
Now I start working my way up and it’s time to add the shoulder pads and trophy rack. I start laying down the base colors. The cape will be the same color as the tabard. The fur is a base of Karak Stone washed with Agrax and Highlighted with Karak and Rakarth Flesh. I also lay down the base colors on Drach’nyen here – Mephiston Red for the hilt and Reaper Snow Shadow for the blade.
Adding the cloak means I can finish the OSL effects on the back. I start by painting the cloak normally, then figure out where the effect will be strongest, and start blending in yellow in those spots. Iyanden Yellow contrast paint is a big help here, and I work up to Flash Gitz Yellow.
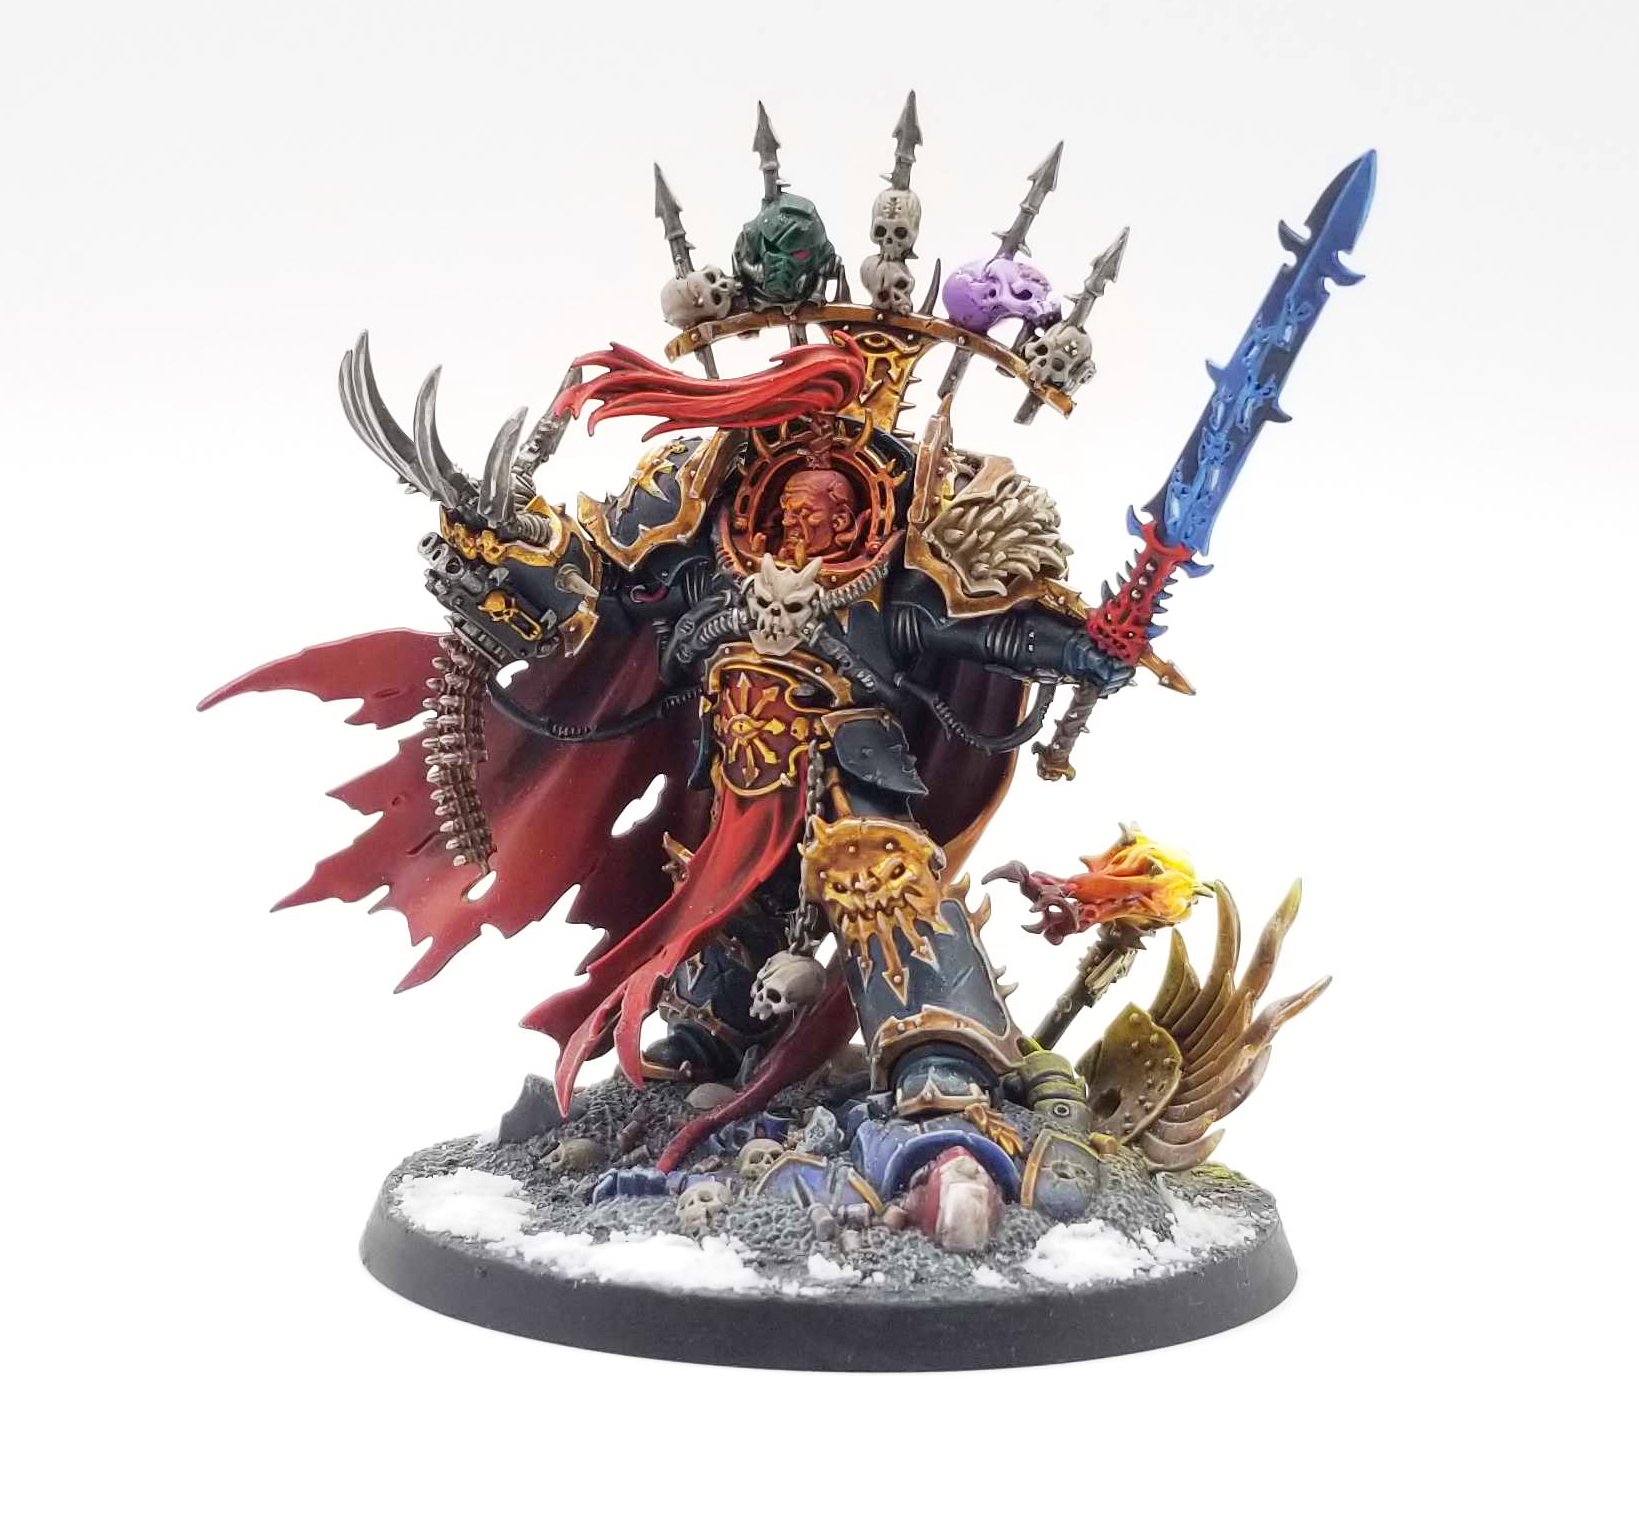
From here there’s just a lot of finishing work and little details. Painting the metal on the Talon is mostly Leadbelcher and washing with Nuln Oil, then highlight back up to Runefang Steel. The sword I wash with Drakenhof Nightshade a few times, then highlight with Lothern Blue and glaze with Guilliman Blue. The topknot goes on and gets the same red shades as the cloak.
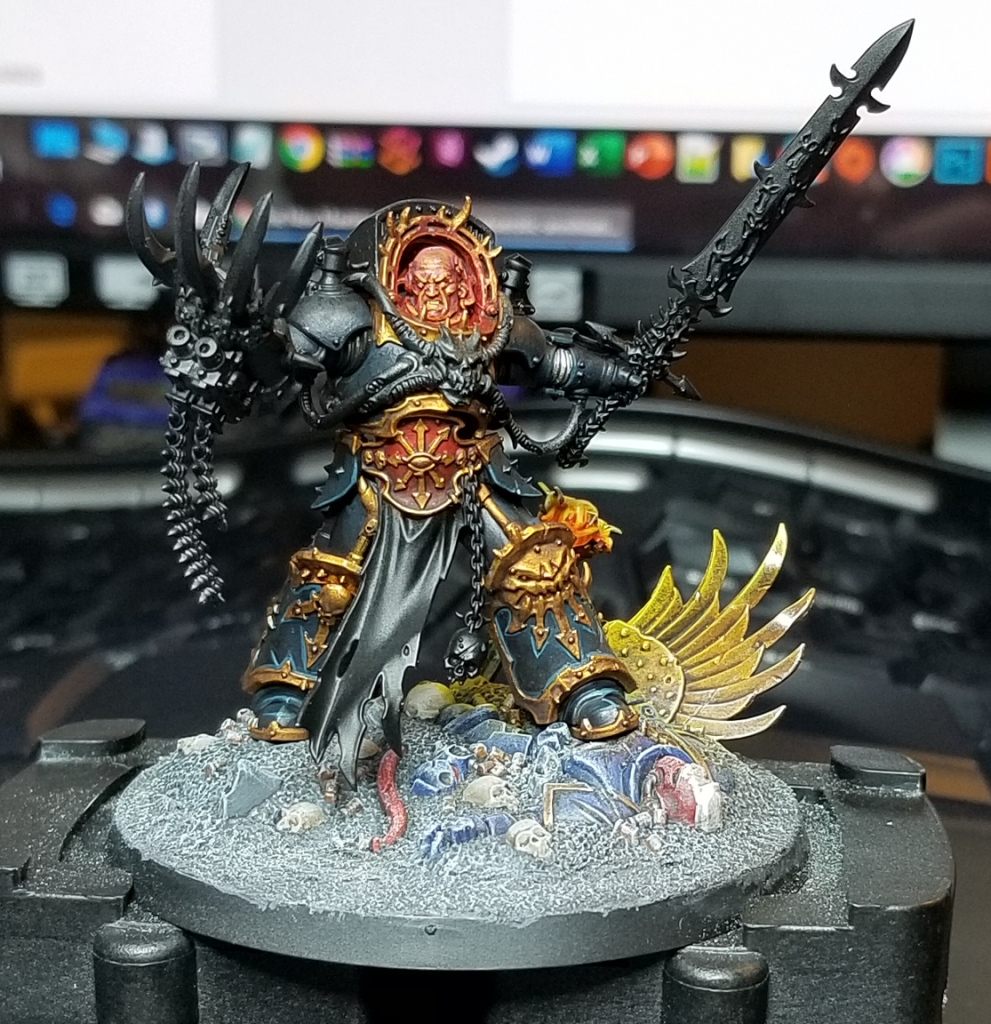
I finish the model off by adding some Valhallan Blizzard in spots, both to make it mesh better visually with the rest of my Black Legion and to hide the seams between the modeled base and the technical paint.
Final Thoughts
Overall I’m very happy with how Abaddon turned out. He’s probably the best looking model I’ve ever painted, and certainly one of the ones I put the most time into. He’s not super complicated colors-wise, but I do feel like I was able to accomplish quite a bit with a reasonably limited palette and he fits in well with the rest of my Black Legion. He was a great model to paint but definitely daunting in some respects. getting the armor on after painting his head was more of a challenge than I expected but I’m still glad that I did the subassemblies that way.
Have any questions or feedback? Drop us a note in the comments below or email us at contact@goonhammer.com.

