
Oh It’s Halloween again and that’s our favorite time of year! We love talking about monsters and horror and so this week we’re revisiting some classic movie monsters from the minis line by Studio Miniatures and talking about how to paint them.
Skails
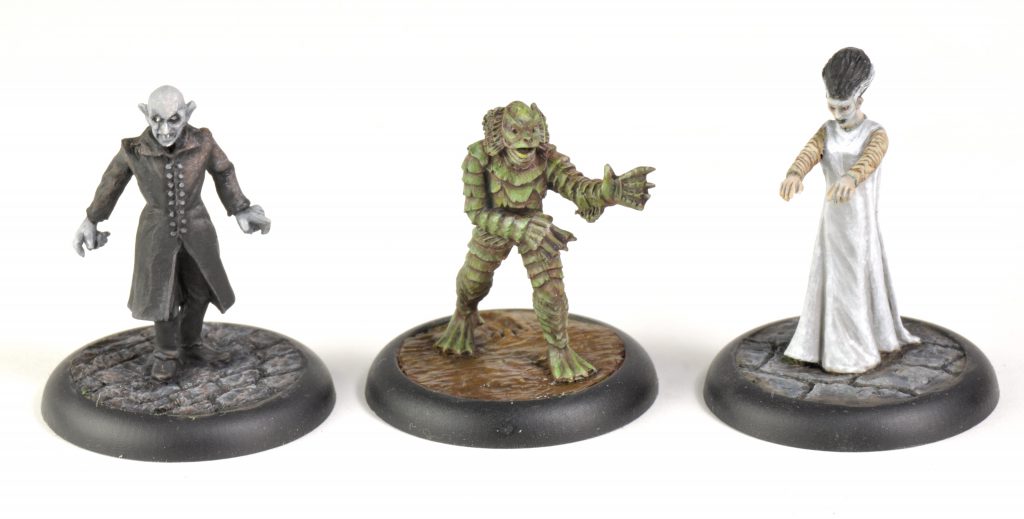
Skails here, running through how I painted ‘The Vampyr’, ‘The Creature’, and ‘The Bride’ by Studio Miniatures. They paint up fast for my speed, being about three hours each. Their bases were slightly recessed, so I used greenstuff to sculpt the ground. For the stone it was roughy pressed flat to be level with the edge of the recess. Then cracks were made in lines by pressing a flat tool into the surface. The mud for The Creature was done similarly, but instead of making cracks I dragged the rounded end of a tool across the surface repeatedly to make a wavy surface.
Nosferatu
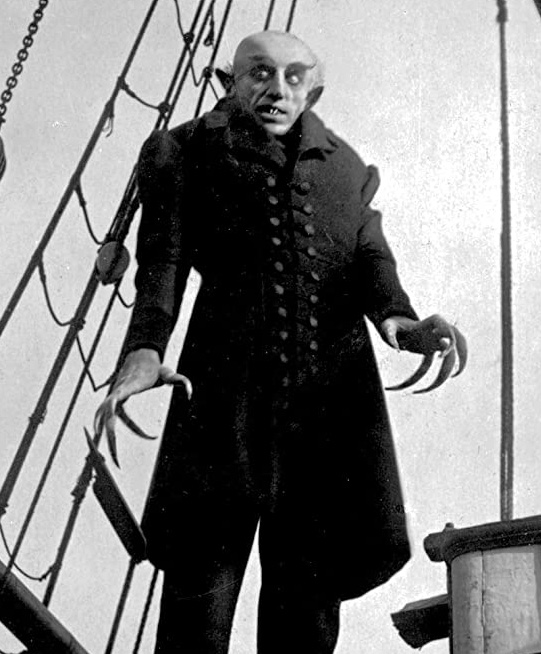
I used this still from the 1922 silent film ‘Nosferatu’ as a reference photo. Max Schreck plays Count Orlok in this unofficial adaptation of the 1897 novel ‘Dracula’. The film is pretty great, I highly recommend seeing it. The miniature is a pretty good representation of this creepy bald vampire.
Paints used:
Pro Acry Coal Black, Vallejo Model Color Basalt Grey, Citadel Pallid Wych Flesh, Pro Acryl Mahogany, Citadel Nuln Oil, Vallejo Game Color Dead White, Citadel Druchii Violet
Process:
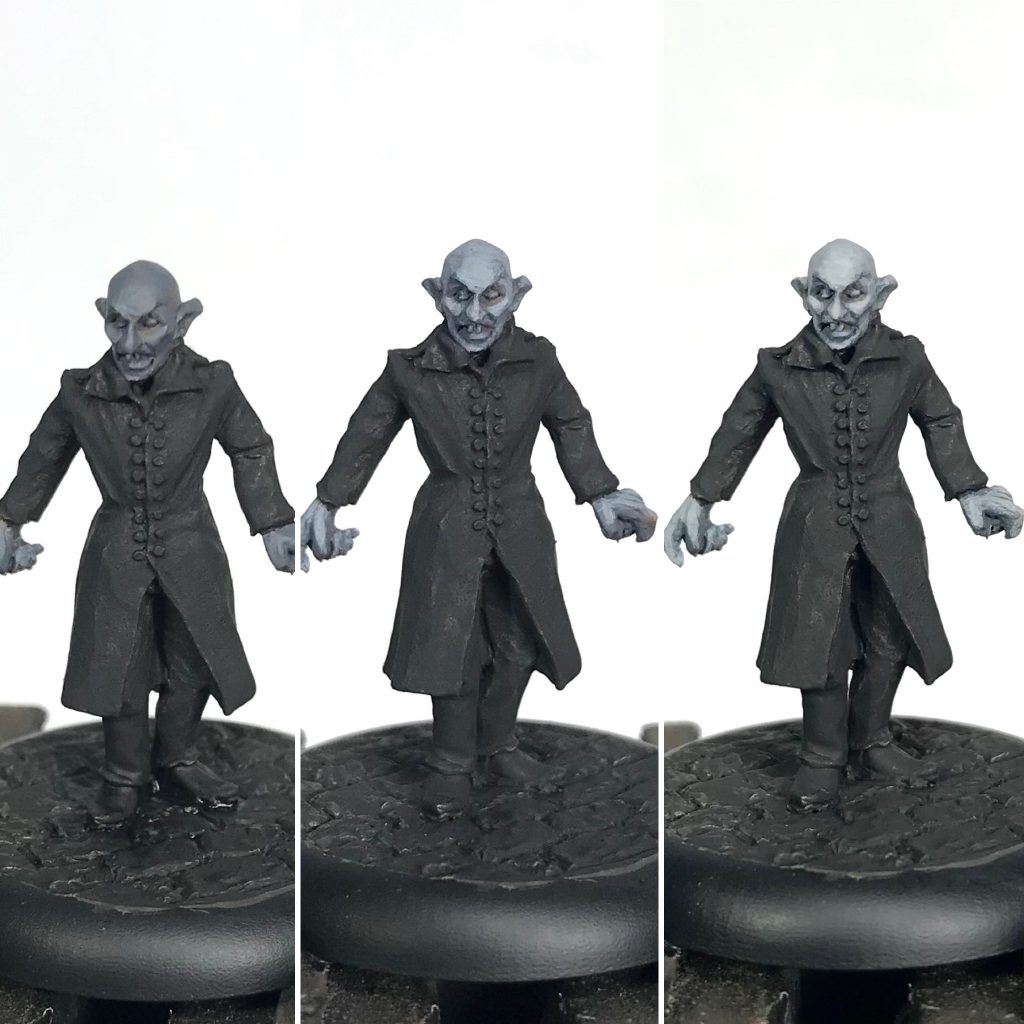
I started with a prime of Stynylrez Ebon Flesh. The clothes and cobblestones were given a base coat of Coal Black, and the skin a base coat of Basalt Grey. (Left frame)
The first layer pass was done with a 1:1 mix of Basalt Grey and Pallid Wych Flesh. It was applied over most of the skin, leaving the base coat showing in the deepest recesses. (Middle frame)
To first layer mix I added a bit more Pallid Wych Flesh and hit the knuckles, more upward facing areas of cheeks, the forehead and chin. It took a couple thin layers of this to get the coverage I wanted. (Right frame)
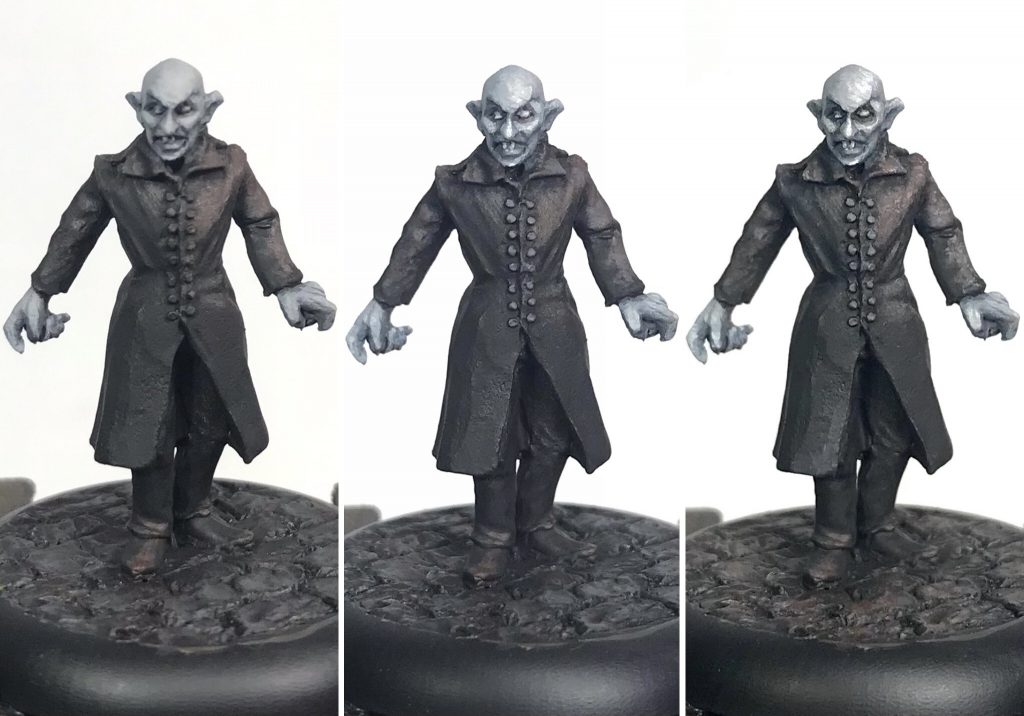
For the coat I started with an initial layer that was a mix of Mahogany and Basalt Grey, some where close to half and half but on the darker end. This was applied like drybrushing but a little wetter. The brush was wiped on a paper towel a couple times and dragged across the raised areas. The reference image was usesd for the light placement, mostly lighting his top left side. A couple fold around his waist and some of lower coat were also lit according to what felt right given the miniatures slightly different posing. (Left frame) Next a mix of Mahogany and Pallid Wych Flesh was stippled onto the most upward facing angles on the coat. I feel like it gives it a little bit of a wool-like texture. Finally a precise wash of Druchii Violet was put into the edges and corners all the clothing and the bottom the boots. The buttons were hit with Basalt Grey, doing more layers towards the top to make them brighter.
On the face a layer of Pallid Wych Flesh was added, focusing on the top left side of his face, eyes, and hitting some other spots that are exposed to light in the reference image. (Middle frame) Next a precise application of Nuln Oil was put around the eyes and in the mouth, ears and in the recess between the face and collar. (Right frame) Then Dead White was used to hit the most brightly lit areas on forehead, cheeks, chin, top of ears, upward facing fingers, back of hands, and knuckles. (Right frame)
I did a couple more layers on the forehead and face before the final picture. First was a glaze of watered down Dead White mixed with a bit of Basalt Grey, maybe in the 2:1 range. This was applied across the previous highlights and overlapping the earlier layers. The result was a slightly smoother transition, with the highlights toned down a bit. Next Dead White and Basalt Grey were mixed in the range of 4:1 to punch up the highlights on the brightest spots again, left side of forehead, eyes, chin, left side of nose, and top of cheek and ears.
The cobblestones were dry brushed with Mahogany mixed up to Basalt Grey, and an even light pass of Pallid Wych Flesh. Nuln Oil was applied precisely into the cracks.


Bride of Frankenstein
I haven’t seen this movie, but the miniature looked like it could be an interesting challenge and boy was it ever. Between being tiny and using an ill chosen base-coat of the skin with Kislev Flesh it was a bit of a struggle.
Paints Used:
Vallejo Game Color Stonewall Grey, Vallejo Game Color Dead White, Golden Satin Glaze Medium, Pro Acryl Coal Black, Citadel Kislev Flesh, Citadel Pallid Wych Flesh, Vallejo Game Color Black, Citadel Druchii Violet wash, Citadel Incubi Darkness, Citadel Zandri Dust, Citadel Ushabti Bone, Citadel Screaming Skull, Pro Acryl Mahogany
Dress
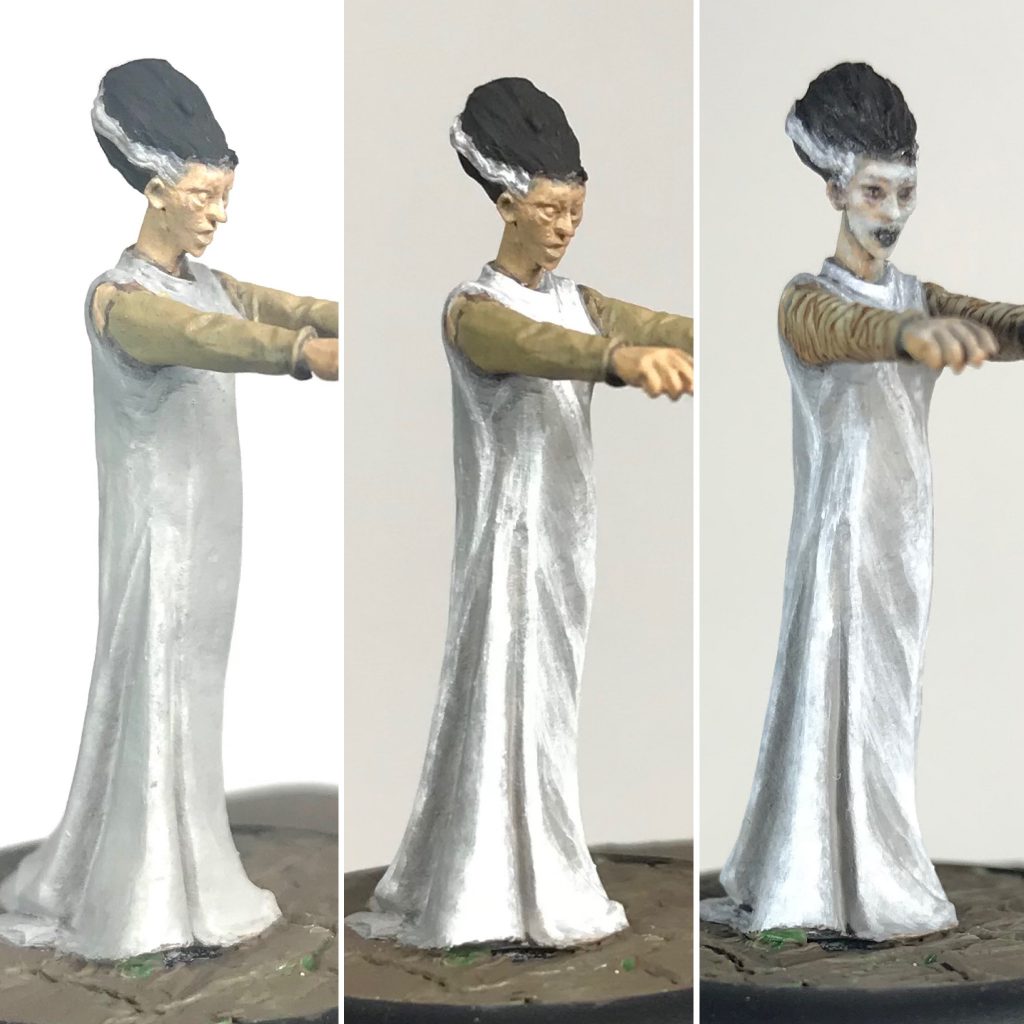
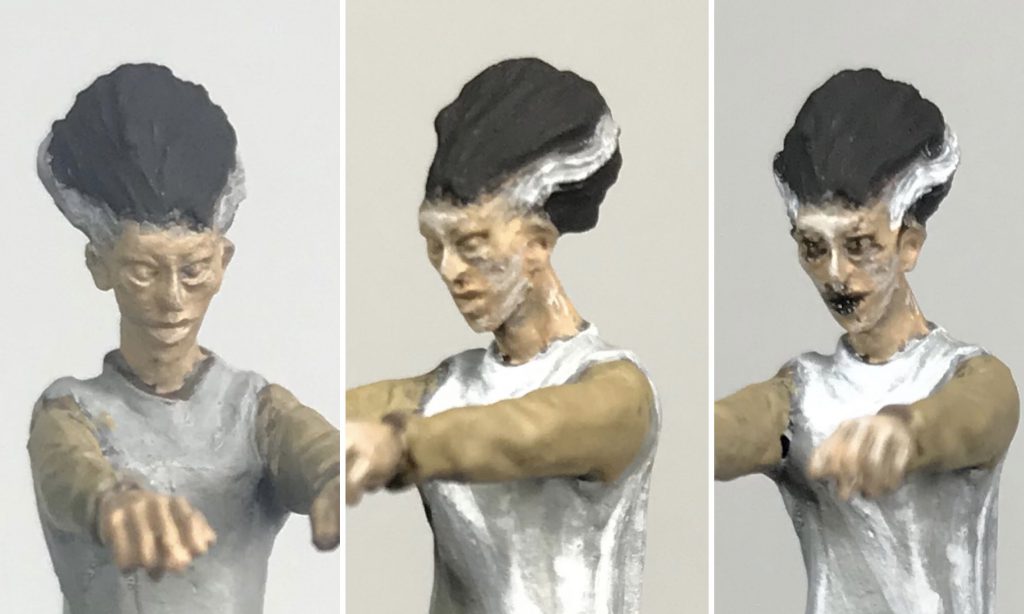
The dress was first given a few layers of Stonewall Grey until it reached a solid coat. (Left frame) Next Dead White as built up in thin layers where I felt the brightest highlights should be. These were placed loosely where they are in a movie still and also according to the folds on the miniature. (Middle frame) Finally a Stonewall Grey and Dead white mix (somewhere in the 1:1 range) plus some Golden’s Satin Glaze Medium was used to soften the transition between the first Stonewall Grey layer and the Dead white layer.
Face and Hands
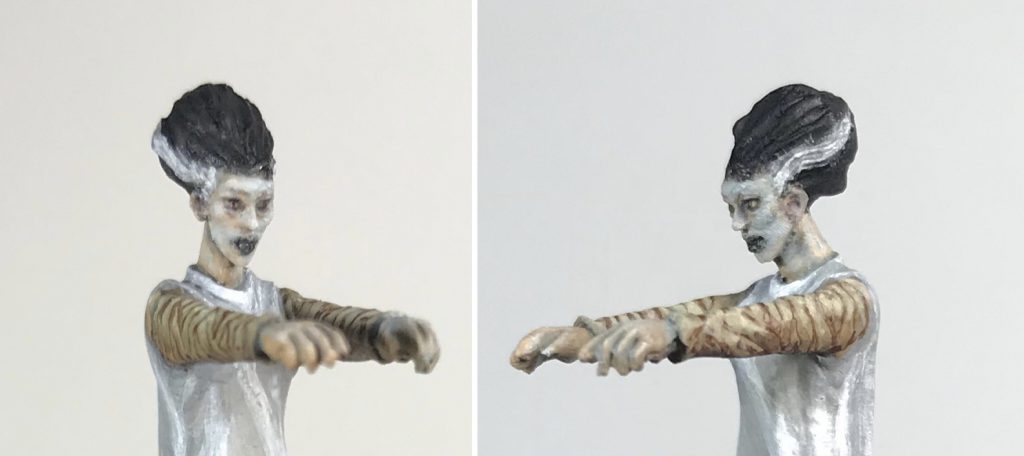
The hair was base coated with Coal Black, with Stonewall Grey streaks. The skin all had a base coat of Kislev Flesh. These both took at least a couple layers for good coverage. (Left frame) Next the face was given a highlight of Pallid Wych Flesh. This proved to be a mis-step, a better course of action would have been to do a mix of the Kislev and Wych Flesh next. It doesn’t look good straight over Kislev and also in it’s pure state it tends to go on a little grainy which can lead to a slightly crusty appearance to the paint surface after too many layers. Kislev Flesh and Pallid Wych Flesh were mixed to try and soften the transition but still wasn’t quite right. Next slightly watered down Black was applied around eyes, on pupils and on the lips. (Right frame) It looks a little rough here but I touched it up as I worked on the later skin tones.
Druchii violet was applied carefully into the ears, under the nose, and around the neck line under jaw and where skin meets clothes.
The next thing I did was to mix a tiny bit of Incubi Darkness with the Kislev Flesh to give her the unhealthy pallor she needed. Basically this was kind of a reset for the skin tones. This was painted into the shadowed areas of the skin and the edges of the skin around the face and neck. To this mix I added some Pallid Wych Flesh and began building back in some highlights.
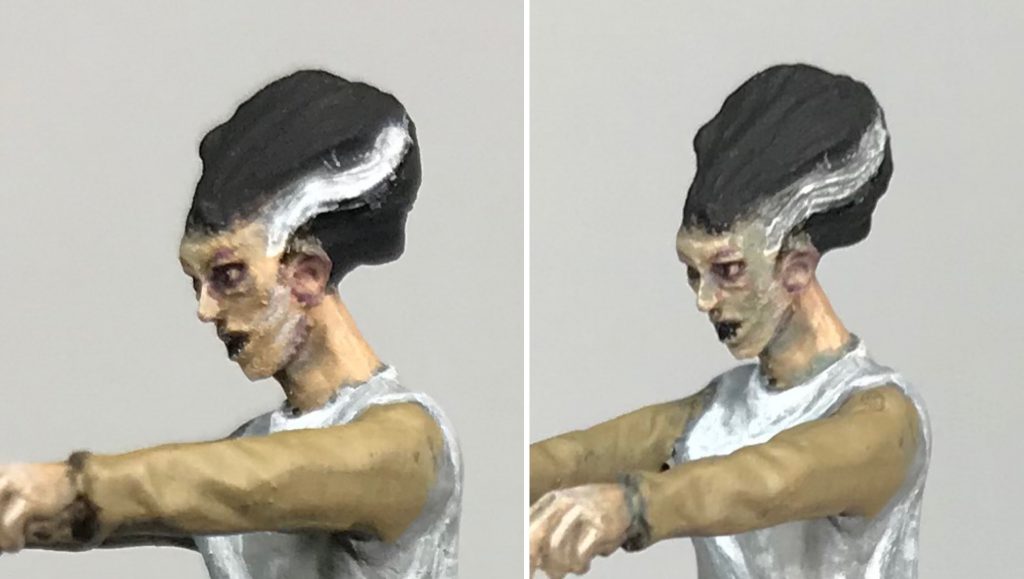
For her hair I watered down some Vallejo Black to wash into the recesses. This paint is on the glossy side so it gave it a little contrast to the very matte Coal Black. The streaks were hit with some Dead White, leaving the Stonewall Grey showing in recesses.
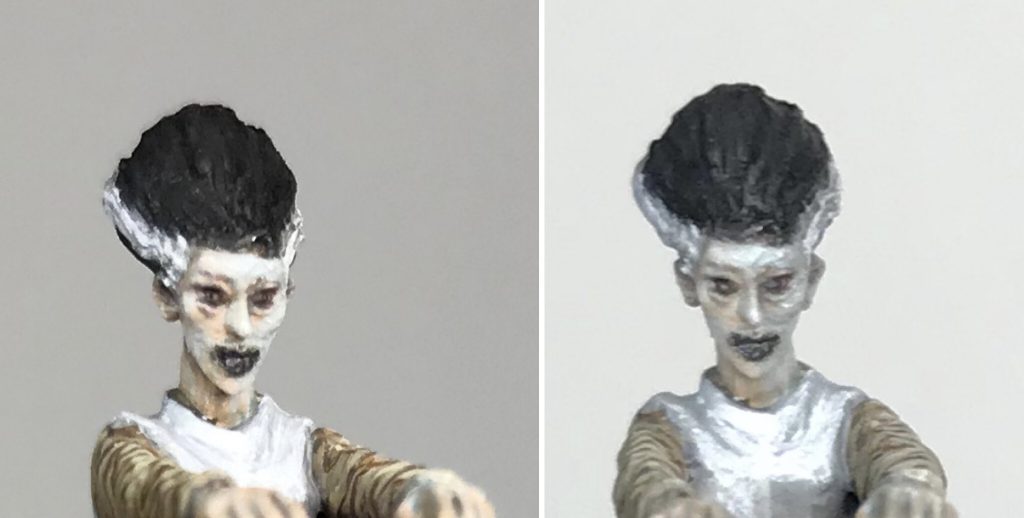
Now for the face I mixed Pallid Wych Flesh with a little bit of Incubi Darkness to continue highlighting up. Then a smaller stage of just Pallid Wych Flesh followed by a mix of Pallid Wych and Dead White with just a dot of Incubi Darkness.
Arm Wrappings
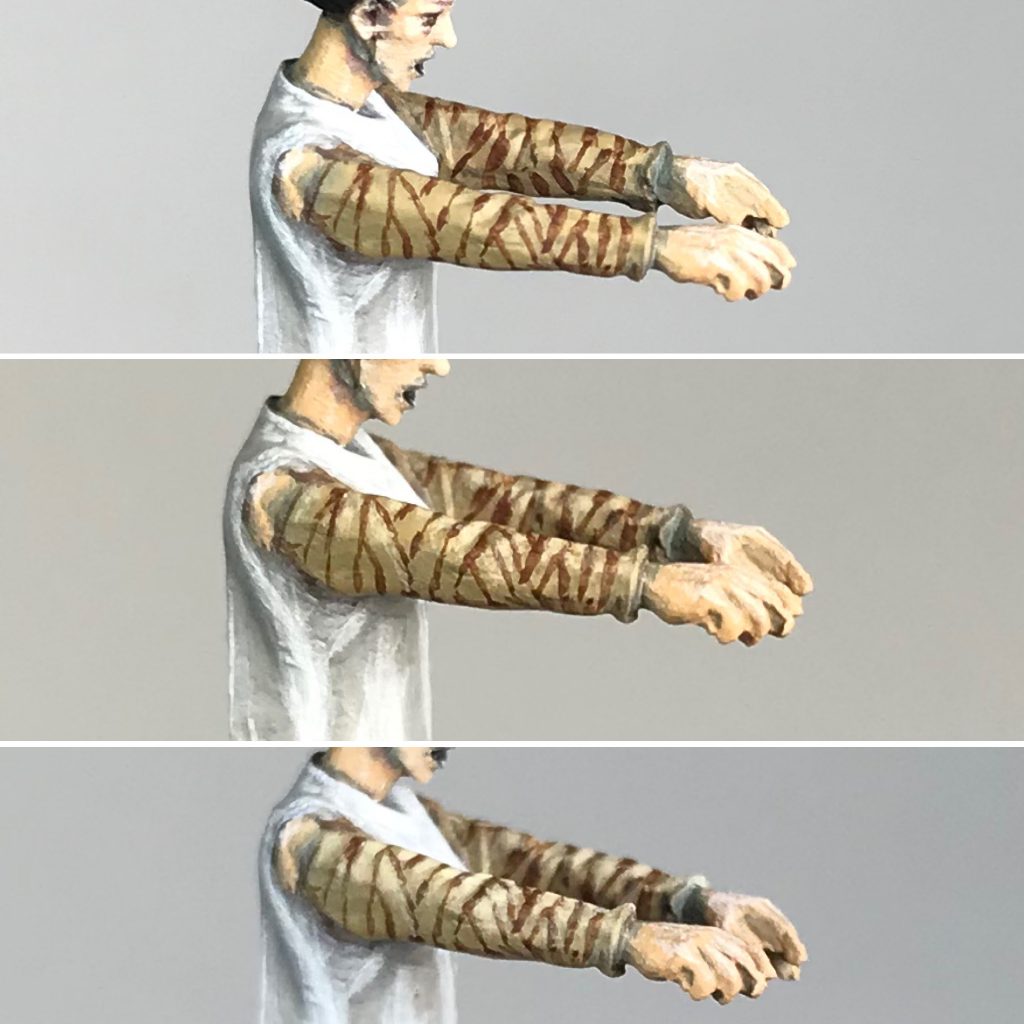
This miniature has arms that appear to be covered in sleeves. In the movie her arms are wrapped in bandages, so I painted the wrappings on. To begin with the arms were base coated to a solid consistency with Zandri Dust. Then lines were painted on with Mahogany. My goal was to keep from having too many parallel lines. Two or three were painted at the same angle, then a few more at a slightly different angle so that they appeared to overlap.(Top frame) Next the top portions of the wraps were painted with Ushabti Bone. (Middle frame) Then a smaller portion of that highlight was painted Screaming Skull. (Bottom frame) Finally a mix of Ushabti Bone, Mahogany, and glaze medium was painted along the bottom of arms.
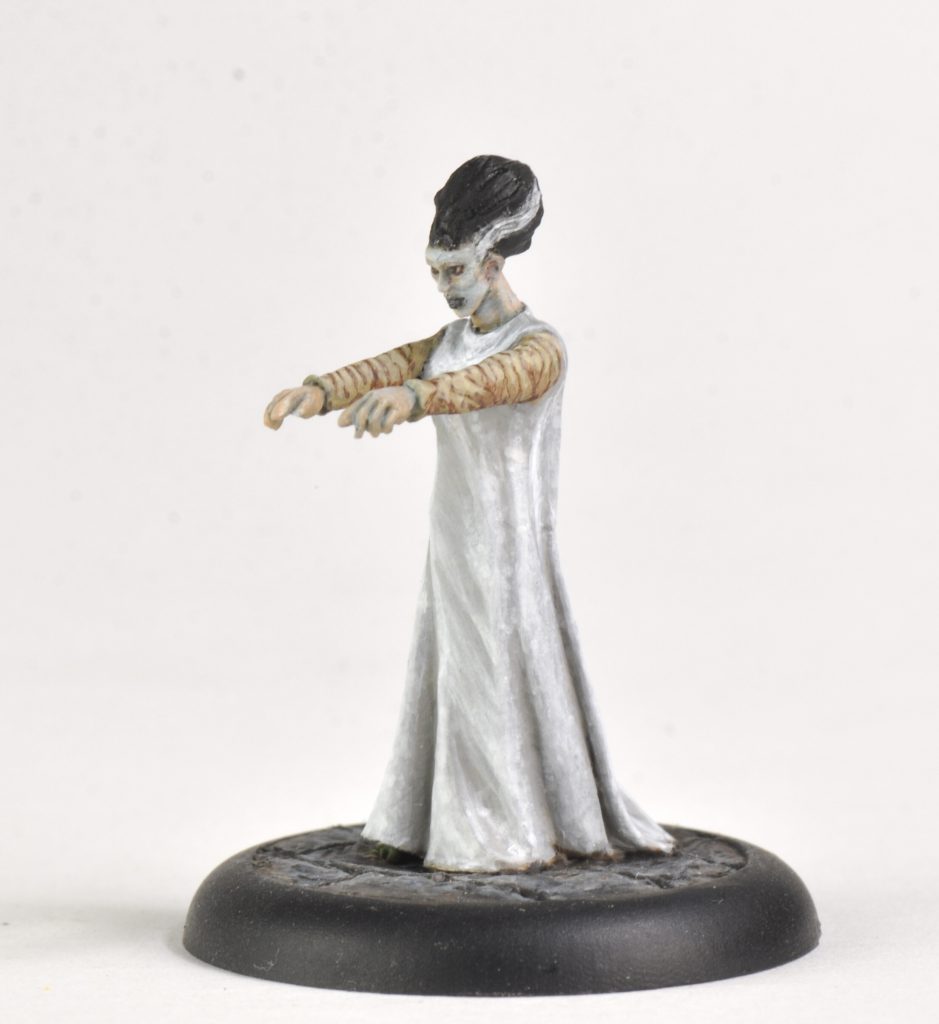
Finished Pics:

Creature from the black lagoon
Paints Used:
Citadel Rhinox Hide, Pro Acryl Mahogany, Vallejo Game Color Goblin Green, Scale 75 Hyek Yellow, Vallejo Game Color Sun Yellow, Druchii Violet
Process:
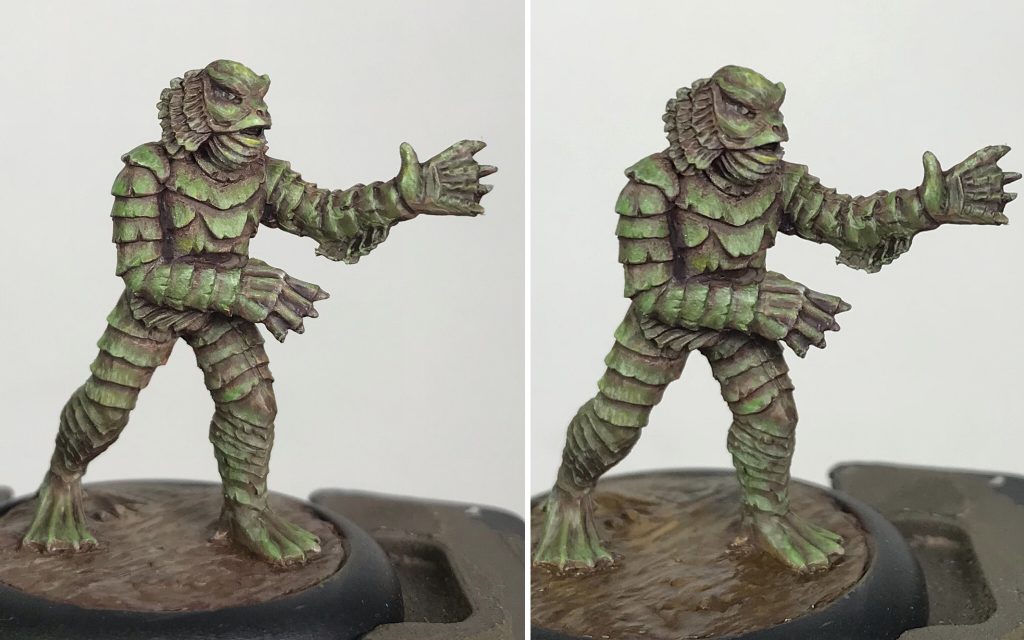
The creature was given an initial wash of Rhinox Hide over the Ebon Flesh primer. This was watered down to the consistency of dark brown water. Next Mahogany was painted into the bottom edge of all the recesses. Then Mahogany mixed with Goblin Green (slightly favoring the Goblin Green) was painted along the rest of each segment. After that was another layer straight Goblin Green over a slightly smaller area of each segment.
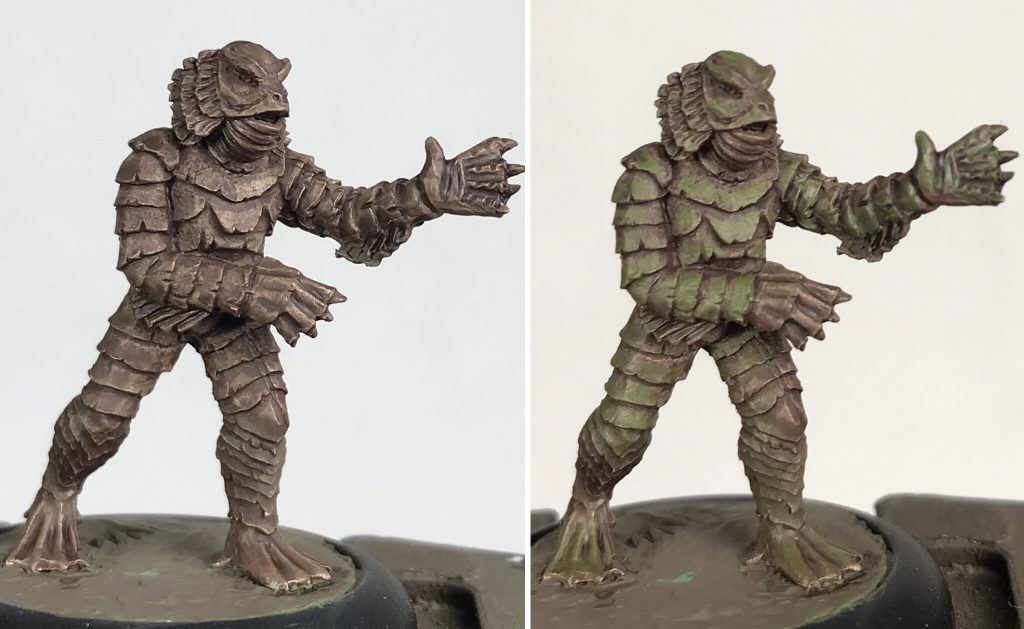
Goblin Green mixed about equally with Hyek Yellow was painted over the previous layer with sharp strokes toward the bottom and of each segment and some stippling along the edges. A thin layer of Hyek Yellow was painted onto the most upward facing angles and the eyes. Sun Yellow was painted directly over the last layer, and wherever light would fall naturally. Finally a couple coats of Druchii Purple was put into the deepest recesses- Between arm and body, under arms, along fins, and neck.
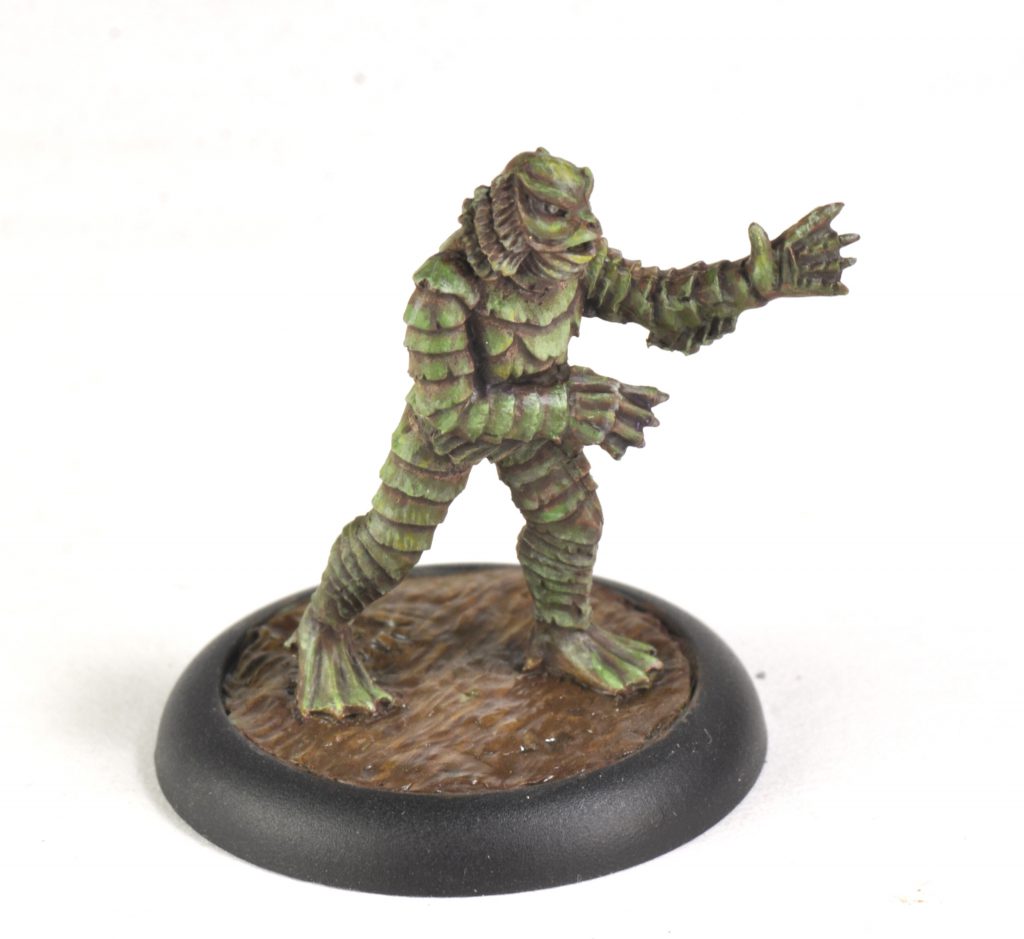
For the muddy base I washed it all over with Mahogany. Then hit some of the raised areas with Zandri Dust mixed with Mahogany. Zandri Dust was painted on a few of the most raised tips. Finally the whole thing was hit with a Burn Umber in wash. This is a 1:1 mix of Daler Rowney Burn Umber acrylic ink, matte medium, with a couple drops of flow improver. It still has a fairly glossy finish making the mud look wet.
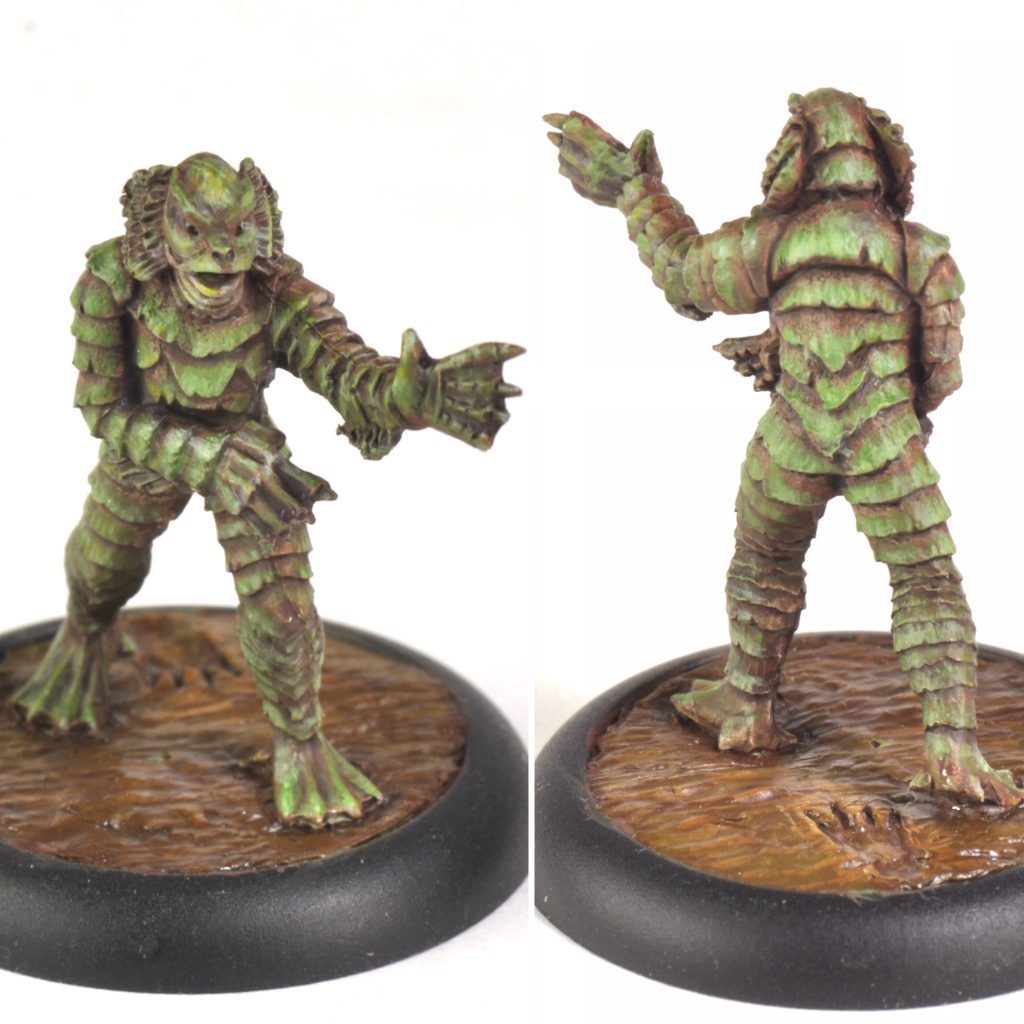
Final Pics:
Brin
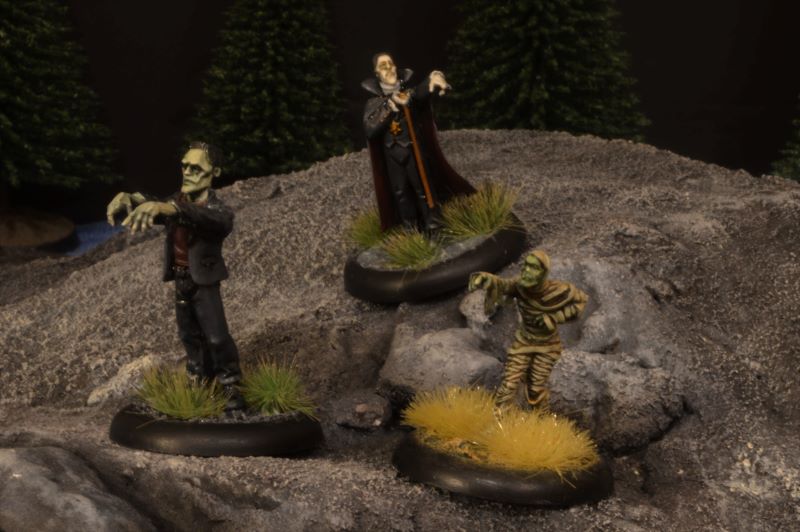
I’ve painted The Mummy, Dracula and Frankenstein’s Monster up for this feature in a fairly simple scheme, intended to be fairly easy to follow and sub out colours if you wanted a slightly different feel.
The Mummy
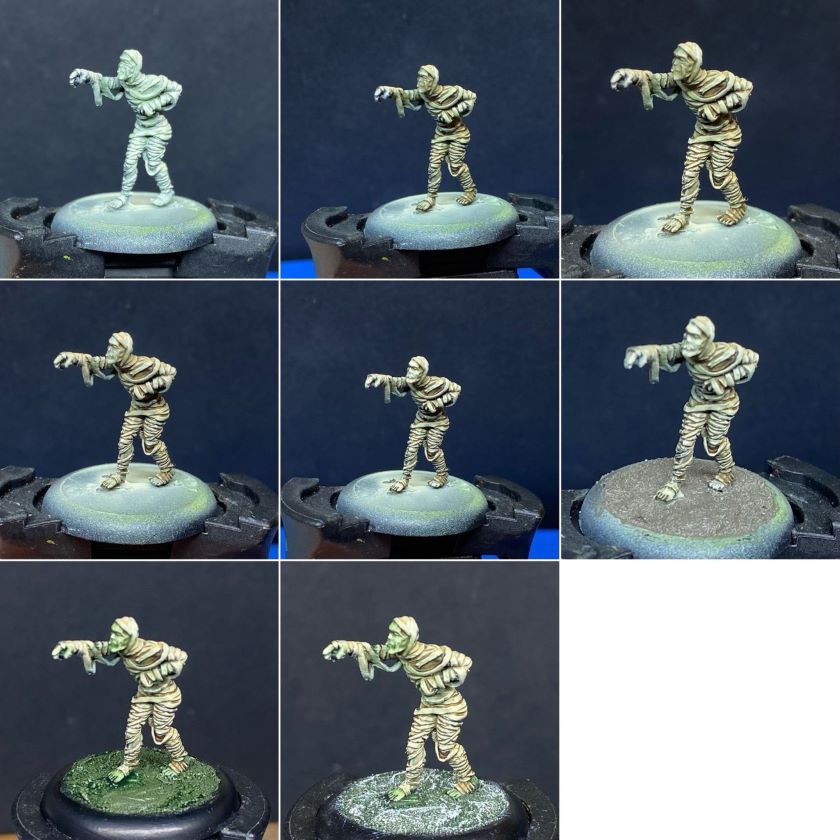
Starting with a green prime to give a slight greenish hue, this was followed a zenithal coat of white from my airbrush in order to quickly establish some contrast and pick up the detail, although this stage could be entirely skipped or replaced with a basic drybrush.
A sepia wash was used to shade the bandages, quickly bringing them into the colour profile we want while still retaining a greenish hue in the shadows. Next a dry brush of a bone colour was used to highlight the bandages and push the contrast back up.
Next the skin was highlighted up to a near white and then given a wash with a green tone.
The basing was done with a texture paint, washed with green and dry brushed up, initially I used a pale sand colour although this looked too white and was replaced with brown before dry grass tufts were applied and the base rimmed in black.
Frankenstein’s Monster
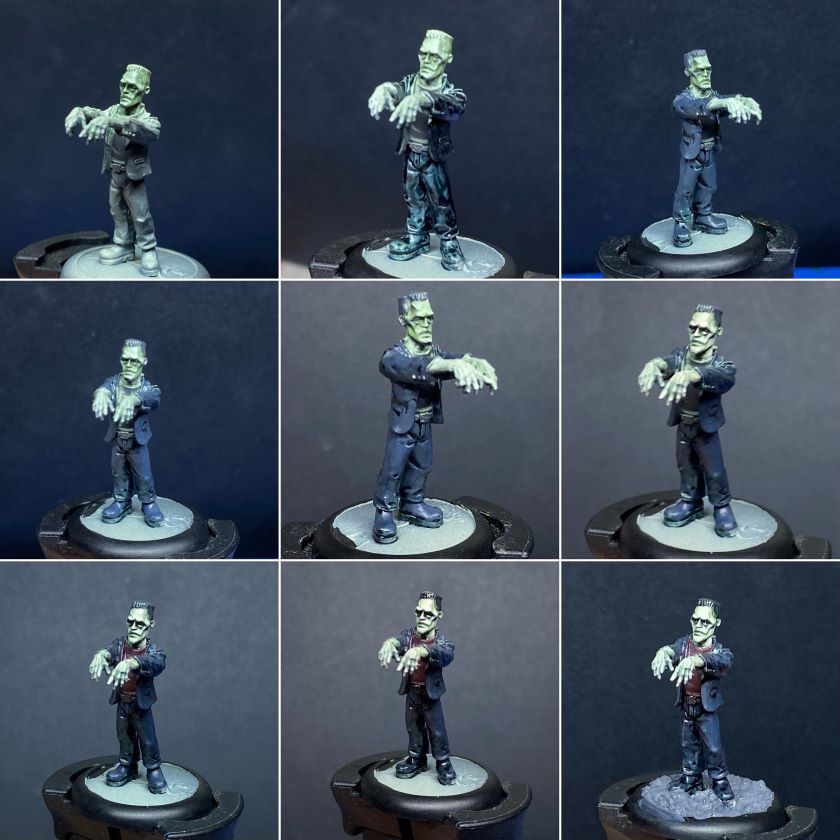
Starting with a black prime, followed by the same green as my mummy, then a white zenithal highlight was applied.
The first brush pass was using a contrast black to establish the clothes and hair against the skin, this was then tidied up with a dark grey, highlighted up by mixing a little bit of blue into it.
The skin was then worked up through green-greys mixing in a bit of a skin tone with each pass. The inner shirt was then painted in a mix of the grey and a dark red, highlighted up with the same red.
A little black wash was applied mainly used as a glaze in areas that needed more shadow and around the eyes.
He was then based up with a basic texture paste, washed black and drybrushed up to a grey, some green tufts and a black rimming were applied to finish him off.
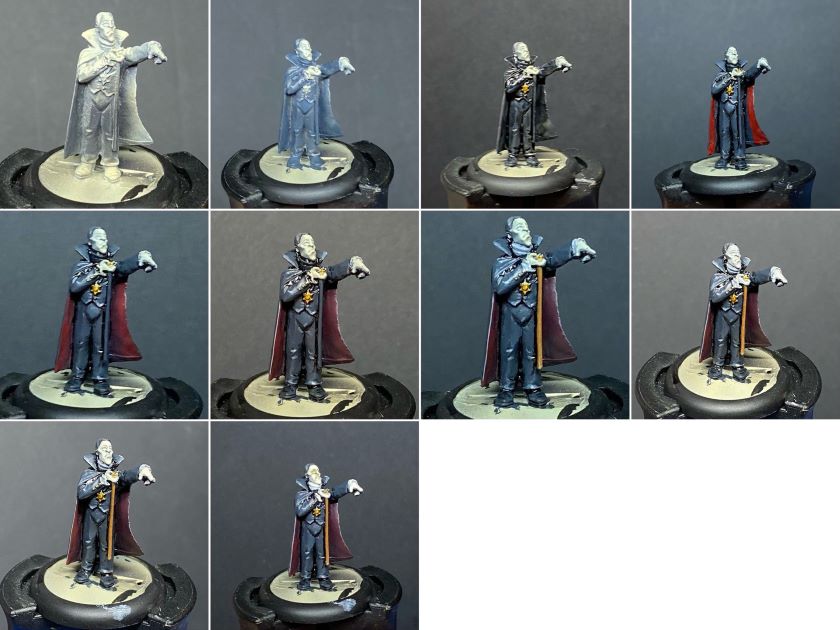
Dracula
Dracula started with a black prime, this was zenithal highlighted up with a warm off-white.
His clothes were blocked in with the same dark grey as I used for frankenstein, this was then washed black and then cleaned back up with the same grey, some edge highlights were applied to this using a brighter grey.
The inside of his cape was painted using a dark red then blended into the shadows of it with a mix of that red and with some of the dark grey.
His medallion and cuff buttons were dotted with gold and a tiny amount of brown wash applied to the medallion, his cane was painted with a brown, mixing a bit of pale skin tone into it for the highlight on the end.
Finally his skin was highlighted up through a series of greys with a bit more pale skin mixed into each step, a tiny drop of the brown wash applied to his medallion was also applied to his face to increase the contrast a bit, he was based in the same way as with Frankenstein’s Monster.
That wraps up our look at classic movie monsters but there’s more in our How to Paint Everything archives. As always, if you have any questions or feedback, email us at contact@goonhammer.com.
