
In our How to Paint Everything series, we take a look at how to paint well, everything. From armies to materials, techniques to finishes, we dive into the different ways of building and painting minis and examine the lore behind them. In this week’s article, we’re talking about the basics of using an airbrush to paint your miniatures.
Using an airbrush to paint miniatures can achieve some spectacular effects and save a ton of time. But it can also be incredibly daunting for someone new to the process and unused to working with an airbrush. In our Fabricator General article on Tuesday, we talked about the basic equipment and set-up you need for airbrushing; today, we’re going to talk about the airbrush painting process and walk through some basic techniques to help you get started. There’s a ton to cover here and more than a single article’s worth of content, but we frequently reference airbrushing methods in other How to Paint Everything articles, so keep an eye out for those when they come up.
Painting With An Airbrush
Priming is the first step after assembling your miniatures, it provides a surface for your paint to grab onto and provides a uniform basecoat of color. The color of the primer you use will usually depend on what your paint scheme will involve. Gloss black will make metallics more bright and reflective. Regular black is often a popular choice to start hand brushing from as any missed spots will look like shadows. Grey is a neutral color that works as a good general choice and what I usually work from. White is good for making bright colors pop and as good as a base for Citadel Contrast paints (Badger’s Stynylrez white primer in particular is great for this). I’ve found that generally primers will not need any thinning but I know that many hobbyists do so adjust as needed.
The main two acrylic primers out there are from Vallejo and Badger. I recommend Badger’s Stynylrez as they’re very no fuss and go down very smoothly. Vallejo is decent but has a tendency to clog airbrushes so this may be a case for thinning your primer.
Onto paints you’ll likely be thinning them yourself though there are a few paint lines specifically pre-mixed for airbrushing. Those include a few Vallejo lines (Model Air, Game Air, Mecha Color) and Citadel Air. With these you’re able to directly pour into your airbrush and use them without any fuss.
In terms of actually thinning your paints, you can mix your own thinner which is a combination of flow improver, medium and distilled water. I personally don’t bother and just use a premixed airbrush thinner like Vallejo Airbrush Thinner. As you become more confident you may want to tweak the consistency of the paint so having the components of an airbrush thinner is really useful. I’d also recommend getting some little sauce pots with pouring lips or mixing cups and pipettes. Mixing outside the cup makes it way easier to see what’s going on with your paint before you start spraying!
You’ll see a number of techniques suggested as you begin to practice and paint with your airbrush. Generally they’ll focus on dual-action brushes like the Patriot 105 recommended earlier. I recently switched from one technique to another, I’ll explain both below and provide video links too.
Technique One:
For this technique, paint should be around the consistency of skim milk and your compressor’s air pressure should be somewhere between 12 – 16 PSI. Start with the airbrush off one side of the miniature. Begin applying pressure down on the trigger and pull back to begin spraying paint then move the brush horizontally over the miniature. Once you’re clear of the miniature ease off of the paint (moving the trigger forward) and then the air (releasing your finger from the trigger). The main bit to take note of here is you don’t want to start your spray on the miniature itself as you’ll end up with areas with more paint than others. You can use this technique to spray horizontally back and forth over an area to get a consistent coat, or even adjust the amount of paint you’re spraying for each pass to create gradients.
Technique Two:
Paint consistency isn’t as important and air pressure should be somewhere between 29 – 35psi.
The brush is positioned where you want the paint to land.
Apply pressure so that your air is on and gently rock the trigger back and forth. NB. In this technique you alter paint consistency depending on the job you’re doing. A base layer would be much thicker than a glaze.
Technique may sound a lot simpler but takes a lot more practice. By pulsing the paint on to the model you’re building up very small and controlled layers over time, drying them with the airflow of the brush in between.I’ve begun to prefer technique two, though I started with one myself. I can go from varnishing, to priming, to laying down an air paint all without changing the PSI or doing any thinning. Here’s a video that explains it well.
Varnishing
Varnishing, also known as topcoating, is a final step for protecting your miniatures and applying a desired surface finish. These can be applied exactly the same as your primer and paint but just be sure not to flood the surface. Vallejo makes good varnishes but for gloss topcoats it’s hard to get much better than Pledge Future. It’s a floor polish that works as an acrylic gloss topcoat that’s strong as hell, easy to use, and very cheap.
Basic Fades, by Evan “Felime” Siefring
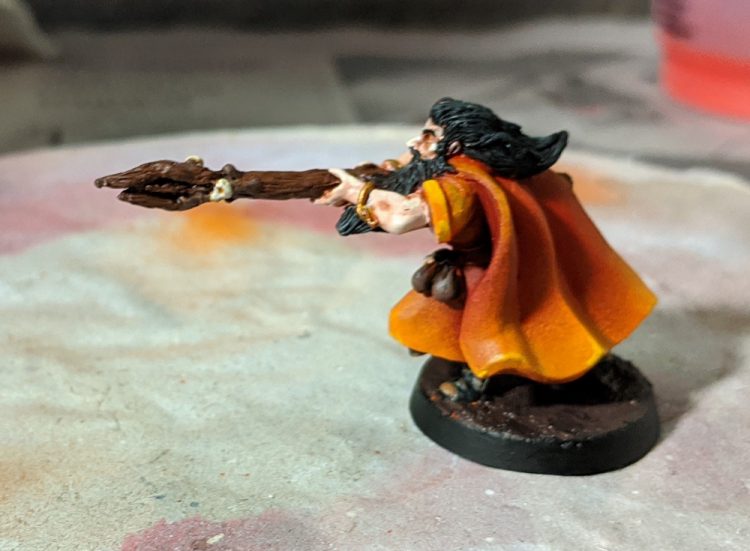
Making it easy to apply smooth color transitions to a model is one of the best advantages an airbrush has to offer. The effect we’re going to showcase here is a very basic fade, which will then be followed by painting the rest of the model traditionally. Framing airbrush effects with detail done with a brush is a great technique that goes quite quickly and can be quite striking on the tabletop, while helping avoid the more traditional “airbrushed look”. I am going to use a wizard, but this could work well on anything with a large flowing area you want to apply a fade to, such as nighthaunts, robes, capes on Space Marine captains, etc. — Just change out the colors as needed.
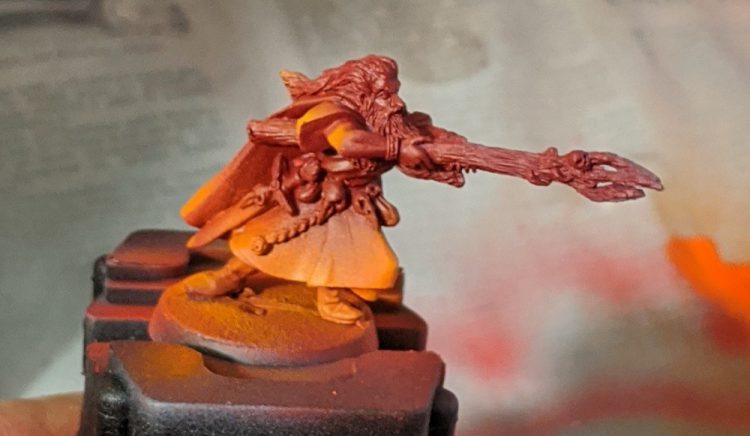
Here’s our wizard after the first steps. To do this, first spray the entire wizard with a dark red(VGA Gory Red). Once the entire model is red, come in with an orange (VGC Orange Fire), starting to spray off of the edge of the model and moving along the edge of the area you want to be orange, gradually going back and forth to build up the effect until you’re happy with the amount of orange present. Then, I repeated the process with a yellow (Golden High Flow Acrylics Hansa Yellow Medium. Any nice pure yellow will work, I used this for convenience), spraying along the edge of the fade and moving upwards, but much less far this time, only catching the very edges.
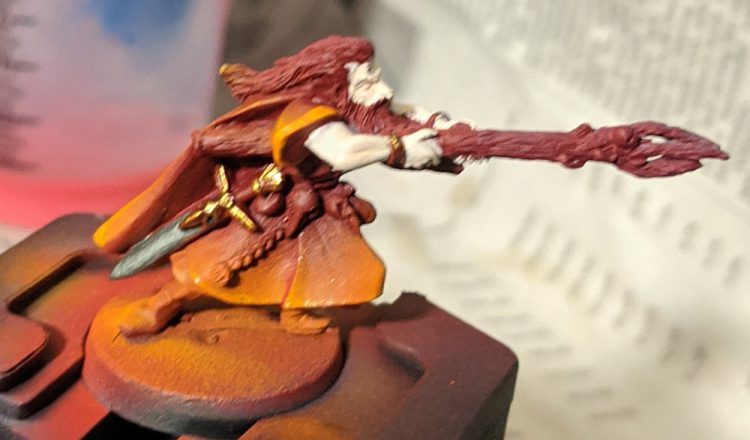
Here the wizard is after I did a little bit of brush painting. I reinforced the trim on his sleeves with the orange color and edge highlighted with yellow. At this point, as I started to get a better idea of how the final colors would look, I decided that I hadn’t been aggressive enough with the yellow and wanted to blend in the edge highlights a bit more. As I haven’t painted much along the edges, this isn’t too big of a problem. If you’re careful, you can go back in and modify your airbrush work even when you’ve done a bit of work on the model.

I went back in with my airbrush yellow, repeating the previous process to work more yellow into my fade. I then touched up the bits of the sword and skin that had gotten caught in the crossfire of the airbrush, and continued my brushwork.
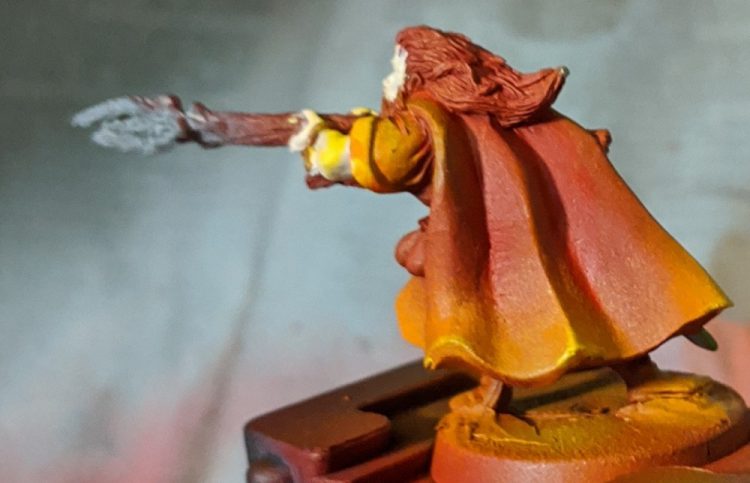
Now paint the rest of the owl. Nothing particularly special, and I mostly used the opportunity to play around a bit. I’ll include a reference for the other parts of the model at the end of this segment.
The idea of laying down an airbrush effect, then coming in and working around (or over) it is the basis of a lot of airbrush work. Without too much modification, you can apply a similar technique to things like fur, patterns on horses, large areas of skin, gradients on armor plates, or anything else your mind can come up with. Just play around and have fun learning and experimenting!
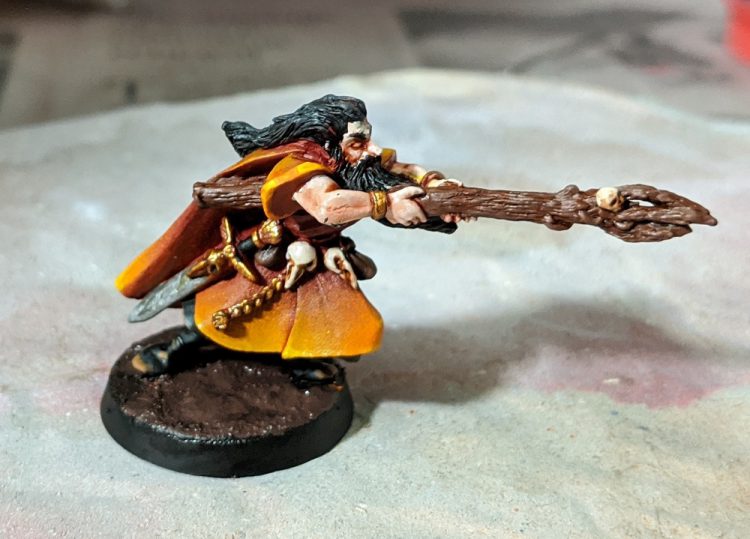
Paints Rundown:
- Skin: VGC Pale Flesh washed with Guilliman Flesh thinned with Lahmian Medium, extreme highlights with VMC Pale Sand (Less successful on this old metal model than on newer plastics)
- Boots: VMC Black Highlighted with Skavenblight Dinge, then Skavenblight dinge mixed with Jokaero Orange, then dots of Jokaero orange
- Staff: Gorthor Brown washed with watered down VMA Burnt Umber
- Pouches: VMA Burnt Umber highlighted with Gorthor Brown
- Skulls: Filthy Brown highlighted with VMC Pale Sand, recesses reinforced with very watered down VMA Burnt Umber
- Beard: VMC Black highlighted with Skavenblight Dinge
- Gold: VGC Hammered copper, dotted with Retributor Armor in highlights
- Steel: Vallejo Mecha Air Dark Steel, dotted with Vallejo Mecha Air Steel to highlight.
Zenithal Priming, by Alfredo Ramirez
Zenithal priming is another great way to achieve striking effects quickly with an airbrush. With zenithal priming, rather than priming our model with a single uniform coat, we instead use several shades for the primer coat, with lighter colors sprayed from the direction of the “light source” we’re going to apply to the model’s paint (this is typically from above the model, so the lightest points will also be the highest points, or zenith, of the model). Once we’ve laid out a primer coat in this way we can apply a single thin layer of paint over it that will naturally reflect the colors of the undercoat, creating visually striking but subtle effects that improve the model’s appearance.
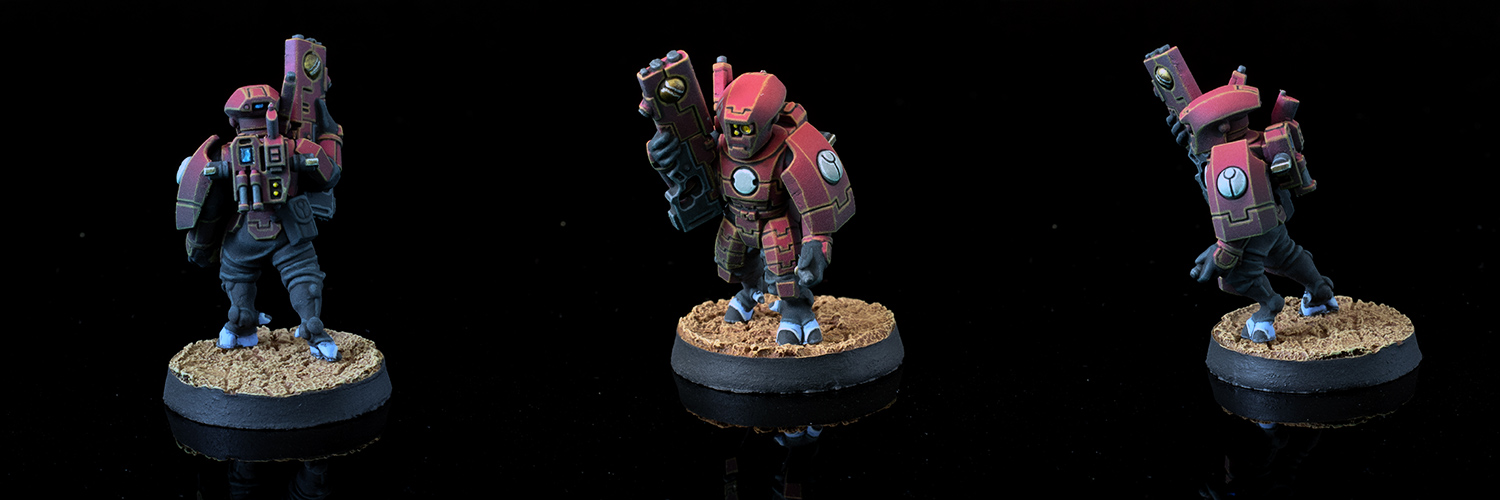
In this example from How to Paint Everything: T’au, Alfredo talks about his approach to painting Farsight Enclaves Fire Warriors.
T’au infantry are relatively simple in that they don’t have a ton of materials, so you get large blocks of color. But you also get a lot of edges. My goal for this scheme was to maximize contrast on the red armor so that Joe would be easily readable at a distance. That said, I also didn’t want to go with a complicated scheme so hopefully you’ll find this approach relatively simple but striking.
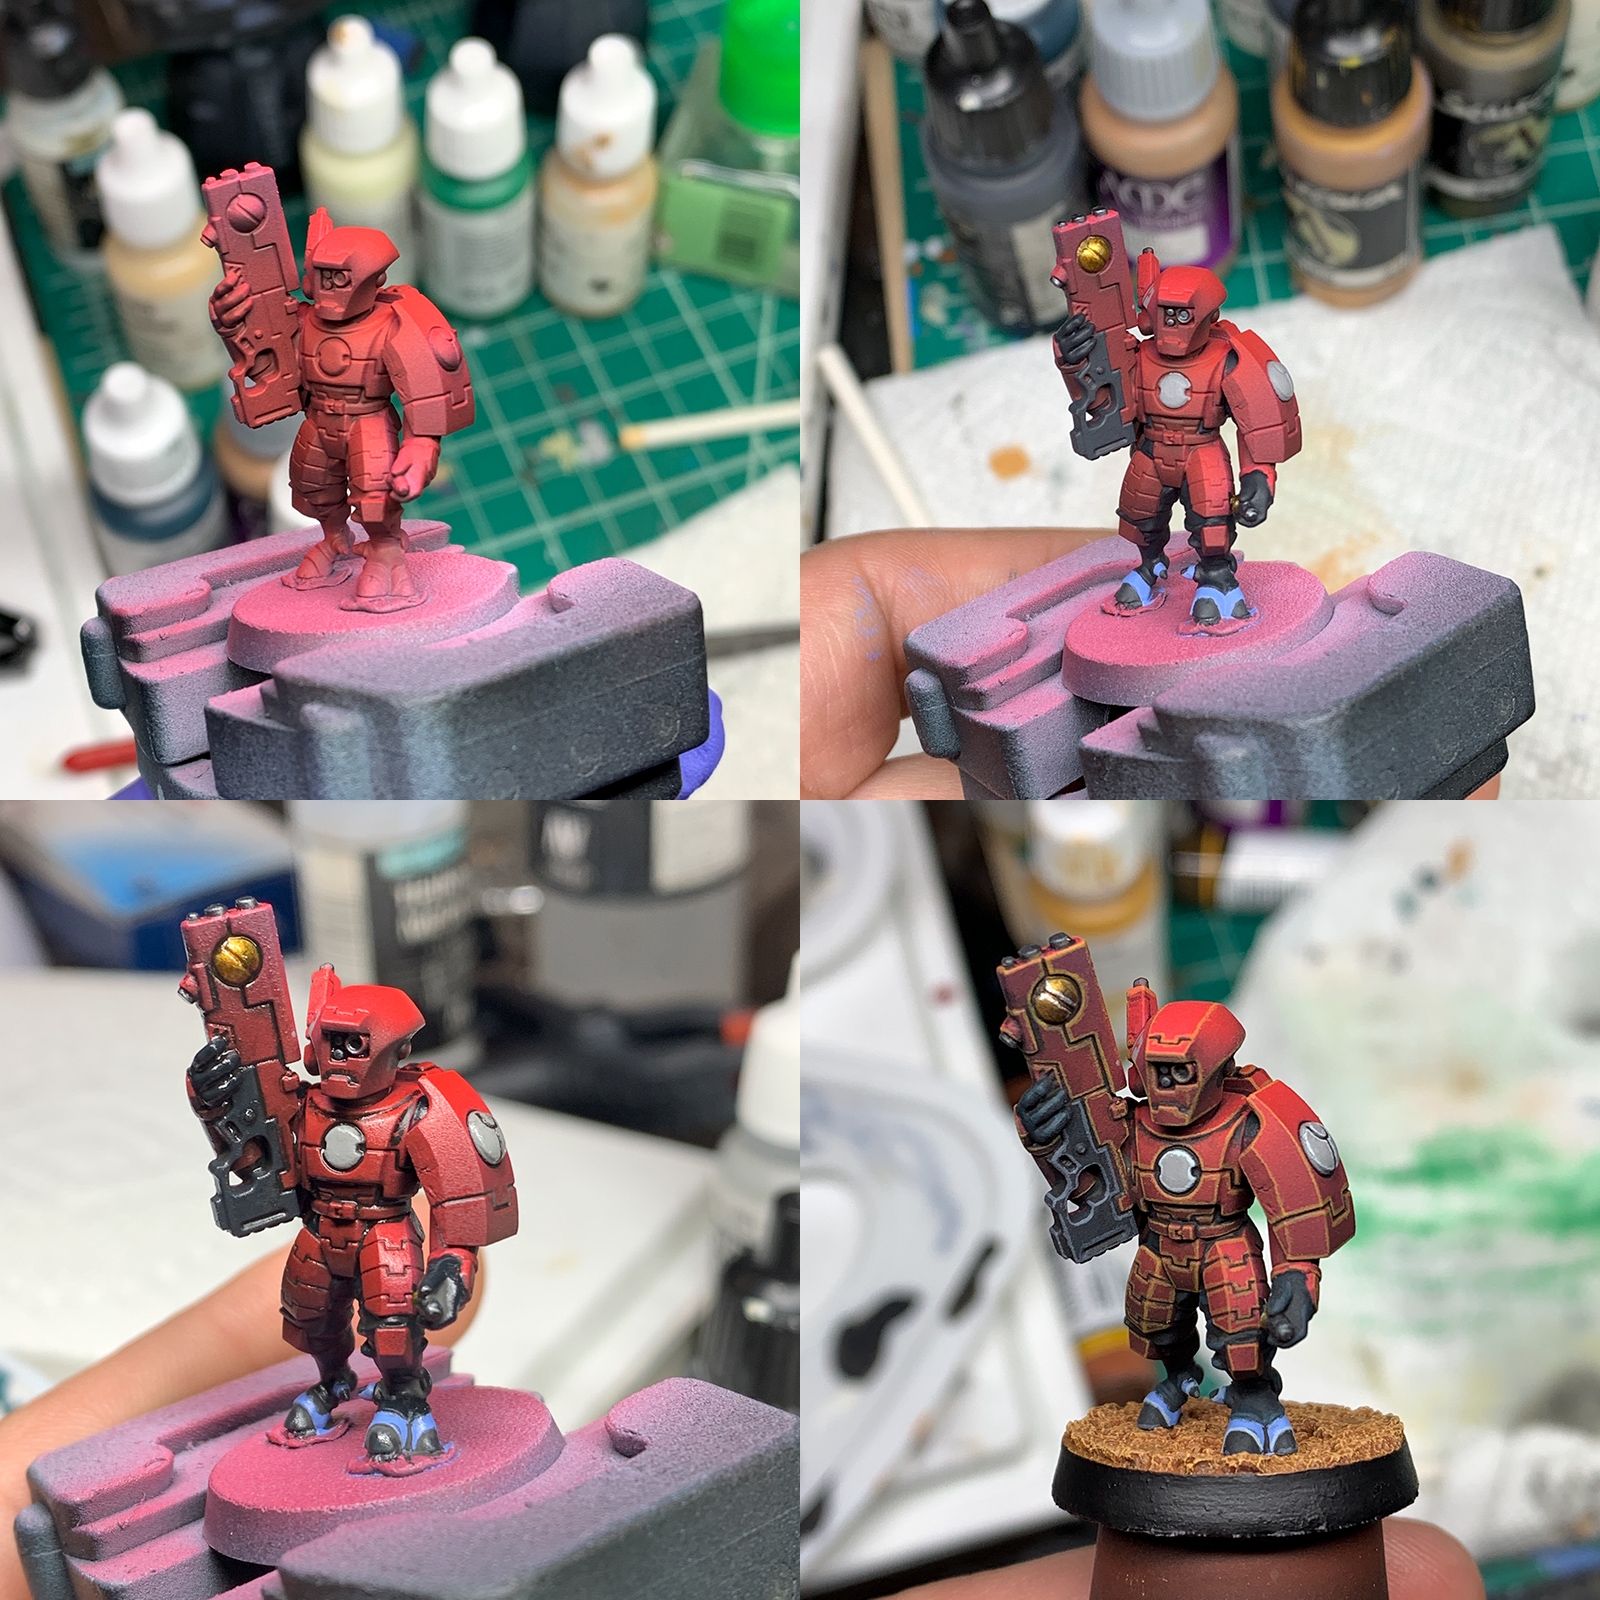
Joe Tau Credit: Alfredo Ramirez
- First things first was priming (which isn’t pictured but I’m sure you know how that works). I went with a black/grey/white zenithal prime using my airbrush. The plan here was to give me enough initial contrast so that I could then spray a single base color and still get a nice gradient effect. To achieve this I airbrushed Scale75 Blood Red which makes for a great baseline red in my opinion. I thinned it 4:2:2:1 with water, flow improver and airbrush thinner and sprayed it in several thin layers to get a nice basecoat that takes advantage of the zenithal underneath. The contrast is much less obvious when you first spray the model and everything is the same color but it comes to life as you paint more. To push the contrast further, before moving on to the remaining basecoats, I thinned green ink heavily (8:1) and sprayed it from below to push the shadows towards green and have them contrast with the red armour.
- Like I said, there’s not a ton of materials on your typical T’au infantry so the remaining basecoats were fairly simple. For all the cloth I used a 1:1 mix of Black and Vallejo Dark Sea Blue. This is a green-ish dark blue (not unlike Incubi Darkness) and again helped me push the contrast with the red. For the sept color I went with Vallejo’s Dark Sea Grey which is a cold grey with some green tones (do you see the theme here yet?). Other than that I used a nice bright gold for the thankfully limited metal bits and a neutral near-black for the rifle. For the skin, I wanted something reasonably saturated and found that Vallejo Azure was the perfect color to serve as a base for T’au skin. Like any skin, feel free to vary this across your army and create some tonal variations (I can’t imagine all T’au are exactly the same color).
- As is usually the case, I gloss coated the miniature and then use a black enamel wash to pin wash everything. T’au have lots of panel lines and so pin washes work really really well to create visual distinction. Just take your time with this and erase any mistakes with thinner, it’s pretty simple thankfully.
- Finally, edge highlights. There’s a lot of these on the armour and they take a while, so buckle up. For the armour, I highlighted using an ochre, which is my preferred method usually instead of an orange or pink. I specifically used Vallejo Brown Ochre and also used that as my first drybrush on the base (which helps tie the model and the base together). The cloth was highlighted by mixing in some Sunny Skintone to Dark Sea Blue in order to add some yellow tones and brighten it up. The rest is pretty straightforward, neutral grey for the weapon, a lighter grey for the sept color and highlights for the gold. For the skin, you want to have something actually skin-like to highlight with. You can use an actual light skin color (like kislev) or mix it in with whatever you base was. In my case I have a lot of fantasy/alien skin colors and I used Scale Fantasy’s Braineater Azure to highlight. It’s blue but also skin-like so works great. The final step was to once again spray the entire mini from below with thinned green ink to push the contrast further. I think it worked quite nicely and you end up with some really good tonal variation that is readable at a distance. The actual last step (after matte varnishing) was to paint a bright silver on the eye lenses (and the glowy bits on the back) and then cover with Tamiya Clear. You could use green for the eye lenses for maximum contrast but I’ve usually seen yellow in the codexes so I went with that and it looks good. I gloss coat the lenses afterwards and all finished.
And the final result:
Joe Tau Credit: Alfredo Ramirez
Start Creating
With a little practice, an airbrush can be a very useful tool. It can aid in laying down primer, basecoats, and varnish, and those are a great way to start to learn the fundamentals. Once you are comfortable with the basics, you can start playing around. This is a fairly quick and simple project that you can do without too much know-how or a particularly fancy airbrush that hopefully gets you thinking about ways to incorporate your new toy into your painting routine. And once you are regularly creating jewel-like objects of wonder and sharing them online, feel free to share them with us in the Comments below, or if you have any questions or feedback, drop us a note there or email us at contact@goonhammer.com.
