In our How to Paint Everything series we look at how to paint well, everything, with different methods, approaches, and painters. In this article we’re looking at how to paint the traitorous forces of the Iron Warriors for Warhammer 40k and The Horus Heresy.

The IVth legion of space marines were masters of siege warfare, particularly the destruction and dismantling of defenses. They were known for their grim determination and steadfast resolve, as well as their chant of “Iron Within, Iron Without” when they went into battle. As a legion they followed their Primarch, Perturabo’s lead, being technically adept and being experts at the application of vehicles and siege engines.
When Horus rebelled against the Emperor, Perturabo and his legion followed suit. They’d been stretched to the breaking point during the Great Crusade and were tired of never receiving the recognition they felt they deserved, even as they engaged in a grueling campaign against the Hrud. Turning against their brothers, they relished the opportunity to attack the defenses built by their rivals, the Imperial Fists. They played an instrumental role in the Siege of Terra, working to break down the defenses of the Imperial Palace.
After Horus’ death, the legion retreated into their fortresses and strongholds, and were only chased into the Eye of Terror at considerable difficulty and cost. They continue to attack the Imperium to this day, serving as siege experts in Abaddon’s Black Crusades and leading warbands of their own, often teeming with infernal daemon engines.
Covered in This Article:
- How to paint the Iron Warriors, with different methods for painting the legion.
- How to paint Heresy-era Iron Warriors, with a link to an article on how to paint the legion’s Primarch, Perturabo.
- Notes on the Heraldry and iconography of the Iron Warriors.
- How to paint the distinct yellow and black hazard striping the legion is known for.

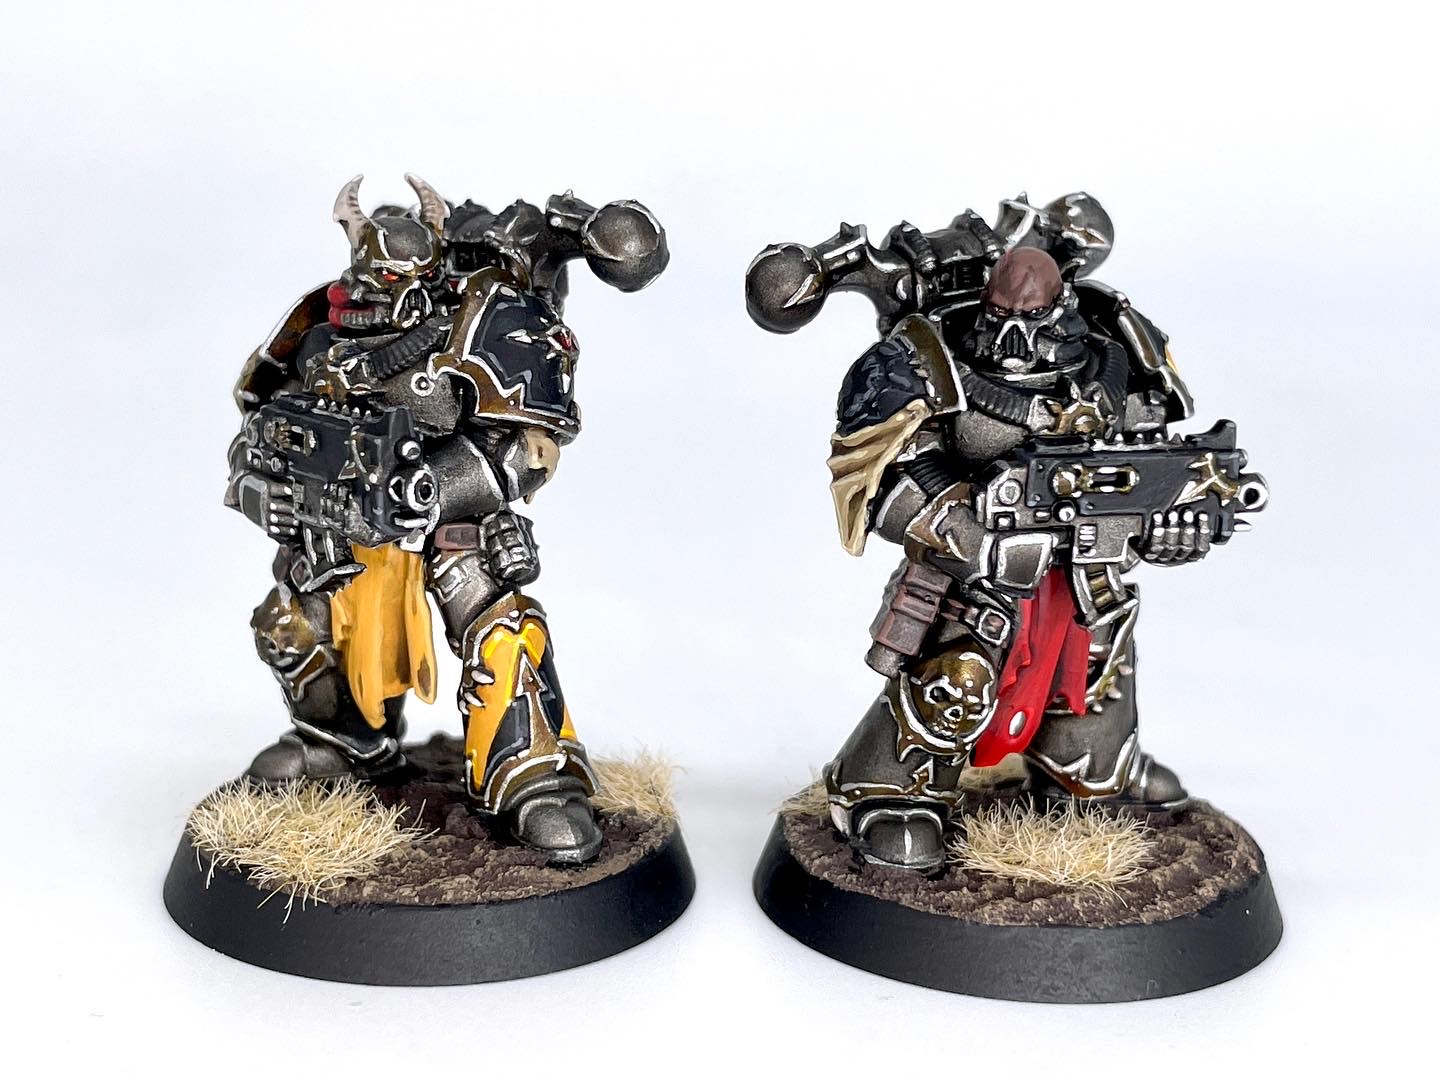
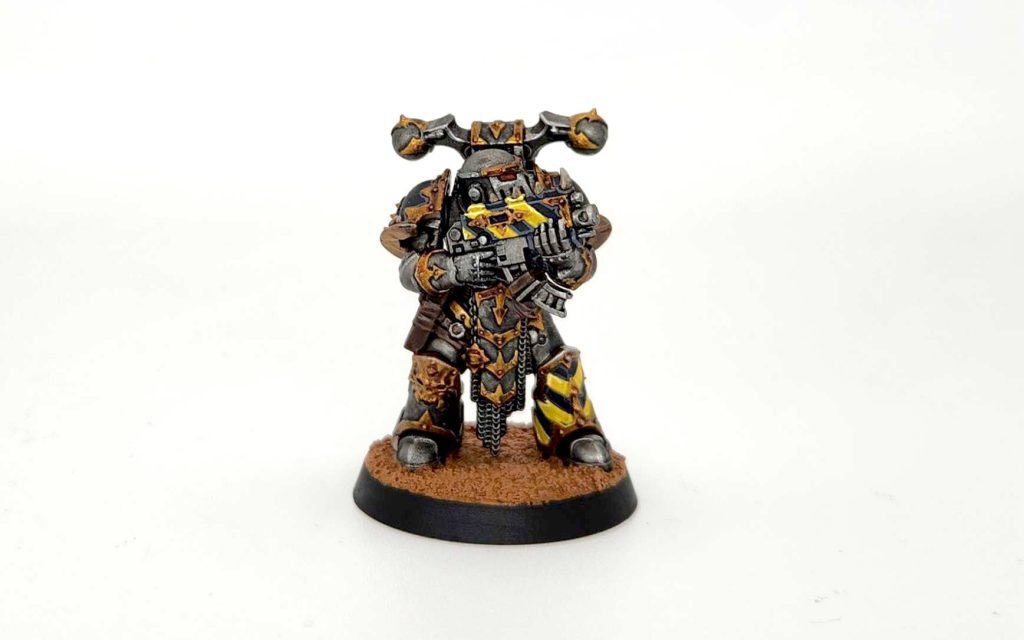
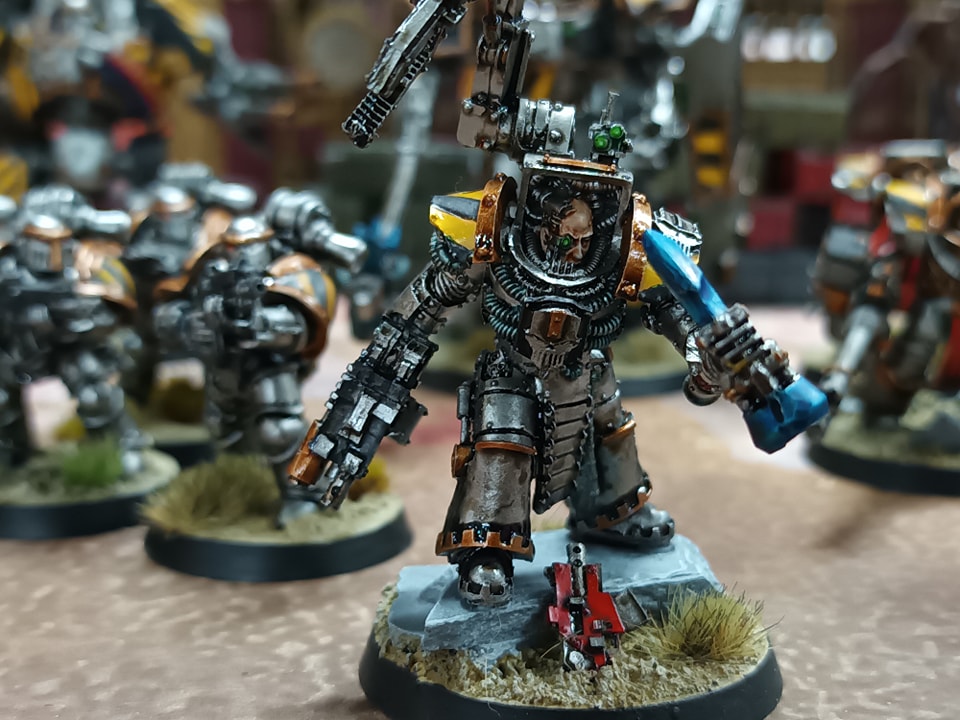
Iron Warriors Heraldry - Click to Expand Like the other traitor legions, the Iron Warriors abandoned most notions of proper organization following the Heresy, splitting into smaller warbands led by powerful Chaos Lords, Warpsmiths, and Daemon Princes. That said, there are some notable quirks to the legion – Warband leaders in the Iron Warriors are called Warsmiths, and the warbands themselves usually employ a larger number of Warpsmiths, Daemon Engines, and Obliterators. The first recorded instances of Obliterators were from among the Iron Warriors’ ranks. The legion’s colors and heraldry have changed little from the days of the Heresy, with the addition of gold trim and additional hazard stripes being the only major change they’ve implemented.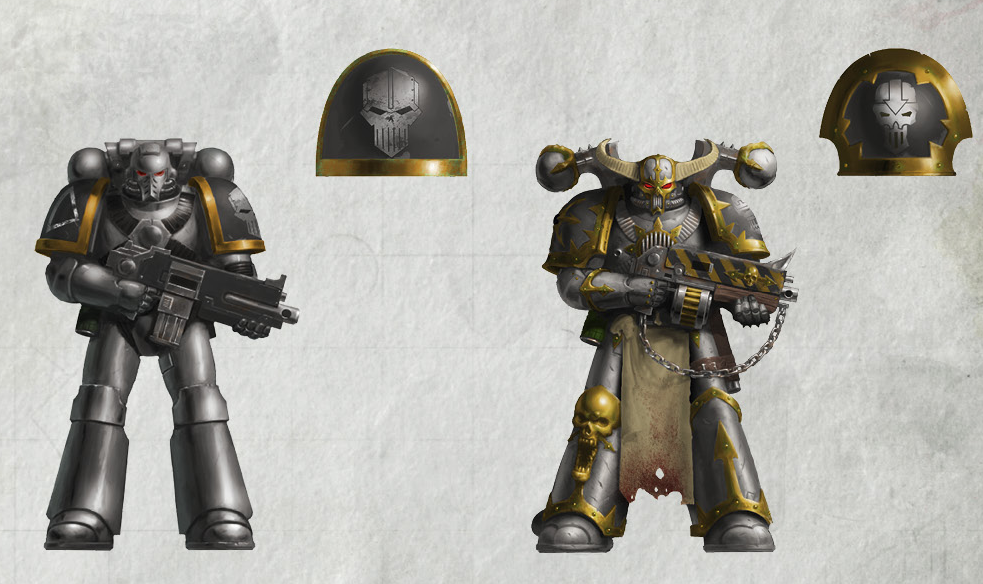

Hazard Striping - Click to Expand We’ve written a whole guide to painting hazard stripes, zigzags, and checker pattern designs. You can find that guide by clicking on this link.

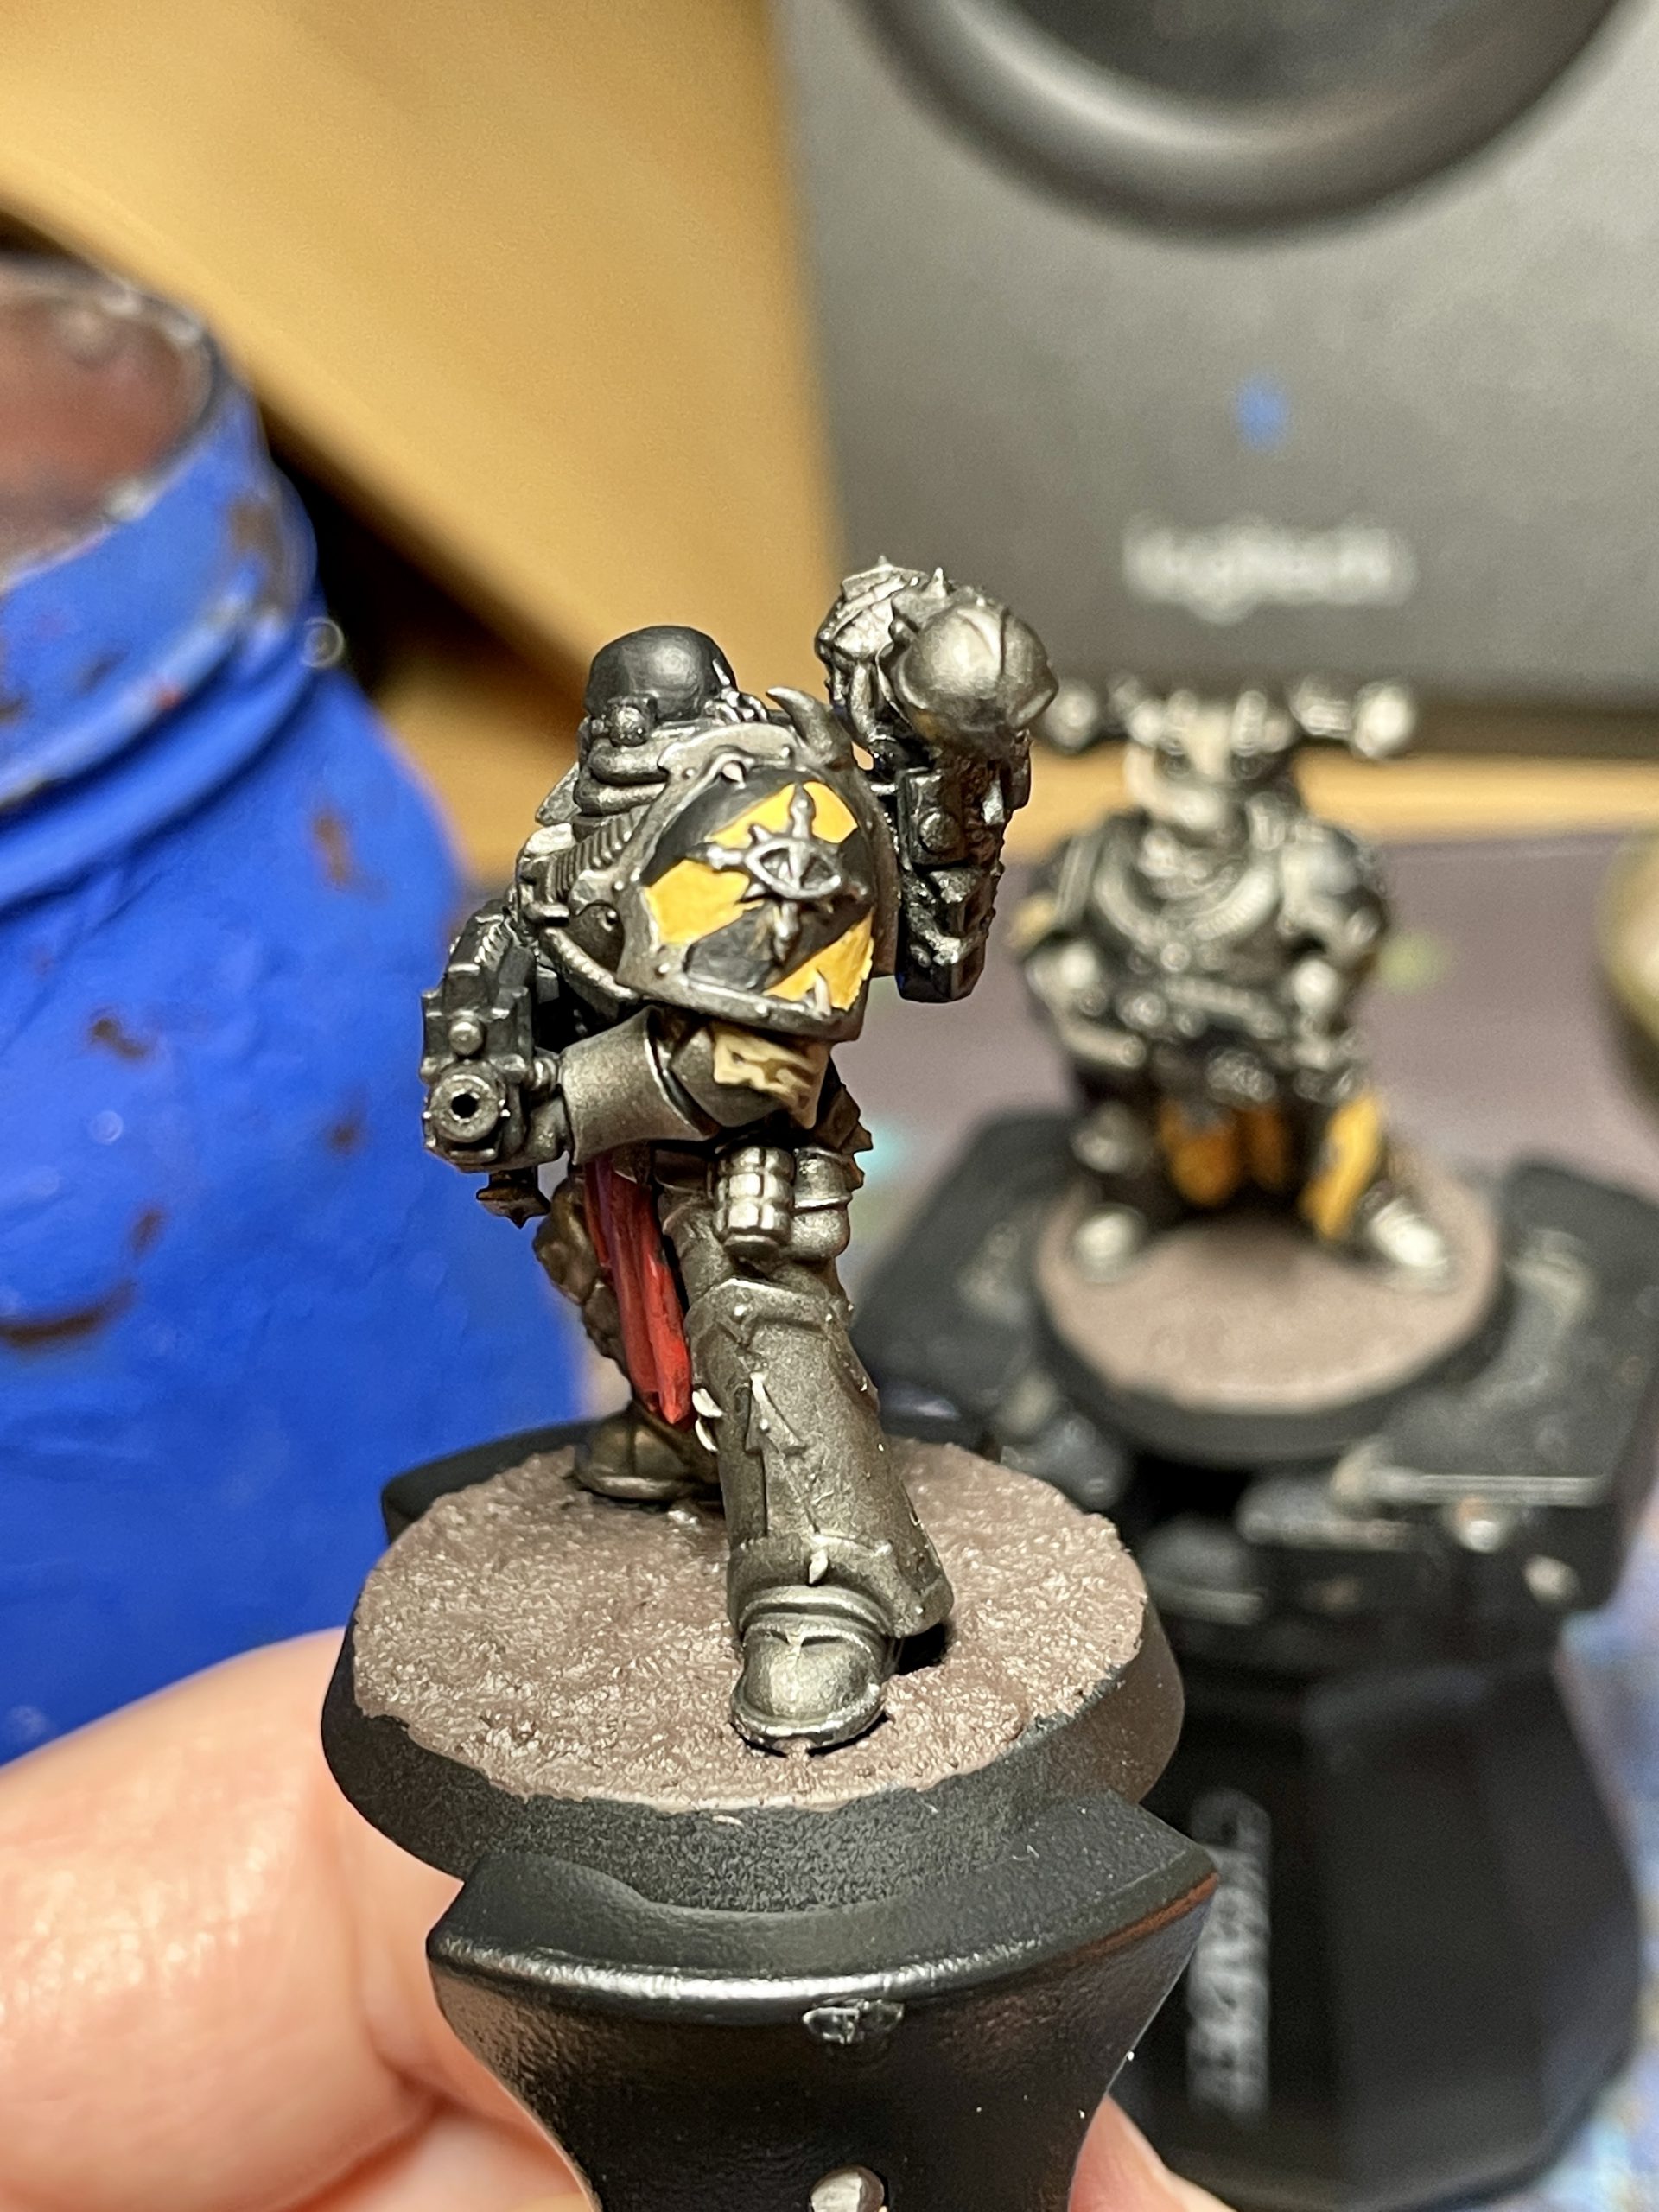
Campbell's Method - Click to Expand Hey, it’s me, the guy who writes a painting tutorial before actually painting anything! I have this awful habit of writing a painting tutorial completely off the dome, then going back and following it, adjusting as needed. It’s not a good process, but it’s my process. This will be working from black primer. You could use Leadbelcher primer instead, but I find it dries kind of glossy and washes slide off it. We’re also going to be going darker than Leadbelcher, but if you really wanted to use it instead of Iron Warriors I can’t stop you. I’m neither a cop nor your dad, so do what you will. Appropriately, we’re going to start by painting the whole miniature with Iron Warriors metallic paint. Don’t worry about getting onto other details, you can be sloppy with it. We’ll follow that by popping on our basecoats for the leather, cloth, bone, and other details, then slathering the whole mini in a 50/50 wash of Nuln Oil/Agrax Earthshade. Mixing these two gets an oily, dark and dirty look. You could do one then the other but it’ll double your drying time, and I want to get these guys on the table fast. Once the wash is all dry we can go back and start layering and highlighting up each of the previous colors, then take the time to fill in the black and yellow details. We’ll begin by going back and blocking in all the areas we want to be black or yellow. For hazard striped areas like the field on the pauldrons (and potentially greaves and gun casings if you’re feeling spicy) paint them with Averland Sunset. It’s easier to paint black over yellow than it is to paint yellow over black. It’ll probably take 2-3 coats. You can then take thinned black (I use P3 Thamar Black, but GW’s Abaddon Black will do) and lightly paint the lines where you want the hazard stripes to be. Fill them in with black, clean them up if need be, and do a recess shade of Seraphim Sepia on the yellow. You can then highlight with Yriel Yellow, followed by Dorn Yellow for the sharpest points. The black should be highlighted with Eshin Grey then Dawnstone, following the same techniques. For more detail on painting hazard stripes and such, we wrote a great article with loads more methods. Black areas can simply be blocked in with your black paint of choice. This is generally going to be one or both pauldrons and the weapon casings. As the legion badge sits on the left pauldron, it’s usually a good shout to put down a more plain color so it won’t look so cluttered if you freehand the Iron Warriors symbol or slap a decal down there. Highlight the black as detailed in the caution stripes step above. There’s often some cloth or hair floating around, like loincloths, capes, topknots, or some other textural elements. As the Iron Warriors scheme is heavy on neutral colors, it’s a chance to get a pop of color in there without straying too far from the established color palate. For yellow cloth, I base with Averland Sunset to tie it in with the hazard stripes. For red cloth, I base with Mephiston Red, which ties in with the eye lenses and weird Chaos tubes. Lastly, for a more neutral cloth, I base with Zandri Dust. These all get knocked down by the 50/50 Nuln/Agrax wash, so we’ll bring them back up to their base coat and layer up by mixing in lighter shades of yellow, red, and tan respectively. You could just go straight to highlighting instead, but I like layering cloth up – it’s relaxing and a nice break from sharp edge highlights. The specific colors I use are further down this article but the method is what’s most important. Teeth and bone find their way onto Chaos models on the reg. We’ve already based these areas with Rakarth Flesh and washed them with that same all over 50/50 Agrax/Nuln mix, so let’s brighten them back up. Using Rakarth Flesh, go back and highlight all that osseous detail, then mix in gradually more Flayed One Flesh for increasingly raised areas. I like doing a final highlight of Flayed One Flesh for any sharp edges. Contrast paints are going to be your friends for a lot of the details here. First, use Black Templar on all the ribbing in the joints, all the ribbed pipes, grilles, vents, and so on. It’ll help make those pipes stand out from the dark steel of the armor, and add some depth and a blackened effect to things like the backpack vents. Next, it’s the real magic trick of this whole process – Nazdreg Yellow on all the trim. Painting and highlighting the trim is always the biggest pain in the butt on Chaos models, but one coat of Nazdreg Yellow over the dark steel we’ve already established will give you a dirty gold that fits perfectly with the Iron Warriors aesthetic. If there’s any other gold you want to put on the model, like some of the random Chaos icons, hanging baubles, or what have you, this is still the go-to method. Just be careful and don’t bother thinning it down at all, as we don’t want it flowing elsewhere on the model. If you spill over a little, be quick and soak it up with a brush. Invariably you’ll run into lenses – eyes, weapon targeters, those cool cyber-monocles, whatever. Base these with Mephiston Red, and highlight the bottom half of the lens with Evil Sunz Scarlet. Now highlight the very bottom edge with Fire Dragon Bright. Then in the furthest corner from these highlights, use a tiny amount of that same 50/50 wash to darken a round area at the top of the lens. Put a tiny dot of White Scar in that darkened corner. On eye lenses, do the same process but with the white dot appearing on the far outside corners, and the oranges concentrating towards the center of the face. You could do that darkened dot in a darker red or even a black, but I’m trying to be quick here. There are these fleshy tubes that find their way onto Chaos models which I’m not exactly buckwild about. They’re kinda gross and usually have some mechanical ribbing, but there’s a few ways you can go about painting them. My first attempt was Mechanicus Standard Grey with Black Templar Contrast paint, then a soft highlight of Eshin Grey on the most raised areas. This lacked lower-case-c contrast with the steel of the armor, so on my second attempt I went for red instead. Starting from Mephiston Red, I washed it with the same 50/50 Nuln/Agrax wash I love to use so much, then highlighted it back up with Mephiston Red. I mixed in just a smidge of Wild Rider Red for some of the sharper highlights on it, but I really don’t like these details so I didn’t spend too long on them. Lastly, it’s time to highlight all the metals. This is the longest part of the process, but the one that makes all those details pop and brings the scheme together. I went with Stormhost Silver, as I wanted to maximize the contrast and definition of these models. Normally I’d do some weathering too, but these models are already so busy that adding scratches and such just seems like it would be too much. Tying it all together, I went with a pretty neutral muddy base with some Galeforce Nine dead grass I bought in 2008. The basing was just Stirland Mud with successive drybrushes of Steel Legion Drab and Karak Stone, with a final coat of black around the base rim. Paints Used - Click to Expand Thing (Location): Dark Steel (Armor): Ribbing (Joints, vents, grilles): Dirty Gold (Trim): Black (Gun casing, shoulder pad field): Leather (Straps, holsters): Bone (Horns, skulls, uhhh femurs I guess? ): Hazard Stripes (Shoulders, greaves, wherever): Neutral Cloth (Tabbards, cultist uniforms): Red Cloth (Tabbards, spicy cultist uniforms): Yellow Cloth (Tabbards, pissboy cultist uniforms): Lenses (Eyes, targeters):

Paints List

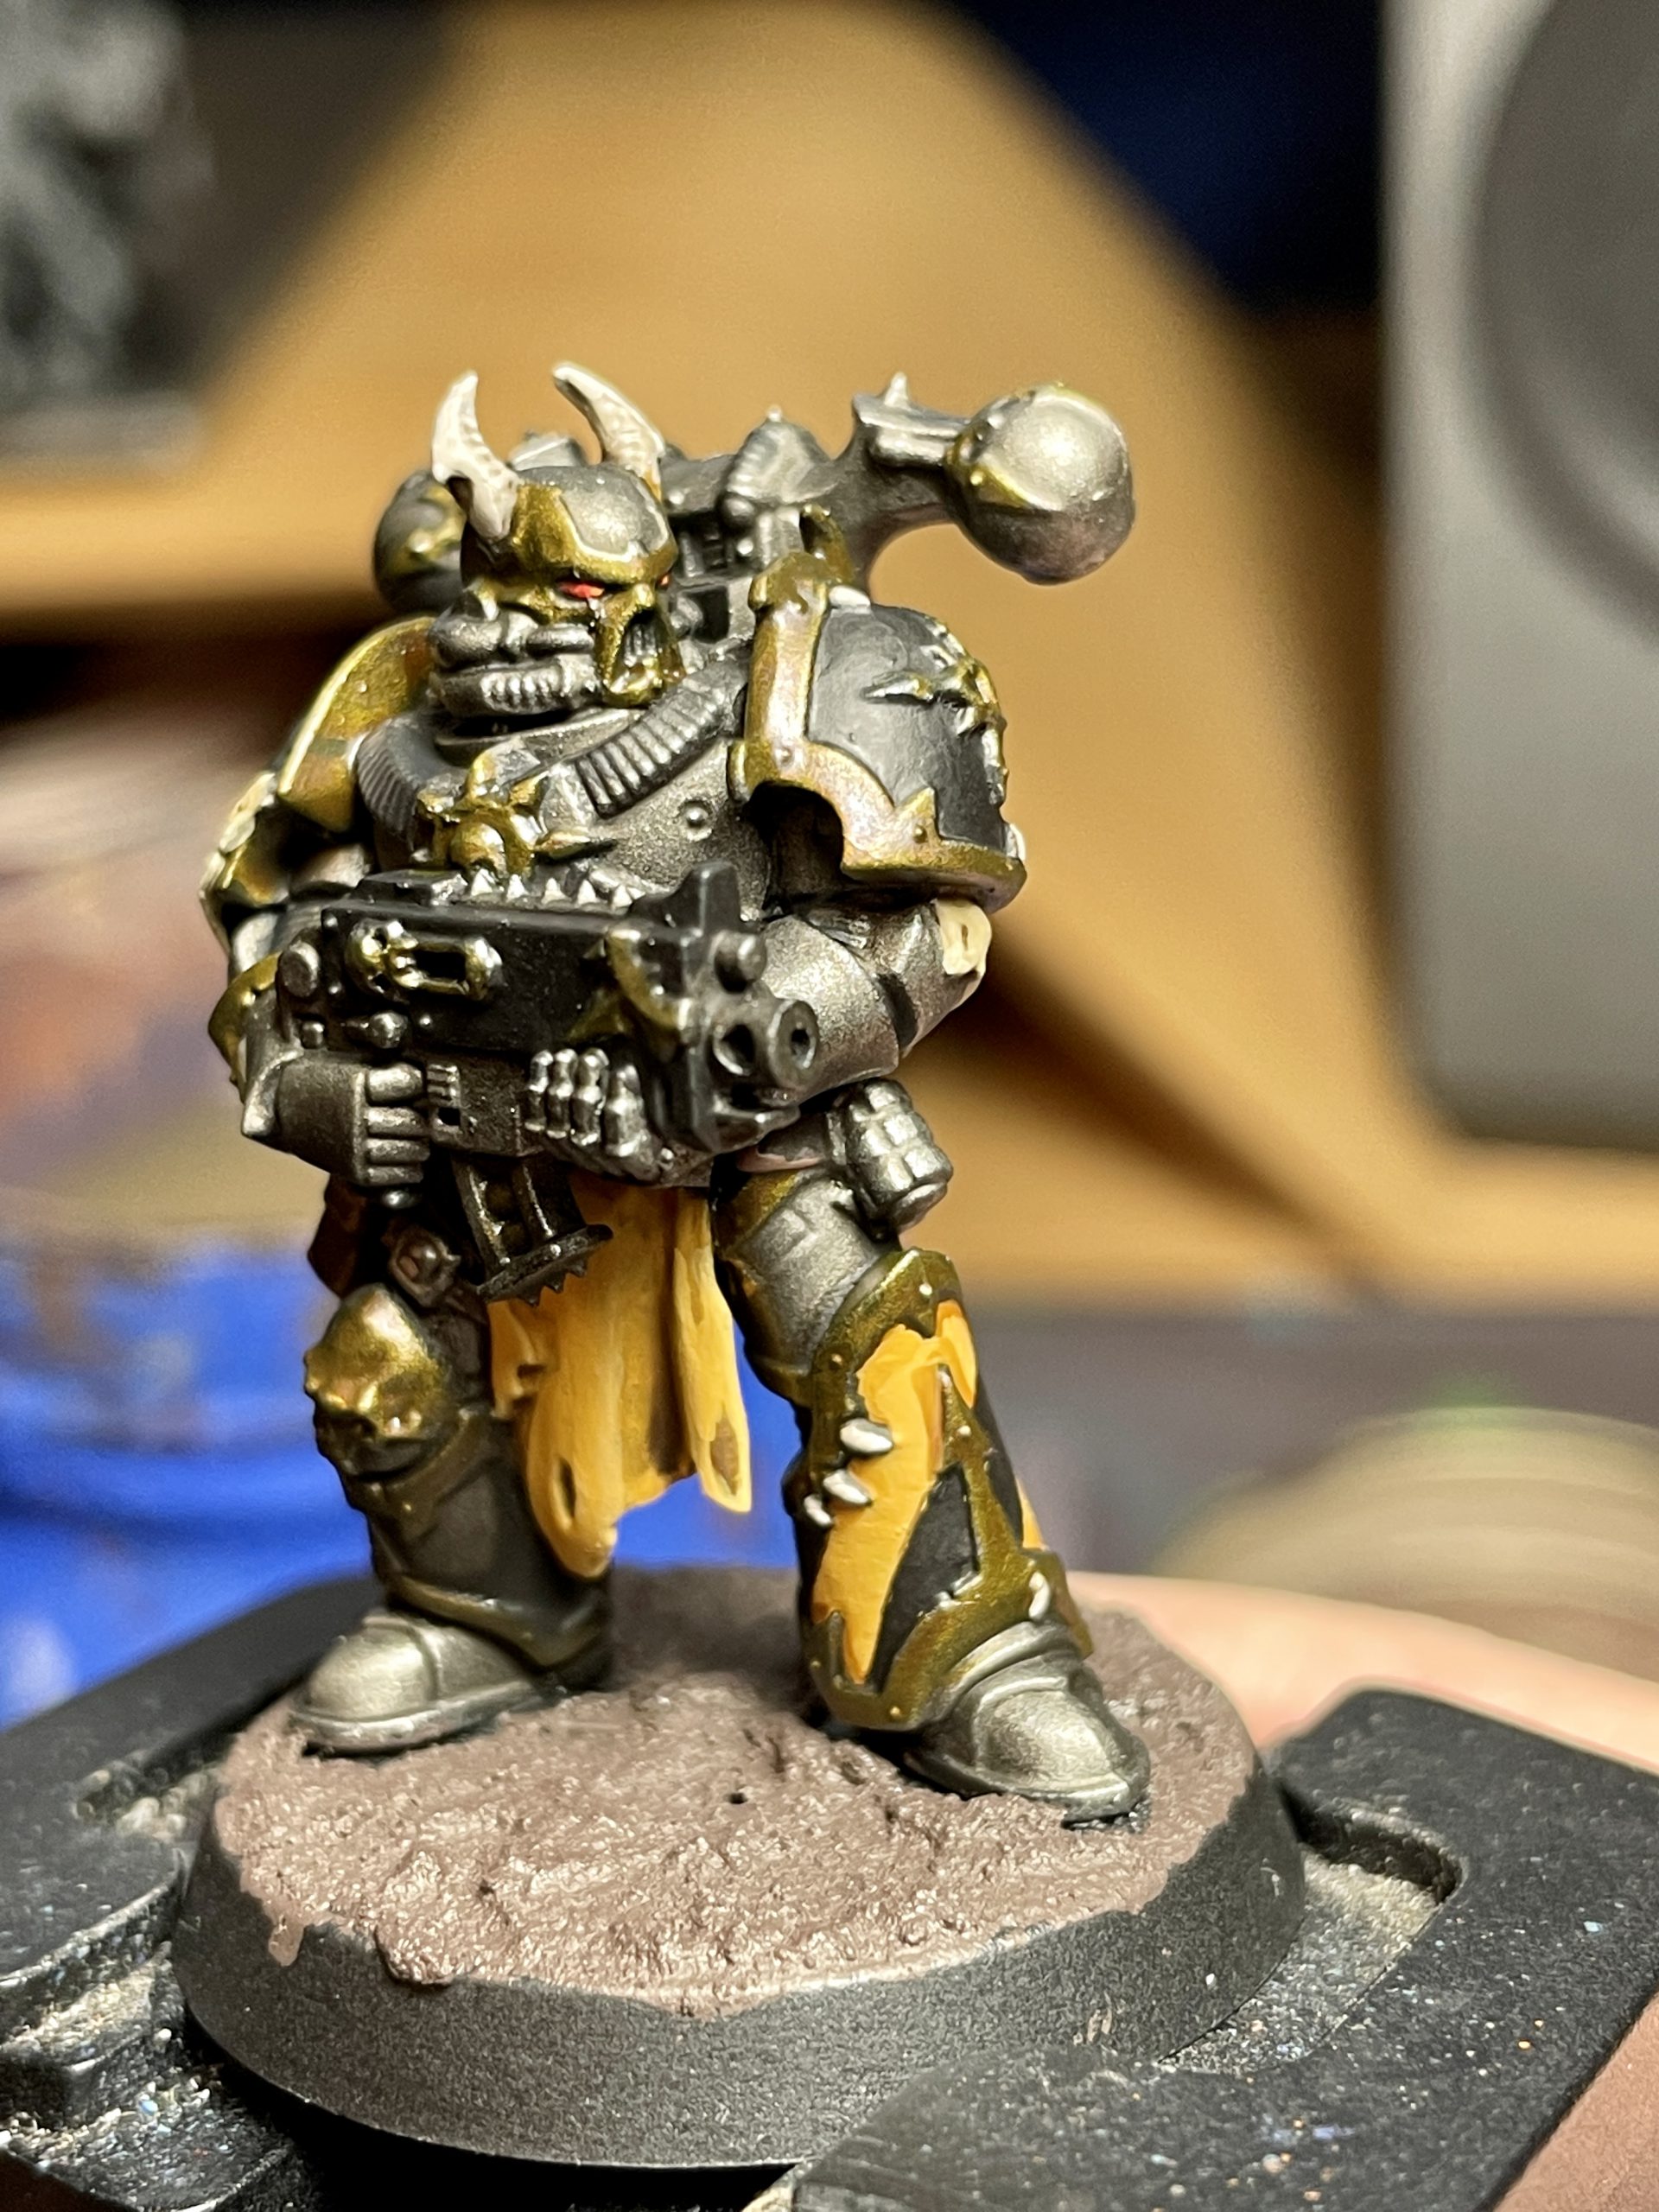
TheChirurgeon's Method - Click to Expand I’ve been playing Iron Warriors since 3rd edition, when the Index Astartes article convinced me to start an army for the legion. I’ve always really liked their backstory and paint scheme, and they’re definitely among the easier schemes for beginners. I started by priming this model black. You could do Leadbelcher, but I had the same issues Campbell has had with the spray. I start by painting the armor with Leadbelcher. I’m going to shade it with Iron Warriors and Nuln Oil but if you wanted to instead start with Iron Warrior and highlight with Leadbelcher, that’s fine too. I shade the armor with Iron Warriors and then wash it with Nuln Oil. Then on the black armor parts – both pauldrons and one of greaves, plus the gun casing – I shade up using Corvus Black. I’ll blend this using mixes of Corvus Black and Black Templars Contrast Paint. I’m going to paint hazard stripes on the greave and the gun. Time to do some highlights. I’m primarily tracing the black armor panels around the trim using Mechanicus Standard Grey. I’ll eventually edge highlight the metal armor with Runefang Steel. I start my hazard stripes with the outlines, painting those with Averlund Sunset before filling them in with a few thin coats. Once those are down and I’m happy with the width I’ll come back and highlight them with Flash Gitz Yellow, then edge highlight them with Dorn Yellow. Finally I’ll come back and shade them a bit with Cassandora Yellow. Time for the trim. This is pretty straightforward – paint the trim with Retributor Armour Gold. Next wash the trim with Agrax Earthshade. Not a ton left now. The eyes are Mephiston Red with a highlight of Evil Sunz Scarlet, while the leather is done with Gorthor Brown washed with Agrax Earthshade, then highlighted again with Gorthor Brown. This is also when I usually come in and add the edge highlights of Runefang Steel, and I’ll paint the rivets. And that wraps up another Iron Warrior. I tend to base them with a muddy bases to emphasize their trench/siege warfare inclinations.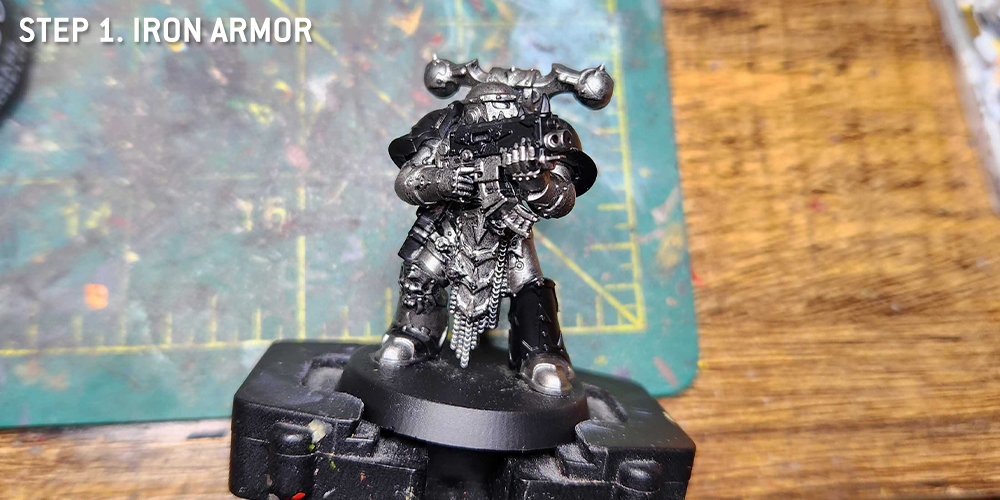
Step 1. Armor Basecoat
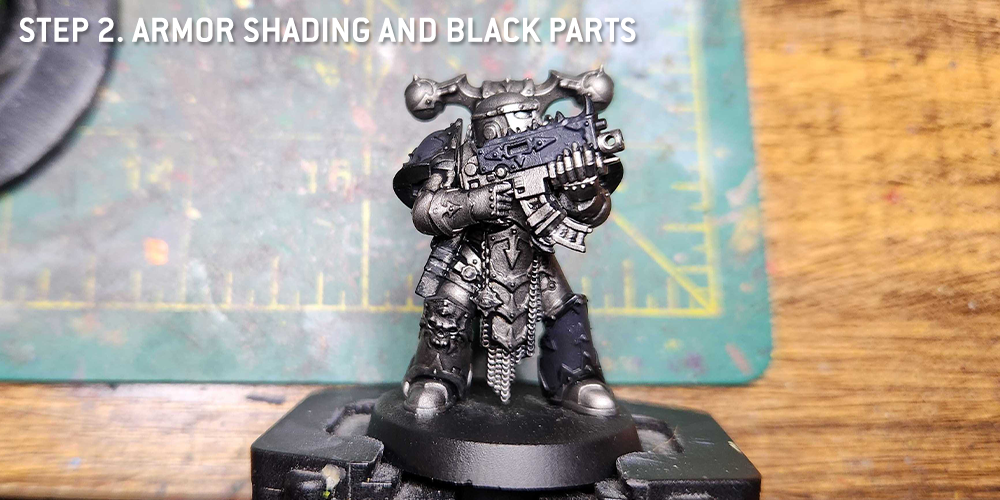
Step 2. Armor Shading and Black Armor
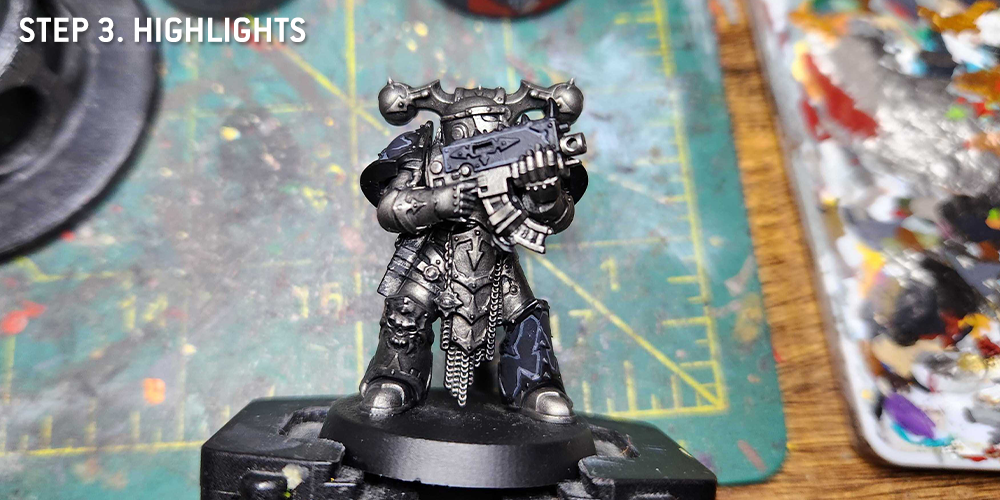
Step 3. Highlights
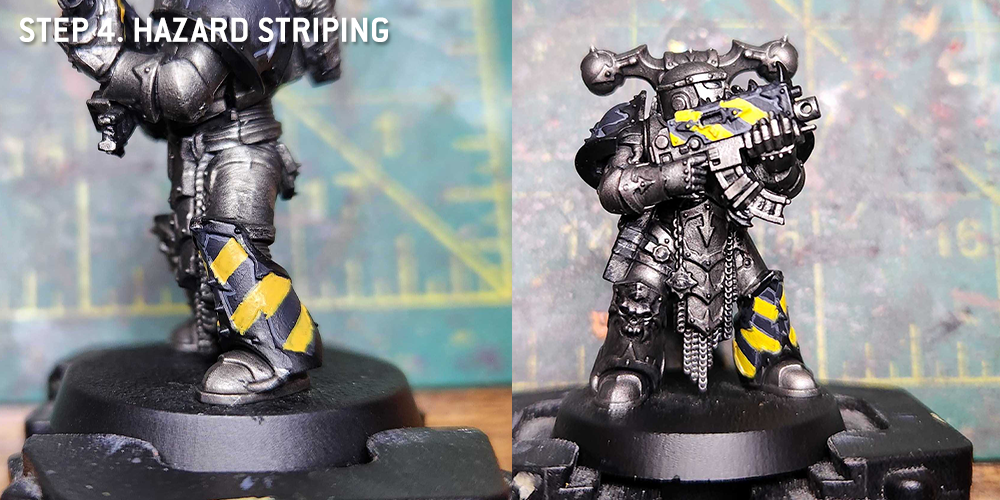
Step 4. Hazard Stripes
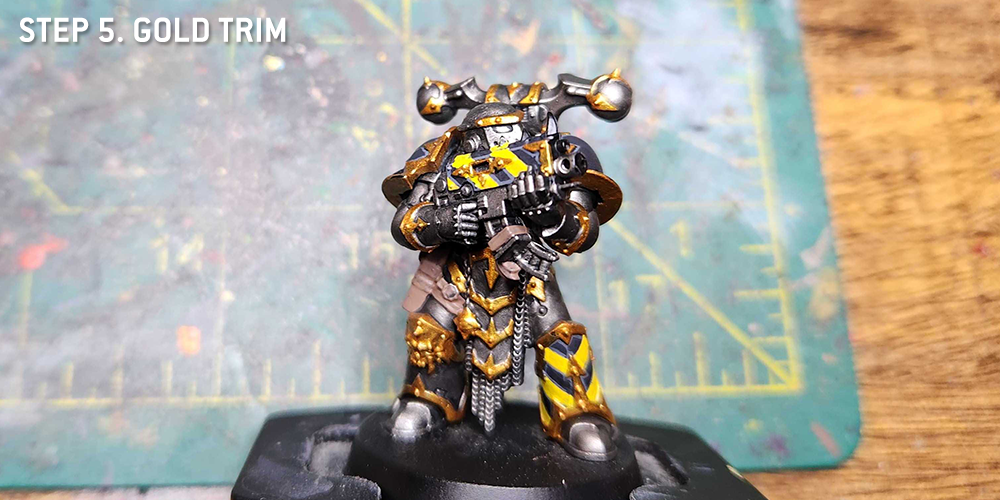
Step 5. Gold Trim
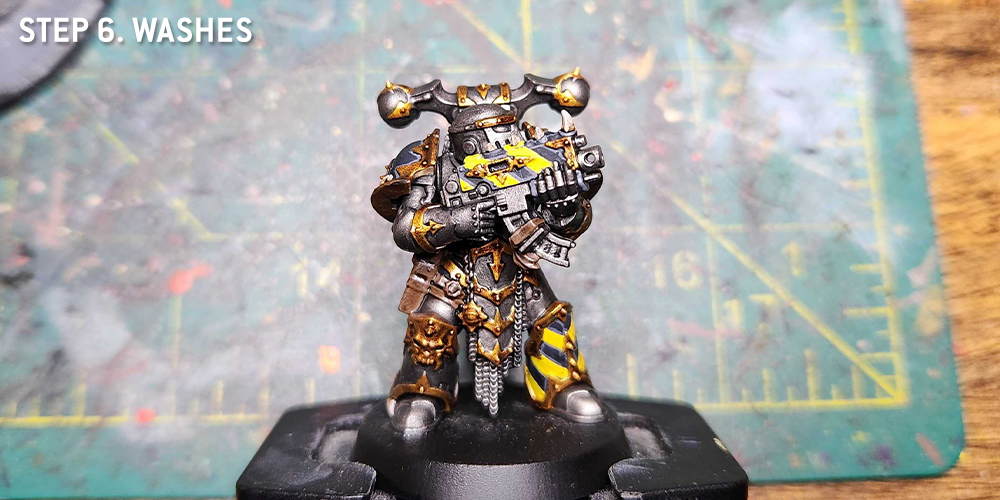
Step 6. Washes
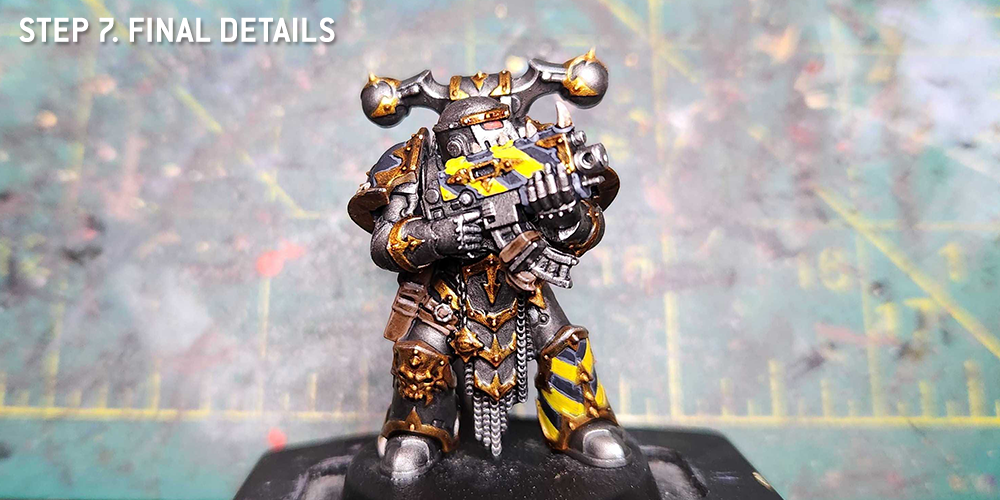
Step 7. Final Details

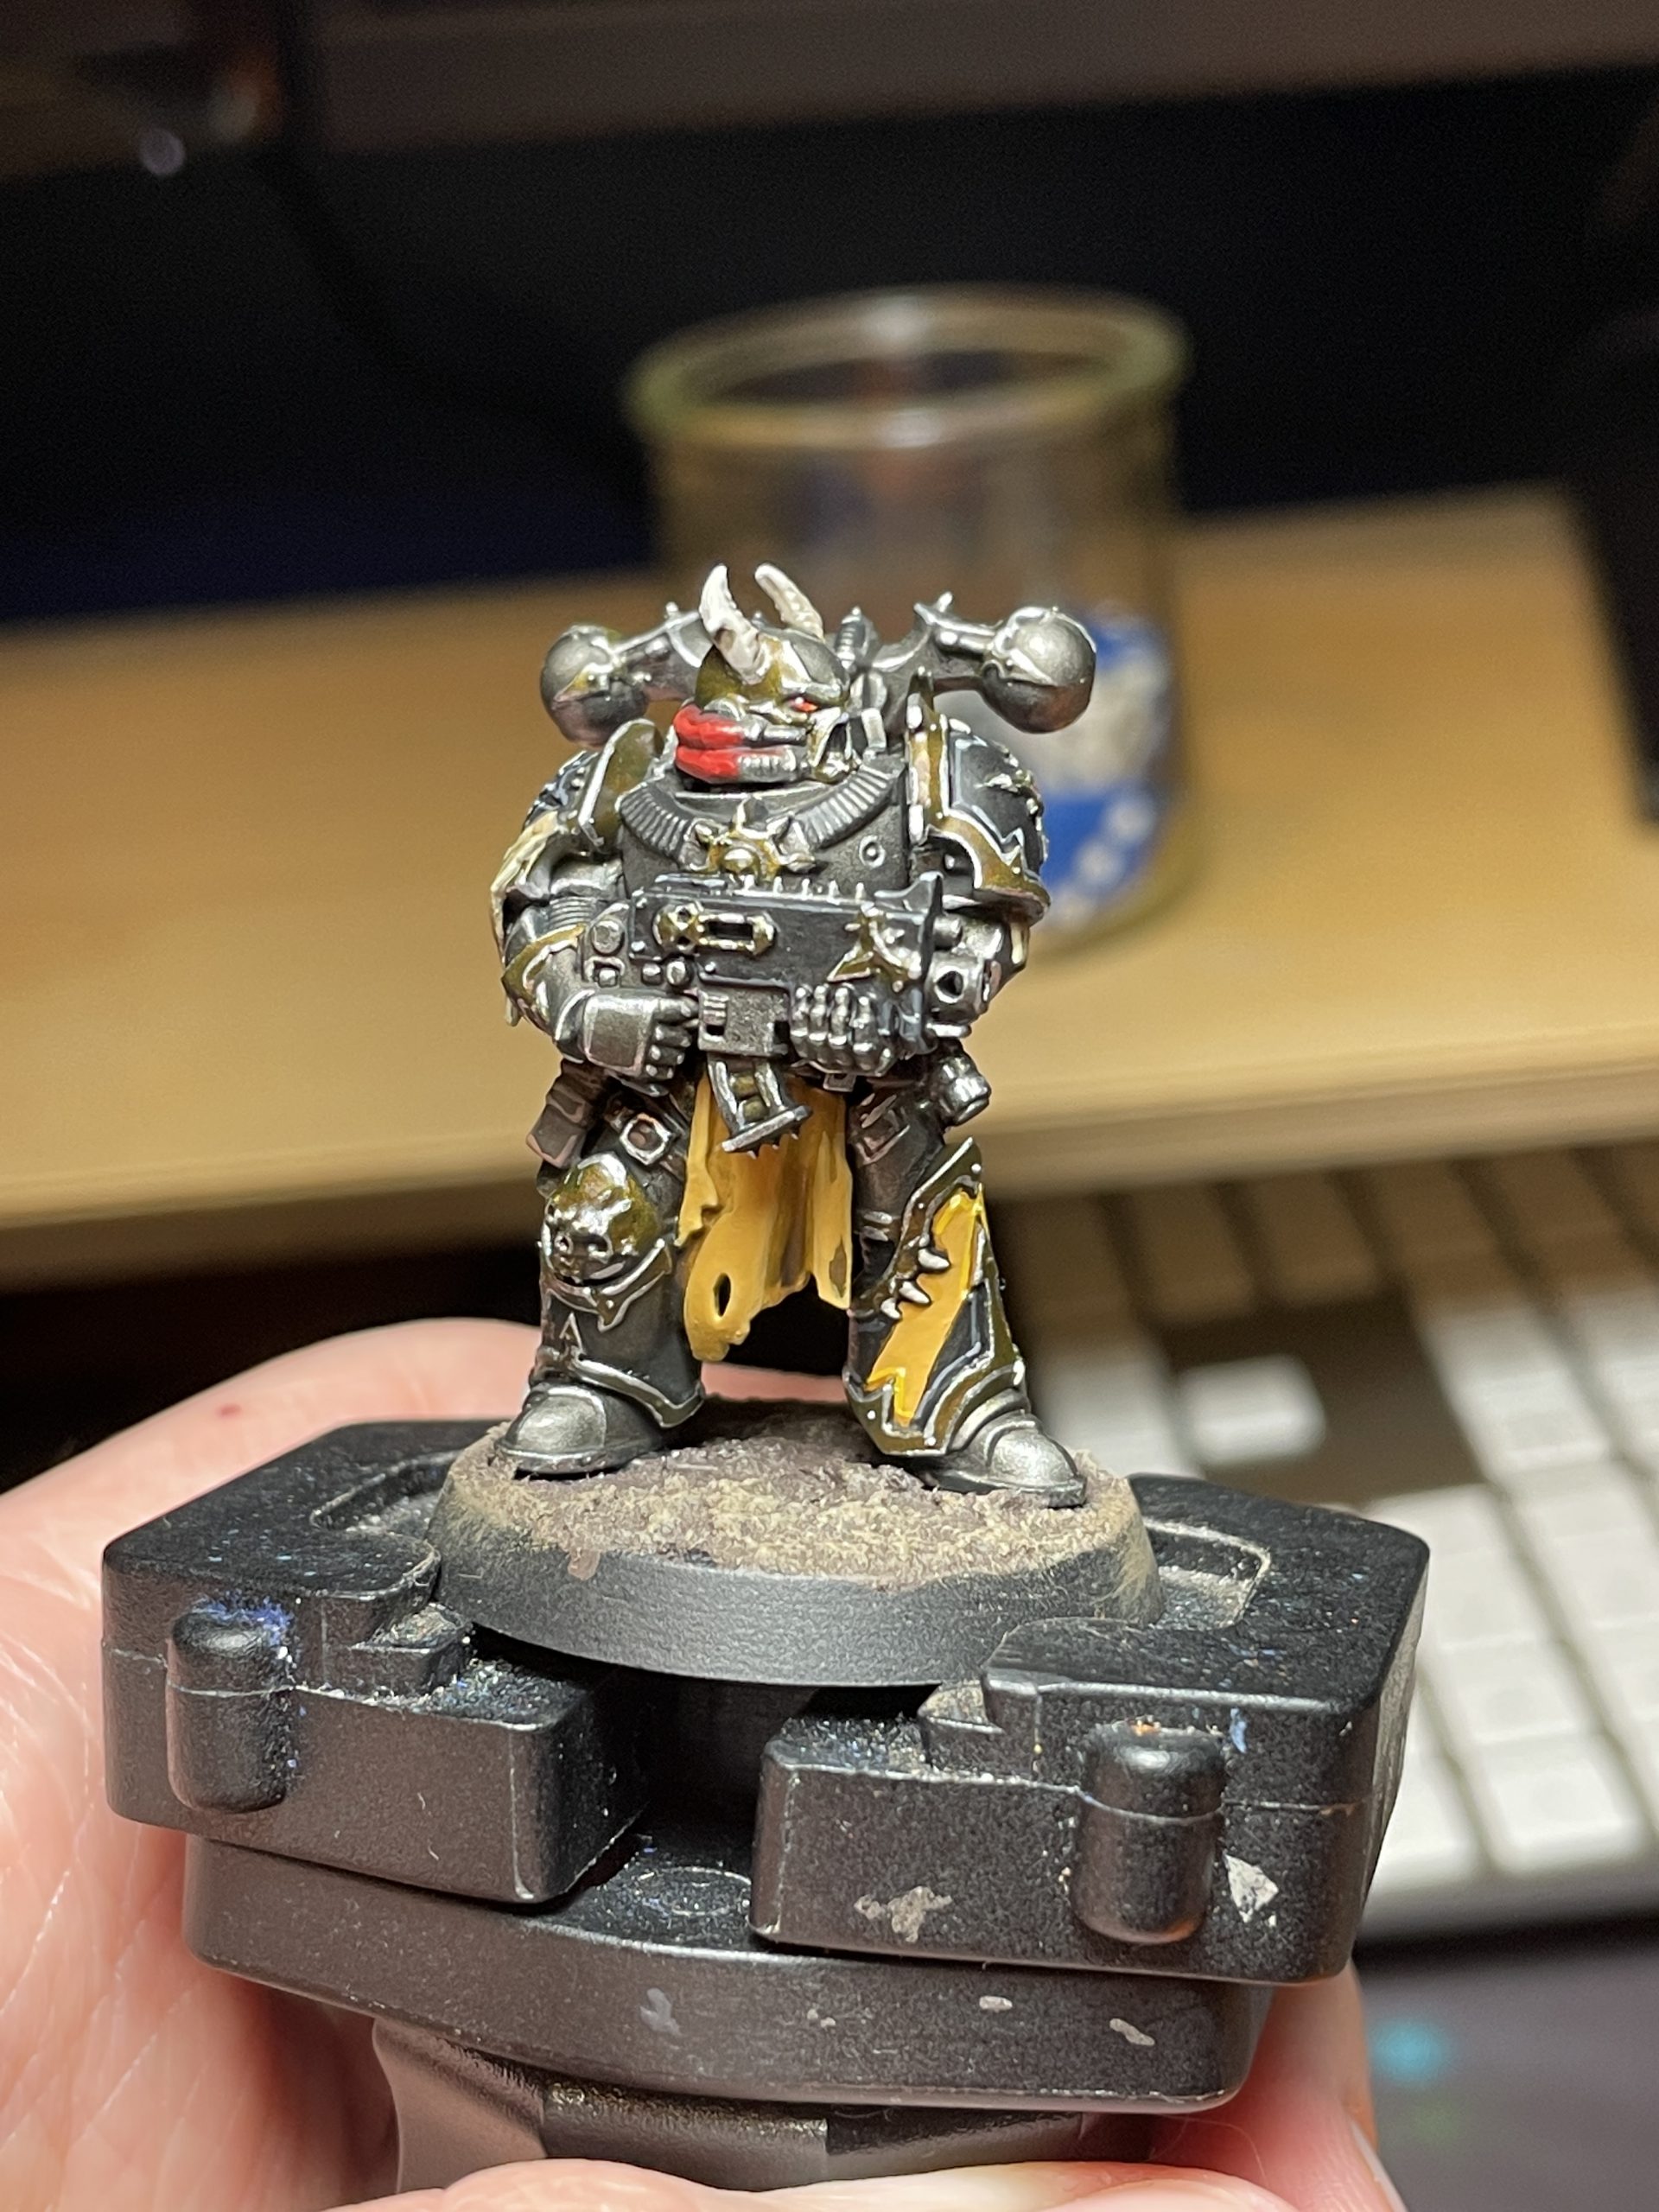
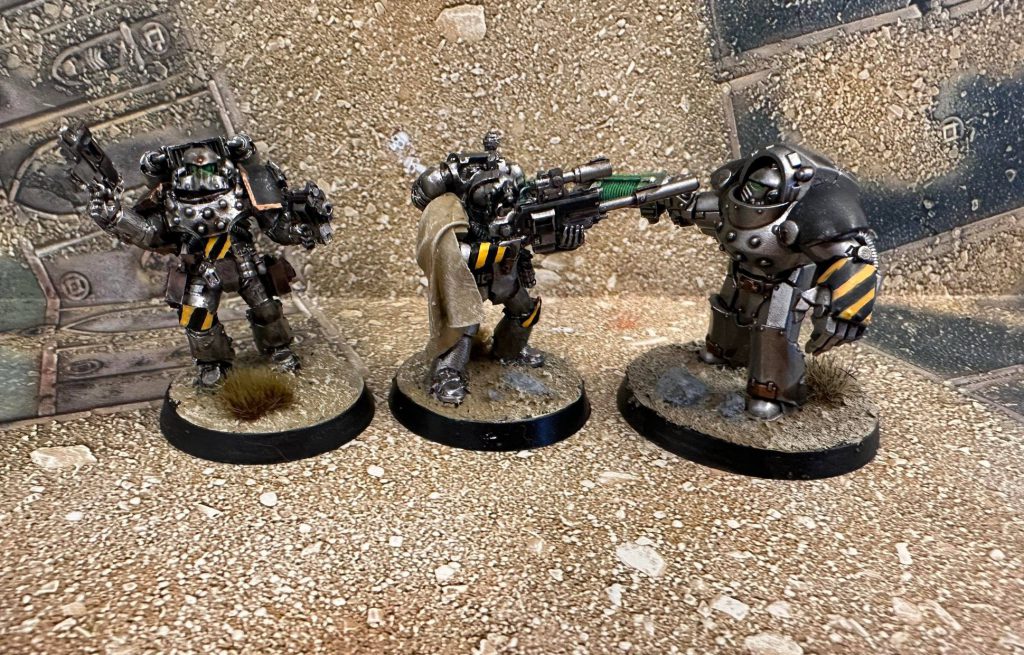
Sockbert's Heresy-Era Method - Click to Expand We’ve had Chaos and loyalist Space Marines from the 41st millenium, so lets take a trip back in time to the Horus Heresy! My painting talents lie in quantity, not quality (I’ve somehow painted about 6000 points of Iron Warriors since Horus Heresy second edition dropped…), and, knowing that going in, I recognised I’d need a simple, easily repeatable scheme where the priority is getting models on the table to be wasted and ignored by those that commanded them. The steel is the most important part, and while a lot of people go with a very grimy look for this most grimdustrial of Legions, I wanted to go with something a bit brighter after the heavyily weathered look I went with for my Mechanicum. To get this gleam, I primed black before getting a nice even coat of Vallejo Metal Dark Aluminium with my airbrush. I don’t normally paint with an airbrush, and only use it here to ensure this layer was as smooth as possible so the next step works. You could use Ironbreaker, or even a rattlecan of Leadbelcher if you wanted a darker look, but I prefer the more metallic, gleaming finish of the excellent Vallejo Metal range. This may take a few coats, and you really need it to be even and smooth across the model, but the next step is simple: slather the model in Nuln Oil Gloss. Make sure it doesn’t pool too heavily anywhere, but after that you’re done. The natural glint of the Dark Aluminium combined with the gloss of Nuln Oil, particularly flowing into and around all those cracks and crevasses, gives a finish that looks way better than it has any right to for how little work you just put in. The brass trim and spot colouring is pretty similar: basecoat with Brass Scorpion, then wash with Agrax Earthshade Gloss. You’ll probably want to highlight the brass (I used Runelord Brass), and if you want to pick out a few shinier spots on the steel, try Vallejo Metal Silver; I don’t use it as a line highlight, rather almost a smudge on high points where the light may hit. Sadly, Nuln Oil Gloss and Agrax Earthshade Gloss are both extinct in the wild, but there are a few alternatives I’m yet to check out. Vallejo’s Gloss Medium is a frontrunner, but I’d also like to try just a simple black wash using Windsor & Newton ink. The guns are simply Black Templar Contrast over however the metal of the guns has ended up (no need to neaten it up first!); it gives them enough definition at a distance to not look like just a blob, and doesn’t draw away from the rest of the model. The red, which I used as a spot colour and for most eyes, was simply Mephiston Red washed with Carroburg Crimson, then relayered with Evil Suns Scarlet. Green, used for lenses and screens, is Moot Green washed with Biel-Tan Green, then with spots of Moot Green taking up less of the lens. You may find that the Moot Green doesn’t cover the now much darker base layer; this is fine, and you should lean into it. Do your next spot of Moot Green much smaller inside, so you’ll have a focused, bright spot of Moot Green in the centre, fading outwards. Cables were simply washed with Coelia Greenshade. As for bases, a sand mixture was placed down and painted with Tallarn Sand before being drybrushed with Tyrant Skull and then Terminatus Stone. Tufts were whatever I had lying around and, finally (before the fun of hazard stripes!), stones were painted with Dawnstone before a rough drybrush of Celestra Grey, and a lighter drybrush (or line highlight where possible) of Ulthuan Grey. Big shout out to DeathWatch Studios for this trick, taken from their MCP bases painting guide. Hazard stripes aren’t… well, they’re not complex, but they’re not exactly easy either. I’ve found that after a certain point you’re losing a lot more time than you’re gaining results, and for me the aim was an army that looked good across the table and in a cabinet, not one that was going to win a painting prize. Where possible, I used Iron Warriors pauldrons and parts which have hazard stripes moulded into the pauldron, but I don’t think you should worry too much about precise smooth lines if you’re army painting. I free handed a lot of these stripes (obvious, I know…), but you can also draw an outline on with a pencil or micron pen. I used Zamesi Desert as a base, being a very yellowy brown, as it covers over whatever you’ve got there much, much easier than any yellow I’ve found. Some people stop there, just neatining up with Abaddon Black. I wanted somethin a bit brighter, so the next step was a thinner layer of Averland Sunset, which covers just fine over Zamesi. At this point I did all the neatening I could, including drawing a thin line with a micron pen around all the edges of the black, doing an almost black-on-black highlight. Finally, a heavily thinned Yriel Yellow was applied down the middle of the yellow stripes, making the whole thing pop a little more.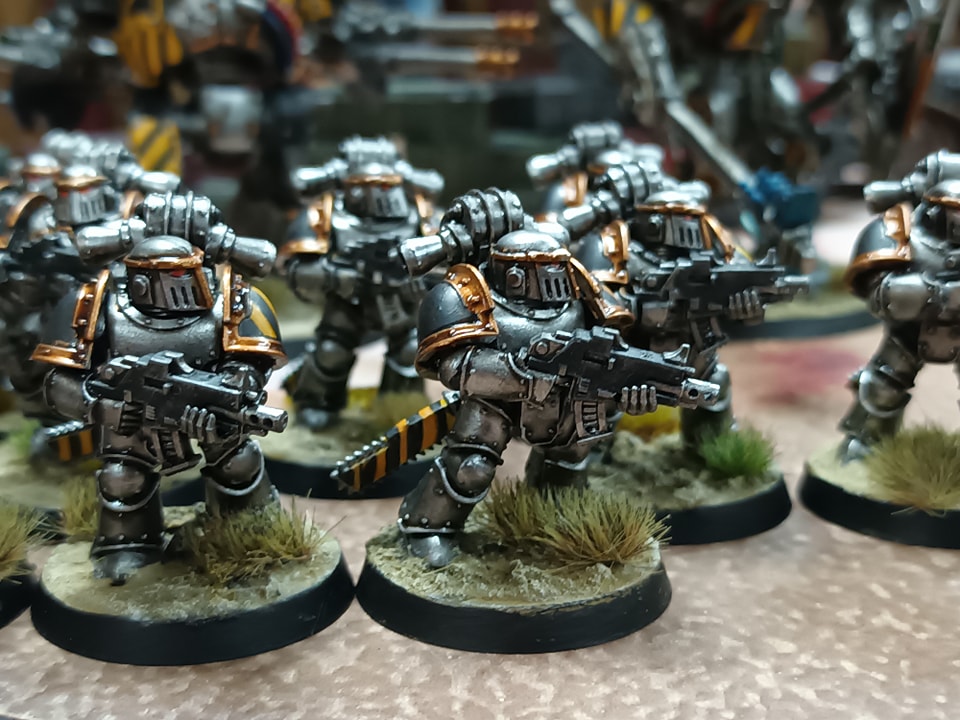
Special Units
There’s a dearth of named character models for the Iron Warriors, in both 40k and Heresy. However the Iron Warriors were one of the first legions to receive a Primarch model, and if you’re interested in painting Perturabo, you can find our guide to painting him by clicking on the banner or link below.

As always, if you have any questions or feedback, drop us a note in the comments below or email us at contact@goonhammer.com.
