
In our How to Paint Everything series, we take a look at different armies of the Warhammer universe, examine their history and heraldry, and look at several different methods for painting them. With Halloween fast approaching, we’re looking at how to paint the spookiest monsters around. In today’s HTPE, we’re looking at how to paint fearsome monsters that live inside each of us – Skeletons.
Skeletons have been around as long as humans. Hell, maybe even longer. But the important thing is they’ll be here long after we’ve all died and our bones have risen up again to fight in the Great Skeleton Wars. Perhaps the seemingly familiar nature of skeletons is what has kept them from getting proper due as monsters all these years; fiction just needs to work harder than hoping you’ll be afraid of something you can find in any doctor’s office. But regardless of whether you fear skeletons or find them hilarious, they’ve been a fixture in fantasy and tabletop games for a long time, acting as spooky undead minions for larger, more imposing villains. Usually Necromancers or other evil wizards. On the tabletop, they can be found occupying the same roles, often playing the role of rank-and-file warriors to nastier warriors. Except for Nagash, who is the nastiest, most evil skeleton of all and doesn’t answer to anyone. Nagash is rude as hell.
Table of Contents
Where to Read/Watch More
Despite not being classic movie monsters per se, skeletons have been in many books and quite a lot of movies. Basically all of the movies, if you count the ones where they’re covered in skin and flesh and other extraneous bits. If you want to read or watch more about Skeletons just doing their thing out in the open, then consider checking out some of these extremely cool books and movies:
- Army of Darkness features an entire skeleton army attacking the living and just having a grand ole time. Many of the best skeleton memes about angry dooting come directly from this Sam Raimi/Bruce Campbell classic. It’s not really a horror movie, but it absolutely rules.
- Nightmare Before Christmas is a classic kid’s film where the main character is a skeleton who kidnaps Santa Claus and then scares the shit out of children all over the world.
- Pirates of the Caribbean: Curse of the Black Pearl – the original Pirates film is still the best, since it combines a decent concept with rad pirate skeletons and was before we got incredibly tired of Jack Sparrow’s bullshit.
- Anything about Nagash – Nagash is, as we mentioned above, rude as hell. He was a major player in the Old World of Warhammer fantasy and when that ended (see: The End Times series), he ascended to become the god of the dead in the Age of Sigmar.
- Battletome: Ossiarch Bonereapers covers skeletons in Age of Sigmar, though they’ve gotten SIGNIFICNATLY BUFFER than skeletons normally are, adding tons of mass. Speaking of which…
- All of He-Man – regardless of whether you’re watching the Filmation original or the gritty-ish anime-like reboot from the early 2000s, Skeletor is all over these and he is the buffest musclewizard skeleton of all. He’s also kind of hilarious looking back 30 years later.
- Jason and the Argonauts – one of the pioneering films of action cinema, this movie represents a milestone in special effects and animation for film, featuring a climax that sees a spooky skeleton army that still holds up remarkably well.
Painting Skeletons
Painting Skeletons is really about methods for painting bone, and so that’s really what we’re exploring today – multiple techniques for painting bones. And also Skeletor.
Skails’ Method
Paints Used for Bone:
Citadel Zandri Dust
Citadel Ushabti Bone
Citadel Screaming Skull
Citadel Shade Druchii Violet
Scale 75 Hyek Yellow
Vallejo Game Color Dead White
Pro Acryl Mahogany
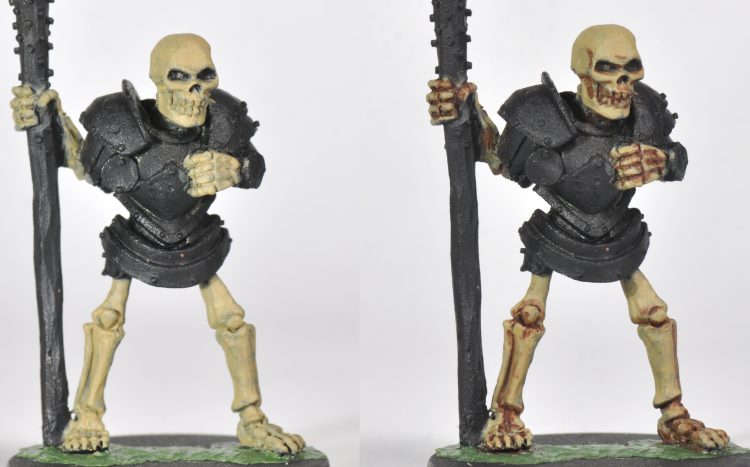
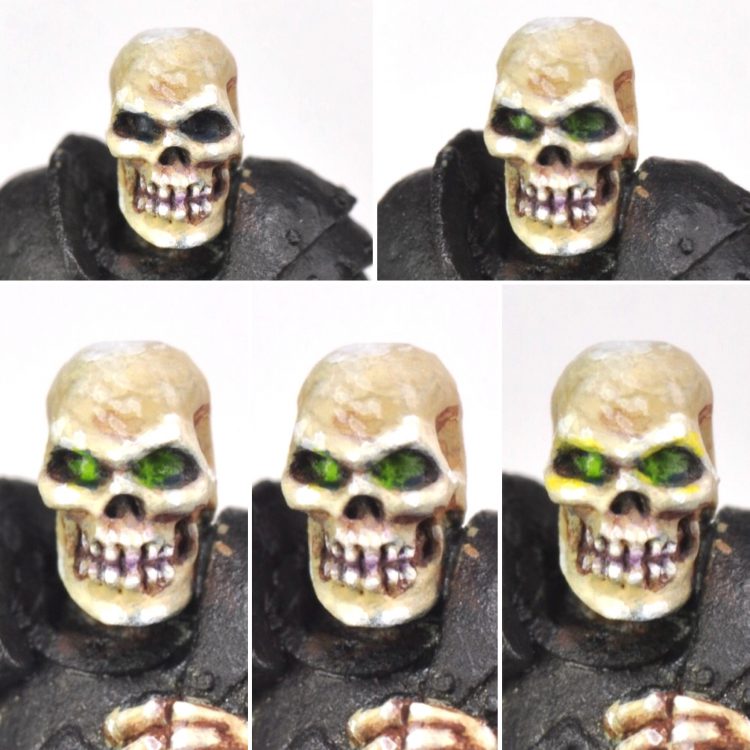
Step 1(Left)- A solid coat of Zandri Dust. My pot is pretty thin and it took three coats to get a mostly smooth base coat.
Step 2(Right)- This is Mahogany thinned to a watery consistency. The paint should flow off the brush into the recesses. Hit all the areas between bones and teeth along with the recesses on sides of skull and jawbone.
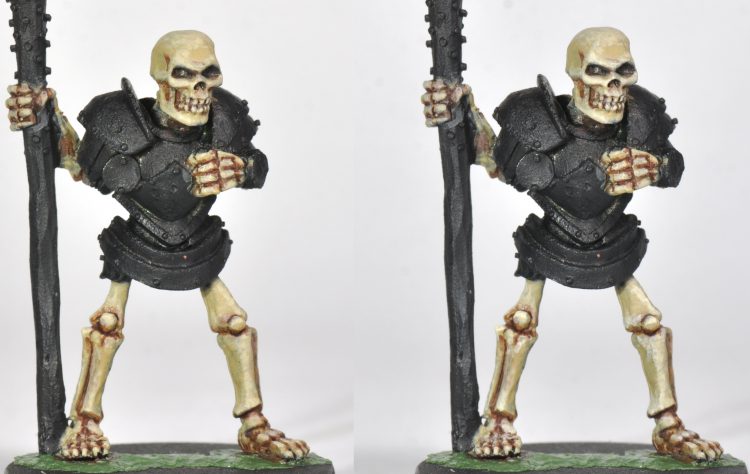
Step 3 (Left)- Using Ushabti Bone, create a wide highlight area. This will cover all the upward facing areas where light would hit, leaving the Zandri Dust showing at the downward facing angles and next to the Mahogany.
Step 4(Right)- Screaming Skull is painted along the ends of the bones, teeth, edges of eye sockets, and any other strongly upward facing angles. This will cover a smaller portion of the Ushabti Bone, leaving it to transition to the Zandri Dust.
Step 5(Left)- This layer is a mix of Hyek Yellow and Dead White. Hit a smaller portion of the Screaming Skull to build up a brighter highlight.
Step 6(Right)- Final highlight of pure Dead White. Mostly just small spots over the last layer to build the strongest highlight.
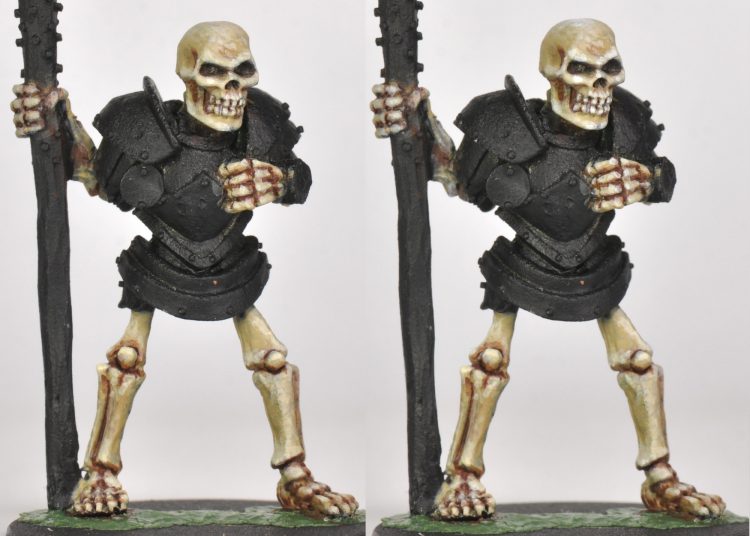
Step 7- This last step is a wash of Druchii Violet in the deepest recesses- between upper and lower teeth, between long bones and feet, hands, middle of recesses between radius and ulna, tibia and fibula.
Eyes:
Incubi darkness in whole socket, then Vallejo goblin green on the back wall.
Left to right on bottom: Pro Acryl yellow green dot in middle back, scale 75 Hyek yellow + yellow green in center. Last one is Hyek yellow + yellow green + white thinned down and put around socket.
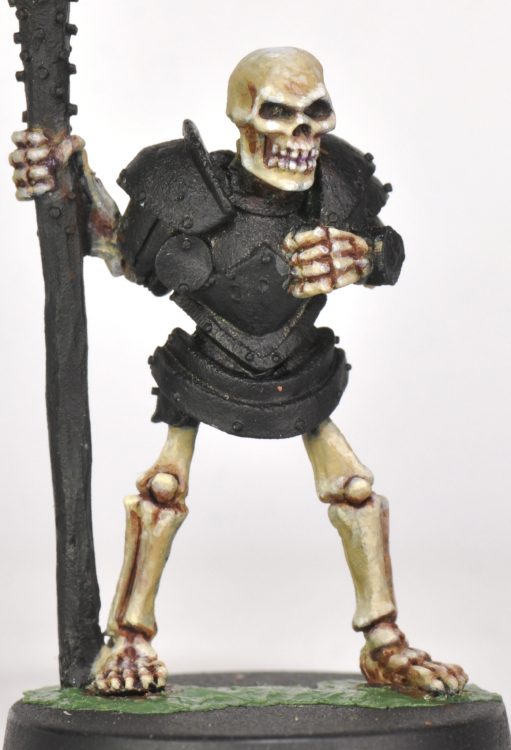
Final:
For the finished piece I also added some stippling and streaks of Umber ink wash on the bones to add some dirt and grime. This ink wash is a 1:1 mix of umber ink and matte medium, with a few drops of flow improver. This can be easily watered down to subdue the effect. This is also splotched around on all the metals. The blade is Leadbelcher with various washes and stippling of Nuln Oil. Some scratches are done with a streak of black paint along with a underline of Hyek Yellow. The armor is Leadbelcher mixed 1:1 with black, highlighted with lead belcher and a few high points hit with runfang steel.
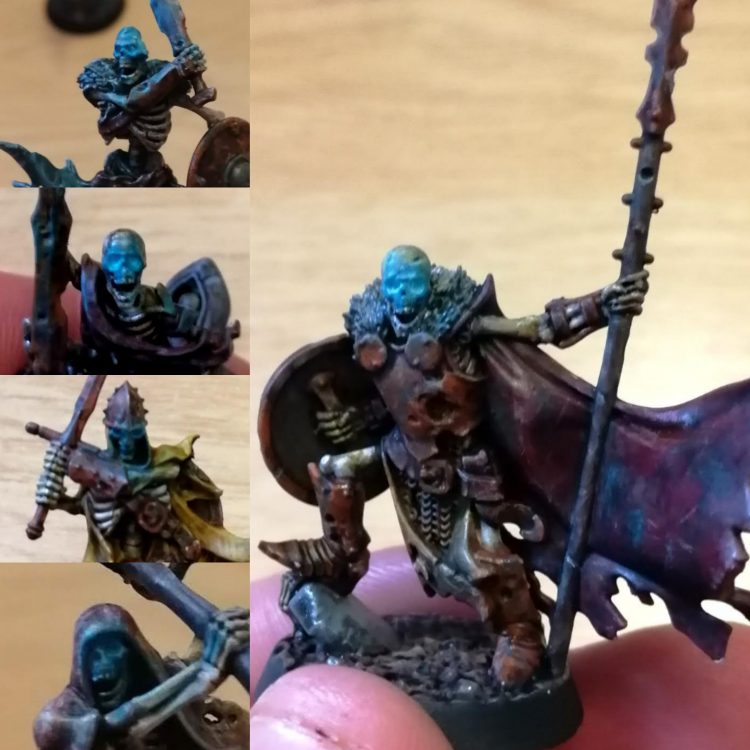
Lupe’s Method
When I tackled my favourite Warhammer Underworlds warband I wanted to try something a little different, and so decided to go for an entirely non-metallic approach. Painting corroded metal without any metallic paints and make it still look metallic can be a right challenge, but I also wanted to get some decent bone tones and some eye glow too – can’t have skeletons without glowing eye sockets in my opinion.
I concentrated on working with very few paints, and really taking my time and working layers and shades. The paints I used for all the models here are (all citadel):
- Rakarth Flesh
- White Scar
- Nuln Oil
- Nuln Oil Gloss
- Abaddon Black
- Skrag Brown
- Ryza Rust
- Khorne Red
- Averland Sunset
- Baharoth Blue
I started basecoating the metals black, the cloth yellow, red or rakarth flesh, and the bone flesh. After an all-over Nuln Wash it was time for the real work to begin.
With few colours at my disposal (these were painted in a hotel room with no access to any more paints) I focused on textures and layers. I mixed most of the paints to get the effect I wanted. For metal areas I mixed apply Skrag Brown in glaze layers to build up colour, making sure to apply it where light would hit, but not on the sharpest points or edges. The key to making it look like metal is to understand the hot and cold tones you need to build up the colour – look at the plate boots of the Warden, and you can see how the areas that are in true shadow are black, but the surfaces that get more light but are not at the most extreme points of light have a brown tone. I worked in Ryza Rust, thinning it heavily, here to give more tonal variation. I think mixed a very light grey using the White Scar and Abaddon Black, and glazed in the sharp highlights. Finally I did just a few more opaque highlights in a near white, building up the feel of a sharp metallic object, without using any metallic paints.
Bones were worked up in much the same way, but this time forgoing the same warm/cold divide, as the bones are softer and smoother in shape. I built up zenithal highlights (as if light was coming from above) using Rakarth at first as a glaze, and then adding in White Scar. However, I also started to carefully consider at this point where the light shed from the eyes would be striking the bones. I made sure to build up highlights to represent this glow, not too much, just a little around the face. Finally I used harder highlights both to catch the extreme light on harder edges but also to pick out detail – particularly on the teeth and the bottom of each eye socket. This is important for the OSL glow later – the source of the light is always brightest, but I wanted the source to be deep inside their skulls, so I needed to make sure the eye socket itself was brightest as the place that would catch the light first. I focused on the bottom of the socket to give the sense of light coming from where the brain would be. With the model top left with a crack in its skill I made sure to put bright highlights in the crack and around, as that would be a source of light too.
With the first wash completely dry, I washed the cloth areas again, this time with nuln oil and a little Skrag Brown mixed in. This made them muddy and dirty looking. When I went back, I didn’t reapply any colour, instead mixing a tiny amount of the base colour with rakarth, and then glazing highlights on. I made sure to feather these highlights, keeping noticeable strokes and lines in my work, to build up a feeling of cloth and differentiate it further from the other elements. I also stained and weathered the cloth with black, skrag brown and even a little baharoth blue to represent mildew and mould.
Now it was time for the glow. I simply mixed a thin glaze of baharoth blue and applied it over the highlights I’d built up, making sure it only went on places the light would hit, and being pretty conservative with application. For the basing I used a mixed grey with a little brown in it for the earth, grey for the stones and then gave everything a healthy wash with nuln oil gloss, to make it look slick and rain-swept.
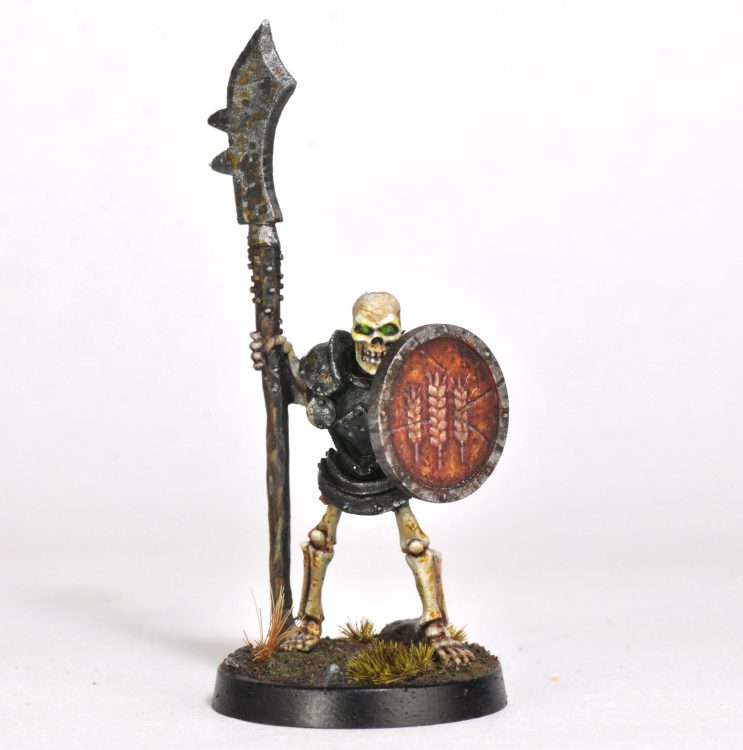
BuffaloChicken’s Spooky Skeletons Method

Bone Recipe
- Basecoat Vallejo Parasite Brown
- Highlight 1:1 Vallejo Parasite Brown and Vallejo Bonewhite.
- Highlight Vallejo Bonewhite.
- Wash Citadel Agrax Earthshade.
- Highlight Vallejo Skull White
- Highlight Vallejo Dead White
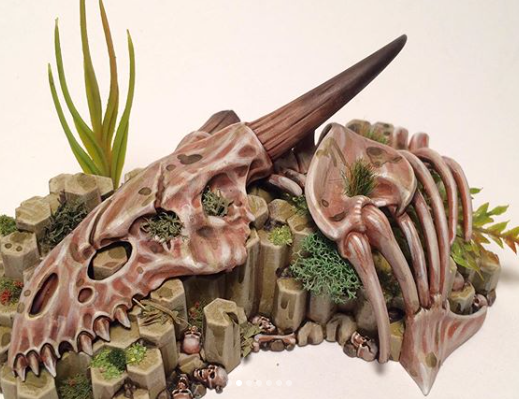
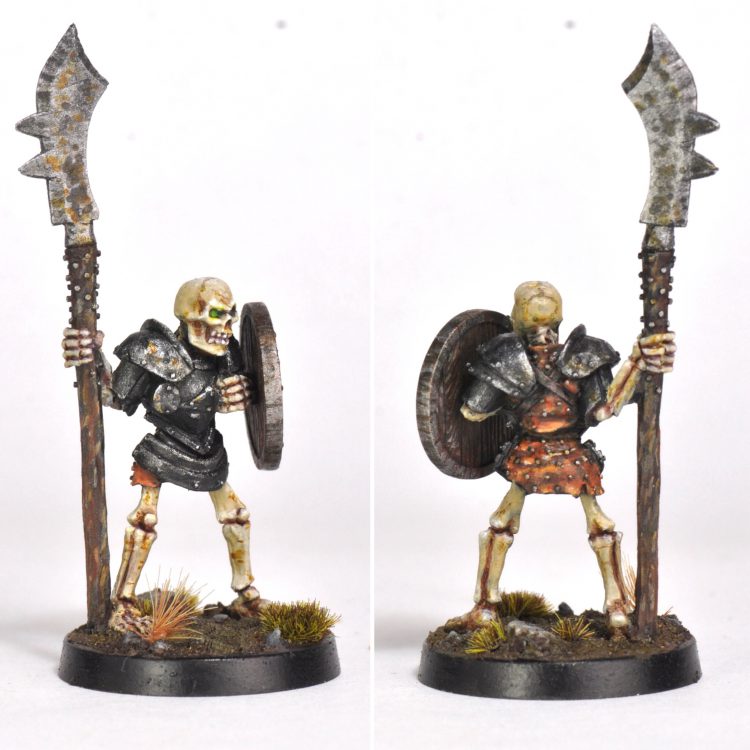
Bone Horn Recipe
- Basecoat Vallejo Parasite Brown
- Highlight 1:1 Vallejo Parasite Brown and Vallejo Bonewhite.
- Wash Citadel Agrax Earthshade.
- Highlight 1:1 Vallejo Parasite Brown and Vallejo Bonewhite.
- Wash Vallejo Charred Brown, leaving the base of the horn untouched, and smooth the wash line with water. Let dry thoroughly.
- Wash Vallejo Charred Brown several more times, starting further from the base of the horn each time, and smooth the wash lines with water. Let each layer dry thoroughly before moving to the next.
- Wash Vallejo Black, leaving the bottom half of the of the horn untouched, and smooth the wash line with water. Let dry thoroughly.
- Wash Vallejo Black several more times, starting further from the middle of the horn each time, and smooth the wash lines with water. Continue until the tip of the horn is completely black. Let each layer dry thoroughly before moving to the next.
- Wash Citadel Agrax Earthshade.
- Highlight very base of the horn 1:1 Vallejo Parasite Brown and Vallejo Bonewhite.
Beanith’s Guide to Bone Bros
See How to Smoosh Necrons, Beanith Style
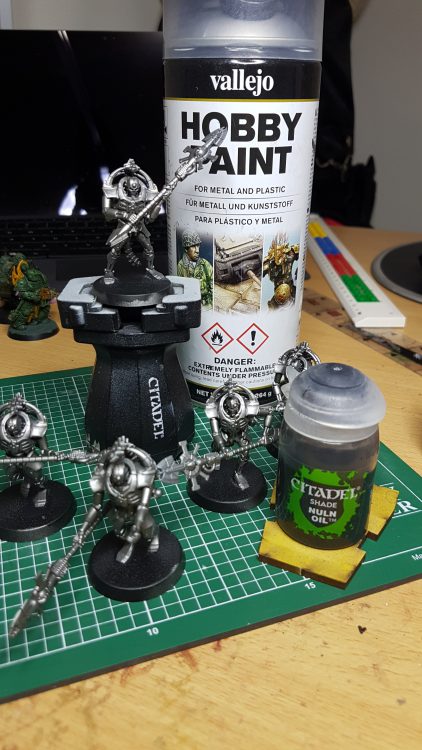
But in case you want to do actual boney skeletons, substitute the Silver undercoat for a Grey Seer undercoat, smoosh on some Contrast Skeleton Horde and then wave some Nuln Oil at it. Bosh, simple enough to power through the brick of 40 skeletons you’ll want so Arkhan the Black will have some company on the table.

Also because I’m awesome at impulse purchases, I have 100 Chainrasps (who have bones so I’m totally fine to use them in this article) which I was got from a few copies of the first Mortal Realms magazine for which I have vague plans at turning into count-as Plaguebearers that are being midway through being summoned into reality. Here I’m trying out a super quick paint scheme to churn through them as quickly as possible by simply slather on Technical Astrogranite, followed by Contrast Plaguebearer Flesh and then adding spots of Contrast Nazdreg Yellow.
Not pictured is the giant pile of Tabletop Adapters I’ve had to buy when Jon Kilcullen asked if the base size was correct for Plaguebearers (Pro tip, it wasn’t) On the bright side, it’s now easy to see which model belongs to which squad of 20 or 30 Plaguebearers based on the ring colour.
Fowler’s Evil Scheme
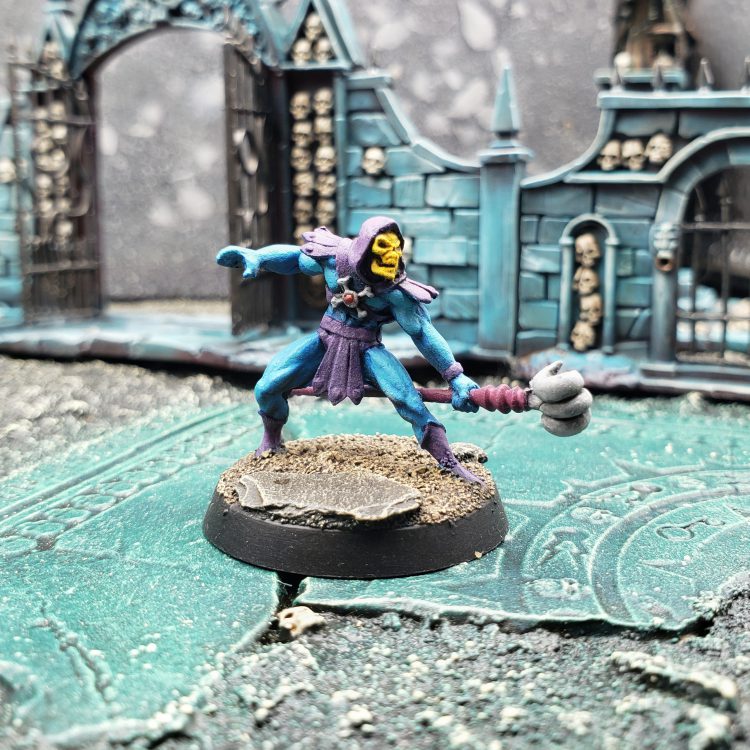
I’m shooting for a 1981 Filmation cartoon look here, with some extra detail inspired by one of many reissue figures.
Zenithal prime. Basecoat “skin” with Thousand Sons Blue, lightly wash with Coelia Greenshade, and highlight with Ahriman Blue. Base armor with Naggaroth Night, wash with Druchii Violet, Highlight with Xereus Purple. Paint the staff with Screamer Pink, wash Carroburg Crimson, Highlight with Pink Horror. The Staff head and any bone details on the chest get Administratum Grey, wash Nuln Oil, go back over with Administratum Grey.
To get the sunken face effect, I painted the face black first, and carefully caught the raised details with drybrushes of white (it may help to wash it with Nuln oil and hit it with your drybrush highlight again to make the effect stronger). I washed the face with Iyanden Yellow and added a tiny bit of highlight with Flash Gitz Yellow. The chest stone got a bit of Stormhost Silver, and after varnish a coat of Spiritstone Red. I’ve got a few of these figs from Quest Miniatures, and they really benefit from bright and bold paintjobs over meticulous highlighting.
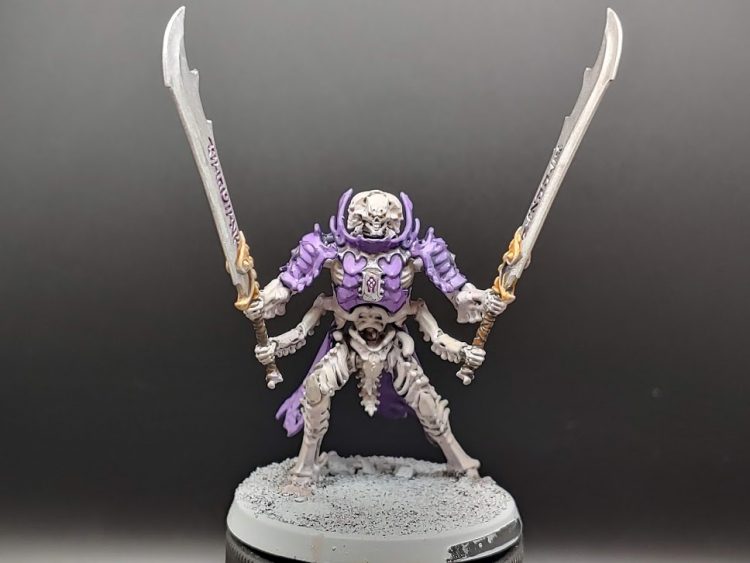
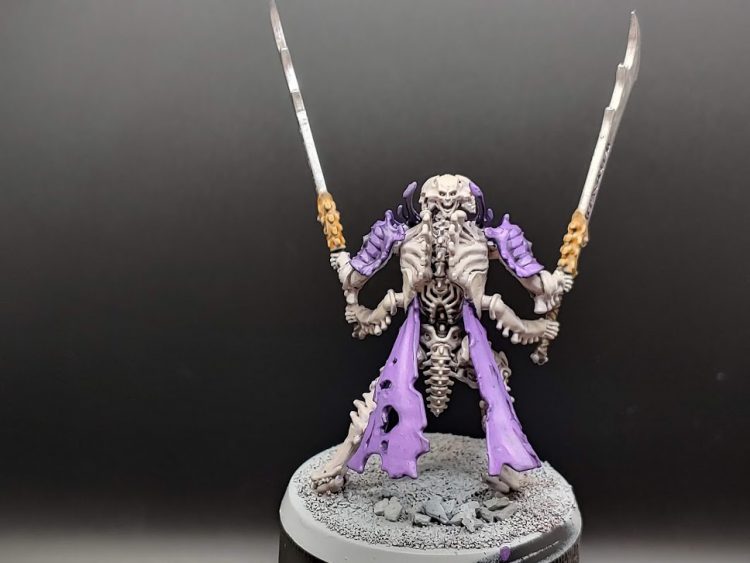
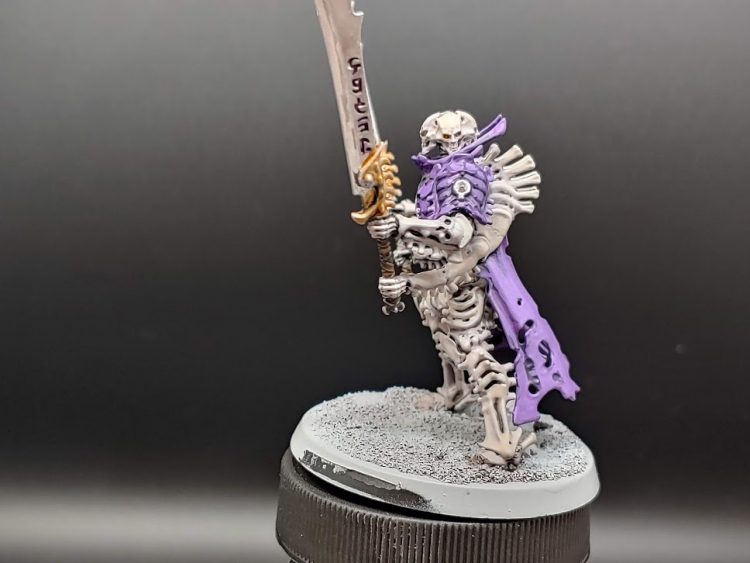
Kenji’s Method for Ossiarch Bone Reapers: 2* Color Challenge
For this scheme, I was inspired by Miniac’s video on color theory, in which he discussed a way to use yellow and purple on what just happened to be a skeleton. I found the idea interesting, and wanted to challenge myself to do something based on this by limiting myself to 2* colors, with a few extras for various accents and a metallic. The basic idea is to use these paints and mix them into one another to help blend along the colors themselves, while also creating that distinct, contrasting tone that would make the models stand out.
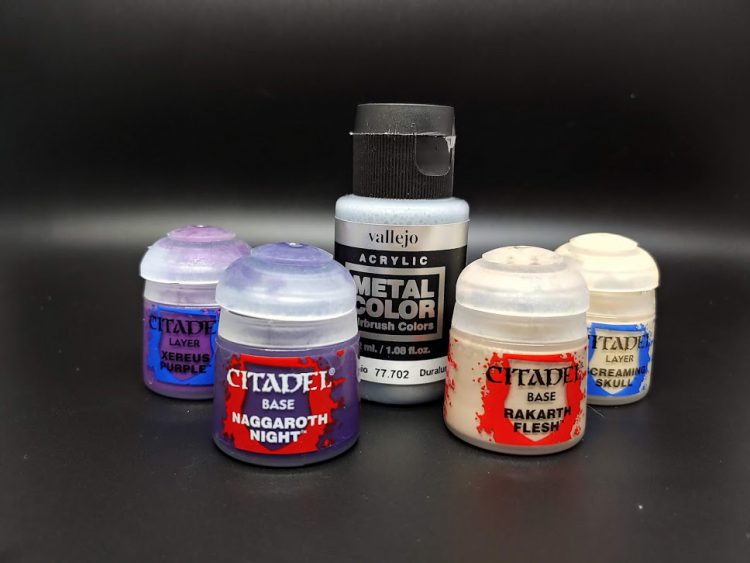
For this paint scheme, I used the following paints:
Base Paints: Naggaroth Night and Rakarth Flesh
Layer Paints: Xereus purple and Screaming Skull
Metallic: Vallejo Duraluminum
Accent Paints: Abbadon White, Pallid Wych Flesh (as a white), Nuln Oil, Seraphim Sepia, and various contrasts for small accents.
Yes, I realize that is a lot more than 2 paints, but the basic job here could actually be completed with just Naggaroth, Rakarth, and a white and black of your choice. The metallic is mostly to help models meet 3 color criteria, as are most of the use of certain contrasts.
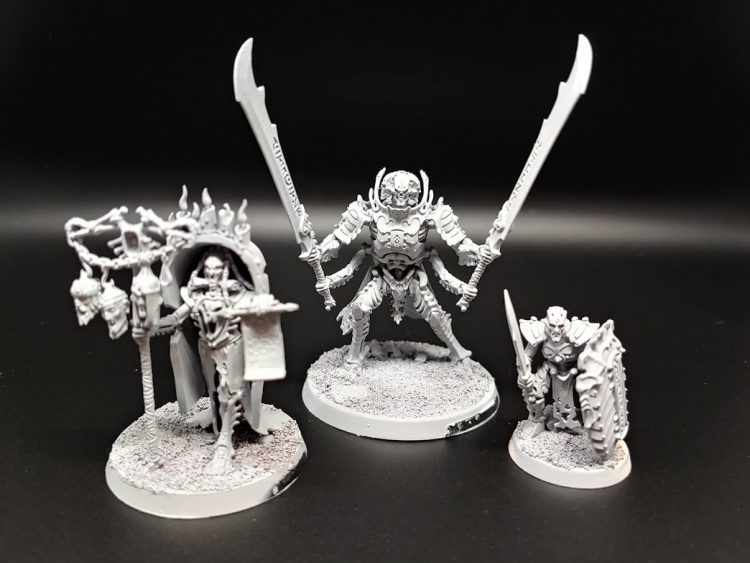
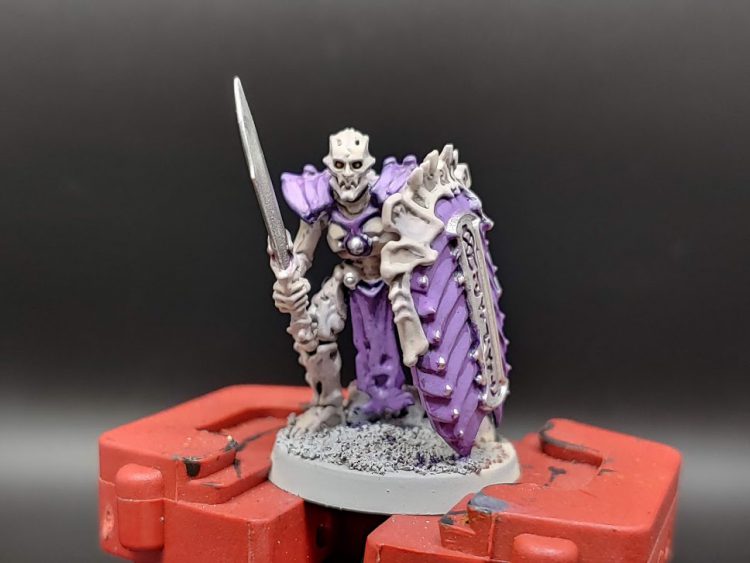
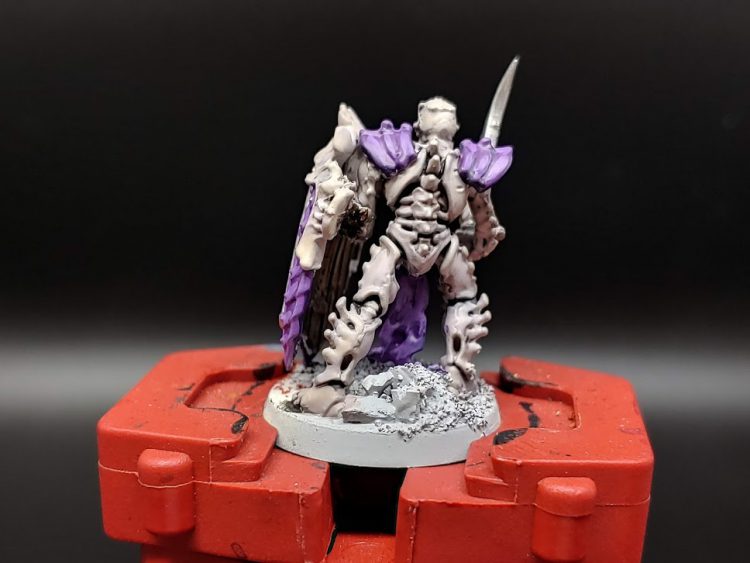
To start, I picked these 3 Ossiarch Bonereaper models. I primed them in gray, figuring that would be a good way to go in either direction, but after paiting them I feel like white might actually have been easier, or black, depending on whether you want to focus on the bone or the purple. Still, gray was a good starting point.
The base layer for the bone was a 2:1 mixture of Rakarth Flesh and Naggaroth Night, which would give a slight purple tint to the bone color but not enough to be noticed. In the pictures, perhaps due to just mixing at different times, you can see Vorkmortian is a bit more ‘purple’ than the others, but it is easy to fix or balance with layers, of which you’ll end up doing quite a lot here.
The purple was straight up just Naggaroth, as mixing in yellow/white came later in the layering stage.

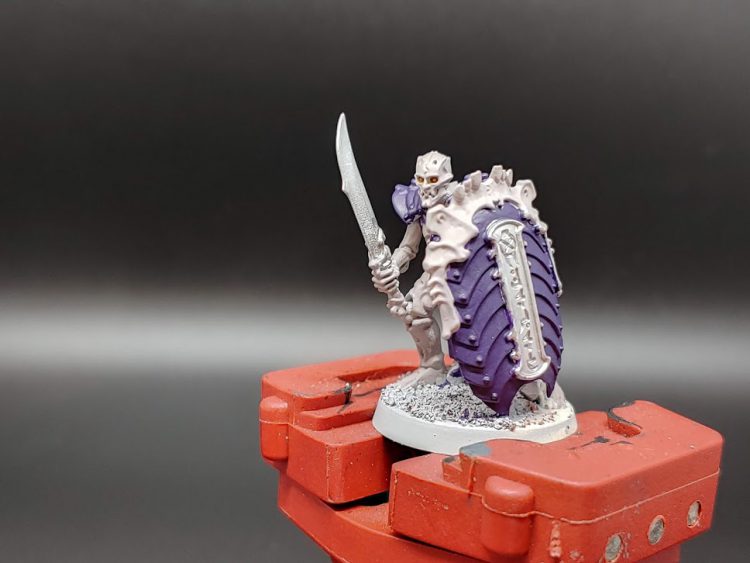
The next step was a layer of shading, mostly Nuln Oil on the entire models to help fill the recesses. You may not need to do this depending on what skeleton you’re painting, but on the OBR, they have a lot of little recessed detail and ‘hiding’ places that really needed the shading layer. The big step after the shading is layering. There is a lot of layering involved in this, as you’ll be coming back over the shaded model with increasingly brighter versions of the paints. For the purples, I ended just shy of going towards periwinkle, and for the bone I got right up to the tip of doing pure yellow-ish white, focusing the layers on the model’s raised surfaces and painting less and less of the model with each pass.
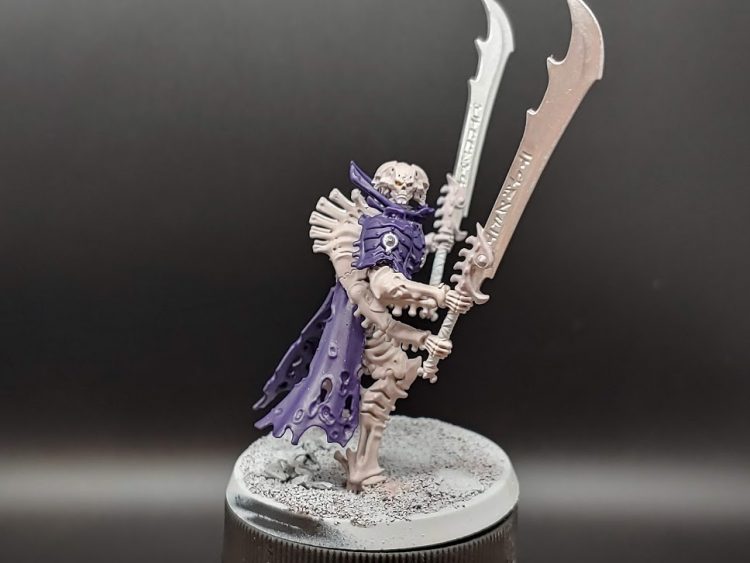
For the Mortek Guard below, this would be about what I’d consider finished. At this point it’s just a matter of doing any final touch up and deciding on a basing scheme, but I think the shield especially shows the way these two contrasting colors can really pop when successive layers of the colors blended together are applied. Also, as a note, that is NOT the standard shield; I was given the model without an arm and converted a shield for him. It’s like the same size as him, and he is my cute smol skeleton son now.

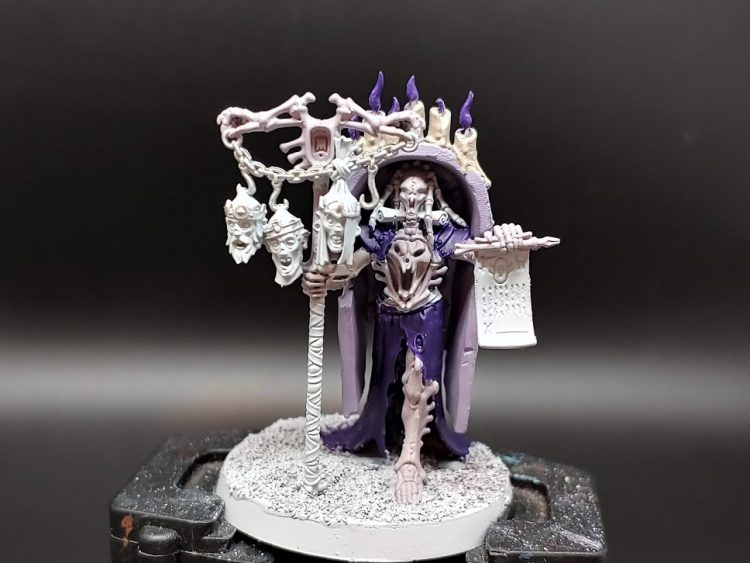
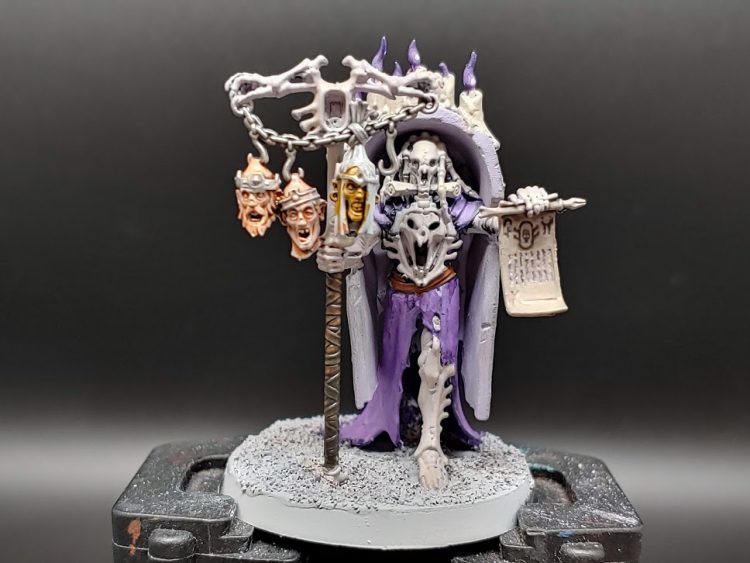
For a more character oriented model, like Vokmortian, the scheme presents a few challenges that I wanted to meet in interesting ways. The tombstone shell he wears is a detail obliterator, so I needed a way to carry the scheme through. I decided on a purple-gray stone color, and used Rakarth for the candles, with various layers of purple and a touch of white for the flame, rather than trying to bring in reds or oranges to the model. For the staff I was a bit more perplexed, but am currently working on making various, yellowed-skins, but that’s not important to this scheme so I didn’t rush to finish them. The wrappings of the staff is Wyldwood, which actually has a slight yellow-ish tint to it, which helped keep the theme.
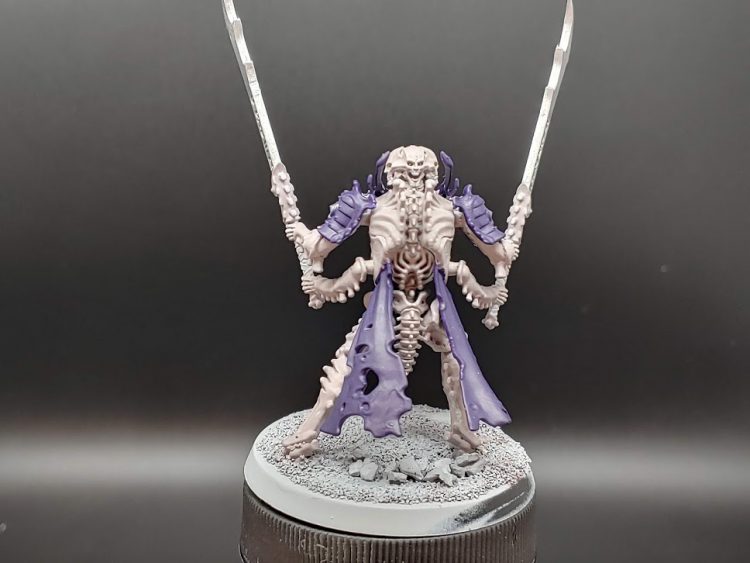
Finally, the Necropolis Stalker is an interesting model because while huge, it actually doesn’t have a lot of detail, and the swords draw the eye quite a bit at the same level as the face it has. For that reason I wanted to make the guards stand out a bit, and applied some Seraphim Sepia to them to give the bone on the handles a more aged look, as if they were crafted from something different than the Bonereapers themselves. Otherwise, he follows the same scheme as the others, layering various levels of the colors into one another over successive coats.
Overall I really enjoyed this scheme and hope you’ll consider giving it a try. Aside from presenting myself with a painting challenge that helped me learn a lot about using mixes of paint and a limited pallette, it also showed that there’s a lot of things you can do when you only use 2 paints (and maybe 5 other accent pieces!). Still, if you want a new spin on doing bone-colors and contrasting it to things like purple or blue, consider working on it by mixing the colors together; the browns used here could easily have been made by fudging together black, purple, and yellow, for example!
Everyone’s Gonna Fight in the Skeleton Wars Eventually
That wraps up our look at painting bones and skeletons. Join us next time when we look at painting an even spookier type of model: Ghosts. In the meantime, have any questions or feedback? Drop us a note in the comments below or email us at contact@goonhammer.com.
