
Another installment in my crazy plan to participate in the ITS After Dark qualifying tournament at GenCon. What was I thinking?
O Hisashiburi!
OK, so it’s been a minute since my last post. You might think that in the intervening time I’ve gotten a lot accomplished and am in a much better position in terms of tournament prep than I was in my last installment. You would be sorely mistaken!
See, when I first signed up for the tournament and decided that I needed to get cracking, I looked at the calendar and did some mental math for how long I’d have to paint all my shit. Knowing how slow a painter I am it was dicey, but OK, I could make it work. Of course I wasn’t really factoring in spending two weeks on vacation. I finished the last installment of this series early and it actually posted while I was out of the country, thanks to the magic of scheduling in WordPress (very dark magic, to be sure). I’m not sad I went on vacation (we had a fabulous time and gods know I needed it), but it did take a big chunk out of my available painting time.
What I absolutely did not account for were the trips I’ve had to take for work. Apparently business travel is “a thing” again. So I lost three evenings last week. Worse, I now have an unavoidable meeting scheduled on the 2nd and 3rd of August. For those paying attention, GenCon starts August 4th. While the company is going to be flying me direct from BWI (insert obligatory “Fuck you, Baltimore” for Greg) to Indianapolis after my meeting late-o’clock on the 3rd, that means losing another two days I could be painting.
So…uh…yeah, I need to get my butt in gear and make some major progress.
Progress!
If you’ve ever played Infinity, you’ll know that Remotes are a big part of the game – and none are more ubiquitous than the Total Reaction Remotes to which every faction and sectorial has access. If you’re an Infinity novice, the Total Reaction skill means that you get the full Burst value of your weapon in the Reactive Turn (where ordinarily your Burst value is 1). All of the different factions’ Total Reaction Remotes are slightly different, but virtually all of them have some kind of heavy weapon (usually an HMG) and a 360-degree Visor. This is a drone that you can plunk down somewhere and control an entire fire lane more or less single-handedly. While new players detest Total Reaction Remotes, veteran players will have more tricks up their collective sleeves to deal with these pesky bots. Still, anything you can do to force your opponent to spend precious orders is worth doing. And the fact that Remotes in N4 can now go prone (and do so automatically when they go Unconscious) strongly contributes to their survivability – as does the second level of Unconscious provided by the Remote Presence skill. If you have an engineer or said engineer’s Servant Peripheral around, Remotes can be surprisingly hard to put out of the game.
For the Combined Army, the Total Reaction Remote is the infamous Q-Drone. Like most of its ilk it has a 360-degree Visor, but the aliens take it one step farther and give the drone Mimetism, which imposes a -3 modifier to enemy troopers’ rolls to hit it. That does not suck, as every little bit helps when you’re trying to win a shoot-out at BS 11. Burst also helps, and like most TR bots the Q-Drone can pack an HMG which confers 4 dice every time it shoots.
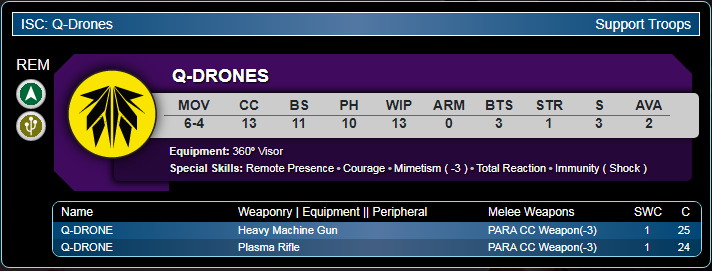
But what really sets the Q-Drone somewhat apart from other factions’ TR Remotes is its plasma profile. That’s right, the greebly aliens have figured out how to weaponize plasma and can scorch people to death in coruscating fire. Toasty! The Plasma Rifle is very short ranged (it’s +3 range band only extends from 0-16″), but in that range it can be devastating because it forces a target to make a save against both ARM and BTS for each hit sustained. And at Burst 3, that is potentially a whole lot of wounds – especially against certain factions (<cough>Ariadna</cough>) that seriously lack BTS. Or you can be a massive jerk and fire it in blast mode, in which it uses the 5″ circular Impact Template. Great for shooting at fireteams! And unlike many weapons that offer a choice between template and non-template attacks, the Plasma Rifle is still Burst 3 even in blast mode. That’s right, you can be placing three 5″ circular templates every time to rock out with one of these bad boys. In ARO they all have to be centered on the same target, but the possibility of having non-link-leader models in a fireteam sucking down 3 ARM rolls and 3 BTS rolls forces people to make some really hard decisions.
In the context of the ITS After Dark missions, a plasma-toting TR bot offers a lot of potential. This is especially true of the Frostbyte mission, where Remotes are immune to the effects of cold and the mission funnels both players into the middle of the board to try to dominate the central zone. In a short range firefight, a Q-Drone with plasma is going to be both a significant speed bump and contribute 24 points to zone dominance. And for Capture & Protect (where you know your opponent has to make a run at your beacon), the plasma Q-Drone makes a great beacon babysitter, so long as you can keep your opponent from blasting it from afar. Finally, remember that this is a 400-point tournament, which means I am more likely to encounter TAGs. Putting a TR bot up against a TAG in the Reactive Turn is suicide, but in the Active Turn it’s a much more reasonable prospect. And while most TAGs have quite good ARM and BTS attributes, the more rolls you force your opponent to make, the more opportunities he or she has to fail.
I don’t know yet what my final army list(s) will look like, but having a finished Q-Drone will open up a bunch of options for me, which is what bumped it to the top of my list.
More Fun With Drones!
Let’s talk Fireteams for a minute. Some sectorials are defined by the quality and variability of their Fireteams. The Shasvastii are definitely not one of those armies. Part of the problem is that so much of the sectorial can enter a marker state that it doesn’t leave much left over to form Fireteams. Your only unlimited Fireteam Core option are Nox Troopers, and your Haris options are the Jayth (short ranged close combat troops), the Haiduk, and the Gwailo, with the former being too expensive to field in multiples and the latter being AVA 1 (meaning you have to put something else with it). Further, all of the Wildcard options are relatively expensive characters, many of which have niche capabilities. Most of these “count as” Nox troopers for Fireteam bonuses, so that’s worth something at least.
But one of the more interesting “counts as Nox” options in the Core Fireteam list is the T-Drone FTO (FTO being “Fire Team Option”). While again all factions have access to a missile-launcher-armed drone with the BS Attack (Guided) skill, the Shasvastii are one of the few who can stash it in a Fireteam where it benefits from a bunch of bonuses. And because it counts as a Nox Trooper, it doesn’t break the “single troop type” status, which stacks on even more bonuses. When rolled into a 5-man Fireteam Core, your unassuming missile drone now has Burst 2 (in both the Active and Reactive turns) and +3 to both Discover and BS Attack rolls. The Shasvastii don’t generally have the EWAR/Repeater coverage to make the Guided aspect as terrifying, but a 2-Burst missile Launcher hitting on 18s in its good range band can do some work. Firing with AP+Explosive ammo in hit mode is also great against heavily armored targets like Heavy Infantry and TAGs, which again I am likely to see in a 400 point game.
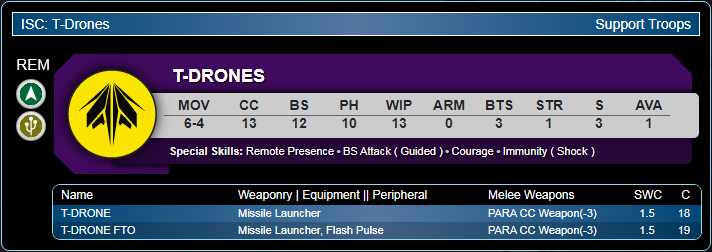
And at only 19 points, it’s kind of a steal. As such, I decided I needed one of these as well.
Painting The Drones
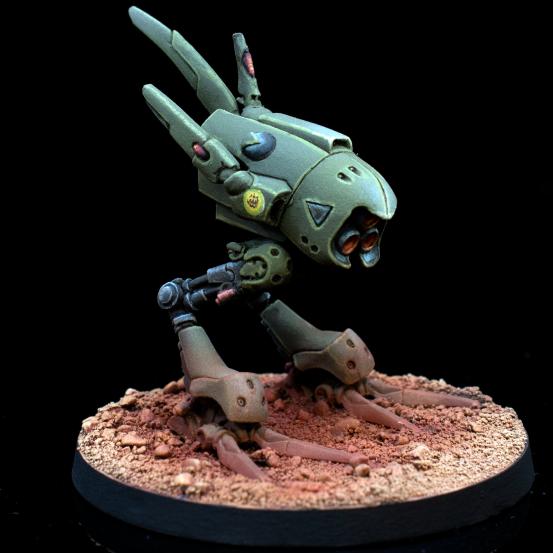
This is where I get to my next poor life choice – for whatever reason I fully assembled these drones before I painted them. The Combined Army Remotes are this bizarro mix of mechanical and organic(ish?) parts, just the sort of nightmare fuel you’d expect from an alien hegemony bent on galactic domination and assimilation. I absolutely love the look of them, but god damn do they have a lot of fiddly details.
All of this is made worse by their quadruped legs, upright torso, spindly arms, weapons, and horizontal head(?) and generator(?). When the things are fully assembled they look pretty bad-ass, but you are virtually guaranteed that there will be parts of it that you can see but can’t easily reach with a brush. If I’d had half a brain (I don’t), I’d have left the torso, arms, and head as one sub-assembly and the legs as another. This would have made my life monumentally easier.
But I didn’t do that. Worse I am a masochist working with a base color of white, so the inevitable slips and touch-ups are a colossal pain in the ass to cover. Argh.
Also, way back when I first started painting Infinity minis in the early days of N3, I was so taken by the NMM style that Angel Giraldez so effortlessly perfected on the studio minis that I decided I wouldn’t use metallic paints on any of my Infinity stuff. So all the ball joints and sockets and crap on these drones that could have been done so easily with a metallic base, metallic highlight, and wash instead had to be worked up through pretty much Vallejo’s entire line of grays.
See above under poor life choices. Also, it’s official: I am fucking old. I finally resorted to getting one of these goofy things.
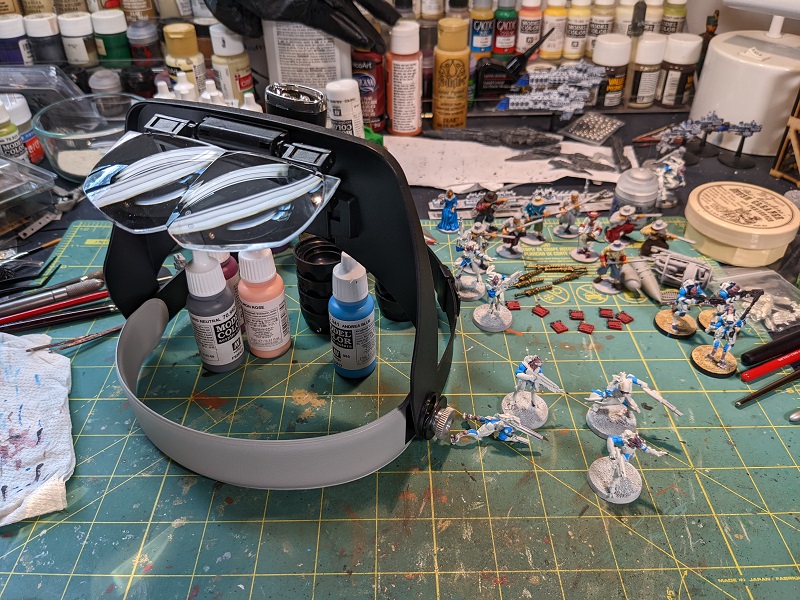
As a result of my terrible choices these two miniatures – comprising a maximum of 44 total points – took me the better part of a week to finish. But it was totally worth it. At one point I was working on some tidbit of one drone while the other was sitting nearby. I glanced at it and thought to myself, “Hmmm, I’m not entirely sure I like how shiny those joints a…wait, that’s not actually metallic!”
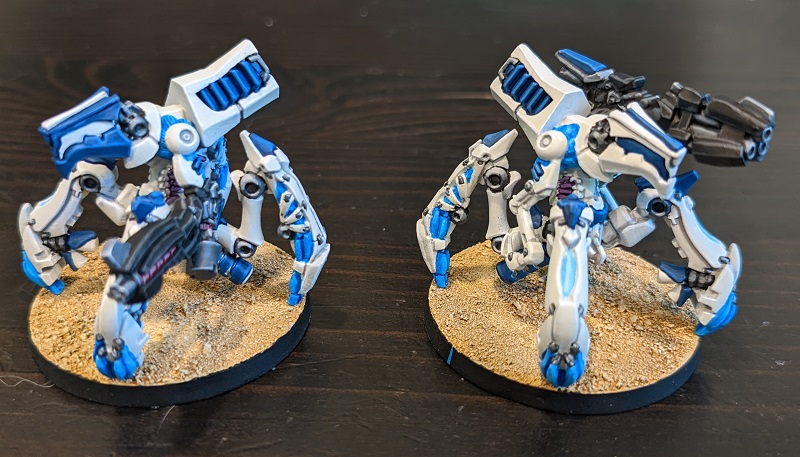
Though it meant a ridiculous number of tiny touch-ups, I kept with the white theme I’ve used for all of my Shasvastii to date. All of the “muscle” fibers are done in the same light blue used for the skin-suits on the line troopers, and the dark blue accent panels round out the look. There are also a few details in pink and purple to provide a little bit more visual interest her and there. I couldn’t decide whether I wanted the “head” to be predominantly white or dark blue, so I did one of each, just reversing the colors of the components. I am really happy with how everything turned out and I look forward to getting these minis onto the tabletop.
Q-Drone


T-Drone


Now I just need to make sure they don’t get clowned off the board immediately by my opponent.
Practice
If you read Genghis Cohen’s recent article about the Avatar Meta in Infinity, you’ll know that at this event I’m likely to encounter one of these beasts. To that end, I thought it would be a good idea to get in some practice against a list that included one. Fortunately, one of my regular opponents has one – as well as a bunch of other CA units to go with it – so I asked him to put together a 400-point list kitted out for Frostbyte, one of the missions I’ll be playing in the event (I discuss the mission itself in more detail in Part 2 of this series).
Another of our regular gaming friends set up a table for us and we got down to work.
Set-up and Deployment
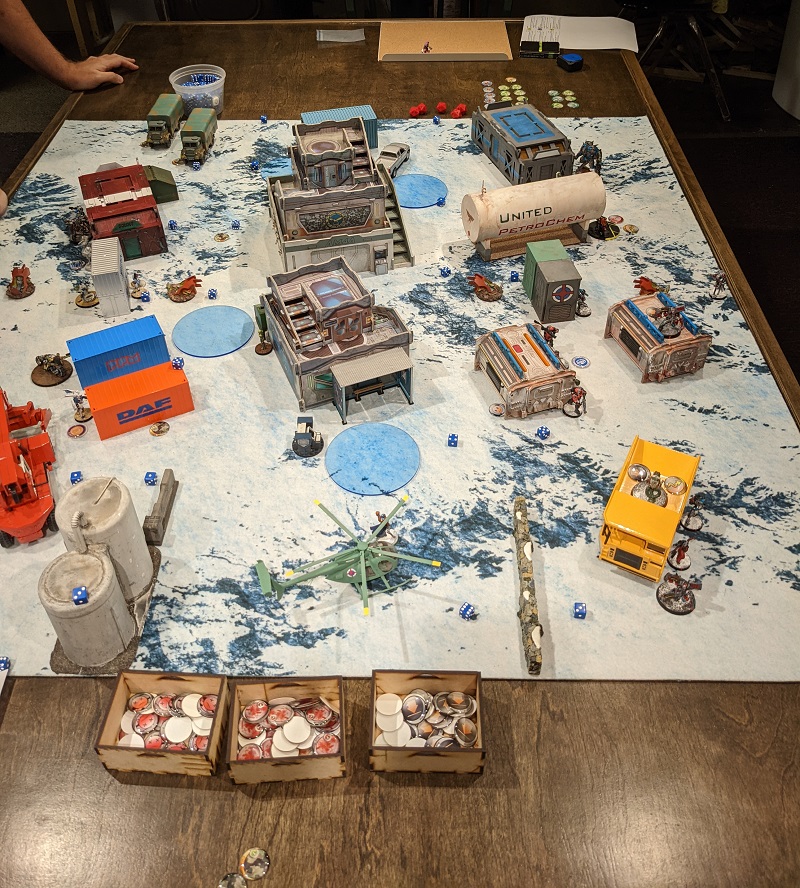
I lost the Lieutenant roll and my opponent chose deployment (picking the right side in the photo above and forcing me to deploy first). Any mission which includes zone domination as a primary objective rewards going second, but I knew that I didn’t want to deploy second and go second, especially against an Avatar list. As such I decided to go first, hoping that in my first turn I’d be able to do some damage. My opponent predictably used a Command Token to reduce my order pool, but my Mentor unit’s Counterintelligence skill was able to blunt this to just losing a single order.
In the picture above, I’m starting from the left side. The blue acrylic circles are the blizzard regions, with each player placing two. These count as difficult terrain and saturation zones, reducing the Burst value of attacks passing through them by 1. The ranks of blue dice mark out the deployment zones, dead zones, and center area – we removed them right after this photo was taken because Infinity is a game that does not allow pre-measuring.
With my opponent forcing me to deploy first – and knowing that the Avatar’s Strategos Level 2 skill would allow him to hold two troopers in reserve – I knew that it was unlikely I’d be able to get my Speculo Killer in a place to make an attack run against his Avatar (because he’d place it after my Speculo was already on the board). Worse, he’d brought an M-Drone, whose Triangulated Fire skill would give him a better-than-average chance of peeling my shape-shifting assassin off his Avatar with a blaze of gunfire if I somehow did manage to get into silhouette contact. So instead I set up to make an attack against the two Suryat Heavy Infantry he brought to bully the center of the board, one with a Heavy Rocket Launcher, the other with a Vulkan Shotgun. The rest of my stuff was deployed with an eye towards early movement and accomplishing Classified Objectives (of which this mission has 3). I kept my Sphinx in Hidden Deployment right next to the blue shipping container at the front edge of my deployment zone.
Everyone else was heads-on-swivels looking in all directions because I fully expected my opponent to field a Speculo of his own. I breathed a sigh of relief when he didn’t, but that sigh was short lived when Nourkias and the Avatar deployed together on my left flank. You can see the Avatar at the top right of the table – the model is an absolutely massive chunk of pewter and the paint-job it’s been given is fantastic. I wish I hadn’t been so focused on the game and remembered to take close-up photos!
Turn 1
Given the way things worked out, my first orders were spent on my Gwailo. One of the Classified Objectives I drew required a trooper with MSV or a Biometric Visor make a WIP roll with the enemy HVT in Zone-of-Control or Line-of-Fire. The Gwailo could do that and easily accomplished that objective on his first order. My next order of business was to deal with my opponent’s plasma-toting Q-Drone (which you can see at the corner of the yellow dump-truck at bottom right), for which the Gwailo was again the perfect weapon as its MSV2 negated his Mimetism and I was in a better range band (we were at around 28 inches, which put me at a +3 and him at a -3. Better yet, Bit – one of the best hackers in the game – was standing close enough to the enemy Q-Drone that she too was covered by the templates. I managed to hit with both rockets, knocking the Q-Drone into its 2nd level of Unconscious and completely immolating Bit. Unfortunately the Q-Drone dropped prone, which put it out of line-of-sight behind a stone wall. My opponent’s Dr. Worm was lurking prone in the bed of the dump-truck, so I suspected I’d see that Q-Drone back in action soon.
With the opposing TR bot out of the way for the moment, my Speculo Killer crept around the corner to blast the nearby Suryat with Vulkan Shotgun in the back (he was facing backward to protect his HRL buddy). I scored two hits, but the Suryat’s armor tanked one of them. Still up (most HI troopers have 2 Wounds), he turned around and faced my Speculo. Template weapons are not kind to sneaky assassins, so rather than dump more orders here, I chose to shift gears knowing my opponent had a short ranged weapon. Spending another order on my Gwailo, I moved out to gain Line-of-Fire and shot at the Suryat. I missed, but so did my opponent. My dice were not helping me here. Sighing as I burned another order to repeat the process, I was gratified to see the Suryat go down. Even better, a nearby Slave Drone was caught in the blast radius and went Unconscious as well.
My second combat group contained a 4-man Nox Fireteam Core, and my HMG deployed able to see both his Suryat HRL and his M-Drone. That was a contest that was a little bit dicey, but with the Fireteam bonuses I decided to risk it, splitting my Burst 2 and 3 respectively. I tagged both, and while the Suryat’s armor laughed off my attack the M-Drone dropped Unconscious. Now with only a single target on which to focus, I spent all my rounds on the Suryat and killed him dead. The remainder of my orders were spent moving my Shrouded hacker into a position to be able to hack a console to activate the heating unit in my deployment zone during Turn 2.
All things considered, that was an incredibly productive first turn. I managed to drop a Q-Drone, Bit, two Suryats, an M-Drone and a Slave Drone, pulling a total of 5 orders away from my opponent. I just had to hope it was enough.
My opponent immediately answered with his Avatar, moving it forward and towards the middle of his deployment zone. The second half of his movement brought the hulking monstrosity into LoF of my Speculo Killer and it was here that I made my first bone-headed blunder. Excited about the prospect of getting in a free shot on his Avatar, I chose to shoot with my combi-rifle in ARO. I don’t know what I was thinking, because predictably his Armor 9 laughed off my paltry Damage 13 attack, and his next order was to absolutely annihilate me with a Multi-HMG. Had I been thinking clearly, I would have attempted to drop smoke to obscure myself, as that would have prevented the Avatar from shooting at me again. But alas. With my sneaky assassin out of the way, my opponent pulled his Avatar back into a position where it could look down the middle of the board, where there was a fire lane that overlooked the center console and into the middle of my deployment zone. Cagey.
Then began the dreaded attack run, not by the Avatar but by something almost more terrifying: Nourkias.
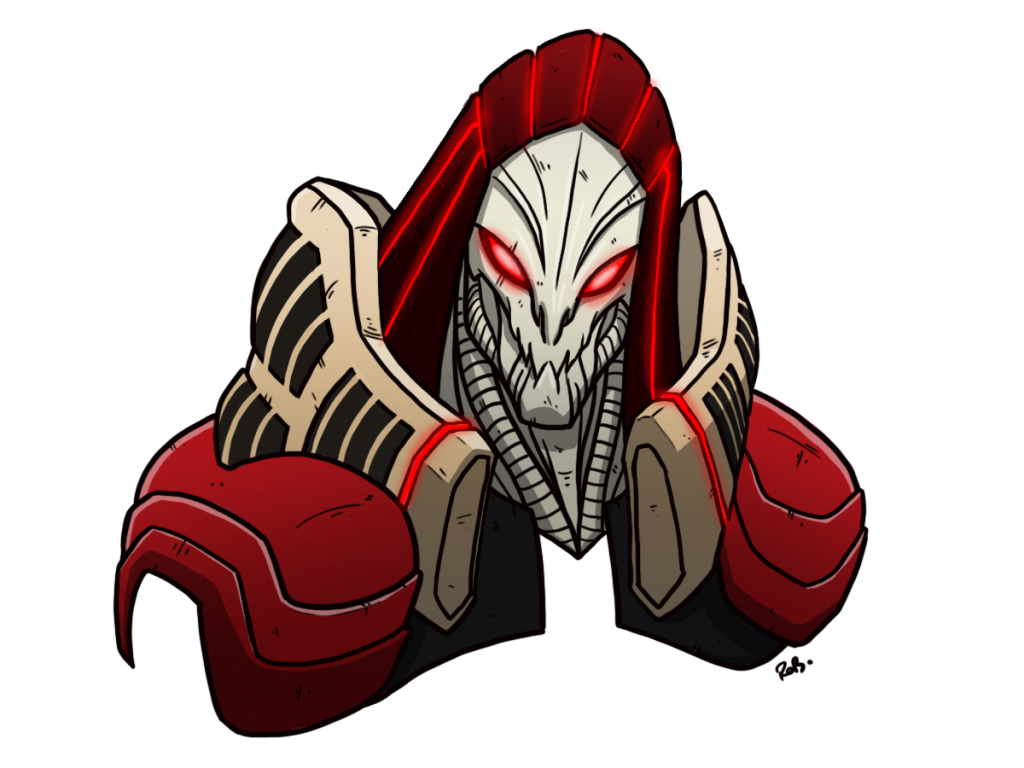
Nourkias is an Umbra Samaritan special character. Umbra are Super-Jumping space vampires that have a crazy-good attributes and laundry list of weapons and special skills that make them terrifying. Nourkias is that, only better. In addition to being a death-dealing bad-ass in close combat, my opponent chose the Killer Hacker profile which comes with a stronger version of the “Total Control” program – which Killer Hackers normally don’t have access to at all – that’s used to possess TAGs. Not cool, man.
So Nourkias started moving up my left flank. I didn’t have much that was in a position to oppose him, and he was easily able to leap over the silver pickup truck and hack the console to activate the warming unit in his own deployment zone. His move to get there however happened in LoF of my Seed Soldier, who opted to hatch into its “developed form” ARO (accomplished with a successful Dodge roll). Now I had at least one trooper who was in a position to do something, anything to Nourkias before he got into my line.
My wily opponent had his sights set on my MSV2 Haiduk, who with his AP Marksman Rifle stood probably the best chance of both hitting and wounding the Avatar of any trooper in my entire force. Sliding up to a low wall, Nourkias was set to make his attack with his Breaker Combi Rifle in its good range band. I took this opportunity to reveal my Mentor (who was camouflaged at the forward edge of my deployment zone), shooting with a Boarding Shotgun in template mode. Nourkias split his burst among the Mentor, Seed Soldier and Haiduk – ballsy! Over the next several orders, Nourkias managed to drop my Seed Soldier and utterly obliterate my Haiduk. My Mentor was hit but was saved by his high BTS (which is good, because losing him would have put me in Loss of Lieutenant). I chose to fail my Guts check and move out of Nourkias’ LoF.
Finally, in the center of the board my opponent advanced two Unidrons, spending his last order of the turn to put one of them into Suppressive Fire.
Turn 2
My first order of business in Turn 2 was to use a console to activate the heating unit in my own deployment zone, which was easily accomplished with the Shrouded hacker I’d moved into position in Turn 1. I then tried to move my free biker unit forward to get line of fire on the downed Q-Drone but got taken out by a lucky ARO from one of those pesky Unidrons. Oh well, that guy cost me 0 points. I spent an order on the Gwailo to avenge my biker and remove the troublesome Unidron.
Switching to my second combat group for a moment, I activated the Nox fireteam and used the HMG trooper to cross the small gap between the building and the stack of silver shipping containers to be in a position to engage Nourkias. My first shot was dismal, only hitting once (my opponent rolled well and moving across the gap I was unable to claim cover). Spending another order, I fired again, this time getting 4 hits. This was (finally) sufficient to put Nourkias down. Thank the gods, I didn’t want to consider what would happen if he got into my deployment zone and started carving people up and growing stronger by feeding on their life force.
With that out of the way I activated my Nox Hacker with his irregular “Snow Ops” order. This is a special rule for this scenario – each player nominates one trooper to be a special scout, who gets an extra order and is immune to cold. This dropped him out of the Fireteam, but I figured I’d want a hacker in the central zone to at least give me another option for dealing with the Avatar. Advancing, he spent the last order of the 2nd order pool successfully Spotlighting the Unidron in Suppressive fire. Even better, the Unidron attempted to Reset, which took him out of Suppression.
Finally, I made a combat drop with my Cadmus Killer Hacker. This was done on my extreme left flank. I had initially thought to use the Cadmus’ MorphoScan capability to copy the attributes of the Avatar, but upon closer reading it can only be used on enemies with a Wounds characteristic (as opposed to Structure). Alas. But I was able to succeed at a WIP roll to accomplish Mapping, my second Classified Objective. With just a couple of orders remaining, I took at run at the Avatar, blasting it with my Boarding Shotgun. I used blast mode, both to have a better chance of hits and to also catch a nearby Slave Drone in the pattern. True to form, the Avatar laughed it off, but the Slave Drone went down. Now if my opponent’s doctor/engineer wanted to heal/repair anyone, he’d have to do it the old-fashioned way.
With that, I went over to the Reactive and my opponent commenced his second turn. His first action was to sepsitorize my poor Cadmus, who failed both his Dodge roll and his BTS roll and became part of my opponent’s team. Whatever, he’d done his job.
The Combined Army had some airborne deployment tricks of their own, bringing on Ko Dali from my left-flank table edge in the dead zone just forward of my deployment zone. I had nothing on the table with line of sight to the spot she stepped onto the table – except the Sphinx I’d kept in Hidden Deployment. Knowing full well how dangerous Ko Dali can be (she’s almost as nasty as Nourkias) I opted to reveal myself and take the shot with my Spitfire in ARO. I of course missed, but I’d get another chance as she was still in my LoF (airborne deployment capabilities are Entire Order skills, meaning the order you come onto the table you can’t do anything else – like Dodge). The second time was the charm, and Ko Dali was unable to dodge my second ARO, dropping unconscious from a Spitfire wound. I heaved a huge sigh of relief, as she’d have eaten my Lieutenant for a light snack had I not killed her.
Now unfortunately I had a new problem – my Sphinx had been revealed. Sensing a juicy target, my opponent started pumping orders into the Avatar to advance it into position to attack the Sphinx. In moving to engage Nourkias with the Nox HMG in my previous turn, I no longer had an HMG covering the central firelane and the Avatar was able to concentrate on my Sphinx without interference. Over the remainder of his turn, the Avatar tried to blast the Sphinx, who did an admirable job of ducking, weaving, and dodging, sustaining two wounds in the process. But it was still up!
Turn 3
Starting with my second combat group I tried to move my Nox Hacker towards the center console, making a Cautious Move crawling from behind the building to behind the central console. Alas, I wasn’t able to move quite far enough and ate an Explosive HMG round from the Avatar for my troubles. Miraculously, I made two of the three required ARM rolls (and missed the third by 1), which just dropped me Unconscious. This would be important later.
But my most important order of business in Turn 3 was to get my Sphinx back to full health and into the central zone. I burned an order making a Cautious Move with Dr. Worm to get across an inconvenient gap without getting blasted, then spent the following two orders repairing the Sphinx back to full health (although I did have to burn a Command Token for a re-roll on my first attempt). I then spent an order on the Sphinx to get the hell out of LoF of the Avatar and another to obliterate the remaining Unidron in the middle of the board. The remainder of my orders were spent moving the Sphinx and Gwailo up into the exclusion zone and my Shrouded Hacker back to my own deployment zone (such that he didn’t die due to cold at the end of the game).
My opponent started his third Turn with a ballsy move by his own Dr. Worm, vaulting out of the bed of the yellow dump truck to get into base contact with his Q-Drone. This was a bit of a desperation play, as I had three troops that got an ARO to this (including my Gwailo and Sphinx). I of course missed all three shots, leaving the enemy Dr. Worm free to repair the Q-Drone. Well, crap.
The newly resuscitated Q-Drone was the next to activate, targeting both the Gwailo and Sphinx with plasma. Both returned fire in ARO, and while the Sphinx missed the Gwailo scored a hit with another heavy rocket. This ARO not only knocked the Q-Drone back into unconsciousness, it lit Dr. Worm on fire and killed him outright.
At this point I had done a lot of damage and my opponent really had no alternative other than making a sweep to my right flank with his Avatar. The beast came charging around a corner, blasting away at my Gwailo with his Multi-HMG Surprisingly, the plucky little HI managed to Dodge one of the two rounds that hit and tank the other. With the very last order came the attack I’d been dreading – closing to just within 10 inches, the Avatar was able to make a Sepsitor attack on my Gwailo. Holding my breath, I rolled my Dodge – and made it!
Scoring
All in all, I had killed more Army Points of my enemy that he had of mine (3 points), had activated a Heating Unit (1 point), and had accomplished 2 Classified Objectives (1 point each). I had a total of 93 (Sphinx) + 43 (Gwailo) + 19 (Nox Hacker) points in the zone compared to the 118 (Avatar) of my opponent; dominating the Exclusion Zone gave me another 3 points. I was able to count the Nox Hacker thanks to the “Shasvastii” special rule – these aliens carry around seed embryos wherever they go, so even if they’re knocked unconscious they still apply their points towards zone domination. My opponent activated a console for 1 point, for a final score of 9-1 in my favor.
In case that sounds like a landslide, it isn’t. Remember that last Dodge roll with my Gwailo? Had I failed that roll and gotten Sepsitorized, the Gwailo’s 43 points wouldn’t have counted for me. Given that Sepsitorized is considered a “Null State” it wouldn’t have contributed to my opponent’s tally either, but the Avatar is just to goddamned beefy that its 118 points would have been more than enough for the 93+19 I had remaining. That would have meant him dominating the exclusion zone rather than me, a 6 point swing in the differential. Had I not made that Dodge during the last order of the game, the score would have been 6-4 in my favor. That’s still a win (and I’ll take an ugly win over a loss), but due to the way rankings are done on successive rounds of the tournament, having more Objective Points is better (scoring more Objective Points racks up more Tournament Points). If players tie on Tournament Points, total Objective Points earned across missions is the tie breaker, so a decisive win is better in the long run.
It also goes to illustrate one of the things I really love about Infinity: while you do occasionally have games that are blow-outs, you are vastly more likely to have a game that goes down to the wire and is decided in the last one or two orders. I’ve lost count of the number of games I’ve seen decided on the very last roll. I love the tension and engagement that comes with this aspect of the game.
All in all, I felt like I played well. I think my dice karma was relatively evenly split, and ultimately my plan to starve the Avatar of orders worked well. I made some errors (sloppy AROs, a couple of longer-than-recommended-odds plays), and most importantly I learned from them. Big thanks to to my gaming buddies for setting up a table and throwing a nasty list at me. I feel like I’m in a better place for the ITS After Dark event.
With these two jokers done, I’m now at around 344/400 points, but I am unlikely to field both of them at the same time. That means I still have a long way to go and not a lot of time left.
Next Time:
The bad seed(s).
