
Hello again, Mali-folks! We’ve been plowing our way through Madness of Malifaux… so far we’ve covered Harold Tull and the Cavalier keyword, Damian Ravencroft and the Witness keyword, Kastore and the Returned keyword, the Clampetts and the Angler keyword (twice!), and Linh Ly and the Red Library and Story keywords. Now we’re covering the last of the six new keywords: the Explorer’s Society/Outcast dual faction keyword Bygone and its leader, Tiri.
Bygone With The Wind
Understanding Tiri takes some understanding of Malifaux’s past (a topic covered at some length in Kastore’s article). Fans of Titania may be surprised to hear that she doesn’t have a monopoly on the term Fae: the word refers to any of the original inhabitants of Malifaux, the ones that arose naturally from the magic-rich environment. They came in many forms – Titania’s followers were once Dryads (though with the coming of the Grave Spirit, most Dryads became either undead or just… dead), while the Sirens inhabited Malifaux’s seas, the Gigants the mountains, and so on. The Aua lived in the deserts and drew on the baking heat for their forges and furnaces. As such, they were famed as artificiers, and much of the ancient Malifaux technology that so puzzles and fascinates humans is of Aua manufacture.
The time of the Fae came to an end with the Tyrant Wars. The Tyrants were all Fae once, though the power they acquired alienated them from their kin and left them monstrous. From the ranks of the Aua arose Cherufe, who eschewed the subtle magics of life and death in exchange for the destructive power of fire. Cherufe was a living inferno, and when he turned on his people, he blasted their cities to ash. The Aua built armies of constructs to fight Cherufe, but to no avail – he could melt legions to slag with a wave of his hand. Worse, he inflicted a curse on the Aua race, a spiteful parting gift as they fled the destruction of their homeland. Every Aua is burning, slowly, from the inside out. Eventually their bodies transmute to ash and cinder. Their advanced knowledge of prosthetics can delay this process for a long time, replacing flesh with steel, but eventually it claims them all.
When the Grave Spirit destroyed Cherufe’s body and his essence was imprisoned in the Red Cage, the curse lost its power. The few remaining Aua hid away and tried to rebuild their shattered society. When the humans came, the Aua remained hidden. It wasn’t hard – there aren’t many of them, and they dwell in the deep desert of the Badlands, where not much else can survive.
Times have changed. The Red Cage fell, freeing Cherufe, and while he was for a time restrained behind Sonnia Criid’s iron mask, he broke free when Governor-General Kitchener tried to ascend. The creation of the Burning Man unleashed Cherufe’s power and reawaked the old curse. The Aua realized that they couldn’t hide anymore, and have emerged from the deserts, allying themselves with the Explorer’s Society out of necessity. They’ll never be safe until Cherufe is permanently destroyed… but if anyone can pull off such a feat, it’s the Aua, the undisputed masters of high technology.
Tiri, the Nomad
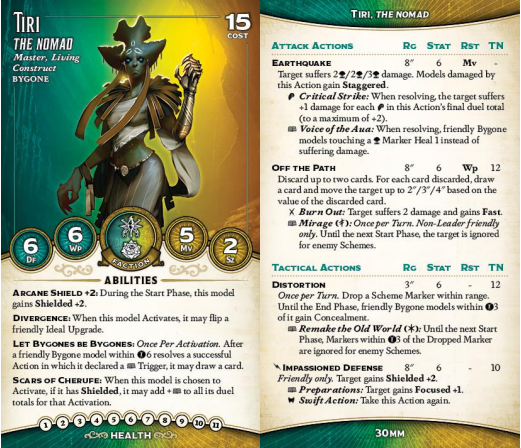
Tiri is young for an Aua, having been born just as their society was starting to crumble. She doesn’t remember the glory days, only fleeing into the desert to escape Cherufe’s wrath. Maybe that’s why she makes the perfect leader: she’s not weighed down by grief at what the Aua have lost, and instead can focus on her optimism for the future. Tiri made the decision to make contact with the humans, and while the Aua are cautious, they’re willing to follow Tiri wherever she leads.
Let’s start with the Bygone keyword mechanic, Scars of Cherufe, since that’s the fulcrum around which this crew turns. All Aua suffer from Cherufe’s curse, and only the use of technology can slow its progression. In game, that means that as long as Bygone models are Shielded (thus protected by technology), they have a built-in tome on every duel they take. Every model in the crew has at least one tome trigger, and most have several. Building in these triggers is the core of the crew’s power, and so spreading and maintaining Shielded is key to the crew’s function.
The Nomad augments that with Let Bygones by Bygones. Once per activation, when a nearby Bygone model resolves a tome trigger, that model may draw a card. That’s usually just a single card draw every activation early on, and it’s still 2-4 draws per turn later in the game. This is massive and a huge part of what makes the crew work. Bygone have a lot of TNs, but being able to cheat low cards to hit them and then redraw is a big, big deal.
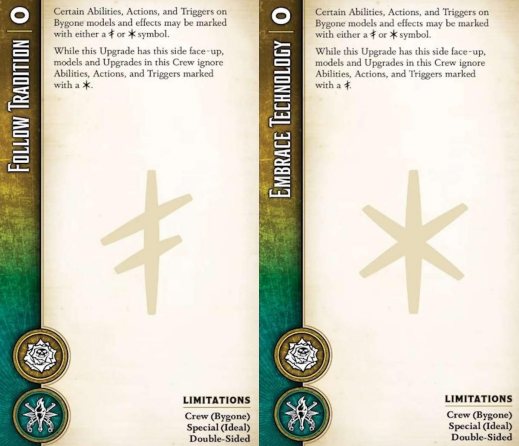
The other core mechanic of the crew is the Ideal upgrade. You attach it at the start of the game if you have any Bygone models in your crew – and, like the Configuration, the upgrade is attached to you the player rather than a model. The Ideal upgrade is two-sided: one side Embraces Technology while the other Follows Tradition. Each is represented by a symbol: the star for Technology, the cross for Tradition. Most Bygone models have abilities or triggers that are marked with those same symbols. These are typically extremely potent abilities, but they are only active if the proper face of the Ideal upgrade is face-up. At any given time, either Tradition or Technology is active and the other is inactive. When Tiri activates, she can flip the upgrade – and this is the only way to do so. Figuring out when to flip the upgrade is a major part of playing this crew.
The rest of Tiri’s card marks her as a support master. She’s got Arcane Shield, which means her triggers are all built in from the word go, and though she does have 6/6 defenses she’s pretty fragile if attacked – so keep her safe. She can use Impassioned Defense to hand out shielded to her allies, and either do it again with a mask or add Focus on a tome (which, remember, will be built in). But she doesn’t just hand out Focused and Shielded – she can give out Fast, too, using the Burn Out trigger on her Off the Path, while at the same time repositioning an ally and cycling her hand. This is an enormously powerful setup, and giving a beater Fast and Focused and Shielded while also pushing them forward and drawing two cards is winding up an enormous haymaker. Off the Path has her first Ideal-locked upgrade, too – Mirage is a fascinating trigger, since it directly interferes with your opponent’s ability to score by giving a friendly model one-sided Insignificant. If you can suss out your opponent’s Vendetta target, or if you realize they have Catch and Release or similar, you can screw up their plans in a big way.
Tiri’s other attack, Earthquake, is not to be slept on either. The damage track is low, but it’s a reliable Stat 6 vs. Mv, and Staggering everyone you tag with the blasts is very strong. Plus, with Critical Strike you can do a surprising amount of damage, which should catch opponents off-guard if they underestimate Tiri’s offensive output.
Finally, Distortion is an interesting ability, one that you won’t necessarily use often but that you will really appreciate when you need it. It drops a Scheme Marker nearby without an Interact – always a plus – and hands out Concealment in an aoe. The wording is such that attacks that ignore LOS will still suffer the concealment penalty, since the marker doesn’t create an aura of concealing terrain but just gives nearby models concealment directly, like Sputtering Exhaust. It can also, if Technology is active, turn off enemy Scheme Markers for scoring purposes. This is of limited utility in GG3, which doesn’t really feature that many marker schemes, but is invaluable in older GGs.
Nomad is an incredible toolbox, able to support her crew, scheme and counter-scheme, and take charge herself. She’s very strong and well-rounded and a great all-comers master without any particular weaknesses.
Tiri, the Architect
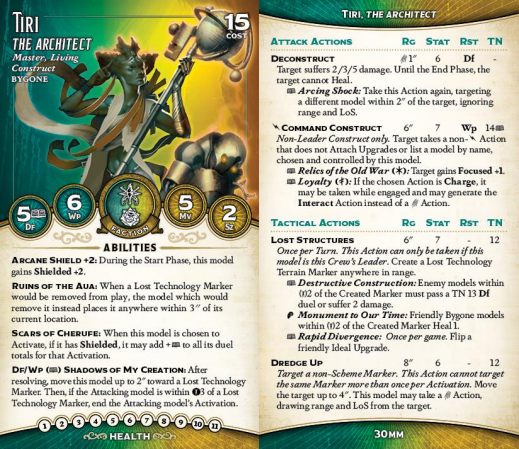
Taking on the Burning Man is a heavy lift, especially for a people like the Aua. They’re going to need all the help they can get. Fortunately, there are tools available. Despite the devastation wreaked by Cherufe, there are plenty of Aua relics left around, and their ruins contain plenty of still-functional machines. Unlike the humans, who have to fumble past traps to find weird old tech that they can’t make heads or tails of, the Aua know exactly how to find this stuff and exactly how it works. That has allowed them to amass a pretty fearful collection of old machines and weapons in a short period of time. The Ashmounte volcano held a cache; so did the ancient city of Kethsora. Tiri coaxed these machines to life, raising them from the shifting desert sands and putting them to work. Robotic legions march alongside the Aua now, but for all their strength, there’s risk, too – plenty of people would kill to lay claim on Aua technology, and Tiri has taken it on herself to safeguard her people’s relics as well as their bodies.
Lost Technology markers are the key to understanding Tiri, the Architect. These are special, unique Terrain Marker. There are four of them, three of which have two abilities (one each locked to Tradition and Technology) that function as always-on passive auras.
The Markers have a few other things in common: they’re all 30mm bases, they’re all Impassable, Blocking ht 3, they’re all created by Tiri’s once per turn Lost Structures tactical action (which she can only do if she’s the leader – a shame, since these things are cool tech, but understandable), and none can be removed while Tiri’s on the board. If an opponent’s effect would remove a Lost Technology marker, instead they get to place it within 3″. Finally, they interact with Tiri’s Shadows of my Creation defensive trigger. She gets to sidle away towards a marker, then if the attacker is within 3″ of a marker, their activation ends. This can be a powerful defensive tool, though usually in a denial sense – enemies just won’t come within 3″ of a marker if they plan to hit Tiri, unless they’re planning that hit to be the last thing they do that activation.
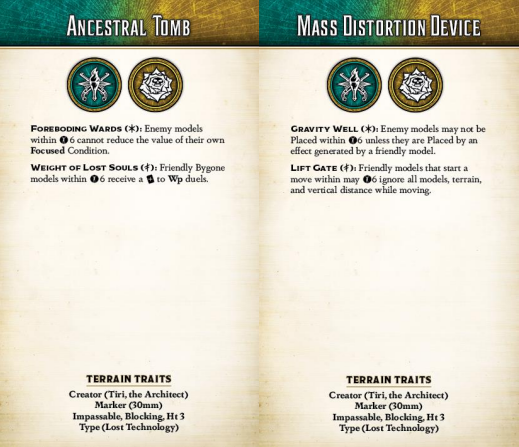
The Mass Distortion Device is the splashiest piece of Lost Technology. Gravity Well is a tremendously powerful ability, one that often defines models that have it, and being able to just plunk it down anywhere – and to have it sit there, mostly un-interactably – is very strong. It denies Summoning, Flight, and all sorts of things. Don’t sleep on Lift Gate, though – it’ll help your unpack tremendously, especially if you start Tossing models around like incorporeal fastballs.
The Ancestral Tomb is a firmly defensive piece of tech. If your opponent largely targets Wp, you can just give your whole crew +twists to all relevant duels (which includes terror duels, by the way); otherwise, you can create an aura where Focus is useless. The attacking model has to be near the marker, unlike Hildegard’s similar ability, so you really need to be careful placing this one, but if the enemy is melee-oriented fighting near a Tomb will give you a big edge.
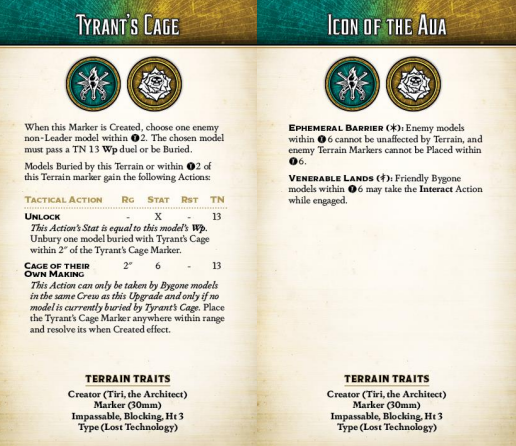
The Icon of the Aua is odd, with a couple pieces of very specific tech. Ephemeral Barrier shuts down terrain marker crews, both by blocking the placement of their markers and forcing them to deal with their own markers’ effects. Titania, the Clampetts, and Kaeris will hate it, but many crews just don’t care. Venerable Lands effectively gives AoE Don’t Mind Me (not exactly, but similar), but as I’ve previously stated Don’t Mind Me isn’t that good in this GG. The Icon may be the hardest piece of tech to use effectively, but when it matters, it matters.
Finally, the Tyrant’s Cage is pretty agnostic to what your opponent is doing; it’s just a repeatable Glimpse the Void with a lower TN that also can’t target Leaders. However, the ability to trap someone and then push the marker around is reminiscent of the famous Thoon – Bury – Shove combo, and imprisoning something important where nobody can get them is pretty big game.
These markers are what make the Architect tick. Tiri can make one per turn within 6″ of herself, and can either heal nearby friends or damage nearby foes as she does so. She can also flip the Ideal upgrade at the same time… once per game. That’s right: once it flips once, that’s it, that’s the side it’s on for the rest of the game. That is very restrictive, and a real head-scratcher for the Tiri player. Figuring out what mode to start in and when to switch is going to be critical to playing the Architect effectively. I think it’s probably correct to start in Tradition and flip to Technology midway through turn 2 as you engage, but this is really something that’ll take practice and familiarity.
Once the Markers are out, Tiri can shove them around with Dredge Up to get them into position, and the attack she arcs through them isn’t that bad. Deconstruct’s 2/3/5 damage track isn’t much to write home about, but it’s not nothing, and turning off all healing for the turn on a single hit is actually quite strong. And she can even build in the trigger to let her do it again; sometimes, it’ll just be correct to attack six times with Tiri in one activation. Her bonus, Command Construct, amps up her offensive power, as there are plenty of extremely swole Constructs that she’d love to send into battle. The Ideal-locked triggers on Command are pretty interesting, too – Relics of the Old War lets you just take whatever attack you command with a Focus, nice and simple, while Loyalty lets you charge out of melee and Interact afterwards if you wish, which is bizarre but honestly pretty good. Also remember both of those clauses are independent – if you want to attack, you can charge out of combat and do so!
I like Architect a lot, but I think she suffers in power level relative to her original, largely because of the Once Per Turn text on Rapid Divergence. All of the Lost Technology effects are very, very specific, and not being able to flip them at will makes them even harder to use. She’s cool, and I’m going to love converting some Lost Technology markers, but I just don’t think she stacks up to the flexibility of the Nomad.
Oro Boro
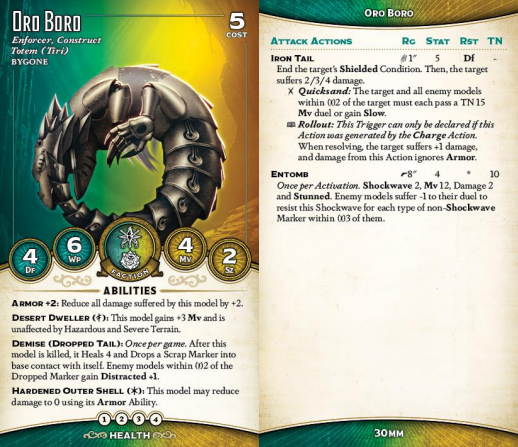
Tiri’s Totem, Oro Boro, is the cutest little construct you’ve ever seen. He was Tiri’s mother’s last gift to her, and he faithfully protects his charge, accompanying her wherever she goes. Mechanically, he’s the only Bygone model without Scars of Cherufe. He doesn’t really need it, though- he’s totally serviceable on his own. Df 4 is pretty bad, and he’s only got 4 health, but Armor +2 is a lot and you really have to kill him twice. The Dropped Tail Demise trigger is cute, but what you’re really taking him for is Entomb. This is a strong shockwave – it’s good when Mikhail does it, and it’s even better when it comes for free with your totem. Especially once you start racking up Lost Technology markers… you can push the TN on Entomb unreasonably high, at which point you’re just stunning everyone in a pretty hefty aoe without too much counterplay.
Oro Boro’s Ideal-locked abilities are pretty cool, too. Mv 4 is very slow, but in Tradition mode’s he’s Mv 7 and ignores terrain, which lets him get basically anywhere he wants to be. Once you switch to Technology, Hardened Outer Shell gives him astonishing protection. One of the ways to deal with armored models is to ping them down, and that just doesn’t work on Hardened Oro Boro. If he has 6 burning or poison or less, he won’t take condition damage either, and having to hammer through his defenses is not appealing (especially since you’ll then have to do it again).
Finally, his melee attack – while not amazing – is actually quite serviceable, especially if your opponent is relying on Shielded. The Rollout trigger should terrify long-time pokemon fans; a 3/4/5 attack that ignores Armor and Shielded is going to make a hefty mess, though the fact that it only functions on charge attacks and you can’t build it in means you won’t be declaring it too often. Quicksand is a perfectly fine trigger, since TN 15 is a lot and the Slow aoe is pretty big.
I really like Oro Boro. I think his offensive input is impressive for a totem, and while he doesn’t have a lot of utility, he doesn’t really need it – he’s just an annoying, hard to remove threat that you get for free.
The Iron Matron
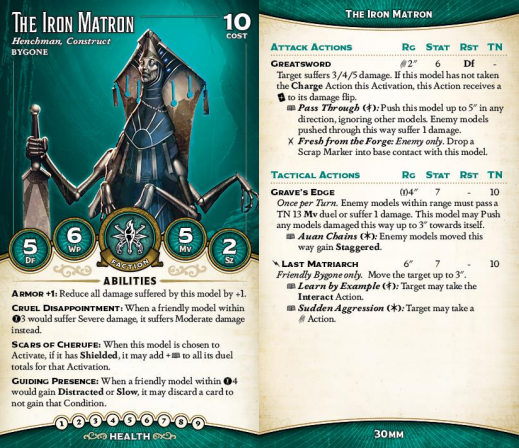
Tiri’s grandmother, Ava, led the scattered remnants of the tribe for hundreds of years, ever since they fled Cherufe’s wrath into the desert. Time catches up with everyone, even the near-immortal Fae, and Ava’s curse brought her to the brink of death. To save her, the Aua transferred her soul to a custom construct body. Now Ava follows Tiri, providing her guidance where appropriate, and her gigantic friggin’ sword where necessary.
The Matron provides two things to any Bygone crew: Cruel Disappointment and an absolutely hellish beatstick. The former is one of the game’s strongest pieces of defensive tech. Malifaux is full of 2/4/6 and 2/3/5 attacks, and stripping away their high end (or their potential to Red Joker a damage flip) makes them feel really bad into a crew full of Armor and Shielded. If you put a Shielded Ancient Construct in the Cruel Disappointment aura, that just multiplies the effect; even the mighty Seamus’s gun can’t do more than 3 damage to anyone within the Construct’s Take the Hit radius.
As for the latter, well, the Greatsword is good enough for Justice and it’s good enough here. Stat 6 3/4/5 isn’t outrageous, but it’s solidly in the realm of “good beater.” More important, though, are the available buffs. Tiri can make the Matron Fast and give her Focused, and Parson (of whom more later) can give her a second +twist on all her damage flips, meaning she can basically always cheat damage. Couple that with the crew’s draw meaning she’ll usually have the Severes in hand to cheat, and she can just crunch her way through pretty much anything your opponent cares to throw at you.
She even has a neat little anti-Slow-and-Distracted aura. That’ll come up somewhat rarely, but not never so remember it when it does!
The one thing holding her back is the mediocre triggers on her attack. Fresh From the Forge is neat, because this crew can use Scrap Markers and doesn’t have a lot of ways to generate them. Pass Through is much more interesting; it turns her 3/4/5 into a 4/5/6, which makes her truly insane (although it doesn’t work well against Incorporeal targets), but it comes at a cost. That cost is paid in her bonus action. Last Matriarch is very strong (and you’ll usually target yourself), but one option is much better than the other. You really don’t want to charge with the Matron, so giving yourself a 3″ push lets you get into melee range without losing that sweet +twist to damage, and getting a free attack is just bonkers. The Matron can get 4 attacks in a single activation, all of which are at double positive twists to damage (and some of which can be at triple due to focus). Very, very little lives through that. But you have to choose between the extra attack from Sudden Aggression or the extra damage from Pass through. There is some consolation if you’re playing Cursed Objects, since she can hand off an Object and then murder the target with Pass Through attacks, but usually you’ll be attacking with her in Technology mode – not least because that’s the required mode for Parson to boost her damage.
She also has a tactical that pulses out a Mv duel, but I really can’t see myself ever using that. Just make more attacks, dude. That sword is busted.
Kett
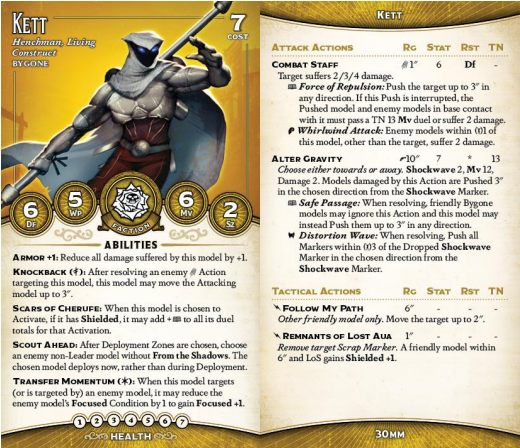
Tiri’s older brother Parson has just 25 years on her, which by Aua standards makes them practically twins. He saw Cherufe’s devastation firsthand and is thus more pessimistic than Tiri, but recognizing that that makes her a better leader for the Aua than he would be, he defers to her. He’s aggressive, and that aggression has cost him, but his prosthetic limbs make him stronger and tougher than an ordinary Aua – and more than capable of defending his sister and his people.
Kett’s cheap for a Henchman, and when I first read his card I wasn’t impressed, but he’s grown on me. The spice here is Alter Gravity, particularly the Safe Passage trigger. You can just do this twice and push your whole crew 6″, then Follow My Path to push another model 2″. That’s a lot of displacement, effectively better than 8 Walk Actions in a standard-sized crew, which gets you right into your opponent’s face from the starting line. Don’t sleep on Alter Gravity generally, either – it’s a big shockwave and while it’s not too hard to pass, late in the turn when your opponent’s hand is light it can do some work.
Kett’s surprisingly tough, between Armor, his ready access to Shielded, his Henchman status (and concomitant Soulstone use), and his Ideal-locked abilities. Both are defensive; Knockback only function in melee but pushes the attacker back 3″, knocking most enemies out of range to hit back, though you should look out for Frenzied Charge or Laugh Off as both abilities make this a lot worse. Transfer Momentum is more straightforwardly powerful and works offensively, too; Kett can steal Focus from enemies, making it incredibly uneconomical to take focused swings into him. Pair this with As the Smoke Clears from Ancient Constructs (we’ll get to them) to produce an incredibly annoying-to-remove threat. Kett’s damage output isn’t spectacular, but if you have rams you can do a surprising amount to bunched-up enemies. Beyond that, he has a little utility in Scout Ahead and Remnants of Lost Aua – we’ll see that ability again, and it’s a neat little way to spread Shielded, but it does rely on Scrap and this crew doesn’t exactly print the stuff the way Mei Feng does.
Parson

For many years, the Aua smith known as Parson made his home in the Ashmounte volcano. He lived in solitude, maintaining his collection of Auan devices, until an Explorer’s Society expedition led by Lindsey Parson made contact with him. Every member of the expedition vanished, one by one, but the forgemaster had brokered contact with Gretchen Janus, and agreed to help her once he learned what had been going on in Malifaux while he hid. The Society refers to him as Parson in their files, which is fine by him. When Tiri brought her people back to civilization, Parson joined them, and he’s as dedicated as any to bringing down Cherufe once and for all.
Parson is the lynchpin of any good Tiri crew. First of all, Auan Forgemaster is a way to spread around Shielded without spending AP. There are only two models in the crew that can do that, and both are valuable. What you’re really taking him for, though, is Remove Impurity. Clearing conditions is key to letting the Matron do her thing – she hates being Stunned especially – but it’s the triggers that make the ability insane. Distant Memory is strong enough, since you can time it right to always draw a Severe, but Superheated is absolutely bananas. You stack this on the Matron’s built in +twist to damage and she can cheat basically any damage flip she makes – even Hard to Wound enemies or Soulstone users can’t put her on a negative (though a model with both could do so… unless she spent Focus).
Parson’s got a hammer, too. Relic Hammers are extremely potent weapons, but Stat 5 is kinda bad… unless you’re in Tradition mode, then the enemy can’t cheat against him. Forcing through a straight flip against most targets most of the time is a solid play when you’re hitting a 3/4/6 damage track. The other Ideal-locked front of card ability, Reflective Glass, is ok – it’s a bit similar to Sparks’s Packed with Explosives, though slightly more limited – but it’s definitely the weaker option. Finally, Parson can hand out Shielded with Encase in Steel, and can even do it twice if necessary. Sometimes that’s just the best play.
His biggest weakness is being fragile. Opponents will target Parson, since killing him really reduces your damage output, and he’s only Df 5 with no real defensive tech outside of Shielded. He can’t even spend Soulstones. Flush With Cash helps, but the real money is in Ancient Constructs, which can Take the Hit for him – and even blast attacks won’t pick him off, due to Evasive. Keep him safe and he’ll do a lot for you, though.
The First Light
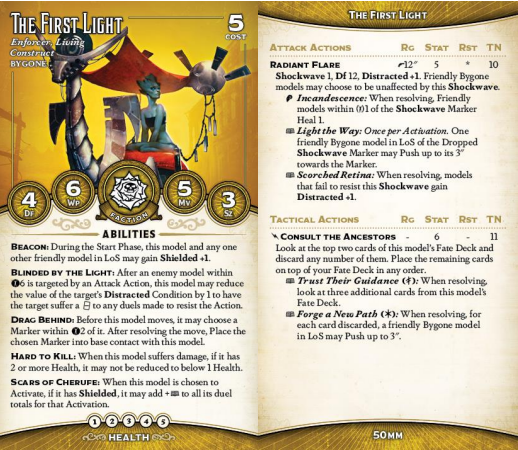
Stop me if you’ve heard this one before: ancient dying race, blah blah blah, no new births in ages, blah blah blah, a child is born, blah blah blah, otherwordly powers, blah blah blah…
Tropes aside, Deza – also known as the First Light – is pretty cool, with genetic memories and vaguely defined oracular powers. On the table, she’s a steal at 5 stones. She hands out a free shielded at Range LOS, which is always good, but mostly what you take her for is her bonus action. In Tradition mode that lets you look at 5 cards, discard any bad ones, put the best one on top of your deck, and then draw it because of Tiri’s aura. That’s basically just “draw a Severe,” which is extremely strong. When she’s not doing that she gives some free out of activation movement with Light the Way, healing with Incandescence, and very occasionally Distracted. Blinded by the Light is basically trinket text – you never want to be close enough for it to go off, because her card is lying. She is not hard to kill at all. Sometimes I’ll Interact early and drag the marker up with Drag Behind if Leave Your Mark or similar is in the pool, but mostly the First Light exists to spread Shielded, push your dudes around, and draw a Severe each turn. That’s a lot for five stones and you should pretty much always take her.
The Unseelie Engine

Malifaux is littered with relics from its past. The Unseelie Engines are a rather unwholesome variety of these, their astrolabes pulsing with otherworldly energy that distorts and enervates. Some of these litter the Hushed Copse, and Kastore has bent them to his will.
The Engine is a pretty strange support model that does different things in the different crews it’s in. In Kastore, the role is fairly obvious: it spreads around healing, so your fragile healers can stay in the back pumping heals into it which it can channel into more frontline models. It’s also got Armor +2, so healing goes a long way – it’ll take a lot of hits to bring down. Ancient Technology is kinda cute, but it’s very niche; sure, sometimes it’ll turn off an opposing model’s Regeneration or similar, but you have to be pretty close.
No, the real spice is Lost Engine. The Engine has two powerful Auras, and it never has to let them drop if it doesn’t want to. Ritual of Cleansing is fairly narrow but backbreaking in the matchups where it matters (i.e. Pandora); I would go so far as to say that Pandora is a really bad drop into Explorer’s Society now, because the Engine is so good at shutting her down. Hidden from the Outside World is more generally applicable, and it gets absurd very quickly. How’d you like to Take the Hit on a Df 7 Ancient Construct? Or a Df 8 Intrepid Emissary? It’s not keyword-locked! It doesn’t matter against melee crews, but against shooters, the Engine is brutal. And you can just keep the party going forever, never giving your opponent a window to hit you. Two irreducible damage adds up, but the engine can self-heal in a couple of ways.
Its melee attack isn’t terrible either, though stat 5 is pretty bad. This thing is slow and not that killy – it’s not a beater, it’s a support model. Power the Engine is mostly going to be used to damage friendlies so you can heal (remember, you can relent to friendly duels now), which is pretty interesting in Bygone; you have support models clustered in the back who are Shielded to enable their triggers, and once they’ve activated you can Power the Engine to strip all that Shielding, convert it to healing, and send it forward (or sideways, to your Ancient Construct or the Matron).
The Engine is definitely a sometimes food, and I wouldn’t take him unless I was very confident that one or both auras would be decisively relevant, but that means things like “my opponent is using ranged attacks” so it’s not that heavy a lift.
Aua Warrior
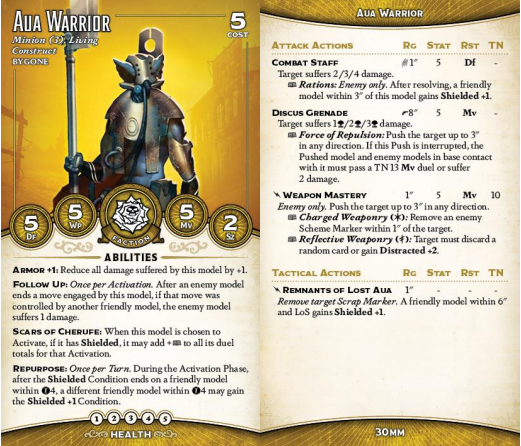
Aua are survivors. The curse of Cherufe, the desert wastes… they push on, no matter what. The replace their failing bodies with technology and push on.
I wanna like these guys. I really do. I’ve harped on the five-stone minion problem, but they have Armor and ready access to Shielded. But…
I just have not been able to make Aura Warriors work. It’s not just that they do basically nothing but attack, with nothing but Stat 5 attacks. It’s that they just don’t have the tools to do their jobs. See, it’s not hard to see what they’re going for: they spread around your shielded with Repurpose and they make some attacks for cheap. But their attacks are bad, and all the most relevant stuff is enemy-locked. Rations would be a good way to hand out Shielded… if you could smack a Technology-mode Oro Boro for it. Weapon Mastery would be a good way to push your friends up the table… if you could do that. Follow Up would be a reasonable source of damage if Bygone’s attacks that moved models were strong… but mostly you’re using Off the Path on friendlies for Fast, you’re Tossing friendlies, and Kett’s shockwave is for pushing your team around. And Remnants of Lost Aua? Where’s the scrap coming from?
Ultimately, the biggest knock against Aua Warriors is that they can’t declare a Tome trigger without hitting an enemy model with a stat 5 attack. And that is just not where you want to be. They don’t draw cards well in Tiri1 and they don’t really hand out shielded very well either. You can take ’em if you want – the models are super cool looking. But they just aren’t that efficient, and that’s a shame.
Ancient Construct
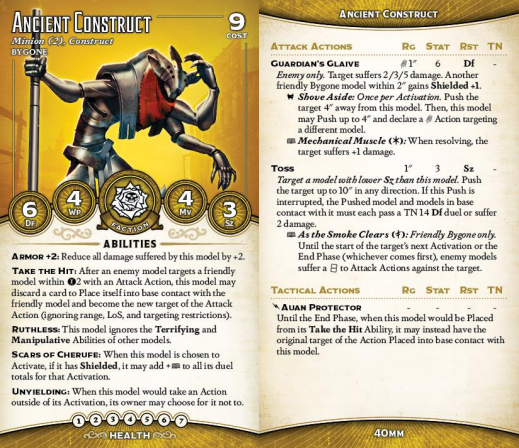
Aua elders don’t really die, as such… they just reach the point where it’s less efficient to keep slapping bionic parts onto them than it is to just cram them into a robot body. These Ancient Constructs protect the tribe, wielding massive glaives and, apparently, bowling around other Aua like Colossus.
You want minions? Now we’re talking. The Constructs bring something that Outcasts haven’t had yet – Take the Hit. That’s an immensely strong ability, and Tiri draws enough cards that you can afford to pitch them. It’s not just Take the Hit: it’s Df 6 Take the Hit on an Armor +2 model with ready access to Shielded. That will sometimes be sitting in a Cruel Disappointment aura. What’s that, Lord Cooper? You wanna shoot Parson? How about you just shoot my robot friend here, instead? Oh, you Red Jokered the damage flip? That’s nice. I’ll go ahead and mark two whole damage.
That’s not even taking into account Auan Protector, which is just absurd and makes them truly annoying to face. You go to all the trouble of slingshotting your beater forward, getting into my juicy backline… and then I just pitch a card and not only is Mr. Roboto stepping in the way of the axe, but now your target is hiding behind him, too. Get wrecked.
I love these guys. What I just described would be enough, but they also have Ruthless and Unyielding, so their Wp 4 is a bit less of a liability than it would seem. Their melee attack is pretty righteous, too; the damage isn’t excessive, but free Shielded is nice, and if you’re in Technology mode they can bake in a trigger for a respectable 3/4/6. And even if not, they have Shove Aside, which is great on every model that has it. Finally, Toss is simply one of the strongest actions in the game, and they have one of the best Tosses of all. That trigger is beastly. Send the Matron in, and then drop a scheme marker near her with Tiri1’s Distortion; now enemy ranged attacks are at two negative twists to hit her, so they can’t even Focus past it.
I love Constructs. They’re not mandatory: Wp 4 is bad, Mv 4 is worse (especially paired with 1″ reach) and 9 stones is a lot. If the enemy has armor piercing, they will go down fast, especially if it’s Twist Reality. But in matchups where Taking the Hit matters, which is quite a few, they’ll absolute give the opponent fits. Plus, you can turn a Hopeful Prospect into one, which is funny to think about.
Overall, I think Bygone is a tremendously powerful crew. Perhaps too powerful: I’d say, next to Witness and possibly Cavalier, they are well above the power curve that’s healthy for the game, and I’d like to see them reined in a bit. But I’ve been running a lot of Tiri lately and having a blast. Jamming the Matron down someone’s throat is always fun.
That’s the last of the six new crews for Madness! There are a few other models in the book, though, and two of them are tremendously impactful, so next time we’ll be covering the odds and ends.
Have any questions or feedback? Drop us a note in the comments below or email us at contact@goonhammer.com.
