I’ve moved a lot in my life. My family moved five times before I finished high school, and since then I’ve moved another five times. I’ve changed states five times and countries twice. And over that time I’ve learned that keeping friends after you move takes work. Especially as you get older, it takes a lot of effort to bridge the gaps in geography, income, and lifestyle that can make it easy to fall out of touch with the people you care about and connect with. This is a story about building a bridge. Not a literal bridge. Well, there’s a literal bridge in it, but this is about building a table that acts as a metaphorical bridge between friends.
Ok, I’m getting sidetracked here. Let’s re-center:
Shortly after I got married, my wife and I moved to New York. We met as undergrads in college, and after we got married decided that we didn’t want to live in the Baltimore area any more and moved to New York, leaving most of our college friends behind in order to not live in Baltimore anymore. I haven’t regretted doing this, but it did make things tougher for a little while. People we had gotten used to seeing every day or every week were suddenly more than three hours away and likely to be people we saw once or twice a year, if that. So I decided that one way I’d work to bridge the gap was with games. Some of this was weeknight Xbox Live gaming, and some of it was Warhammer 40k. My forever bro Greg “Greg” Chiasson was already into 40k, owning more Dark Angels than any human should ever be allowed to, and we convinced his now-longtime rival SD47 to join as well. Greg had set up a table in his basement, and we gamed there a couple of times. The problem was that we couldn’t stay at Greg’s house and four hours is too far to travel for a game of 40k, especially if you are traveling with your spouse.
Then in 2013 my parents moved to Delaware, to a house about two hours away from where we were living in New York and about two hours north of Greg and SD47. This was kind of an ideal situation – it was an easy train ride for us to get there, and from there we could either borrow the car and drive down to meet Greg and SD47 at Greg’s place, or they could come up to meet us. The only problem was that there wasn’t a game store close to their house, which meant I’d need to build a gaming table for their place. The good news is that my parents are cool as fuck, and were absolutely down with me setting up a gaming solution at their place. After all, they wanted me to visit more, so it was win-win.
So I took on one of the most daunting, rewarding hobby projects a Warhammer player can take on: I built a table. Today, I’m going to be talking about that process and sharing my thoughts and notes on how you can build your own table geared toward telling the kinds of stories you want to tell in your games.
TheChirurgeon’s Guide to Building a Gaming Table
So, sometime around Christmas of 2013, I started working on my game table. Note that this means that when I was working on the table, it was mostly just above freezing outside. This will be important later.
Step 1: Pick a Theme
Building a good table starts with having a strong theme. What are you going for? What kind of terrain are you going to create for it? How does this impact your planning, design, and construction? Most importantly: What kinds of stories do you want to tell with your games?
This is important stuff, because your theme will have major consequences on the materials you’ll need and the way you’ll construct your table. Are you planning to do a cityscape? Then you’ll need to plan out roads and sidewalks. A desolate desert board? Then you’ll need to have dunes and rocky outcroppings. Going for a dense wood? Then you’re going to need lots of trees, and ideally ways to turn those groups of trees into real cover. Rolling hills? Water features? Rocky cliffs?
I’ve always loved urban combat in 40k tables. Towering buildings, dense streets, claustrophobic alleyways — there’s something that’s just so freaking cool about fighting in the downtown of a ruined city. So that’s what I wanted to go with for my board. I also wanted to do some kind of river or water feature — I love it when terrain matters in a game, when players have to figure out how to use a key terrain feature to their advantage, or work around a disadvantageous one. So I wanted to have a river of some kind as well. That would also need bridges at some point. And I’d have to build the terrain to cover the table once it was complete — which would mean a lot of Sector Imperialis buildings.
Step 2: Create a Plan
Once you have your theme in mind, it’s time to build out a plan. There are several important questions you’ll need to ask as you do this, and they’ll all have a major impact on your planning:
- Do I need to be able to store the table?
Is this going to sit out, year-round? Or will you have to stow your carefully-constructed table from time to time? If you have the space to just let your table sit out, then I congratulate you achieving the dream. Otherwise, you’ll need a plan for how you’re going to pack everything up and store it. - How am I going to move and store the parts?
If you’re going to store the table, you’ll need a way to assemble it and break it down into manageable parts, which can ideally be easily carried from your storage location to your set-up spot. - How am I handling the base? Does it need to be modular?
How’s the table going to be based? Are you just going to roll out a FAT mat (or other neoprene solution), or are you going to use a textured surface? Is it going to be modular, where you can adjust and move the terrain tiles? Are you using Games Workshop tiles or making your own? And if you make those tiles, how are you going to store them? Also, how does this all fit into your theme? Making a modular tile setup carries with it a whole bunch of interesting challenges that I’ll get into below. - What kind of terrain will I need to build for it?
How are you going to cover the thing once it’s built? What kind of terrain do you need to place on it, and how will you build it? Thinking about this in advance is important to making sure that your table and terrain come together cohesively. For example, I was building a city board, which meant that I’d be building a lot of tall, multi-story buildings that would need wide, “sidewalk-like” spaces for them to sit on, and roads between them where I’d want to be able to place barricades or craters. - What else do I want in a table?
Don’t forget to think about the extras — Do you want cupholders? A lip around the table? A space to roll dice? Now’s not a bad time to think about this stuff, or at least how you’ll accommodate these things on the new table. Will people be able to roll dice on your table or is that going to cause you to wince every time it happens? If it’s the latter, you might want to find a dice rolling solution that players can use.
These are questions you need to answer as you plan your table. For mine, I had a lot of constraints I needed to meet. The first and foremost was that my parents weren’t going to let me keep a Warhammer table out year-round, particularly because the best place in their house to game was on top of their kitchen island. They had a large, marble-top kitchen island that was pretty much perfectly-sized for a Warhammer table, at just over 6’x4′, and they were willing to let us use it because, again, they are cool as fuck. They also read the site and share our posts on Facebook despite not knowing what half of them are about and so excuse me for a moment when I say: Mom, Dad, I love you and you both rock.
Ahem
Anyways, that meant I needed to be able to break the table up and store it, and the storage space I had was essentially some shelves in the garage. So I was working with the following constraints:
- The table had to be something I could break down and re-assemble easily
- The kitchen was upstairs above the garage, so I had to be able to carry the parts easily up one flight of stairs without scuffing up any walls
- It would need to be as light as possible
- There was no room for a 6×4′ plank, and I wanted to make the table tiles modular anyways, so I’d need to make tiles – at least 6
- The tiles needed to be stackable, so I could put them on top of each other on a shelf. This means they’d need to be mostly flat, or such that stacking them wouldn’t break them
- I’d need a frame to hold the tiles in place, because trying to use tiles without a frame sucks ass. That means that I’d need a frame that could also break down into smaller parts, because otherwise it would be a chore to haul up and downstairs.
- The modular tiles needed to contain roads that could line up multiple ways
- The tiles needed to come together to create large sidewalk spaces that could hold buildings
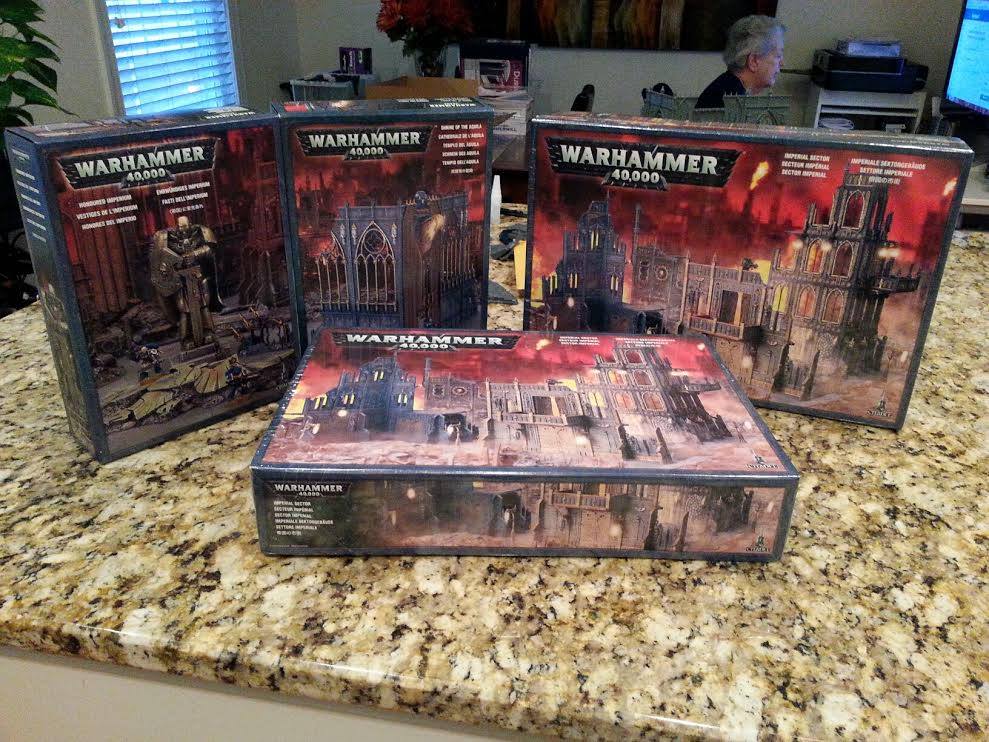
So in total my plan would involve building a multi-part/foldable/detachable table frame, 6-10 2’x2′ tiles with stackable features. I also really, really wanted a river feature on my table. I love having terrain features that players have to plan around, and that make things like jump infantry and skimmers more valuable, so I’d need to incorporate a river into some of the tiles as well. At this point, you might be asking why I didn’t just look into the Sector Imperialis tiles, which I own now anyways. The answer is because this project happened back in January 2014, before the tiles were released. Also I don’t love those tiles.
Time to plan!
The Frame
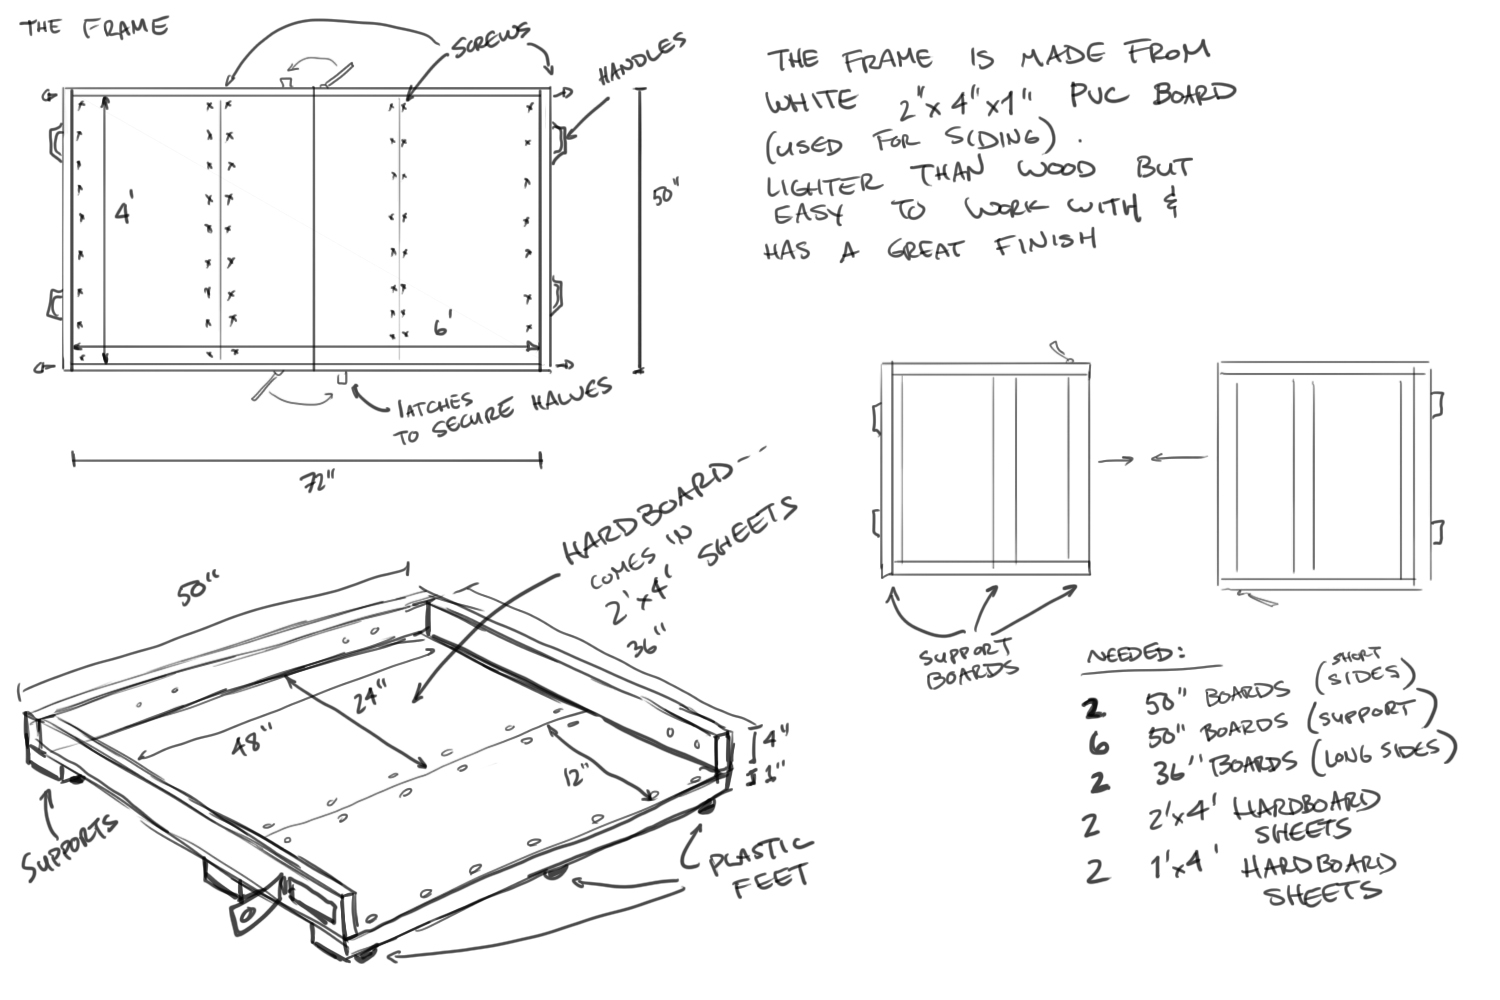
The Frame was the toughest part. I need something I could break down easily into more manageable chunks, so having it be assembled in two halves seemed like the right choice. It would need to accommodate a 6×4 table inside, which meant if I was building the frame out of 2×4 boards, it would have to be 74″ (72″ + 1″ on either side) long, and 50″ wide. Because one set would sit inside the other, I used 72″ boards on the long sides and cut the short sides to 52″. I also needed support underneath, to hold the boards in place. Then I could screw 1/8″ sheets of MDF into the boards to create an interior floor to set boards in. Finally, I needed the sides to latch together. I ended up installing latches on both sides of the table frame so I could secure the whole thing together.
The Tiles
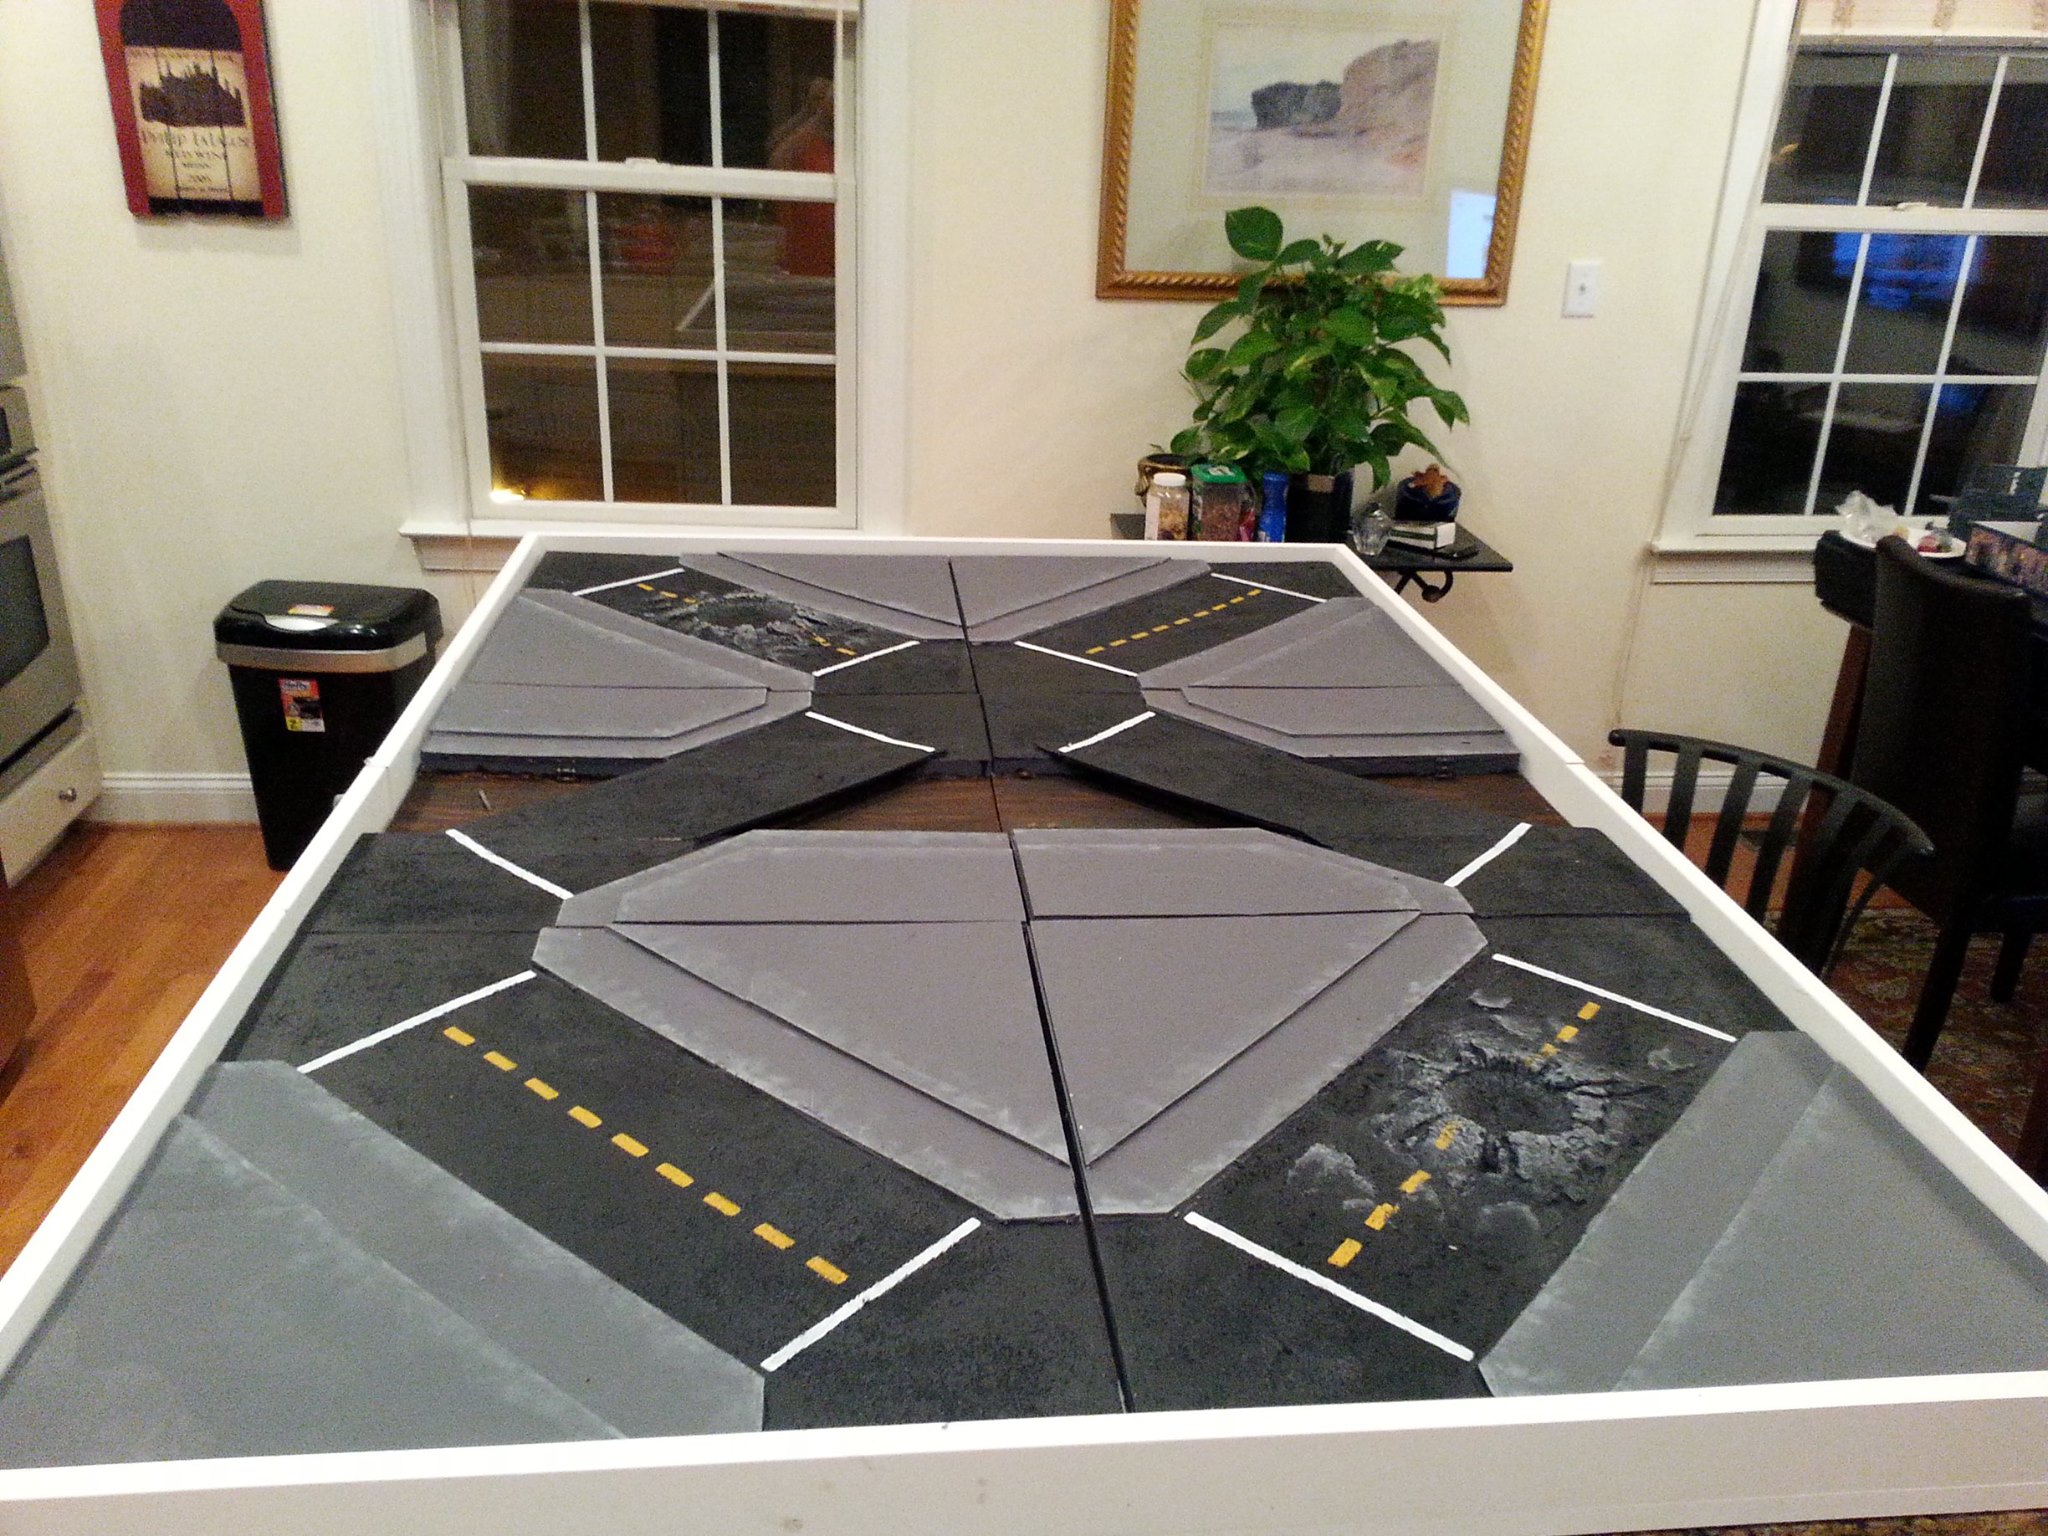
 Next up: Planning the terrain layout. I wanted modular streets and sidewalks. I knew that. The problem was, how do I make the streets fit together in a way that wasn’t boring and led to good table layouts? I considered a few different options, but in the end went with a diagonal road design that would allow me to create full city blocks while also having lots of long roads that made sense from a city planning and layout standpoint. I planned several tile types on graph paper beforehand, including the river and bridge tiles. My initial plan called for 8 tiles, though I built only 6 on the first pass (more on that later).
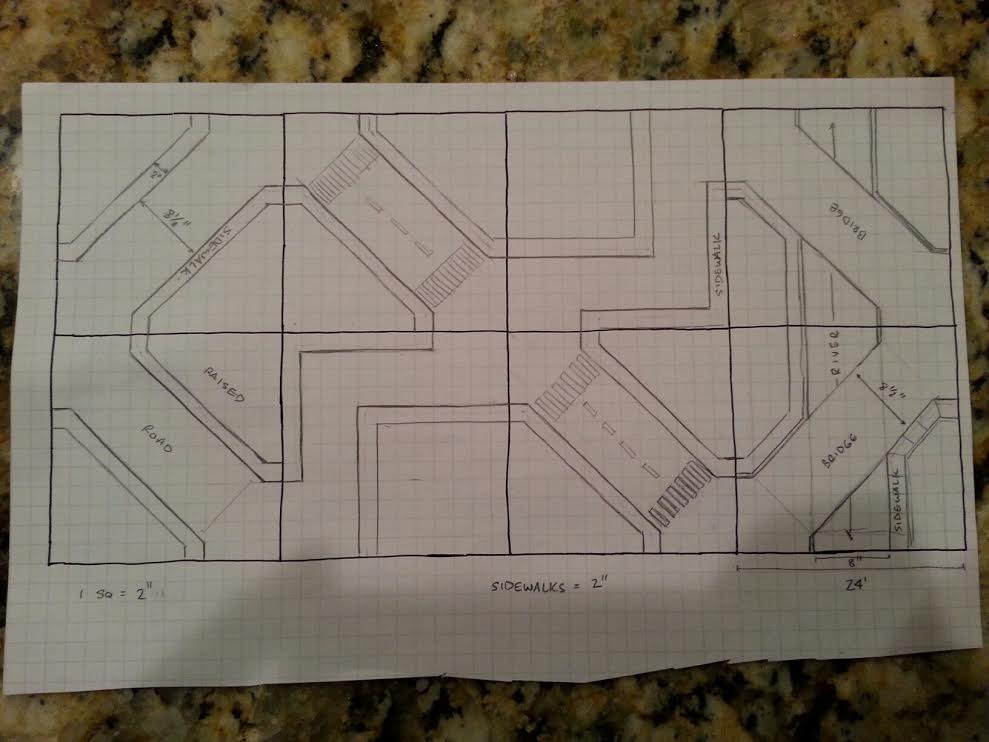
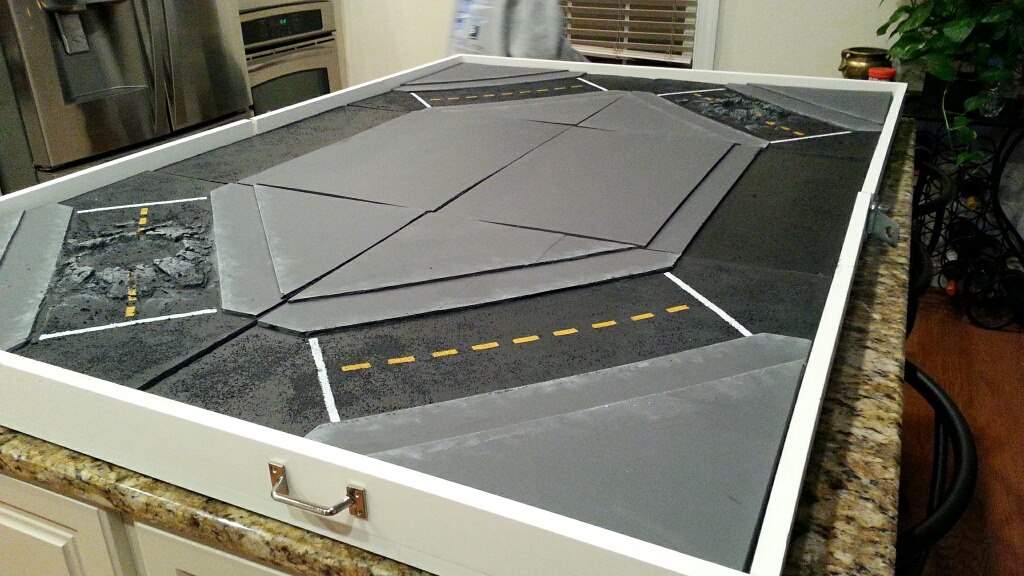
The layout changed a bit eventually, into what you see below:
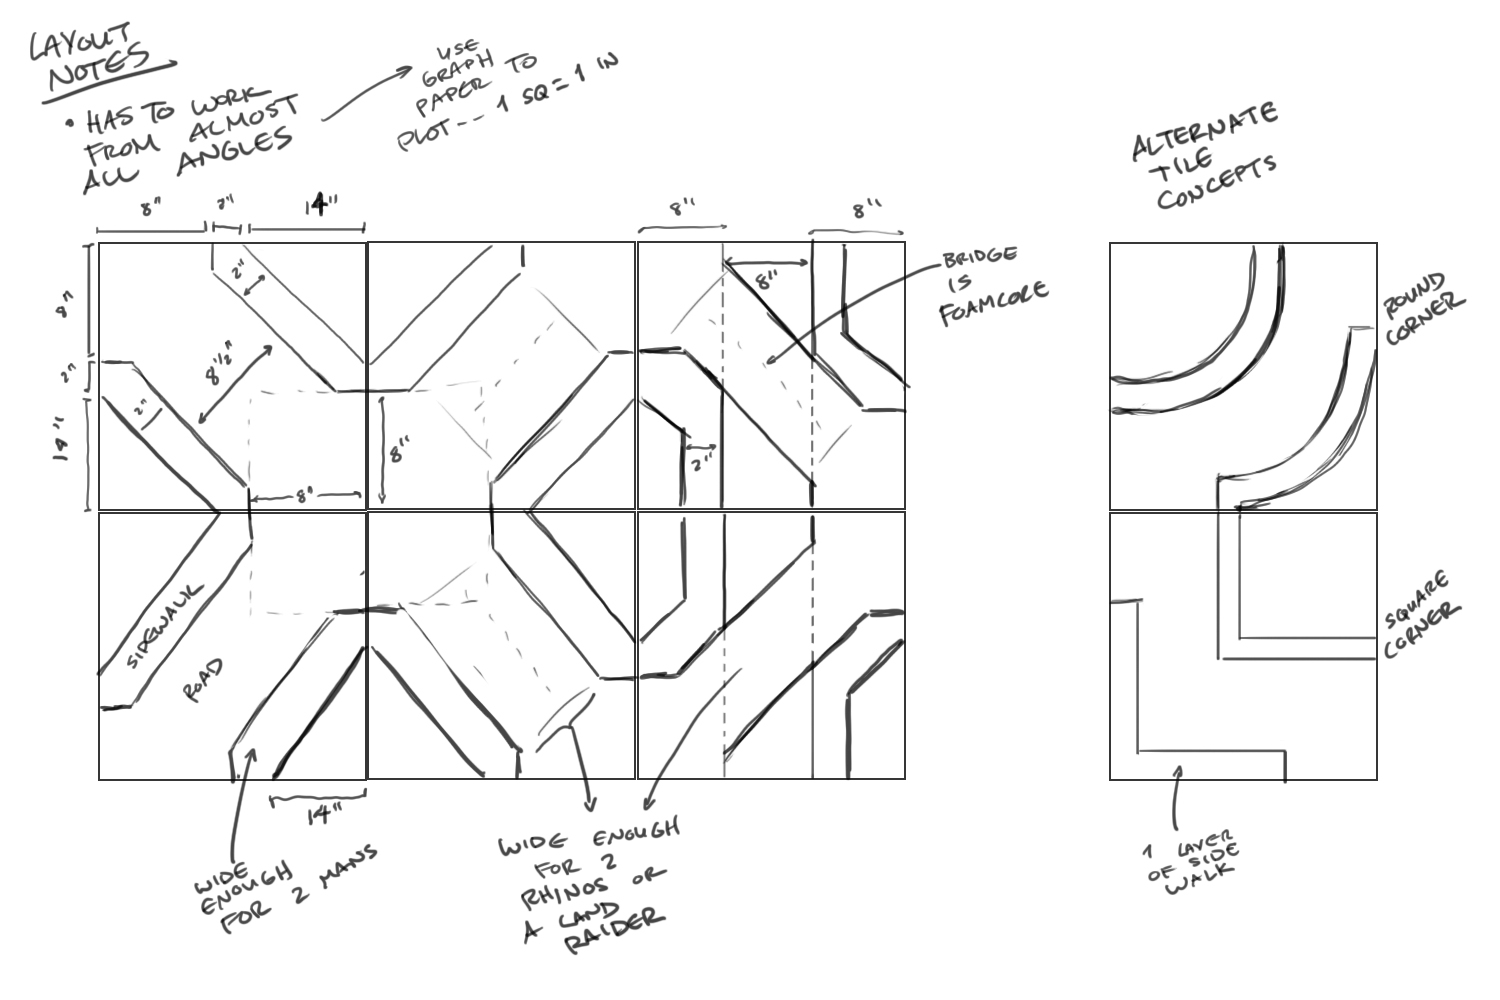
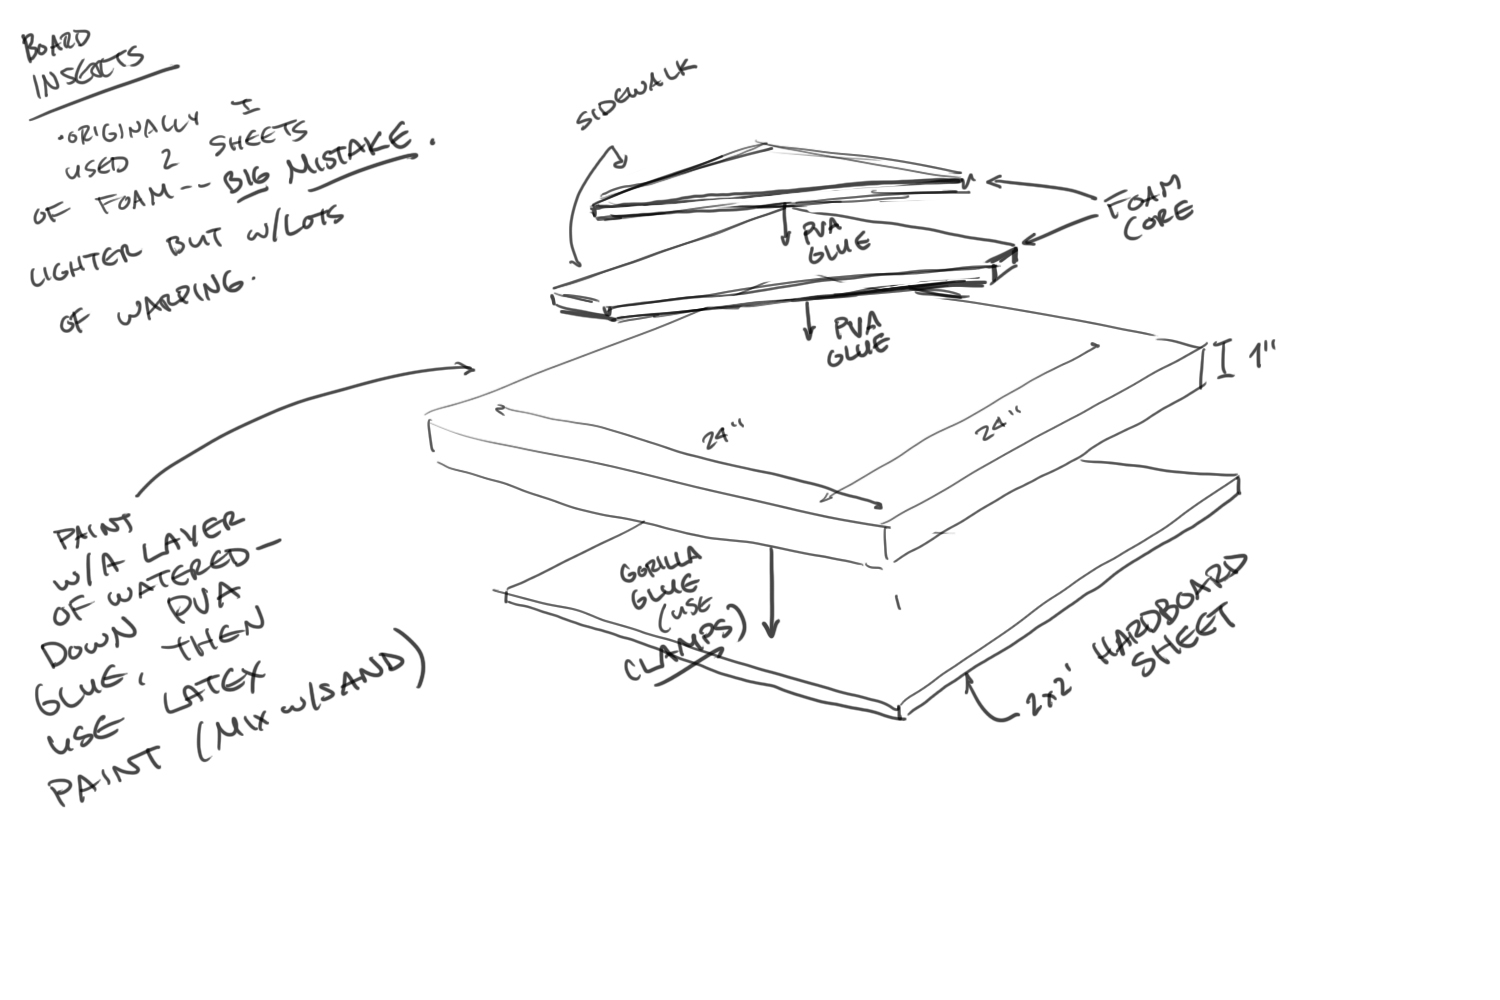
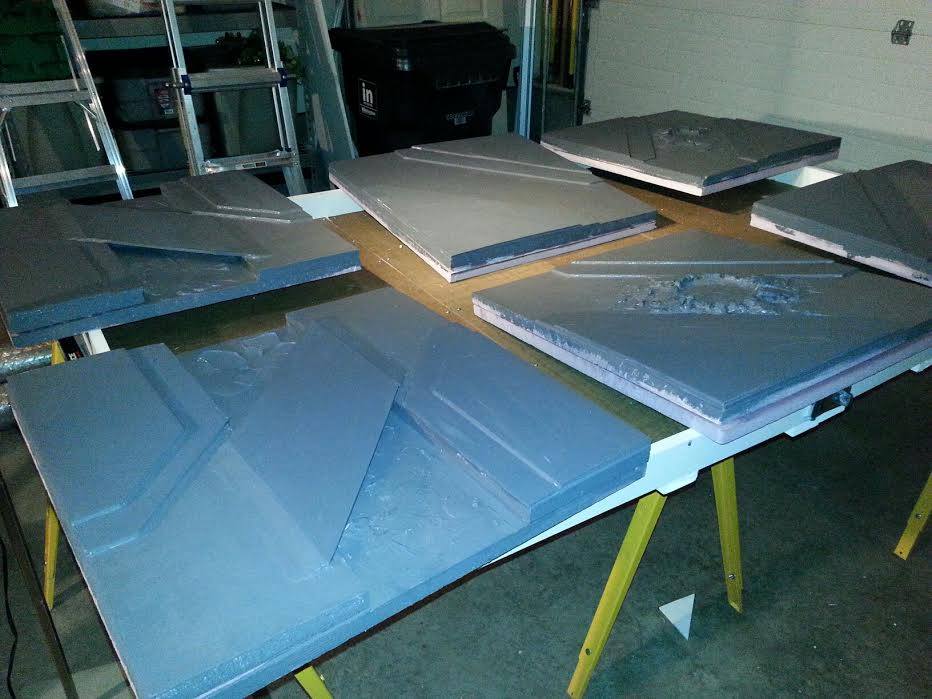
Some of the final dimensions changed, but only by a couple of inches. It was important when I built the tiles that the roads be two Rhinos wide, since I felt that would give the table a real sense of scale and ensure that pretty much any vehicle in the game could travel down them. In order to accommodate the river, I planned to make my tiles 4 inches deep, stacking two 2″-thick sheets of insulation foam (“pinkboard”) on top of them. Ultimately, this was a mistake, but more on that later.
Step 3: Build The Table
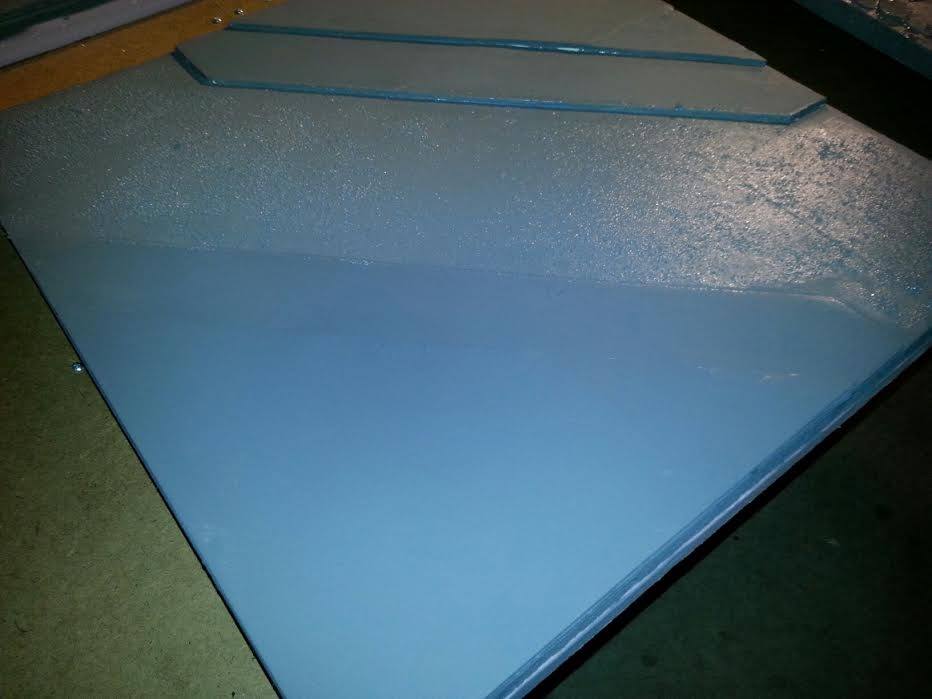
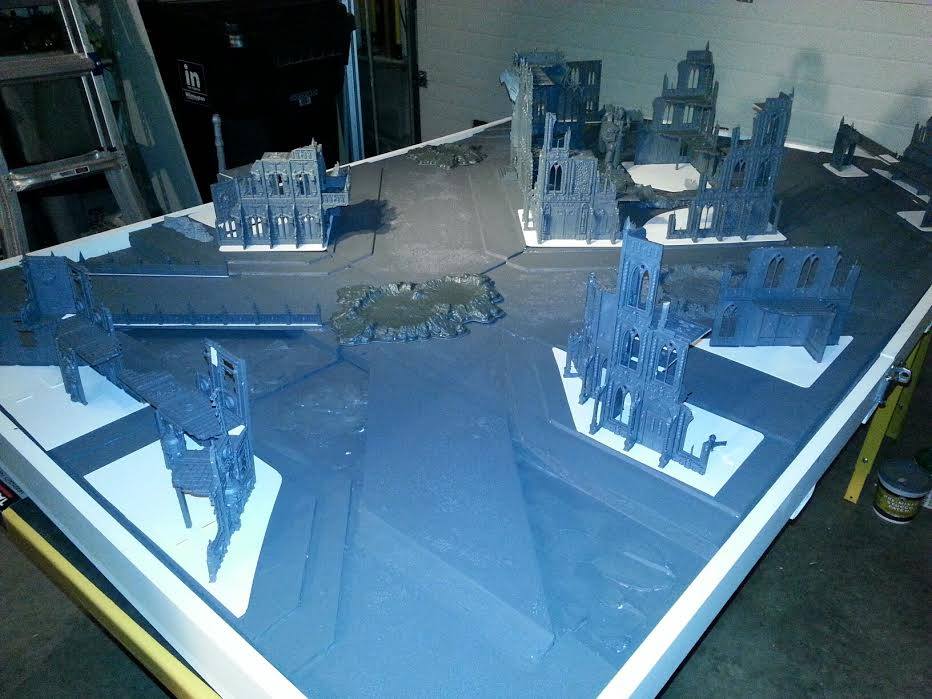
I was able to find a bunch of 2’x2′ insulation foam tiles at the local Lowe’s, which sped up the task quite a bit, and from there I used PVA glue to make the tiles, gluing together two 2×2′ foam sheets using PVA glue (note: this was a mistake – I should have attached them to sheets of MDF as well, for more support and to stop them from warping). I then cut foamcore board and glued that on top of the tiles to create the sidewalks and used a mix of PVA glue and water to seal the edges of the foamcore and coat the tiles to seal them and allow me to spraypaint them. I had the local hardware store mix me up a can of gray paint color-matched to Astrogranite, the texture paint I use for most of my bases. NOTE: It is very important that when you build your table, it matches your primary army’s bases. This gives them home field advantage, and there’s nothing cooler than when your minis look like they match the table and all its terrain.
Finally, I added craters to two of the streets to give them a more 3-D feel, and break up the terrain a bit. These all sat overnight, probably in colder temperatures than they should have.
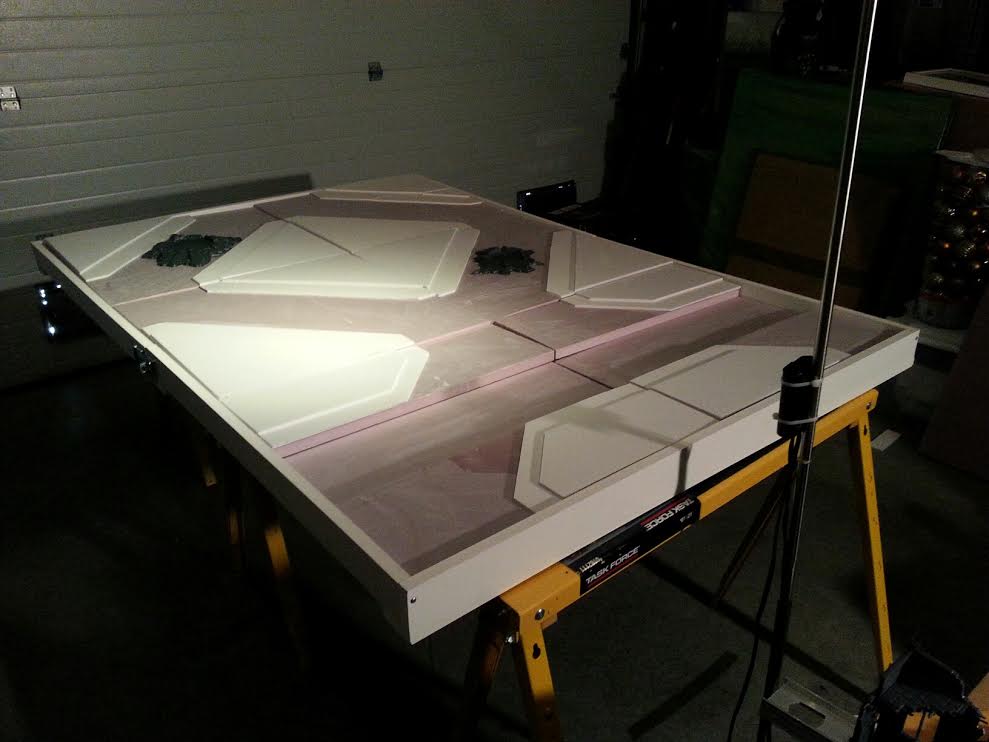
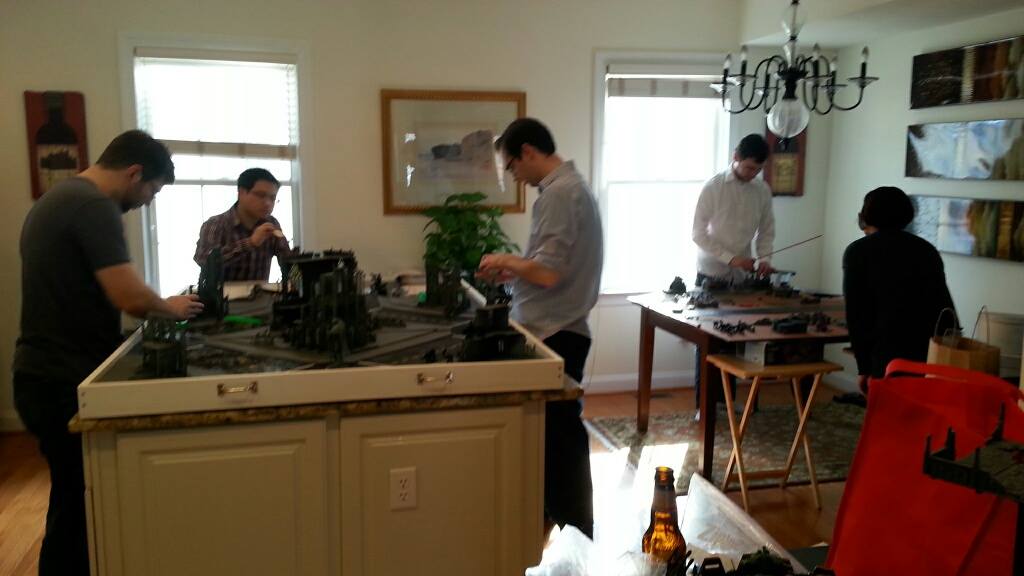
At this point I have to note that both my dad and my good friend SD47 helped me with the construction of this monster, and I cannot imagine trying to tackle a project of this size by myself. Having someone there to help made things waaaay easier.
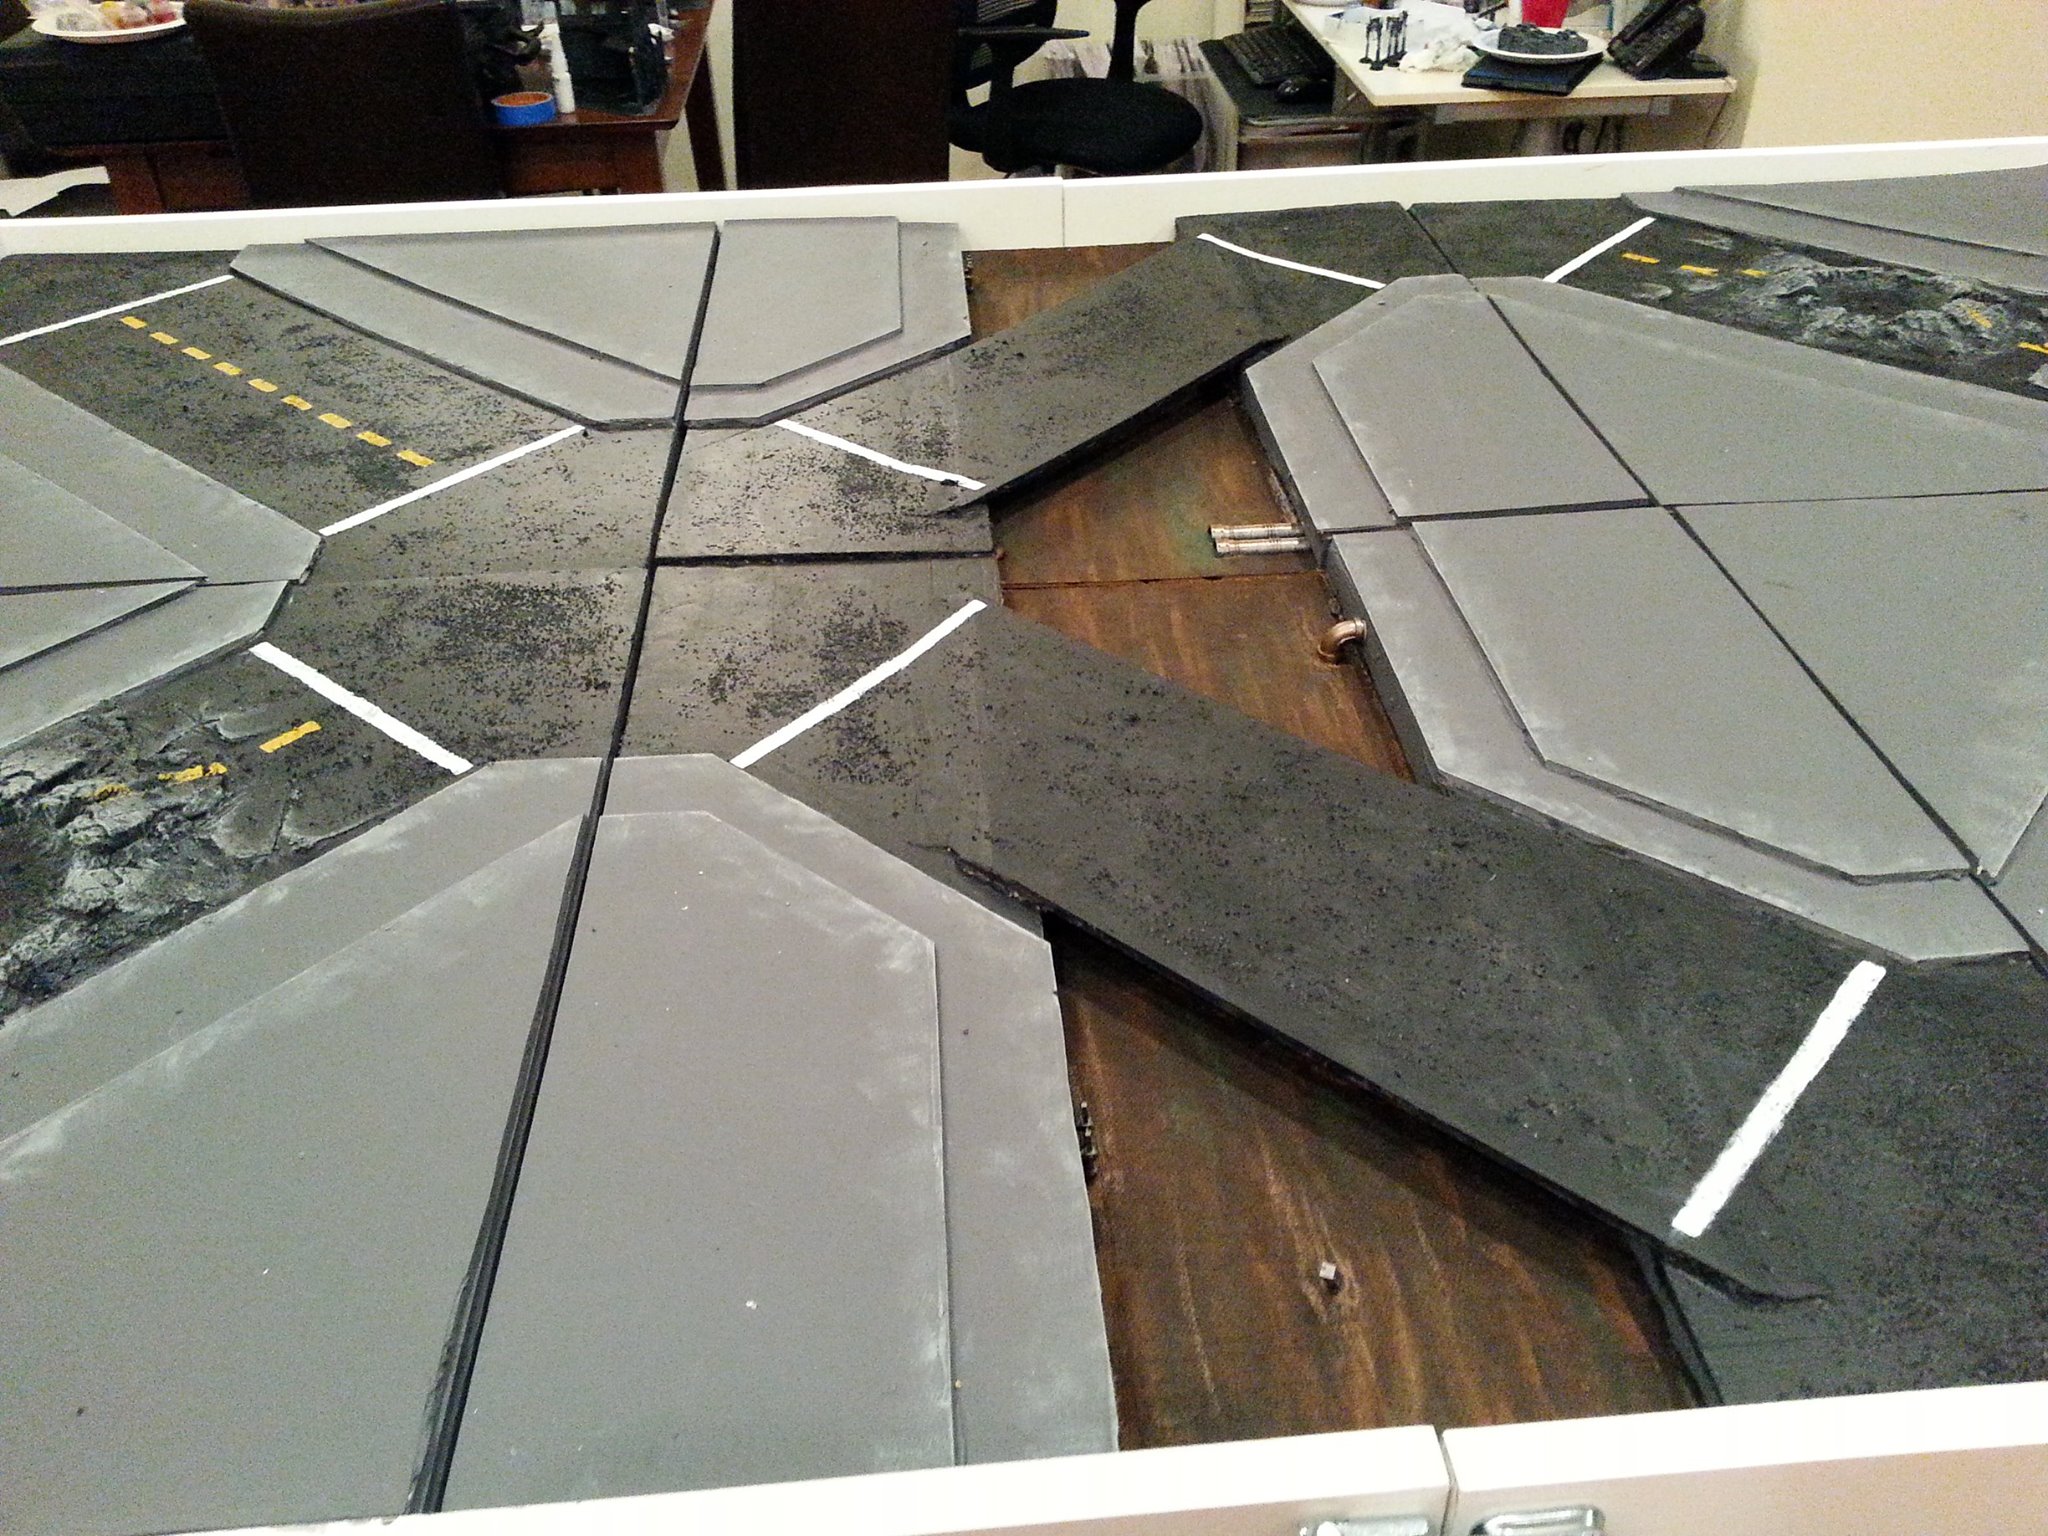
I used drywall spackle to both blend the craters into the streets and add some texture to the river, then I used foamcore board to make the bridges. I had a plan to dress them up later, but this is as tall as they could be if I wanted my tiles to stack well. You may notice some gaps in the table already. Yeah, I noticed those too. Because I used two sheets of foam and because of the temperature, some of the tiles warped pretty badly overnight, and some of the fits weren’t ideal. I’d fix this later on.
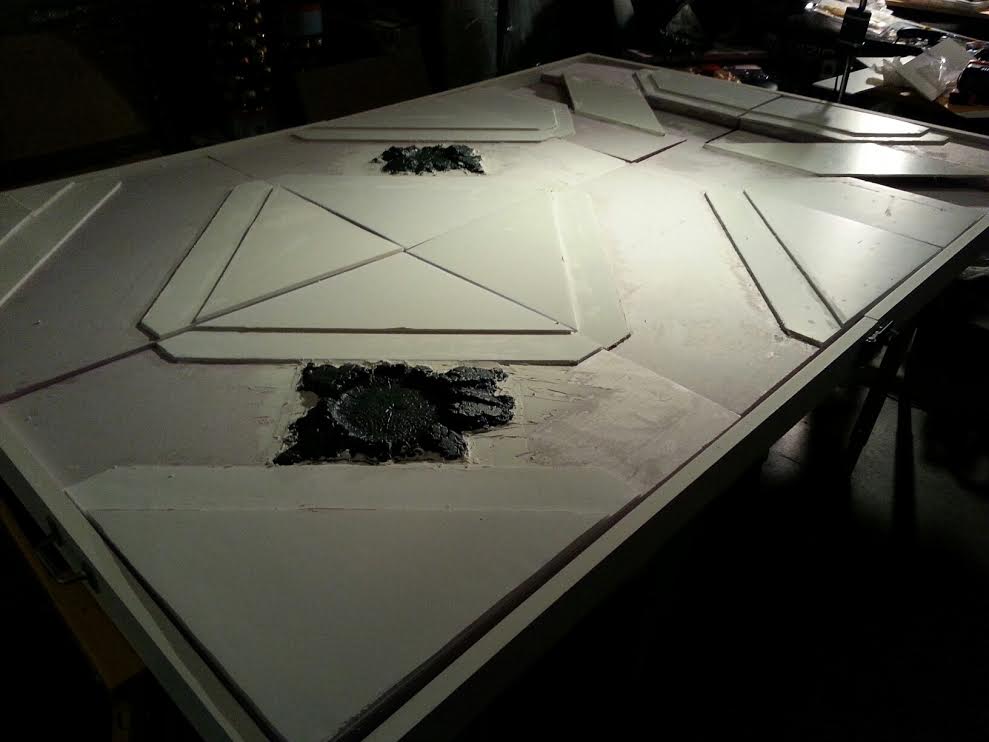
Step 4: Build the Terrain
When I was done, here’s how the table looked, layout-wise:
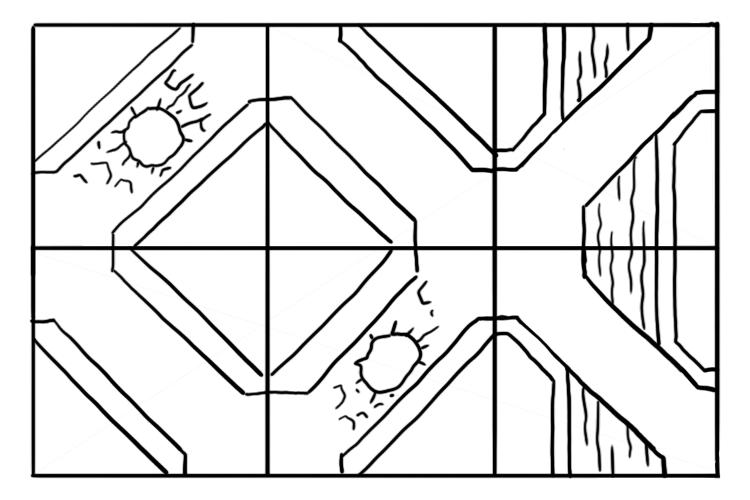
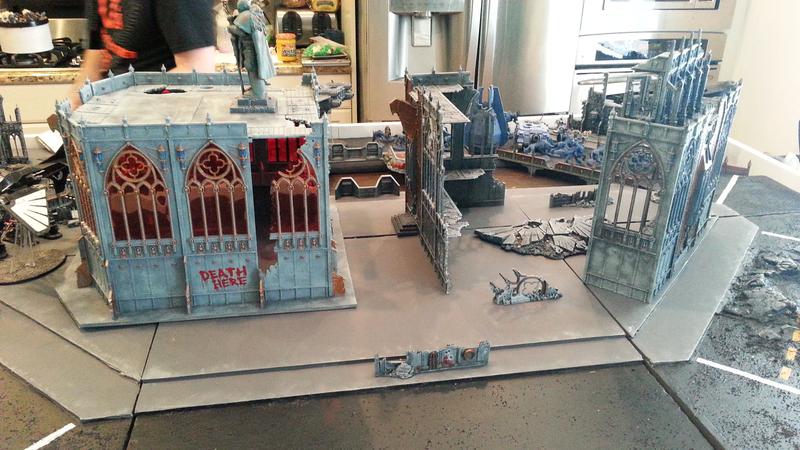
Terrain-wise, my layout had certain implications. I wanted to be able to fit something on each sidewalk section, so I needed to have terrain to match. I didn’t have to base the terrain, but it’d help smooth over the cracks between tiles and in my experience, it’s just good practice. It also future-proofed the table for 8th edition well. I’d need 4 large corner ruins, 2 smaller corner ruins that could fit in the less-full sections by the bridges, two triangle sections, and two smaller, flatter pieces for the opposite side of the river.
Painting wasn’t really going to happen that night, so SD47 and I retreated upstairs to drink beer and build terrain. I picked up a modest amount of Sector Imperialis terrain to get working. At this point, we knew the table dimensions, so we could start planning bases and sizing terrain accordingly. The goal was to be able to cover each sidewalk section on the 6-tile board I’d designed, plus create some key barricades and other road blocks as needed, so that the only real sightlines would be down roads for units firing diagonally. Note that this is also during 6th/7th edition when cover was a bit more useful overall. This was pretty much enough to do everything I needed in the diagram above.
Step 5: Basecoat
The next day, I broke out my can of custom-mixed Astrogranite Gray, mixed it with a bunch of sand, and got to work painting the table with a basecoat. I went with latex paint, which dries faster.
The sand gave the paint a nice texture that I could use later on for drybrushing the roads and helped everything match with my minis’ bases. I mostly applied the sand-paint mixture to the roads, and left the sidewalk/raised pavement sections clear.
At this point, things were in good shape, but I had to head back home to go to work on Monday, and this was shaping up to be a multi-week project. Before I left, I tested out some terrain placements on the new table, to look at the coverage I had. Things looked good!
I also created four strips of removable railings for the bridges, which I could use to give cover to units on the bridges and also make them look more like actual bridges.
Step 6: Play Some Games Already
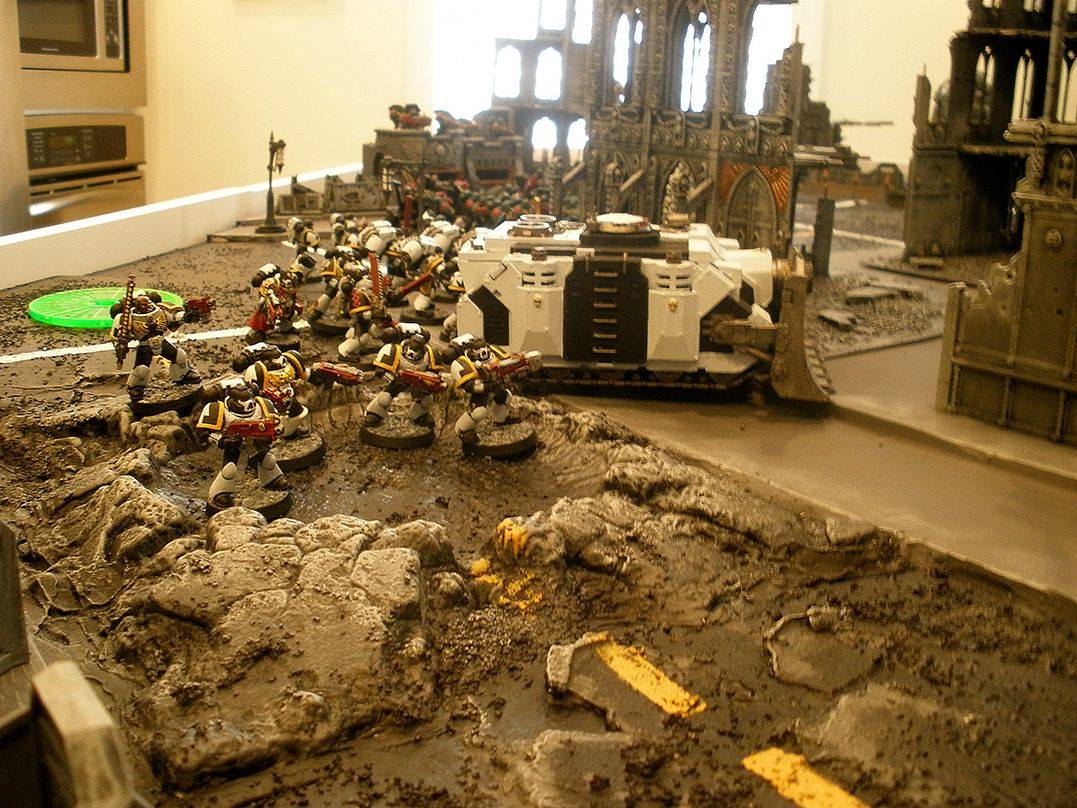
There was still a lot of work to be done on the table and the terrain the next time I visited my parents’ house, but that wasn’t about to stop me from playing some games of 40k on it. One nice day a few months later, Greg came up to visit and we got some games in on the fresh table, with my Iron Warriors clowning his Blood Ravens as we played in the garage, with the door open.
 At this point, I had started priming the buildings and basing them. Still had a lot of work to do building my city, though.
Step 7: Paint The Thing, Then Play More Games
A couple of months later (around Memorial Day), I went back to my parents’ house again and this time basically had a ton of time to just plug away at the project. I had been unhappy with the way my first set of tiles had warped, and I didn’t like how the table fit together or how the streets looked. So I did a few things:
- I tore the foam tiles I had apart (this was pretty easy), and glued the top tiles to sheets of 1/8″ thick MDF, using Gorilla Glue and clamping them overnight to ensure they’d hold firm. NOTE: Not doing this initially with clamps was a big mistake. The new tiles were thinner and more solid, but a little heavier, which meant they’d put more pressure on each other. But the overall effect was better.
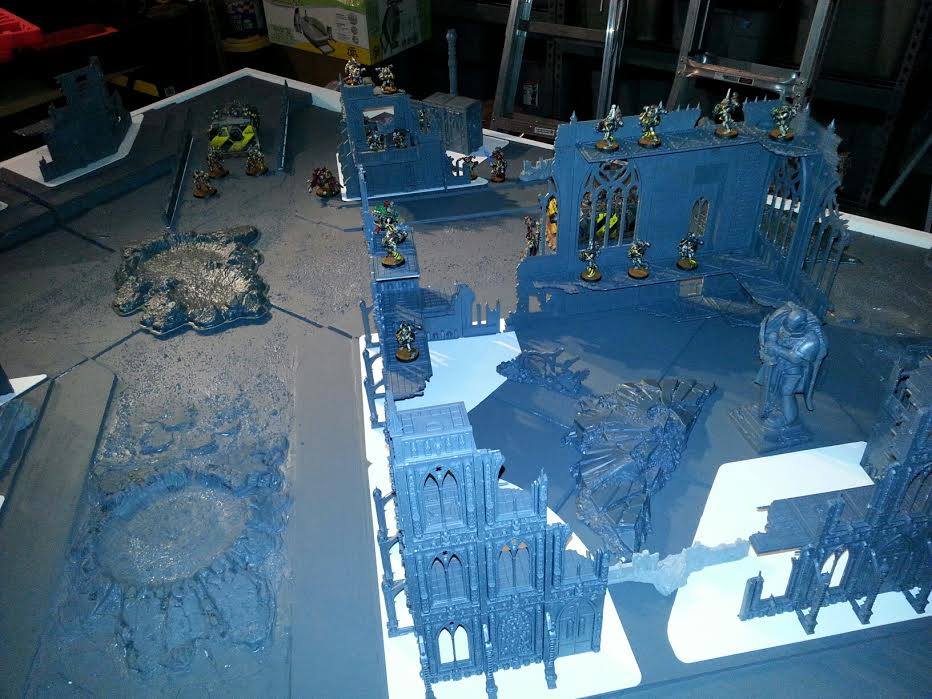
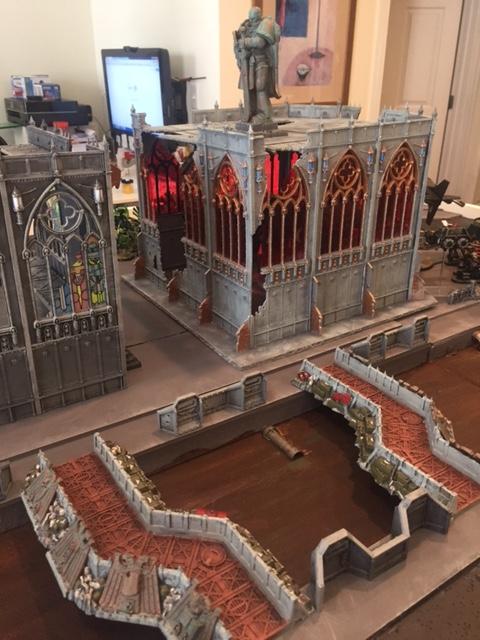
- I painted the streets black and drybrushed my sidewalks and roads, and added traffic lines to the roads. I added paint and details to the river to make it stand out, including some half-submerged pipes that give it some real depth. I can’t stress enough how important these details are–the little details like pipes and debris and street lamps basically add a sense of place and story to your table and make it come alive as a real location and not just a futuristic paintball field. As you build your table, think about how you can add these details, and where they make sense. Think about the stories that lead to them. Why is that skull on the pavement? What’s next to it? Where are your street lights? I couldn’t glue streetlights to my tiles and have them stack, so I put a bunch on weighted bases to add to the table for games.
The end result was much more striking, and much more fun to play on:
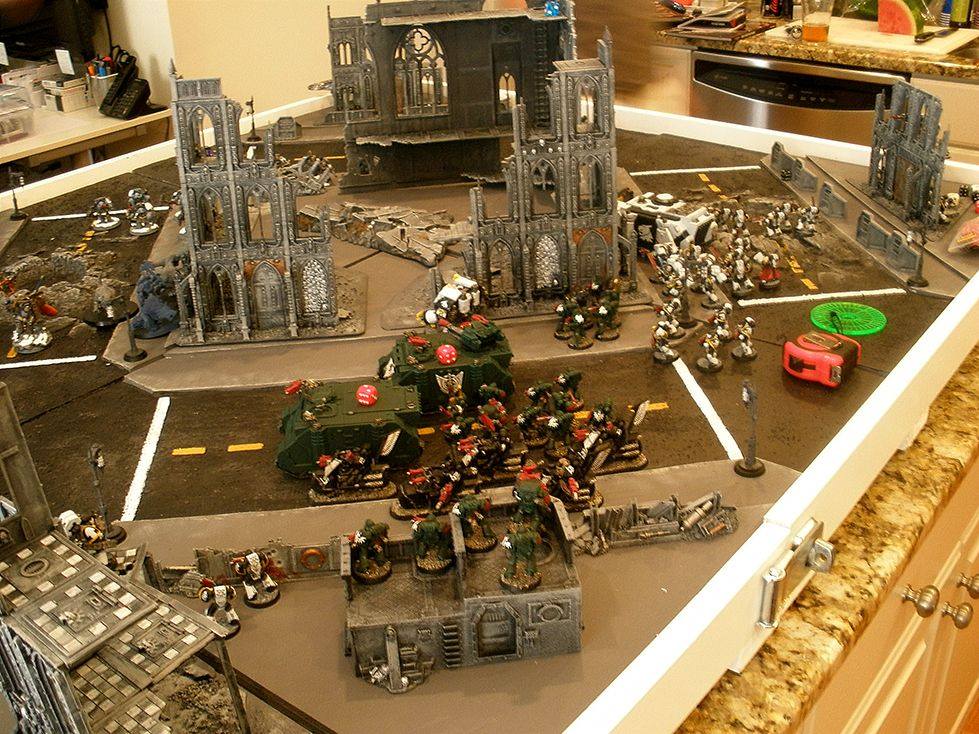
This led to more games almost immediately, which, when the terrain was painted, led to some killer photos. This photo also shows off how we designed terrain bases and features for different parts of the table, with triangular bases and flat walls for the corners, and corner sections for the middle to give us a big center skyscraper.
By this point, I’d made a good half a dozen trips down to my folks’ place, half of which involved games at their place, and the other half games at Greg’s. We’d settled into a rhythm of alternating locations, so that half the time I’d go down to his place and the other half he’d come up my way, usually carpooling with SD47.
Step 8: Projects Are Never Really Finished
Flash forward another five months to October. We’ve been regularly playing games and at this point I’m ready to try some new things with the table. After all, I’ve still got all the old materials I used to build the table. I decide to add three more tiles: Two that will allow me to create a single massive center island, and a third that will let me extend the river the length of the table. These are pretty easy – I use the same technique as before and just match up the new sidewalks. Each tile only takes an hour to make, then it has to sit overnight with the clamps.

The new tiles allow for a bunch of more interesting layouts that let us do some interesting things with the river, depending on how it’s placed.

Step 9: Play More Games
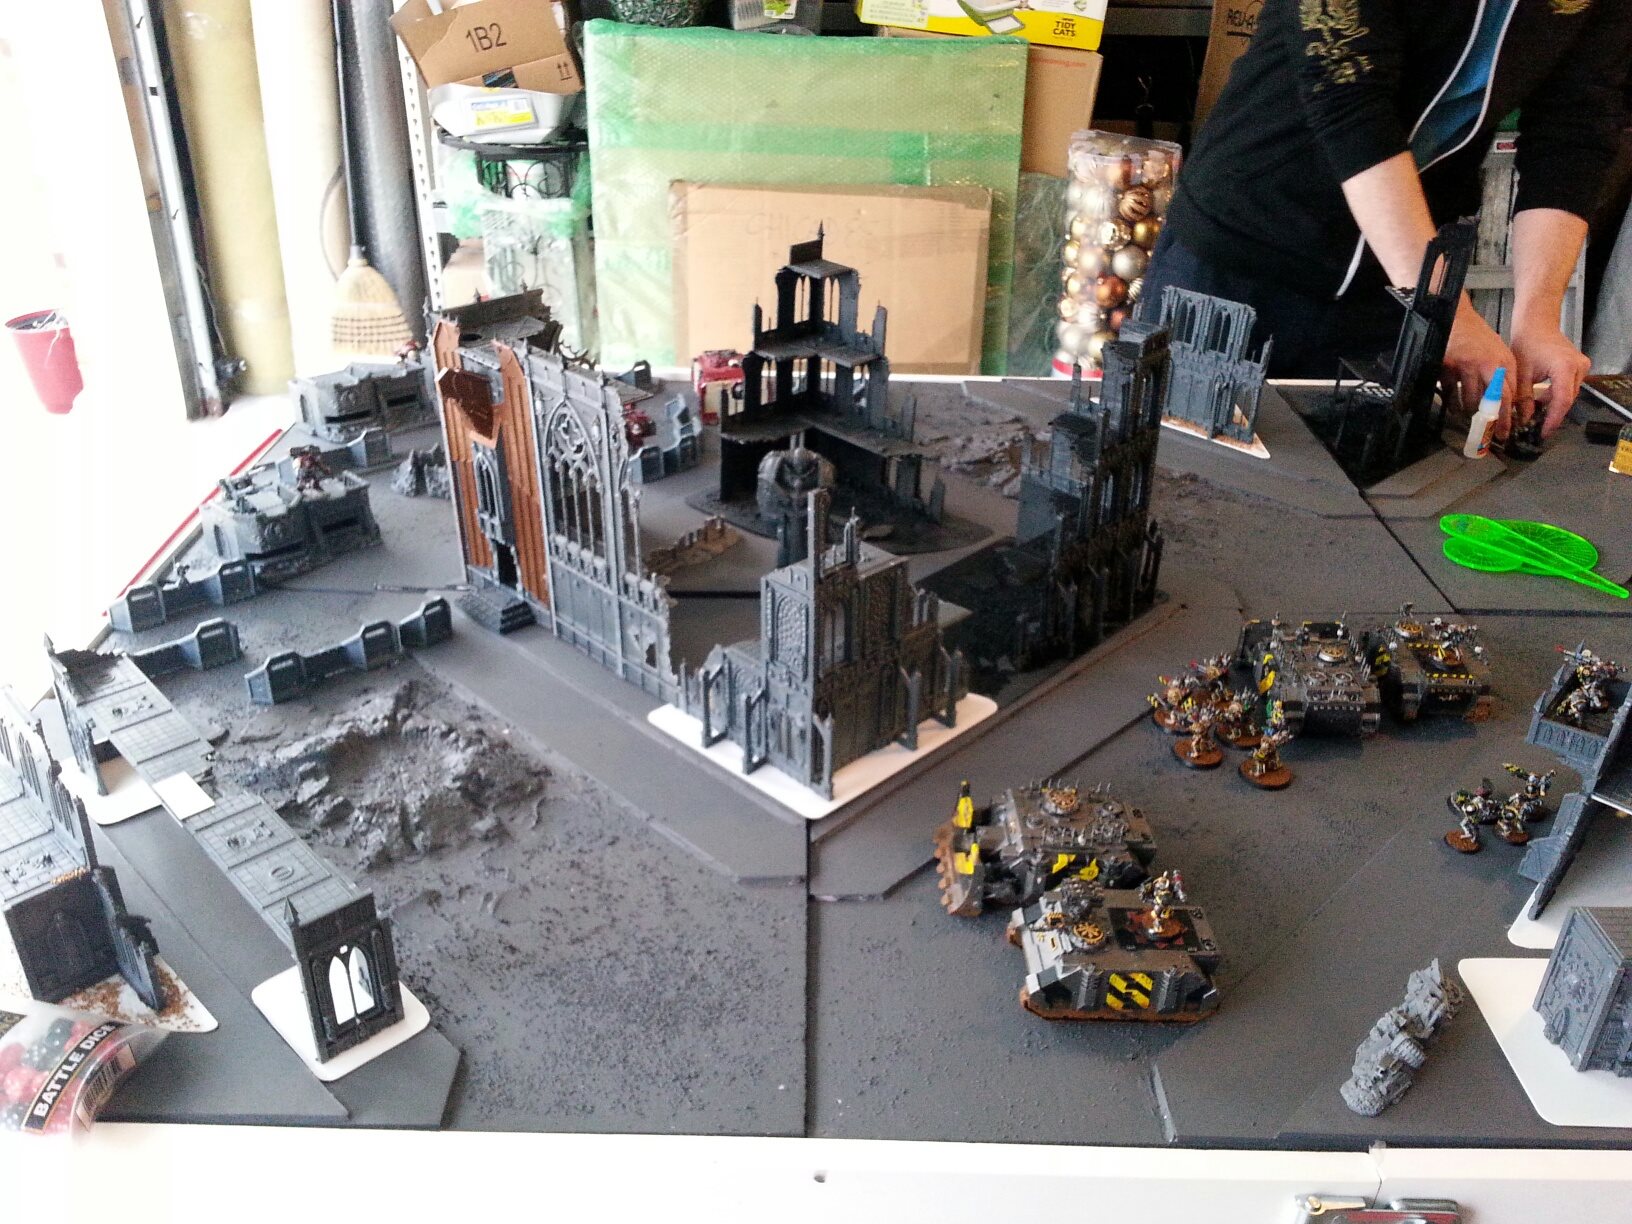
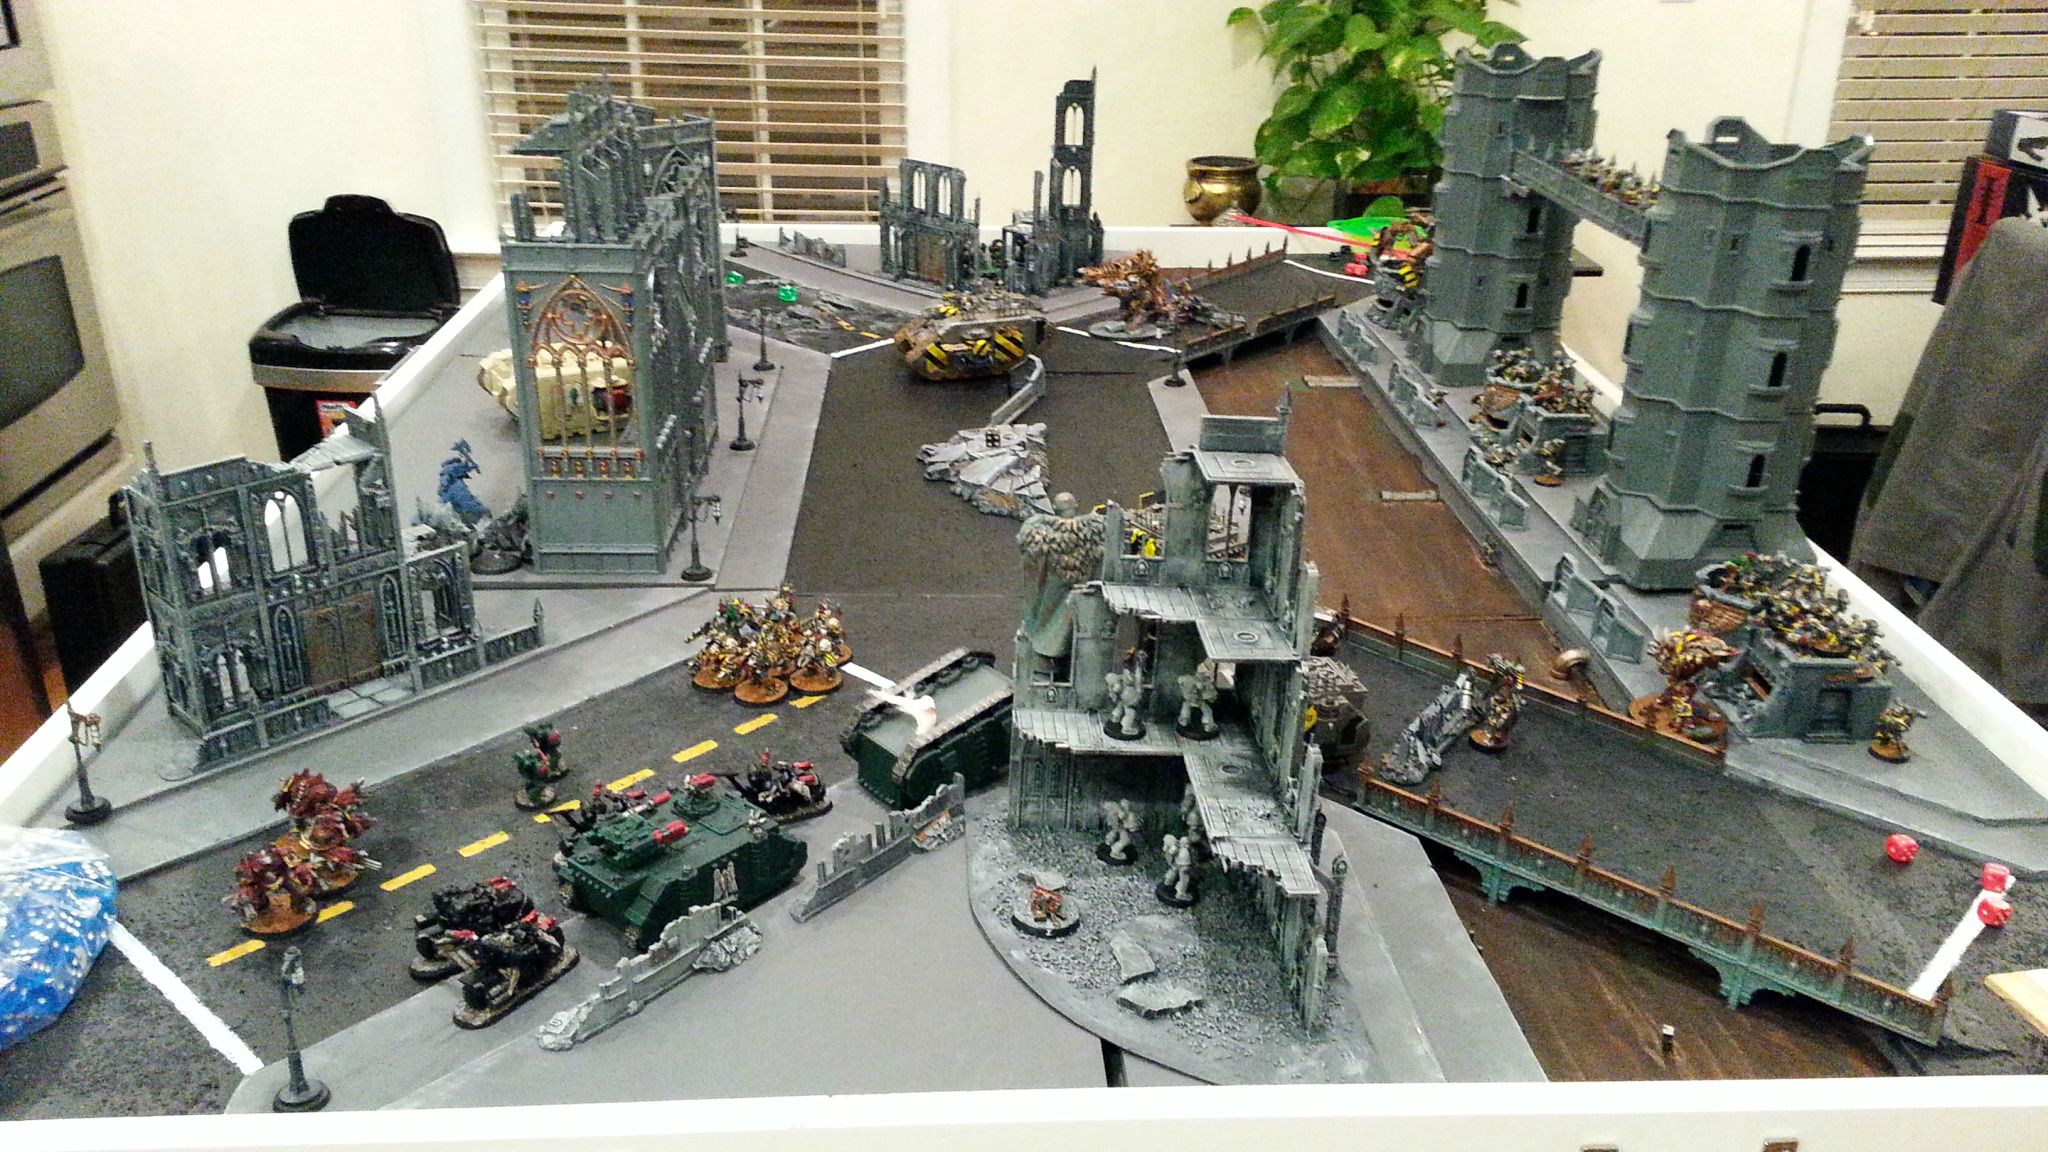
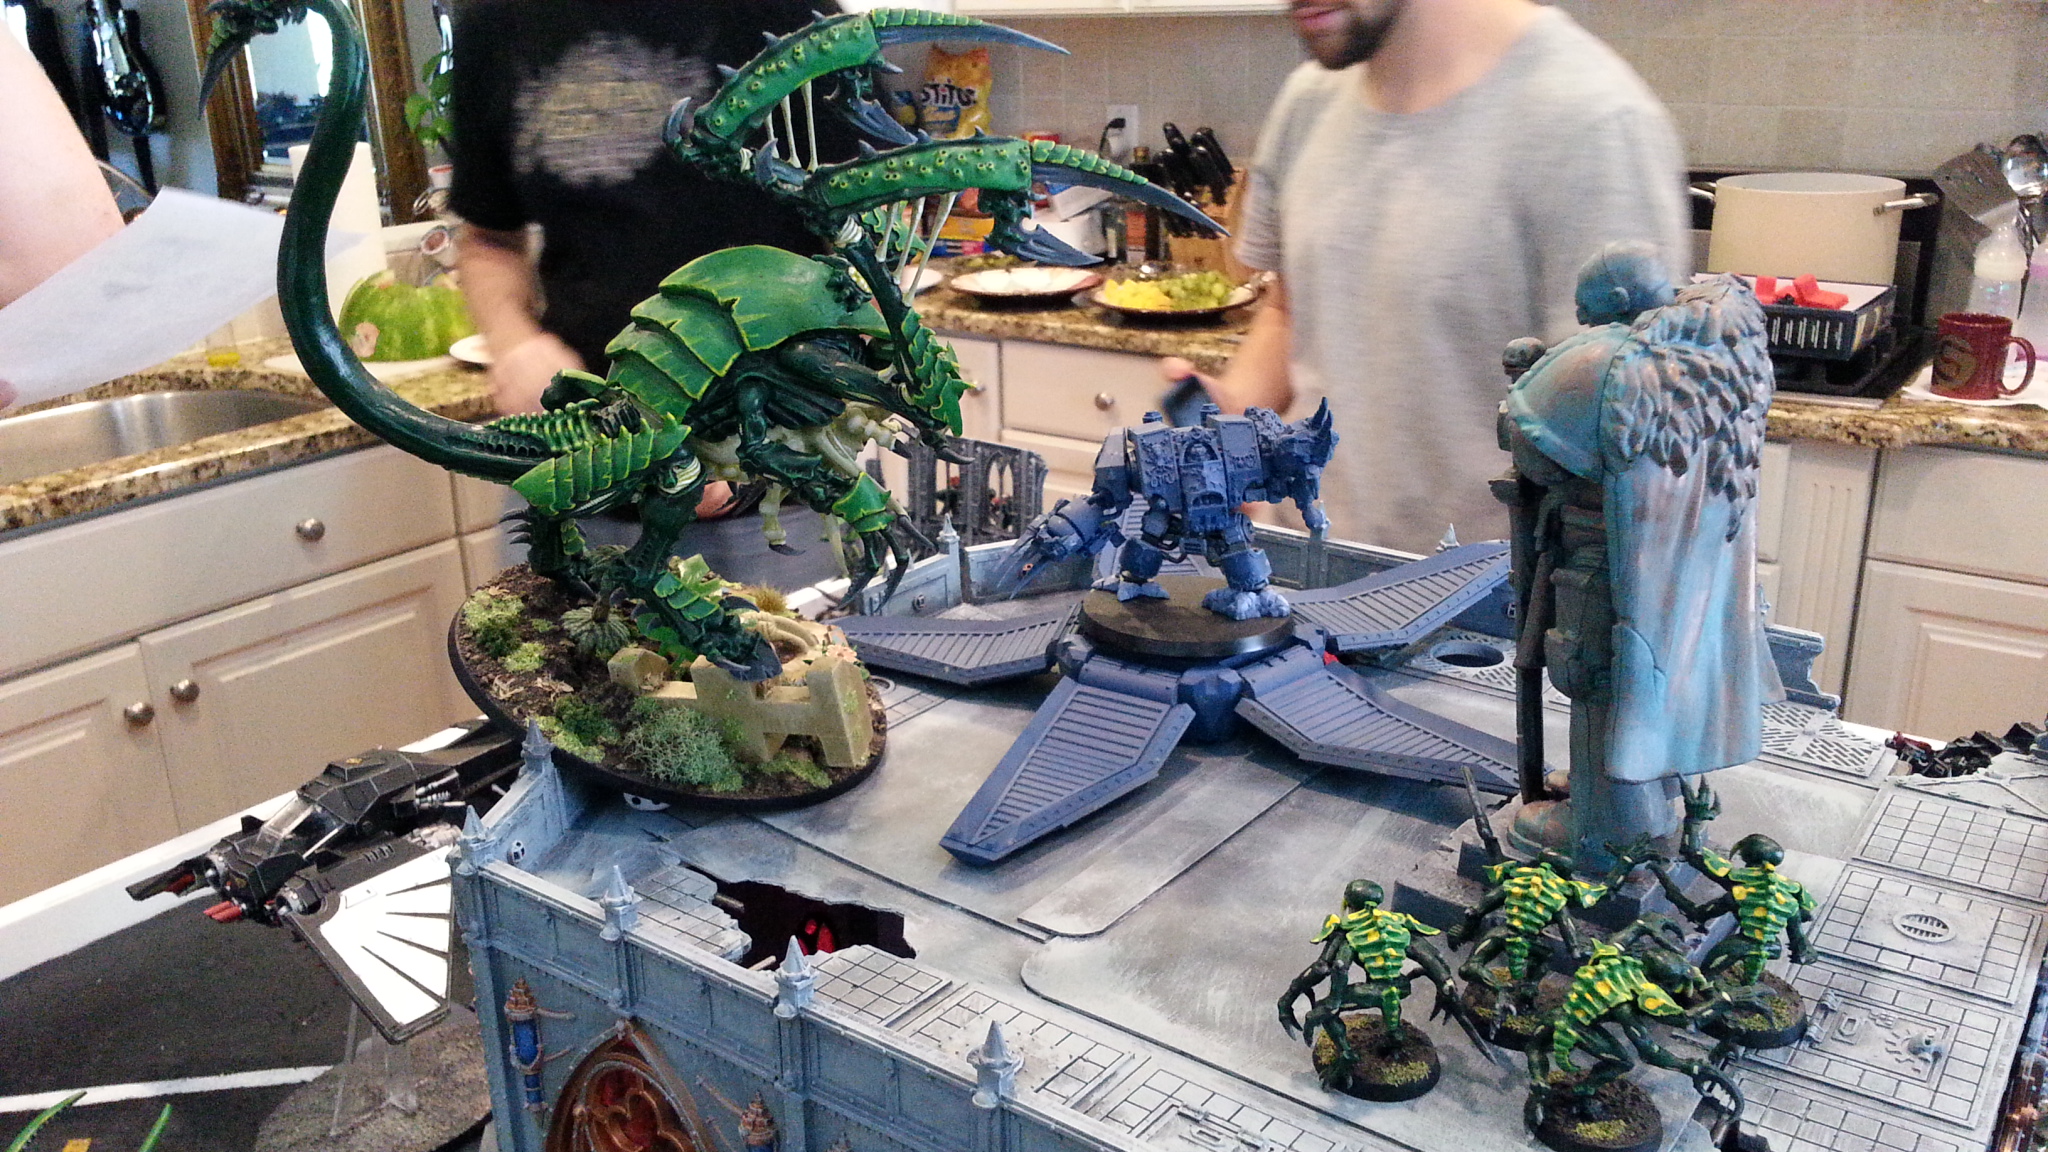
Eventually I got a set of the Realm of Battle tiles, which slot into the table frame I’d built pretty much perfectly and gave me a lot of flexibility in how I wanted to set things up, giving us options for multiple terrain/table types. This was especially handy when we ran a big campaign-ending game of Apocalypse, where BuffaloChicken and his brother came down to have their 6,500 points of Tyranids taking on the campaign’s armies across two tables simultaneously. By this point, I had accumulated an insane amount of terrain for the table, designed to work with different street and sidewalk layouts. The building in the center was something I built from extra Shrine of the Aquila sets I’d bought on eBay, because I wanted a very large, tall, enclosed building for units to land on top of and maneuver around. We used some Wall of Martyrs trenchlines for additional makeshift bridges to avoid creating too much of a bottleneck for the Imperial army.
Ultimately, I wanted a tall building like this because I wanted to create a second level to the battlefield. I wanted to create a second, smaller battlefield on the rooftops for armies to fight over.
It worked. Midway through the game, BuffaloChicken’s genestealers infiltrated to the top of the building, hoping to hold the statue objective. Seeing an opportunity to defend, SD47 used his drop pod to deploy Murderfang on the top of the building.
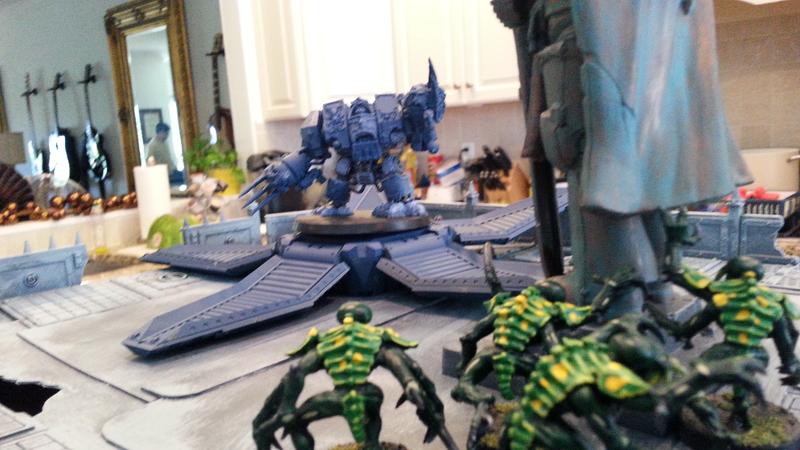
This led to BC’s Dimachaeron jumping up the side of the building and taking it on in head-to-head combat…
…and proceeding to tear it to pieces.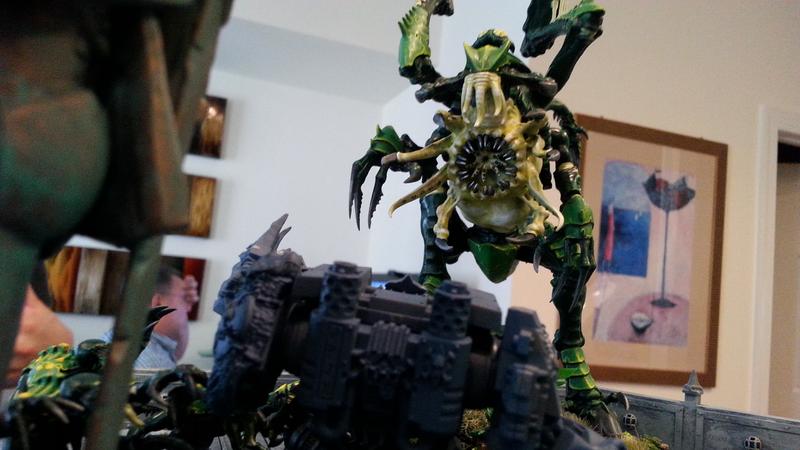
…which then prompted SD47 to land his Wolf Lord and Blood Fangs on top of the building. They charged the wounded Dimachaeron and killed it.
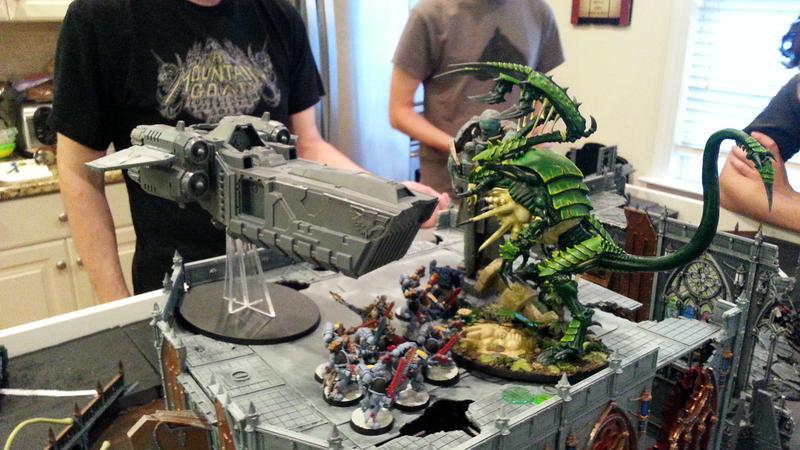 Meanwhile in the streets below, Space Wolves and Dark Angels continued to fight it out with a Winged Hive Tyrant and its swarms.
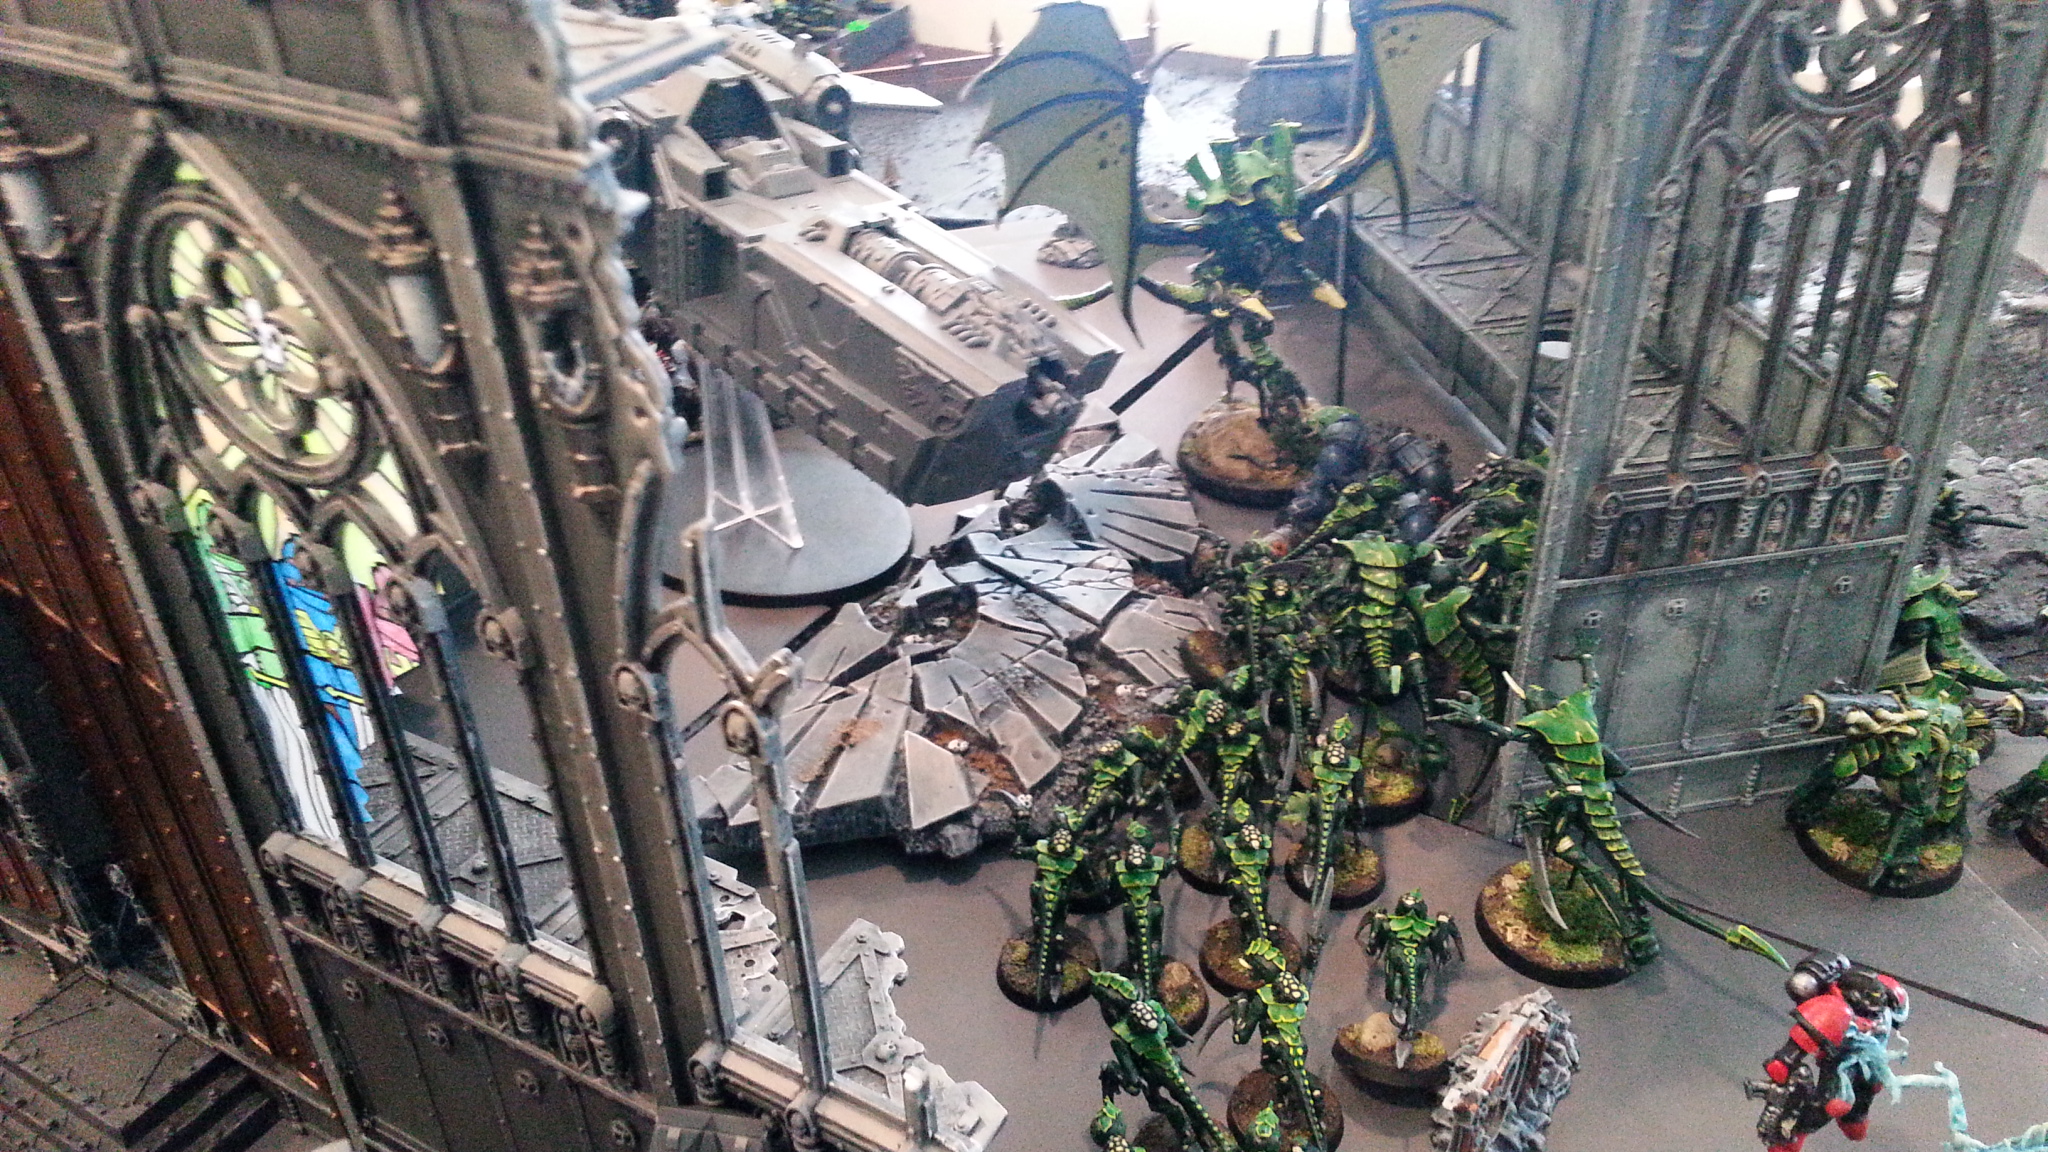
And so in the middle of this massive, two-table battlefield, a separate, smaller battle unfolded on the rooftops of the city’s buildings. It’s the kind of extremely cool narrative scenario that can only happen with the right terrain in place, to create a situation where only some units can participate. When you build a table for hobbying, this is the kind of thing you hope will happen.
My parents eventually moved again when my dad changed jobs. But in the two years they lived in Delaware, I got in about 30 games with Greg and SD47, making trips down to see them about once per month, something that never would have happened if I hadn’t put in the effort to build the table and have a space we could meet halfway to game. Yeah, we could have just met up and hung out and watched movies or gone drinking, but using 40k as the backbone of this made it much more involved. It gave us a reason to meet up – “let’s get a game in, I want to test this new unit.” Or “I want revenge from last time, when are you gonna be back down?” It also gave us hobby motivation to get things painted for the next game. And while my parents don’t still live in the area, we still use 40k as a reason to stay in touch; Greg and SD47 play in the campaign I’m running. Greg and I roomed together at NOVA. You might have even read about it. SD47 came down to hang out at NOVA both years I’ve attended. As you think about building your own table and the kinds of stories you’re going to tell on it, and how the terrain and features you’re building will feed into and encourage that. And if you can use the table as an excuse to hang out and strengthen friendships you’ve had for years but need to work to maintain, then all the better.
Epilogue
When my parents moved I kept some of the terrain for my own gaming space at home and left the rest with SD47, who now has the table frame, the tiles, and my Realm of battle tiles at his place. We’ve broken them out to play with them once or twice since, but it doesn’t get as much use. That’s a shame, but the important thing was that we got a ton of use out of it while my folks lived in Delaware, particularly when I was running my first campaign. At that point we had the room to set up two tables and our group had expanded to include our friends Pat and Theresa and her brother. They don’t still play much since having kids, but we still talk to them and visit every now and then. I still make my way down to Maryland every few months, and when I do I try to take an army and get in some games. Turns out even if we’re playing in a store and not at someone’s house, 40k is still a great excuse to get together and hang out.