
In New Year New Armies Lupe attempts to go from a Warhammer Zero with no playable forces for any mainline Games Workshop game, to a Warhammer Hero with an army for each of Warhammer 40,000, Age of Sigmar, and Middle Earth Strategy Battle Game and some games under his belt to (re)learn the rules.
The Malifean 6th are my Warhammer 40,000 project for this mad dash I’m making into 2022, where I try to assemble, paint and play with an army from each of the three mainline games that Games Workshop makes. I chose the Astra Militarum as my army on the basis that:
- I enjoy painting historical tanks, and the Imperial Guard have the closest equivalents in 40k
- If I’m going to paint massed infantry then they need to be simple to paint and easy to drybrush up to good effect
- They’re cheap and easy to pick up second hand because literally every guard player seems to have 16k points of them sat somewhere and more new on sprue in boxes
I wanted to do three things to prepare for getting my Malifean 6th project underway: create some lore for the regiment; design a rough list at 2000pts to work towards; and create a paint scheme for tanks and infantry that suits my sensibilities and is easily replicable across a lot of models.
“The Hellriders”
On the planet of Malifeus war is an ever-present looming threat, but rarely an immediately personal one. Positioned in a strategically important location close to a Space Marine Chapter Homeworld, Malifeus is an advanced industrial world with no immediate and direct risk of invasion. The presence of the Crimson Guardians chapter and their defences means that the major military application of the Malifean regiments are as supporting troops for Astartes offensives and patrols. In order to work better with the superhuman might of the marines, they are highly trained and well equipped, specialising in mechanised warfare and rapid insertion tactics. Though massed infantry formations aren’t unknown to the planet, they are much rarer than in other places. Most platoons are mechanised, ready to redeploy at speed, and support large formations of tanks including a huge number of the Leman Russ main battle tank.
The overall fluff for the world that provides the Malifean 6th you can read above: an industrial world whose military tends to support the local space marine chapter (I may even paint a few marines at some point in the future, who knows), and leans towards armoured columns and mechanised infantry over footslogging and massed warfare. I liked this as a general theme, as a more professional and regimented armed force than some guard regiments, but I wanted something to pick the 6th regiment out from the crowd in particular.
I have quite a few World War 2 armies, and historical militaries are going to be a big influence on these minis. As such I started looking how armoured divisions and mechanised units worked in the second world war and what their culture was. In particular I was taken by the many evocative nicknames that they accrued for their particular fighting styles, and settled on “The Hellriders” for the 6th. This would be down to their tendency to prefer plasma weaponry, which also gives me a nice opportunity to paint plasma coils, something I enjoy a lot. I would include a plasma gun in each infantry squad, and give the tank commander in the tank platoon a plasma cannon as the main turret weapon.
The Hellriders, then, are particularly aggressive and vicious even for Astra Militarum units, and known for their extensive use of plasma weaponry. As such they’ve gained a reputation for being excellent enemy armour hunters, moving in fast and flexible formations that can take down enemy vehicles and armoured infantry with ease. They’re a valuable support for the Vermillion Knights in their increasing clashes with the Necrons that are emerging from a nearby tombworld. When working with them they often provide the Hammer to the Astartes’ Anvil. The Vermillion Knights dig into a position and hold the line against the enemy while the Hellriders encircle them and then strike from the rear at great speed.
Taskforce Bolero
For the army I was going to build I wanted to lean into this fluff that I had created: a fast moving and heavy hitting force that was built around armoured vehicles. I also wanted, because I’m a history nerd, to roughly reflect reasonable real world fighting formations. As such I decided that my list would be made up of three main parts: a medium tank platoon; a mechanised infantry platoon; and a heavy tank support.
The medium tank platoon would be made up of Leman Russes (of course). Though in 40k they’re described as heavy tanks or Main Battle Tanks, they’re just not from a military history perspective – they much better fit the operational role of a medium tank as used in WW2. As such I decided I would deploy them in formation similar to British tank platoons of the time: four tanks, with the tank commander in an up-gunned version of the same tank. In the Second World War this was a Sherman Firefly VC, but in my force it’ll be a Leman Russ Executioner to lean into the plasma focus of the regiment. The others will be the standard Leman Russ as stand-ins for the Sherman Vs that the British would have used.
The Mechanised Infantry Platoon would follow a pretty standard format for such units in history: a company commander, command squad and three infantry squads mounted in four Chimera APCs. The command squad would be fully fitted out with a veteran plasma gunner, medic, vox-caster and standard bearer, with each squad featuring a plasma gunner and vox. I’m told by the more competitive-minded folks here that putting these upgrades on these units is obviously a mistake but having a radio network for my fast-moving rapid response platoon is just good sense and I refuse to be moved on this matter. At the moment I’m not planning on adding a heavy weapon to each of these squads, as they can’t take plasma cannons and I’m nothing if not laser-focused on a theme. I may add a psyker or other character into the command Chimera if points allow, we’ll see how it looks when the army is together.
Finally I wanted to add some serious heavy armour support. It wasn’t unusual for a heavy tank to be attached to an armoured task force like this, often a single Churchill tank for British forces. And what’s the obvious 40k counterpart to a Churchill heavy tank? A baneblade of course.
Truly, I am an idiot.
Quickly throwing all these things into a list suggests its about 1800pts, so I grabbed a sentinel as a scout component of the mechanised infantry, and then I’ll add in some characters or another sentinel when I approach the finishing line.
For my first goal however I’m going to focus on getting a 50PL Crusade List ready to go so I can get some games in as soon as possible: A tank commander and two russes, a couple of infantry squads and a platoon commander, and a couple of chimera to carry them. That, it turns out, is all you get for 50PL!
I Want to Paint it Black
Let me admit something to you: I love 40k armies that have black paint schemes. God they look good. So cool. But also, absolutely hateful to paint. Black and white are notoriously the worst colours to paint whole armies, so I can’t do that to myself. I wanted to find, therefore, a scheme that felt like it was black without actually being black. After some experimentation I settled on three near-black colours:
- Scale 75 Abyssal Blue (for armour)
- Scale 75 Black Leather (for leather)
- Scale 75 Eclipse Grey (for cloth)
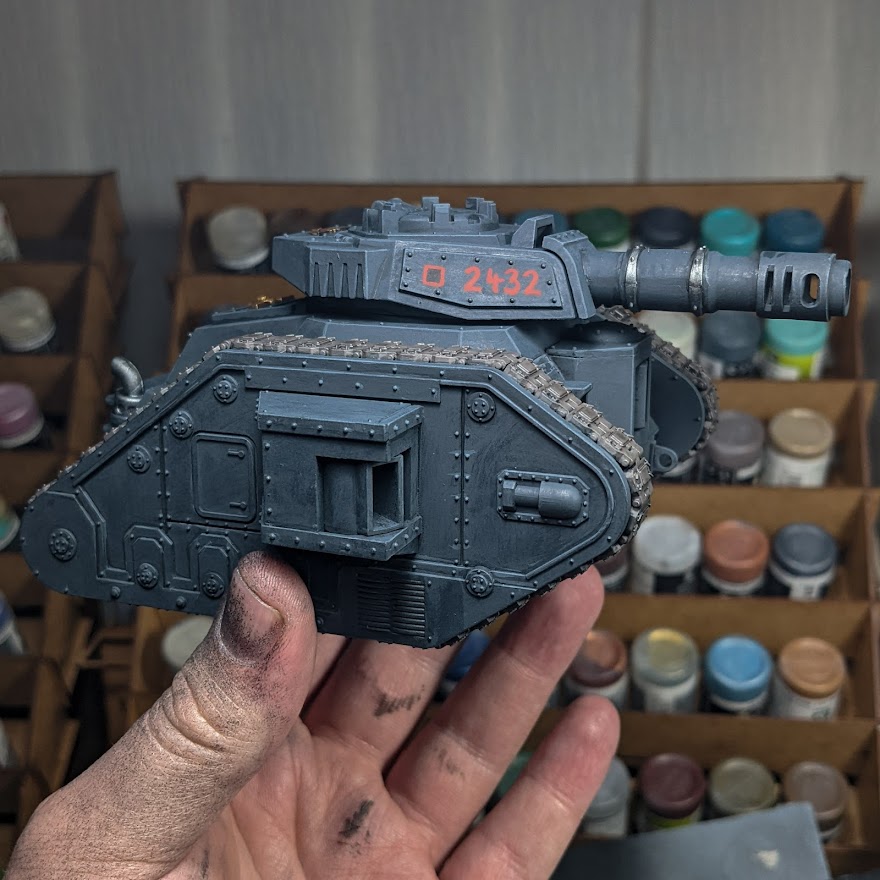
Let’s start with a tank, because everyone loves tanks.
- Prime Mechanicus Standard Grey. You don’t have to, but I found this was the best colour for coverage and depth. It meant that I could get the Abyssal Blue basecoat on with just two thin coats rather than the three it needed over black, and also it brings out the blue tones rather nicely
- Basecoat the entire vehicle in Abyssal Blue. You’ll need two coats, and the goal here is just nice smooth even coverage. If you have an airbrush this is the obvious thing to use here, but I don’t so I just did it with a brush
- Basecoat the tracks with Vallejo Panzer Aces Track Primer, the steel metals with Scale 75 Black Metal, the Gold details with Scale 75 Viking Gold, leather hoods or covers with Scale 75 Black Leather
- Deep line shade the Abyssal Blue with heavily thinned black – just run it into the recesses to give them depth. It’s a little time consuming but very easy to do
- Edge highlight the Abyssal Blue. I used 1:1 Scale 75 Bering Blue : Abyssal Blue, but honestly any mid-tone blue-grey colour will do just as well. Just take your time and edge highlight the entire hull of the tank, focusing on the edges on the surfaces at the top and sides, and only doing the deep overhangs (like on sponsons). This will give the tank a sense of light coming down and make it feel more grounded
- Wash the steel areas with Nuln Oil and the gold and leather areas with Agrax Earthshade
- When dry, carefully dry brush the tracks with black metal giving them a little steel at the edges of the plates
- You can highlight or touch up the other parts you washed, but honestly I didn’t bother – they’ll look good regardless and I found I didn’t want to draw more attention to them
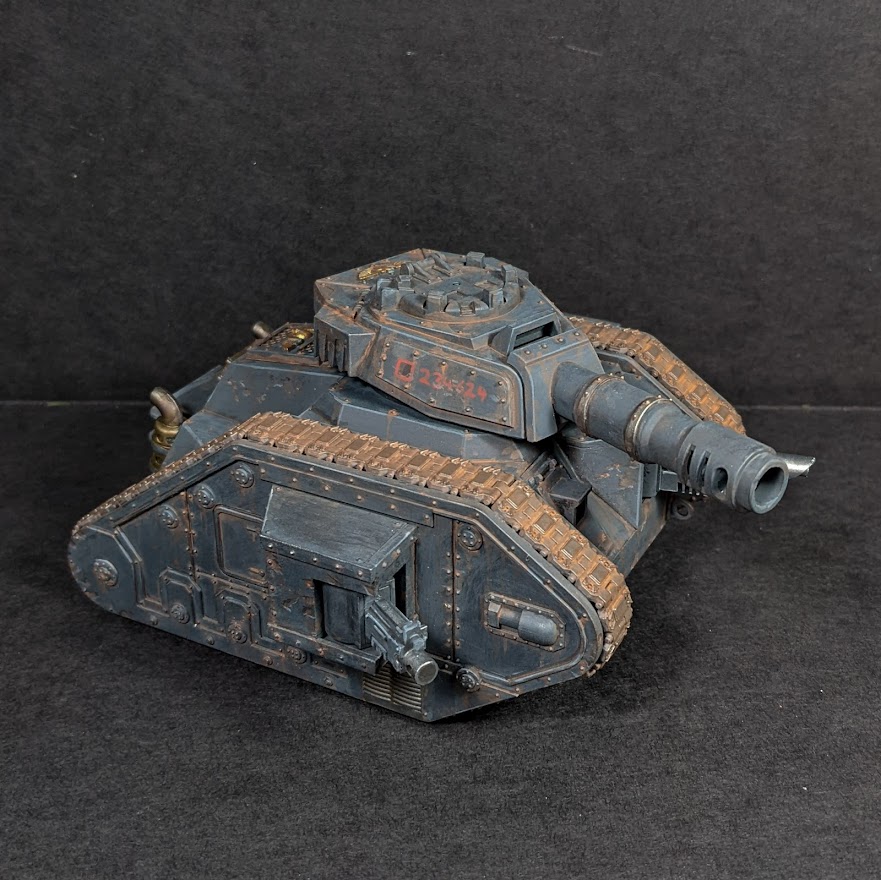
You can leave it here if you want a nice clean look, but if you want something more weathered (like I do) then you can move on to the weathering stages:
- Thin Vallejo Panzer Aces Dark Rust down so it’s almost the consistency of a wash and then carefully dab it onto rivets, and along the underside of recesses. Let it dribble down in a few places where water might flow if it was raining (but water wouldn’t flow around it, so in larger recessed areas)
- With less thinned paint of the same colour paint in with a brush, or dab on with a sponge, some chips, scratches and scrapes. Concentrate on places where paint would get worn away or damaged, like near the bottom of the sides of the tank, by the tracks especially at the front, or at the front of the tank on the central hull section
- Thin Vallejo Panzer Aces Light Rust down so it’s almost the consistency of a wash and then add it lightly to some of the rivets you applied the dark rust to. Don’t just go over all of them, but pick a few that look like they could be extra rusty and apply it there. Maybe add a little just at the top of where the rust drips are, and give a slight extra bit of colour around the bottom of recesses areas where water could pool
- Using a less thinned version of the same paint, just add a little colour variation and pattern to the chips and scrapes, dabbing a little of the paint on at random to mix up the look a bit
- Using thinned pure black paint add dark lines at the top of the chips and scrapes. This will help them look a little three-dimensional, and give the chips and scrapes some depth
- Finally using your edge highlight colour you use for the main hull paint highlight under the chips and scrapes. This will make them jump out and look like actual bits of missing paint almost immediately
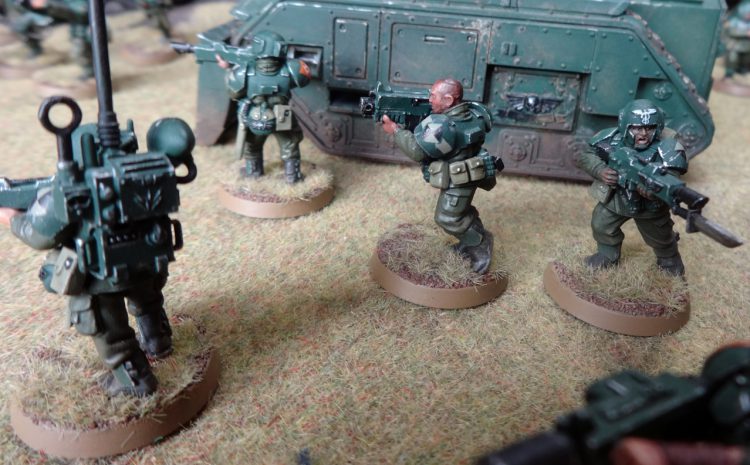
Now onto the infantry. My goal here was to create a scheme that looks good but that is extremely quick and easy to do. I quickly found that the Black Leather I used on the vehicles was too bright, so I subbed it out for Vallejo German Grey. Here’s the scheme I went with:
- Prime Mechanicus Standard Grey
- Basecoat the cloth Eclipse Grey, the armour Abyssal Blue, the leather and straps German Grey, the gold features Viking Gold, and the steel areas Black Metal. Don’t bother basecoating any skin, plasma coils or other details that aren’t the colours above. We’ll deal with those in a bit
- Wash the entire model with a thinned Black Ink. I’m extremely old and so I’m still using official Citadel inks, but any decent black ink will work absolutely fine (I’ve used the Scale 75 Inktensity ones and they’re good). Thin it about 10:1 water to ink. The reason we want to use an ink rather than nuln oil is threefold here: firstly the inks are going to be true blacks, which nuln oil isn’t, and will add a much better level of shadow to these already dark colours. Secondly, the ink behaves a little differently to a shade paint and will leave the raised areas stained but not coated – this means that the overall colour palette will be altered, but you’ll get less pooling and blotching. Finally, inks are a consistent satin, whereas I’ve found Nuln Oil, particularly recently, to be unpredictably glossy
- When it’s completely dry, carefully basecoat your skin tones and any other sections you left to one side (like painting plasma coils white). Skin tones are very much something that are up to you and your personal approaches, but mine are all pretty simple: a base coat, then a shade paint (reikland for lighter tones, druchii violet for darker ones), and then a single round of highlights, whites and pupils for the eyes, then a subtle reddish shade around the nose, lips and ears and maybe a stubbled glaze
- If you want you can touch up the gold section just to brighten them up again, but everything else should look fine without any further touchup
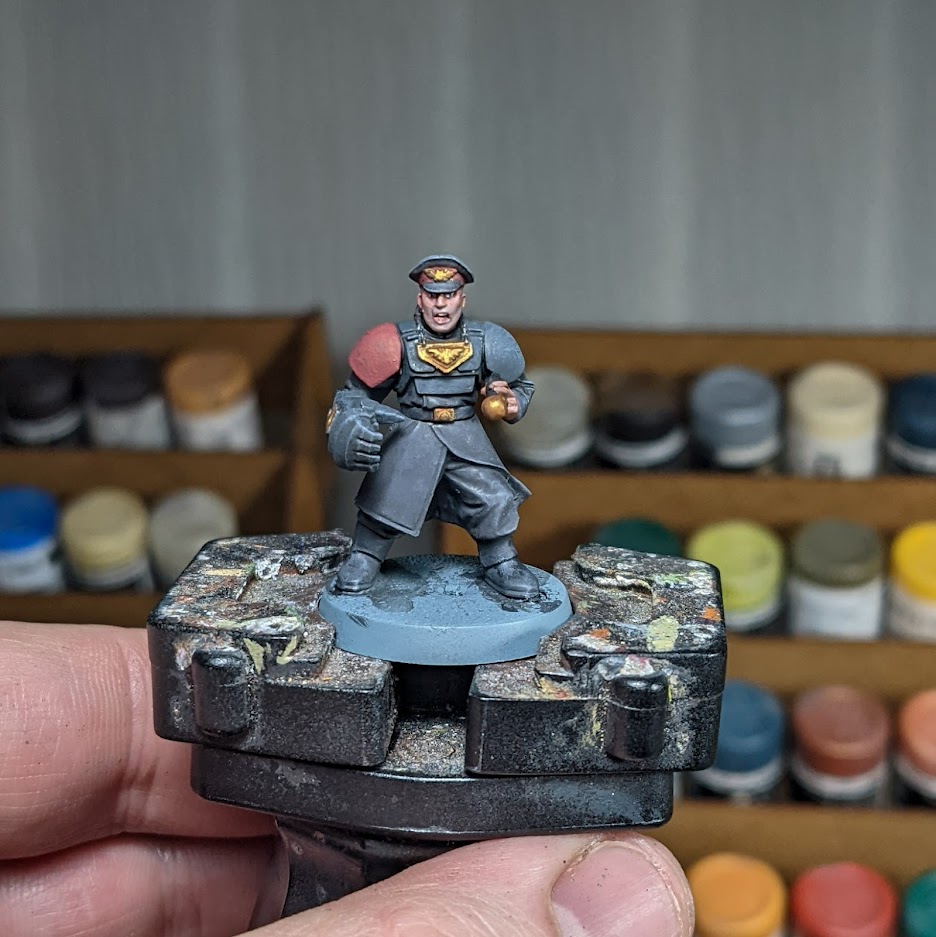
- Paint the right shoulder pad red. I used Khorne Red, but whatever red you have handy will do.
- Finally red dot lenses, buttons, etc that need to be lit up, and paint in your plasma coils (mine are literally just a coat of tesseract glow over the white)
And that’s it! With my paint schemes ready, it was time for me to get cracking on building and painting my starting crusade force. Next time I’ll be diving into Middle Earth and seeing what it’s like to try and build an army for that game.
Have any questions or feedback? Drop us a note in the comments below or email us at contact@goonhammer.com.
