
Welcome to Ruleshammer! This week is the fifth “episode” of a series I’m calling Ruleshammer Battle. A step by step explanation of a small game of warhammer 40k. Remember the banner below will take you to the Ruleshammer 9th Edition Compendium, for all the questions I’ve answered for the last few months!

Welcome back! If you missed Episode (4), I’d recommend having a read of that first to get caught up! Last episode we went through all the Tau’s Shooting, Melee and Morale Phases. This week lets see how we faired VP wise, and see the Death Guard begin their turn.
Robert “TheChirurgeon” Jones – I’m back here too for the occasional note on high-level play. I’m also an editor, so Rules Rob can’t stop me.
Table of Contents
Tau Secondary Scoring
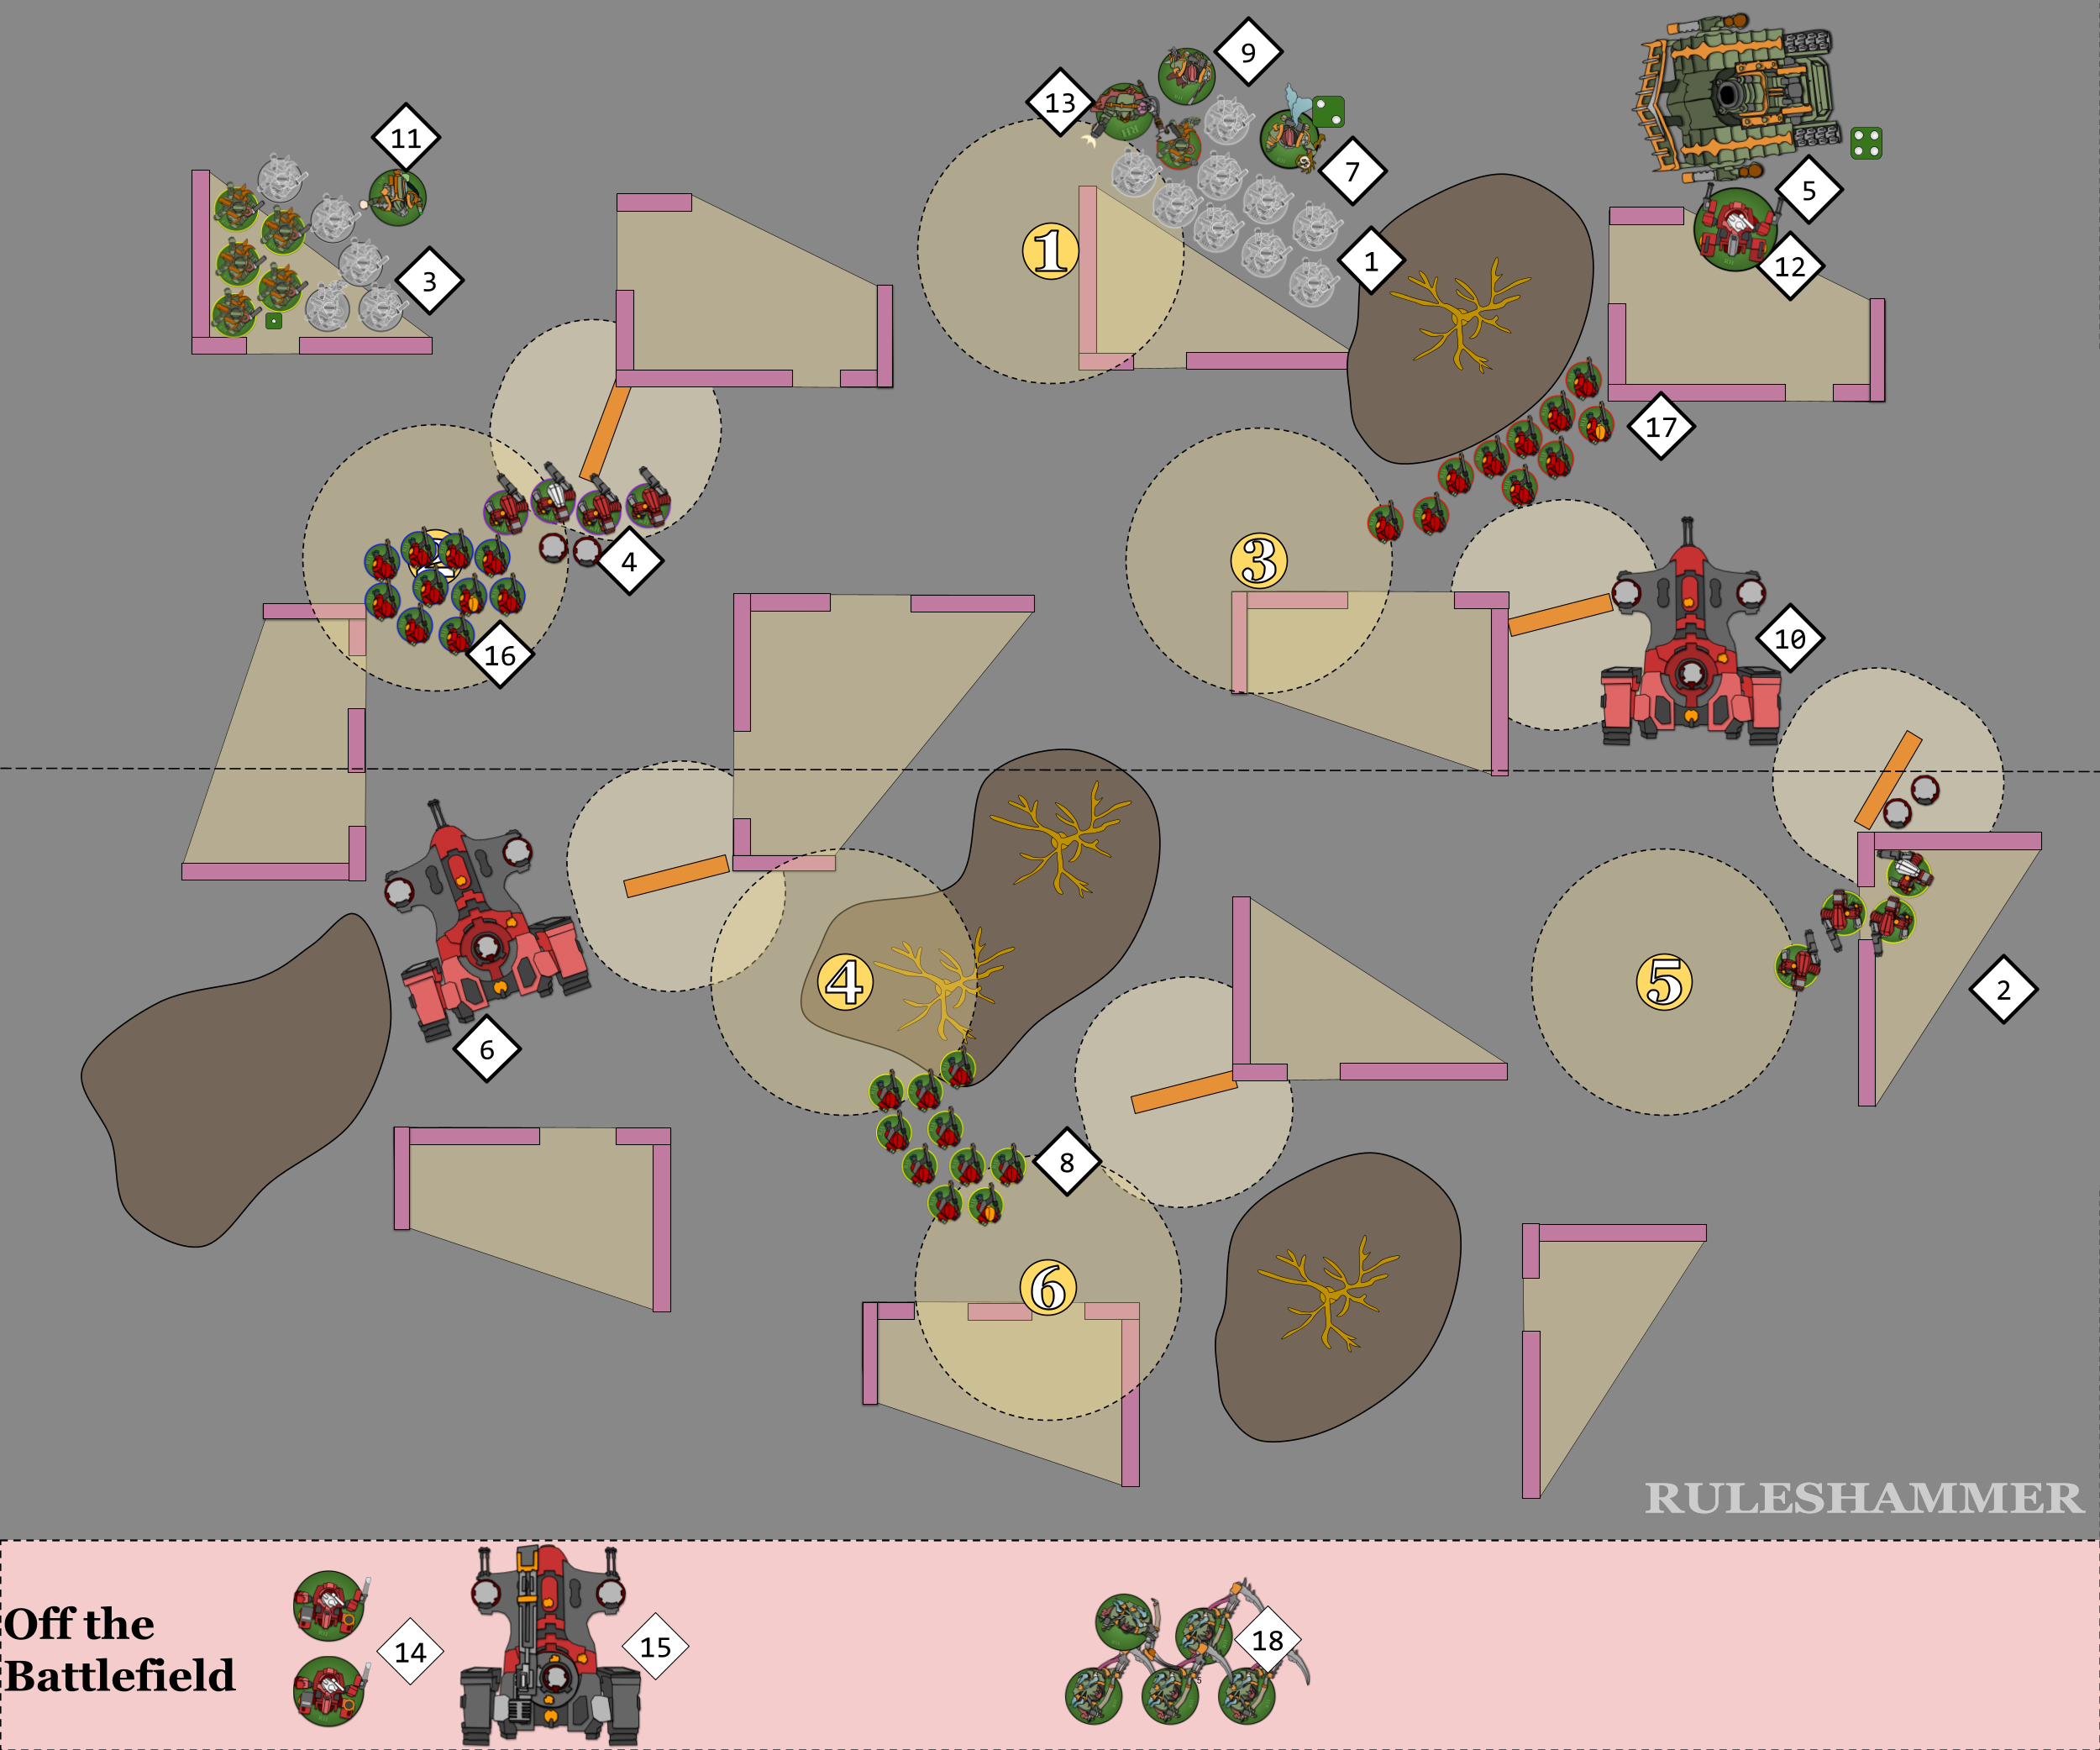
In episode 3 I made it clear that having a plan for your turn before you start making any moves will help figure out what those moves should be. The turn is over now and it’s time to compare what the Tau wanted to achieve to what they actually managed to do. Let’s go through it point by point; first of all here’s what the board looked like at the end of that turn:
How’d the plan go?
The Primary Objective for the mission awards 2 VP at the end of the Turn for controlling an Objective in Enemy territory. That’s Objectives 1, 2, or 3 in the diagram above. 1 is going to be pretty hard to reach, but 2 is very much in reach of either the Devilfish (6) (and its embarked unit) or the Stealth Suits (4). The Stealth suits could also likely reach 3 with a good advance roll, but doing so would leave them very exposed.
The Tau did manage to reach Objective 2 with a whole unit of Fire Warriors and some Stealth Suits, and managed to get one Fire Warrior onto Objective 3. It’s the end of the turn now so this will score +2VP for the Tau player. Remember that a game of 40k is made up of 5 rounds where both players have “a Turn” so whilst people might say “we’re still on Turn 1” for either player’s first Turn, it’s actually Round 1; both players have a separate “end of the turn”. Some rules do use “end of the battle round”, or even “end of the game”.
The Engage on All Fronts Secondary could easily score 3VP for them this turn. The Tau have units multiple units – (6), (4), (10), or (2) – that could move forward to secure the left and right opposing table quarters.
The Tau player did manage to get an eligible unit into every quarter of the board. So they will score the full +3VP for this Secondary. Remember that it’s whole units that must be in the quarter, this is why the Stealth Suit unit in the bottom right quarter didn’t cross that boundary line.
Note: This series is using GT2022 Nachmund missions and rules, changes to the Engage on All Fronts secondary subsequent to that book are not being used.
Rob: It’s worth noting here that in Nephilim you are required to be more than 6″ from another table quarter to count for Engage, and so in this case it doesn’t look like either of the lower two table quarters would count, though it would have been relatively easy to position units in order to score this. Note that this change also makes Engage on All Fronts much, much worse (and harder to score) in Incursion games, where you have a smaller board to work with.
The Grind them Down Secondary is trickier to plan for; it’s plausible that enemy units Plague Marines (3) and Foul Blightspawn (11) could be destroyed this turn, but just 2 units is not an insurmountable challenge for the Death Guard to respond to. Committing too many forces forward at this point as well will leave the Tau’s deployment zone exposed to the Deathshroud when they arrive in either Turn 2 or Turn 3.
This is where things start to unravel for the Tau player, they actually managed to kill zero units in this first turn. Both the Plague Marine units survived, just about, which also leads onto the next failure.
Rob: This is basically why Grind Them Down is a trap for most armies – once you miss those points there’s no way to get them back, you have to kill at least one unit per round, and if you’re going first your opponent gets all the information they need to stop you.
While technically scored at the end of the battle, the Assassination secondary would score 3VP if the Foul Blightspawn (11) was killed this turn. Remember though, that only Characters which have been destroyed at the end of the battle award VP. If the enemy has an ability that resurrects a character and it is not destroyed again before the end of the battle then it won’t count for scoring.
The Tau failed to kill enough Plague Marines (3) to remove the Foul Blightspawn’s (11) Look Out, Sir protection, but they did take some pot shots at the Malignant Plague Caster (7) getting it down to 3 wounds. Not scoring any VP for Assassination in Turn 1 isn’t all that atypical though, and it’s really only because of the small size of these armies that the opportunity is coming up at all. With that all tallied lets see the score.

Only the 5VP in the end; a bit shy of the 10VP our plan was hoping for. The Tau are in control of a lot of Objective though but not with anything with significant resilience, what they remain in control of when Turn 2 begins will decide a lot.
Death Guard Turn 1
Command Phase
The Command phase is pretty simple for the Death Guard in this turn: They’ll first gain the +1CP Battleforged Bonus (Reminder, this is Nachmund rules, so it’s 1 CP for the Death Guard player only).
CP Update!
Tau: 8
Death Guard: 11 + 1 = 12
The Death Guard Characters on the battlefield don’t have any Command Phase abilities to declare.
The Tau player has no abilities to declare in the enemy Command Phase.
Movement Phase
Again: Let’s Stop and Have a Plan!
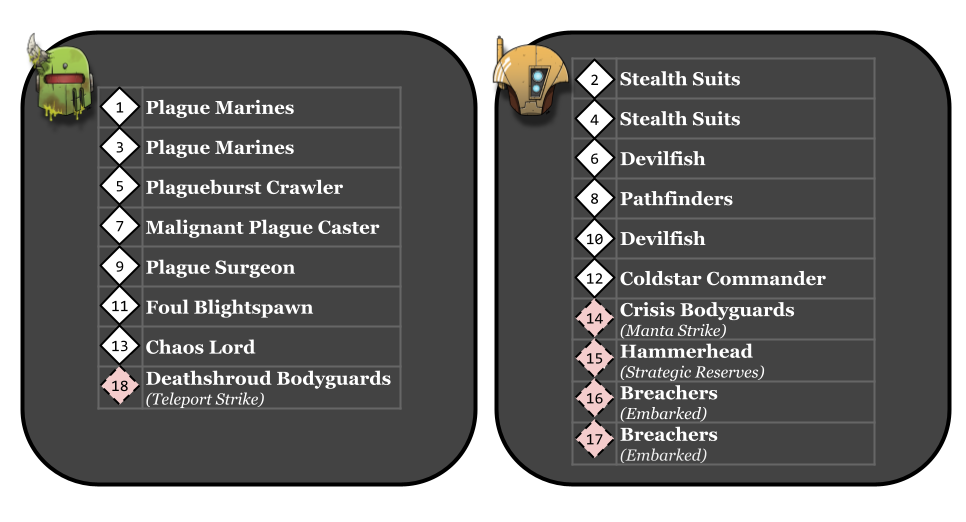
Lets look at the Death Guard secondaries they picked again.
- First there’s the Primary Objective for the mission to think about. The Death Guard however are a lot slower to cross the table than the Tau and can’t reach objectives 4 or 5 to score this turn.
- For Stranglehold the Death Guard need to control 3 Objectives to score 3VP at the end of the turn, 1 and 3 are pretty easily done but will leave units exposed. Not that cover was of significant benefit in the previous turn. Objective 2 is swarming with Fire Warriors but not unassailably so.
Note: It’s a bit meta and this did start as a mistake, but this is actually not entirely accurate. To Score 3VP the Death Guard player needs to control 3 and more objectives than the Tau. This article will continue with the Death Guard player having misread their secondary, and we’ll talk about how important that can be when they come to scoring, as in this case that mistake will dictate what they try to kill. - Taking Objectives 1, 2, and 3 in this turn also has the added impact of preventing the Tau from “holding more” in their next Command Phase for full Primary Objective points.
- 6″ of the centre is quite a trek for our Malignant Plague Caster this turn to start warp ritual, but as this objective maxes in 3 turns they can afford to be offensive with the unit this turn on their way to the centre of the board.
- Grind Them Down’s 3VP is very much within reach this turn; the Tau failed to get any unit kills in the previous Turn so the Death Guard only need to kill one Tau unit to score this.
Start of the Movement Phase
Before the Death Guard begin any moves there are two abilities that I think are worth going over as they will impact the movement decisions the Death Guard make.
MALICOUS VOLLEYS
Instead of following the normal rules for Rapid Fire weapons, models in this unit shooting Rapid Fire bolt weapons make double the number of attacks if any of the following apply:
– The shooting model’s target is within half the weapon’s range.
– The shooting model is INFANTRY and its unit Remained Stationary in your previous Movement phase.
– The shooting model is a TERMINATOR.
and
INEXORABLE ADVANCE
– This unit counts as having Remained Stationary if it did not Fall Back or Advance in your previous Movement phase.
– If this unit has the VEHICLE keyword, it does not suffer the penalty incurred to its hit rolls for firing Heavy weapons at enemy units that are within Engagement Range of it.
– If this unit has the INFANTRY keyword, it can ignore any or all modifiers to its Move characteristic, Advance rolls and charge rolls.
These abilities interact: The Plague Marine units will be able to move and still fire their Bolters at full range twice. This is because they will count as having “Remained Stationary” due to Inexorable Advance, which satisfies the criteria of Malicious Volleys.
Inexorable Advance also means that the forest between some of the Death Guard army and the enemy doesn’t slow them down during the charge phase. Charging to take objectives will likely be key to the success of the Death Guard in this turn as they lack the movement distance to achieve their whole plan without making some successful charges.
Here’s the start of the Movement Phase for the Death Guard:

During the Movement Phase
- Plague Marines (3) move out of the Ruin getting two models on to the Objective. Not enough to take control but within a nice short charge that after shooting and fighting will hopefully leave enough Tau dead to secure it.
- Foul Blightspawn (11) moves to support the efforts of the Plague Marines with its shooting and combat.
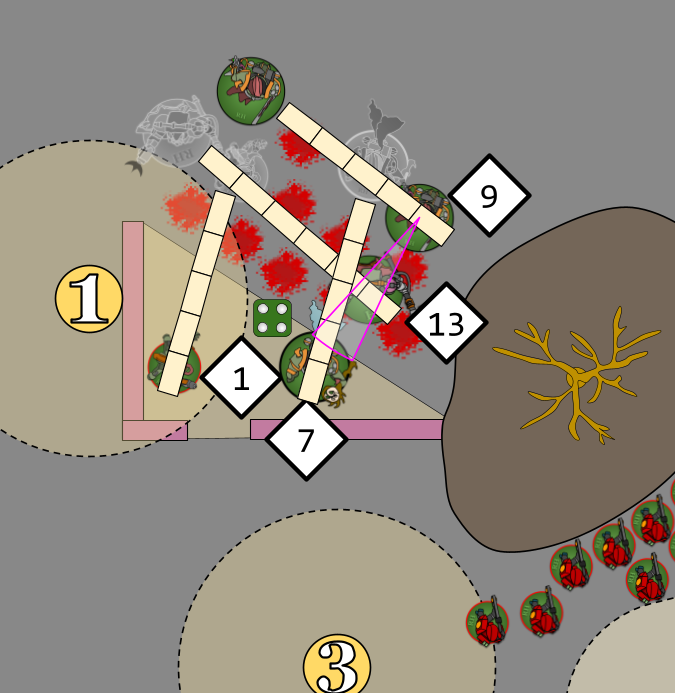
- Plague Marines (1) move into cover and to take Objective 1. Some indecision on which side of the wall was best for this move but securing the cover won out despite the larger number of units visible from this side. The Death Guard player is hopeful they can thin that threat out.
- Plague Caster (7) moves their full 5″ into cover but still able to see the Tau Breachers (17) for Psychic attacks.
- Death Guard Chaos Lord (13) moves their full 6″ to get within a reasonable charge distance of the Breachers. It is still a 7″ charge though, and any attacks into the Tau unit could make that charge longer.
- The Plague Surgeon (9) moves to join the Chaos Lord in their charge but makes sure that the Plague Caster (7) remains within 3″ so that they can heal them at the end of this phase.

The Reinforcements Step
It being the first turn, the Deathshroud Terminators must remain in reserve for the turn.
End of the Movement Phase
At the end of the Movement Phase the Plague Surgeon (9) use their healing ability on the Plague Caster (7).
Revitalising Malignancy: At the end of your Movement phase, this model can heal one friendly BUBONIC ASTARTES INFANTRY model whose unit is within 3″ of it. That model regains up to D3 lost wounds. Each model can only be healed once per turn.
They roll 2 on their D3; healing the Plague Caster back to their full 4 of 4 wounds. They could remove the dice at this point if they wished to.
Psychic Phase
The Plaguecaster, being too far away from the centre for the Warp Ritual Secondary this turn is going to attempt some psychic powers. They know 3 powers.
MIASMA OF PESTILENCE
Blessing: Miasma of Pestilence has a warp charge value of 6. If manifested, select one friendly DEATH GUARD unit within 18″ of this PSYKER. Until the start of your next Psychic phase, each time an attack is made against that unit, subtract 1 from that attacks hit roll.
PLAGUE WIND
Witchfire: Plague Wind has a warp charge value of 6. If manifested, select one enemy unit within 18″ of and visible to this PSYKER. Roll one D6 for each model in that unit. For each 6, that unit suffers 1 mortal wound. If the result of the Psychic test was 9+, that unit suffers 1 mortal wound for each 5+ instead.
and the old faithful,
SMITE
Smite has a warp charge value of 5. Add 1 to the warp charge value of this psychic power for each other attempt that has been made to manifest this power by a unit from your army in this phase, whether that attempt was successful or not. If manifested, the closest enemy unit within 18″ of and visible to the psyker suffers D3 mortal wounds. If the result of the Psychic test was 11 or more, that unit suffers D6 mortal wounds instead.
The Plague Caster can actually use Miasma of Pestilence on themselves as the ability does not say “other friendly” and they are a friendly DEATH GUARD unit within 18″. This should help the keep them around to do Warp Ritual later on.
- Starting with Miasma, they roll a 6. Tau have no denial abilities so that succeeds, attacks against the Plague Caster (7) will now have -1 to hit.
- Next Plague Wind on the Breachers (17). First the roll to manifest the power; 7. The power is manifested but not at the higher level. The Breacher unit contains 10 models so they roll 10 D6; 1,2,2,3,4,4,4,5,6,6. This kills two Breachers with 1 Mortal wound each.
On top of that, the Plaguecaster rolled a 7 for to manifest a power – this triggers its Pestilential Fallout ability, which does an additional mortal wound to the closest enemy unit within 12″, killing another breacher with an additional mortal wound.
Rob: In reality you’d never take Plague Wind when Curse of the Leper was available and this is why. Curse of the Leper here lets you roll 7D6 and score a mortal wound for each value that beats the toughness of the target. This turn it’d only be rolling a 4+, but on future turns with units in contagion range you could easily make that a 3+, and even rolling a 4+ odds are good you’ll get 3-4 mortal wounds on the unit instead of 1-2 with Plague Wind. Don’t take Plague Wind, kids.

Next Time: The Death Guard Starts Blasting
That’s almost half the turn wrapped up! In episode 6 we’ll go over the more of the Death Guard’s turn!
Ruleshammer Battle Index
Episode 1 – Game Set Up Part 1
Episode 2 – Game Set Up Part 2
Episode 3 – Pre-Battle Abilities, Tau Turn 1 Command, Movement, and Psychic Phases
Episode 4 – The Tau Turn 1 Shooting, Melee, and Morale Phases
Episode 5 – Tau VP and Death Guard Turn 1 Begins
Episode 6 – Death Guard Turn 1 Shooting Phase
Have any questions or feedback? Got a rules question you want answered? Drop us a note in the comments below, ask a question in our Ruleshammer form, or head over to r/ruleshammer to discuss.
