
Although we love Warhammer 40,000, the game’s complexity can be daunting, particularly for newer players. In Ruleshammer, we look at the nuances of the game’s rules and how they affect gameplay, clearing up potential issues and helping make sense of some of the game’s less common interactions. In today’s Ruleshammer, Rob “Vre’kais” Chilton covers some more from the Charge and Fight Phases!
Editors note: This article was written for Warhammer 40,000 8th edition, and may no longer be completely accurate for 9th edition.
How to Heroic Intervention
Heroic Intervention happens in the enemy charge phase, after they have declared all their charges. Here’s the actual rule text;
After the enemy has completed all of their charge moves, any of your Characters that are within 3″ of an enemy unit may perform a Heroic Intervention. Any that do so can move up to 3″, so long as they end the move closer to the nearest enemy model. [Core Rules Pg 8]
Few key points to remember: firstly, even if the enemy doesn’t declare any charges that turn you still can heroically intervene.
Q: Can you ever perform a Heroic Intervention during your own turn?
A: No. [Core Rules FAQ Pg10]
Secondly, like the Pile In and Consolidation moves, the move to Heroic Intervene must have that model end nearer to the closest enemy model.
Full Version of this Diagram can be found here
This limitation is per model as well, so if you have a whole unit that through some means is allowed to use Heroic Intervention, each model must end up closer to the model nearest to them.
Q: If a unit has an ability that allows it to Heroically Intervene as if it were a Character, how is this resolved?
A: Each model in the unit must finish this move closer to the enemy model that was closest to it. [Core Rules FAQ Pg12]
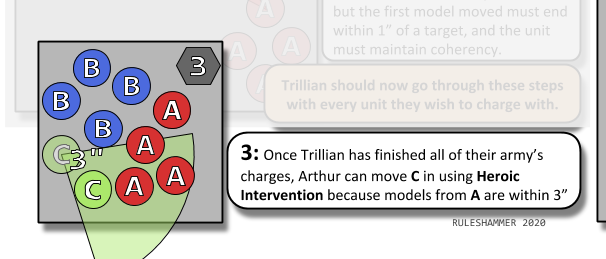
Remember the Pile In!
It’s important to remember that when activated models that Heroically Intervened are going to be able to Pile In. Often you might want to limit that. See the Diagram below for how this can vastly change what that Character is able to fight. To make things clearer I’ve included a small table of which models are on which side.

Preventing that character from attacking the rear unit can be important. It’s not going to be every game that the enemy manages to pull off this sort of attack though. When facing enemy characters be aware that even if you’re not charging, they might be able to use your units as stepping stones to targets you want to keep safe.
Heroic Intervention and FLY
Heroic Intervention happens in the Charge Phase, not the Fight Phase. As such these models can make use of the FLY keyword to ignore enemy models. Practically with a normal 3” Heroic Intervention this isn’t especially useful, a very specific set of criteria would need to be met for you to be able to use it. I’ve shown them in the diagrams below. It does get a bit easier though if the Character has a longer Heroic Intervention that normal, 6” is the most common extension. See the diagram below for how powerful this can be, same belligerents as before!
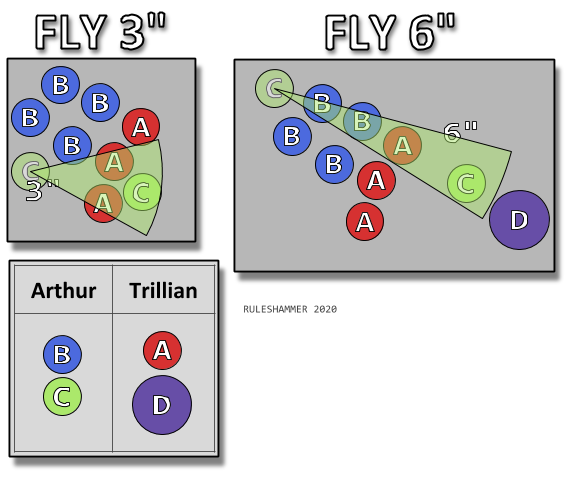
With the 6” Heroic Intervention plus the FLY keyword it’s possible to leap through both your unit, and the enemy and end up on the other side of them whilst in fighting range of another unit. It’s important to note that Model C still is nearer to the closest model in Unit A than it started, as required by the Heroic intervention rule. It just started far further away than is typical, giving it quite a lot of freedom.
What can attack what?
When you Heroically Intervene it doesn’t change anything about the enemy charges. They can still only ever attack the units they declared as targets this turn.
As the charging player; it’s not always clear if declaring the Character as a target is worthwhile, if your unit is unlikely to be able to damage them then declaring them as a target is potentially just more Overwatch to survive. As you gain experience this gets easier though.
Fight First Abilities – what order should these be resolved?
Some units have abilities where they “always fight first”. Though it’s not obvious how this should be resolved between charging units and other units with similar abilities. One such ability is the Emperor’s Children legion trait Flawless Perfection;
Units with this trait always fight first in the Fight phase even if they didn’t charge. If the enemy has units that have charged, or that have a similar ability, then alternate choosing units to fight with, starting with the player whose turn is taking place.
I’ve had questions about how this rule interacts with fights and charges. It essentially creates two groups of models for the fight phase.
- Group 1 – Units that charged this turn, and/or units with the Flawless Perfection Rule.
- Group 2 – Units that didn’t charge this turn (usually the units of the player whose turn it isn’t or units that stayed in combat).
If it was the opposing player’s turn (not the Emperor’s Children) and they charged with one unit this turn. First resolve all the Group 1 units, so that charging unit first and then any Flawless Perfection units that are eligible to fight. It’s not their turn so they can’t have charged which means that’s just the units within 1” of the enemy. After all of those are resolved move on to eligible Group 2 units as usual.
NOTE: If any of the Group 2 units Piled in to a unit with Flawless Perfect that hadn’t fought yet this turn, you would resolve that unit’s attacks next.
Fight again Abilities – how do they work? Who can I attack?
Lots of units and models in the game have these abilities, but it’s not always clear when they should be resolved and who they can attack. For instance the Berzerker Ability;
Blood for the Blood God: This unit can fight twice in each Fight phase, instead of only once. [Chaos Space Marine Codex Pg140]
Or this Tyranid Stratagem;
Adrenaline Surge: Use this Stratagem at the end of the Fight phase. Select a TYRANIDS unit from your army – that unit can immediately fight again. [Tyranids Codex Pg120]
There’s a key difference here that does slightly alter how these are resolved, one is “fight twice” and the other is “fight again”. The former has gotten quite a lengthy FAQ answer to clear things up.
Q: If a unit has an ability that allows it to fight twice in the Fight phase (e.g. Berzerkers), at what point during the Fight phase do they fight for the second time?
A: Treat each time the unit is able to fight as a separate unit selected to fight for all purposes.So, if such a unit charged this turn, it will fight both times before any units that did not charge. If the unit did not charge this turn, then, after all units that did charge have fought, you can select this unit to fight with, then your opponent can select a unit to fight with, then you can select your unit to fight with for the second time (you need not consecutively use both of the unit’s opportunities to fight – unless of course there are no other eligible units to select to fight with).
Note that any rule that interrupts the normal sequence of who fights first (such as the Counter-Offensive Stratagem, or the Slaanesh Daemon Quicksilver Reflexes ability) may be used to fight in between the unit’s first and second ‘fight’. [Core Rules FAQ Pg13]
This clearly explains that in the turn they charge most of the time you could resolve attacks for Berzerkers one after the other, this changes if they didn’t charge this turn or if they had a unit that could interrupt them. The Flawless Perfection ability I went over above would allow them to fight between the first and second lot of fighting for instance. The abilities that trigger at the end of the fight phase always happen after the initial charging fights. Be weary of anyone trying to say; “I’m just going to do both their fights at once to save time” as they could be rolling more attacks than they might have after your models have had their turn at ripping and tearing.
But who can they fight?
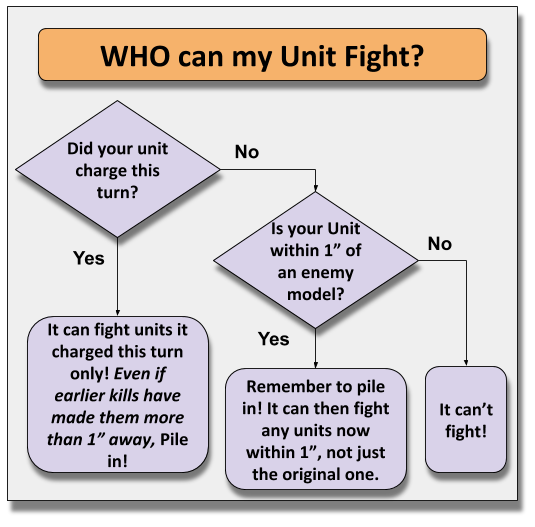
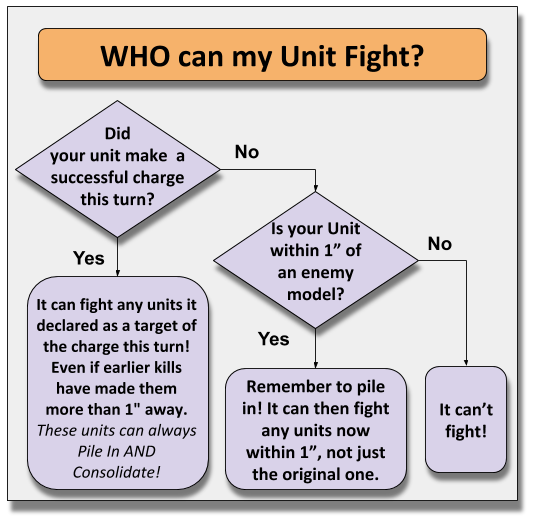
I’ve stressed this across several articles now, but these abilities do NOT allow a unit to ignore the rules for what they can fight. The flowchart still rules supreme (twice in one article)!
Q: If a unit that can fight twice in the Fight phase charges one enemy unit and destroys it during their first ‘fight’ in the subsequent Fight phase, and then consolidates into a second enemy unit, can they then attack that unit during their second ‘fight’?
A: The charging unit can only make attacks against the second unit if it also declared a charge against it in its charge phase. [Core Rules FAQ Pg13]
They do get to Pile in and Consolidate again though, which can lead to another atypical situation.
If they Pile In or Consolidate to units that haven’t fought yet, can they?
I’ve had this question on reddit, and it’s not 100% clear from the wording what happens. The confusion stems from “end of the Fight Phase”, which could imply that nothing else happens after it but that’s not the case. Fortunately this specific situation has an FAQ answer.
Q: When using an ability or Stratagem at the end of the Fight phase to immediately fight again (e.g. Fury of Khorne) and the selected unit moves within 1″ of an enemy unit that has not yet fought this phase, after fighting with the unit selected, can that enemy unit now fight even though it’s the end of the Fight phase?
A: Yes [Core Rules FAQ Pg10]
It’s important to note that plenty of rules happen at the “start” or the “end” of a phase. They do not however move the game on to the next step by themselves. For instance most deepstrike abilities happen at the “end of the movement phase”, but bringing such a unit on doesn’t move the game on to the Psychic Phase. Or you’d only ever be able to bring one unit on, which is obviously not the case.
As ever there’s more discussion on this and all other Ruleshammer articles here. Or drop us a note in the comments below or email us at contact@goonhammer.com.
