
In our Fabricator General series, we talk about hobbying techniques and tricks, and ways to build, model, shape, and fix everything, with an eye toward information for both beginners and veterans. This week Robert “TheChirurgeon” Jones is talking about building a table for gaming on.
I’ve moved a lot in my life. My family moved five times before I finished high school, and since then I’ve moved another six times. I’ve changed states six times and countries tw… wait. Didn’t I already say all of this?
checks Fabricator General archives
Yep, I definitely covered this topic before – back in Better Friendships Through Table Construction I talked about how to build a gaming table and the process of creating the frame and tiles for the table that my friends and I played on at my folks’ place. Well here we are, nearly ten years later and I’ve finally moved to a house with a lot of real space. Time to build a new gaming table.
A lot has changed for me since I built that last table. The biggest change is that my wife and I bought a house. Now I have all the room I need – a dedicated Warhammer room, in fact. The previous owners put a pool table in this room, which meant it was already perfectly sized for a gaming table and had the perfect lighting set-up for my needs. Because I have all that space, I can now think about building a table that doesn’t require nearly as much modularity or stow-ability – my last table needed to break down and be (somewhat) easy to transport, and relied on 2×2 tiles that had to be stackable on top of each other during storage. Now I’ve got a ton of space to store tiles and terrain. And on top of my new space considerations, I’ve both A. acquired the knowledge from building the previous table, and B. purchased a lot more power tools.
Before I started this project I considered buying one of those custom gaming tables that you can get now. I decided against it for three primary reasons:
- Those usually run over a thousand dollars, easily
- I need to justify having these power tools I own
- “I bought a table” is a shitty article
So let’s jump into the process of building a new gaming table from (mostly) scratch. In total, this project cost me about $300 in materials, including the two MALM dressers.
Planning
Last time step 1 was picking a theme but this time I’m not doing 2×2 tiles any more. For one, the game size for 40k has changed, and a 44″x60″ board doesn’t break into tiles nearly as neatly – I could potentially do four 22×30 tiles, but those are an awkward size that would require more custom cutting than I care to do. 22×15 could also work here, but the big problem is that I’m no longer working with a size that’s as cleanly divisible. and I’ve also gotten more accustomed to just playing on a FAT mat. I still love the look of textured tiles and the modular aspect of them and it’s something I’ll revisit but for now I’m just not sure if I want to put in that particular level of work.
What I did know was that I wanted to build a 4’x6′ playing space (48″x72″). 40k games might be on 44″x60″ spaces at the 2,000-point level now but that could change again at some point and while it’s easy to mark off a smaller space it’s not so easy to make a framed space larger. Plus it means that for most games I’ll have a foot-wide sideboard to put models on, roll dice in, and set down materials. That’s pretty great, so it’s worth going ahead and just making the full space. All of this comes back to the questions I asked last time:
The Chirurgeon’s Table Construction Planning Questions
- Do I need to be able to store the table?
Nope! This table will sit out year-round. That means I need something sturdy, with its own legs, storage underneath, and it has to not look like total shit as it’s going to be in a prominent place in my house. - How am I going to move and store the parts?
N/A – this bad boy isn’t going anywhere. - How am I going to support the table?
A new question I had to consider this time – am I going to make legs for it, and if so, how will I implement the storage I want underneath? - How am I handling the basing? Does it need to be modular?
The plan right now is to just use a mat that sits into the table, but I also own Zone Mortalis and Sector Imperialis tiles that I’ll want to set inside the frame. - What kind of terrain will I need to build for it?
N/A – I’ve already got all the terrain I’ll need for things, but since I’m going primarily with mats, that terrain will need bases. - What else do I want in a table?
Some kind of storage under the table is a plus; it needs to be tall enough to use stools with, and I’m going to want cup holders on it.
Building a full table is a lot more involved than just making a frame. Mostly because you have to think about the legs and how to support it and how you’ll make it look not like trash (spoiler: Mine doesn’t look amazing at the end of this but that’s something I’ll be addressing). In my original concepts for the table I went back and forth on how to do the legs and under-the-table storage and then my buddy Dylan (of Necro table fame) just suggested I could solve a lot of problems by replacing the legs with IKEA dressers. That would give me great stability, drawers for storage, and would also look pretty decent compared to something I’d make (I have more tools, but none of them is a lathe).
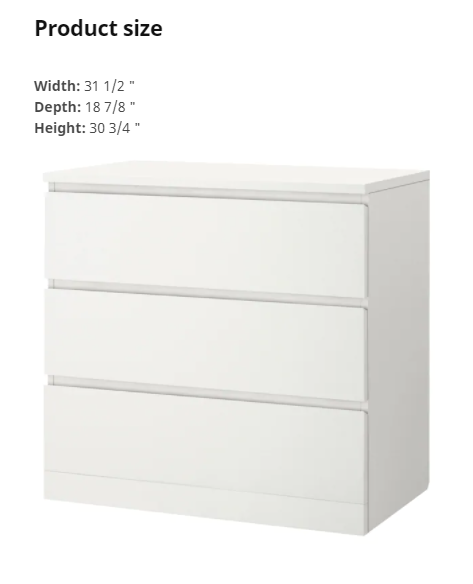
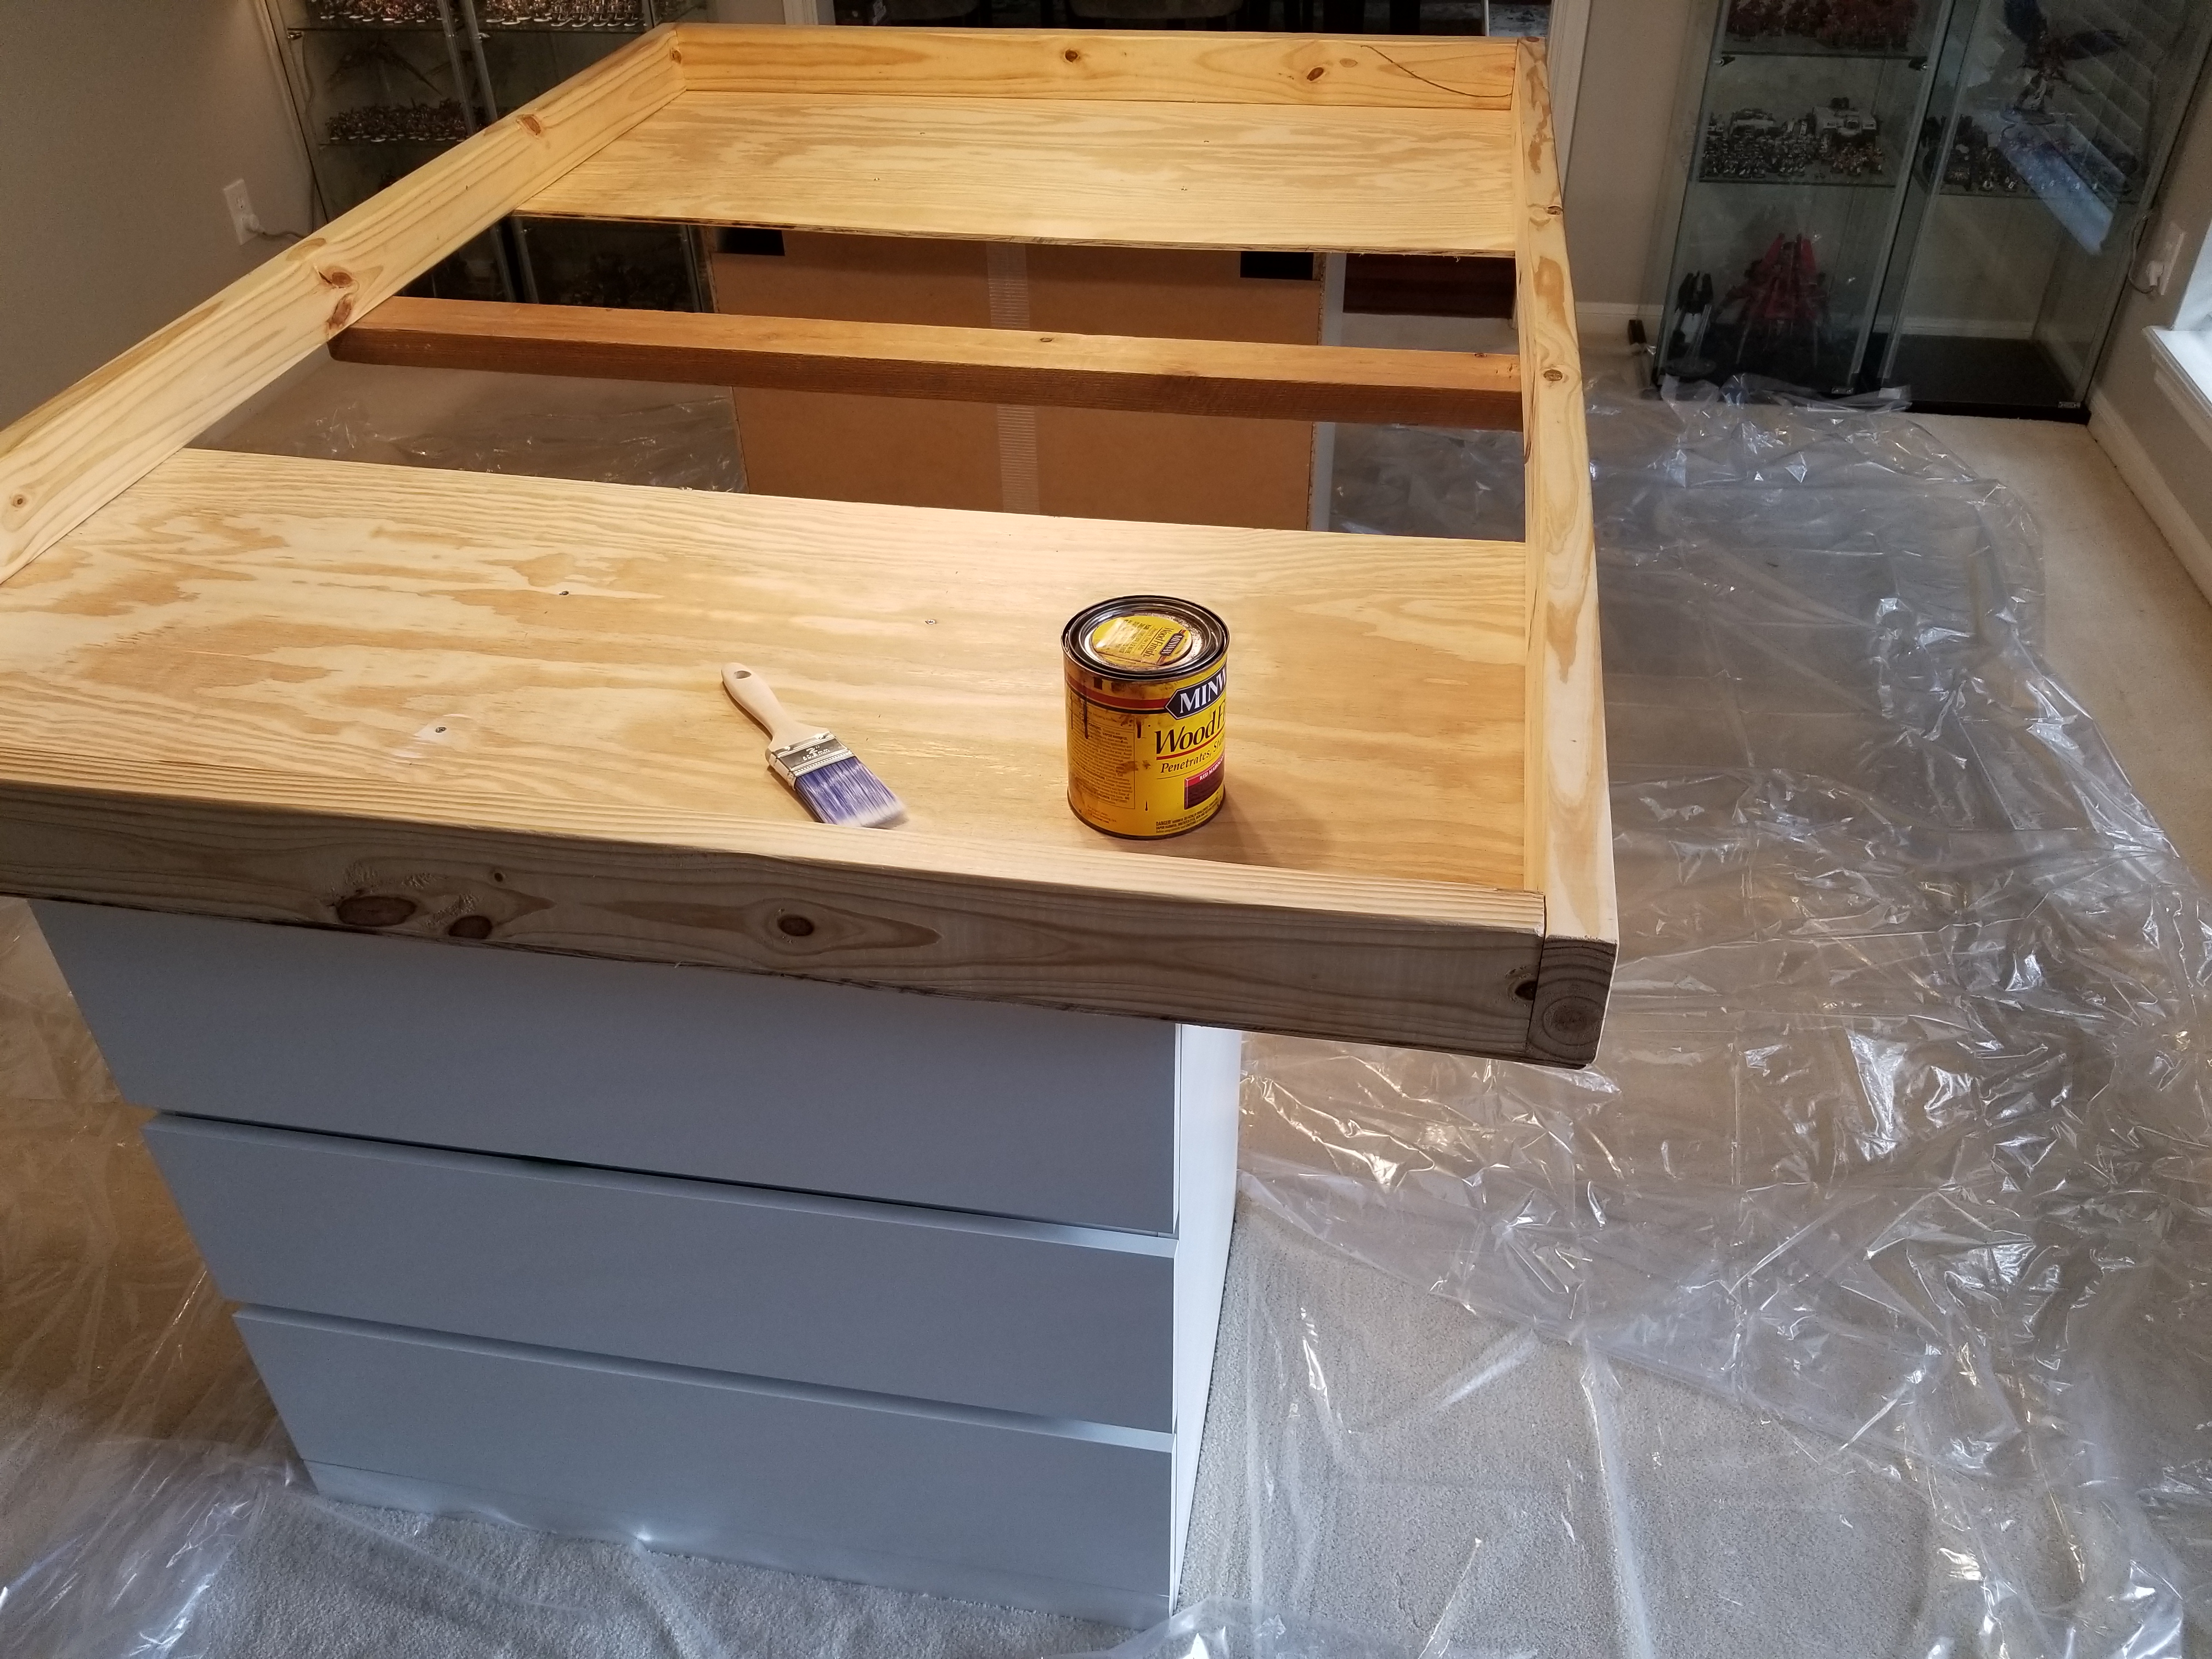
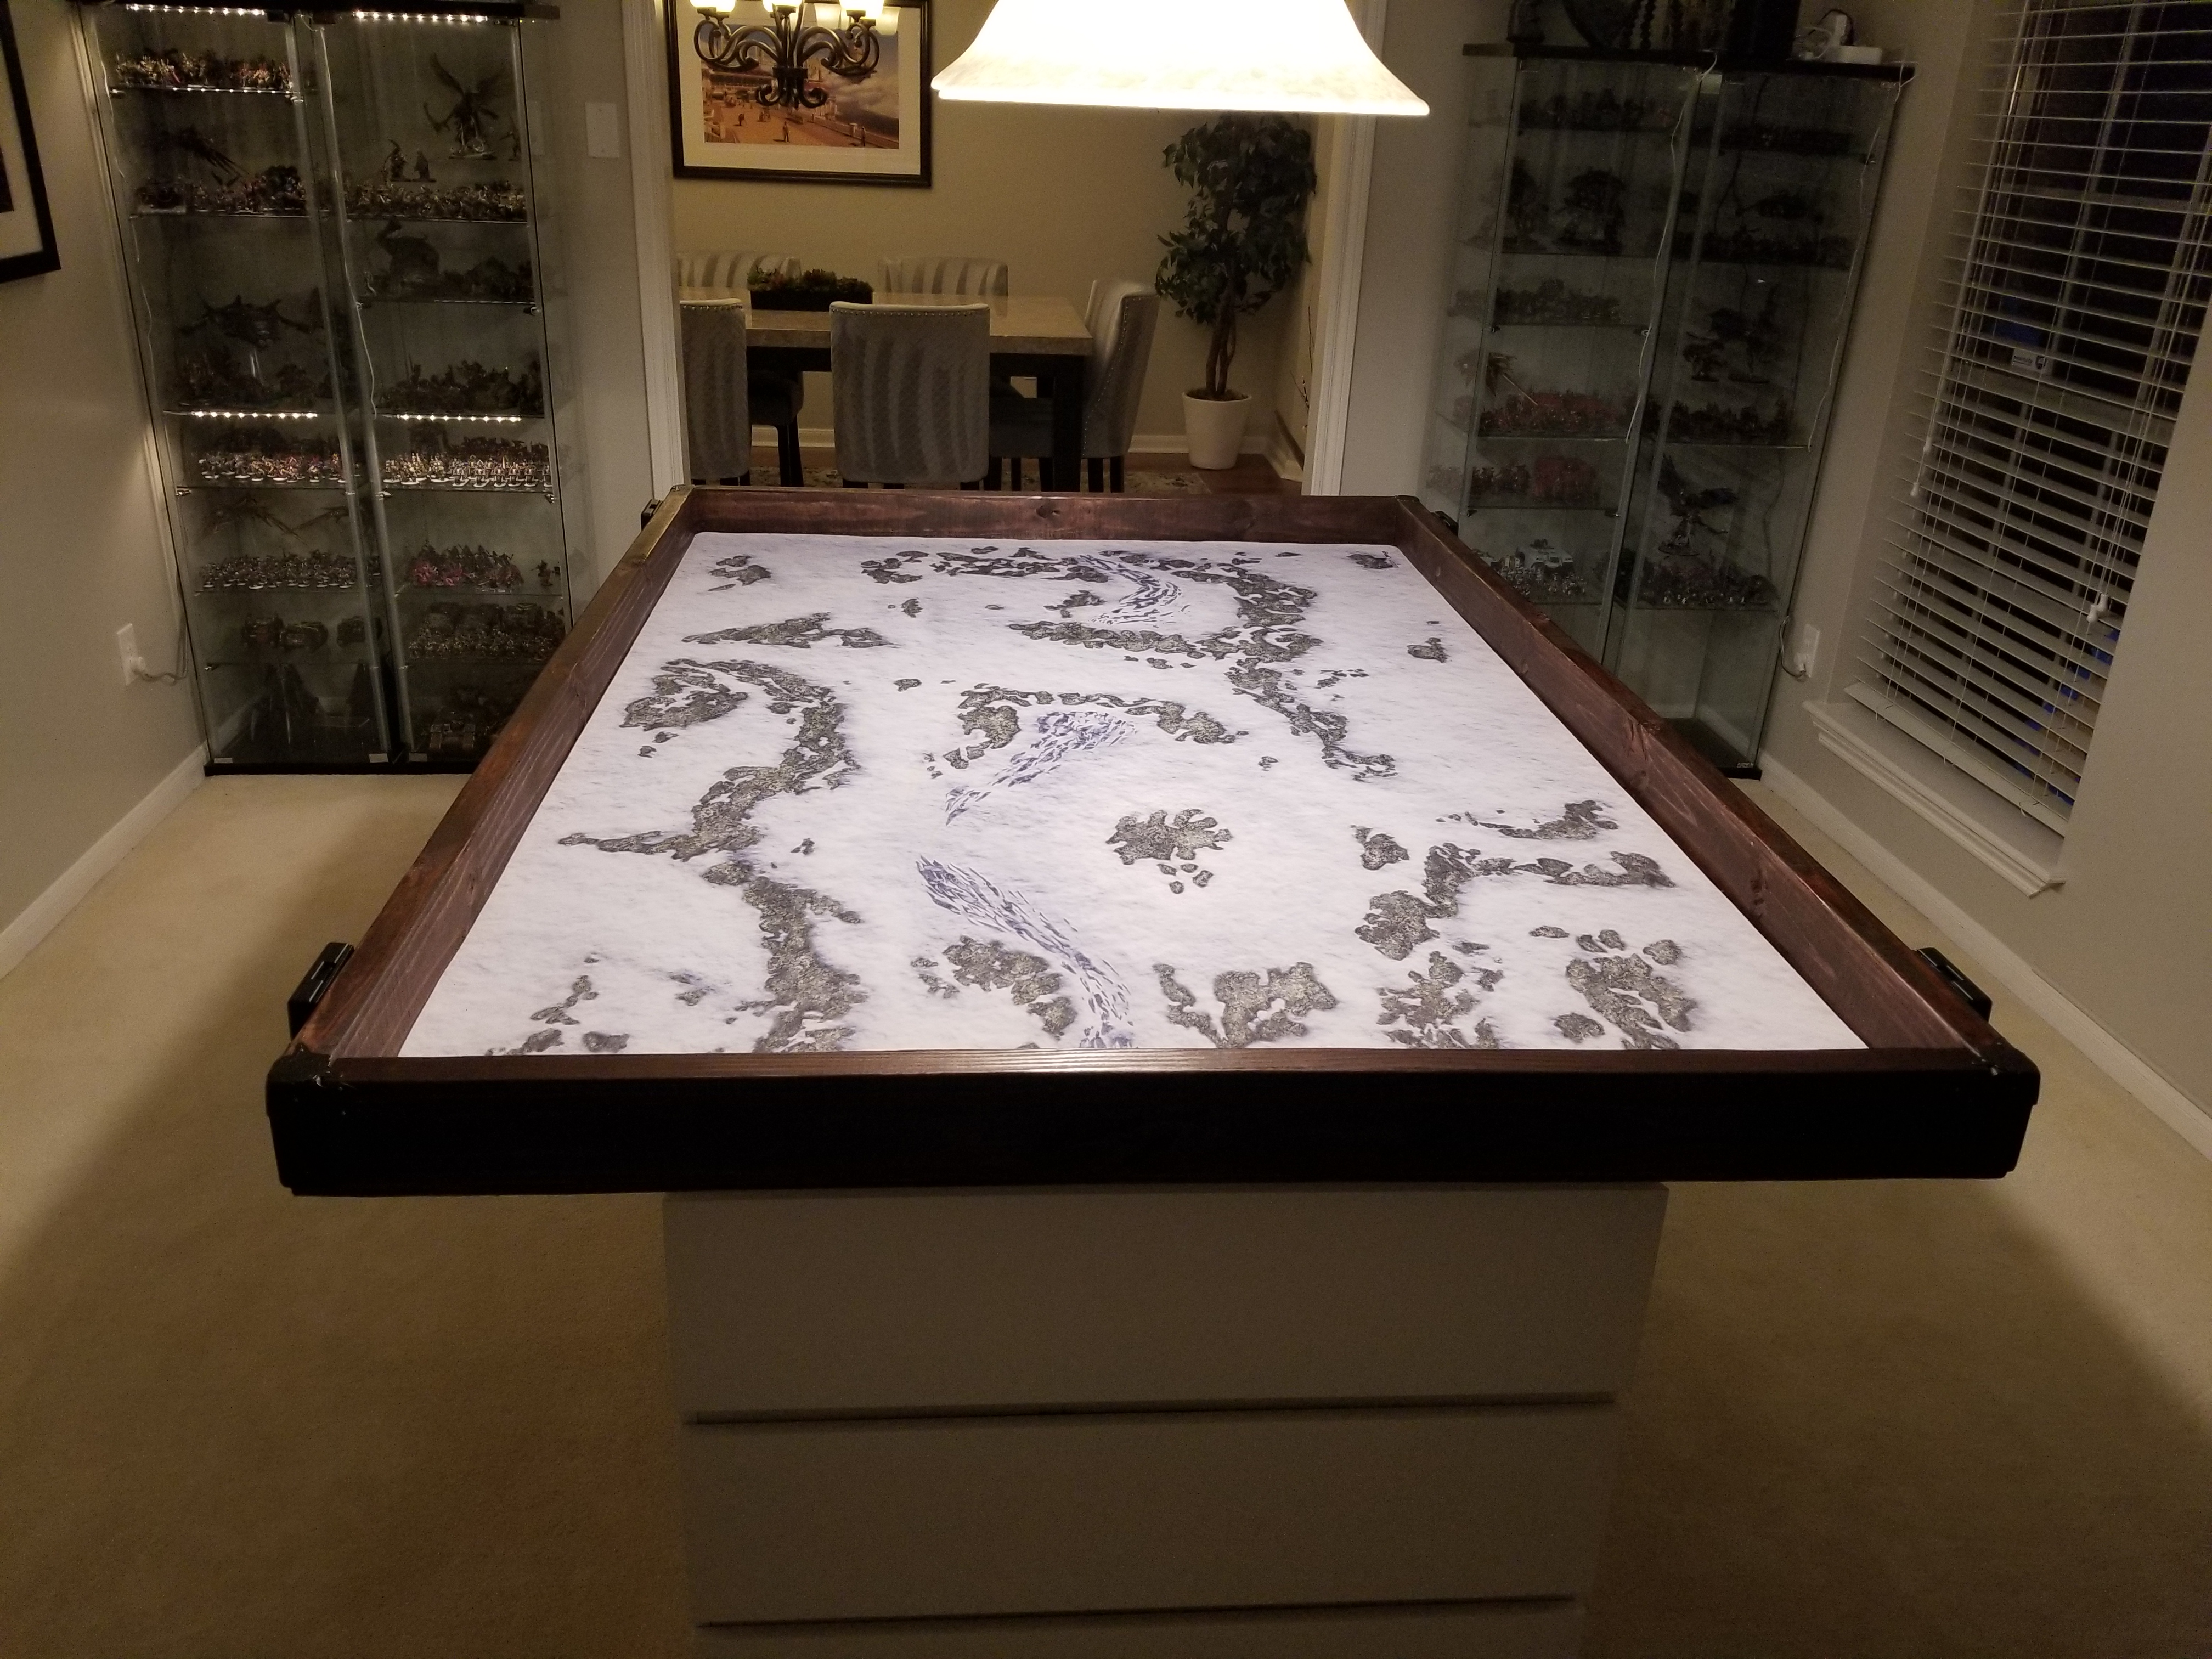
Aside from the need to build legs, I had a lot fewer constraints this time around. Going with Dylan’s idea to use dressers for the table’s legs, I went through the IKEA catalog to find something that would suit my needs. The average table height in America is between 28 an 30 inches, and I knew I’d want something on the taller end, as I’m likely to have stools instead of chairs with the table, and because a taller table keeps my four year-old son from having easy access to the table’s contents. This will especially be true with the added height of the frame. I ended up settling on the IKEA MALM, which had the benefit of being cheap enough that I wouldn’t be upset if I didn’t like the way they worked and had to scrap them or move them to another room in the house. At 30 3/4″ tall, they’re the right height, plus they have large, flat tops that I can screw into and there’s enough clearance between the top of the dresser and the top drawer that I should have no issues getting the drawer out with the table on top.
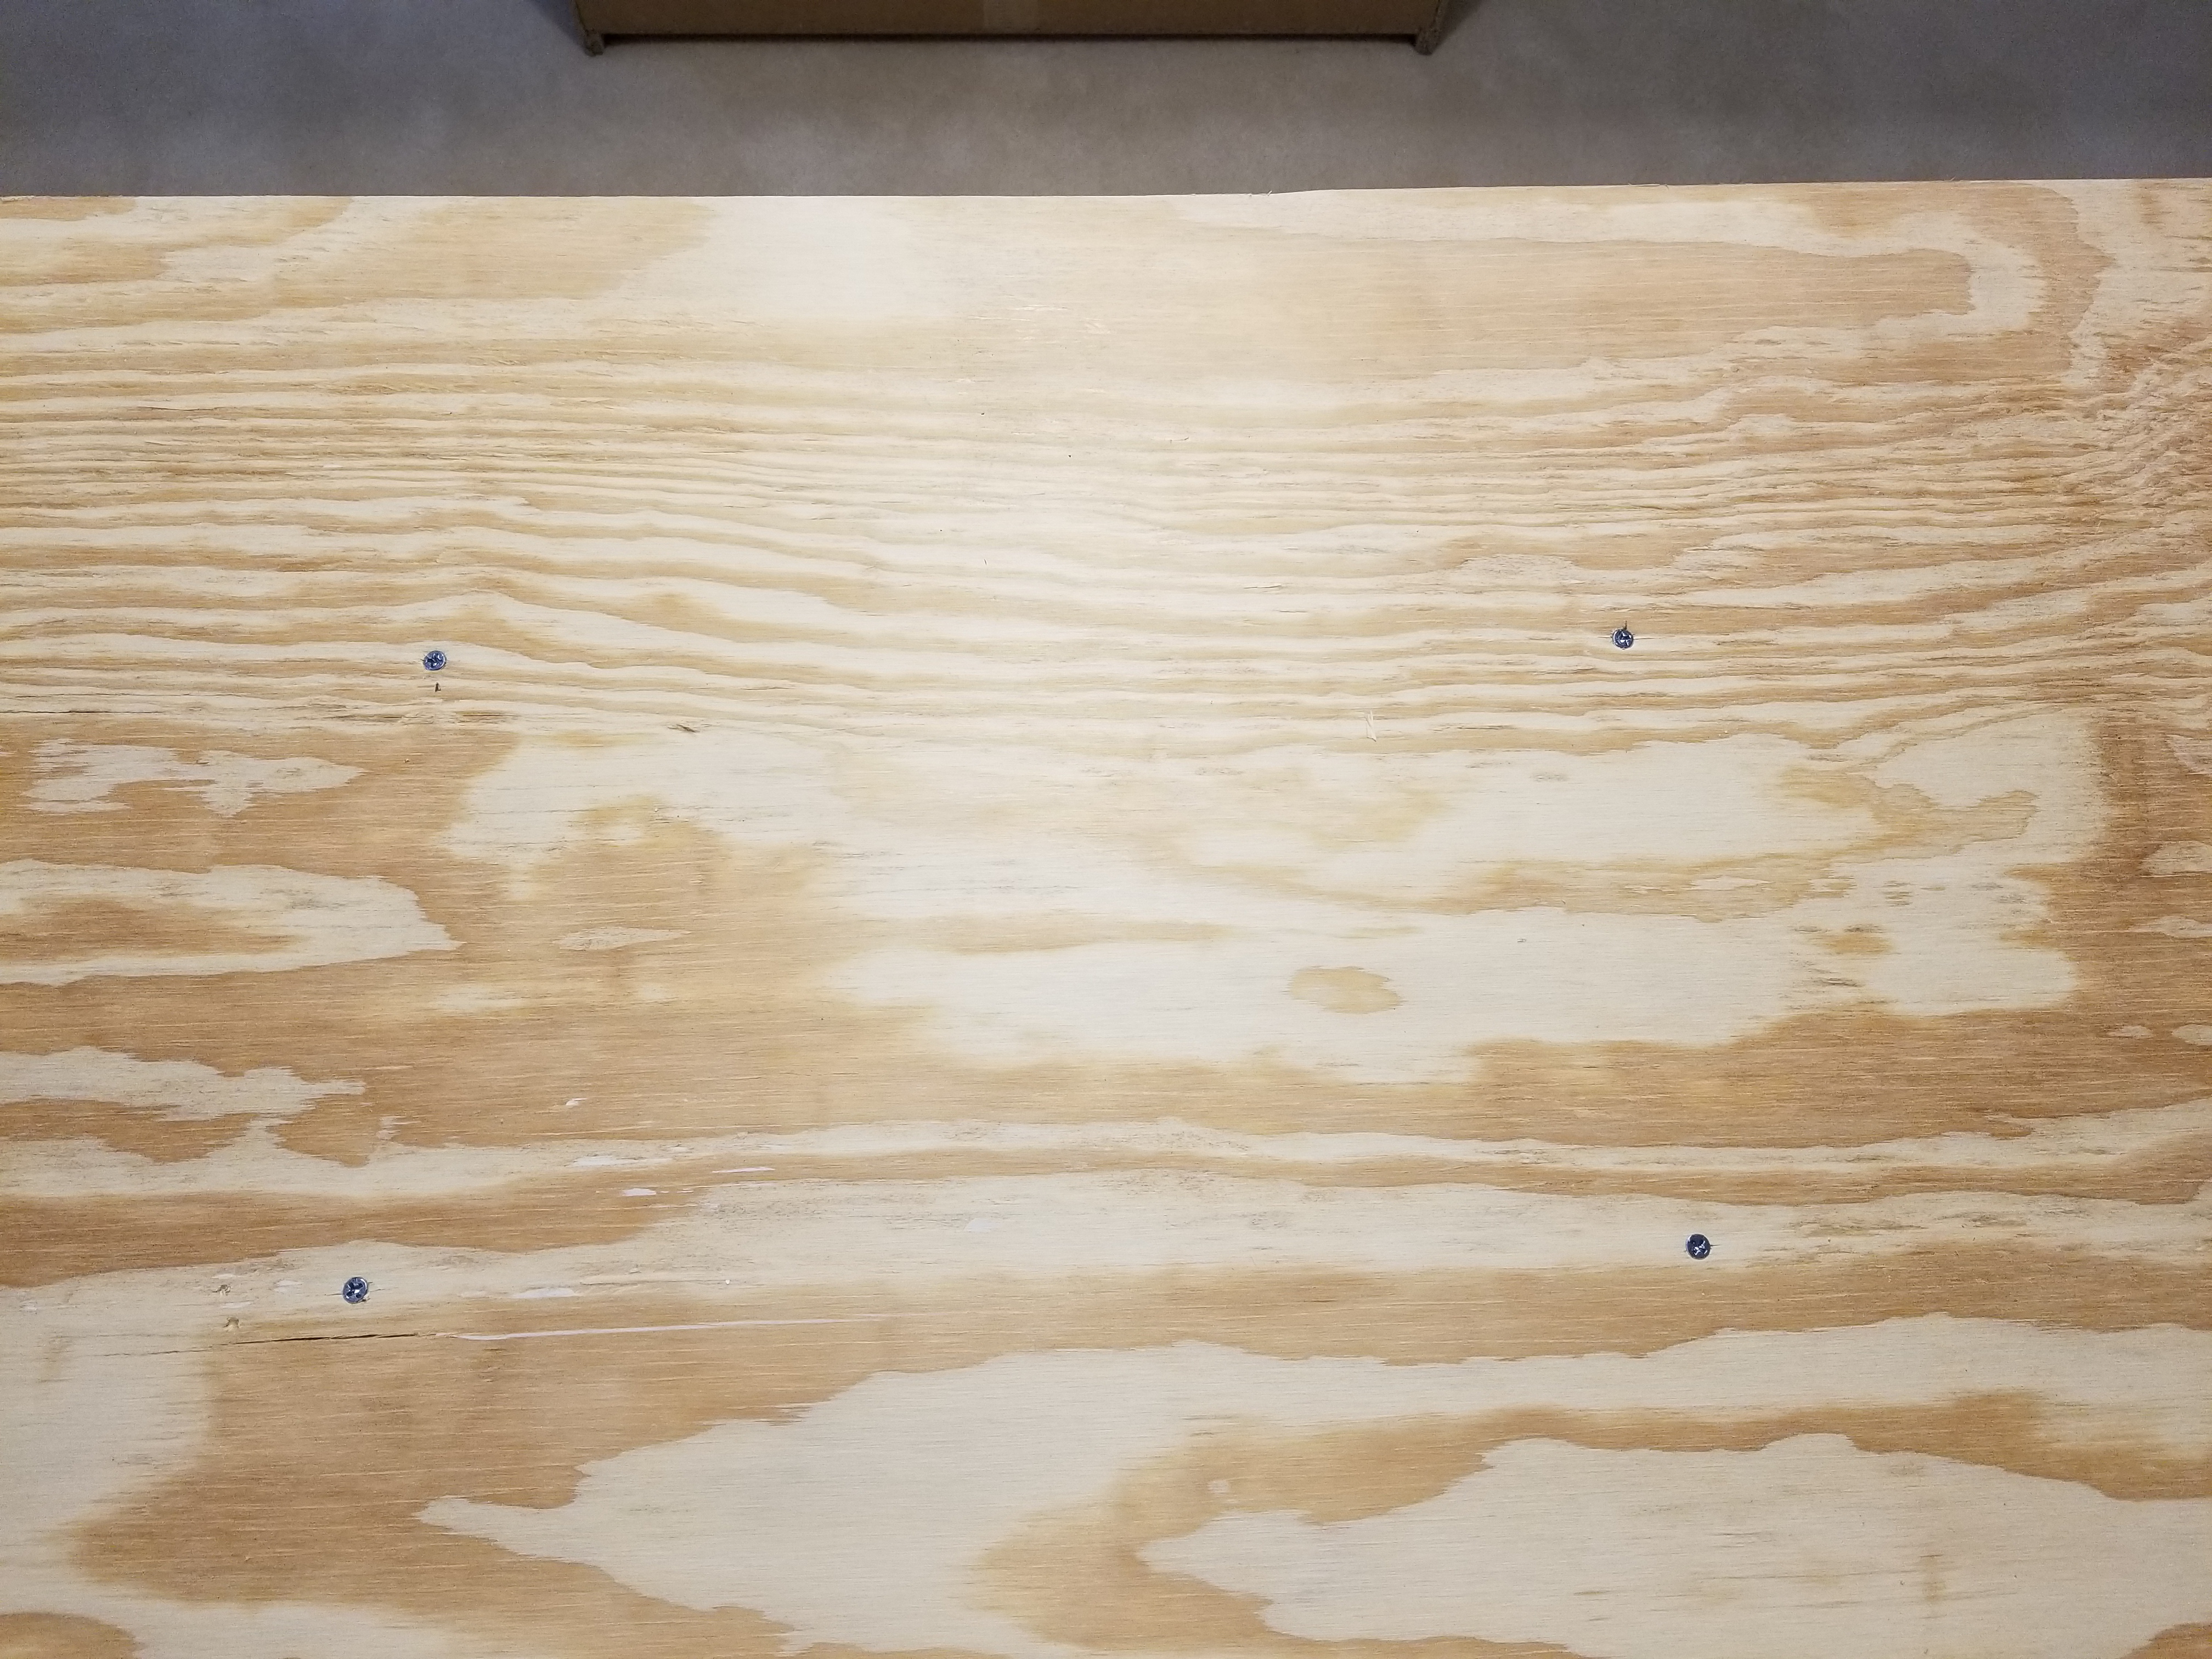
Next I need a table top. The basics of this are that it’s a wooden frame made from two-by-fours. The interior dimensions have to measure 72 inches by 48 inches to accommodate my 4×6 mat. Note that because most American Two-by-fours are actually 1.5″x3.5″, this means that my frame will end up having about an inch of extra space inside. This is a good thing, as it gives me some additional tolerance for putting in the table top – I need the interior area to be a little bit bigger than 48″x72″ all around so everything will fit. The frame is wider than the two MALM dressers, so I need some way of screwing it down into the tops of the dressers. For this I decided to use two 24″x52″ sheets of plywood, which will help stabilize the frame and can be screwed down into the cabinet tops. Why not just use one large sheet of plywood? There are three reasons for this:
- Plywood comes in sheets that are 48″x96″ usually, so this made construction easier
- Somewhere down the line I want to cover the table surface in felt. To have this be relatively seamless, replace-able, and something I could add later, I needed the main playing surface to be separate from the frame
- Keeping a gap in the middle keeps the frame lighter and makes it easier to push the table surface out from below
Additionally, I’d need some extra support for the frame and something that could help keep it straight, so I planned to run one more stud/plank across the middle underneath, measuring 53″ in length.

So the plan is two dressers, with the frame on top of that. A 48″x72″ table surface sits down inside of that, and the playing mat goes down on top of that. To give an idea of the way the final construction will go, I’ve drawn the diagram below. Note that in the final build, the two dressers face outward; I’ve drawn the rear one facing in here so you know there are two of them, and because I just copy->pasted the first dresser when drawing this image. Obviously don’t build one dresser facing inward if you do this at home.

Acquiring Materials
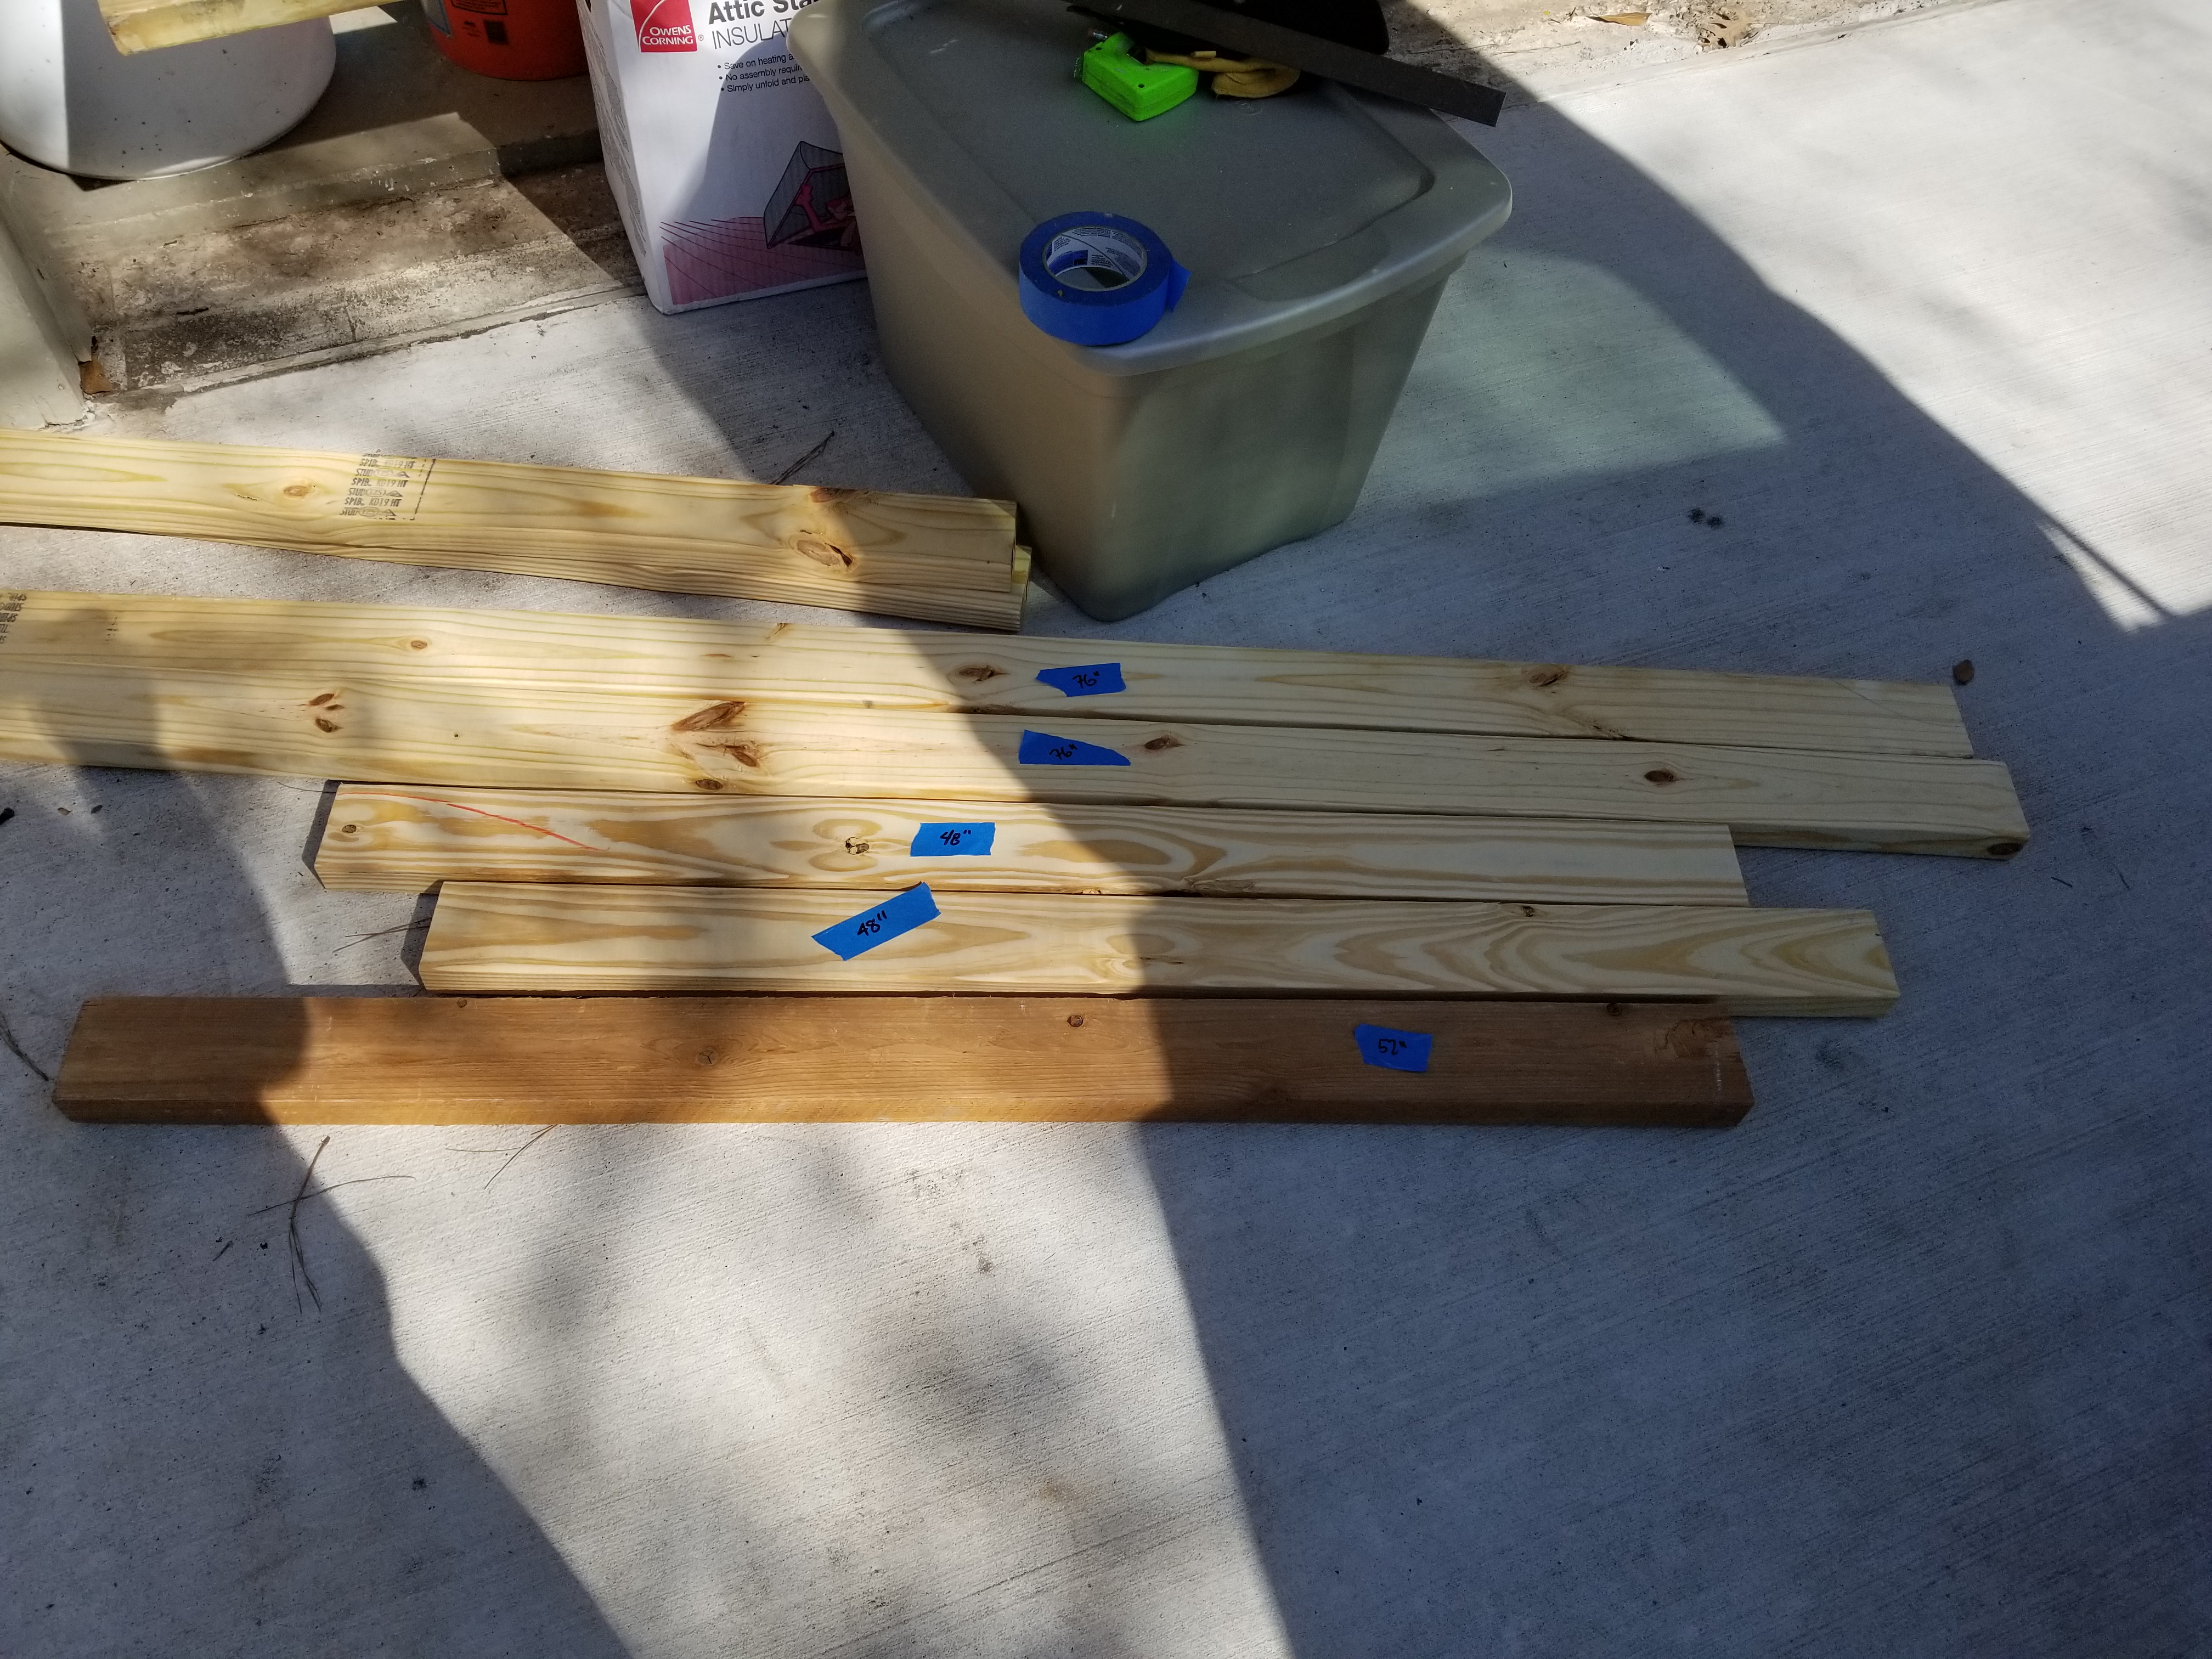
Time to order the materials. I don’t own a truck nor do I have easy access to someone with one right now, so that meant I had to order Home Depot delivery. This was… adequate, but avoid doing this if you are able. It’s not because Home Depot did a necessarily bad job delivering them – they were fine, although they didn’t text me and it was raining when they arrived so some of the lumber got a bit wetter than I’d like – but because going into the store means you can hand select the lumber you want. And that means you can get higher quality studs and planks – straighter, with fewer knots. My shopping list for this was:
- Two sheets of 48″x96″, 3/8″ thick sanded pine plywood (about $60 USD)
- Four 2″x4″x96″ pine studs (about $25 USD) – note that I said five earlier – I had an extra piece of lumber in my garage I decided to use. If I didn’t have that, this would have been five studs, and come to about $30
- Flat-head/countersunk wood screws – 1 1/2″ for screwing the table to the dressers, and 5″ for screwing together the frame
- Wood glue – though I didn’t end up using this
- Sandpaper
Tools Required
Additionally, I used the following tools for this:
- Circular saw – I used a corded Black & Decker circular saw to cut the sheets of plywood. A table saw might have worked OK for this on the smaller sheets but shearing two feet off the end of the 8-foot sheet wouldn’t work that way
- Hand drill – I used a corded DeWalt hand drill that I used both for drilling pilot holes and screwing in the screws
- Miter Saw – I used a Black and Decker Miter Saw for cutting the studs, though you could use a circular saw for this if you wanted
- File – I used a metal file to smooth down the edges after everything was in place
- Safety glasses and gloves – There is nothing to be gained from not taking proper precautions
- Pencil, metal t-square, tape measure – for measuring
- Sawhorses for mounting this on. I had two, but three would have made things easier
- An assistant – my dad helped me with this project. You could do it by yourself, but doing that sucks, and makes certain parts more dangerous than they have to be
Construction
Alright, now it’s time to start building. I picked the best, straightest parts of the lumber I had and cut them with the miter saw – two at 76″ and two at 48″. I was a little generous with the 48″ boards, just to make sure I’d have some outside tolerance on the final table. We also cut the plywood down, making two 53″x24″ sheets out of one of the large sheets, and cutting 24″ off the other one to make it 48″x72″. When you’re doing a project like this, remember: Measure twice, cut once.
Next it was time to start assembling the frame. We started with the outer frame, drilling two pilot holes and putting two wood screws on each corner. After that it was time for the cross-bar. Before we installed the cross-bar however, it was important to make sure the frame was square and not a parallelogram. The pavements we were working on weren’t completely flat and we had boards that weren’t absolutely straight (see my notes above on going to the store and choosing your own lumber), so this was a good opportunity to ensure that things were straight and we could use the crossbar to hold our adjustments in place. We put a t-square in one corner, pushed the frame until it was flat against the square, and then installed the crossbar to hold it in place. The frame was pretty sturdy at this point, and the plywood underneath would also keep it in the right position.
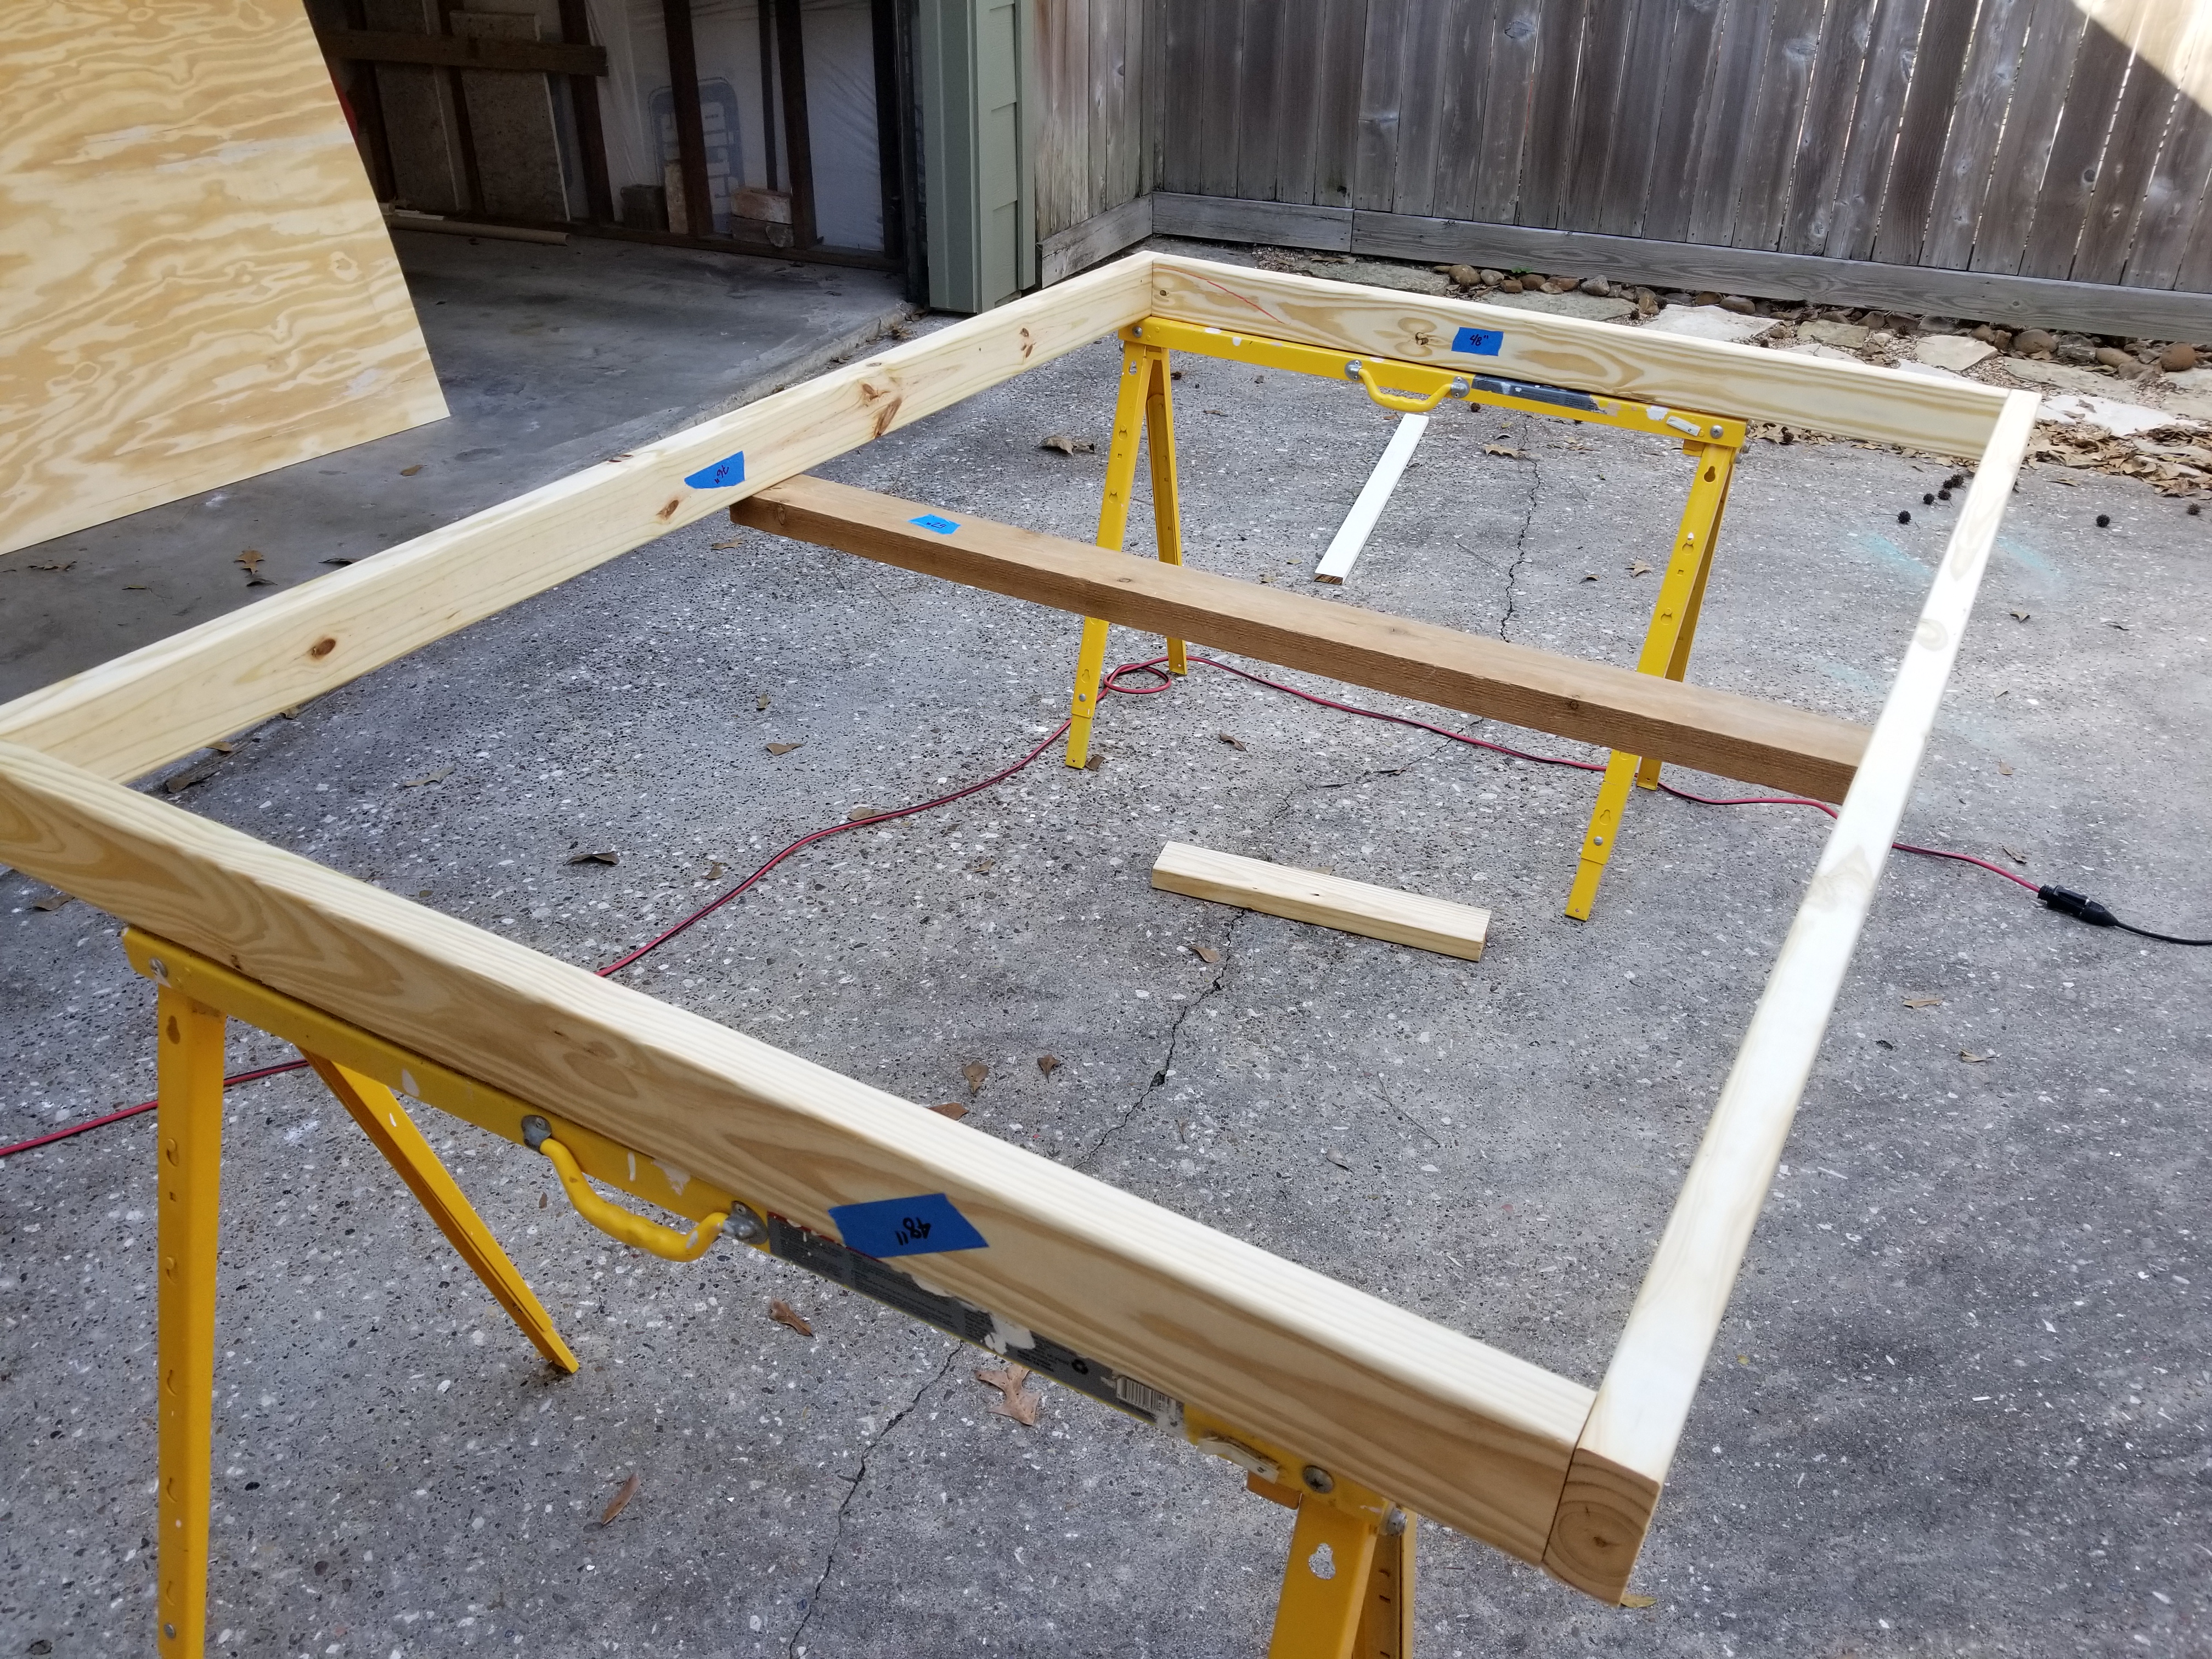
Next comes the underside. We drop the t-square in again to make sure everything’s right, then screw in the two plywood sheets we cut earlier. These are recessed a bit from the table’s edges.

Flip that bad boy over and make sure everything looks OK.

Awesome. Now the time-consuming hard part is done. There’s just a few more holes to drill and it’s getting late in the afternoon so it’s time to refresh ourselves with some cheap beer.

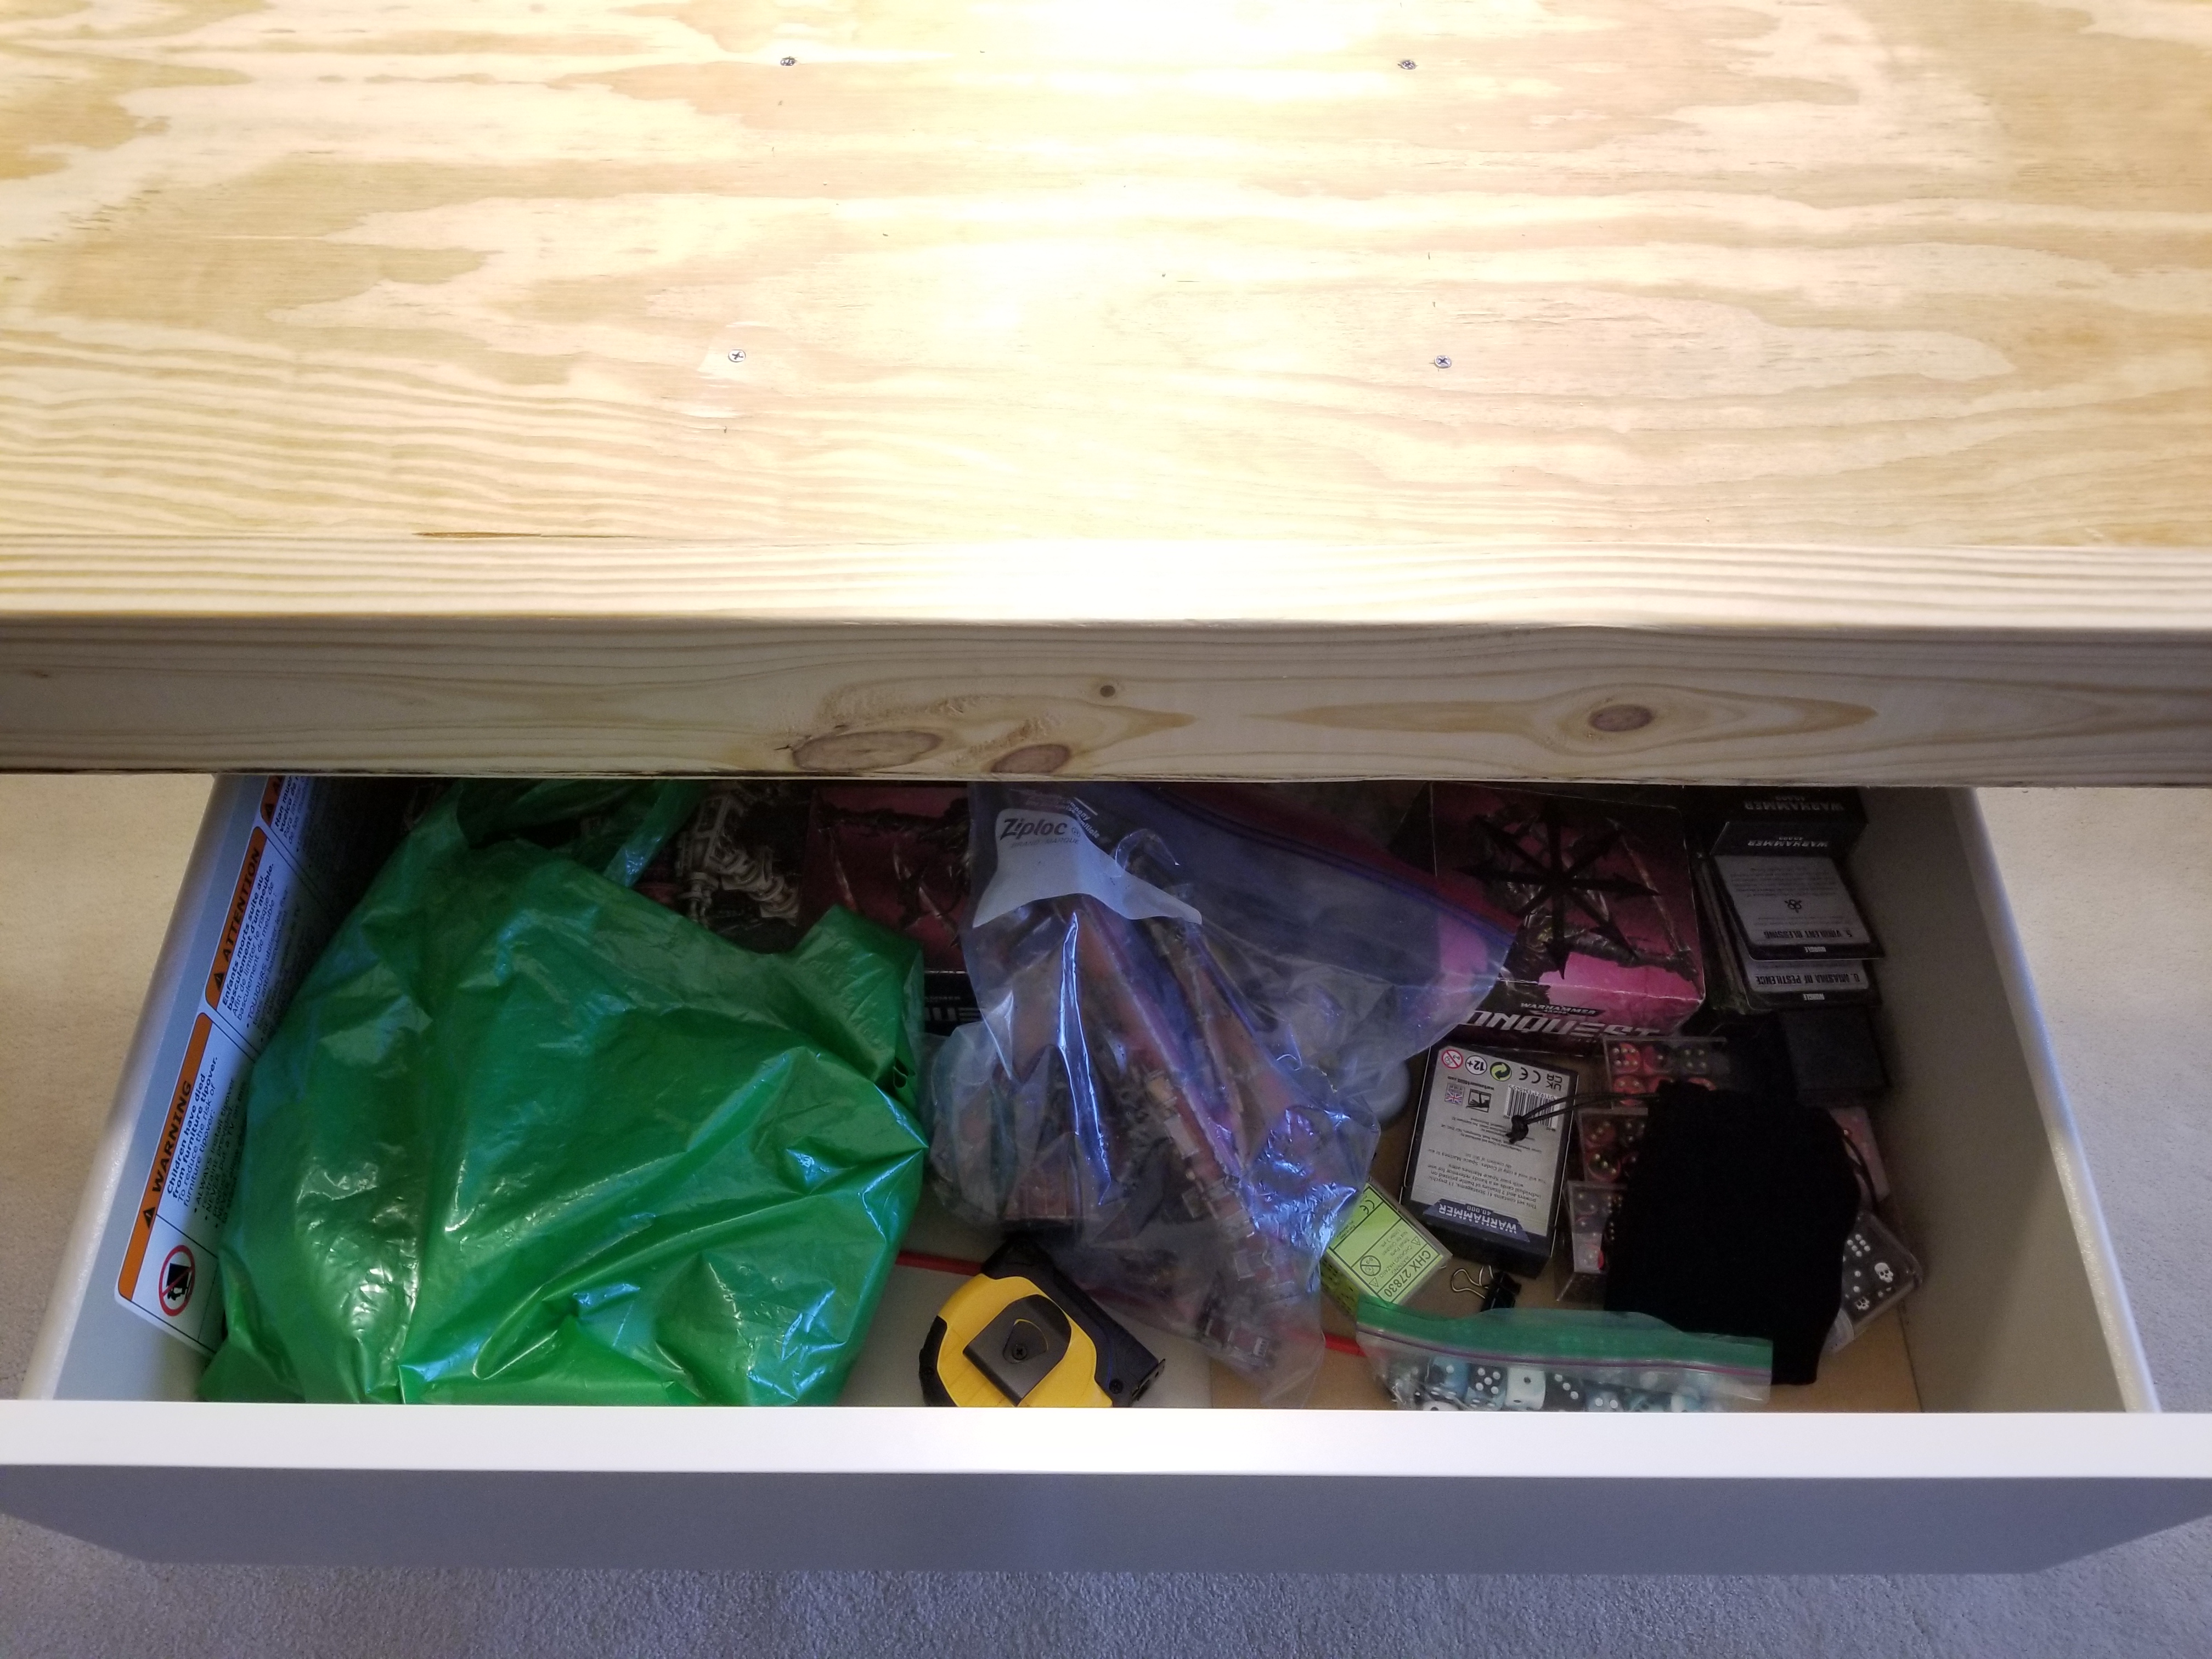
Now it’s time to bring the table into the house and mount it on the dressers. This is pretty easy. We set it down on top, get it centered, and then measure out four even holes on each side. I used 1 1/2″ countersunk wood screws on this, but I could have probably gotten away with 1″. The material on the dressers is cheap particle board, and the screw heads poked through a little undearneath but you’d have to go feeling around for them intentionally to ever encounter them. I could have also used flathead bolts on this part and winguts or something similar, but I didn’t think about that until late in the project and by that point I didn’t care. I may replace these screws with bolts if I ever have to take the top off to paint it.
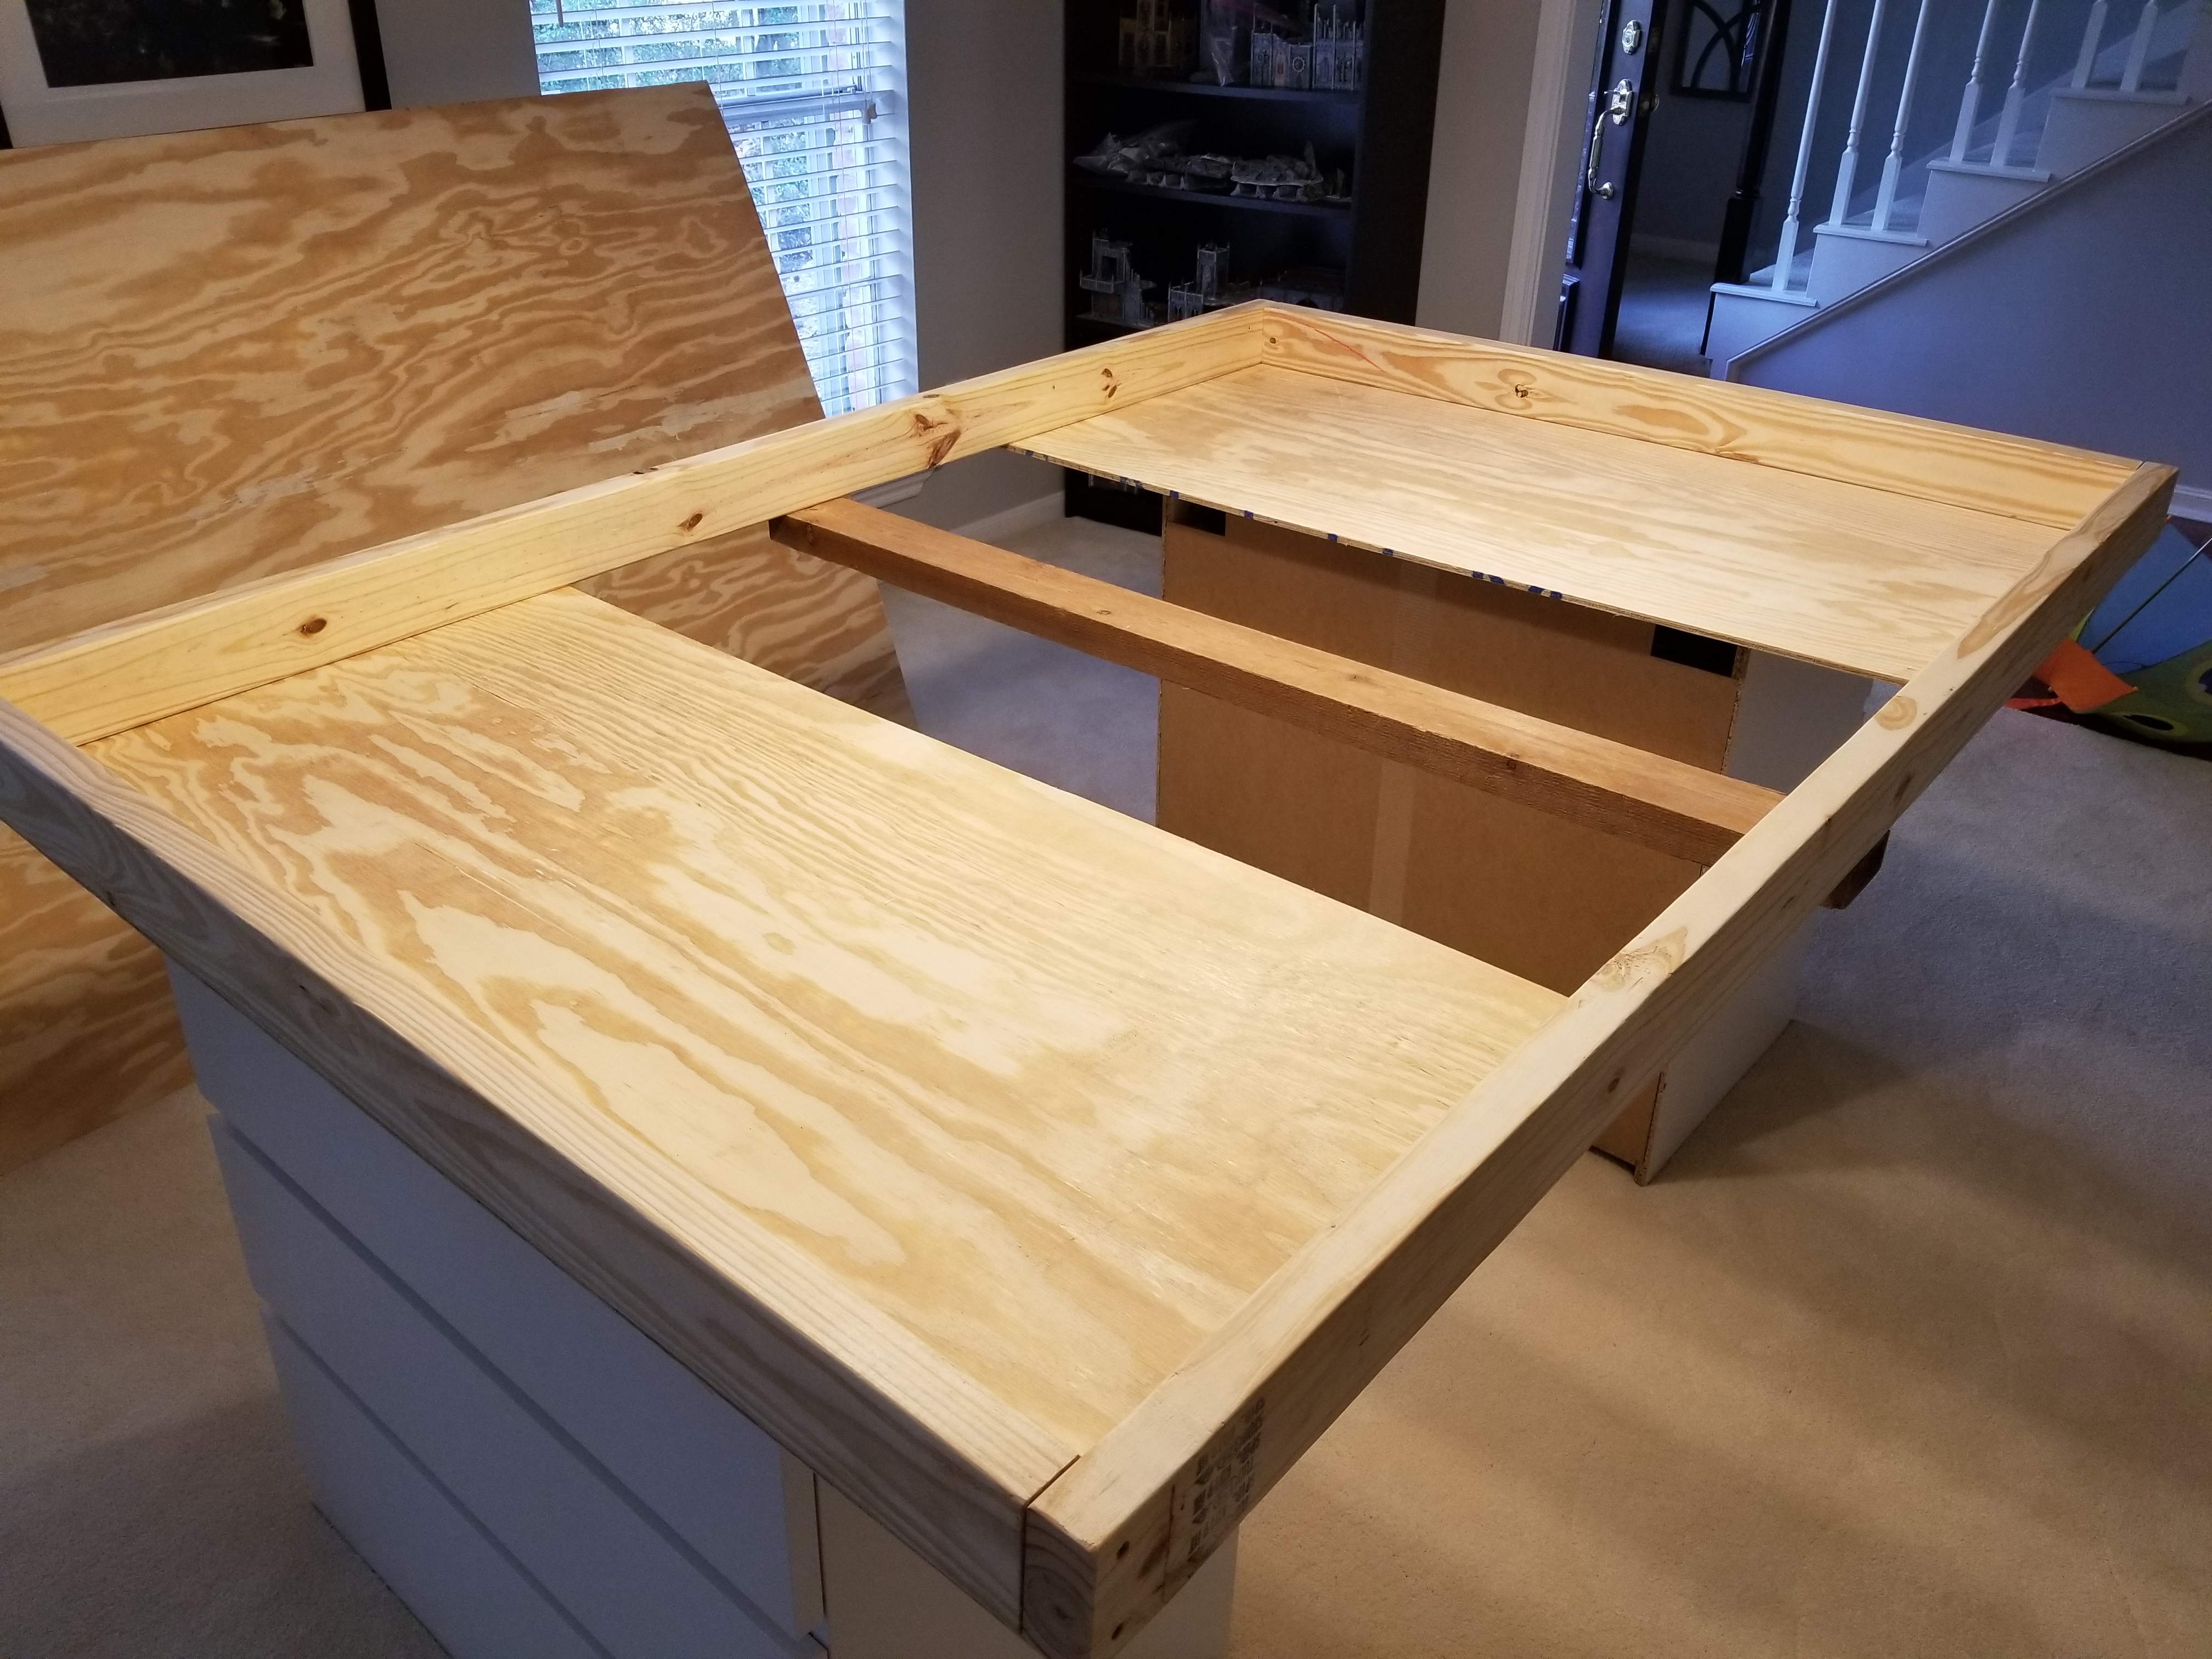
So far so good, and the drawers are easily accessible at this point.
All that’s left to do now is drop in the table surface – watch your fingers! and roll out the mat on top of that. Overall I’m very satisfied with how it turned out. It’s sturdy as hell, the storage space is great, and there’s still juuust enough room under it to stow the two stools I have, plus that large gap under the table is great for placing carrying cases while you play. The extra length is great for having room on the sides, and what I’ll end up doing until my new 44″x60″ mats arrive is just using painter’s tape to mark off a 44″x60″ area on the mat I’ve got. The end result is a game room that’s now fully functional.
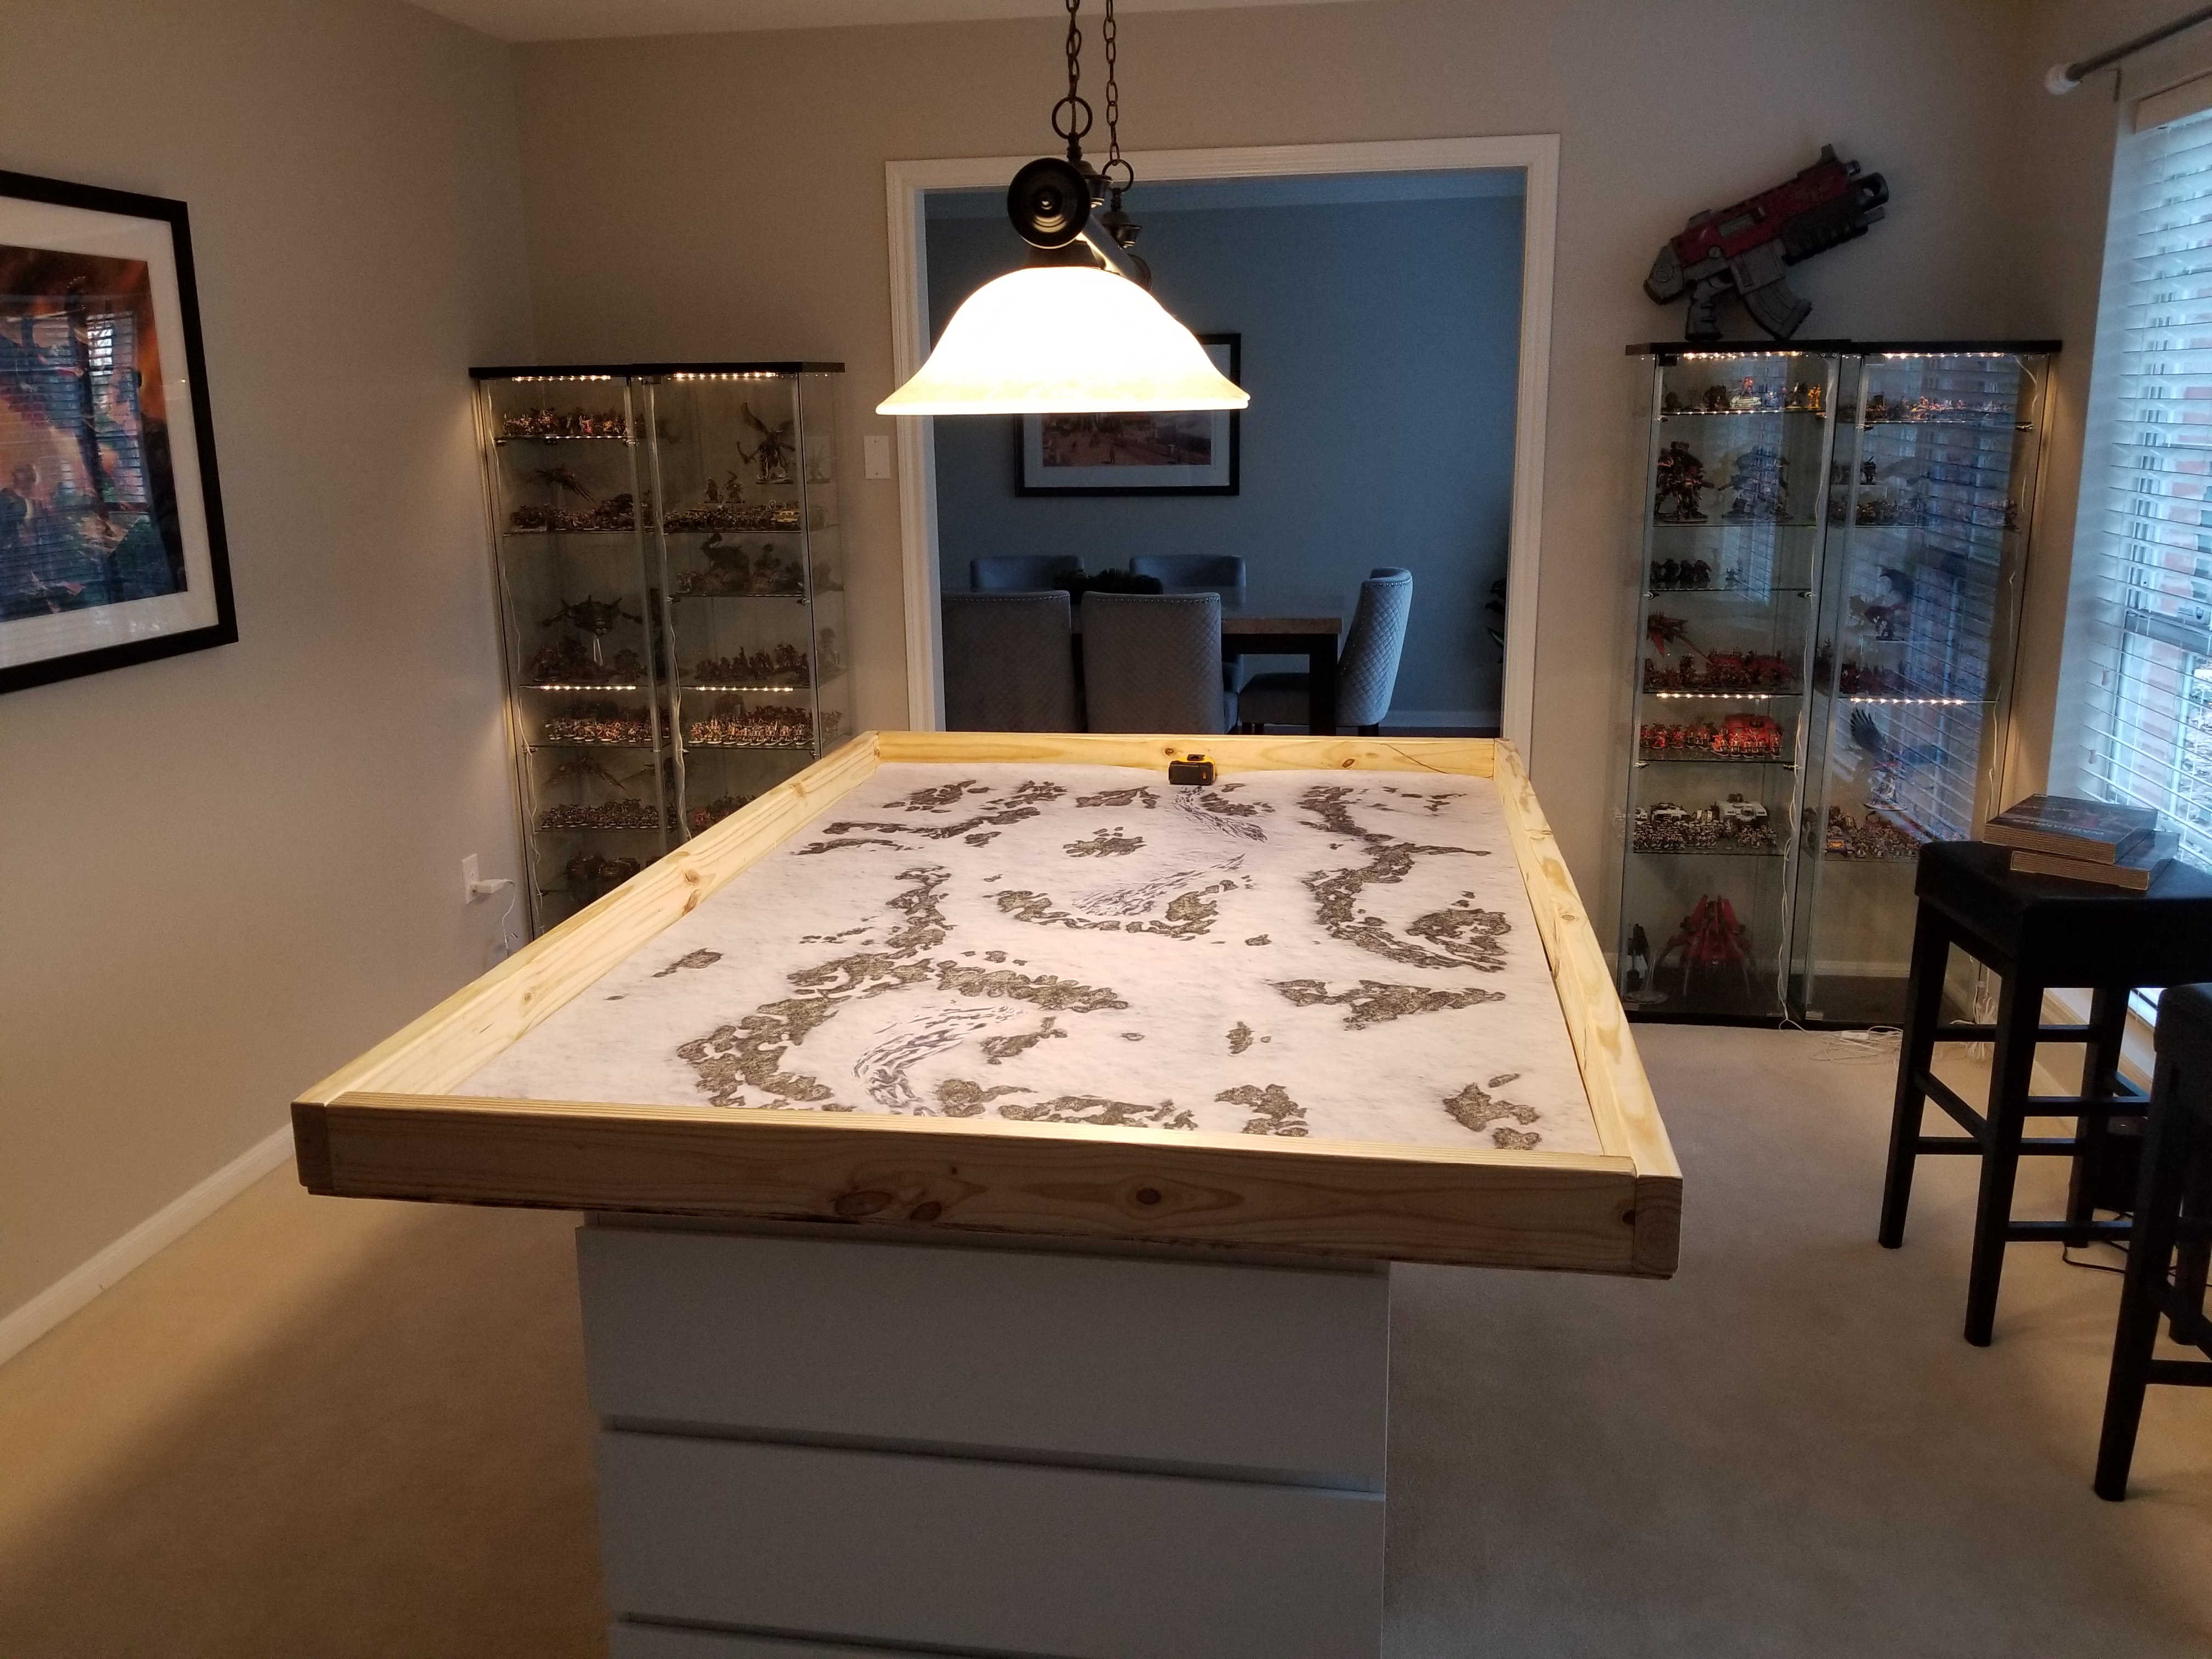
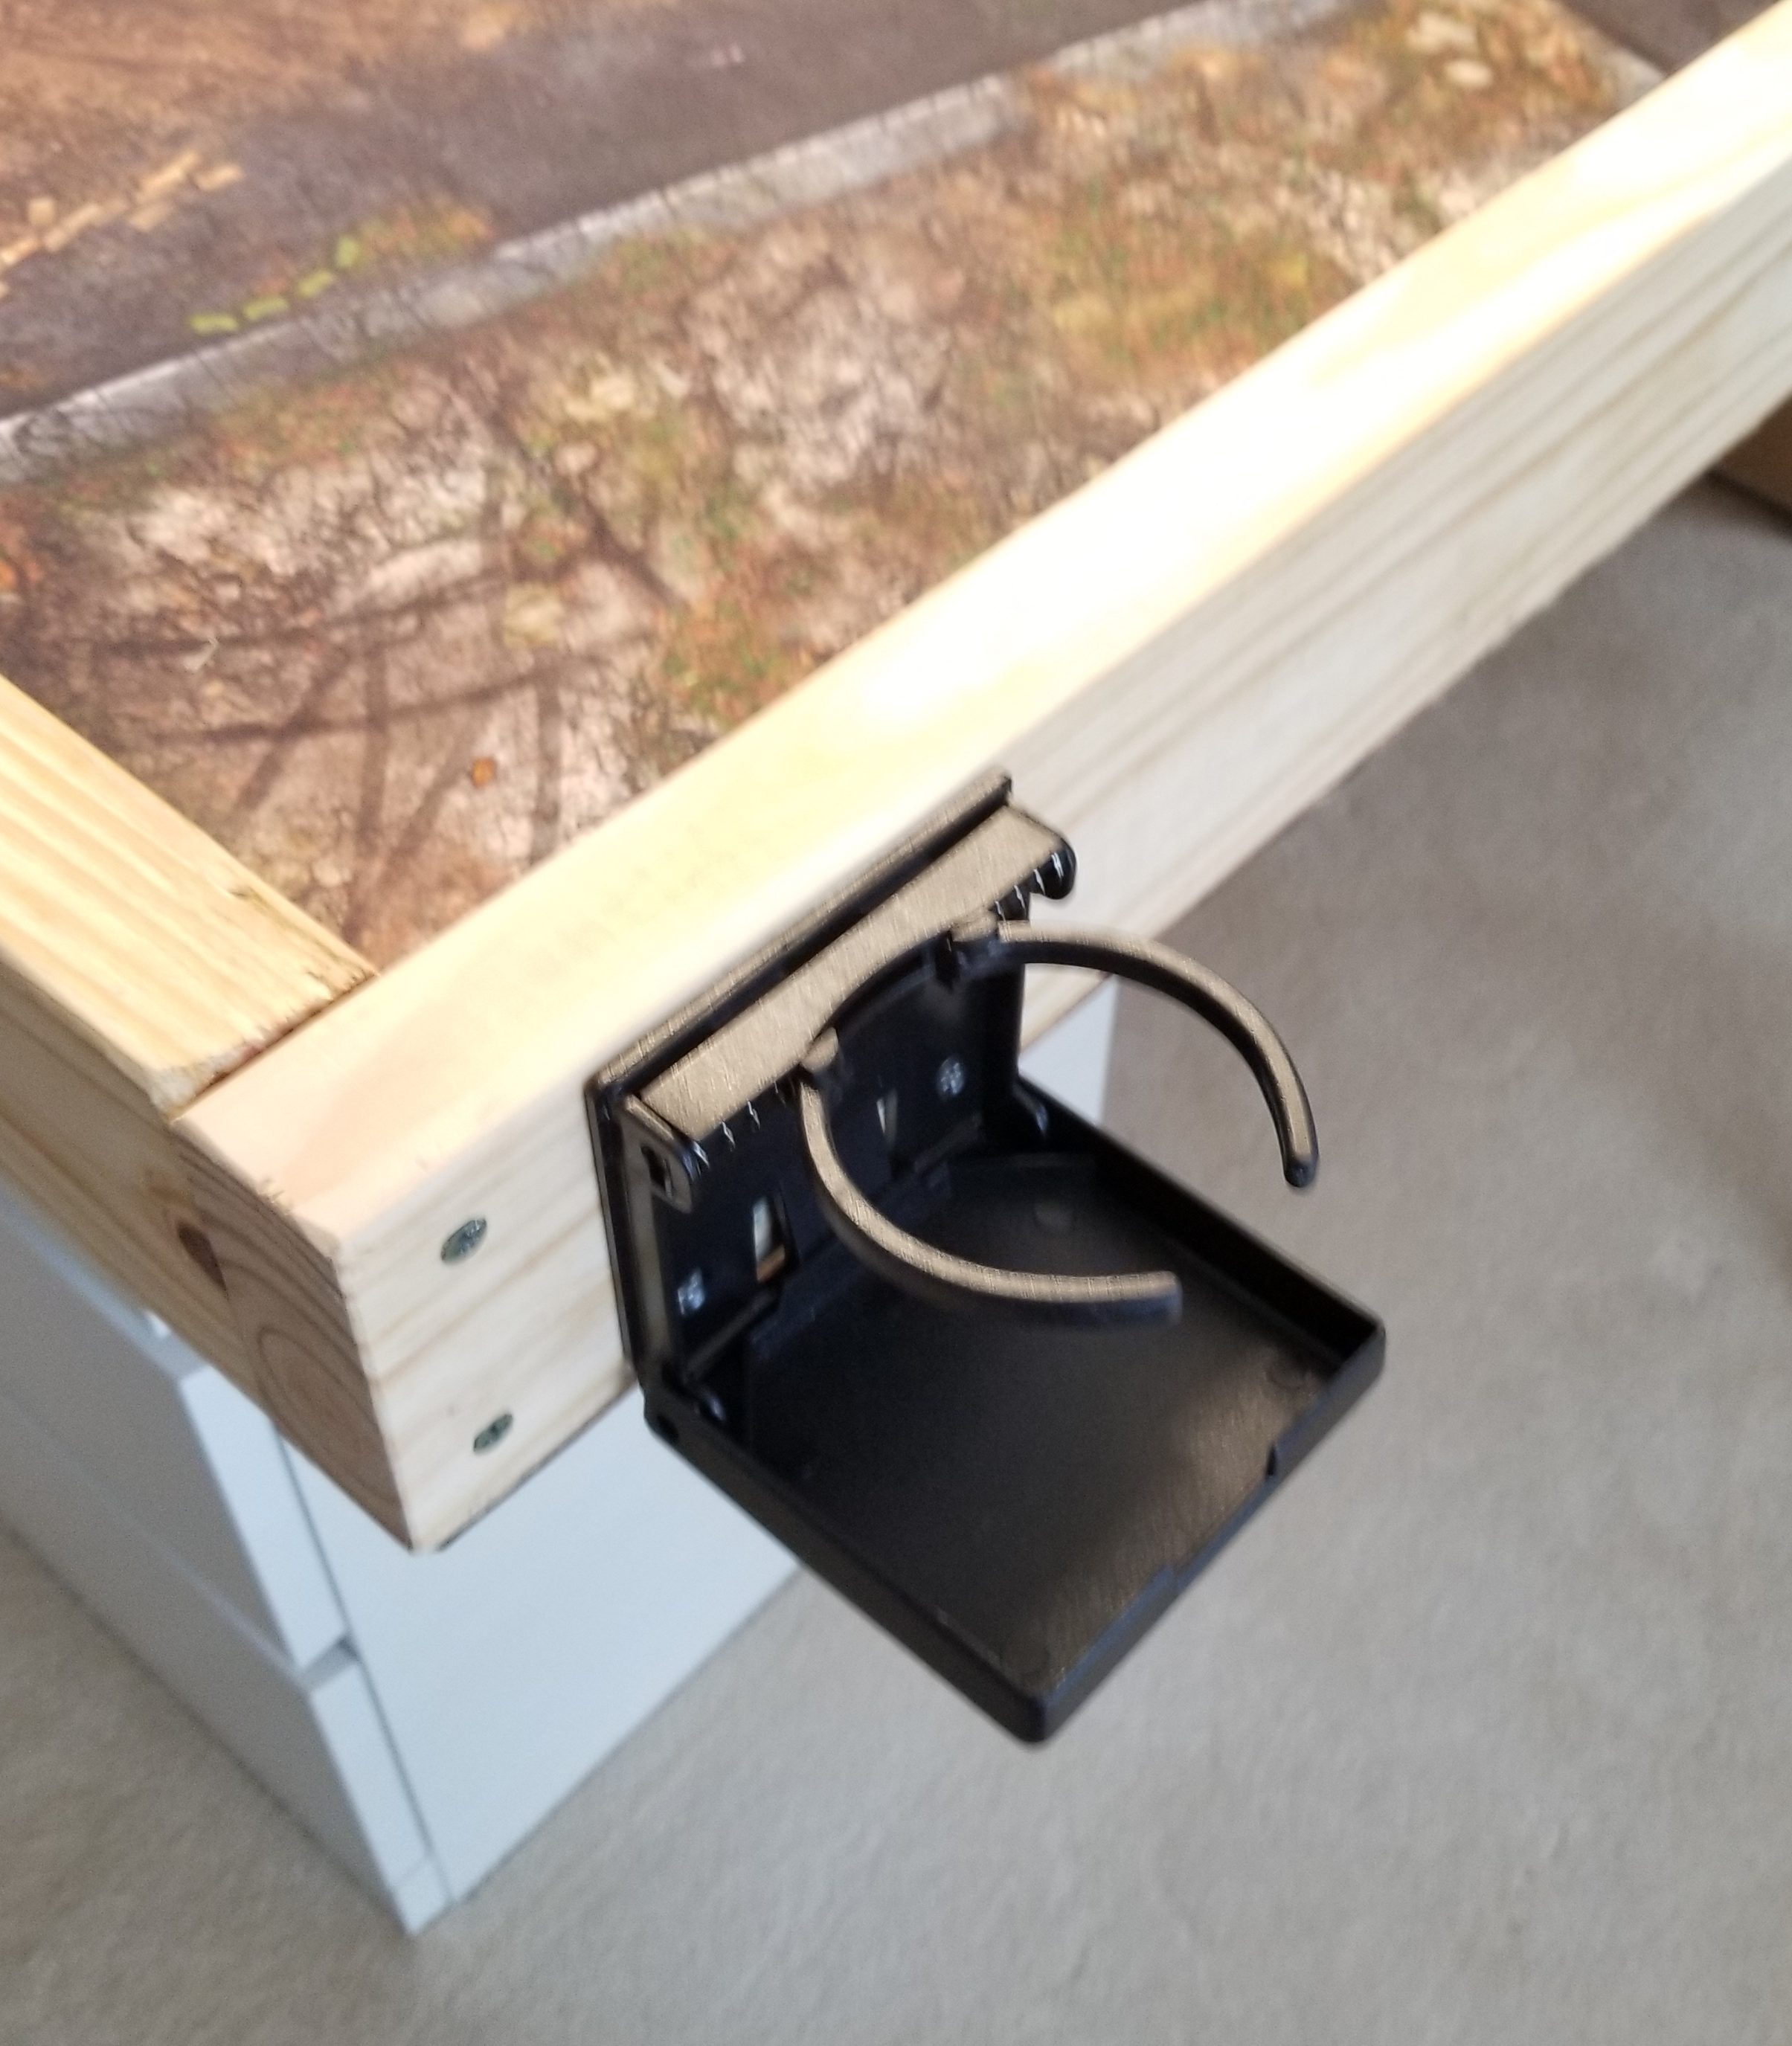
Next up is adding some bells and whistles. I ordered a set of four folding cup holders to install on the sides – these will be great for giving people a space to put drinks that isn’t on the game mat. These are also fold-out cup holders, allowing me to keep the profile of the table smaller as needed. It’s a fun little addition that gives a nice little quality-of-life improvement. I also picked up two 44×60″ mats from Tablewar, one for the snow design I already had and one for ruined city streets to match the aesthetics I want to build toward.
Staining the Wood
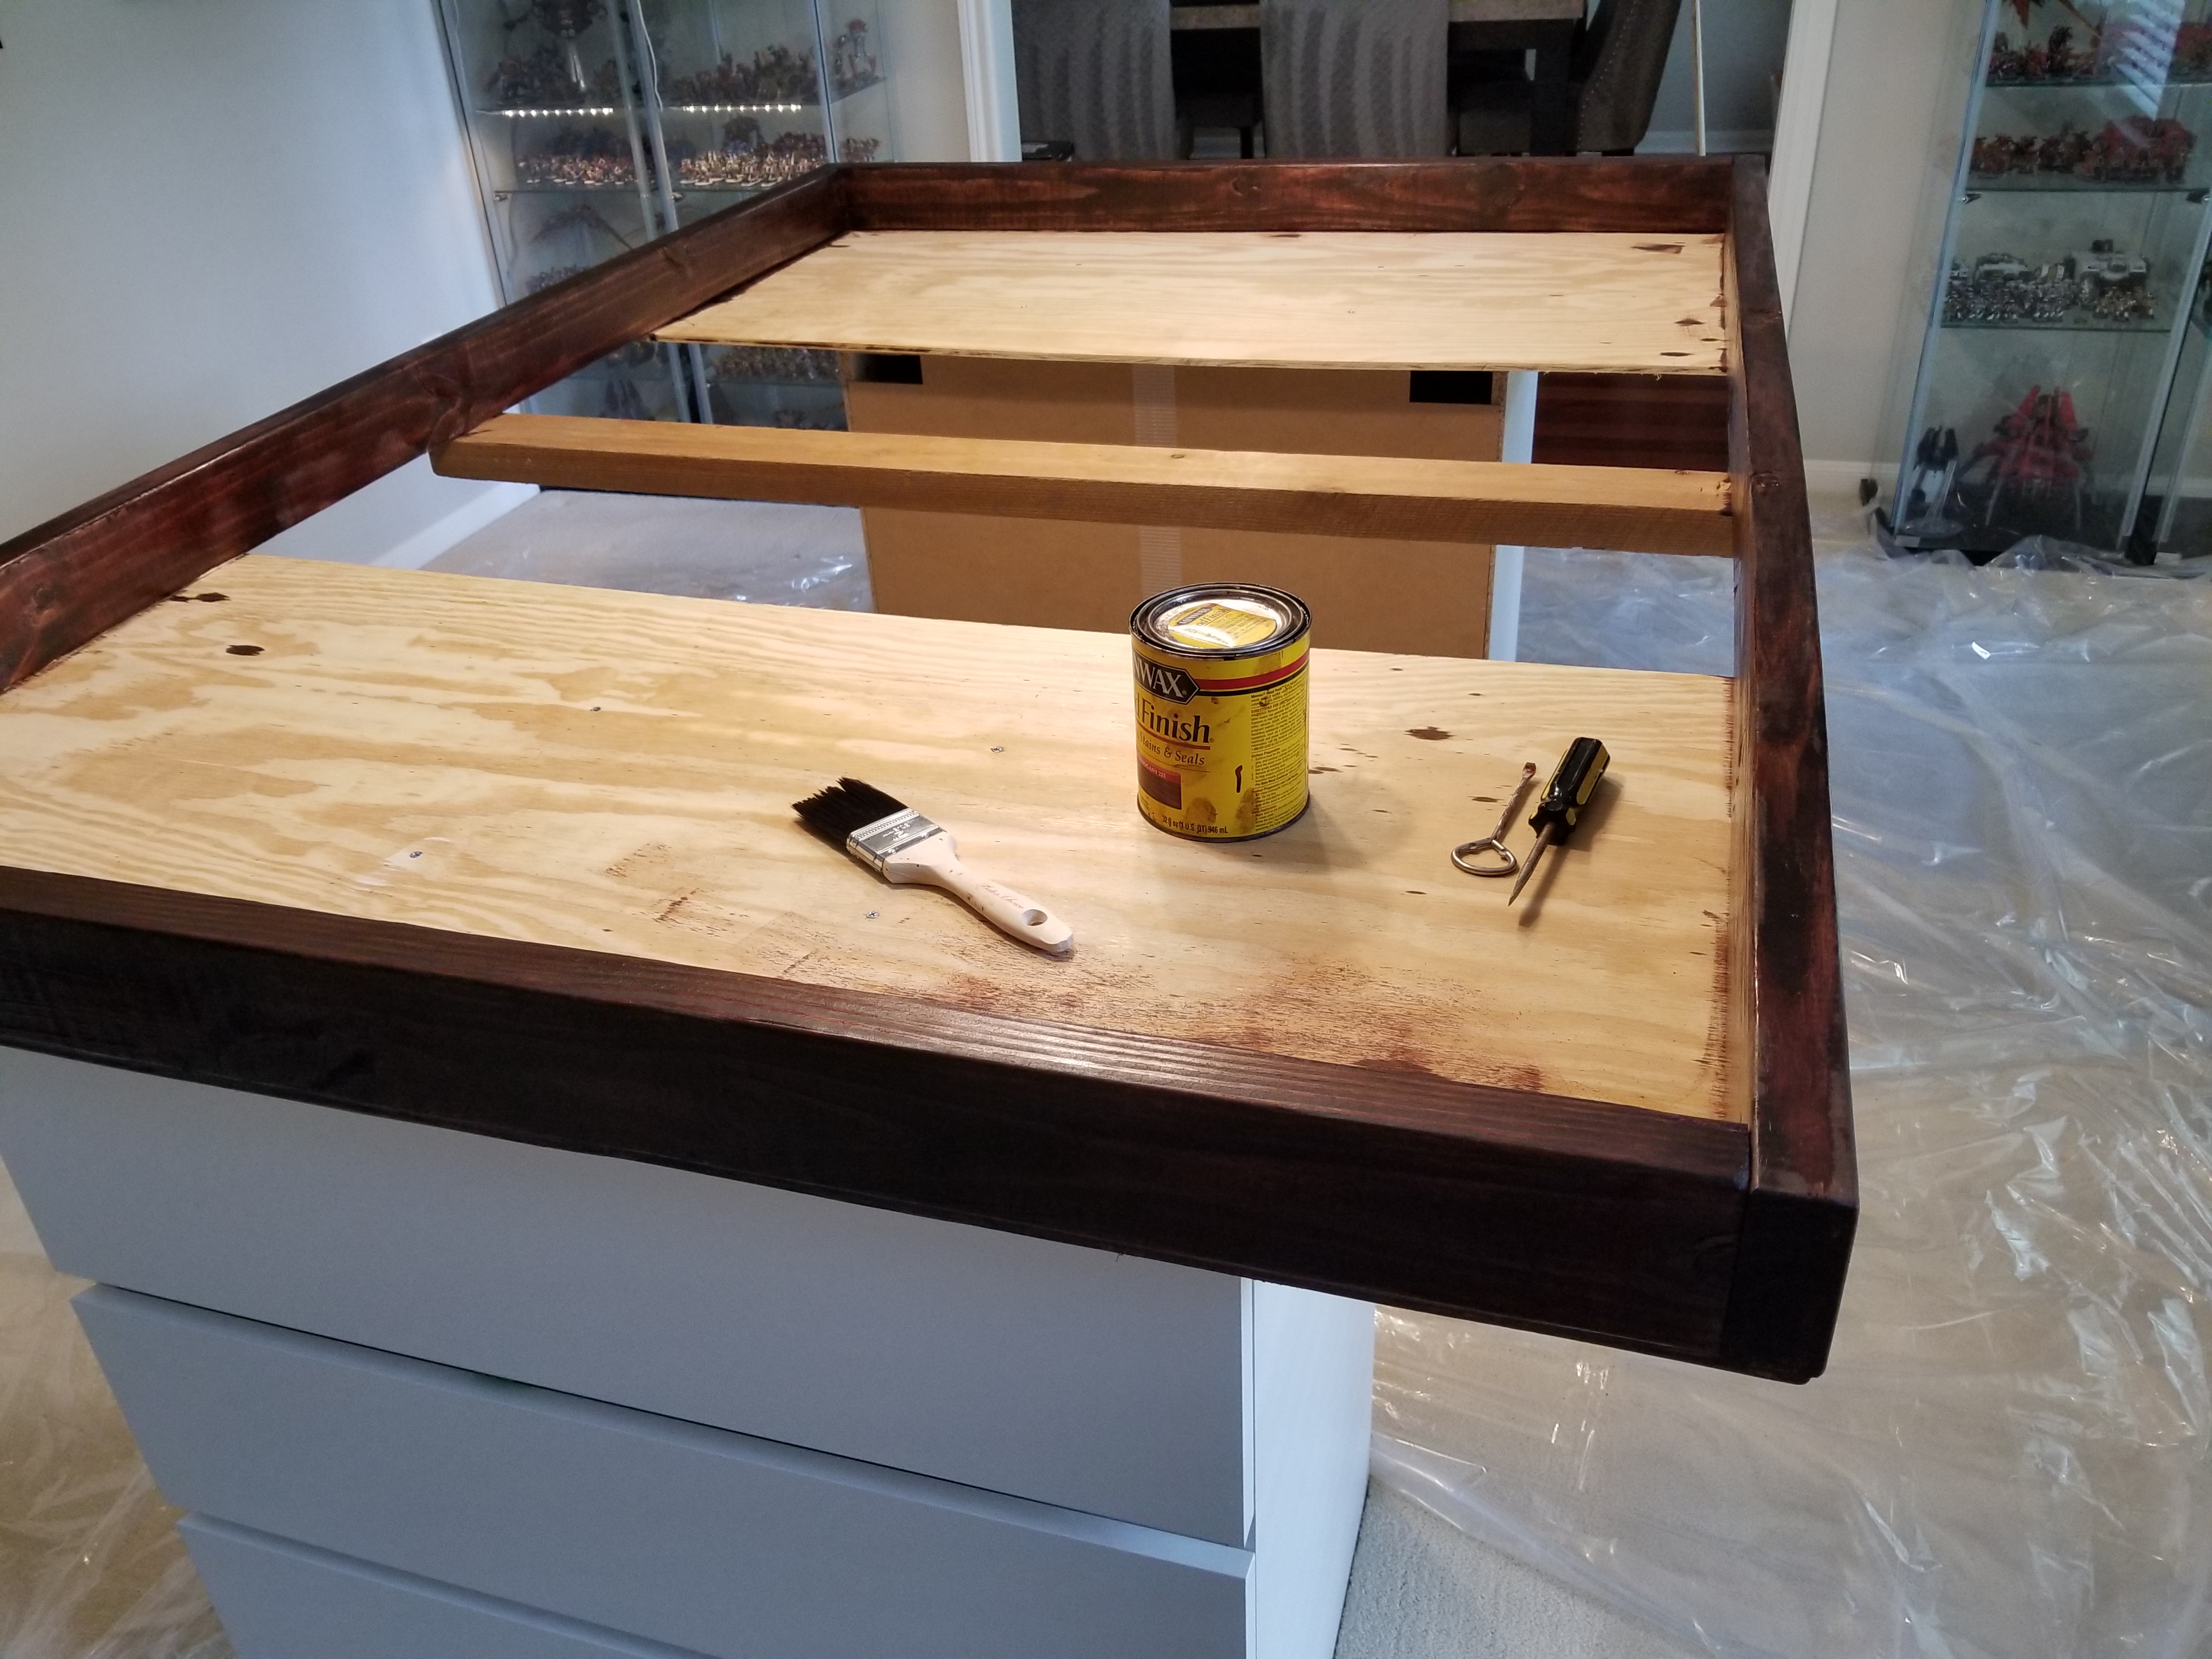
At this point the table was good and perfectly functional. And it looked alright, but I could do better. So about two months later, I laid down some drop cloths and stained the whole thing to give it a darker finish.
I can’t stress this enough: PUT DOWN CLOTHS. We have light carpet and getting any wood stain on them would have been a big mistake on my part. Once I got started, I put two coats on the table. The whole thing took about an hour, plus another couple of days to dry completely. The effect was completely transformative, though.
The next step was cleaning up the corners a bit. The table looked better like this, but was missing a few details that might give it more polish.
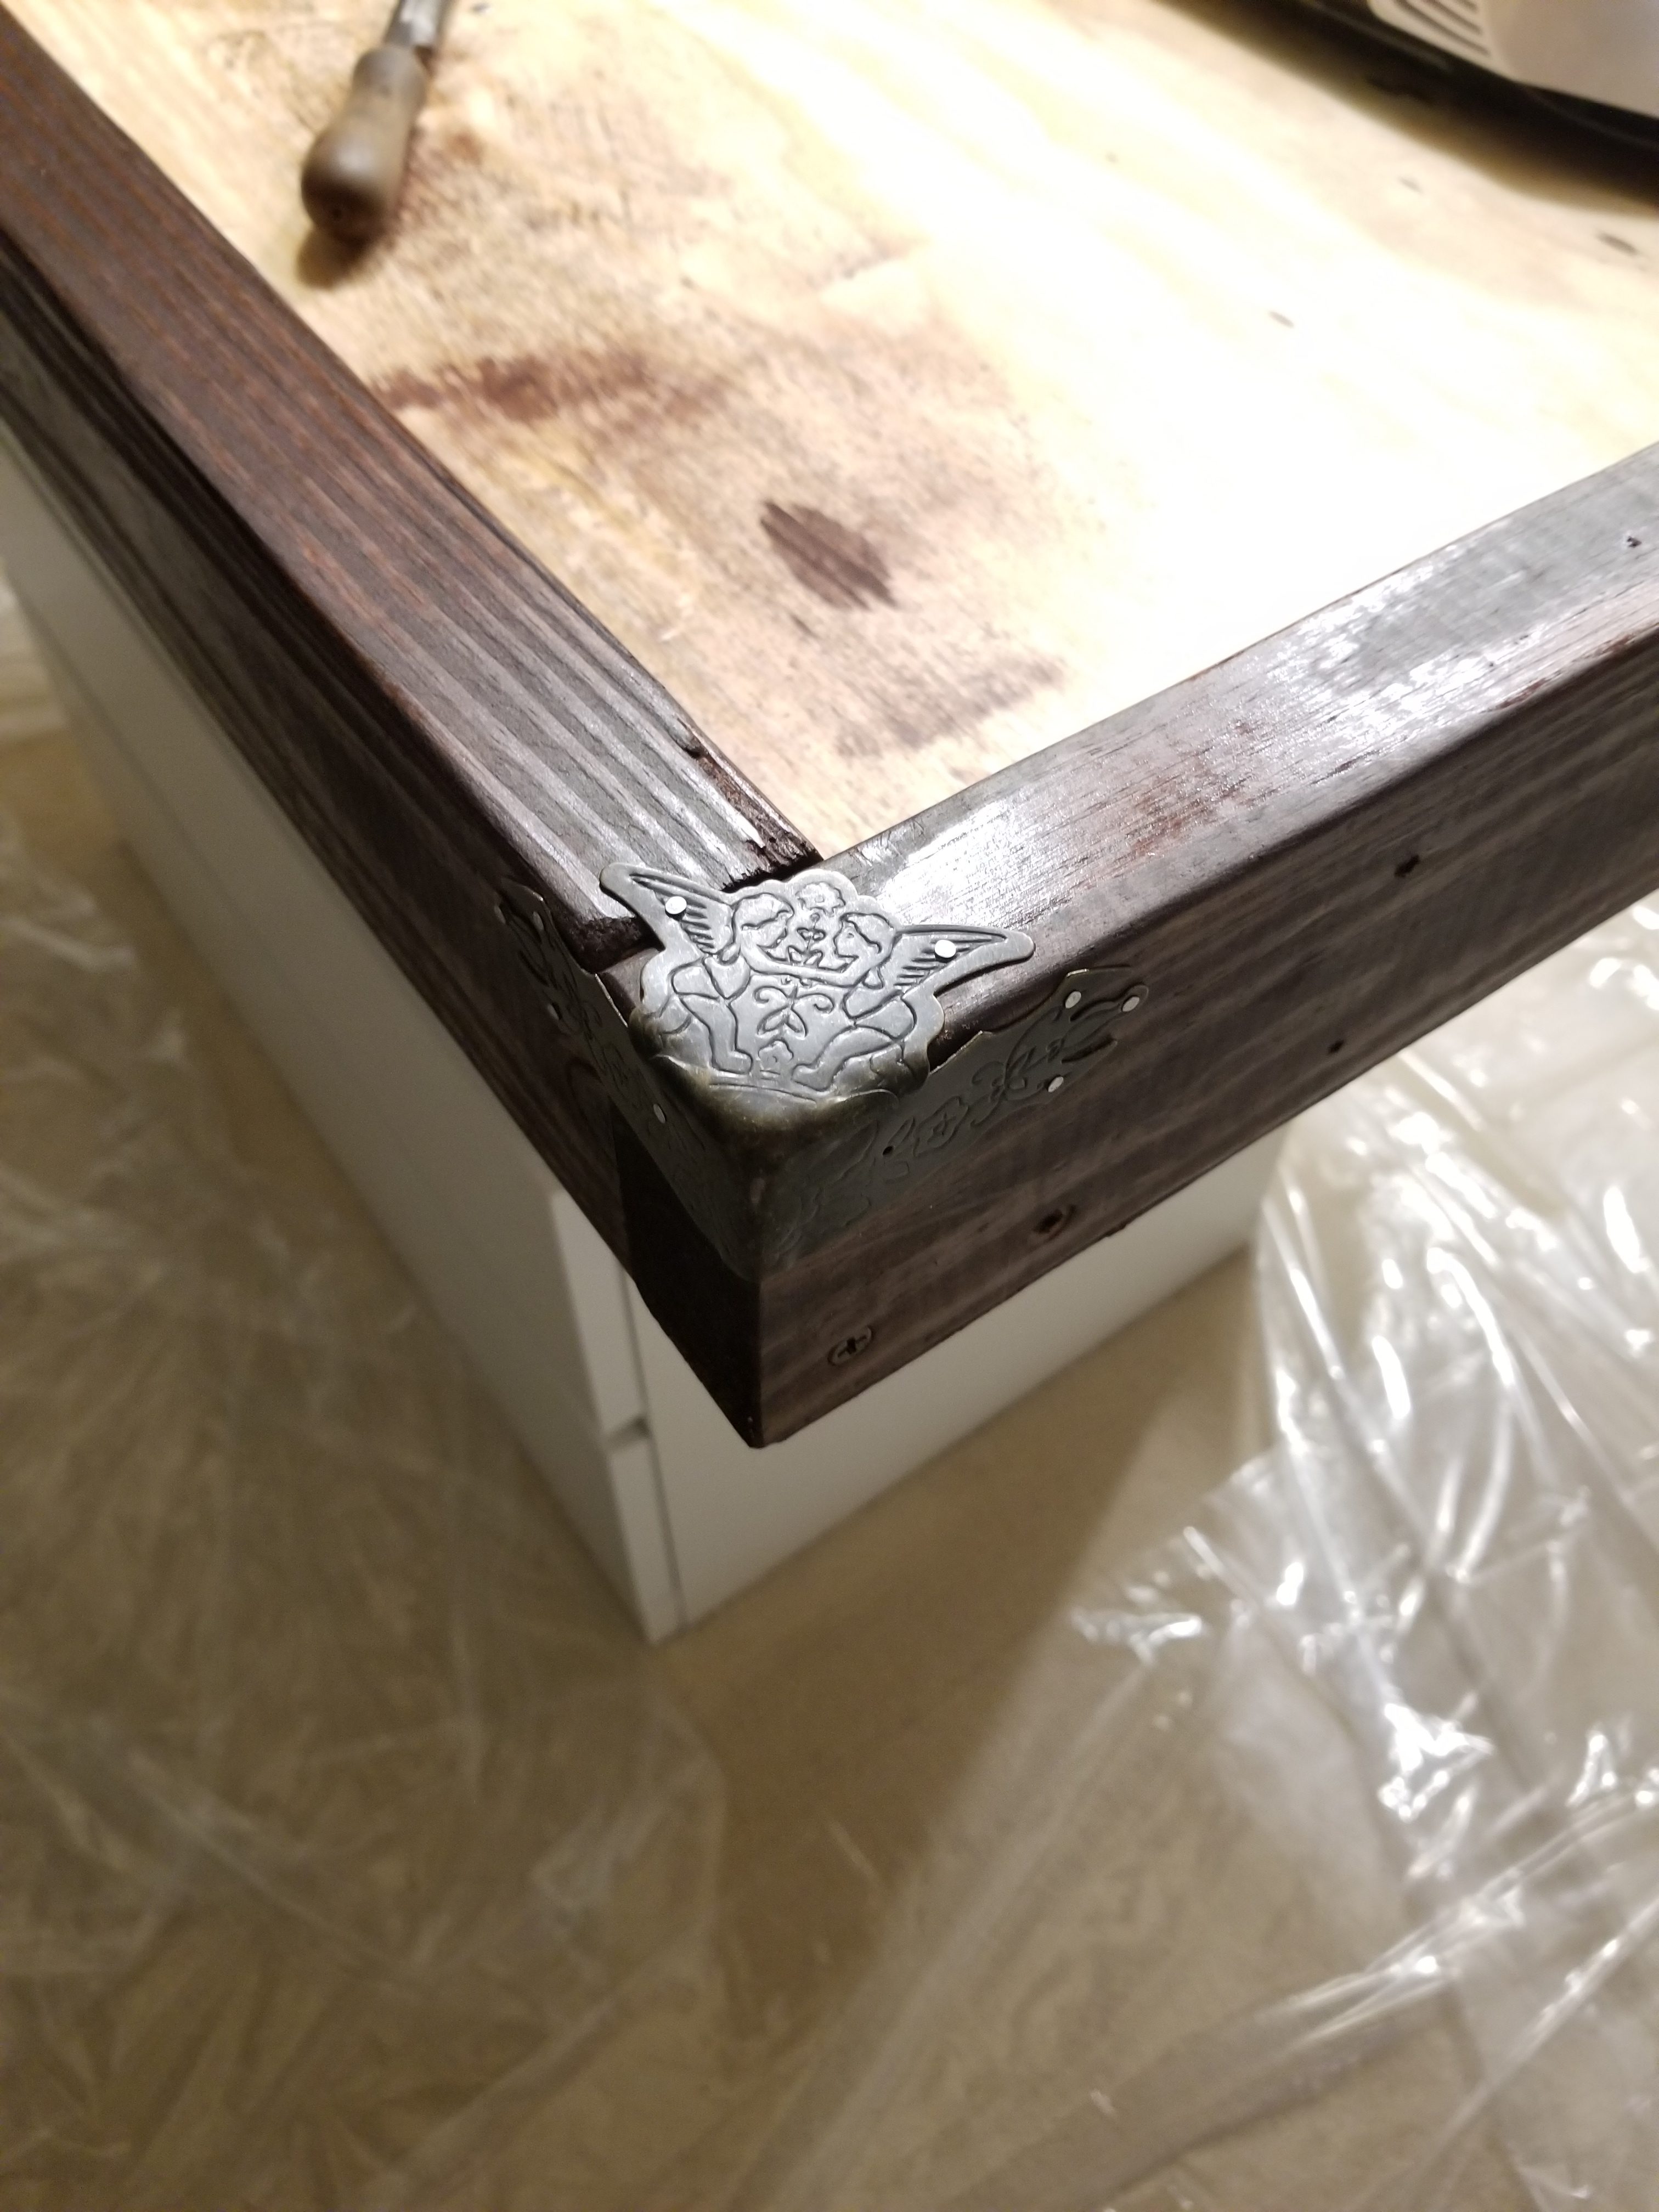
My dad found these metal corner covers on ebay and bought them for me as a gift. They’re nice, and after using a rasp to smooth down the edges, I was able to apply them and nail them in using 3/4″ wire brads.
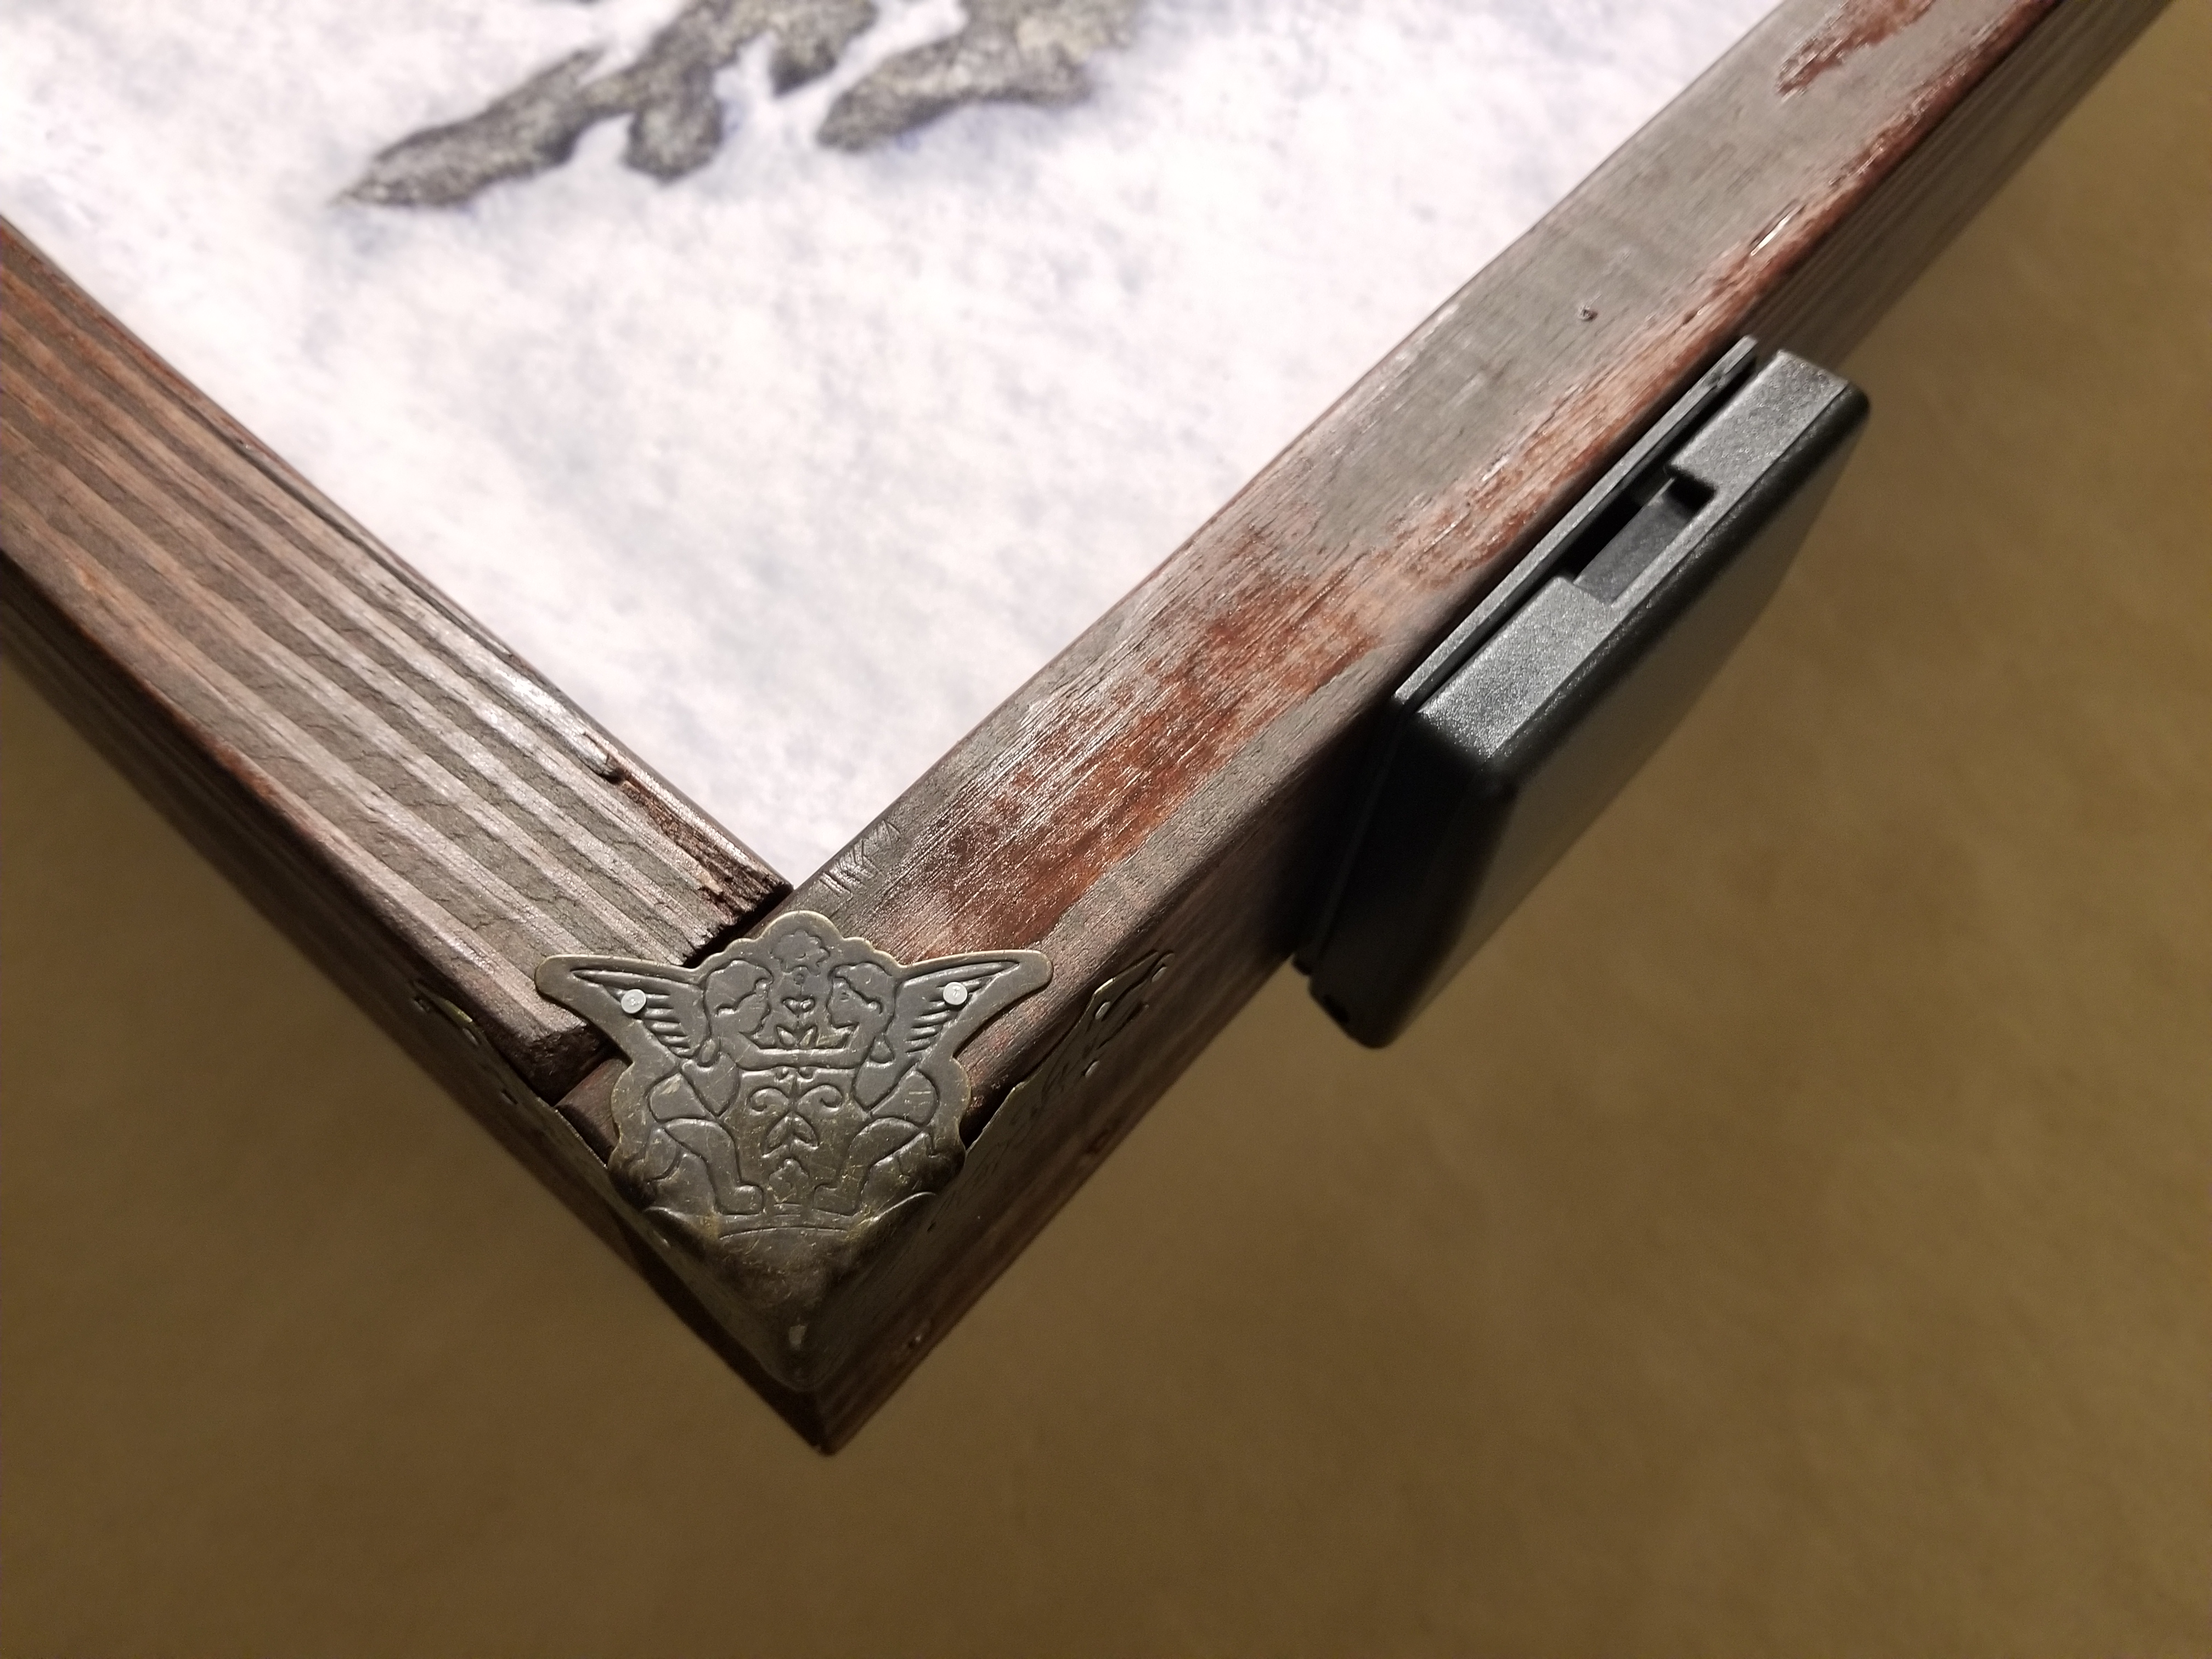
Adding these also meant moving the cupholders, so those moved in just a little bit on each side.
 I’ve said it already but let me repeat: The final effect was transformative, giving the table a much, much more polished look. staining it and adding the corners turned it visually from “a neat thing I made” to “a real piece of furniture” as far as appearances are concerned. I’m very, very happy with it at this point, and the next step was to add some seating.
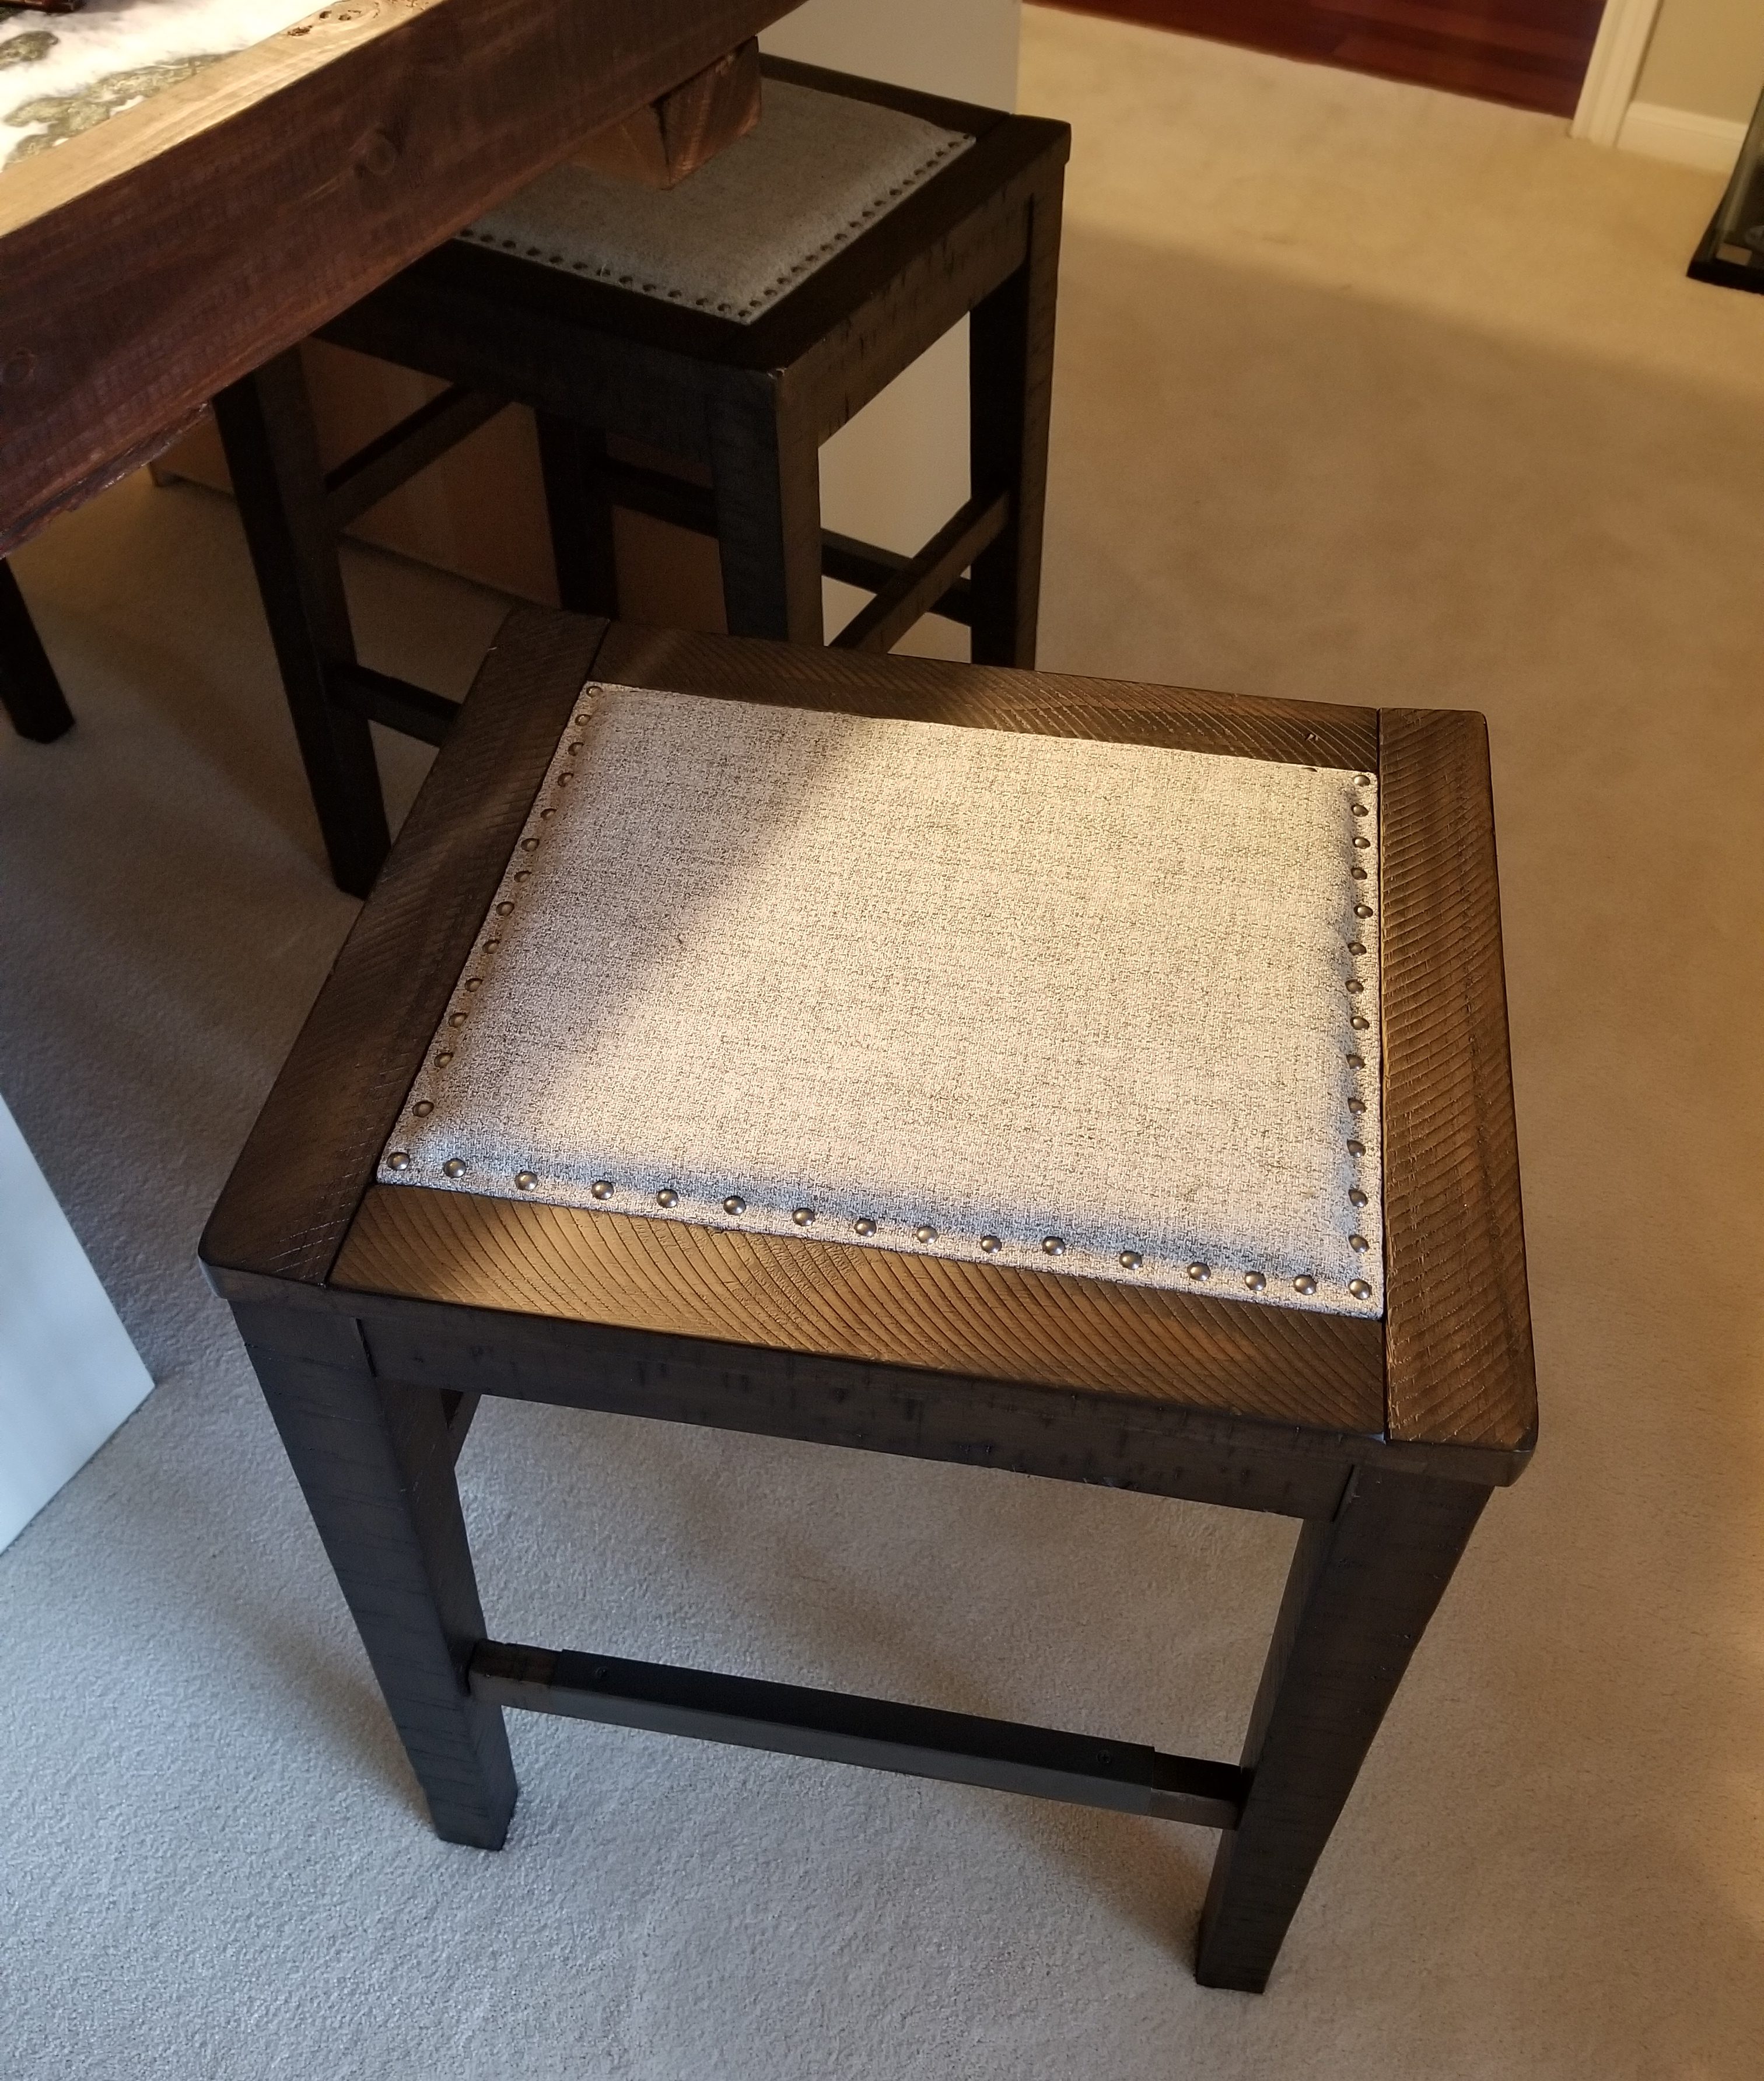
Although I already had a pair of stools in the room that the prior owners had left in the house, these were a little too tall for the table, plus they were wobbly in ways I didn’t love. So after I’d stained the table I went over to Ashely Furniture and found a set of four shorter, well-made stools to tuck under the table. These all fit under the table very well and are extremely well made. They’re cushioned – also important – and while they don’t have backs (a tradeoff I had to make to have them stow more easily), they’re pretty comfortable.
After the seating was done, I wanted to add a dice tray – there was usually extra room on the table to roll, but that last foot or so would typically act as a model sideboard, so I wanted something to hang over the side. I had already picked up a couple of pretty nice Games Workshop dice trays with finishes which matched the table, so I opted to use one of those. The goal here was to add a dice tray would would be modular – something I can move around or remove if need be, rather than something permanently fixed to the table.
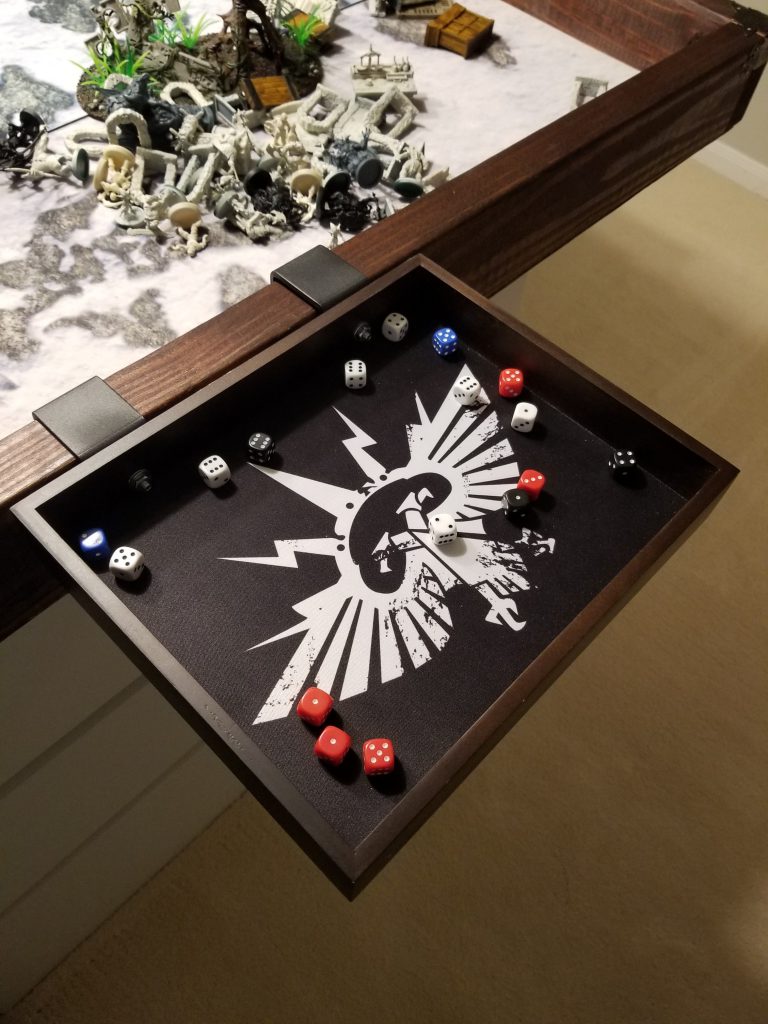
The hard part was finding a way to mount it. Because the frame for my table is made out of 2x4s, actually finding a bracket of the type I wanted – cast iron – was a bit more difficult than I expected. Hilariously, I ended up using a pair of barricade brackets for it – they’re already sized to hold a piece of lumber, and I was able to find a pair that weren’t so heavy duty they’d overhang the table too much. After that the hard part was getting a pair of flathead bolts to attach the brackets to the tray, but the process of drilling those holes and getting everything mounted was pretty straightforward.
I’ve written since about decorating the room – you can find that article here – but that’s pretty much the last modification I’ve made to the table. I’ve been incredibly happy with it since finishing and the table has held up extremely well. There are a few adjustments I might make if I had to do it again, but I’ve gotten a ton of use out of it and would absolutely build another one like this if I had to do it again.
Have any questions or feedback? Drop us a note in the comments below or email us at contact@goonhammer.com.
