
The Warhammer 40,000 universe is a massive place, and in the Fabricator General hobby articles, we cover larger, more complex projects that might be daunting to newer entrants to the hobby. This week, Charlie A is talking about revisiting his Nurgle display board project and building a new, improved version for events.
Improving on an Old Design
There was a lot to like about my first display board. Unfortunately there were many aspects that didn’t hit the mark, such as its massive footprint (nearly 8 square feet of foam made up just the bottom layer). As such, when I began prepping for the recent Glass City GT, I took it as an opportunity to refine my display board and make a new attempt.
Any of the steps below could easily be replicated and modified to suit whatever theme of display board you’re looking to make. Hopefully reading my rationale and method might give you a leg up on making your next display board. Materials I used include:
- Pink foam
- Hobby knife
- Foam cutter
- Modge Podge (or another white glue equivalent)
- Plaster of Paris
- Paper insulation
- Water
- Cheap hobby store paint (the $0.79/bottle stuff)
- Brushes
- Woodland Scenics Deep Pour Clear
- Basing stuff like Vallejo European Mud and grass tufts
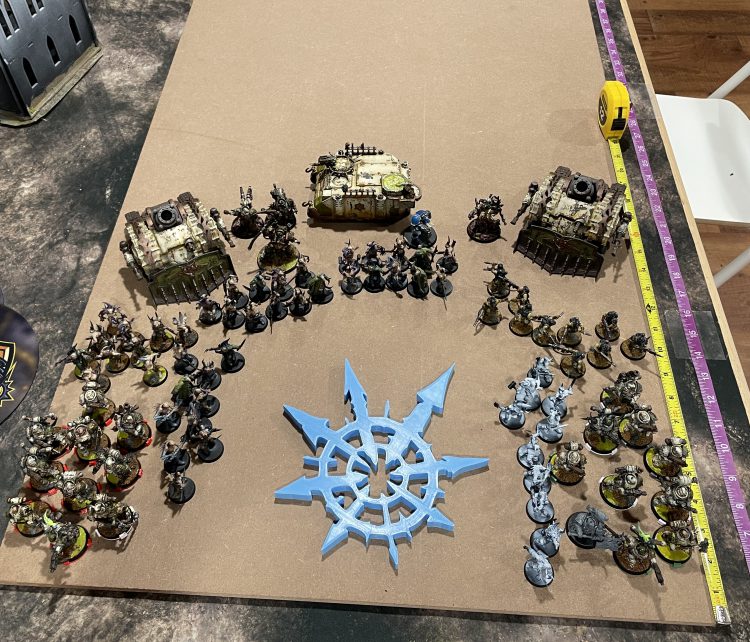
First thing’s first, I wanted to ensure that I had enough space for the army, but not too large of a footprint. Keeping the board size manageable would ensure that it was easy to carry around at the event and wouldn’t get in the way if it needed to be set aside. By laying out most of the army on the base, I was able to better judge the size needed ahead of time. I knew I wanted enough room to feature a massive chaos star “floating” in a swamp-type feature in the front of the board, which I was able to get a buddy to 3D print for me (thanks, Tom!).
Some simple foam-cutting work (via a hobby knife and a hot foam cutter) was all that was needed to size the three tiers necessary to build up a backdrop and the “bones” of the board. I intended to build up the ground around the swamp as an easy way for it to look deeper than it was. Because I used Modge Podge to glue everything together (it takes a long time to dry), I used gallon-size containers of olive oil and dumbells to weigh everything down for 24 hours for everything to firm up. (Editor’s Note: Clamps are also great for this)
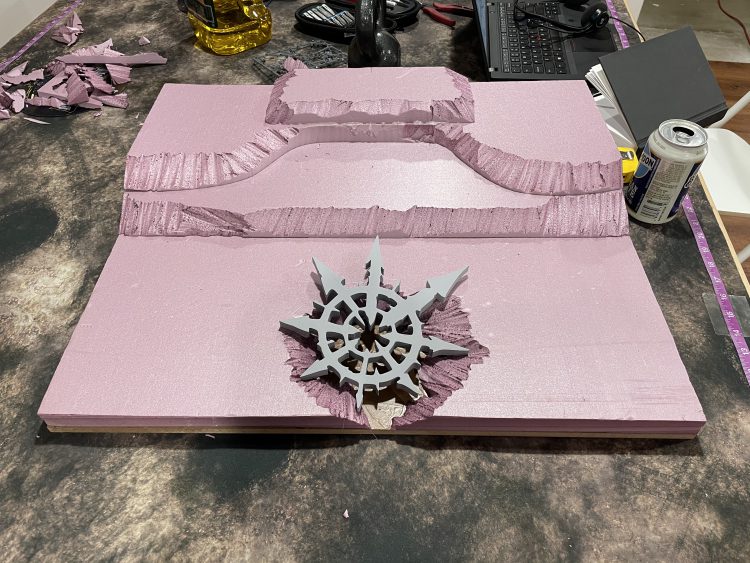
I used a tip from Luke Towan on how to make my own sculpt-to-mold using a 50/50 mix of plaster of Paris and “green fiber” paper insulation (a paper-based insulator found at big box home improvement stores), which is then mixed with just enough water to make it spreadable. This is a very easy way to blend together the seams of the foam board and create some ground texture immediately. It also allowed me to build up the rim around the foetid pond.
Because I had previously used this technique on my first board, I knew I needed to work fast as there’s only about a 15-minute working window for this stuff. This time around, it was very straightforward to mix up and apply. It hardens quickly, which means I can get to painting within minutes of applying the texture this way.


I was stupid with my first board, forgetting that spray paint melts pink foam. The fact that I used spray paint last time lead to the board ultimately cracking and is what encouraged me to take a second stab at a display board. This time I remembered not to spray paint the board’s primary colors, choosing instead to apply the paint with a paintbrush.
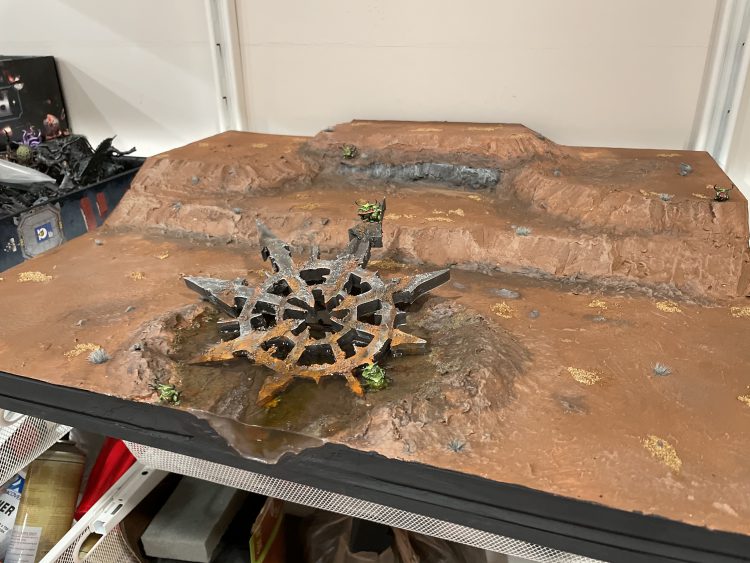
I mixed cheap paints to get an approximate color match to my current basing scheme, first. After this was done, I painted the bottom of the pond a darker brown to help simulate depth, while also painting some plaster-poured rocks a dark grey to ultimately build up in color. I have also been experimenting with Vallejo ground coverings, so used their European Mud product within the pond. It’s got a bit of a green tint to it that felt right at home in s stanky Nurgle water basin. Next, I thinned some dark brown paint and ink mixture way down to artificially create shadows at the base of each tier to help further simulate high differences. Lastly, I drybrushed raised areas to help create more contrast and visual appeal before adding some grass tufts.


Once the foundational work was completed on the board, it was time to paint the chaos star. Because the intent was to depict a rusty, crusty chaos start that’s been submerged in this necrosis-inducing pond for millennia, I wanted it to look very corroded. I started by slathering on some Vallejo ground covering and Typhus Corrosion to build up the underlying texture of the rust since rust is three-dimensional. Priming over the built-up and dry surface, allowed me to build up true metallics with dark, medium, and bright silver colors, which I then subsequently weathered back down using a combination of a thinned-down The Army Painter Dry Rust, Agrax Earthshade, and Glossy Nulin Oil.
Once the star was fully painted, I took a few leftover individual nurglings from various kits to paint up and pose in numerous locations across the board. I specifically chose poses that interacted well with the scene I was trying to build. For example, there’s a nurgling being squished by the star, under the water, and then there were two nurglings “playing chicken” with one on top of the other’s shoulders, wading in the murky water. It’s this sort of thing that I have fun with, telling a story via terrain, models, and effects.
Finally, it was time to finally pour the Woodland Scenics Deep Pour Clear. I had never used this product, but it came well-reviewed online and had easy-to-follow online tutorials. I fully read and followed all the instructions to the letter, and overall my experience was great. I’d recommend it to people dipping their toes into resin pouring (figuratively speaking, of course). Masking off the edges was as simple as using 2″ wide painter’s tape., though I did stick around for the first 10-15 minutes after pouring it, and I’m glad I did. I had to add a few extra pieces of tape to combat a couple of small leaks, but overall simply taping the edge worked well enough.


And with that, all I needed to do was add some class by painting the rim of the base black. I always paint my base rims (you should too, if you want an easy way to make it look a little bit more “polished”), and figured the same rationale held for a display board.
Overall, I’m very happy with this second version of my Nurgle display board. It’s not stupidly large like the first one. It’s not cracking like the first one. And I think the new one looks better, overall. It got good paint points at the event I took it to, and I expect to keep/use it for years to come.


Have any feedback or questions? Drop us a note in the comments below or email us at contact@goonhammer.com.
