
In our Fabricator General series, we cover large projects or those with lots of building and construction and custom work. This week, we are taking a look at 3D printing from the design side with the first in a series of special guest posts from fellow SA Goon Dave “TKIY” Gordon. If you’re interested in the designs he’s talking about here but don’t feel up to making your own, you can find them on Dave’s Etsy store by clicking this link and following along with new designs on his Facebook page and Twitter.
First of all, thank you to the Goonhammer crew for giving me a chance to contribute to an amazing source of hobby knowledge. My name is Dave “TKIY” Gordon, and I’ve spent the last year or so diving into the realm of 3D printing, and naturally I’ve combined it with my love for wargames.
On the Fabricator General so far, we’ve covered the basics of 3D printing from purchasing a printer to finishing your prints, but today we are going to look at what to do when the design you want doesn’t already exist. Almost everyone that buys a 3D printer immediately goes to Thingiverse, Cults3D, or another site to find an STL file they want to print, fires it into their slicer of choice, and ends up with GCODE ready to print. Having an STL file is great, but sometimes you just can’t find what you need.
The Right Tool for the Job
First things first, you are going to need to find a design tool that you like, and there are a lot. Each has its strengths and weaknesses; some are better for mechanical designs and accurate geometrical shapes, while others are ideal for more natural and biological shapes. In many cases you will be jumping back and forth between tools in order to develop a workflow that works for you. Many of these tools are free, or have free limited licenses, so dive in and play around.
Some of the more popular tools include:
- MeshMixer
Meshmixer is a great tool for modifying existing STL files, and its toolset lends itself to combining multiple STLs, modifying faces, bending and otherwise altering standard geometrical patterns. - Blender
Blender is primarily a 3D Modeling and Rendering tool for digital assets, and is heavily used for high-polygon count models for animation and video games, but it also produces STL files suitable for 3D printing. There are thousands of readily available premade models suitable for wargaming that you can modify and pose in Blender and then export to STL for printing. - TinkerCAD
TinkerCAD is, to my mind, the easiest tool to pick up and learn modelling with. It’s free and web-based, so your designs are available wherever you have access to a browser. It largely deals with geometric shapes and may be a bit simple depending on your design requirements, but it’s an excellent place to start. I started with TinkerCAD before moving on to more robust solutions. - Solidworks
Primarily used for industrial design and is a complex but full featured 3D design application specifically designed for 3D modelling. While it might be overkill for our purposes, it’s hard to argue with its capabilities. If you plan to design something with moving parts, Solidworks is well worth the time and effort to learn. - Fusion 360
Another AutoDesk product like TinkerCAD and MeshMixer, Fusion 360 hits a balance point between the simplicity of TinkerCAD and the complexity of Solidworks, and has a free non-commercial license as well. Fusion has a learning curve but once you have a license (even a free one) you’ll have access to the community support forums, which are an invaluable resource. - Rhino 3D
Rhino is perhaps the most versatile modeling tool available at the moment, and uses the same mathematically intense modeling system as Solidworks, but with a stronger set of features for less geometric shapes. If you want to learn something with no holds barred, you can’t go wrong with Rhino, but be prepared for a nasty learning curve.
Having said all of this, I started with TinkerCAD, learned a bit of MeshMixer, and then moved on to Fusion 360. Fusion is the sweet spot for me and my designs, and I often move between Fusion and MeshMixer to finalize my STLs.
What Else to Keep in your Toolbox
Everything we’ve talked about so far is focused on 3D modeling, which makes a lot of sense, but not everything you will be working on is strictly 3D based. A lot of modeling work is done in 2D first, and you’ll need a tool that you are comfortable working with for producing 2D vector images. Unfortunately (or fortunately if you don’t like long articles) I haven’t done as much research here, as I started working with Inkscape, and haven’t needed anything else. Inkscape is great and it’s free. Go download Inkscape. Now.
If you don’t want to use Inkscape, find a tool that you do like that will save or export vector images, specifically SVG format. An SVG, and vector images in general, aren’t a traditional image like a JPG or PNG format which are literally a collection of coloured dots. Vector images are descriptions of shapes, which can be rotated and scaled without losing any crispness like happens with other image formats. 3D modeling software like Fusion can use SVG images as a basis for creating a 3D shape.
Enough Jibber-Jabber, How do I Make Something?
First things first, what do you want to make? Start with the idea of something you want to create and build your model around that. As an example, I’ll go through the process of creating my Miracle Dice Holder for Adepta Sororitas:
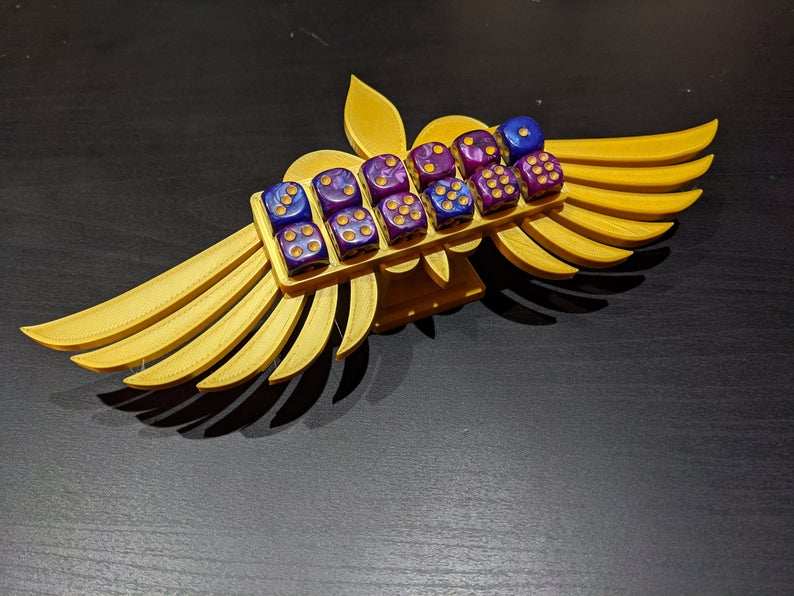
The concept is simple, a place to store Miracle Dice so they won’t get knocked over, accidentally rolled, etc., while also looking great on the tabletop. A dice holder is a simple creation, so it’s a great place to start.
First Things First, Function Before Form
Before I start any design, I try to make sure that I know what will make people want to use the final product. In this case the very basics are:
- What size dice are people using?
- How many dice do you need to hold?
- What would make it better than any other dice holder?
After talking to people that play Sisters, most use the 16mm ‘official’ Miracle Dice, but several use 12mm, so the design should scale well for both. Most players agreed that they would never have more than 10 or so, so I bumped it up to 12 dice just in case. Finally, brainstorming the third question, I opted for a bold iconographic design in a prominent and thematic colour (gold in this case), with an angled holder so that the dice would be visible sitting or standing.
This is one place that 3D printers excel over the more common laser-cut options; we can go vertical in our designs far easier than laser-cut designs can, so take advantage of it.
Here, Hold My Dice
One rule of thumb I’ve learned the hard way: 12mm is not 12mm. Your average 12mm die is probably 12.1mm square, or maybe 11.9mm square. That 25mm GW base? 25.1mm. Always give yourself a little more space than less, so in this case each die socket will be 12.2mm square. In the case where I need to have a final product that needs to scale to multiple sizes, in this case scaling for 16mm dice, I always design the smallest possible version first. You may find that if you design big and then shrink down you end up with components that are too thin to print, so avoid this whenever you can.
Figuring out my 6 x 2 array, with room for dividers between and enough space around the sides for a strong model, I know that I want the body of the holder to be about 90mm x 30mm. You may work in inches if you are a heathen Imperialist.
I also know I want to use a set of Angel Wings to provide one of the design elements for the holder. Getting the angel wing design into Fusion is the job of Inkscape or the drawing tool of your choice. Either draw, trace, or otherwise create the design to your liking, and save it as an SVG file. If you do opt to trace or directly import a premade SVG file, be sure to check the licensing of the design itself. Many are free, some are not. Respect the creator of the image if you don’t draw it yourself.
In Fusion, using the ‘Insert -> Insert SVG’ function will let you lay down that 2D image, rotate, and scale it. After drawing my 90mm x 30mm rectangle and laying in the SVG image, I can play with the scaling to come up with an overlaid design that I’m happy with.

The advantage of layering these two together is the rather long and fragile wings will be anchored in the solid block of the dice holder itself.
Once you have your basic shapes laid out, you can extrude the individual components, which makes your 2D drawing into a 3D object.
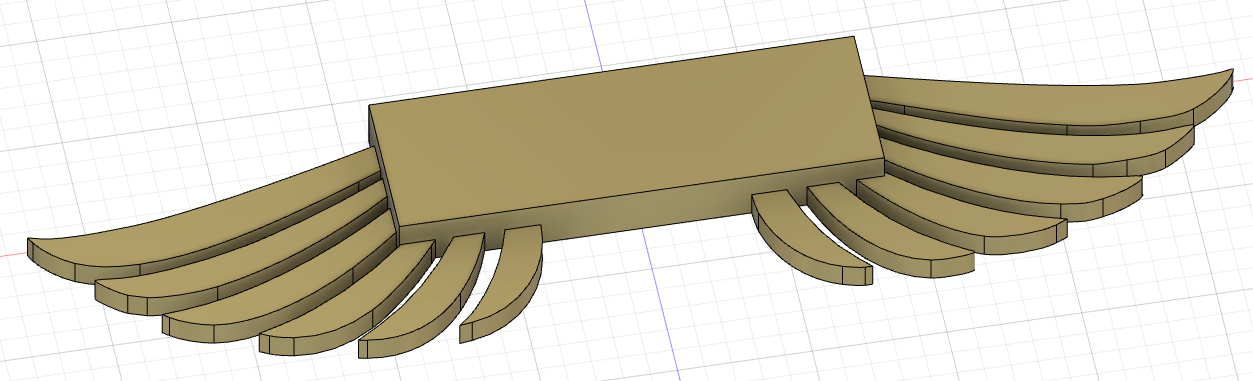
I’ve extruded the box to a 10mm thickness. I need it this thick as I plan to recess the dice socket at least 1/3rd of the height of the dice themselves. I extruded the wings to 5mm, which is usually my minimum thickness for anything long and thin. I’ve also popped into the render menu and assigned the design a gold colour to help visualize the design better. So far so good but we are a long way from a usable design.
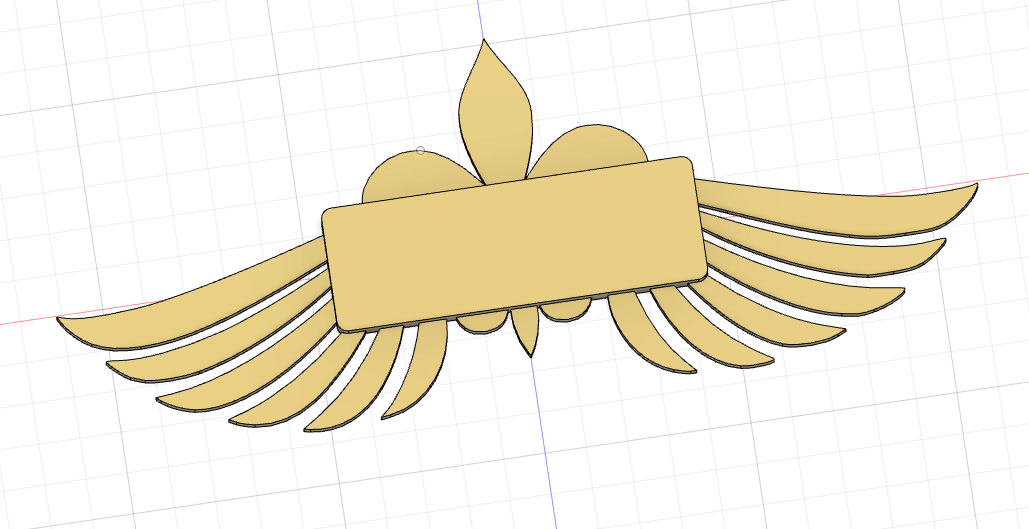
The corners of the dice holder are a bit too sharp for the flowing design of the wings, so the corners get a filet to round them off. Also the centre of the design is too bare, so I import another SVG on the origin layer, this time a Fleur De Lis which also has a strong tie to the Sisters concept. Extruding this to 5mm as well to match the wings, and the design looks much better overall.
Be careful when you extrude one body into another. Fuson, by default, wants the new extrusion to ‘Cut’ the existing body. If you want to create one solid body, use ‘Join’ or you can use ‘Create New Body’ if you want the two components to combine but be distinct objects for moving or scaling later.
The final step for this design was to create a 12.2mm square on the surface of the dice holder, and extrude it into the body of the dice holder. This is where you do want to ‘cut’ where you extrude.
Using the rectangular pattern tool to ensure even spacing, I create the 6 x 2 array of dice sockets, and the holder design is complete for now.

What makes a design useful is what makes it stand apart. In this case we already have a good design that’s functional, looks great, and we could easily stop here. However, I always want to find a way to make my designs stand out a little. In this case, I literally want the design to stand out, so I begin to design a plinth. Tune in to the next Fabricator General as we go through the process of designing a socket, curving flat surfaces, and working with angles.
You can find more of Dave’s designs in his Etsy shop.
