Welcome, Sports Fans and burgeoning coaches, to the Goonhammer Blood Bowl Combine! For those of you who are new to Blood Bowl, or maybe those returning after a long hiatus, we’ve assembled a playbook here that will hopefully get you onto the field and winning, drawing, or at least losing in style! Although Blood Bowl is technically about literal fantasy football, the game itself is fairly strategic and is best thought of as a style of skirmish game with a sports theme. Passing, blocking, scoring, stalling and fouling are all part of your toolkits, but how, when, and where you should do these things can be the difference between great success and spectacular failure. Let’s continue with some basic ideas regarding kick-off formations!
Kick-off Formations
A Kickoff starts every drive. Setting up your team to score or defend can be daunting, but there are a few takeaways that apply to every team. Again, each team is different, and so their formations will end up looking different, but there are some easy-to-recognize general takeaways. Let’s start with defense.
Setting up a Defense
There are a three important concepts to focus on when setting up a defense:
- Coverage: You want to cover the field so your opponent cannot easily run right through your defense. Multiple overlapping tackle zones is the best way to do this.
- Block Mitigation: Remember that the receiving team gets to go first, so you don’t want to give them more than the minimum number of blocks right off the bat. You have to put 3 players on the line, and they get 1 Blitz, but you do not want to give them more than 4 Blocks on their first turn.
- Set Yourself Up For Success: Set up your team so that you can take advantage of its Strengths. Got a fast team? Aggressively load speedy players in the wide zones to take advantage of a potential Blitz! Result on the Kickoff Events table. Got a slow team? Try to funnel the opponent towards the middle of the pitch where more of your team can stay relevant.
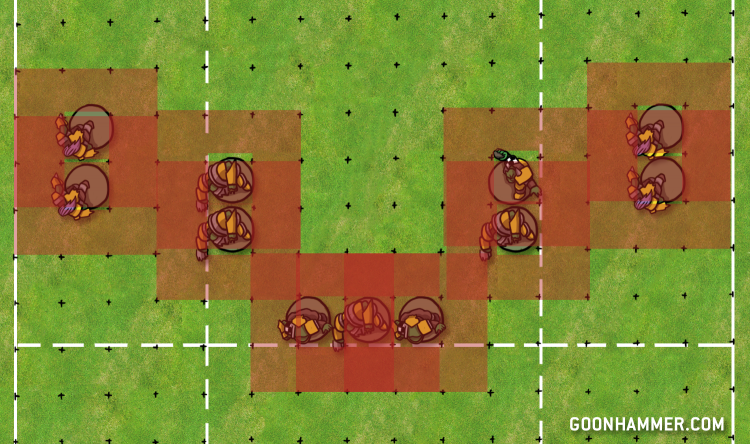
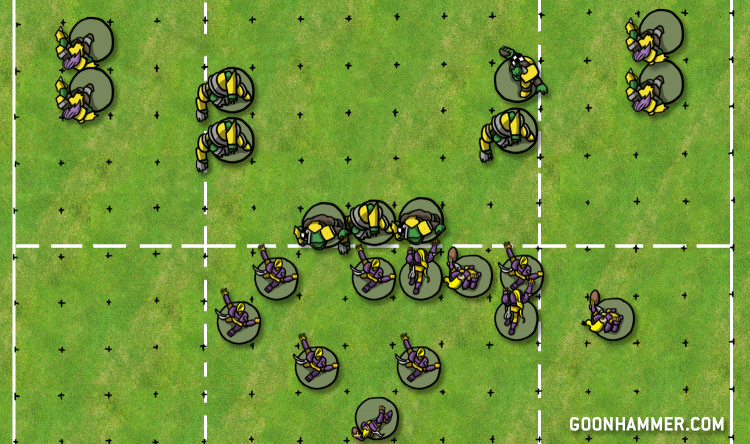
What kind of website would we be if we didn’t have custom-built diagrams to show what we’re talking about? The following example is using an Orc team. It’s set up to cover the whole pitch and specifically funnel the opponent towards the middle of the pitch so that the Orcs’ slower players can remain relevant throughout the drive. Let’s take a look:
In this example, our Orc team has 1 Thrower, 4 Blitzers, 4 Big Un Blockers, and 2 Lineman (notice the Team Comp?). The whole field is covered, fulfilling our first defensive concept, and there are only 3 players on the line: A Big Un and 2 lineman. Lineman are perfect for absorbing blocks, as they’re the least useful players on the team.
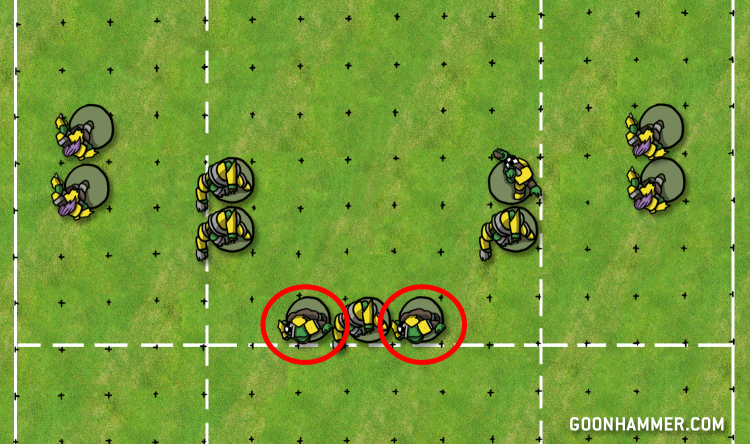
For the third defensive concept, let’s start with a question: have you spotted the weak points in this setup, yet? It’s not on the wide zones, they’re covered by Blitzers who are stacked up to prevent an easy end-around. The weak points in this setup are here:
In this example, the linemen are the weakest and least skilled players on the Orc team, making them the obvious point of attack. You may think that an obvious flaw like that is a bad thing, but dear reader, it’s not! One of the Orc team’s biggest weaknesses is their relative slowness, and by exhibiting a weak point in the middle of the pitch it will draw their opponent right down the middle, where there are plenty of S4 Big Uns ready to pummel the opposing team. Orcs on defense play best when they’re shading towards the middle of the pitch, so setting up an opponent’s run up the middle plays directly into the Orc team’s strongest defensive position.
Setting Up on Offense
Defenders set up first, and it’s up to the receiving team to answer. There is no specific “right” way to set up on offense. The key here is to create mismatches and exploit any seams in the defense. It’s important to think about how many opposing players you’ll get to block on your first turn, too. Most players will give you the minimum number of players to hit, which is 3, and you get 1 Blitz, so you’re generally looking at 4 players to block on your first turn.
Another thing to keep in mind here is that you don’t need to set up your offense symmetrically! Humans love bilateral symmetry, but in Blood Bowl, it’s often best to overload a side to help dictate where the game is going to be played. Generally speaking, the faster your team is, the more wackadoo you can get with your offensive formation. For slower teams, you’ll want to keep players more centrally located, as it may be harder to put supporting players where you need them.
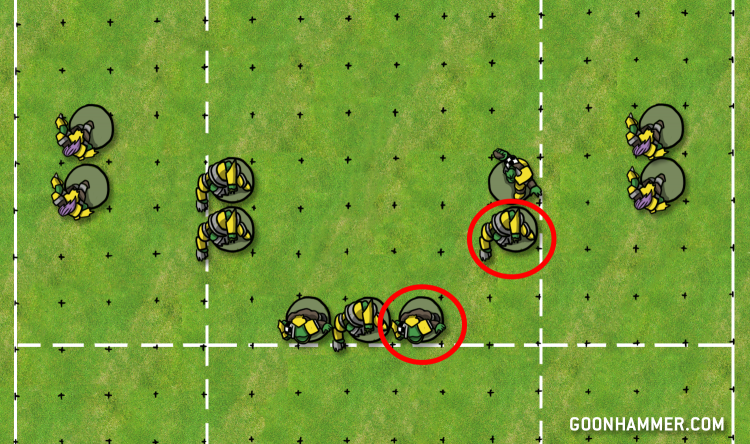
Ok, so let’s think about our example defense and decide where the focus of our blocking is going to be. Orc Linemen are tough but unskilled, making them an easy target for a quick block. Big ‘Un Blockers are tough, strong, and unskilled, also making them a tempting target, though we will need more support to effectively block them. On the right side, there’s an Orc Thrower hiding behind a Big ‘Un. Throwers are useful on offense, but on defense, they are kind of a liability. In addition, Orc Throwers have a lower AV than the rest of their team, making them a very tempting target for a block. So with all that in mind, we’re going to focus our efforts on these two:
The Lineman there is one of the weakest members of the Orc team, and the Big ‘Un is supported by the Orc Thrower, who we’re fine with getting into the eventual scrum. The Big ‘Un also has no skills, so a cheeky Blitzer can run in and exploit that no problem. Here’s how I would set up my Elven Union team in response to this defensive formation:
You’ll immediately notice that I’ve overloaded the right side. I’ve done this for two reasons: first to give me man-advantage on my first few blocks this drive. Second, I’d like to get my opponent to overcorrect as much as possible on their turn. We know that the Orc player here is trying to funnel me towards the middle, but that’s fine, because as soon as they give up the edges of the field, I can send some Elves to the wide zones and take advantage with my team’s better speed. And if my opponent sends too many orcs to the right or up the field to chase after my thrower, I can place a Catcher or Blitzer in space on the left side and threaten to score on a completed pass.
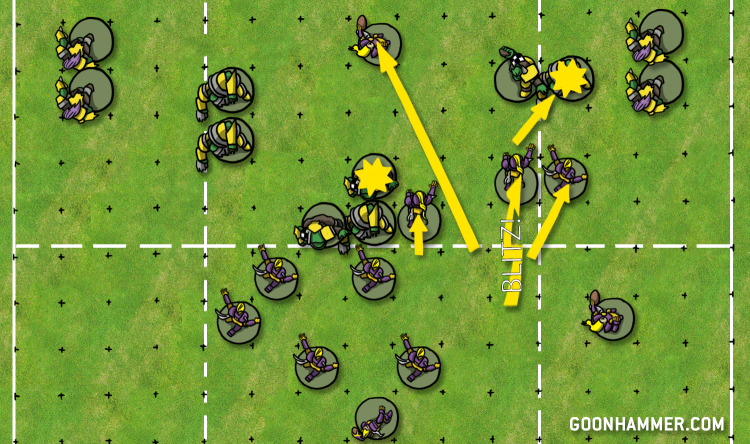
Let’s take a quick look at my first moves this drive:
By focusing on the right Lineman and Big ‘Un, I was able to create a seam in my opponent’s defense. Through that seam, I can send both of my catchers into their backfield, mark his important players with my Linemen and Blitzers, and set it up so that my ball carrier – my Thrower – can’t be easily blitzed this turn, or even at all.
Final Thoughts
The key takeaway here on offense is to use what your opponent is giving you. Since the receiving player sets up second, you can’t come into a drive with a 100% concrete plan. You need to evaluate the defense and identify the weak spots. It might be a daunting task at first, but with a few games under your belt, you’ll pick it up quick enough.
And on defense, remember those three important concepts listed above:
- Coverage
- Block Mitigation
- Setting Yourself Up for Success
If you can stick to those basics and use your team’s strengths to the best of your ability, then you’ll be well set-up to stymie your opponent’s scoring efforts. And as always, if you see an elf on the ground, stop what you’re doing and foul them!
Thanks for reading, Sports Fans! We’ll be back next time with some thoughts on how to move the ball, and how to stop the other guy from moving the ball. Fun stuff – See you on the pitch! And in the meantime if you have any questions or feedback, drop us a note in the comments below or email us at contact@goonhammer.com.
