
Something we’ve been continually asked about as we’ve released articles on Kill Team is Commanders We admittedly don’t think about them all that often; they’re not part of competitive play, and the majority of our content skews heavily in that direction, or at least assumes that people are playing Kill Team or Kill Team: Arena with Elites in games that range between 100 and 150 points. Yet in the early days of our Kill Team Tactics articles, we’d be frequently met with requests for Commanders and to weigh in on faction options. And while we started doing that for factions, we haven’t really had a chance to dive into the broader Commanders rule set. So this week, we’re looking at Commanders, and covering everything you need to know – from abilities to specialisms, to powers, it’s all here.
Table of Contents
Generic Commander Abilities
There are a few abilities that apply to every Commander in Kill Team, and these frequently get ignored fro some of the more specialized abilities and quirks that Commanders have access to from their faction.
General Tactics
Every kill team can use these tactics.
- Duel of Honour (1 CP) – Use at the start of the fight phase. Your Commander can only target enemy Commanders, but can re-roll failed hit and wound rolls.
- Heroic Intervention (1 CP) – Use at the end of the movement phase. If your commander did not Advance, Fall Back, Retreat or make a charge attempt. They can make a pile-in move if they are within 3” of an enemy model.Note: Despite not charging, they can still fight in the Fight Phase, however, they won’t count as charging, so they won’t fight first.
- Look Out, Sir! (1 CP) – If you fail a saving throw for a Commander and there is another, non-shaken model within 2” of them, the damage is inflicted on that model on a 2+.
Traits
When you pick a Commander for your kill team, you can buy them up to three of these traits. They all cost points, and the Generalist, Tactical Planner, and Master Specialist traits can only be taken by a level 4 Commander.
- Iron Will (5pts) – This model automatically passes Nerve Tests.
- Stoic Hero (10pts) – Ignore the penalty to hit rolls due to flesh wounds for this model
- Destined By Fate (10pts) – This model receives a 6+++ against Mortal Wounds
- Generalist (15pts, Level 4 trait) – Instead of choosing a level 4 specialism ability, you can choose a level 1 ability from a different specialism.
- Tactical Planner (15pts, Level 4 trait) – At the start of the first battle round, you receive D3 Command Points.
- Master Specialist (30pts, Level 4 trait) – Instead of choosing one unchosen ability from their skill tree, you can choose 2.
Psychic Powers
Commanders who are PSYKERs have access to these Psychic powers, which can replace the Psybolt power or any other they’d know. This is really helpful if your faction’s psychic discipline is not so great, though these aren’t particularly amazing either.
- Iron Arm (WC7) – Add 2 to the psykers Strength and Toughness. Really good when pushing past a breakpoint (so S4/6 → 6/8 when dealing with T3/4), and absolutely amazing when going from S3 to S5 against T4 (you go from wounding on 5’s to 3’s!). The toughness increase is also nice. Pretty solid if you plan to get into melee. B
- Forewarning (WC6) – The psyker has a 4++ save. If you don’t have an Invuln and/or you’re facing a ton of high AP weaponry, this is great, though of course, it does depend on them targeting your psyker. Another solid power. B
- Fire Shield (WC6) – Pick a friendly model within 6”, that model counts as obscured, even if they are completely visible to the firing model. I mean there’s situational usefulness of making a target that’s possibly close to an enemy obscured. But that’s it, pretty situational. C
- Psychic Shriek (WC5) – Choose an enemy model within 12” that is visible to the psyker. They must immediately take a Nerve Test. So in theory, you could do a WC5 power to force an enemy to have a 50% chance to die (Psybolt), or you could do a WC5 power that gives an enemy a…chance to not do anything for a turn. D
- Enfeeble (WC7) – Choose an enemy model within 12” that is visible to the psyker. They must subtract 1 from hit and wound rolls for close combat attacks. I mean the pro here is that the charge phase is before the psychic phase, so you can never really cast it on the wrong target. -1 to those rolls is also decent, but then you could also just…Psybolt them and get the -1 to hit assuming you can flesh wound them (or just put them out of action) C+
- Misfortune (WC7) – Choose an enemy model within 12” that is visible to the psyker. Any weapon that targets the model has 1 additional AP. The Warp Charge is a bit high for the effect, it’s not dreadful, just very mediocre. D
Ferocity Specialism
The messy killer Commander option, Ferocity Specialists specialize in fighting first and often, with abilities to always fight in the Hammer of Wrath phase, fight again on death, and scare the bajeezus out of nearby combatants. They’re better at drawn-out fights than Melee Specialists, but potentially not as good at winning decisively on the charge.
Tactics
Level 1 Tactic: Murderlust (1CP)
This model can make a charge against an enemy model within 15” of them, and you can add D3 to the dice roll.
Having a 9″ charge instead of a 7 inch charge (on average) is sort of fine, and using this alongside the CP re-roll when you absolutely have to make a charge is…also fine. It’s fine. C
Note: I’m sure if you use this tactic on a Troupe Master you’d be rolling 3D6+D3 for your charge roll, but you might only be able to declare a charge on something within 15”, but at least you’ll definitely make that charge.
Level 2 Tactic: Bellow of Wrath (2CP)
Enemy models within 6” of this model must re-roll successful Nerve tests.
2CP is pretty steep for this tactic in my opinion, especially since you’re gonna have to inflict flesh wounds to everything within 6” of you to really get value out of this tactic. Also, I’m not sure what the interaction is between “You can only re-roll a dice once” and “Re-roll a nerve test that you passed after using a re-roll” but I’m sure it’s hilarious. D
Level 3 Tactic: Fury Unleashed (2CP)
Add 1 to all Injury rolls you make while resolving attacks for this model in the Fight Phase.
I like this a lot, injury rolls are the main sticking point in Kill Team, and anything that makes them more effective is a major plus in my book. The 2CP cost is pretty annoying though. C-
Abilities
Level 1 Ability
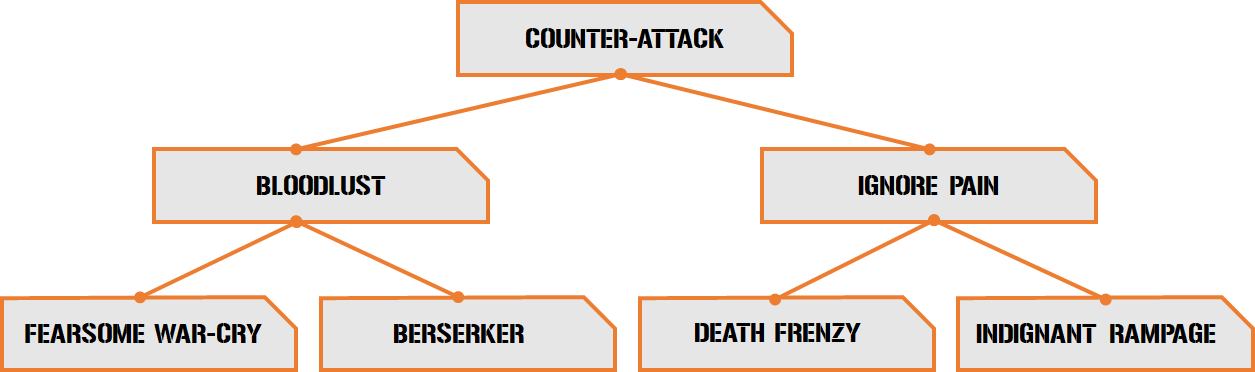
- Counter-attack: This model can always be chosen to fight in the Hammer of Wrath phase, even if they did not charge that battle round. So this ability is actually pretty major. If you have initiative for the turn, you can always attack first with this model. They literally cannot be counter-charged, because they’ll just smash them instantly. It’s a bit less powerful if you don’t have initiative, but it’s still a very, very interesting Level 1 ability. B+
Level 2 Abilities
- Bloodlust: You can re-roll failed charge rolls for this model. Solid ability, will generally save you the issue of having to use a CP when you’d really, honestly rather not. It also makes those charges much more certain, especially in combination with Murderlust. B
- Ignore Pain: This model’s attacks in the fight phase suffer no penalties due to flesh wounds to their hit rolls. Another good ability, less good on Marines due to Transhuman Physiology, but it’s still pretty neat. Especially good if you somehow get jumped on. C+
Level 3 Abilities
- Fearsome War Cry – Subtract 1 from hit rolls that target this model during a battle round in which it charged. So this ability is sort of counter productive. You’re generally going to want your specialist to charge, and you’re going to want them to just smear as many things as possible on the charge (so you don’t get hit back and they don’t fall back and screw you over). So the -1 to hit is only really useful in case you fail to kill everything you charge. Either way, -1 to hit is nice, but that’s it really. C
- Berserker – Subtract 1 from wound rolls for attacks that target this model in the Fight phase. So this is basically Fearsome War Cry, but it’s always on, and it’s much harder to influence a wound roll than a hit roll (due to stuff like Flesh Wounds), so you’re less likely to hit the point where you need a 6 to succeed and then you get a -1 to your roll…then still succeed because you need a 6. It’s just better, in my opinion. C+
- Death Frenzy – If this model is taken out of action in the Fight phase, you can choose to fight with them again, even if they have already fought in that phase. I like this, especially in combination with Ignore Pain (so you’re basically hitting with no modifiers) and Counter-attack (so you’ve almost always definitely got your first round of fighting off anyway). You just have to make sure you actually die in the fight phase, rather than in the shooting phase. B+
- Indignant Rampage – Add D3 to this model’s attacks characteristics for the duration of the Fight phase if they have less than half their wounds remaining. This is good if you either have some absolutely crazy multi-round combat going on (or you tank a ludicrous amount of overwatch), or if you just got killed and then you get to pop Death Frenzy, keep in mind, due to how Flesh Wounds work, if you have a model that normally has 3+ wounds, as soon as they suffer their first flesh wound, they’re going to have this ability on, constantly. B
Verdict
Ferocity Specialists are good at getting up close and personal with targets and then really, really good at protracted fights, and then even better if you somehow kill them in the Fight phase. Their main drawback is the issue that enemies can just…fall back and shoot you in the face. So you’re either going to have to annihilate everything you charge that phase, or find a way to prevent them from escaping. So you either want high attack, high damage weapons with a good Weapon Skill tied to it. Or something like a Succubus who charges a ton of stuff and hopes to win a No Escape roll.
Fortitude Specialism
Fortitude specialists are all about being hard to kill. And they live up to that, with a number of abilities that reduce incoming damage, increase wounds, or alter injury rolls. We’ll dig into the math around these in a bit, but suffice to say, this specialism delivers on its promise.
Tactics
Level 1 Tactic: Pain is for the Weak! (1 CP)
When an opponent makes an injury roll for a model within 3” of your specialist, you can subtract 1 from all dice rolled for that injury roll.
So this sounds really good, but then when you look at the maths involved, the absolute biggest difference is going from 75% of an out of action result to 55% when a 2 damage weapon hurts a model with 0 flesh wounds. This pretty much is only useful for low-mid damage weapons against low flesh wound targets. D+
Level 2 Tactic: It’s Just a Scratch (1 CP)
At the start of the Morale phase, roll a D6 for each Flesh Wound on this model. On a 5+, remove a flesh wound
Decent tactic, naturally better the more flesh wounds you have. 1 CP also makes it real usable. Consider it if your specialist has 2 or 3 flesh wounds. Which, based on some of the abilities here, is going to come up a lot. B
Level 3 Tactic: Refusal to Fall (2 CP)
When an opponent makes an injury roll for this model, apply a -2 modifier to the injury roll.
The text for this tactic is different for whatever reason, but it’s much, much better than Pain is for the Weak! A -2 modifier is worth way more than -1, and in combination with some of the abilities here can make your specialist an absolute hassle to shift. 2 CP cost does hurt it though. B-
Abilities

Level 1 Ability
Hardy Constitution – 6+ FNP, if you have an ability like this already, choose whichever one you like and re-roll 1s Solid starter ability, you’ll get to dodge a lot of wounds this way, especially in combination with some of the later abilities. B+
Level 2 Abilities
Indomitable – Once per round, you can make your opponent re-roll an Injury Roll for this model. The way re-rolls work for injury rolls (roll all the dice again) makes this ability less good than it should be, but it’s still really, really good for 1 damage weaponry. B
Hard to Kill – Halve the Damage characteristic of each weapon used to attack this model (rounding up) for the duration of the attack. Pretend I just posted the Iron Hands HoM article here and then added “This also works for Injury Rolls as well”. A+
Level 3 Abilities
- Feel No Pain – Opponents must subtract 1 from Injury rolls made for this model. I’m aware I just called Pain is for the Weak! a piece of crap, but getting the ability for ‘free’ without actually using CP makes it…actually really good. Combine with Refusal to Fall, and being Obscured to be functionally immortal until you’ve suffered at least a single flesh wound. A
- Unyielding Will – This model can attempt to deny a psychic power in the psychic phase. If it already can, it may deny an additional power. It’s okay, I guess, but the unkillable fuckerlord stuff is infinitely more fun. C+
- True Grit – Add 1 to this model’s toughness. Standard rules for anything that increases toughness, if it gets you past a breakpoint, it’s really good, if it doesn’t, then it’s trash. There’s also other better abilities here though. C (or B)
- Iron Constitution – Add 1 to this model’s wounds. An extra wound never goes amiss. Hard to Kill and Feel No Pain are just way better though. B-
Verdict
So this pretty much allows you to build the defensive version of the Fun Police (the offensive version is coming soon). We’ll compare the chances of a standard model and a Fortitude Specialist with, Indomitable, Feel No Pain and Hard to Kill getting shot in the face with a 6 damage weapon (after failing their armor save).
Standard model – Has a 98.40% chance to die. (The chances of getting at least single 4+ on 6 dice)
Meanwhile, let’s look at our Fortitude Specialist:
- Hard to Kill – Instantly reduces the weapon’s damage to 3, the chance is now 87.50%
- Feel No Pain – Opponents have to subtract 1 from Injury Rolls made by that model, meaning the chance is now 70.40%
- Indomitable – Forcing the opponent to re-roll the Injury Roll if you’d be taken out of action lowers the chance to 49.57%.
You’ve taken it from a certain thing to a coinflip, and that’s without even using CP on Refusal to Fall, which would make it literally impossible to suffer anything more than a flesh wound from a SIX DAMAGE WEAPON.
So they’re really, really good at not dying, especially if you’re able to take advantage of FNP rolls as well. A barrage of mortal wounds from a bunch of different sources will eventually clean their clocks, but you have to get them down to 0 wounds first anyway…
Leadership Specialism
Leadership Specialists should, in theory, inspire troops on the battlefield. And they kind of do that, with abilities that make it easier for their teams to pass Nerve tests and abilities that extend the range of their aura abilities. Unfortunately, most of these aren’t very useful, and the net effect of several of these is paying to get more out of abilities you already have to spend CP to use.
Tactics
Level 1 Tactic: Second in Command (1 CP)
Use this tactic at the start of the battle round. Your Leader specialist can use Commander Aura tactics, and they gain the aura ability.
…You can spend a CP to… spend a CP to have the model that generally hides in the back of the board be able to use an aura that generally has a 6″ range.
…I hate this. D-
Level 2 Tactic: Bring Them Down! (1 CP)
Select a model visible to the Leadership Specialist at the start of the shooting phase. You can re-roll hit rolls of 1 against that model for this phase.Pretty much what it says here, a real decent way to just get re-roll 1s against a specific target. If you’re swimming in that, it’s bad, but if not, it’s good. B-
Level 3 Tactic: Inspirational Oratory (2 CP)
Use at the start of the Morale Phase. All friendly models on the battlefield pass Nerve tests. This is pretty amazing, just being able to blanket pass all nerve tests is really, really good. The main drawback is the pretty heavy CP cost, in combination of when you have to use it. B+
Abilities
Level 1 Ability
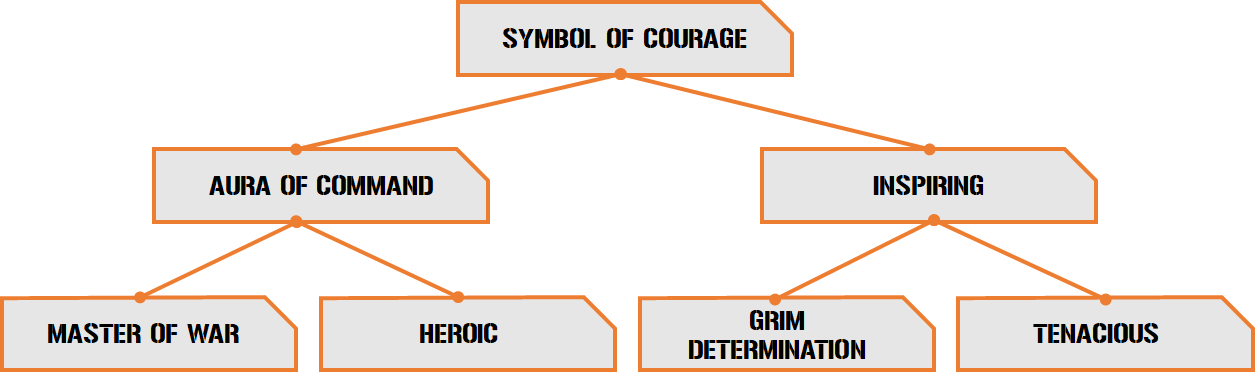
- Symbol of Courage – As long as this model is on the battlefield and not shaken, subtract 1 from Nerve tests for friendly models. Solid ability, pretty much raises the threshold of dead models you’ll need in order to actually start getting shaken. Especially good when comboed with the roll D3 for your Nerve test faction traits. B
Level 2 Abilities
- Aura of Command – Increase the range of all Aura tactics used by this model by 3”. Basically, an Aura tactic is a tactic that your commander can use that basically gives them the.. auras that the model would get in normal 40k. No, I don’t get why it’s so convoluted. Naturally, this ability depends on how good your aura is. C
- Inspiring – Friendly models within 3” pass Nerve tests automatically. This is pretty okay, getting to add a little Fearless bubble to any other bubbles you already have is neat. C+
Level 3 Abilities
- Master of War – Each time this model uses an Aura Tactic, you regain 1CP on a roll of a 3+. Really solid B+, getting to use your decent aura abilities for free makes this really nice, especially when comboed with…
- Heroic – You gain 1 additional CP at the start of the round. This can only be spent on Commander Tactics. Naturally, you can combo this with Master of War, use it on an Aura Tactic, recycle your CP into a CP you can use on anything else, and enjoy your 3CP in a single turn. A+
- Grim Determination – Friendly models within 3” of this model do not suffer penalties for one flesh wound they have. So, naturally you’d think “Oh this is okay but trash on Marines”. Except the wording of the rule means that Marines just get to ignore hit penalties from their first two flesh wounds, pretty much meaning they don’t degrade, ever. Other races get to enjoy not degrading a little, as a treat. The range is a bit lacking though. C+ (B on Marines)
- Tenacious – This model always controls an objective if they are within 2” of it, even if there are more enemy models within 2”. If an enemy model with a similar ability is nearby, neither ability has an effect. There’s probably some sort of use where you can give your model that is based around having a posse within 3 inches of it at all time an ability that functions the best when it is not near anything and surrounded by enemies, but I can’t quite think what it is. C-
Verdict
This seems like it’d be pretty fun and interesting and then you find out the Strategist Specialist just completely and utterly blows it out of the water, which is sorta sad. Oh well.
Logistics Specialism
Logistics specialists have abilities based around buffing teammates and uh, generating campaign bonuses. Given how bad and universally reviled the Kill Team rulebook campaign is, you can imagine how much value that adds to Logistics Commanders.
Tactics
Level 1 Tactic: Grav Chute (1 CP)
Pick a single model at the start of the first battle round. This model does not take falling damage and never falls on another model.
I guess this is good if you’re playing on a really vertical map, and you decide to jump down a bunch, and then you’re really scared of that ⅙ chance of a mortal wound for each 3 inches you fall down. I guess. D-
Level 2 Tactic: Armour-Piercing Ammunition (1 CP)
Use in the Shooting phase when this model makes a shooting attack with an Assault, Heavy, Rapid Fire or Pistol weapon. Increase that weapon’s AP and Strength by 1.
This is interesting, in a vacuum, it’s really, really bad, but when combined with some of the abilities that show up, you’re basically giving a weapon 6” more range, re-rolling hit rolls of 1, possibly modifying the wound roll by 1, increasing the AP by 1 and then doing an extra damage with the weapon, remember you have this when you really wanna make something count (by hitting Strength and AP breakpoint). B-
Level 3 Tactic: Refractor Field (1 CP)
Pick a single model at the start of the first battle round. That model has a 5+ invulnerable save for the rest of the battle.
I really like this, you can pick a high-value target (like a Sniper specialist) that’s likely to get their head blown off by high AP weaponry and just make them a much more unappealing target, or just make something sturdy even more sturdy. B+
Abilities
Level 1 Ability
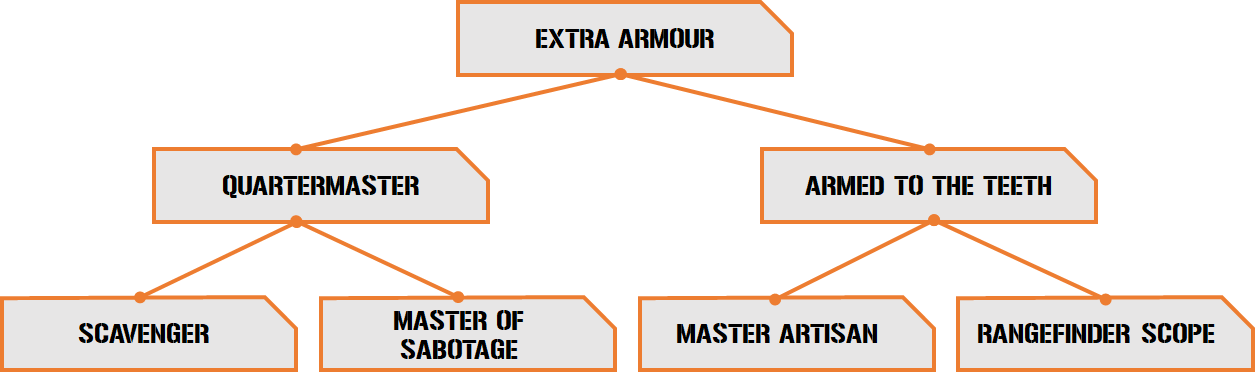
- Extra Armor – Ignore AP characteristics of -1 for attacks that target this model. It’s neat, getting better saves is always good. Not much else to say. B
Level 2 Abilities
- Quartermaster – If this model is in your kill team and not out of action at the end of the game. Roll a dice for each point of Materiel you’d lose. On a 2+, you don’t lose it. In Campaign: I guess you could get some use out of this where you completely kneecap your Commander so you can play the long con of just hoarding Materiel and boring your opponents to death. C+ Outside of Campaign: Trash Garbage. K-
- Armed to the Teeth – In each shooting phase, instead of only a single model from your Kill Team being able to fire a Grenade weapon. This model, and another model in your Kill Team may fire a Grenade weapon instead of any other weapons. So most of the time this is going to be comically situational since grenades are just generally better than “the normal weapon your grunts carry”. The one time I was thinking it’d be really useful is on Death Guard, so you can use the Blight Grenade Aura Tactic and have two models throw out really busted Blight Grenades…but the model that does the aura doesn’t have Blight Grenades, so..yeah. D+
Level 3 Abilities
- Scavenger – If at the end of the battle, this model is not out of action, roll a D6 and add the number of enemy models that were taken out of action (before casualty rolls) to the result. On a 7+, you gain 1 Materiel.
- In Campaign: I guess you could get some use out of this where you completely kneecap your Commander so you can play the long con of just hoarding Materiel and boring your opponents to death. C+
- Outside of Campaign: Trash Garbage. K-
- Master of Sabotage – If, at the end of the battle, this model is not out of action. Roll a D6 for each opponent that played that mission. On a 5+ they lose 1 Materiel. So you know when people go “If your game comes down to a dice roll, you probably did a bunch of things wrong beforehand.”? Imagine a 4-player game that’s part of your campaign where some chucklefuck just hides their Level 3 Logistics specialist behind a pillar for the entire game, doesn’t win, and then rolls a 3 for their Quartermaster roll and then a 6 for their Master of Sabotage roll and you hit 0 Materiel and then you’re out of the campaign. Your campaign came down to a dice roll, and you lost. A+
- …No but Realistically though, K
- Master Artisan – Pick one of this model’s weapons, add 1 to its damage characteristic. I was so busy ragging on abilities that GAVE OR TOOK AWAY Materiel that I wasn’t expecting an actual good ability to show up. This dramatically increases the killing power of any weapon you have, and it also makes it much easier to carve through multi wound models, works for pretty much any weapon, especially when combined with Armour Piercing Ammunition and Rangefinder Scope. A
- Rangefinder Scope – Increase the range of an Assault, Heavy, Rapid Fire or Pistol weapon by 6” and re-roll hit rolls of 1 when making a shooting attack with this weapon. As mentioned in Armour-Piercing Ammunition this is actually really good, re-rolling 1s is good, especially if you don’t have the aura to do so, and no one will ever complain about their weapon getting more range.. B+
Verdict
You can make a pretty decent argument that the combo here makes a Logistics Specialist better at shooting than a Shooting Specialist (besides a couple of weird outliers). Of course, the entire left side of the tree is horrendous, so don’t go near it unless you love Materiel and you want to marry it and kiss it on the lips and so on.
Melee Specialism
Melee specialists are all about bringing the pain in melee combat. They’re like a beefed-up version of the Combat Specialism for Commanders, and give you a few ways to increase your melee damage/output.
Tactics
Level 1 Tactic: Stunning Blow (1 CP)
When this model makes an attack against an enemy model, if the attack hits, then that enemy model must deduct 1 from their hit rolls for the rest of the battle round. The fact it’s only one attack makes it not ideal, but the fact it only has to hit makes it pretty okay. The actual reward is rather underwhelming though… C-
Level 2 Tactic: Haymaker (1 CP)
When this model makes an attack against an enemy model, if that attack is successful, the damage inflicted is doubled. Double damage is one of my fave things in Kill Team, but you have to be absolutely positively sure you’re going to be able to get through every roll possible. Of course, if you do, the payoff is massive, but…it’s risky. B
Level 3 Tactic: Fight Dirty (2 CP)
When an enemy model targets this model in the fight phase, the enemy model must subtract 2 from all hit rolls that target your model. I mean you can get some mileage out of partially neutering a single model (making them go for 3+ to 5+ to hit is rather drastic), but it costs 2CP…bleh. D+
Abilities
Level 1 Ability
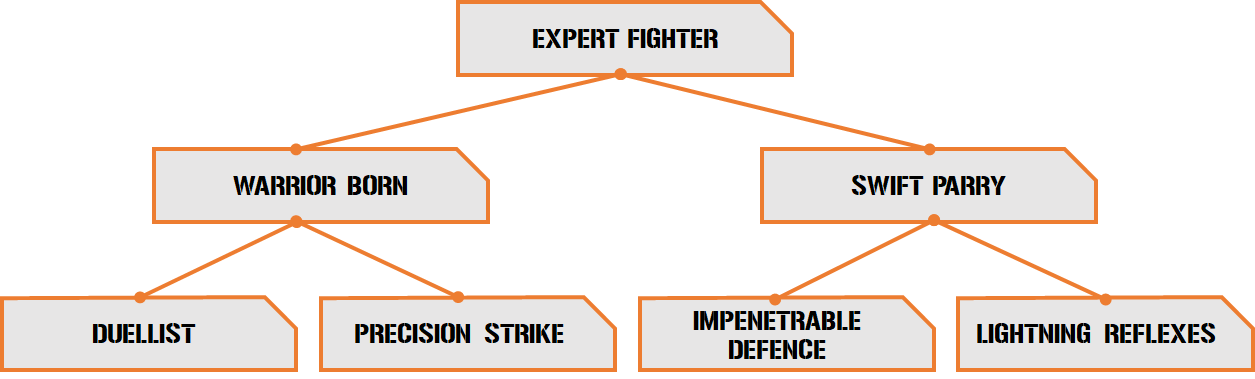
- Expert Fighter – Add 1 to this model’s Attacks characteristic. I swear this is just the same name and ability that the Combat specialist gets at level 1. …I just checked and it is. The ability is great but I’m mad they just literally repeated the same thing, and Commanders should get something better. B+
Level 2 Abilities
- Warrior Born – Re-roll hit and wound rolls of 1 in the Fight Phase for this model. Really, really good, especially if you have an aura tactic that does something else. A
- Swift Parry – Opponents must re-roll hit rolls of 6 for attacks that target this model in the Fight phase. Has enormous levels of synergy with Stunning Blow and Fight Dirty, or just flesh wounding a bunch of targets that are going for you. The chance of hitting a model when you’re 6+ to hit and re-roll successes is less than 3%, so…that’s really cool. On it’s own though, it’s just a nice thing to have, but nothing major. B
Level 3 Abilities
- Duellist – When you use the Duel of Honour tactic on this model, roll a D6, on a 2+ you gain a Command point. Note: Duel of Honour only allows you to target enemy Commanders for that Fight phase, but you re-roll hit and wound rolls. Duel of Honour is a good tactic if you use it in the obvious way, getting to cast it for basically 0 CP is also really, really good. Also goes very well with Stunning Blow and Haymaker, since you can re-roll all the fiddly parts of the attack (and then just rely on some AP to get the latter through). Has a bit of redundancy with Warrior Born, but then it’s not like you’re always going to be targeting Commanders in every Fight phase. B+
- Precision Strike – Each time you make a wound roll of a 6+ for this model’s attack in the Fight phase, inflict a number of mortal wounds equal to the weapon’s damage characteristic, the attack sequence then ends. I really, really dislike abilities like this. Mortal Wounds are capped at 1 damage each (but they get applied sequentially), which means if you’re hitting someone with a S8, AP-5, Damage 6 weapon, then rolling a 5 to wound means you’re rolling 6 dice for the Injury roll, but rolling a 6 means you’re rolling 1 dice, no matter what. D
Note: If you’re playing with the Injury Roll rolling the damage characteristic of the weapon regardless. Then this has some legs to it, you get around invulns at the very least. In which case I’d give it a B+ - Impenetrable Defence – Subtract 1 from the Attacks characteristic of all enemy models within 1” of this model when they fight in the Fight phase, until the phase ends. A big scary commander is probably the one thing you’re not going to be afraid of overkilling, so lowering the number of attacks in total has some merit to it. However, to be more uncharitable, it’s (to me) a worse version of the Combat specialist ability which GIVES you attacks based on the amount of enemies nearby. C+
- Lightning Reflexes – Roll a D6 each time this model would lose a wound in the Fight phase, on a 5+ it’s not lost. If you have an ability like this, choose the one you want and re-roll 1s. A feel no pain is always good, and a 5+ one is even better. Nice and solid ability. A
Note: Since this ability only applies in the Fight phase, I have no idea how the ‘stacking’ with abilities like Disgustingly Resilient during phases which aren’t the Fight phase. I’d assume it doesn’t since you can’t choose to use Lightning Reflexes outside of the Fight phase.
Verdict
So, in a vacuum, I’d say this specialist is actually worse than the Combat specialist, especially at killing. The Combat specialist gives you at least 2 extra attacks, vs the Melee specialist’s 1. The combat specialist adds 1 to hit rolls and can re-roll wound rolls, vs the Melee specialist being able to re-roll hit and wound rolls of 1. True, the Melee specialist is better at not dying, but then you could just take a Fortitude specialist to be an unkillable wall.
Psyker Specialism
Psyker specialists are all about casting psychic powers, and making casting easier and more common during a game.
Before we get started, we’re gonna need a little reminder on what Psybolt does:
- Psybolt (WC5) – The closest visible enemy model within 18” of the psyker suffers 1 mortal wound. If the result of the test was 11+, they suffer D3 mortal wounds.
Additionally, note that Psyker Commanders have access to the generic psychic powers listed in Kill Team: Commanders, that we’ve already covered.
Tactics
Level 1 Tactic: Mental Focus (1/2 CP)
After manifesting Psybolt, you can manifest Psybolt again. If you can only manifest 1 psychic power per phase, this power costs 2CP.
1 CP to just pretty much have an 83 92% chance to just do another mortal wound to a target? Amazing. A+
Level 2 Tactic: Loremaster (2 CP)
At the start of the psychic phase, this model can swap a power it currently knows (other than Psybolt), for another power generated from the Psychic powers list.
You do lose your faction-specific power if you do this, but it does allow you to be extremely flexible, if you want. It’s nice to have, and it might let you do a big play. B
Level 3 Tactic: Psychic Barrage (2 CP)
This model can attempt to manifest one additional power in this phase that it has not already attempted to manifest in this phase.
If there were more diet-Smite powers (or Executioner!) this’d be absolutely disgusting. Instead, it’s just more…nice to have. B-
Abilities
Level 1 Ability
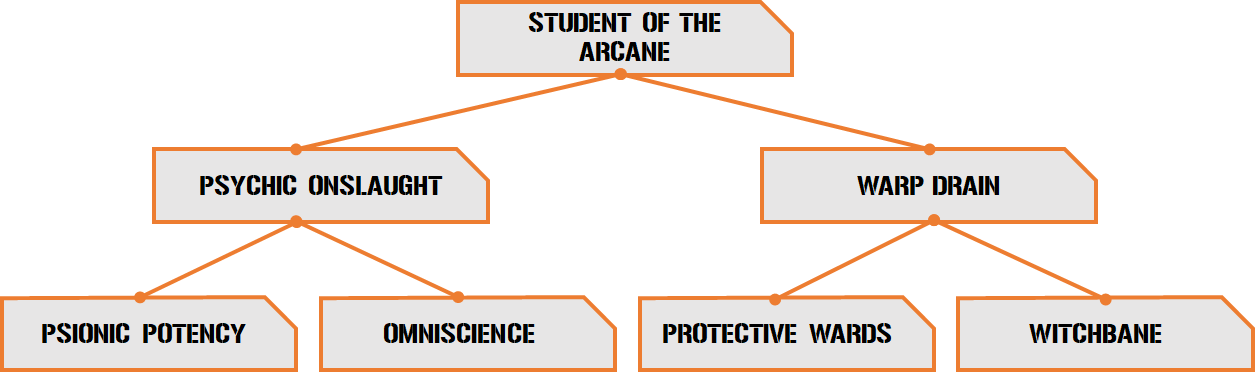
- Student of the Arcane – Add 1 to this model’s psychic tests. Solid, good, nice. It does what you want it to do, the only way this would be better is if the number was higher, but then casting Psybolt on a 3+ would be a bit crazy…. A
Level 2 Abilities
- Psychic Onslaught – Add 1 to this model’s Psychic tests for each psychic power they manifested earlier in the battle round. …Allows you to cast your second Psybolt on a 3+, dear god. A+
- Warp Drain – Add 1 to this model’s Deny the Witch tests. It’s not really bad or anything, but the rest of the tree is so much better that this average ability just looks like crap. D+
Level 3 Abilities
- Psychic Potency – Increase the range of Psybolt from 18” to 24”. This seems like it should be really good, but it generally won’t be, since there’ll be at least 1 model within 18” that’s visible, and this sadly doesn’t stack with Omniscience in the fun way due to how the ability is written. C-
- Omniscience – You can target any visible model within 18” instead of the closest. Your psyker is now a sniper that can just deal mortal wounds for fun. A+
- Protective Wards – If this model suffers Perils of the Warp, roll a D6 for each mortal wound they suffer, on a 4+, that wound is not lost. If a model has an ability with a similar effect, choose which ability applies and re-roll 1s. A 50% chance to ignore mortal wounds is great. On a Farseer this is actually disgusting, since it turns into “ignore wounds on 2+ and re-roll 1s”. It’s real good. A
- Witchbane – This model can attempt to deny one additional psychic power per round. Similar to Warp Drain, this is pretty okay, you can try and just shut down Psybolts, but generally being proactive is better than being reactive… B-
Verdict
This is pretty straightforward, you spend 1 CP a turn to get off 2 almost guaranteed mortal wounds on 2 targets of your choice. Farseers can re-roll dice at least once, and pretty much don’t get hurt by Perils, which is great. Shadowseers and Thousand Sons Sorcerers (if they can get 3CP in a turn) can slam down Bolt of Change or Mirror of Minds (at a +3 modifier) to do even more Mortal Wounds. It’s pretty obvious, you just deal mortal wounds that they don’t have a lot of recourse against, it’s amazing.
Shooting Specialism
Shooting specialists specialize in uh, shooting things. They have a bunch of abilities that focus on killing things at a distance and pulling off weird trick shots.
Tactics
Level 1 Tactic: Itchy Trigger Finger (1 CP)
Ready this model at the start of the Shooting phase if it is neither shaken nor within 1” of an enemy model.
This allows your Shooting specialist to move and then shoot before most models. However, unlike the Sniper specialist, you don’t get any bonuses for Readying this model, so..it’s okay, I guess. C+
Level 2 Tactic: Lucky Hit (1 CP)
Use after you hit with an attack with this model in the shooting phase. Do not make a wound roll, it automatically succeeds.
Considering you’re able to re-roll 1s with this specialist and ignore obstruction penalties, this is really, really good, especially if you’ve got one of those mid to high damage, low strength weapons, like a Guardian Spear with Vengeance Rounds or something. B+
Level 3 Tactic: Impossible Shot (1 CP)
Use when this model makes an attack that targets an enemy model in the Shooting phase. Do not make a hit roll, this attack automatically hits. You can’t use this in the same battle round as Lucky Hit
Considering most Commanders will be hitting on 2s or 3s, ignoring obscured penalties, and getting to re-roll 1s, this isn’t exactly great, at least until you’ve got multiple flesh wounds and you’ve got issues shooting stuff. C+
Abilities
Level 1 Ability
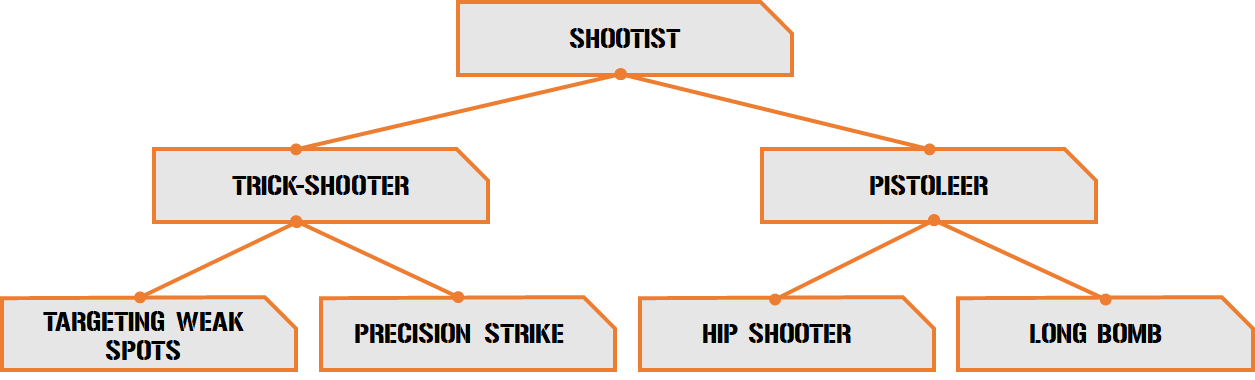
- Shootist – Re-roll hit rolls of 1 for this model when it makes a shooting attack. This is fine, you’re generally going to be hitting on 2s or 3s anyway, so there’s not much here that can go better for you. B+
Level 2 Abilities
- Trick-shooter – This model does not suffer penalties to their hit rolls due to their target being obscured. Pretty much keeps you at hitting on 2s, re-rolling 1s, unless you’re firing at long range. So another decent ability. B
- Pistoleer – This model can shoot twice with one Pistol weapon they are armed with in the Shooting phase; after they have shot with their pistol the first time, immediately shoot with it again. I’m 99% sure that a Harlequin Troupe Master (or an Autarch with Swooping Hawk Wings) running (or flying) up to within 2 inches of you, using Itchy Trigger Finger to ready up, popping their Aura Tactic to re-roll failed wound rolls (or saving a CP for when they roll a 1 to wound), and then shooting you in the face twice with a Fusion Pistol counts as some sort of war crime. A+ if you have a really good Pistol. D otherwise.
Level 3 Abilities
- Targeting Weak Spots – Add 1 to wound rolls for this model when it makes a shooting attack. Works pretty well with mid strength, high AP and damage weapons, going from 3s to 2s is really, really nice. B
- Precision Strike – Each time you roll a 6+ to wound for this model’s attack in the shooting phase, inflict a number of mortal wounds on the target equal to the weapon’s damage characteristic, the attack sequence then ends. How good this is depends on how mortal wounds work in your play group/tournament, because apparently there’s some confusion. So I’m gonna cover both options:
- Mortal Wounds Always Deal 1 Damage For Injury Rolls: I hate this! The way mortal wounds work is like a trap! You’re making your massive damage weapon count as 1 damage for injury rolls! It’s okay I guess if they have a 2+ invulnerable save. D-
- Mortal Wounds Count as Weapon Damage for Injury Rolls: Pretty decent, the + to wound works with Targeting Weak Spots, allowing to get through invulns and high armor saves. It’s a nice surprise when it happens. B+
- Hip Shooter – This model can shoot an Assault, Rapid Fire or Pistol weapon in the shooting phase even if it Advanced. If it does so, subtract 1 from any hit rolls made unless you’re firing an Assault weapon. As an Eldar player, I… Seriously though, this is really neat for anything that isn’t Eldar, especially in combination with Itchy Trigger Finger. It makes you more mobile and able to just run up and frag things. If the -1 to hit gets you, then just use Impossible Shot as well. B, unless you’re Eldar, in which case F.
- Long Bomb – Double the range of any Grenade weapons this model uses. This model can also target an enemy model that is not visible to them with a Grenade weapon, however the target counts as obscured. So uh, Krak Grenades are now 12” range weapons, that don’t suffer from long range penalties, will always hit at base BS if you take Trick Shooter (so generally 2’s, re-rolling 1s), and wounding on 2s with Targeting Weak Spots, and then doing D3 damage, AP is an issue, but still. This could be fun for a stupid gimmick. C+
Verdict
Despite being called a Shooting specialist, this is more of a crazy gimmick specialist, the main tangible bonuses you get a re-roll 1s to hit, +1 to wound, and no hit penalty for being obscured, which is nothing to write home about.
Of course, if you want to be Pistol Elf, then go nuts, take this, run around and shoot lava at things and just be a complete shithead. That or Krak Grenade thrower.
Stealth Specialism
Stealth Specialists are all about moving through the shadows and evading the gaze (and bullets) of their enemies. In practice, this means a lot of tricks for moving around the battlefield, and most fo them aren’t that useful.
Tactics
Level 1 Tactic: Hidden Deployment (1CP)
Use at the start of the first battle round, but before the Initiative Phase. This model can make a normal move as if it were the Movement phase.
Another recycled tactic, this one taken from the Veteran Specialist, except it’s actually worse, since you can’t use this one to Advance. Amazing. B
Level 2 Tactic: Dive for Cover (1 CP)
Use at the start of the shooting phase if this model is within 2” of a piece of terrain, that model is now obscured from all enemy models.
The most interesting/fun use I can think of is using it after you fail a charge to make yourself very, very hard to shift. Since in that case, it’s very possible to be “out in the open” but within 2 inches of any terrain piece. C+
Level 3 Tactic: Backstab (2 CP)
Use when a Stealth specialist attacks a model that is within 1” of any other friendly model. If the attack hits, the specialist inflicts a number of mortal wounds equal to the weapon’s damage characteristic.
So this is interesting. It’s pretty much made for, like a bunch of things, low strength, low AP, high damage weapons, but also on a chassis that’s built for a Stealth specialist. So this means you’re looking at things like Huskblade Archons, Kiss Harlequins and GSC Magi. Then you realize that you could instead make the Archon a Strategist, the Troupe Master a Shooter and the Magi/Shadowseer a Psyker and just be better off in every way.
Good idea, but held back by your lack of options. D+
Abilities
Level 1 Ability
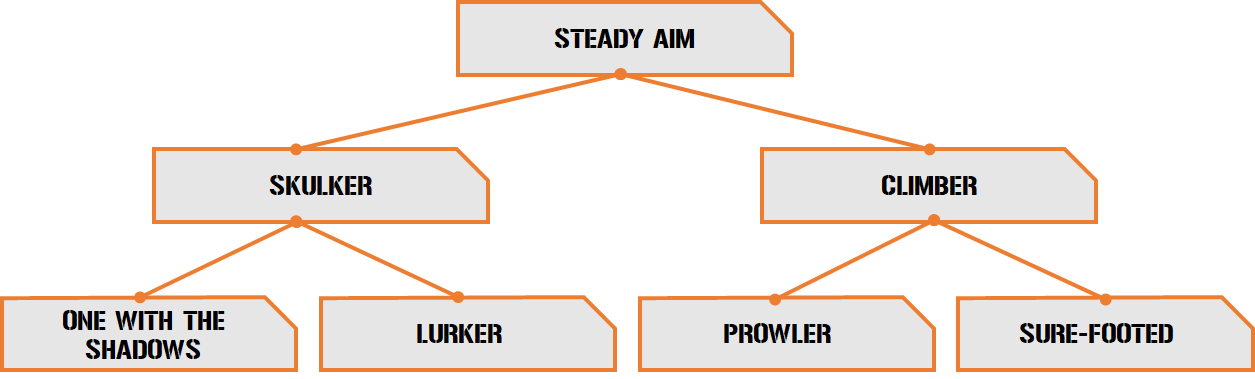
- Steady Aim – This model always counts as readied in the Shooting phase provided it remained stationary or made a normal move of no more than half of its Move characteristic in the movement phase of this battle round. This lets you slowly creep up the board while getting a major advantage in shooting stuff. But to what end? C
Level 2 Abilities
- Skulker – If this model is completely visible but within 1” of any terrain, it is considered to be obscured. So you’re pretty much at -1 to hit and injure no matter what. That’s pretty neat. B
- Climber – If this model climbs any distance vertically during a normal move, halve the distance moved. Sadly this doesn’t work for charges, so it’s just another sort of neat ability, rather than anything really interesting. C-
Level 3 Abilities
- One with the Shadows – If this model is obscured when targeted by an enemy in the Shooting Phase, your opponent must subtract 1 from hit rolls. -2 to hit is even better, obviously, now you’re even harder to hit! B
- Lurker – If this model is obscured and would lose a wound in the shooting phase. It does not lose that wound on a 5+. Standard semi-situational FNP roll, another nice thing to have, but…that’s all it is, it doesn’t really add up to anything. B
- Prowler – Enemy units cannot fire Overwatch at this model if it was within 6” of them at the start of the Movement phase. Allows you to get a nice, incident free, safe charge off. Now we just need something good to round it out. B+
- Sure-footed – This model is never affected by difficult, dangerous or booby-trapped terrain. …Oh. D-
Verdict
This specialism is…weird. You get a bunch of stuff that makes you hard to hit or be shot at, but then it doesn’t do anything to make it so people would want to shoot this model. It’d be good for something that’s naturally scary, like a Broodlord, but then you could just make your Broodlord even scarier with the Fortitude, Strength or Ferocity specialisms instead.
You’re basically throwing bad money after good with this thing.
Strategist Specialism
Strategists are the core thinkers, the real tactical masterminds out in the kill team field. And this is represented by them giving you more CP, the ability to re-use tactics, and a set of abilities that make them among the best Commanders you can choose.
Tactics
Level 1 Tactic: Decoys (2 CP)
Use this Tactic at the start of the first battle round, but before the Initiative phase. Roll a D3, you can redeploy that many models.
So we start off with a budget version of Craftworlds Phantasm, it’s sorta okay, but the cost is a bit steep, though as I mentioned there if you’re Sun Tzu or something, you can get some use out of this. C+
Level 2 Tactic: Inspired Tactics (1CP)
Use this tactic after you’ve used a tactic from the Command Points and Tactics section of the Core book. You can use that tactic again in this phase.
Look how OP these tactics already are now imagine you can use them twice in the same phase and they cost half as much CP (I’m not even going to get into the amount of CP this specialist just generates). Also you can just do a re-roll twice in the same phase, for fun. A+
Level 3 Tactic: Counter Tactics (2 CP)
Use this Tactic after your opponent uses a Tactic. Your opponent must spend 1 additional point to use that Tactic. If they can’t or won’t, the CP is refunded, but the tactic doesn’t resolve, and can’t be attempted again this phase.
So now you get to just use the massive CP advantage this specialist already gives you to just…bully your opponent into not being able to use their Tactics. This is hilarious, this entire specialist is hilarious. Decisive Shot them and then when your opponent tries to counter you, use this and then generate CP for them even daring to think they can use a Tactic, then just use Inspired Tactics and Decisive Shot them again. S+
Abilities
Level 1 Ability
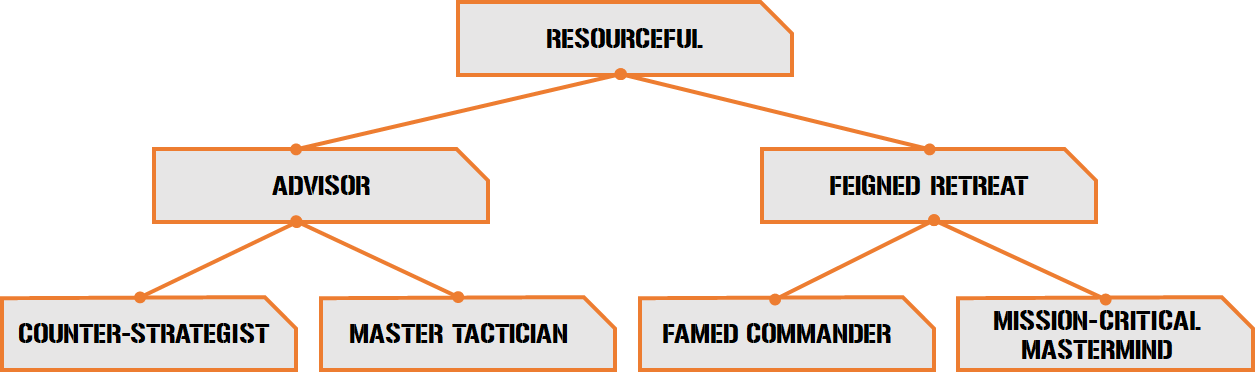
- Resourceful – As long as this model is on the battlefield and not shaken, you gain an additional command point at the start of the round. 3CP a turn lets you do so much more, there’s not much to say, it’s just obviously fantastic. In fact, it’s so good it single-handedly makes every other Commander Specialism look pretty bad, and immediately makes Commanders who can take the Strategist specialism more valuable, because even at level 1 they pull their weight. S+
Level 2 Abilities
- Advisor – Whilst this model is within 3” of other friendly specialists. Those specialists count as being one level higher than they actually are for the purposes of determining what tactics you can use. This is…sorta fun sounding. It’s the type of thing where when I rate abilities like this I can’t really give it a proper rating (because it’s so situational), but in a campaign where things level up and are all over the place, you’re more than likely going to find some use for this. B
- Feigned Retreat – This model can shoot or React even if it Fell Back or Retreated earlier in the battle round. So there’s two halves to this ability: The first half is, if you get charged or end up in a crummy combat, you can fall back and still shoot things, that’s really good. The second half pretty much means you can retreat from a charge attempt, and then either…retreat again if you get charged again, or shoot them during both overwatch and the shooting phase. It’s a good utility ability. A-
Level 3 Abilities
- Counter-Strategist – As long as this model is on the battlefield and not shaken, roll a D6 each time an opponent uses a tactic. On a 5+, you gain 1 Command Point. So this already owns in standard 1v1 Kill Team, but if you’re ever doing one of those wacky 4 player missions, this becomes completely and utterly disgusting. There’s a reason they capped this in the base game, and it’s because getting at least 50% more CP than normal is…it’s good. A+
- Master Tactician – As long as this model is on the battlefield and not shaken, reduce the cost of all Tactics you use by 1 (to a minimum of 1). Uh. Huh. Okay. S+
- Famed Commander – If this model is on the battlefield and not shaken, gain an additional command point. This can only be spent on an aura tactic for this model in this battle round. So this naturally depends on the auras you’re bringing along. For Ethereals and Cadre Fireblades, this is real good. For AM Commanders it’s neat, and for Commissars it’s pretty eh. Weigh up your auras vs the other ability here and just make a judgement call. B+
- Mission-Critical Mastermind – Your Kill Team cannot be broken while this model is on the battlefield. Yeah sure, let’s just cap it off with this. You can’t be broken. Dear lord. A
Verdict
This is really good, really good. It’s pretty much tied with Psyker for best specialist.
Spend 50 points to get a cheapass level 4 Commissar, Company Commander (or just shy of 70 points for a Cadre Fireblade or Ethereal), give them Resourceful, Advisor, Counter-Strategist, then spend 45 points at level 4 to give them Tactical Planner, Master Tactician and Mission-Critical Mastermind (or Famed Commander if you want to use Auras). Since you’re being an actual CP cop here, bring along a level 3 Comms Specialist with Expert and Command Relay too, and bring a Leader with Tactician as well.
You now start T1 with 3+D3 CP, are now generating 3CP per turn (with a chance to generate a 4th on a roll of 5+), all your tactics are going to be pretty much 1CP and you get the CP back on a 6+ as well as an extra CP on a 5+, you generate CP for each enemy tactic on a 5+ (as well as preventing them from using their own tactics for 1CP), and you are either unbreakable or have free auras.
Congratulations you are now playing early 8th edition 40k, have fun.
Strength Specialism

Strength specialists are all about throwing their weight around and hurting enemy models, giving you options for boosting your model’s Strength characteristic and at level 3, increasing the damage of their melee weapons.
Tactics
Level 1 Tactic: Body Slam (1CP)
Use this Tactic after this model ends a charge move within 1” of any enemy models. Roll a D6 for each enemy model within 1” of this model. On a 6, that model suffers 1 mortal wound.
It’s basically Mandiblasters, so a nice way to do some out of phase mortal wounds. The chance is low, so it’s not really ideal, but if you manage to get a nice multi-charge off, then give it a shot. C+
Level 2 Tactic: Mighty Blow (1 CP)
Use this Tactic when this model makes an attack against an enemy model. If the attack hits, this specialist deals 1 mortal wound on the target. The attack sequence then ends. I’m not a fan of this, going from the chance to do a ton of damage and massive injury rolls to…a single mortal wound is pretty lackluster. D
Level 3 Tactic: Grab and Throw (1 CP)
Use this Tactic when a model in an opposing Kill Team has to take a falling test within 1” of this model (and this model does not have to take a falling test). Instead of taking the Falling test, both players roll a dice and add the result to their model’s strength. If you win or draw, the Falling test is failed, otherwise it is passed.
Okay this is hilarious, here’s what it basically means:
- If a model is within 1” of an edge of terrain while not on ground level when they get hit by an attack or lose a wound, they roll a dice, on 2+, nothing happens, on 1, they fall to the ground.
- For each 3” between their starting location and the ground, roll a dice, for each 5+, they suffer a mortal wound. If they fall on someone, the model they fall on also rolls that many dice.
- What this tactic does is turn the initial roll (that gets failed on a 1) into one where they fail if they roll a dice, add their strength and score lower than or equal to your dice roll plus your strength. Which makes them failing the falling test more reliable, especially since a Strength Specialist is going to have high strength anyway.
Anyway, it’s a good way to add on some mortal wounds, and the falling test happens after all the attacks that would cause it are resolved anyway, so you don’t exactly lose out by doing it. It’s also really funny. B-
Abilities
Level 1 Ability
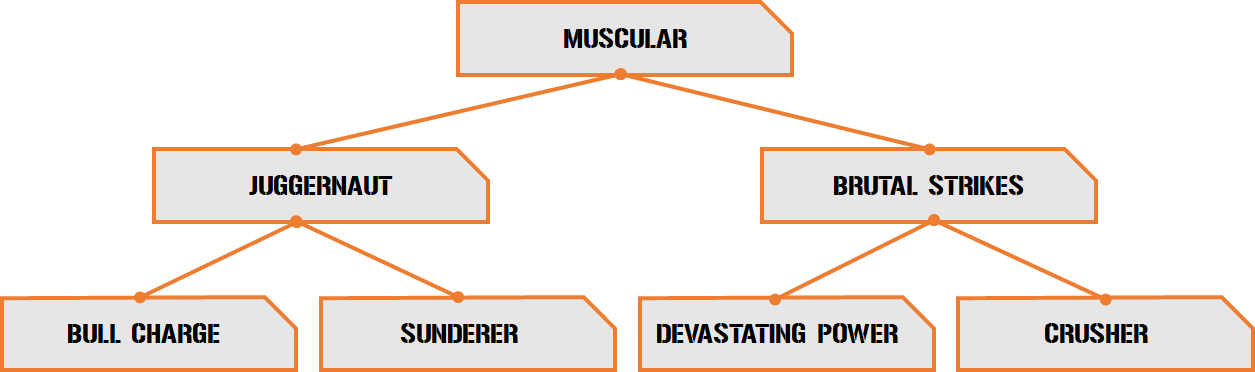
- Muscular – Add 1 to this model’s strength characteristic. Like all of these, good if it hits a break point, bad otherwise (but always good for Grab and Throw). C
Level 2 Abilities
- Juggernaut – Add 1 to wound rolls for this model in the fight phase of a battle round in which it ended a charge move within 1” of an enemy model. Solid ability, you’re gonna be wounding on 2’s or 3’s most of the time, which no one will ever complain about. B
- Brutal Strikes – Re-roll wound rolls of 1 for this model in the Fight Phase. Another good ability, re-rolling 1s is always real good. B
Level 3 Abilities
- Bull Charge – Add 1 to this model’s attacks characteristic in the fight phase of a battle round in which it ended a charge move within 1” of an enemy model. Sort of okay, 1 attack isn’t much to write home about, and the right side of this tree is way, way better. D+
- Sunderer – Improve the AP characteristic of this model’s melee weapons by 1. Similar to Bull Charge, it’s okay, but compared to the other side, it’s really, really lacking. D
- Devastating Power – Improve the Damage characteristic of this model’s melee weapons by 1. Now we’re talking, more damage means more wounds and more Injury dice and thus more Out of Actions. A+
- Crusher – Add 1 to Injury rolls as a result of damage inflicted by this model’s attacks in the Fight Phase. This is also really, really good. This, in combination with Devastating Power, means even the most basic 1 Damage, 0 Flesh Wound Injury roll goes from having a 50% chance to knock a model out, to a massive 89%. It’s good, take this side of the tree. A+
Verdict
This is your “guy who hits stuff” specialist. Power Swords (Power swords!!!) get buffed up massively with this thing, a standard Company Commander is wounding Marines on 3’s rerolling 1’s and doing 2 damage per hit to them. Even stronger weapons get even better, the damage and injury roll modifiers are just good. Make sure you have something that can benefit from it though, and keep in mind you don’t get any modifiers to hit…
Tips for Playing With Commanders
If you’re playing games with Commanders, there are a few things to keep in mind. Here are some helpful tips for getting the most out of the experience:
- Generally, more models is better than a Commander. What you’re going to find in most games – especially now that Elites are out – is that it’s better to have 200 points of regular joes than it is to have 70ish points plus a big expensive Commander. And just like with non-Commander specialisms, it’s generally not worth it to pay a ton of points to upgrade a single model when you could get better mileage upgrading several others. So keep your Commander cheap, and look for Commanders that give you cheaper options. This is admittedly a bigger deal for elite kill teams with more expensive models, but there are plenty of other teams that can benefit from more points to spend on models.
- Read the Mission Carefully. Know what you’re going to be up against. Hell, half of the Commander missions don’t let both players bring Commanders (these are pretty lame tbh but we see what they’re getting at with some of them). In many missions, taking out the enemy Commander is the primary goal, or worth so many VP that all other goals are only a minor consideration at best. Know what the stakes are and whether your Commander will have to get their hands dirty or if they can sit back and act as a force multiplier. In Matched Play Commander missions, this is less harsh a consideration, but still important to know.
- Strategist Specialists are pretty much the best. Yes, there are other options, and if you want to just play Narrative play and not worry about it, feel free to take other specialists except for maybe Logistics. But if you’re playing with an eye toward winning, then your best options will pretty much always be a Psyker specialist or a Strategist Specialist, where the latter just acts as an incredible force multiplier, giving you extra CP and activations to work with that are just brutally strong/good.
Have any questions or feedback? Have a sick Commander conversion you want to show off and tell us why they’re totally rad? Drop us a note in the comments below or email us at contact@goonhammer.com.
