
This week, Condit and Bair are taking to the battlefield again, this time with something of a role reversal: Condit’s running a gunline, while Bair’s list is built to make a mad dash to close combat. Hell has frozen over, and cats and dogs are living together. Will the outcome of Bizarro-World Titanicus be any different than games in the real world? Read on to find out.
Open Engine War
For this game, as for just about all of our more recent games, we played using the Open Engine War deck of cards that we covered in a previous article. We used the Draw 3 Strike 2 method that we talked about in that piece, and play the game as per the Matched Play rules in the main rulebook, being a 4 turn game with the possibility of going to a 5th and then even a 6th turn. The cards for this game are:
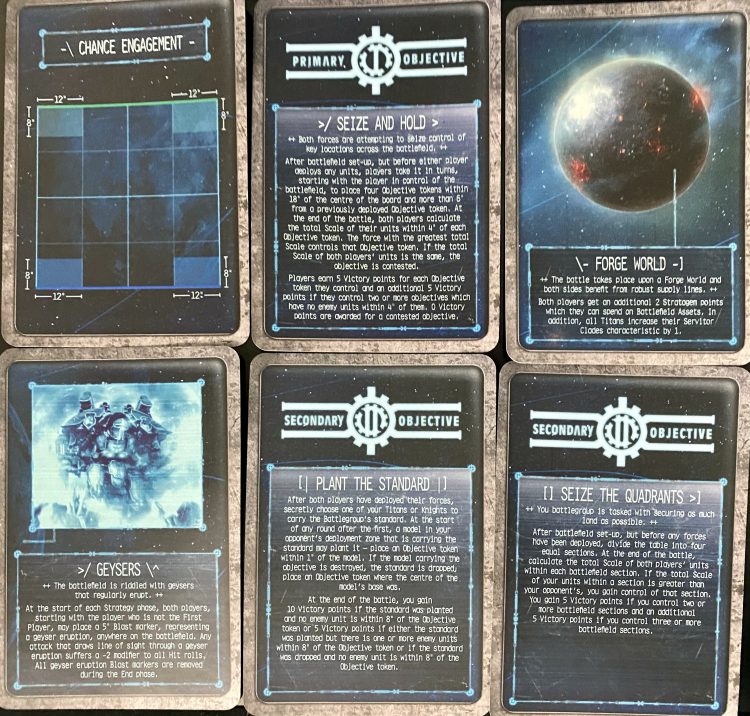
Chance Engagement means the melee Titans are not starting very close to the Oberon Battlegroup, something in Condit’s favour, however it also means that Bair’s Lust for Glory targets are split into two very different sides of the board making those choices easier, and being able to keep the bonuses easier as well. Seize and Hold as the Primary Objective is fair footing for both sides, each with the potential for high mobility late game to take the points with 3 of them being nearer to Condit’s deployment since Bair wants to be on that side of the table anyways. Forge World is a massive boon to Condit’s force here. If he can keep his Titans still for a turn then the Reavers are repairing with 5 dice and the Warlord with 6 dice, with Emergency Repair Orders always going off on a 2+ with the extra clades from the planet these will be tough Engines to take down if not killed in one swift blow. Then there’s the Geysers, something that will be able to give Bair some massive benefits to crossing the table if they’re placed in good position, however the -2 to hit will also be suffered with Melee weapons as well if caught under the template making movement potentially an issue.
Bair’s Secondary Objective is Plant the Standard which was put on the Princeps Seniores with Power Fist and Laser Blaster, and Condit’s is Seize the Quadrants with the hopes of being able to make a dent into Bair’s forces early and get to the mid-field to take the Primary Objectives and subsequently score Secondary points by being in different portions of the board.
The Lists
Bair’s War Griffons 1745
Ferrox Light Maniple- 870
Reaver Battle Titan 330
- Laser Blaster
- Power Fist
- Vulcan Mega Bolter
- Motive Sub Reactors
- Princeps Seniores- Reckless Maverick
Reaver Battle Titan 310
- Volcano Cannon
- Laser Blaster
- Apocalypse Missile Launcher
Warhound Scout Titan 230
- Plasma Blastgun
- Vulcan Mega Bolter
- Enhanced Auspex Array
Ferrox Light Maniple- 875
Reaver Battle Titan 340
- Melta Cannon
- Power Fist
- Vulcan Mega Bolter
- Motive Sub Reactors
- Princeps Seniores- Reckless Maverick
Reaver Battle Titan 305
- Gatling Blaster
- Chain Fist
- Turbo Laser Destructor
Warhound Scout Titan 230
- Plasma Blastgun
- Vulcan Mega Bolter
- Enhanced Auspex Array
I recently just finished painting 8 Gryphonicus Titans in 7 days and wanted to see how they would work out in a far more aggressive list and I thought the best way to do that would be a Ferrox Light Maniple. Then I realised that if I gave up being able to squadron the Warhounds I could take two Ferrox Light Maniples with a Reaver in each subbed in for one of the two mandatory Warhounds. Doing this allowed me to take two Princeps Seniores’ as well as taking Motive Sub Reactors twice on two different Reavers that no longer needed to push their reactor to use their boosted 9” move. Doing this does mean that the two Warhounds that still need to be taken have to run solo, but in Gryphonicus Warhounds aren’t something you’re using in the usual sense anyways due to their trait Lust for Glory. Taking Reckless Maverick on two Reavers with a melee weapon can be incredibly helpful too, the Titan takes 3 pips of heat so gets hot fast but being able to move twice (charge twice) or attack twice in the combat phase once per game (each) can mean the difference between winning or losing, even if it blows up that Titan the next turn. My main plan for using this before the game in particular was to use this in the movement phase to be able to make an effective 18” charge since it’s easy to assume an Oberon Perpetua is going to sit back and avoid getting charged at all costs while shrugging off damage and repairing better than normal every turn.
So, going on the basis of this being a far more aggressive list I picked Stratagems to help ensure these Titans got across the table for their charges. The first choice was easy: Great Crusade Titans, a Loyalist stratagem, which for the turn means every Titan counts as having moved 6” further than it actually had (read: +2 Dice on Charge Order attack). Then Iron Resolve taken twice to make sure the Full Stride orders I needed turn 1 went off, as well as subsequent Charge orders. The last point was spent on Experimental Locomotors so that each of the three Reavers with a melee weapon were allowed to use boosted movement without ever having to push their reactor.
Condit’s Legio Oberon – 1730 points
Perpetua Battleline Maniple
Warlord Battle Titan – 490
- Macro-Gatling Blaster
- Sunfury Plasma Annihilator
- Paired Gatling Blasters
- Princeps Seniores: Tactical Genius
Reaver Battle Titan – 310
- Gatling Blaster
- Melta Cannon
- Vulcan Megabolter
Reaver Battle Titan – 310
- Gatling Blaster
- Melta Cannon
- Vulcan Megabolter
Reaver Battle Titan – 310
- Volcano Cannon
- Laser Blaster
- Apocalypse Missile Launcher
Reaver Battle Titan – 310
- Volcano Cannon
- Laser Blaster
- Apocalypse Missile Launcher
I’ve been looking at trying something different for a while now, and this is what I came up with. The basic idea here is a mobile gun line, taking advantage of Oberon’s defensive capabilities and powerful stratagems, together with the Long Retreat stratagem to fall back and continue firing if enemies pile up on me. Tactical Genius will give me an extra SP to play with, which will allow me to take Strategiser and Decisive Action while still having one SP left over.
Since I’m playing against Gryphonicus, my strategy will look something like this: push forward slightly with the Warlord and gatling/melta Reavers under cover from First-Firing volcano/laser Reavers. He’s likely to Full Stride turn 1, which should allow me to pretty easily put a decent number of shots on target and hopefully deal some damage early. Then, pop Long Retreat in either Round 1 or 2 depending on how close he gets to deny him his charges one more turn. By that point, he should be committed and pairing off my Titans into Reavers should be able to bring one down. Finally, I’ll keep Strategiser to take away Great Crusade Titans, because I know he’s going to bring it, and Decisive Action will let me use Split Fire to more efficiently allocate my firepower across his battlegroup.
Bair: Yeah I sort of forgot about Strategiser until we were already playing otherwise I might have taken another strat like Quake Shells which I knew he’d have to have used it against to remove from the game instead of Great Crusade Titans for my decisive charge turn.
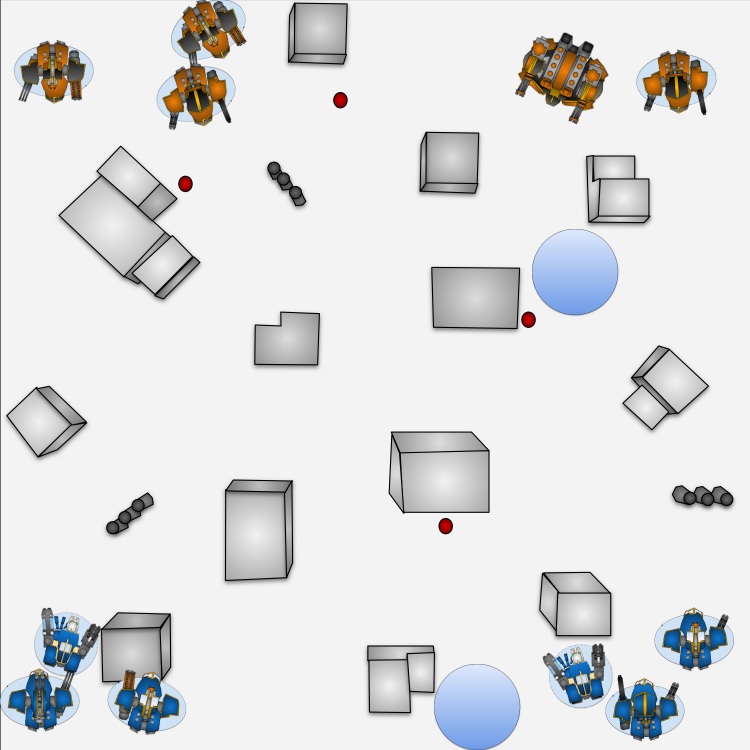
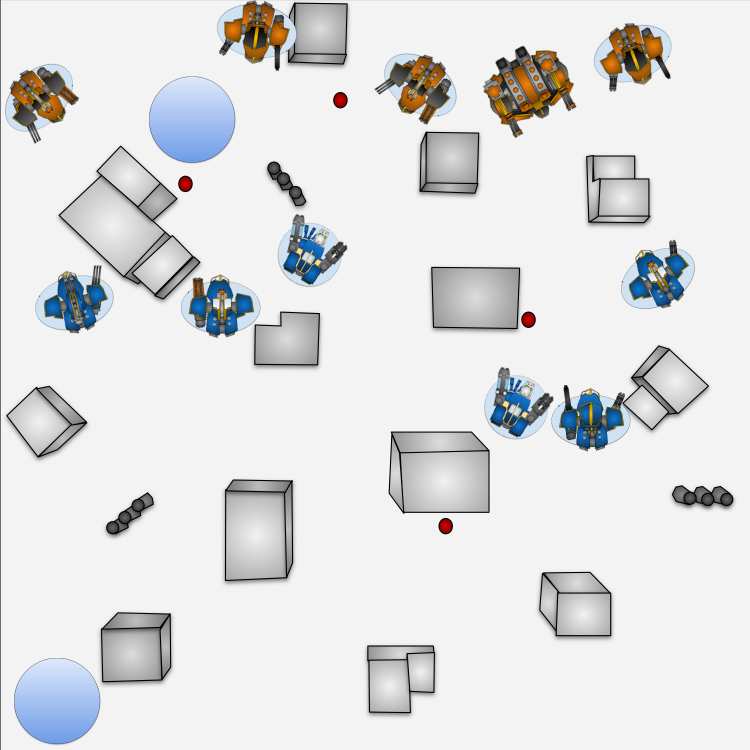
Deployment
Key:
Orange Titans- Legio Oberon
Blue Titans- Legio Gryphonicus
Big Blue Circles- Geyser markers
Little Red Circles- Primary Objective markers
Turn 1
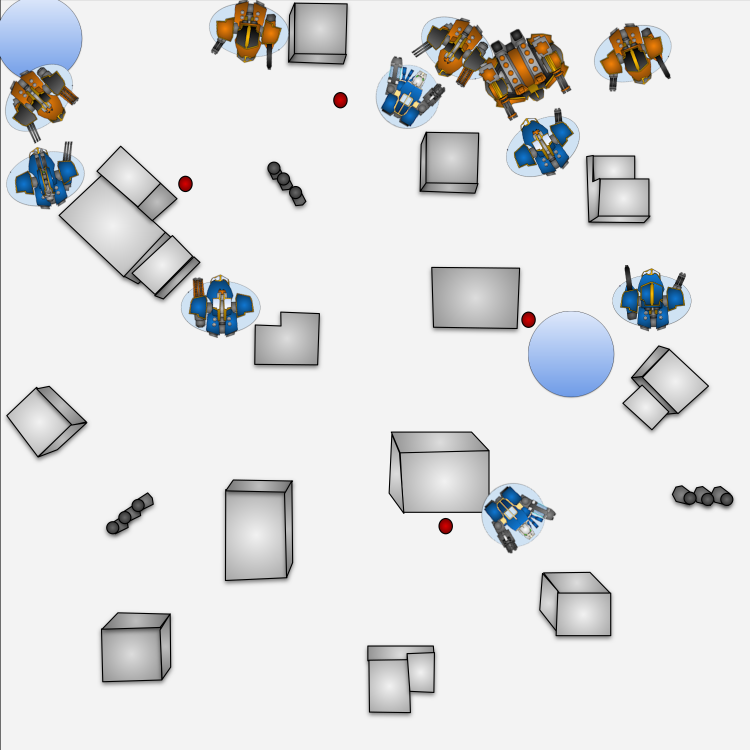
Bair: I actually gave First Player to Condit, so that I could see where he would be moving and act accordingly, giving me more of a chance to dodge the Corridor Arc of the Warlord. I knew that I’d need to get across the table as quickly as possible, so after playing Experimental Locomotors on the Chain Fist Reaver I started issuing Full Stride orders to my battlegroup, first to the Princeps Seniores’ for the 2+ roll and then on the other Reavers, all except for the right-flanking Warhound made their order roll and I didn’t want to expend one of my two Iron Resolves for it since I knew I’d need to score objective points later on anyways and that side of the table was less busy with enemy Titans. This left the Volcano Cannon toting Reaver without an order, but didn’t really need one either with its longer ranged armament which pinged some shots off at its chosen target, taking down a couple shields but that was all, as can be expected in an opening salvo from just 1 Reaver.
Condit: So the good thing here is that I know what he’s going to do. The downside is that I know exactly how bad this is going to be if I don’t stop him. I could have dropped Strategiser on Experimental Locomotors, but on balance saving it for Great Crusade Titans is going to be better value for the points. I’ve taken an Apocalypse Missile Strongpoint with my Forge World points, and between that and my two fire-support Reavers, I’m throwing 15 AML dice. My other Reavers and my Warlord advance a bit to take some board space and hopefully knock down voids on something.
Unfortunately, it didn’t go as planned. I put some saves into both of his Princeps, but neither one took any meaningful damage. Fortunately, they’re banged up enough to where I have a decent chance of putting some damage in next turn, but I’m going to need to get something done or I’m going to be in a bad spot.
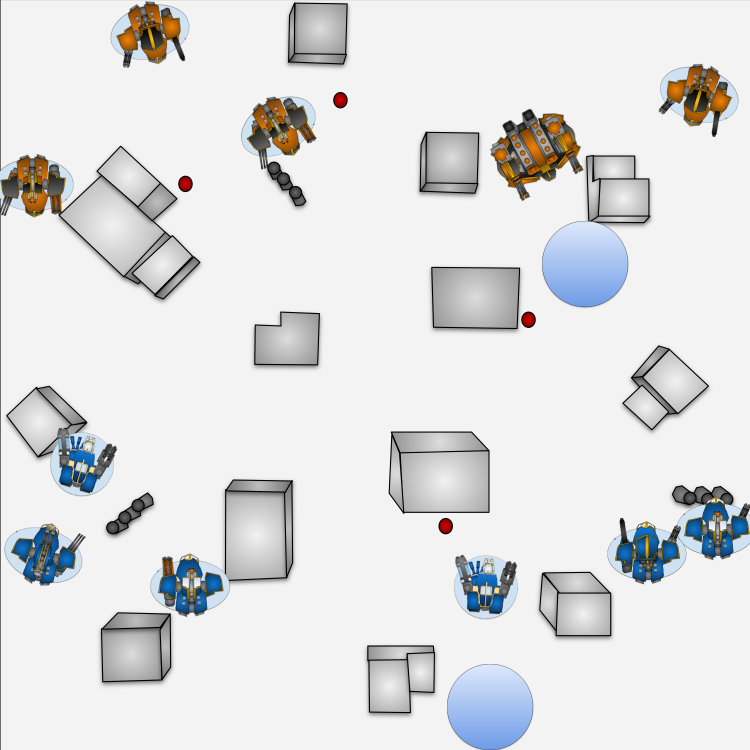
Turn 2
Bair: Condit took First Player again this turn. This was going to be a tough turn that I’d need to try and survive the best I could. I placed my geyser so that the left flanking Warhound would be a little safer, and tried to move my right flanking Princeps Seniores with the Laser Blaster behind a bit of cover forcing 25% obscured shots from at least some weapons, or so I thought I would, but still needing to move towards the Oberon battlegroup to get Charges off next turn. Long Retreat stopped me from being able to Charge this turn with Reckless Maverick double moves so at least I didn’t need to worry about rolling successful orders on any Titans. Just need to survive some fire power this turn and can get it done next turn.
Condit: Alright. Popping Long Retreat to create some space while his Titans close in. This lets me deny the Reckless Maverick charge and continue to throw out some serious hurt. Unfortunately, the dice aren’t with me – I put some damage into one of the Princeps’s legs, but my Warlord’s paired gatling blasters manage to convert 12 shots into a whopping one hit into his legs. Woof.
The rest of my activations don’t go much better for me. Two of my other Titans focus on his other Princeps, but don’t manage to do much of anything. My final Titan throws some shots into one of his Reavers, which plink off ineffectively. Great.
Bair: Yeah. Pretty unlucky for Condit here. Once my Princeps lost all its shields from the Reaver next to the Warlord I thought for sure the Warlord would just murder it, but thankfully not. While sustaining some major damage to the Legs and Body, Condit decided to make called shots with the 12 gatling shots (as anyone would do) but only scored 1 single hit out of the 12 while hitting on a 5+. Big oof. Lucky for me since it meant I’d be ready to charge next turn though. On the plus side for him he was able to get an engine kill against the Melta toting Princeps Seniores, which resulted in a Silenced roll and just stood there, dead to the world, for the rest of the game. Removing this is a big help, but maybe too little too late.
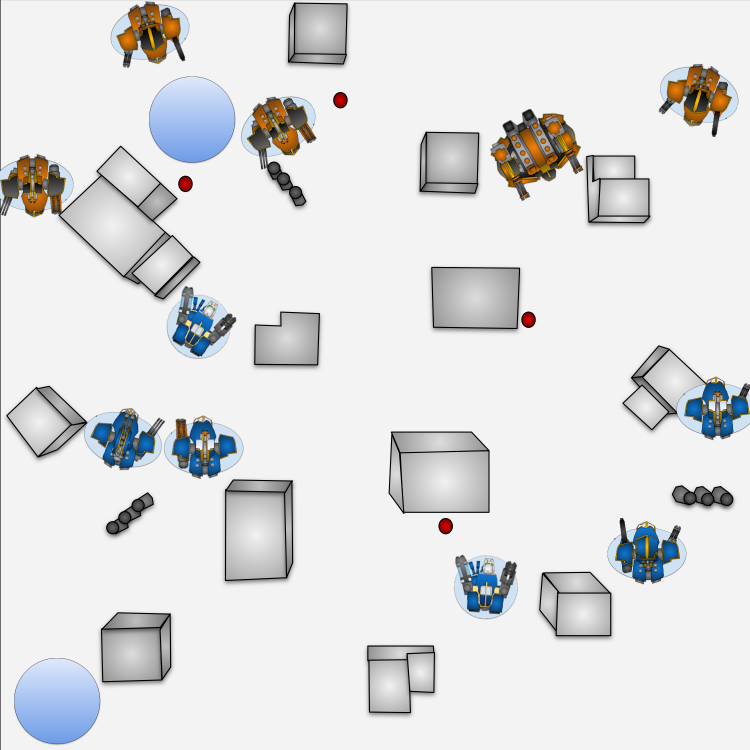
Turn 3
This was the most decisive turn and where it really went one sided, very quickly.
Condit: Ugh. Ok. This turn might have turned out better if I didn’t grossly misplay one of my Reavers. Eyeballing that Titan, it was within 12” of his Warhound, but definitely more than 8”. So I moved it backwards. You might be thinking that this is a good play. You would be wrong. Doing so gave him a long-bomb charge that meant he got more attacks than he otherwise would have, giving him the opportunity to deal a whole pile of S9 hits to the location of his choice. This is, to put it bluntly, Less Than Ideal. Had I made the move I should have and pushed forward, my Reaver might have been able to weather the turn, or at least have forced him to commit another Titan to take it down.
Other than that, one of my volcano Reavers went on Emergency Repairs and gave up its movement to fire its guns in the Combat phase. My Warlord took some more shots at the incoming Princeps, but didn’t manage to get much done. Finally, one of my Reavers managed to survive the incoming charge and counter by removing the offending Titan from the table.
Bair: Titan melee is fun. That’s just a fact. And it can work really well if you can get it all lined up. I did not fully expect to be able to make the Charge with the Warhound, but when it move it’s full 12″ and was just about touching the Reavers base I got to roll 7 Smash attacks at an effective S9 since that Reaver was the Warhound’s target, and from the Ferrox bonus of +1 Armrour, while hitting on a 3+ re rolling 1’s. Ouch. Dead Reaver. This has drastically changed my opinion on singelton Warhounds for Gryphonicus. The Princeps Seniores used Reckless Maverick to get its Charges off as well, needing to use 1 of my 2 Iron Resolves for the first time to get that order after rolling a 1, and leaving the Laser Blaster Princeps in a red reactor and taking a S9 hit to the body which could have tracked its Critical status. During that Reaver’s charge it managed to score 2 Critical hits on the Warlord forcing a VSG burnout and Concussive pushed it back 3″ meaning it would be able to fire back at me with full effect. Fortunately I had First Player and was able to kill it with some called shots with the Laser Blaster before it had the chance.
I had also decided to turn one of the Warhounds back around to go and sit annoyingly on an objective if this turn didn’t pan out for me, but it did, so this was ultimately a move I didn’t need to make.
Condit: As it stands, I wound up losing most of my battlegroup and only took out a single one of his. Not the best use of my resources, to be sure.
Wrapping Up
Condit: While Turns 2 and 3 didn’t go well for me, it also didn’t help that I misplayed. Had I put more effort into concentrating my fire into a single Titan in the early turns, I probably could have taken out another Titan or two, which might have let me swing the entire game in Round 3. At the very least, Bair likely would have had to rethink committing as hard as he did under threat of losing even more Titans if his charges were less decisive than he hoped.
Instead, my gunline collapsed under multiple charges. Which sucks, because that’s supposed to be my trick.
In all seriousness, the game came right down to the wire, and honestly could have gone either way. I definitely could have played it better and given myself a better chance, though. But for a first outing with Oberon, this wasn’t terrible.
