
Welcome back to Goonhammer’s series for aspiring Titan Principes. We here at Goonhammer’s own Collegia Titanica know that Adeptus Titanicus can seem intimidating to players unfamiliar with its particular quirks, but this series aims to equip you with everything you’ll need to play out epic clashes on the battlefields of the far future with your very own Titan Battlegroup. In this series, we’ll be taking a more in-depth look at the various Legios of the Collegia Titanica – exploring their origins and how to use them on the tabletop, from maniple selection and their loadouts, through to how to command them on the field of battle to secure ultimate victory.
Who are Legio Solaria?
Legio Solaria are centre stage of Titandeath by Guy Halley, which looks at their founding and fateful Battle of Beta-Garmon. We’ll keep things mostly spoiler-free here but suggest you give this a read to find out more about Solaria and the biggest clash of literal titans the setting has ever seen.
Unlike most of the other Legios we look at, the Imperial Hunters were founded during the Great Crusade by Mohana Mankata VI. Originally a noblewoman of House Procon Vi, she was refused the right to pilot a knight on account of her gender despite winning the contest that entitled her to. Despite this, she managed to impress the representatives of the Mechanicum present enough to be able to leave and join the Collegia Titanica, eventually leading to the founding of Legio Solaria.
During the Great Crusade and Horus Heresy, Solaria Princeps and Moderati were all vatborn women. Amusingly the Knights of Procon Vi, who had previously exiled Mohana became vassals to the new legion.
Despite their youth as Legio they quickly earned a fierce reputation for being the tip of the forefront of the action. Striking first with agile hunting packs of Warhounds (Audax aren’t the only ones!) toppling foes and punching well about their weight. On the Crusade they developed a fierce rivalry with Legio Vulpa, who they clashed with over the Death Stalkers’ bloodthirsty approach to compliance actions.
This rivalry would culminate at the Titandeath, the battle of Beta-Garmon, where they would meet on the battlefield not as rivals but as enemies.
Painting Legio Solaria
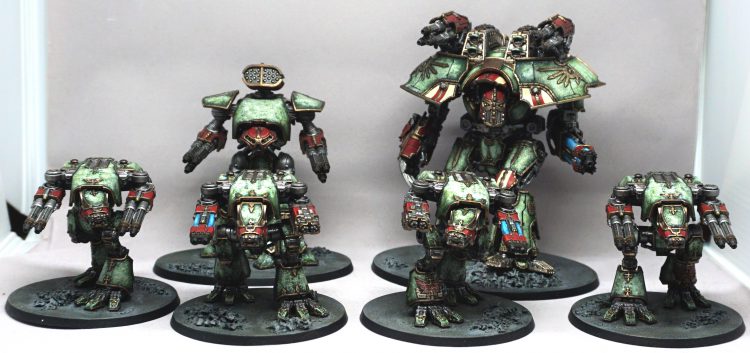
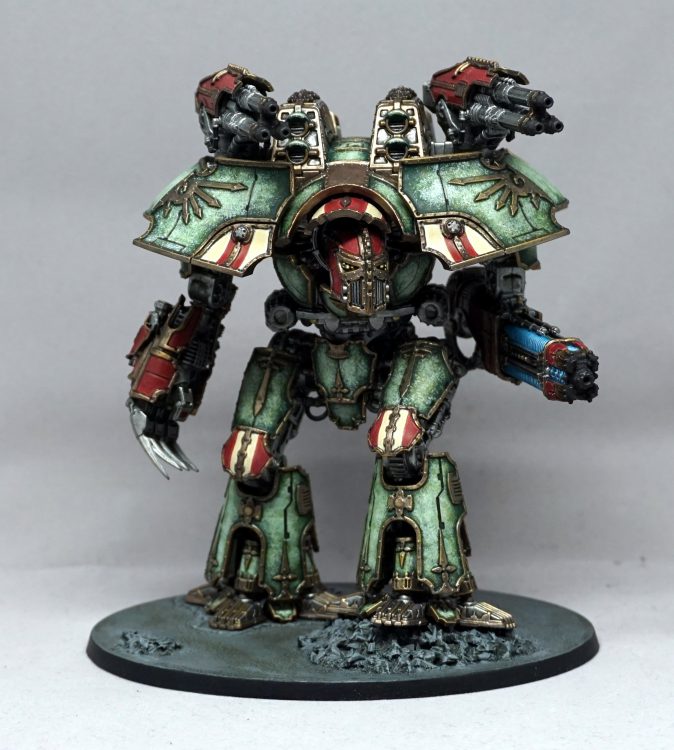
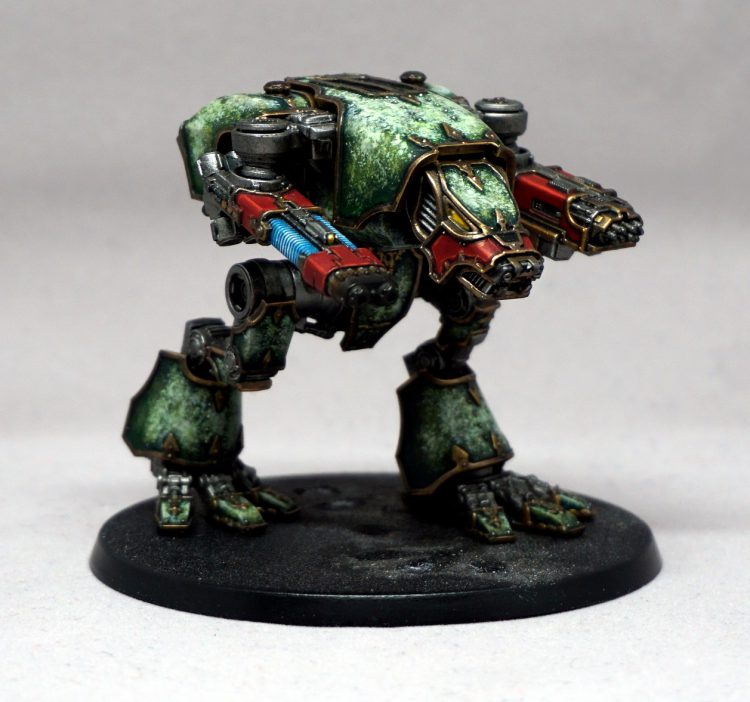
We asked our friend Sam for his method for painting up his gorgeous Solaria battlegroup, perfectly pulling off that mottled green finish.
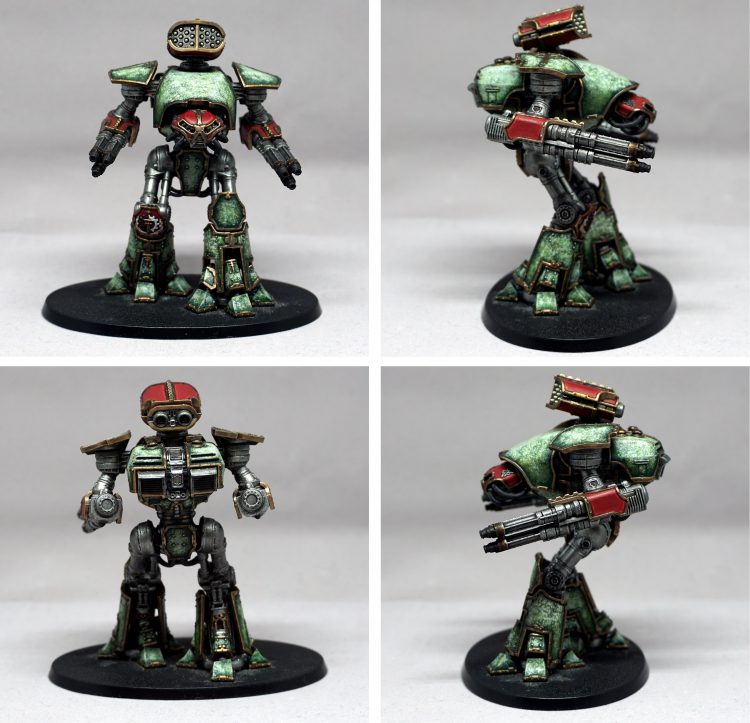
Solaria’s scheme may look a little imposing at first, but it’s honestly pretty simple once you get going. I don’t have an airbrush so I had to figure something else out for doing their green. I found that the mottled green effect is actually pretty easy to achieve with sponging. The important thing is to slowly build up with progressively lighter/paler greens. With smart placement it is still possible to get a fade or specific pattern. I recommend keeping the armor panels on their sprue for this process as it will make sponging easier. Just remember where they’ll be placed on the titan to get the angles right.
One nice thing about Solaria is that they don’t really do checker patterns or segmented panels like other legios. Not saying it’s not doable, but it’s possible to get away with a relatively simple scheme here. As-is, the red weapons and heads contrast really well with the green and I like to use bone as an accent color.
I mostly stick to GW paints as it’s the range I’m most familiar with. I still have some pots of old, out of production paints, such as Waywatcher Green or Chainmail, but I’ll be sure to list a current alternative where that applies. I will also be sure to mention the brand whenever I use a non-GW product. The methods here are also generally pretty simple. Sponging on the greens precludes the use of more advanced techniques like zenithal highlighting or blending.
Generally speaking, if there’s ever any mistakes on a normal color like an errant drop of shade or a too thick highlight, I neaten up with the base color.
Titan Skeleton
I recommend painting the titan skeleton first as there are usually some armor panels included in the assembly. It’s easier to be careful with the sponging later than avoid them while drybrushing the skeleton. This is the easy part.
Step 1: Basecoat with Leadbelcher
Step 2: Shade with Nuln Oil
Step 3: Drybrush with Leadbelcher
Step 4: Drybrush with Chainmail (Runefang Steel)
Step 5: Highlight with Chainmail (Runefang Steel)
Green
As mentioned, keep the panels on the sprue for this. It’ll make things easier and the sponging process doesn’t take too long despite all the colors involved. However, some panels are built into the titan skeleton and can’t be painted separately. You will have to paint them where they are which is why I recommend using tweezers.
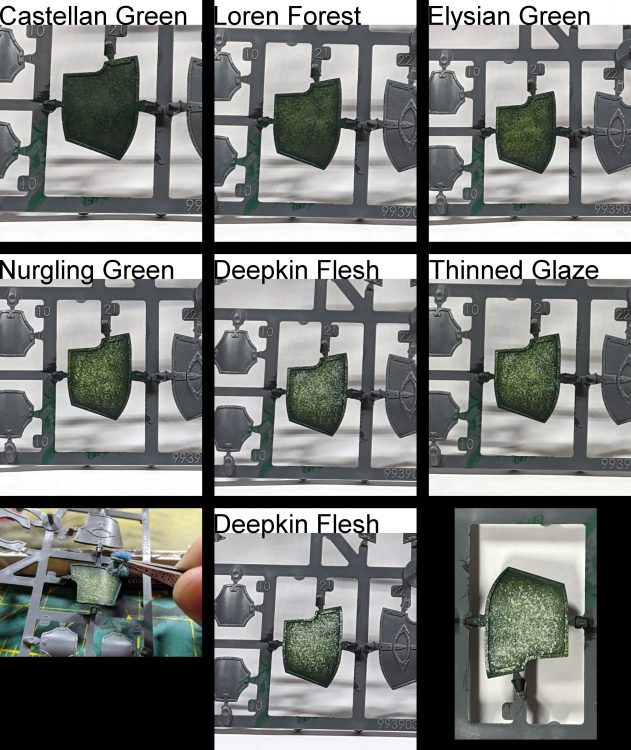
Step 1: Basecoat with Caliban Green
Slap on a basecoat as per usual. I recommend painting over black primer. This will need at least two coats. I also paint the back of the panels at this point, but leave them as regular Caliban Green.
Step 2: Sponge with Castellan Green
First, place the paint on your palette and thin with a bit of water as usual. You don’t want it to be too thick, this will prevent build-up. Then take a small piece of foam/sponge (I use torn pieces of spare KR foam) and grasp it with tweezers. Dip it in the paint and wipe off the excess. You don’t want to soak the foam, that’s too much. Aim for a saturation level similar to painting with a brush. Using the tweezers, begin applying the paint with “pecking” motions across every panel. Leave some Caliban Green showing towards the edges. Don’t be afraid to go back over things to get a consistent color, the paint should be somewhat thin and will be a little more translucent than normal.
Step 2: Sponge with Loren Forest
Follow the same process as with Castellan Green, but stop just a little further from the edges. Continue this pattern with the remaining greens.
Step 3: Sponge with Elysian Green
Step 4: Sponge with Nurgling Green
Step 5: Sponge with Deepkin Flesh
Step 6: Glaze with thinned Waywatcher Green (1:1 Lahmian Medium:Waywatcher Green)
This step ties all the previous layers together. Apply the glaze in a smooth coat and avoid pooling.
If using the current range, mix Lahmian Medium and Warp Lightning. I haven’t experimented with this myself yet, but as contrast paints are more intense than the old glazes, I would start with a 3:1 or 4:1 medium:contrast ratio. You want a light glaze, not to drastically alter the colors.
Step 7: Sponge with Deepkin Flesh
Following on from the previous sponged layers, drift towards the focal point of each panel.
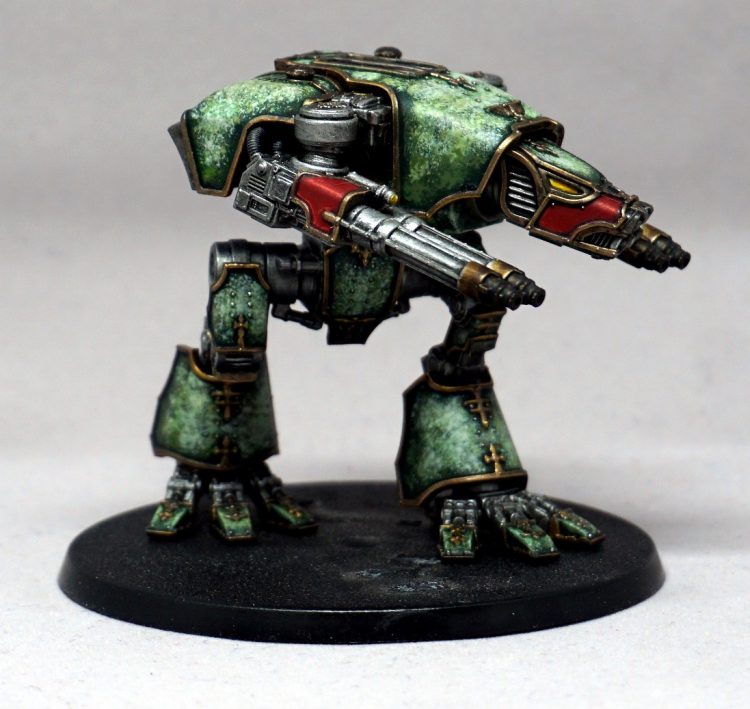
Some panels have deep channels, such as the warlord’s shin guards. I shade these with Nuln Oil, but wait to do so until I am shading the trim.
Once the green is done, it is safe to clip out the panels. I find it easier to paint trim separately and this is a good opportunity to clean up the plastic injection points before continuing. Carefully trim any excess plastic with an x-acto knife and file if necessary. All of the damage will be on the outside edge of the panels and will not impact the green at all. If you have brush-on primer, I recommend hitting these spots before painting the trim.
Repairing the Mottled Green
Mistakes happen, you’re really likely to accidentally get some brass on your nice green panels while painting the trim. Don’t panic. Repairing the green is pretty easy, but takes a little bit of thought. The color(s) you use will depend on where you screw up. If the mistakes are out towards the edges, use Caliban Green and/or Loren Forest. If you have one in the middle of a panel somehow, use Nurgling Green and/or Deepkin Flesh.
Do not use a sponge for this. You don’t want to hit a large area, but to target the offending spot. For this, I recommend a medium layer brush. Apply paint to it as per usual and use it to dot paint over the mistake. Try to tie it in with existing patterns if possible. Depending on the size of the area, it may be necessary to use multiple colors to prevent it looking too obvious. There’s no need to glaze over the area again, a little extra variation doesn’t hurt.
Brass Trim
This is my basic brass recipe that I use across a lot of my armies. In addition to the trim, I also take the time to pick out small details on the titan skeleton such as exposed pipes for a bit of flair. It’s useful to break up the silver a bit.
The panels should be cut out of their sprue by this step. As you will be handling individual panels, I recommend using sticky tack or something similar to hold them in place so you don’t have to touch them. Alternatively, hold onto one side with your fingers and paint the rest of the trim on the panel, leaving room for your fingers to move around a little bit. Move on to the rest of the panels and return to the first once the paint has dried. Grip the opposite side of the panel and paint the empty spot.
I am fully aware that Solaria is normally presented with silver trim. However, I think the brass trim pops a bit more from the silver skeleton and I like it better. It’s just a color I like to paint. I also think they were stated to have brass trim in the Titandeath novel, but I could be imagining that.
Step 1: Basecoat with Runelord Brass
Step 2: Shade with Nuln oil
Be sure to recess shade around the trim. If the panel has a deep channel, such as with some of the larger warlord panels, shade them as well.
Step 3: Highlight with Skullcrusher Brass
Step 4: Highlight with Sycorax Bronze
Dark Brass
This is only used for the void shield generators on the back of each titan.
Step 1: Basecoat with Warplock Bronze
Step 2: Shade with Nuln Oil
Step 3: Highlight with Skullcrusher Brass
Step 4: Highlight with Runelord Brass
Red Panels
I break with GW a bit here in favor of some Vallejo reds. I started using Scarlet Red because I wanted something similar to the old GW Red Gore and Blood Red. Nothing they offered at the time matched up quite right so I tried a different product line. I really like this red, but feel free to use a similar GW one.
Step 1: Basecoat with Vallejo Scarlet Red (Khorne Red)
Step 2: Recess shade with Nuln Oil
Step 3: Highlight with Vallejo Flat Red (Evil Sunz Scarlet)
Step 4: Highlight with Wild Rider Red
Bone Accents
I use this pretty sparingly, primarily as a stripe here or there to break up a red panel.
Step 1: Basecoat with Zandri Dust
Step 2: Basecoat with Ushabti Bone
Optional Step: Recess shade with Agrax Earthshade if necessary
Step 3: Highlight with Screaming Skull
Step 4: Highlight with Pallid Wych Flesh
Lenses
I went with yellow lenses to stand out against the red heads. This also had the unintended effect of complementing the brass trim. This recipe was also used for any targeting lenses on weapons.
Step 1: Basecoat with Zandri Dust
Step 2: Divide the lens into thirds. Paint the back 2/3s with Golden Yellow (Averland Sunset?)
Step 3: Paint the final third with Yriel Yellow
Step 4: Glaze the transition between Steps 1 and 2 with a dot of thinned Zandri Dust
Step 5: Glaze the transition between Steps 2 and 3 with a dot of thinned Golden Yellow (Averland Sunset?)
Step 6: Dot the back corner of the lens with white. I prefer Pallid Wych Flesh, but White Scar works great too.
Red Sandstone
Some titan panels have giant raised designs across them and I wanted to avoid the more usual gold or marble. As Solaria is built around a hunting cult I wanted something a bit more natural. I also wanted something that would stand out among the other colors on my models. I decided on red sandstone. Sandstone can be very interesting as it is a laminated stone and different colors can pop up in the layers. This recipe aims to capture that look by slowly building up the effect.
Right now, this can only be seen on a couple of warhound shin plates. I will be using the more ornate carapace on my next reaver, however, and that will be a great spot to showcase this.
Step 1: Basecoat with Doombull Brown
Step 2: Drybrush with Wild Rider Red
Step 3: Highlight with Wild Rider Red
Step 4: Shade with Agrax Earthshade
Step 5: Paint thin, horizontal lines with Bestigor Flesh
Use slightly thinner paint than usual as if you were freehanding. This may require multiple passes to build up the color.
Step 6: Highlight with Skrag Brown
Step 7: Highlight with Dheneb Stone
Studs/Rivets
This is more of a finishing step than anything. It’s not necessary, but I really like the effect it gives for the small amount of work involved.
Step 1: Pick out any studs with a little Nuln Oil. Be careful to not over-apply the shade.
Step 2: Carefully highlight the studs with Chainmail
Weathering
I deliberately keep weathering minor. I don’t want my titans to be battle-scarred or encrusted in dirt. I like to imagine I am painting them as they might appear at the start of a campaign. However, I do heat-stain plasma weapons and turbo lasers so that they’re not simply more bare metal. I also hit any exhaust ports with black pigment. I will probably do a little more once I have transfers in place, but I definitely like the cleaner look.
Bases and Transfers
Unfortunately, my titans aren’t complete yet. They’re on temporary bases which will eventually get replaced by nice urban bases. I had to figure out something quick for NOVA 2019 and that’s why the current ones suck. Similarly, I’ve been waiting to do the transfers. I have a couple of sheets of Solaria transfers, but lack a few things to get the results I want, namely an airbrush for easier, smoother varnishing. It’ll happen, I just don’t have room for one right now.
Solaria in Adeptus Titanicus
Given their pivotal role in the Battle of Beta-Garmon, Solaria were introduced to Titanicus in the Titandeath supplement. Solaria’s combat doctrine of exploiting their superior mobility to outflank and pick apart their foes is reflected throughout their rules.
Tactical Overview
Solaria’s legion trait is Wolf Packs, which allows you to substitute a mandatory Reaver in any maniple with a Warhound. It also lets you have up to five Warhounds (since Loyalist Legios and FAQ update) in a single squadron. The first half of this is the more interesting one. Being able to substitute in a Warhound into a lot of maniples out there is pretty interesting and allows for some creative list options. We’ll look at some examples of this later, when we look at maniple selection.
Bair: Being able to substitute a Warhound for a mandatory Reaver opens up more possibilities when writing lists. Saving roughly 100 points by doing so gives flexibility in taking support Banners of Knights, or a second Maniple.
On the other hand, taking five Warhounds into a single squadron is very much a double-edged sword. You’ll have some very strong alpha strike potential but suffer from not having many activations, putting yourself at risk of being outmanoeuvred in the movement phase. There are situations where this can work in your favour, but think carefully before you do it.
Fog of War costs 1 stratagem points and allows you to redeploy a Warhound. It can be taken multiple times and each time you take it you can redeploy another Warhound Titan in the first turn. You still have to obey the normal deployment rules, but this is still a great way to take advantage of holes in your opponent’s deployment after everything is set up and even set up some bait and switches too. As in any wargame, deployment is crucial, and being able to redeploy a Warhound or two could give you an early edge and let you get the most advantage out of their superior manoeuvrability. At only 1 point each time you take it, and usually having 5 points to spend, it’s worth doing at least once, maybe twice or more.
Fortis Motivators cost 20 points and let you repair Critical Damage to Warhound legs on a 1+ instead of a 5+ in the damage control phase (notably not under an emergency repair order). Warhounds live and die by their mobility but only have 2 repair dice so being able to guarantee repairing leg damage is great. Thermal Mines and Scatterable Mines are some of the most effective tools against Warhounds, both which target the legs. Being able to consistently repair critical damage that would otherwise slow them down and waste precious turns is a powerful effect, and this guarantees that you’ll be able to keep them mobile. It’s not a game-changer, but it’s definitely worth considering.
Bair: While nice being able to repair damage to legs by discarding otherwise useless low roles, Leg damage is hardly common and once you start taking Critical Damage that’s usually the beginning of a swift end to smaller engines anyways. Not an upgrade I would take unless I had spare points at the end of the list.
Cameleoline Shrouding costs 35 points and can be equipped on a Titan of scale 6 or less (Warhounds) to impose a -1 to hit so long as the Titan has moved at least 6″ and is more than 10″ away from the attacking unit. However, the first time it suffers any structural damage, it loses this effect. It’s a bit expensive, but as long as you can keep your voids up, it’ll still work. Negative modifiers are powerful and stacking this on top of other negatives from terrain means it’ll be very tough to hit your Warhounds until they’re in range. Moving 6″ is easy for them too with a base move of 8″ so will only not be working against enemy First Fire shots that happen before they get the chance to move. Putting these on some squadded Warhounds will make them far more durable during the first round or two especially and maybe even longer if you can keep range, albeit at a combined cost of 70 points. You could put shrouding on one of the pair, and try to encourage your opponent to target it first by cleverly hiding the second one behind terrain on the approach, but you’ll find this tricky. One or two of these may be worth it, but more than that and you may be better off trying to free up space for another Titan or a Knight Banner. Think hard before you invest in many of these.
In terms of Personal Traits for your Princeps Seniores, the Solaria options can seem a bit lackluster at first glance, but some of them have their uses.
Spear of Tigrus lets your Princeps take a Full Stride order without taking a command check. This will increase mobility and will help your Princeps keep up with the rest of your battlegroup if they’re mounted in a Reaver or Warlord. Useful to get a key Titan across the board as quickly as possible. It’s not incredible – a Princeps in a larger Titan is likely rolling for a 2+ or 3+ anyway – but if you know you’re going to need to rely on the certainty of having that order, this is a way to get it. Definitely not a first-choice trait, but might have a place in some lists.
Agile Minded lets you interrupt an opponent’s activation in the Combat Phase once per game to hit back if it hits your Princeps. This is one of those traits that could be great in the right situation but might just as well wind up being kind of a dud. It could give your Princeps one more crucial round of shooting before it goes down, or you could call your shot on a weapon if the enemy Titan’s voids are down to try to stop it from shooting one of its other weapons. An interesting trick that’s worth thinking about on a Titan with powerful weaponry.
Swift Displacement allows the princeps’ Titan to once per game make a move of D6” directly away from an enemy Titan making a Charge move with a Smash attack. This trait is far too specific to get much use out of. Most Titans going on Charge orders will be Reavers with combat weapons and so won’t be making Smash attacks making this trait useless if you’re charged by something with melee weapon. And even if it does come into play, you’d probably be better off with another trait anyway. Not a great choice.
Condit: Oddly enough, this one could be situationally useful against Solaria’s perennial nemeses, Legio Vulpa – the Death Stalkers are a lot more likely to make smash attacks as part of a Charge, especially if they’re running Warhounds. It just doesn’t stack up against options like Dominant Strategist, though.
Maniple Choice
From a lore perspective, a Lupercal maniple is pretty on-brand for the Imperial Hunters, with loads of Warhounds on the field. Going this route, you can make use of Fortis Motivators and Cameleoline Shrouding to help keep your Warhounds in the fight as well as use Fog of War to redeploy your God-Engines to counter your opponent. You do however, completely forfeit Wolf Packs. This isn’t the end of the world, though – the Lupercal’s maniple trait is very good, and Cameleoline Shrouding, while expensive, will help ensure they stay on the board long enough to let you set up your alpha strike.
Taking the other tack, Wolf Packs unlocks a number of interesting maniple options when assembling a battlegroup. Let’s explore some of the possible options:
- Axiom – Replacing the Reaver makes the Axiom cheaper, , and being able to keep issuing orders after failing with the Warhounds is nice. That said, you’re probably better off with a Mandatum if you’re looking at bringing this sort of list – giving the Warhounds a leadership boost will make it more likely to successfully issue orders to them, somewhat obviating the need for the Axiom’s trait, and getting a +1 to hit with good positioning is just gravy.
- Corsair – This is a fun option: not only do you get a cheaper Corsair maniple, letting you fit it into more lists, the substituted Warhound will be able to “moonwalk” eight inches, enabling it to dance through terrain and claim objectives without giving your opponent shots into its rear armor. If you thought chasing down a Reaver that could move its full speed out of arc was annoying, just wait until you see the look of frustration on your opponent’s face as they try to get their hands on this Warhound.
- Fortis – While the Titanic Fortress rule does apply to all Titans in the maniple, the Warlord and Reaver will struggle to keep pace with the substituted hound. If you want to use a Warhound as a shield battery, you’ll probably be better served with a Regia.
- Ferrox – The Ferrox trait applies to all titans in the maniple, allowing the substituted Warhound to benefit. The question you need to ask yourself is do you prefer the Knife Fighters trait over the Lupercal’s Hunting Pack. The Ferrox route will give improved armour rolls up close and allow you to be more accurate within 2”, while the Lupercal gives you activation advantage and an armor roll bonus on coordinated strikes at any range. Both are great valid choices for Imperial Hunters Battlegroups, but the Ferrox gets to bring a Reaver as well to sneak in some heavier guns.
- Dominus – Normally skipped over due to it’s high cost, replacing the Reaver does help bring costs down a little on the initial buyin. You could stack the Knight’s ECM with Cameleoline Shrouding to give your one Warhound -2 to hit at long range while they stand near the banner. Definitely a gimmick, but you could make this work if you wanted to try something different. At least worth considering if you want to bring Knights.
Don’t use Wolf Packs to replace the Reaver in a Venator or Ruptura maniple – the abilities that the Reavers use only work for a Reaver, so if you substitute one out then you’re effectively losing your maniple trait. If you want to bring similar force dispositions, look at other maniples. And while you can use the Myrmidon maniple’s trait on a Warhound, it’s probably not worth giving up its maneuverability for First Fire or Split Fire orders.
A few other maniples are also worth talking about, though they don’t have a Reaver to substitute:
- Regia: Giving a -1 penalty to attacks against your Warhounds will make them more survivable, giving them more opportunities to devote their shields towards protecting your Warlords. Just be careful when deciding whether to merge void shields – your opponent will be even more tempted to just dump shots into the Warlords since your Warhounds will be harder to hit.
- Mandatum: The more aggressive Warlord/Warhound maniple combines well with the added survivability from your wargear. Plus, you’re more likely to be able to get mileage out of Fog of War’s redeployment shenanigans, since you don’t need your Warhounds to be deployed near the Warlord.
- Arcus: More durable Warhounds combined with the ability to redeploy them to best get into line of sight of your targets makes Solaria well-suited to quickly taking advantage of the Arcus’s trait. Your opponents will find it even harder to hide from your Warbringer than usual.
With all that in mind, let’s take a look at a 1500 point list which takes advantage of the options that Wolf Packs unlocks to assemble our Battlegroup.
Legio Solaria Battlegroup – 1735 pts
Ferrox Light Maniple – 660 pts
Warhound Titan – 255 pts
- Princeps Seniores – Iron-Clad Tyrant
- Vulcan Megabolter
- Plasma Blastgun
- Upgrades – Cameleoline Shrouding
Warhound Titan – 220 pts
- Vulcan Megabolter
- Plasma Blastgun
Warhound Titan – 210 pts
- Vulcan Megabolter
- Turbo Laser Destructor
Corsair Battleline Maniple – 1050 pts
Reaver Titan – 310 pts
- Princeps Seniores – Favoured by Fortune
- Vulcan Megabolter
- Melta Cannon
- Gatling blaster
Reaver Titan – 300 pts
- Apocalypse Missile Launcher
- Volcano Cannon
- Laser Blaster
Warhound Titan – 220 pts
- Turbo Laser Destroyer
- Turbo Laser Destroyer
Warhound Titan – 220 pts
- Turbo Laser Destroyer
- Turbo Laser Destroyer
Whilst this list does have the same Titans as some of the other sample lists we’ve looked at in these articles, it will play quite differently due to application of Maniple traits.
The Ferrox Maniple will try to close the gap and flank where possible to make the most out of Knife Fighters. All three could be put into one squadron without sacrificing your activation count too much, assess the table while you rack up and go with what makes sense at the time. Iron-Clad Tyrant is there to help guarantee your Order(s) go off without a hitch.
The Corsair Maniple will fill different roles as the Ferrox marches ahead. In all cases the Fighting Withdrawal trait will prove useful to allow them to strafe into position or withdraw when a melee threat emerges. The Princeps will take to the midfield, stripping shields and making holes in armour with their Melta Cannon. Favoured by Fortune will allow you to reroll those Melta shots, as it is critical you land some damage so the hounds can hammer the gap. The substituted Warhounds will also hang out in the back to mid-field, firing at targets of opportunity with its Turbo Laser Destroyers and weaving between cover. These can be taken either as individuals if you want more activations to make up for the squadron of 3 in the Ferrox or as a squadron, at the range they’ll be firing from either is good but coordinated strikes making those shots effectively S9 really does shine. Take care to keep them alive for the first two turns to ensure you keep your activation count up. The other Reaver will fulfil a traditional fire support role, sitting in the backline while pounding down shields and dropping blast templates from afar. You’ll generally want to give it First Fire or Split Fire orders, but don’t be afraid to move it to dodge firing arcs or hide behind terrain if necessary.
In terms of stratagem selection, Fog of War is a solid choice if you want to play some mind games with your opponent or to mitigate being out deployed due to your lower number of drops. Obscuration Clouds are always useful to help you close in or deny threats you can’t deal with immediately on early turns. Don’t leave home without one.
There’s a bit of room to swap things out in this list depending on your tastes. The Ferrox can be easily swapped for a Lupercal Maniple, if you would rather have the Hunting Pack trait for added flexibility.
You could also play around with the loadouts on your Reavers in the Corsair – building two fire-support Reavers or turning one of them into a more close-combat oriented machine by sticking a chainfist on it will let you tune the maniple to suit your taste.
Playing against Solaria
Karate Kid comes to mind – sweep the leg! When selecting stratagems consider Thermal Mines or, if you’re feeling particularly nasty, Scatterable Mines. Both of these will threaten serious damage to the Warhounds’ vulnerable legs, and Scatterable Mines pulls double duty by restricting movement if your opponent wants to keep their Titans alive. Other prime choices when squadrons are standing bunched up include Quake Shells and Earthshaker Mines – forced movement on Titans in close proximity has a decent chance of causing a collision, and there’s nothing more fun than forcing your opponent’s battlegroup to spend the strategy phase playing bumper cars. While Fortis Motivators can mitigate the effectiveness of critical damage to a Warhound’s legs, at 20 points, they won’t always take it, and even if they do they won’t be able to repair any structural damage they suffer.
If your Solaria opponent hasn’t taken a Lupercal maniple and has gone for large squadrons, consider trying to quickly eliminate the other component of their list to try and quickly starve them of activations once you turn to taking down their Warhounds. The larger their squadrons, the more Titans you’re forcing them to move early with each other Titan you kill, giving you more information about what they’re planning for the combat phase.
Release the Hounds
Legio Solaria’s rules give them some interesting tricks to make their Warhounds more survivable, as well as allowing them to get favorable deployments against most lists through Fog of War. Taking best advantage of Wolf Packs can require a little finesse, but it’s worth it in the end, and can open up some unique list-building options that aren’t available to other legions. Use your Warhounds’ superior mobility to outflank and destroy your enemies.
