Libraxus Tacticae Vulpa
Welcome back to Goonhammer’s series for aspiring Titan Principes. We here at Goonhammer’s own Collegia Titanica know that Adeptus Titanicus can seem intimidating to players unfamiliar with its particular quirks, but this series aims to equip you with everything you’ll need to play out epic clashes on the battlefields of the far future with your very own Titan Battlegroup. In this series, we’ll be taking a more in-depth look at the various Legios of the Collegia Titanica – exploring their origins and how to use them on the tabletop, from maniple selection and their loadouts, through to how to command them on the field of battle to secure ultimate victory.
This week, we’re looking at Legio Vulpa, a Titan Legion who heeded the Warmaster’s call and turned Traitor, becoming one of the most aggressive legions in the entire Heresy. The Death Stalkers’ rules reflect their desire to get up close and personal with their opponents, making them into peerless duelists who can run roughshod over any opponent if they’re able to get close enough to their prey. However, this isn’t without risk: if they’re not careful, they’ll be torn to shreds before they get a chance to bring their superior close range weaponry to bear.
Who are Legio Vulpa?
Unlike other Legios whose fall to Chaos was more tragic, Legio Vulpa was always on that path. During the Great Crusade they were infamous for their cruel nature, laying waste to surrendering cities full of civilians or venting their plasma reactors to irradiate settlements rather than waste the ammunition.
It was no surprise, then, that Legio Vulpa were first in line after Legio Mortis to align with the Warmaster at the outbreak of the Horus Heresy, and they took part in many infamous campaigns from start to finish. During the opening shots of the Schism of Mars, they took their rivals Legio Honorum, the “Deathbolts,” by surprise and crushed them
At Titandeath, the Battle of Beta-Garmon, they clashed with long-time rivals Legio Solaria. One of the more notable actions during this campaign was when eight (of course) princeps were fused with Daemons creating some of the first Banelords, daemon corrupted God-Engines dedicated to Khorne.
How to Paint Legio Vulpa
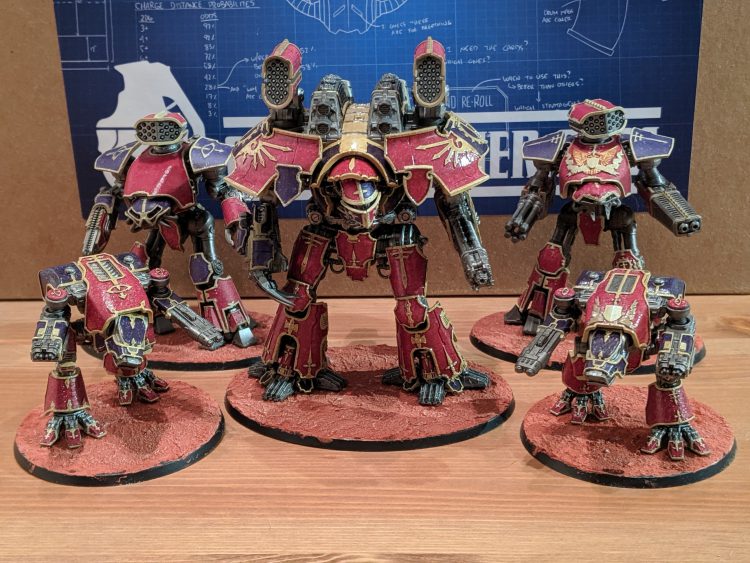
This week, Garrett “John Condit” Severson walks us through how he painted his Legio Vulpa battlegroup.
To be honest, it took me a while to settle on Legio Vulpa. They were my first choice, but were kind of intimidating for two main reasons:
- I wasn’t sure how I was going to do the marble effect on the armor plates, and
- The red and purple color scheme, while striking, also clashes pretty aggressively.
After going back and forth for a few weeks, I finally decided to just go for it, since the Death Stalkers were calling to me in a way no other Titan Legion did. I watched a lot of videos and read a lot of articles looking for a way to get a decent marble pattern, and eventually figured out my process for the marble effect. I also decided to lean-into the clashing colors, counting on the bone trim to pull me back from being painful to look at and keeping my fingers crossed that it’d wind up looking more like knight heraldry than just bad color choice. While it was kind of touch and go for a bit in the middle, I think the end results are solid and I’m happy with what I’ve got.
A few things before we get started: you’re going to want a wet palette for this so the paint doesn’t dry out while you’re working with it as you’re going to continue to mix the same batch of paint for all areas you’re sponging with the same color. Also look into getting some airbrush flow improver to add in – adding a drop or two will slow the process of drying a bit, giving you a little more working time and making sure that the paint on the palette will accept more and mix in nicely for the effect we want.
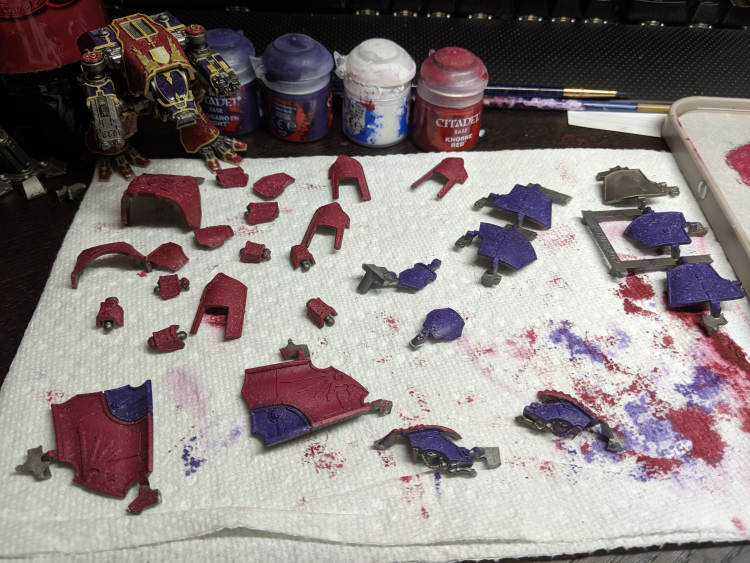
For the frame, I stayed simple: Leadbelcher spray, Nuln Oil wash, silver drybrush with a few edge highlights on things I really wanted to pop. I’m planning to go back through with some bronze to pick out a few more details.
For the armor plates, I started by spraying the armor panels with Leadbelcher spray. Then I got the first layer of color down with a natural sea sponge – Khorne Red for the red plates and Naggaroth Night for the purple ones. The Leadbelcher base will mean that the red and purple won’t get a smooth coat from the sponge and will wind up having some spots that don’t get a uniform base coat down. Don’t worry, this is fine. As long as you get some paint over the entire surface, that’s what you need. Once you’ve done the first layer, add a bit of White Scar to the paint on your palette. The color you’re going to get from the mix is going to look weird, but since it’s not going to be the forward color, it’s not the end of the world. Using the same sponge, mix the white in nice and thoroughly, then sponge a layer of the lighter color over the first layer of your primary color. Once you’ve completed that, add some of the primary color back into the mix on your palette, mix it in with the sponge, and sponge that on over top. Repeat this process until you land on an effect you’re happy with.
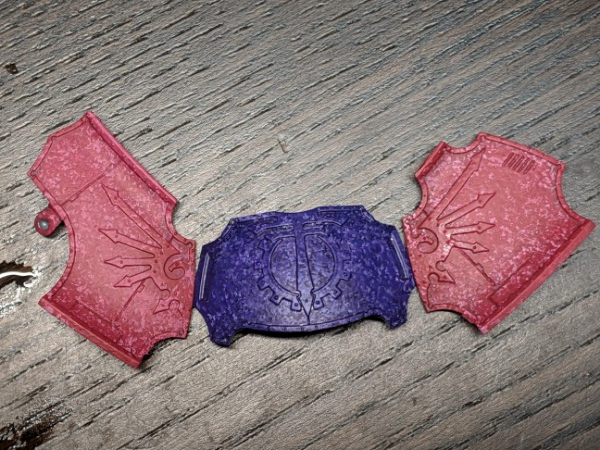
You’ll want to be a little stingier with the sponging on the “light” layers – they can easily overpower the main color, so go easy on the paint and use a light touch when you’ve mixed the white paint in, then on the next layer with the main color, take a little more paint and sponge a little more aggressively (not too much, though!). Also, you’re not trying to cover the entire thing with each layer – you should intentionally be trying to let some of the last layer show through. As long as you’ve covered all of the initial spray layer, you’re fine. Play around with it, and do as many layers as you think you need. Most of my armor plates are somewhere between 4-5 cycles of this, finishing out with a final layer with a little more of the primary color just to close it out.
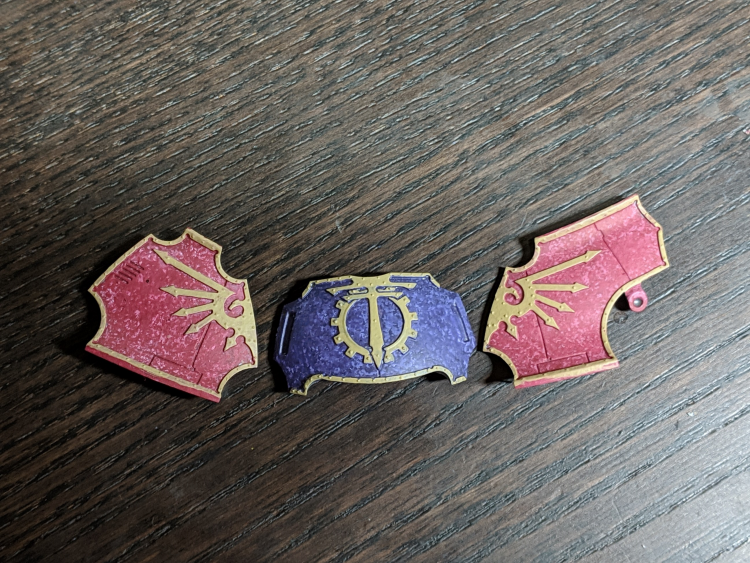
Once you’ve done that, it’s time for trim. I painted on an initial basecoat of Zandri Dust, then a layer of Ushabti Bone over top of it. This is going to take a while, so queue up your favorite podcast or a good album, sit down with your favorite drink, and knock it out. Just don’t be like me and batch out an entire maniple at once. Pay special attention to the “cut-ins” where the trim rises up from the armor plate. It’s going to take time, but the payoff will be worth it. This step is crucial, as the bone-colored trim breaks up red and purple and makes it work much better. Look at how much better this picture with just the first layer of Zandri Dust looks compared to the shot above:
Next is an initial filter to bring down the colors a bit and push them a little warmer. You’ll note from the art that the reds and purples on Death Stalkers Titans are more subdued. I wanted to lean toward that, but didn’t want to sacrifice the bright, heraldic scheme I’d landed on, so I compromised by using thinned-out Seraphim Sepia as a wash over everything – red, purple, bone, every single armor plate on the Titan gets it. I use about a 1:4 mix of Seraphim Sepia to medium and push it around to make sure it’s pooling a little bit in the crevices and giving you a little bit of the shading. After that, varnish to preserve your work.
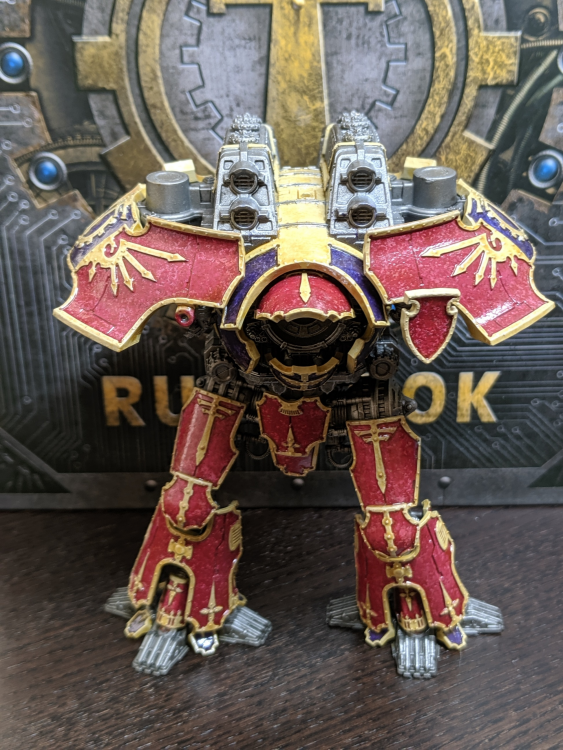
Sadly, I’m not quite finished – real life got in the way and I haven’t gotten back to it to push it forward. I used a gloss varnish because I’m planning to use some oils for a pin wash and to try my hand at some rain-streaking.
Tactical Overview
Honour and Blood is straightforward – get +1 to WS and -1 to BS when within 3” of an enemy. This lets Reavers and Warhounds hit on 3+ if they can move to within 2” and make called shots on a 4+. However, note the difference between where you get the bonus to WS and when you can actually use it – if your opponent can eyeball about 2.5” and stop there, instead of attacking with your improved WS you’ll be forced to take shots with a penalty to BS.
No Pity for the Vanquished is great – for 1CP, you get to fire again with the same weapon when you kill something. The only additional restriction is that the second target needs to be within 12″ of the one you destroyed. Simple and strong if it’s set up right, and another reason to bring at least one ranged weapon on most of your Titans. Just keep an eye on your positioning so you can make use of it.
Plasma Gargoyles are the odd one out here – they’re fun and flavorful, but not that great. Don’t bother on Warhounds – their short reactor track and two repair dice mean you won’t get much damage out of them, and if you’re fielding them in squadrons they have a chance to damage their squadmates whenever they vent if you’re playing to keep the option to merge voids available. You’ll usually take the gargoyles on brawler or claw Warlords, though they can do alright on Reavers. If you’ve got 15 points to spare on a larger Titan, you might as well.
Disruption Emitters. Oh yeah. This is the good shit. Warhounds slam like Reavers. Reavers hit as hard as Warlords. Warlords out-punch enemy power claws. Claw Warlords are frankly overkill. Put this on everything as a matter of course – it’s the reason you’re taking Vulpa. Keep in mind this adds to the strength of weapons, not the armor roll, which can be helpful when trying to punch through a Knight Banner’s ion shields.
With this suite of powerful close-range options, you’re probably thinking you should load up on melee weapons. And while those weapons will be incredibly powerful in Vulpa, the real stars of the show are short- to mid-ranged weapons like gatling blasters and lasers. Remember that when you’re within 2” of an enemy, you use your WS for all attacks, and can call shots at a -1 penalty rather than -2. On Warhounds and Reavers, this means that you’re getting called shots at 4+, and with a Warlord or Warbringer you’re getting them at 5+. This turns weapons like the gatling blaster or laser blaster into serious threats at close range, letting you set up and execute devastating close quarters alpha strikes.
Two of Vulpa’s personal traits are worth talking about: Razor Tongue lets you choose an enemy Titan within 24” of your Princeps and increase its Command value by 2 to a maximum of 10 – use this to ruin your opponent’s plan and make it harder for them to get crucial orders when it counts. Probably not your first choice, but if you’ve got two maniples it can be worth considering. Cruel adds 2 to the strength of attacks against targets of scale 5 or lower. Picture a Warhound next to a sign that reads: “You must be at least this high to board Legio Vulpa’s Wild Ride.” It’s not as strong as it was back when cheap Acastus were everywhere, but it’s still a useful counter to some powerful units. If the game you’re playing allows you to choose personal traits at the table after seeing your opponent’s list, this can legitimately compete with the Core Rules traits if there’s a pile of Knights on the other side, but obviously doesn’t help you at all once those smaller models have been swept off the table. The third trait, Bloodied but Unbroken, seems like it might be good at first glance, as aggressive play means you’ll likely be picking up more critical damage, but by the time you’re able to take advantage of it the Titan is usually not effective anyway. You’re better off using other tricks to boost your armor rolls.
Reavers are your bread and butter, and yours are very flexible. So long as you avoid taking a volcano cannon, nearly any weapon combination will work – you’ll be pushing your reactor at least once a round between getting extra speed and Voids to Full, and the extra drain from weapons can be enough to push you over the edge. Plus, since you’re trying to close the distance anyway, you might as well go with the melta cannon for its improved strength and Fusion trait if you want a high strength ranged weapon.
For Reaver melee weapons, the chainfist is king. With 3 dice at strength 10 with Disruption Emitters, it’ll make short work of pretty much anything, especially if it procs Rending. Power fists are still usable, but be sure to attack with them last in case you push them back into that 2-3” zone and wind up at disadvantage. You might be tempted to run a Reaver with two melee weapons, and as fun as it can be, it’s a very high risk/high reward option. If it’s able to get close enough to use its melee weaponry, it’ll make short work of nearly anything your opponent can put up against it. However, you’ll just as often find it getting swept off the board in the second round without anything to show for the point investment. If you do decide to go this route, take a chainfist and a power fist – the chainfist and smash attack will soften up an armor location of your choice, and the strength 11 power fist attack will let you get that last bit of damage necessary to secure the kill.
The Warhound’s 12” boosted move combines with Disruption Emitters to make it legitimately terrifying on the charge, dishing out up to D3+4 smash attacks at a minimum effective strength of 9. Lean toward turbo-laser destructors rather than plasma blastguns to take advantage of your 4+ called shots, and consider taking a few megabolters – stray shots into voids while you’re closing is never a bad thing, and the high shot volume and +1 accuracy within 8” combine to give you a surprisingly effective finisher.
Brawler Warlords are very strong in Vulpa, since Honour and Blood gives them 4+ WS, making a macro-gatling/plasma Warlord still very effective even if its prey ducks within 2”. They also make incredible use of the Arioch Titan power claw, boasting both 2+ to hit and the option to push it to a staggering strength 14 with disruption emitters. However, getting them close enough can be difficult. Dive into your stratagem pool for some movement tricks (like the new Warp Trickery stratagems) and you can turn your clawlord into an absolute terror. Just be aware it’s going to draw every gun on the table until it goes down.
Warbringers don’t synergize terribly well with Vulpa’s legion rules, but when taken in a Ruptura, they make an interesting target for No Pity for the Vanquished. Getting both a free move with your Reaver and a free shot with the Warbringer who killed its enemy is pretty cool. In addition, Honour and Blood and Disruption Emitters combine to make closing with your Warbringers a riskier proposition than normal thanks to their scale of 9.
Maniple Choice
The Death Stalkers favor close-range engagements where they can take advantage of their legion rules. They obviously do well with melee weapons, but they also get great use out of laser weapons and gatling blasters – the high shot counts and decent anti-armor capabilities combine with their increased accuracy in close to allow them to stack a ton of damage on the same location all at once. This makes them incredibly deadly if they can get in close enough to take advantage of it.
Unfortunately, that can be a pretty big “if.” In order to get the most out of their special rules and wargear, you’re probably going to want to focus on smaller Titans that have the speed necessary to close the gap. A Ferrox is a great way to get those Titans, and the +1 to armor rolls in close dovetails nicely with what you’re trying to accomplish anyway. Unfortunately, your legion trait renders the other half of the maniple trait irrelevant, but that’s a small price to pay to allow your Reavers to throw smash attacks that hit as hard as an enemy Warlord’s power claw.
If you want a Warlord, look at a Mandatum. Its maniple trait works well with a Warlord that wants to get in close, and the +1 to hit it confers to the Warhounds will let them call shots with turbo-laser destructors on 3+ when they’re within 2” of their target. Combine this with Disruption Emitters on your Warhounds and run them in to ruin your opponent’s day with 4 turbo-laser shots followed up with a strength 9 smash for each Warhound, all into the same location track.
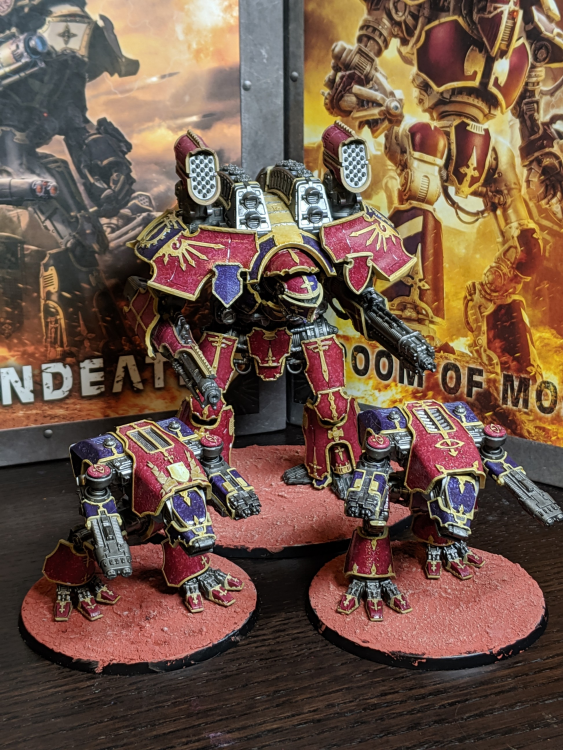
A Corsair or Lupercal is as good as ever here. You’ll find yourself using the Corsair’s movement tricks more aggressively in Vulpa than in most legions – in addition to skirmishing at mid-range to avoid firing arcs while you’re closing, you can use it to do something like a “pile-in” move from 40k to let you target flank and rear arcs with powerful close-combat attacks. Lupercals in Vulpa are incredibly nasty, making coordinated strikes in close at 3+ WS and turning coordinated charges into game-winning moves. Just be careful not to overcommit to charges – one bad roll on the Catastrophic Damage table could lead to multiple Warhounds taking serious damage.
With all of that in mind, here’s a sample battlegroup you could run in a 1,500 point game built from the starter kit and one additional box of Warhounds.
Legio Vulpa Battlegroup – 1,460 points
Ferrox Light Maniple – 1,460 points
- Reaver Battle Titan – 355 points
-
-
- Princeps Seniores: Dominant Strategist
- Gatling Blaster
- Melta Cannon
- Carapace Vulcan Megabolter
- Disruption Emitters
- Plasma Gargoyles
-
- Reaver Battle Titan – 360 points
-
-
- Laser Blaster
- Reaver Titan Chainfist
- Carapace Turbo Laser Destructor
- Disruption Emitters
- Plasma Gargoyles
-
- Warhound Scout Titan – 265 points
-
-
- Turbo Laser Destructor
- Turbo Laser Destructor
- Disruption Emitters
- Plasma Gargoyles
-
- Warhound Scout Titan – 240 points
-
-
- Turbo Laser Destructor
- Vulcan Megabolter
- Disruption Emitters
-
- Warhound Scout Titan – 240 points
-
- Turbo Laser Destructor
- Vulcan Megabolter
- Disruption Emitters
This force is geared toward close combat while still having respectable mid ranged output while it closes. Your Titans can each do massive damage if they get a charge off, but even during the initial rounds of the game while your opponent is still evading you, you’ll still be putting a decent number of shots on target.
The gatling/melta Reaver gives you a unit that can capitalize and open up armor if you happen to pop someone’s voids while you’re closing, and any of your Titans is going to do serious damage to anything it finds itself within 1” of. We’ve made it the Princeps since it will likely be the last one to go all in, letting you play it more defensively to keep it alive long enough to use Dominant Strategist to steal the opus for a game-winning charge.
The other Reaver uses its lasers at range, then charges in with the chainfist. Try to save this one for later in the round if possible and charge targets who’ve already moved so you can swing twice with the chainfist for more chances to proc Rending.
You’ll generally want to run the TLD/bolter Warhounds in a squadron. Between Coordinated Strikes and the Ferrox’s Knife Fighters rule, your megabolters hit at strength 6, your TLDs are effective strength 10, and your smash attack is strength 11, giving you plenty of chances to get damage past armor. When attacking into armor that hasn’t been damaged much yet, you’ll generally want to start with the TLDs without calling a shot, then follow up with the smash attacks into the same location, saving the megabolter for last to hopefully take advantage of the bonuses on the structure track.
Note that the TLD/bolter Warhounds don’t have plasma gargoyles. This is intentional: you’ll want to run them in a squadron when hunting larger prey, and the possibility of dealing a strength 4-5 hit to your squadmate every time you vent heat can make an already risky strategy that much more precarious. Since the dual-TLD hound isn’t generally squadding up, we can go ahead and slap the gargoyles on it and just keep it out of venting range of its allies.
If you want to try something different, consider swapping out one of the Warhounds for a pair of Cerastus Knights. They’re fun, and even more aggressive than the rest of your list, and if they manage to survive long enough to get a 9”+ charge off on anything, your opponent will regret giving you that opening.
You could also consider swapping out the weapons on your Reavers. Switching the laser blaster and the gatling blaster may suit you better. Or you could try running a chainfist on each Titan, replacing either the gatling blaster or the melta cannon. You could also swap out one or both of the Reavers’ carapace weapons for warp missiles, especially if you expect to be facing a lot of Warhounds and Knights.
This list is aggressive and not amazingly forgiving – if you miss your charge order at the wrong time, you could find yourself in a rough spot. However, when it all comes together you’ll find yourself exalting in the thrill of a close-fought victory, and isn’t that what we’re here for?
Playing Against Vulpa
Learn to eyeball 2.5”. They’re going to try to close, so try to set things up so that they take the penalty to BS without being able to make use of the bonus to WS.
Expect them to charge you. All of them. No, seriously: every single Vulpa Titan will at least consider taking Charge orders if it looks like they might pay off, and when they do, it’s going to hurt. If you stop within 9” of a Vulpa Reaver, it is likely going to boost its speed and, if it doesn’t awaken its machine spirit, charge you for a pile of strength 11 attacks. Giving your opponent a charge like this can swing the momentum of the entire game in their favor, so don’t feed them a piece you can’t afford to take the hit on.
By the same token, if you have a model that you can afford to let them charge, think about when to make that sacrifice play. Vulpa players are looking for decisive charges, and denying them the big plays by feeding them something smaller will make it hard for them to get what they want. Knights are excellent for this – use them to clog up charge lanes and deny the Death Stalkers the honorable combat they want so badly.
Just because they want to be in close doesn’t mean you should count them out, though. The ranged weapons that combo best with their legion trait tend to have higher shot counts, which means they’ll still be able to knock down your void shields and start in at armor. However, they’re less likely to bring big guns like belicosas that can credibly threaten critical damage from long range, and are instead likely to deal a lot of direct and devastating hits until they either get into close combat or work their way to the end of a structure track.
Disruption emitters are very, very good, but at +30 points taking them across the entire list adds up quickly. As a result, many lists will find themselves with an activation advantage over a Vulpa list. Use this to your advantage and think about the order in which you move your pieces in order to deny charges or step just barely outside 2″ of a Titan that got in on you.
Rip and Tear
Legio Vulpa supports an all-in aggressive playstyle that can pay off with dividends if they’re able to get in close. With the right maniple trait, their rules and wargear allow them to turn virtually any weapon into a close-combat nightmare for their opponent, and their specialist melee weaponry let them dish out some of the most punishing attacks in the game. However, taking the fullest advantage of their rules requires a sizeable points investment and some of their preferred loadout choices can be difficult to get mileage out of. However, if you’re willing to run the risk, you’ll find that the Death Stalkers offer a powerful and flavorful set of rules that is an absolute blast to play.
