Last week, Cygames surprised just about everyone by announcing major updates to Umamusume Pretty Derby’s balance that essentially boosted the Global server to something closer to the 1 year anniversary balance patch a good 4 to 6 months ahead of schedule. We touched on those changes and what they meant for the game last week, but when the actual patch arrived on Nov. 11th, many players (me, I’m players) were shocked to notice some other major quality of life improvements that the game had silently made. Although none of these changes are the much desired auto career mode, we were instead treated to a handful of amazing quality of life changes that help make the daily grind easier, while also vastly making careers more stable and easier to obtain desired outcomes from Support Card events and other choices.
If you’re new to Umamusume: Pretty Derby, we’ve got collection of guides that can help you, whether you’re looking for Career Mode, PVP, Inheritance Sparks, Support Decks, and more, and last week’s piece about the balance changes is a great sister read to this week. Also, if you’re looking for help with the upcoming Virgo Cup, don’t worry, we put out a guide for that on Monday that you can take a look at! For now, let’s work through the changes from small to large.
Sweating the Small Stuff
One of the first big changes with almost no fanfare is the ability to quick run Team Trials and Daily Races, reducing a somewhat tedious time sink into just a few button presses. This is especially helpful for Team Trials, as many events and challenges ask you to run multiples of ten in Team Trials for full benefits. Daily Races also received a tweak, making it possible to run up to 6 races in the same Daily Race category in a matter of seconds.

This doesn’t fully automate either option, however, and to turn it on isn’t inherently obvious from the jump. On Team Trials, you’ll want to click the small button that says “Quick Mode: OFF” to turn it on (it should turn green). Once you’ve turned this on, the option below will say ‘See All Race Results’, which then plays the results screen for all 5 races in a Team Trial. You can even skip that by hitting the fast forward button in the bottom right corner, reducing a single Team Trial run to a matter of seconds over minutes from beforehand.

In Daily Races, you’ll want to look for a similar small button. Once you do, you’ll be allowed to choose how many of the same race you want to run (up to 6, but generally 3 when an event isn’t going on), which will then show a small results ticker of how you fared in each race. While Career Mode remains the largest time investment in a daily run of Umamusume, these changes make the other aspects easier to do, and in the case of Team Trials, will make the next event goals even easier to obtain, as 5, 10, or even 20 Team Trials can be conducted in less than 10 minutes now due to the quick race change.
All the Answers in One Place
The other small but significant change occurs in Career Mode, which now allows you to see the direct result of what your choices will actually do. Many players (again, I’m players) used third-party websites and guides to help keep track of the numerous career, scenario, and support card events that would occur over any given Umamusume Career Run, which on a mobile device could be onerous; now the game natively hosts all of those answers, meaning that unless you truly enjoyed having a guide on one monitor and the game in the other, you’ll no longer need to rely on that tool to know what will happen when you choose an option.

This is especially great for new careers in which you aren’t sure what to do or how the trainee acts, and can also give you helpful tips such as what multiple outcomes you COULD get are (which are essentially a coin flip), and even helps warn you when choices will end support card interactions, a sometimes confusing and irritating outcome that could ruin a run if you were hunting for specific skills.
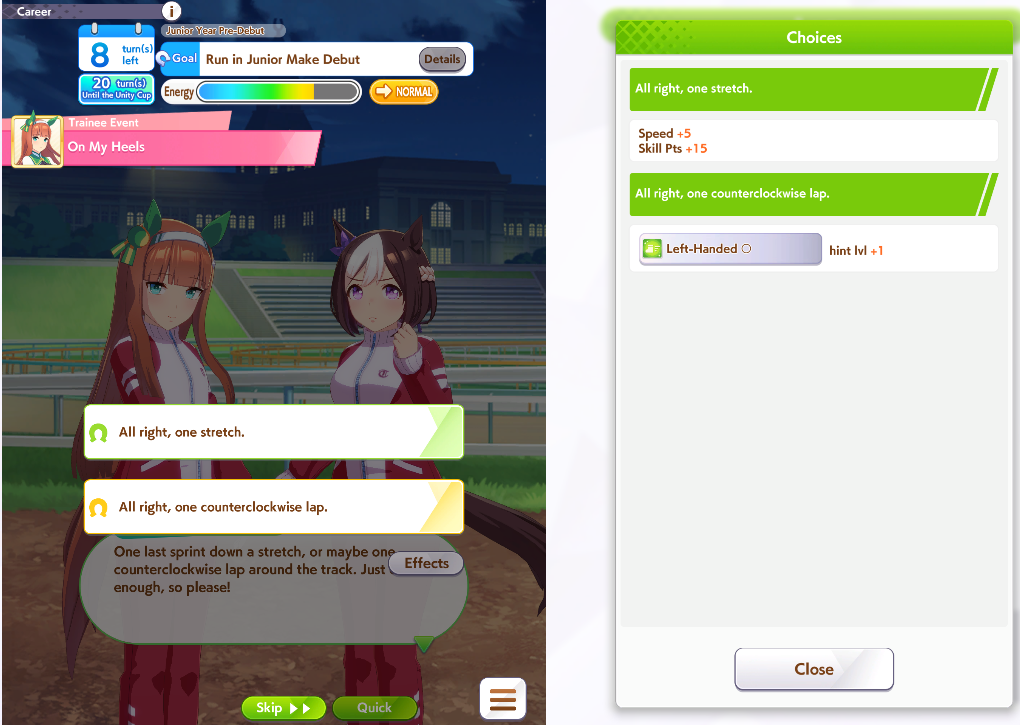
Of course, if you like learning on your own, then you can also just ignore the guide, but why would you do that? The outcomes don’t spoil the dialogue, and instead can really help you prevent an unforced error like losing energy over gaining it, or getting stat points you weren’t looking for; in particular, I’m quite pleased with how clear and concise they made the guide, and it might be my favorite overall change to the update, and should help make the game a lot mess mystifying and confusing for newer or casual players who only get to do a single career a day or didn’t want to invest in spreadsheeting their mobile game.
Buy a Clue

Hint Books were the first unexpected currency to be added in this patch, and what they do is not immediately clear without understanding the Potential Level system. We covered that a few months ago, but as a recap, each trainee has a Potential Level that can go up to LVL 5, and each Potential Level unlocks a skill that the trainee can potentially learn during their career. It is important to remember that these skills are not made innately known, just that you can invest skill points into them and have them available on the character forever by levelling up their Potential, meaning you don’t need to try and obtain the skill through Support Cards.
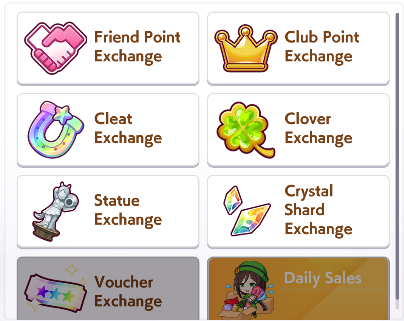
Hint Books allow you to permanently lower the amount of Skill Points that an unlocked Potential Level Skill costs. Although that sounds simple, it is a little more complicated than that. First, there are two types of Hint Books, and each type has two versions, essentially a “small” and “large” book. Small books are sufficient for LVL 1 of a Hint, but after that, a combination of the small and large books are needed, as well as other currency, specifically Dream Glimmers, which are not exactly easy to come by without heavily playing Career Mode.
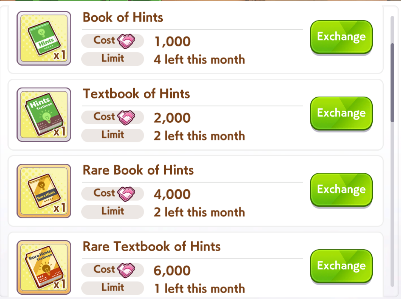
Hint Books are available to purchase using Friend Points, which you probably have a decent amount of depending on how long you’ve been playing (And, obviously, have already maxed out Haru Urara’s Guts card using, right?), but Hint Books are available only in small supply each month, meaning that it will take quite a while to max out Hints for your trainee, and makes investing in multiple trainees less efficient than focusing on a single one of them. A solid tip is to pick one of two avenues here: focus on the trainee you like the most, or focus on the trainee that you want to run as your Ace in PVP / Team Trials. This should ideally also be a trainee that you have at Potential Level 5, and plan to make use of their Potential Level skills.
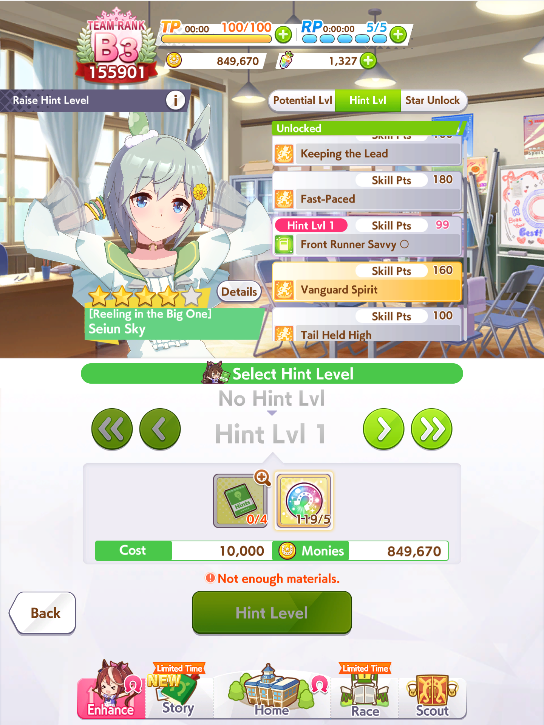
A good example of this is someone like Taiki Shuttle or Narita Taishin, who both want their Potential 5 Skills available and who are hungry for Skill Points to utilize on a number of skills. Another good example is Nice Nature, who can utilize the benefit of lowered skill point costs to obtain more debuffs for PVP use. A possibly “bad” example is someone like Mejiro Ryan, who doesn’t really require or want many of her Potential Skills, and is often raised as a Parent for her Unique than anything else, meaning that the investment of Dream Glimmers and Hint Books (Read: Friend Points) is not worth the cost and time needed to obtain her hint levels.
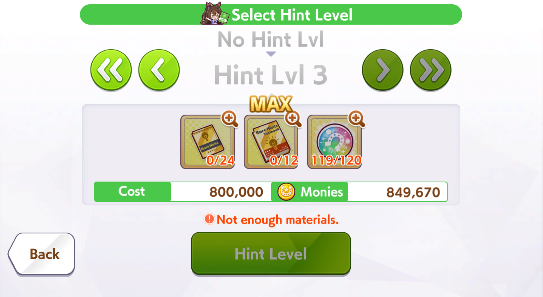
Hint Books can be a great boon to leveling your Ace stars, but be very careful about the investment cost in buying and utilizing them. This is similar to the advice about Potential Levels; after the first level or so, Hint Books and Hint Levels becoming increasingly restrictive and expensive, and wasting resources in Umamusume is one of the worst mistakes you can make, because recouping those losses can take literal months of IRL time; you can’t even fix the problem with spending actual cash.
Crystal Clear
The biggest surprise addition to this patch was the sudden and unexpected release of LB Crystals. Crystals, both rainbow and gold, allow players to uncap support cards that match the color of the crystal. These items are pretty rare and are generally tied to event rewards, often requiring players to earn crystal pieces that can be exchanged for full crystals in the shop, or occasionally given out during events like Anniversaries or other big “reward” periods in the game.
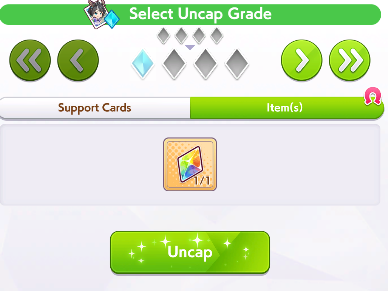
For players who are thinking that this means you should just immediately unlock a card’s potential, well, the actual answer is more complicated than that. These crystals are valuable and not easy to obtain, and thus should only be used to MLB a card, and specifically used to MLB valuable, high tier cards. For example, if you currently owned an SSR Kitasan Black at LB3, using the Rainbow Crystal would give you an MLB Kitasan Black, one of the best cards you could currently have in the game and for quite a while. However, if you only had a LB0 copy of Kitasan Black, the change from LB0 to LB1 by using the Crystal is effectively wasting a precious resource.

This is even more important to consider in light of the fact that Global players can know what banners are upcoming in terms of Support Cards due to the years of released content in the Japanese version of Umamusume. Although we are playing with an accelerated schedule, Global is still about 3.5 years (content wise) behind Japan, meaning that budgeting Carats and knowing what banners are coming when can help prevent wasting crystals for no reason. Back to the above example, Kitasan Black is considered one of the best cards in the first years of Umamusume’s lifecycle, thus making it tempting to try and MLB, but Global players are (generally) aware that there’s another Kitasan Black specific support card banner coming up. This means that wasting the crystal now before possibly being able to pull for multiple copies of the card would use up a resource that isn’t as easily refilled as carats for no great benefit.

So, when it comes to Crystals, the rule of thumb is this: If you have a high-tier SSR non-Event card at LB3 such as Kitasan Black, Fine Motion, or Super Creek, using the crystal is a good investment to make the card MLB. If you have lower than LB3, you should only use the Crystals when you have enough to ensure MLB (so, 2 Crystals for LB2, 3 for LB1, and a whopping 4 for LB0). There’s no rush to use them, and they will remain a valuable and limited resource throughout the game’s life, so don’t feel like you HAVE to use a Crystal just because you were given one; it will take quite a while before we can earn a second one on our own, and currently there’s no way to actually earn a one right now. There are also really valuable cards coming soon, such as SSR Summer Maruzensky, Mejiro Ramonu, and El Condor Pasa’s Speed card that could also make for excellent choices.
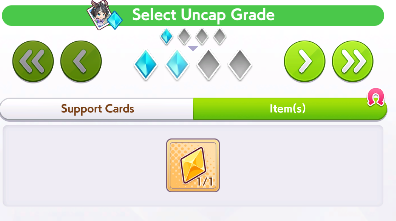
There are also Gold Crystals, which allow you to do the same thing but for SR Cards.The same rule applies to these, even if SR cards aren’t quite as hard to obtain as SSRs, you still don’t want to waste Gold Crystals on cards that aren’t going to be MLB. With SRs especially, it is generally worth trying to see what you’ll even get from the MLB version, as many SR cards are at their best when MLB, but some can be very good at 3LB. Gold Crystals are obtained in the same manner (events), and based on experience with the Japanese side of things, aren’t exactly any easier or more common to obtain than their rainbow counterparts; be sure to consider strongly if you really need an SR card to be MLB before you use it, and if you can’t MLB the card, again, don’t use the crystals.
These have been some exciting and surprising weeks in Global, perhaps some of the most excitement since launch, so hopefully this guide helps you with getting the most out of the new change and features in the game. If you have any questions, please leave us comments down below, drop by the Goonhammer Discord if you’re a Patron, or even email me at marcy@goonhammer.com! Until then, I’ll be training to hopefully see you all out there on this brand new era’s turf!
Have any questions or feedback? Drop us a note in the comments below or email us at contact@goonhammer.com. Want articles like this linked in your inbox every Monday morning? Sign up for our newsletter. And don’t forget that you can support us on Patreon for backer rewards like early video content, Administratum access, an ad-free experience on our website and more.



![[AOS] Competitive Innovations in the Mortal Realms: 2025-12-4](https://d1w82usnq70pt2.cloudfront.net/wp-content/uploads/2020/01/AoS_Analysis_Banner.png)

