Welcome back to our ongoing series for Conquest: The Last Argument of Kings. Last time we covered the basics of how the game plays but today we’re looking at Conquest’s unique Reinforcement mechanic and how to use it to your advantage. Diagrams drawn by Skjalddis; not to scale between regiment size and table size.
Reinforcement Rolls
A quick overview: Conquest’s unique mechanic is that every unit starts off the table and trickle in slowly over the course of the game.
Your units are split up between Light, Medium, and Heavy units which all arrive at different points throughout the game – the ratios of which you’ll want will vary drastically on your army and playstyle and something we’ll be covering separately. As with just about everything in Conquest: rolling low is good. You want to be rolling 1’s 99% of the time not 6’s. At the start of each turn both players roll to see which of their units arrive:
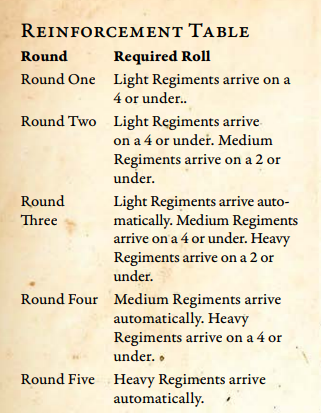
You do not roll individually for each unit. For example if it’s Round 2 and you have 2 Light Units and 3 Medium units yet to arrive, you’ll roll 2 dice needing 4’s or under and then 3 dice needing 2’s or under. Each success from each pool lets you move that many unit cards into your command stack and will arrive that turn. These are placed to the side separate from the rest of your reinforcements; your opponent will know which units are arriving but not which order they’re coming on!
Medium and Heavy units make the bulk of most armies and are how you score most objectives and victory points; Light units arrive sooner and give you board control but they don’t win you games on their own. Keep in mind too that games are generally 10 turns long (unless one player scores max victory points first) so even Heavy regiments will be on the board guaranteed for half the game, at the latest.
Characters join with a unit before the game and will arrive when that unit arrives – you do not roll for Characters separately.
Moving onto the table
When a unit arrives to the battle you place it flush against your own battlefield edge. The unit has to use it’s first action to move onto the table, and if it doesn’t fully fit onto the table hast to use its second action to move again; that’s not something that will be common unless you’re running a very large unit with a short movement characteristic. This part is pretty simple!
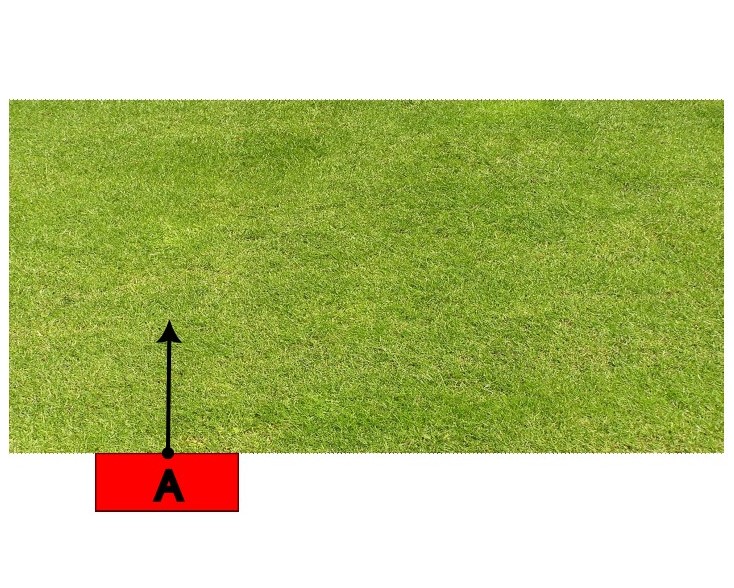
Players take it in turns to activate units whether they’re already on the table or not. When bringing units onto the table there’s a few things to keep in mind whether they’re a shooting or melee focused unit.
If it’s a shooting unit:
- Are there any forests or terrain in the way of line of sight?
- Are there any fast-moving enemy units that could engage them in combat next turn?
- Is there an enemy shooting unit that out-ranges or out-shoots them? Especially if that unit was already on the table and hasn’t activated yet!
- Is there an enemy that is in range for you to shoot? While you can’t charge on the turn you arrive from reinforcements you can volley.
For more melee focused units:
- Is there terrain I can use to avoid getting shot at?
- Are there enemy units on the table that haven’t activated and will charge my unit?
- Are there enemy shooting units that haven’t activated this turn and will be in range to shoot?
Units in Conquest are extremely unwieldy, unable to quickly reposition on the battlefield – a problem that gets worse the larger the unit is. Cavalry units have a higher top speed but no special manoeuvrability; you can shift your battlelines in response to a crisis or opportunity, but often it feels better to reinforce a new unit to shore up a crumbling flank rather than reposition a committed unit.
Reinforcement Zones
After the fist round players use their units on the table (assuming they have any) to determine their reinforcement zone. Player’s determine their reinforcement line at the beginning of the round, before any units are rolled to come and before any units start moving further down the table. Your zone is determined by the rear-most point of your forward-most unit on the board. Here, just look:
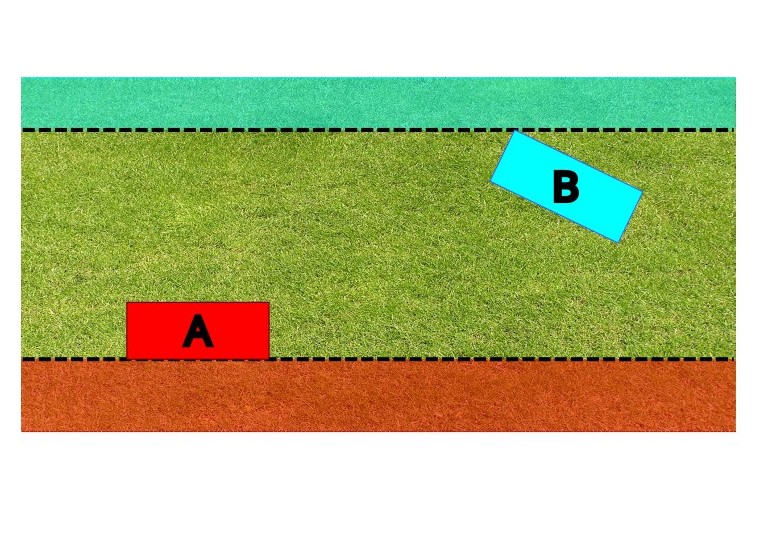
The red player’s unit moved straight onto the table so the line runs along the back of its stand where the blue player’s unit move and then wheeled so the back corner of its stand is used to determine the zone.
However, if players have units locked into combat then those cannot be used for reinforcement zones. In the diagram below units C and D would put their respective player’s zones further up the board, but as they’re locked into combat they do not so it defaults to the other units on the table.
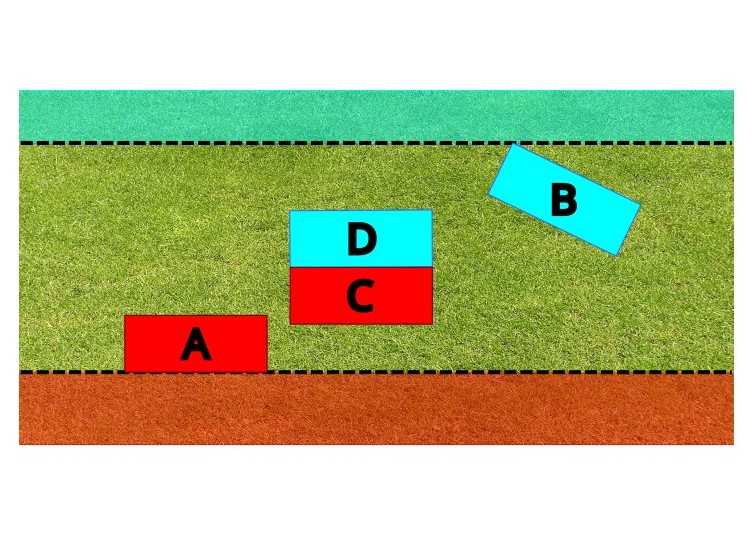
When your units arrive they can walk onto the table from your table edge or from any point on either side of the table in your reinforcement zone. Zooming in below on the Red Player’s reinforcement zone, you can see that units B and C can arrive from the sides as so. Otherwise walking onto the table is identical to doing so from your table edge. Units arriving to the table this turn also cannot charge, regardless of how they arrived to the battle. This keeps enemy units relatively safe, for a turn and means, in the absence of ranged reinforcements that can volley, the enemy deployment zone is a strangely safe place to be.
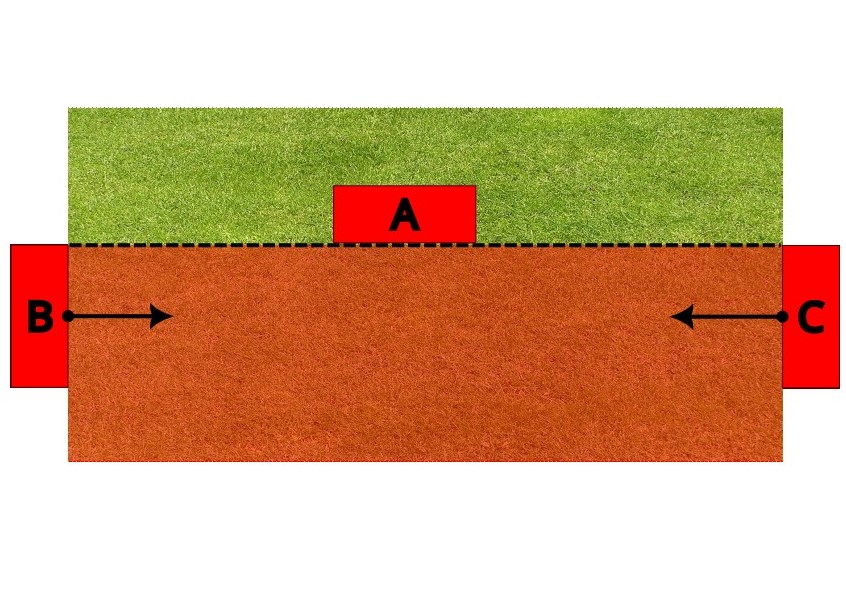
Only Light and Medium units can arrive from a Reinforcement zone created by a Light unit. Heavy units can only arrive from a separate zone created in the same way by Medium or other Heavy units. That means you can’t just have Light units sprint up the table to have Heavy regiments flank on from the sides!
This is an extremely interesting mechanic that requires constant awareness. Players need to be conscious of their own and their enemy reinforcement zones, be aware of where enemies can walk on from, prioritize activating and attacking units based on these lines, and push up their own zones as well to make it easier to walk onto objectives and flank enemy units.
The only time a reinforcement line will change during the round is if an enemy unit moves past, into the zone, pushing it back to your next unit instead.
Moving on from the flanks
Now that we know how to determine reinforcement zones, is moving on from the sides actually better than just moving on from your own board edge? Well, maybe. Maybe not! This is where playing some games and getting a feel for this is going to help you a lot as a player to know when it’s best to do this but there are some basics as well which make it obvious.
Because the unit is moving on from the side if you want them to facing towards your opponent’s table edge you’re going to have to either wheel the unit during one or both of its moves or even use a reform action after moving on to do so. A “standard” move for infantry is only 5″ so marching twice from your own table edge will get them 10″ up the table (or 11″ if they have a banner for an extra inch on the second march). A stand for infantry/cavalry/brutes are 66mm squares, roughly 2.6″ each; a unit that is 4 stands deep would not be able to move onto the table with 2 march moves if they only have a 5″ move with no bonus of any kind. Reforming is a great way to be facing the correct direction, but a reform action takes place around the centre point of the unit. You’ll need enough movement to get your regiment on in your first march to make a reform action after and if your unit is more than 3 stands wide its centre point will be 5″ away from the furthest forward point of your unit already. It’s just not worth doing with large, unwieldy units unless you’re moving into a position for a flank charge in the following turn or to cause other positional issues for your opponent to deal with.
If your reinforcement line isn’t already past this point then you hit a point of diminishing returns trying to be in a better position. Often times it will still be better to march on from your table edge the first few turns of the game. Where flanking on from the sides becomes very interesting is the mid to late game when units can walk onto objectives or be in a great spot for flanking charges in their next turn, causing massive disruptions to enemy plans.
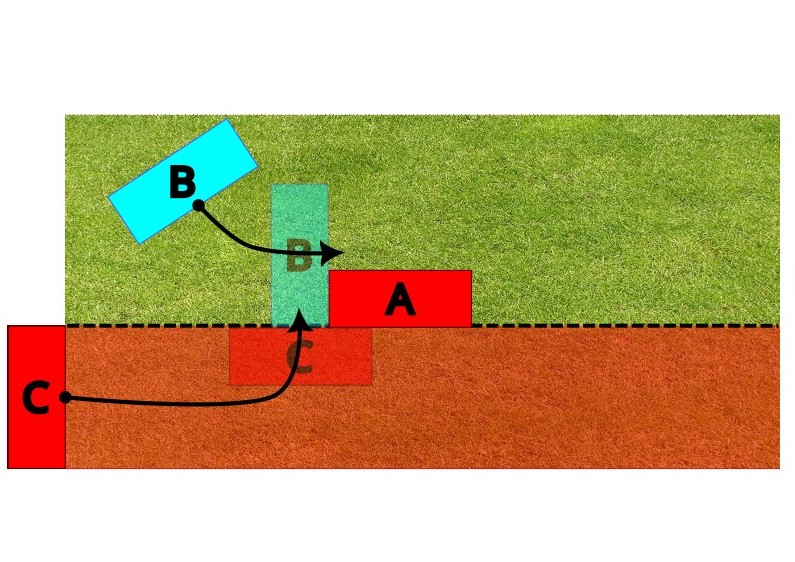
In the above diagram it is assumed that Unit C is moving before Unit B, because otherwise that charge would drastically change the red player’s reinforcement zone. Given how close to the board edge Unit C was anyways it likely would have gotten as far, if not further onto the table by moving on from it’s board edge so using the reinforcement zone is a bad plan to move to its final position. Instead, knowing that Unit B likely wants to charge Unit A when it activates an alternative move would be to march Unit C on just enough to get it onto the table and wheel enough so that Unit B cannot charge its flank.
This presents a far more interesting and difficult decision to the blue player. They could still charge into the flank of Unit A, likely killing or crippling it thanks to flanking bonuses but then open themselves up to being flanked next turn. Or, they could charge Unit C instead, in its front and likely doing less damage to them but in a much safer position from then on. That likely becomes the correct decision for blue player as it still pushes back red player’s reinforcement zone.
Flanking and Ranking
Hopefully you now have a better grasp on how to make use of reinforcement zones and why they can be so incredibly useful in games of Conquest: The Last Argument of Kings. How often you make use of this mechanic may be limited on the army you’re bringing, the mission you’re playing, and of course how your opponent is deploying but being aware of how your opponent can make use of their own zone will make or break your own army’s positioning. It’s something that will take a few games to really get used to and to get to grips on how you want to use it but paired with alternating activations makes for an incredibly dynamic game and something wholly unique to play.


You must be logged in to post a comment.