The last time I wrote one of these was in September after the Goonhammer Open UK, where I played Aeldari and didn’t enjoy it much. Since then I’ve played another 34 games, none with Aeldari, and played in four separate events, but haven’t found time to write them up. Since nobody cares about tournaments that happened three months ago, I won’t go into too much detail on the first three of those, but by way of a brief update:
- London Grand Tournament 2023 – Space Marines – 2 wins, 1 draw, 2 losses
- FactoruM October GT 2023 – Space Marines – 3 wins, 2 losses
- Leicester Super-major 2023 – Blood Angels – 3 wins, 2 losses
A perfectly respectable if unexciting record, and yes I’m distinguishing between Space Marines and Blood Angels; I built and painted a whole separate army, so it counts. The highlights of these events were getting to play Greg Chamberlain (LGT) and Nassim Fouchane (Leicester), both of whom I’ve known for a while but hadn’t ever been across the table from. Both are also strong players who brutally destroyed me with armies I hadn’t yet played against in 10th (Leagues of Votann/World Eaters), so it was educational all-round.
Outside of events, I’ve continued playing at my local club, and also mashed a full 5 games into a weekend away at nerd camp with friends in a big house in Devon. Most of those have been played with either of my Marine armies, but I’ve also snuck in solitary games with Astra Militarum and World Eaters, ticking off more armies from the list so that I end the edition having played with every faction I own. Two very disparate experiences, there; my Militarum army started their lives as Imperial Guard back in 5th edition, and are a bit of a kludge of kits I’ve picked up over the years and different builds that are no longer optimal, while the World Eaters are brand new.
The main thing I haven’t been doing is contributing very much to this website, though I have fulfilled my main function, which is to pay the people who do write articles regularly. In 2024 I would like to be more active again, if only because it’s increasingly embarrassing when people are excited to meet a Goonhammer writer at events and then I can’t explain what I do around here. In that spirit, here’s a first Road To of 2024, and a declared intention to get these rolling more regularly this year – starting by talking about my first 2024 tournament, the UKTC super-major in Nottingham.
For this event I was running Blood Angels in a Firestorm Assault Force detachment.
++ Army List for Nottingham Super-major - Click to expand ++ Fire and Blood (2000 points) Space Marines CHARACTERS Captain (80 points) Captain in Gravis Armour (105 points) Lemartes (110 points) Lieutenant with Combi-weapon (70 points) OTHER DATASHEETS Aggressor Squad (220 points) Bladeguard Veteran Squad (90 points) Company Heroes (95 points) Death Company Marines with Jump Packs (260 points) Eradicator Squad (95 points) Eradicator Squad (95 points) Inceptor Squad (110 points) Inceptor Squad (110 points) Infiltrator Squad (100 points) Land Raider Redeemer (260 points) Scout Squad (55 points) Scout Squad (55 points) ALLIED UNITS Callidus Assassin (90 points)
Blood Angels
Strike Force (2000 points)
Firestorm Assault Force
• 1x Plasma pistol
1x Power fist
• Warlord
• 1x Boltstorm gauntlet
1x Power fist
1x Relic blade
• Enhancement: War-tempered Artifice
• 1x Bolt Pistol
1x The Blood Crozius
• 1x Combi-weapon
1x Paired combat blades
• 1x Aggressor Sergeant
• 1x Flamestorm gauntlets
1x Twin power fists
• 5x Aggressor
• 5x Flamestorm gauntlets
5x Twin power fists
• 1x Bladeguard Veteran Sergeant
• 1x Master-crafted power weapon
1x Neo-volkite pistol
• 2x Bladeguard Veteran
• 2x Heavy bolt pistol
2x Master-crafted power weapon
• 1x Ancient
• 1x Bolt pistol
1x Bolt rifle
1x Close combat weapon
• 1x Company Champion
• 1x Bolt pistol
1x Master-crafted power weapon
• 2x Company Veteran
• 2x Bolt pistol
2x Close combat weapon
1x Master-crafted bolt rifle
1x Master-crafted heavy bolter
• 10x Death Company Marine with Jump Pack
• 10x Inferno pistol
8x Power fist
2x Power weapon
• 1x Eradicator Sergeant
• 1x Bolt pistol
1x Close combat weapon
1x Melta rifle
• 2x Eradicator
• 2x Bolt pistol
2x Close combat weapon
1x Melta rifle
1x Multi-melta
• 1x Eradicator Sergeant
• 1x Bolt pistol
1x Close combat weapon
1x Melta rifle
• 2x Eradicator
• 2x Bolt pistol
2x Close combat weapon
1x Melta rifle
1x Multi-melta
• 1x Inceptor Sergeant
• 1x Close combat weapon
1x Plasma exterminators
• 2x Inceptor
• 2x Close combat weapon
2x Plasma exterminators
• 1x Inceptor Sergeant
• 1x Close combat weapon
1x Plasma exterminators
• 2x Inceptor
• 2x Close combat weapon
2x Plasma exterminators
• 1x Infiltrator Sergeant
• 1x Bolt pistol
1x Close combat weapon
1x Marksman bolt carbine
• 4x Infiltrator
• 4x Bolt pistol
4x Close combat weapon
1x Helix Gauntlet
1x Infiltrator Comms Array
4x Marksman bolt carbine
• 1x Armoured tracks
2x Flamestorm cannon
1x Hunter-killer missile
1x Multi-melta
1x Storm bolter
1x Twin assault cannon
• 1x Scout Sergeant
• 1x Astartes chainsword
1x Bolt pistol
1x Close combat weapon
• 4x Scout
• 2x Astartes shotgun
4x Bolt pistol
4x Close combat weapon
1x Missile launcher
1x Scout sniper rifle
• 1x Scout Sergeant
• 1x Astartes chainsword
1x Bolt pistol
1x Close combat weapon
• 4x Scout
• 2x Astartes shotgun
4x Bolt pistol
4x Close combat weapon
1x Heavy bolter
1x Scout sniper rifle
• 1x Neural shredder
1x Phase sword and poison blades
The core here is the flamestorm Aggressors in the Land Raider Redeemer, accompanied by a Captain in Gravis armour to enable them to pop off the Immolation Protocols Stratagem for free, and/or double up on it with the Land Raider. The other big hammer is the Death Company with Lemartes, who are surprisingly durable thanks to their -1 damage and have good output with their fists and inferno pistols (which get a welcome Strength boost in this detachment). There’s two swords in there because I modelled two with swords ages ago and I wish I had done fists instead, but I didn’t, so here we are.
The Scouts and Callidus do the kind of mission play you’d expect them to, while the Inceptors offer both mission play and some great damage output – and again, they’re quite happy to be boosted to S9 in this detachment. Similarly enjoying the Firestorm are the Eradicators, who really like being S10 in a meta where most of their targets are either T9 or T10.
If you’re wondering what the hell the 3-model Bladeguard unit does, the answer is “exist in painted form at short notice.” They should have been replaced (along with the Gravis Captain’s enhancement) by another unit of Inceptors, but the ones I needed to build and paint showed up on the Tuesday before the event, so Bladeguard it was.
Finally there’s the Company Heroes and their accompanying Captain, a general all-rounder unit which consists of a cheap and efficient 16 wounds at -1 to wound, plus a Captain.
That’s the idea behind it all; let’s see how it worked out in practice.
Day 1
I’ve taken to driving to any event less than about 2.5 hours away on the morning of, rather than staying the night before. This works out better financially, and also saves me some relationship capital as it means I only miss one bedtime for my daughter rather than two. Nottingham is about as far away as that time limit extends, but it’s still within it, so I was up nice and early on Saturday morning. Doing this in midwinter is slightly surreal, because you wake up when it’s still pitch black and spend the first hour or so driving in the dark. I make good time and get to the venue at about 9.05am, at which point we’re already being directed to the overflow area. I park up right next to our patron SD, whose drive has been substantially shorter since he lives nearby.
As I’m leaving the car park the staff are closing it off and re-directing people to one further away, and right at the front of the queue of people being cut off and forced to go around is Robin Cruddace. I guess if the game designers are going to play at any event, it’s going to be this one.
Throughout the tournament I remember to take photos of my games, largely by using the picture reminder feature on Tabletop Battles App, so for once I can offer more detailed write-ups of my games. Whether this is a blessing or a curse is left as an exercise for the reader.
Game 1 – Stuart, World Eaters
Mission: Scorched Earth
Deployment: Dawn of War
Mission rule: Chilling Rain
++ Stuart's list - click here to expand ++ World Eaters 2.0 (2000 Points) World Eaters CHARACTERS Angron (415 Points) World Eaters Daemon Prince (225 Points) BATTLELINE Khorne Berzerkers (200 Points) Khorne Berzerkers (200 Points) Khorne Berzerkers (200 Points) OTHER DATASHEETS World Eaters Terminator Squad (380 Points) World Eaters Terminator Squad (380 Points)
Berzerker Warband
Strike Force (2000 Points)
• Warlord
• 1x Samni’arius and Spinegrinder
• 1x Hellforged weapons
1x Infernal cannon
• Enhancements: Berzerker Glaive
• 1x Khorne Berzerker Champion
• 1x Berzerker chainblade
1x Bolt pistol
• 9x Khorne Berzerker
• 9x Berzerker chainblade
9x Bolt pistol
1x Icon of Khorne
• 1x Khorne Berzerker Champion
• 1x Berzerker chainblade
1x Bolt pistol
• 9x Khorne Berzerker
• 9x Berzerker chainblade
9x Bolt pistol
1x Icon of Khorne
• 1x Khorne Berzerker Champion
• 1x Berzerker chainblade
1x Bolt pistol
• 9x Khorne Berzerker
• 9x Berzerker chainblade
9x Bolt pistol
1x Icon of Khorne
• 1x World Eaters Terminator Champion
• 1x Accursed Weapon
1x Combi-bolter
• 9x World Eaters Terminator
• 3x Accursed Weapon
7x Combi-bolter
6x Power fist
2x Reaper autocannon
• 1x World Eaters Terminator Champion
• 1x Accursed Weapon
1x Combi-bolter
• 9x World Eaters Terminator
• 3x Accursed Weapon
7x Combi-bolter
6x Power fist
2x Reaper autocannon
UKTC announce first-round pairings for their events a few days beforehand, so on my drive I had plenty of time to contemplate my first opponent’s list. When I first saw World Eaters at the top there I was worried, because World Eaters are great and I have only played one game against them which I lost heavily, but then I saw the rest of the list and relaxed. Except for Angron the army can’t really touch the Land Raider at all, and I have vastly more ability to influence the board and choose where battles happen. As we’re doing the transports and reserves bit he puts two Terminator squads and Angron in Deep Strike, which we correct to one squad when I think about it and realise this is about 1200pts, and I figure I’ve pretty much won the game already – he desperately needs Angron on the table forcing me to deal with him before he wrecks face, but instead I can go down one flank and make it mine and as long as I stay mindful about screening him out I’ll be fine.
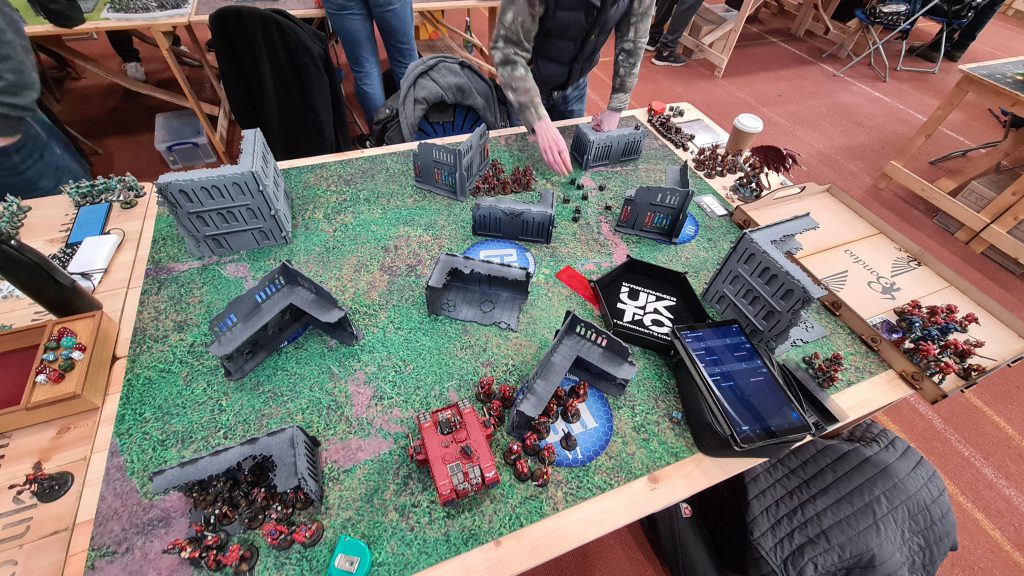
As you can see, what this means in practice is that I deploy on my left flank and refuse the right except for some Scouts (who can be whipped off to somewhere more useful later on). Stuart’s three Berzerker squads are spread out in the three ruins in his backfield, with his Terminators just in front of the central one and his Daemon Prince in the one to my left.
We roll off and Stuart gets the first turn, which he absolutely doesn’t want. He comes forward with the Berzerkers on his flanks onto the two objectives, while the Terminators roll a 1 to Advance and just shuffle up a bit towards the middle. The Daemon Prince comes up in support of the squad on my left side. I also draw Assassination, so the plan is simple – roll up, torch the Daemon Prince with shooting, then kill the Berzerkers in melee. This doesn’t initially go as expected, because the initial shooting into the Prince wildly underperforms, but then the Aggressors pick him up and all’s well again. In melee the Death Company kill the Berzerkers, and it’s the end of turn 1 and he’s down 400pts.
In his turn 2 his options are pretty limited; his central squad of Terminators walks over towards some Eradicators and Infiltrators in the centre and take 4 casualties to the Land Raider’s Overwatch for their trouble. I’ve dropped the Callidus into the big ruin on my top left, and the Infiltrators are covering my right, so there’s nowhere useful for him to try and put his deep strikers. With nothing else much to do, his Terminators charge and kill a single Eradicator.
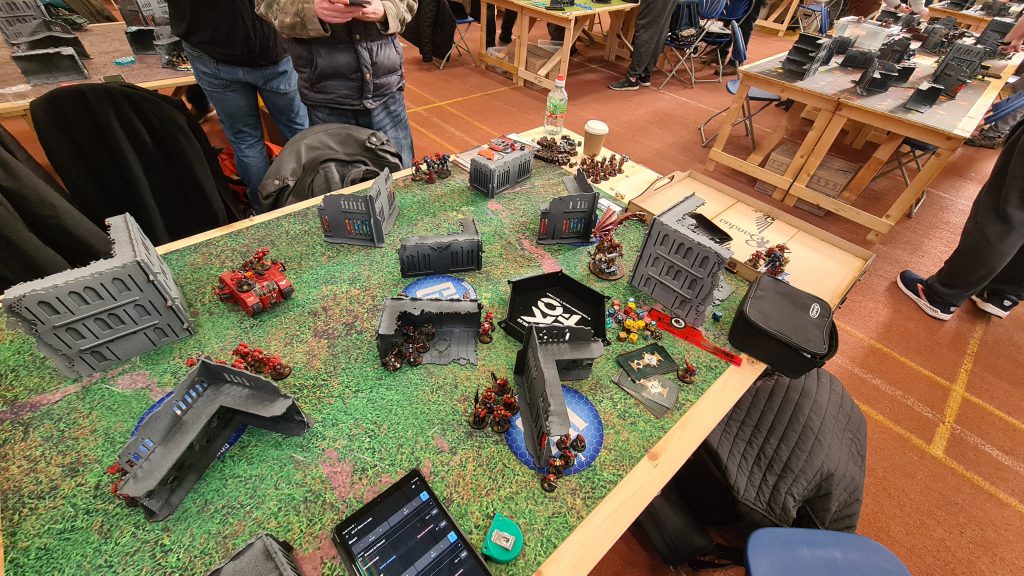
On my turn 2 the Land Raider rolls up into his backfield to shoot the Berzerkers on his home objective, with my Inceptors joining in, while the Aggressors, Company Heroes, and Death Company move to put down the remaining 6 Terminators in the centre. I’ve carefully positioned everything in his backfield so a stray Blood Surge can’t derail my plans, which is wasted as the Land Raider’s flamestorm cannons pick up the entire squad of Berzerkers on the first volley. In the middle my Death Company delete the two Chaos Terminators which are left after shooting, while one squad of the now-redundant Inceptors picks off some of the last squad of Berzerkers – if I’d thought about it I could have positioned both squads to have an open line into the ruin there, but I didn’t expect to kill my first target so easily.
His turn 3 is the last we end up playing. He Rapid Ingressed Angron in my turn to try and get him into a combat that matters, and he brings his other squad of Terminators down at the back to save his home objective. The Terminators charge my Inceptors and sweep them up, which is a nice consolation. Angron charges both the Infiltrators and Death Company, kills two of each, and then is immediately killed in return by the Death Company, at which point Stuart shakes his head and offers to talk the game out.
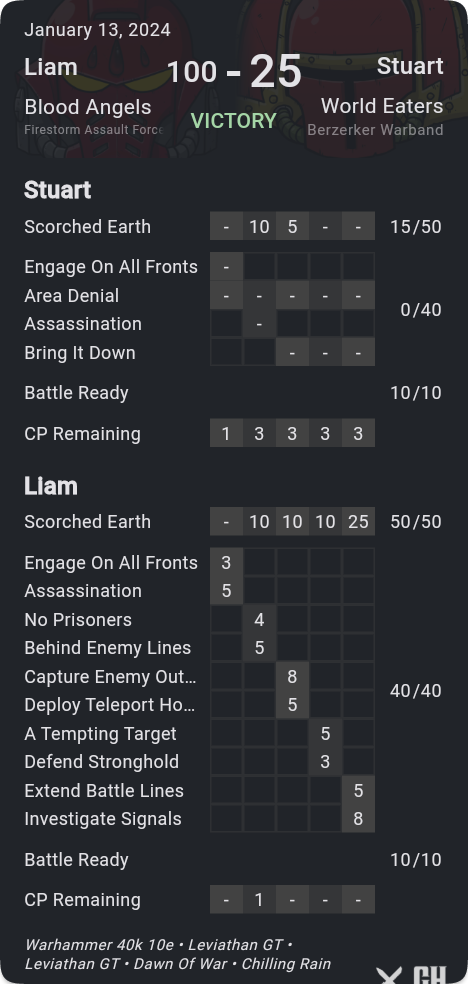
As first games go, this is a comfortable one – I pick up a 100, which is nice because this event still does placings based on battle points (though pairings are wins -> random). Stuart was a nice guy but I don’t think he has much of a route in on this game – the best thing I could suggest is that he start everything on the table and pushes Angron and the 20 Terminators into mid-board, forcing me to deal with them or work hard to dodge them.
The final scoreboard is:
Game 2 – Rob, Drukhari
Mission: Purge the Foe
Deployment: Crucible of Battle
Mission rule: Chilling Rain
++ Rob's list - click here to expand ++ notts 3 cronos (1995 points) Drukhari CHARACTERS Archon (100 points) Lelith Hesperax (85 points) BATTLELINE Kabalite Warriors (110 points) Kabalite Warriors (110 points) Kabalite Warriors (110 points) Wyches (90 points) DEDICATED TRANSPORTS Raider (90 points) Venom (80 points) Venom (80 points) Venom (80 points) OTHER DATASHEETS Court of the Archon (85 points) Cronos (50 points) Cronos (50 points) Cronos (50 points) Mandrakes (65 points) Mandrakes (65 points) Mandrakes (65 points) Ravager (115 points) Ravager (115 points) Reavers (70 points) Scourges (110 points) Scourges (110 points) Scourges (110 points)
Strike Force (2000 points)
Realspace Raiders
• Warlord
• 1x Blast pistol
1x Huskblade
• Enhancement: The Art of Pain
• 1x Lelith’s blades
• 1x Sybarite
• 1x Blast pistol
1x Phantasm grenade launcher
1x Sybarite weapon
• 9x Kabalite Warrior
• 1x Blaster
9x Close combat weapon
1x Dark lance
1x Shredder
1x Splinter cannon
5x Splinter rifle
• 1x Sybarite
• 1x Blast pistol
1x Phantasm grenade launcher
1x Sybarite weapon
• 9x Kabalite Warrior
• 1x Blaster
9x Close combat weapon
1x Dark lance
1x Shredder
1x Splinter cannon
5x Splinter rifle
• 1x Sybarite
• 1x Blast pistol
1x Phantasm grenade launcher
1x Sybarite weapon
• 9x Kabalite Warrior
• 1x Blaster
9x Close combat weapon
1x Dark lance
1x Shredder
1x Splinter cannon
5x Splinter rifle
• 1x Hekatrix
• 1x Blast pistol
1x Hekatarii blade
1x Phantasm grenade launcher
• 9x Wych
• 9x Hekatarii blade
9x Splinter pistol
• 1x Bladevanes
1x Dark lance
• 1x Bladevanes
1x Splinter cannon
1x Splinter cannon
• 1x Bladevanes
1x Splinter cannon
1x Splinter cannon
• 1x Bladevanes
1x Splinter cannon
1x Splinter cannon
• 1x Lhamaean
• 1x Shaimeshi blade
• 1x Medusae
• 1x Close combat weapon
1x Eyeburst
• 1x Sslyth
• 1x Shardcarbine
1x Splinter pistol
1x Sslyth battle-blade
• 1x Ur-ghul
• 1x Ur-ghul talons
• 1x Spirit syphon
1x Spirit vortex
1x Spirit-leech tentacles
• 1x Spirit syphon
1x Spirit vortex
1x Spirit-leech tentacles
• 1x Spirit syphon
1x Spirit vortex
1x Spirit-leech tentacles
• 1x Nightfiend
• 1x Baleblast
1x Glimmersteel blade
• 4x Mandrake
• 4x Baleblast
4x Glimmersteel blade
• 1x Nightfiend
• 1x Baleblast
1x Glimmersteel blade
• 4x Mandrake
• 4x Baleblast
4x Glimmersteel blade
• 1x Nightfiend
• 1x Baleblast
1x Glimmersteel blade
• 4x Mandrake
• 4x Baleblast
4x Glimmersteel blade
• 1x Bladevanes
3x Dark lance
• 1x Bladevanes
3x Dark lance
• 1x Arena Champion
• 1x Agoniser
1x Bladevanes
1x Grav-talon
1x Heat lance
1x Splinter pistol
• 2x Reaver
• 2x Bladevanes
2x Splinter pistol
2x Splinter rifle
• 1x Solarite
• 1x Close combat weapon
1x Solarite weapon
1x Splinter pistol
• 4x Scourge
• 4x Close combat weapon
4x Dark lance
• 1x Solarite
• 1x Close combat weapon
1x Solarite weapon
1x Splinter pistol
• 4x Scourge
• 4x Close combat weapon
4x Dark lance
• 1x Solarite
• 1x Close combat weapon
1x Solarite weapon
1x Splinter pistol
• 4x Scourge
• 4x Close combat weapon
4x Drukhari haywire blaster
Drukhari aren’t good in 10th. Everyone knows this. However, the bottom-ranked win rate doesn’t quite tell the whole story – they’re still pretty good into Marines (just under 53% faction v faction win rate since the last dataslate, per 40kStats) and more to the point Rob is a good player who knows the army inside out. We played once before, at a Hellstorm Wargaming RTT, but that was four years and two sets of Drukhari rules ago now. In the meantime, he’s been to the World Championships, though he freely admits his goal there was to win one game and enjoy his time playing against some of the best players in the world.
I would have vastly preferred to play this game on any of the non-Crucible of Battle deployments. One thing about the UKTC maps is that nobody has ever looked at them and thought “how does a Land Raider get around these?” and the Crucible of Battle layout is particularly bad, because there’s no way to hide the thing and have it be able to meaningfully participate in the game. Rob has a pile of dark lances and haywire blasters on fast-moving platforms, so the big tank is in trouble no matter where I put it. I opt for the path of bravery and deploy it where I can at least hope to go first and push the Aggressors somewhere useful before their ride dies. Put a pin in this and we’ll come back to it in game 4, but let me just say that in both cases the smarter play is to deploy on the left hand side and play conservatively aiming to hold the that side of the table. I don’t do this in either game.
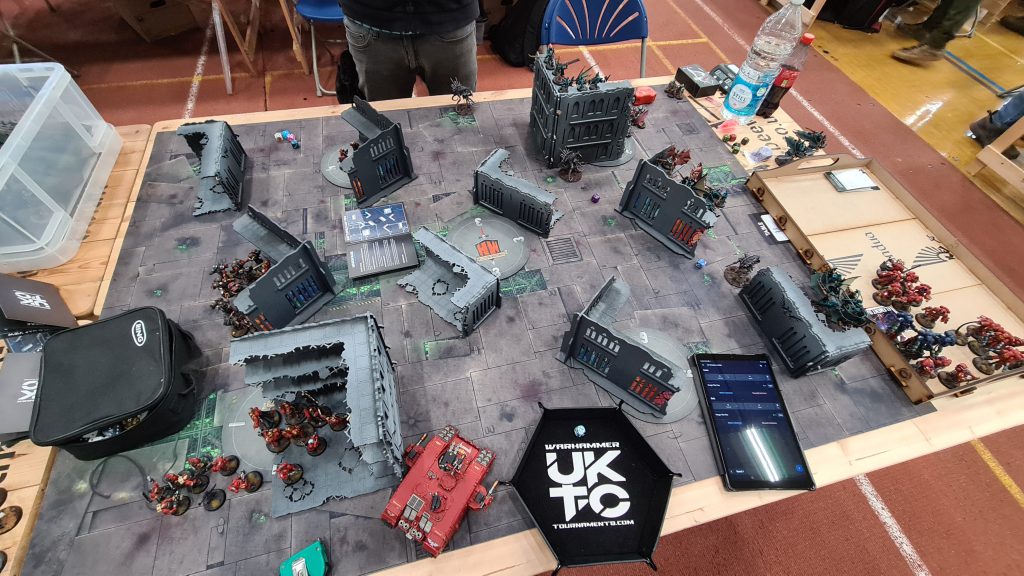
I do at least win the first turn roll-off in this one, and push the Land Raider hard to the right to try and prevent at least some of the incoming shooting from hitting it. It doesn’t help with line of sight, but cover and Armour of Contempt align with a fairly poor roll by the haywire Scourges to keep the thing alive.
This game went the full five turns and in fact overran slightly, so I won’t give the full blow by blow. I kill both his Ravagers early and tag the haywire Scourges so that my Land Raider actually makes it all the way to turn 3, but at the cost of my Aggressors being eaten alive by Lelith and her gang. In the middle, my Death Company bust up some of his screens, but then go down to the relentless firing of his Venom-mounted Kabalites.
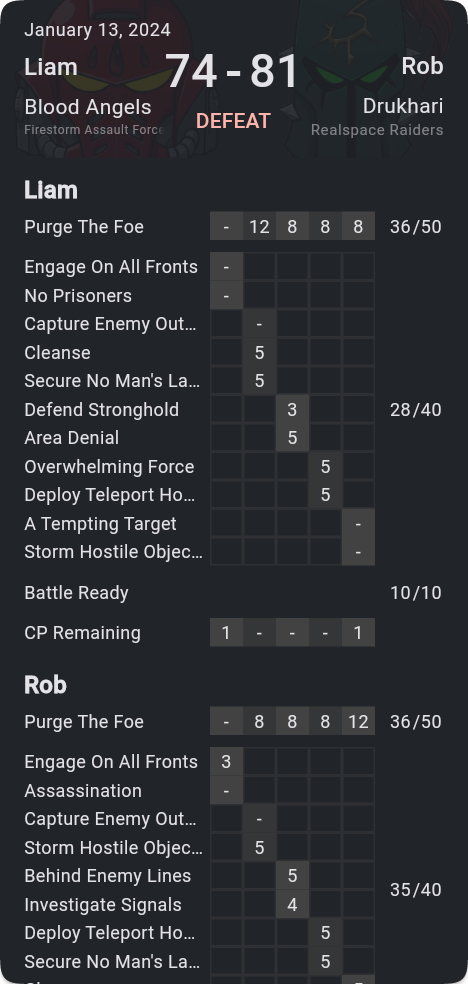
The turns here are an increasing grind, with Drukhari slowly picking off Blood Angels, without quite being able to pull away on scoring. I’ve killed off enough of his firepower to stop him landing a hammer blow, but he can just keep chipping away and that’s enough. The pivotal point comes in my turn 3, and it’s subtle at the time – I drop a unit of Inceptors into my bottom right corner, targeting his Raider. I elect to shoot them first, instead of the other squad sitting on the central objective; they one-shot the Raider which is nice, but then I realise I’ve shot with the only squad that had line of sight to the two remaining Mandrakes from the squad hiddein in the medium ruin on my right. Failing to kill those two Mandrakes means we draw on Kill More for the primary objective, and then Rob whips them over to score a fat 5 on Deploy Teleport Homers – a 9 point swing. Here’s the scorecard for this game:
Yeah, I lost this fucking game by 7 points. A good lesson in relaxing a second before declaring what’s shooting to check you aren’t about to cause yourself any problems.
On the plus side, Rob was my best-performing opponent of the weekend, going on to a 4-1 finish, so it’s not just me getting upended by “the worst army in the game.”
Game 3 – Francesco, Adepta Sororitas
Mission: Priority Targets
Deployment: Search and Destroy
Mission rule: Hidden Supplies
++ Francesco's list - click here to expand ++ ++ Army Roster (Imperium – Adepta Sororitas) [2,000pts] ++ + Configuration + Battle Size: 2. Strike Force (2000 Point limit) Detachment Choice: Hallowed Martyrs Detachment + Epic Hero + Junith Eruita [90pts]: Warlord Triumph of Saint Katherine [125pts] + Character + Canoness [60pts]: Brazier of Holy Fire, Chainsword, Condemnor boltgun, Saintly Example Dialogus [30pts] Palatine [65pts]: Blade of Saint Ellynor, Plasma pistol + Battleline + Battle Sisters Squad [100pts] Battle Sisters Squad [100pts] + Infantry + Arco-Flagellants [130pts] Arco-Flagellants [130pts] Arco-Flagellants [130pts] Crusaders [25pts] Crusaders [25pts] Death Cult Assassins [35pts] Seraphim Squad [70pts] + Vehicle + Castigator [140pts]: Castigator battle cannon, Hunter-Killer Missile, Storm bolter Exorcist [160pts]: Exorcist Missile Launcher, Hunter-Killer Missile Exorcist [160pts]: Exorcist Missile Launcher, Hunter-Killer Missile Exorcist [160pts]: Exorcist Missile Launcher, Hunter-Killer Missile + Dedicated Transport + Immolator [115pts]: Hunter-Killer Missile, Immolation Flamers Sororitas Rhino [75pts]: Hunter-Killer Missile Sororitas Rhino [75pts]: Hunter-Killer Missile ++ Total: [2,000pts] ++
. 6x Battle Sister: 6x Bolt Pistol, 6x Boltgun, 6x Close combat weapon
. Battle Sister w/ Simulacrum Imperialus
. Battle Sister w/ Special or Heavy Weapon: Multi-melta
. Battle Sister w/ Special Weapon: Meltagun
. Sister Superior: Condemnor boltgun, Power weapon
. 6x Battle Sister: 6x Bolt Pistol, 6x Boltgun, 6x Close combat weapon
. Battle Sister w/ Simulacrum Imperialus
. Battle Sister w/ Special or Heavy Weapon: Multi-melta
. Battle Sister w/ Special Weapon: Meltagun
. Sister Superior: Condemnor boltgun, Power weapon
. 10x Arco-Flagellant: 10x Arco-flails
. 10x Arco-Flagellant: 10x Arco-flails
. 10x Arco-Flagellant: 10x Arco-flails
. Crusaders
. . 2x Crusader: 2x Power Weapon
. Crusaders
. . 2x Crusader: 2x Power Weapon
. Death Cult Assassins
. . 2x Death Cult Assassin: 2x Death Cult power blade
. 2x Seraphim: 2x Close combat weapon
. . 2x 2 Bolt Pistols: 4x Bolt Pistol
. Seraphim Superior
. . Plasma Pistol and Power Weapon
. Seraphim with Special Weapons
. . 2x Ministorum Hand Flamers
. Seraphim with Special Weapons
. . 2x Ministorum Hand Flamers
In an amusing twist of fate, Francesco had played Rob in his game 1 and also lost, so we had an immediate thing in common.
Prior to this game I’d only played against Sisters once in 10th edition, and not against the Arco-Flagellant spam list, so I had minimal experience to go on. What I did know was that he was going to struggle to deal with the Land Raider, and that the Arcos have no play into it at all.
This is a really stupid mission and deployment and I don’t understand why it’s still in the UKTC pack; they replaced the other Priority Targets which used to be played in round 4, but left this one in. I had a pretty clear conservative plan, which was to sit tight and cover the two objectives on my left to maximise primary while using my superior scoring ability to outpace him on secondaries.
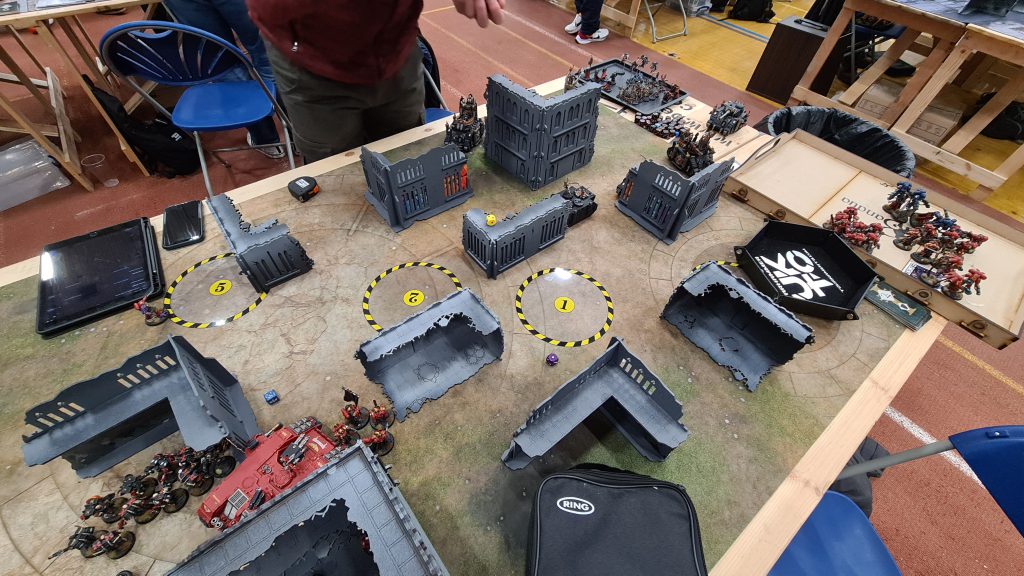
The plan blew up pretty quickly. I went first and barely moved, doing some minimal shuffling (mostly just moving the Land Raider up to a more favourable position next to the small ruin in front of it) before passing to Francesco. He responded by moving aggressively, putting one squad of Arcos onto objective 5 up there in my top left while moving the other Rhino to cover the mid-board. This gave me free rein to move up to pick up 20 of them on my turn 1, while also moving the Company Heroes across to shoot the Crusaders he’d put onto the bottom-right objective and charge the Death Cult Assassins he’d popped out onto objective 1 in the middle. With these and some Inceptors I’d knocked him down to a 5 on primary and also lifted some key mission play from his army, while also forcing him onto the back foot by removing two of his three melee threats.
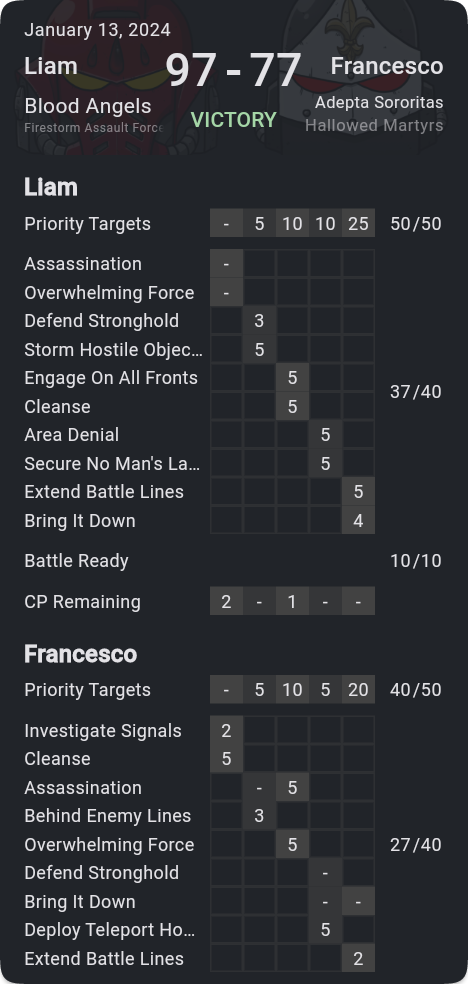
Francesco played valiantly from here on out to try and get himself back into the game, but he was in a poor position – there were three objectives that he was basically unable to apply meaningful pressure to, with Death Company coming in for his home one and the Land Raider and Aggressors applying heavy pressure to the central one that was nearer to him. In theory he was holding the one on my bottom-right ok, but he also needed the units on there to be going out and doing stuff to try and get back into the game. As it was, he just couldn’t do enough – I was able to keep his primary down comfortably, and his secondaries were mediocre and did him no favours. I should also mention that he had some rancid dice; I don’t think he rolled above a 2 for his Miracle Dice until turn 4, and he routinely would roll up 8 shots for his Exorcists and then miss with 6 of them. This had the side effect of winding him up so that he began to swear ever more energetically in Italian, which was highly enjoyable. Vaffanculos aside, this was a game played in good spirits and Francesco was a great opponent. The final scorecard was:
With three games played and two wins on the board, I was pleased with how the day had gone. Wings was also at this event and had similarly gone 2-1, and neither of us felt like doing anything clever for dinner, so we opted for the hotel restaurant which meant whichever mediocre chain happened to be attached to the local Premier Inn. As is typical for these things a number of other players were staying there too, and we joined a bigger group for some fun 40k chat before I took the chance to slope off at a respectable 10pm after eating the vegan burger which was just as average as expected.
I then stayed up until 12.30 because I decided to open the book I’d been carrying around intending to read for a week and fell 100 pages into it before turning out the light.
Day 2
After staying up too late, I woke up too late. I don’t often get the chance to sleep in past about 6.30, so I don’t tend to worry about getting up on time, but I do set a reserve alarm at 8.30 which is the “seriously, get up” alarm to make sure I don’t miss the round altogether. I woke up 3 minutes before this reserve alarm, which isn’t great. After a hurried shower and breakfast I got through the doors at 9.25, and had to do the awkward thing of digging my army out from the table I’d left it on the night before when two guys are clearly trying to set their game up without shoving it onto the floor.
Game 4 – Lee, Necrons
Mission: Scorched Earth
Deployment: Crucible of Battle
Mission rule: Chilling Rain
++ Lee's list - click here to expand ++ Nottingham GT Simon Version (2000 points) Necrons CHARACTERS C’tan Shard of the Nightbringer (255 points) Lokhust Lord (80 points) Overlord with Translocation Shroud (85 points) Plasmancer (55 points) Technomancer (80 points) Technomancer (60 points) BATTLELINE Immortals (140 points) OTHER DATASHEETS Canoptek Doomstalker (135 points) Canoptek Doomstalker (135 points) Canoptek Reanimator (75 points) Canoptek Wraiths (220 points) Canoptek Wraiths (220 points) Deathmarks (65 points) Deathmarks (65 points) Lokhust Destroyers (180 points) Tomb Blades (75 points) Tomb Blades (75 points)
Strike Force (2000 points)
Canoptek Court
• 1x Gaze of death
1x Scythe of the Nightbringer
• 1x Lord’s blade
1x Resurrection Orb
• Warlord
• 1x Overlord’s blade
1x Resurrection Orb
• 1x Plasmic lance
• 1x Staff of light
• Enhancement: Dimensional Sanctum
• 1x Staff of light
• 10x Immortal
• 10x Close combat weapon
10x Tesla carbine
• 1x Doomsday blaster
1x Doomstalker limbs
1x Twin gauss flayer
• 1x Doomsday blaster
1x Doomstalker limbs
1x Twin gauss flayer
• 2x Atomiser beam
1x Reanimator’s claws
• 6x Canoptek Wraith
• 6x Particle caster
6x Vicious claws
• 6x Canoptek Wraith
• 6x Particle caster
6x Vicious claws
• 5x Deathmark
• 5x Close combat weapon
5x Synaptic disintegrator
• 5x Deathmark
• 5x Close combat weapon
5x Synaptic disintegrator
• 6x Lokhust Destroyer
• 6x Close combat weapon
6x Gauss cannon
• 3x Tomb Blade
• 3x Close combat weapon
3x Twin gauss blaster
• 3x Tomb Blade
• 3x Close combat weapon
3x Twin gauss blaster
After that inauspicious start, I was grateful to get to my table and be met with Lee. Lee is a cheerful character and also a regular opponent of Simon, who was once my housemate many years ago and was also playing at the event (and in fact was on the table next to mine during round 1). Simon had assured Lee that I was a pleasant and easygoing person, which doesn’t sound like he remembers living with me very well. It’s always nice to get to the table and find your opponent’s expectations are positive, though.
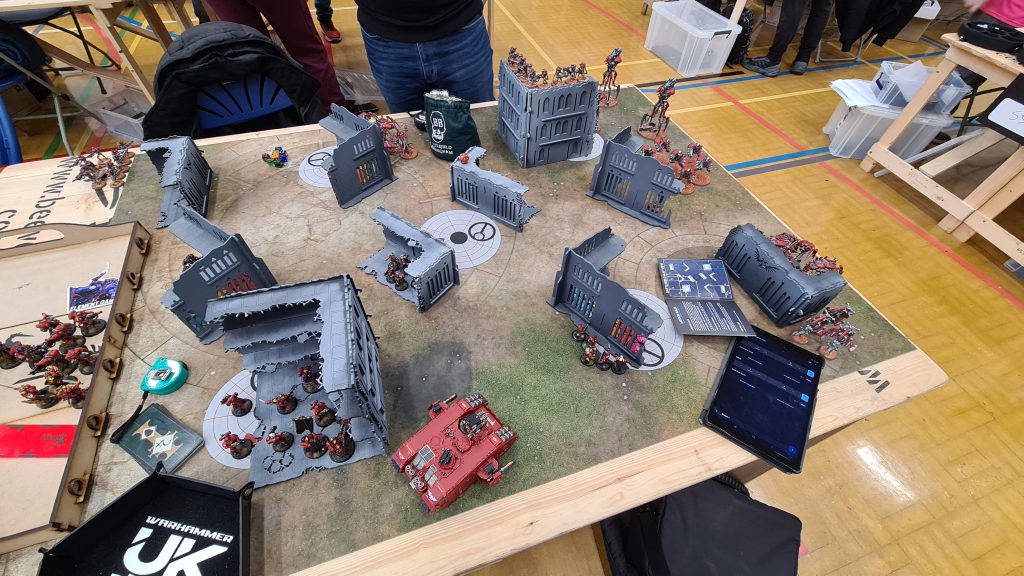
Lee was running a Canoptek Court list using that Immortals combo that would no longer be legal after this weekend, but had been erratad too late for this event. He deployed it right up at the edge of his backfield ruin, which meant it had good angles wherever I went with the Land Raider. He stuck a unit of Wraiths on each flank, with the Nightbringer and Destroyers on my right, and the standard two Doomstalkers in his backfield.
Remember what I said about this map in game 2? It’s equally applicable here, deploying the Land Raider on this map sucks. However, look at where I’ve put it. If you notice that it’s in line of sight of the two Doomstalkers as well as the Immortals, and wouldn’t have been if I put it on my left, then congratulations, you’re more observant than I was until about 3 seconds after I’d lost the first turn roll-off. Lee blew it up on turn 1, though he would have just failed to do so if the idiot tank had managed to make 1/3 of the 4+ saves it needed from the Stalkers before the Immortals unloaded on it.
The one good thing about this was that I did have some reason for putting it there – it meant the Immortals had to come close enough to see it that the Aggressors could then walk up and torch them, while also covering the bottom-right ruin which he moved his Wraiths into on turn 1. The flamestorm gauntlets duly turned the Immortals into Very Mortals, the charge into the Wraiths went off, and I even killed a decent chunk of them. Meanwhile in the top left, the Death Company charged his other unit of Wraiths, killing an ok number of them and losing a single guy in return thanks to some strong saves of my own.
So far this all sounds fine, but there’s three crucial mistakes to assess here, so let’s look at them in turn. The first one is the obvious one, the placement of the Land Raider; it’s much safer (and probably still alive) on my left rather than my right, which also takes his Nightbringer out of the game for multiple turns. The second isn’t visible to you, the reader, but is a lazy habit of mine – I pretty much always put the re-roll 1s to Wound from the Lieutenant on the centre objective. Into Necrons, and particularly these Necrons, this is a horrible idea – his plan is telegraphed quite clearly, he’s going to shove Wraiths into the objectives on either flank and sit on them, and he doesn’t really need to go to the middle as long as he can do that. The better place to put it is on my top left, benefiting the Death Company. Third, the Death Company themselves – he’s positioned his Wraiths so that only a couple of them are on that objective, so I can easily take it off him if I just jump on it. The charge is a longish awkward one and I don’t get the whole unit into combat, and I have to move off th objective to do it. I would have been much better off just sitting the brick on there this turn, flipping control so that he doesn’t get re-rolls on the Wraith unit on my right, and then waiting for him to charge me – which really isn’t that scary of a prospect for Death Company with Lemartes.
Despite these errors, Lee isn’t having an easy time of it either – with the Immortals dead and the Doomstalkers way in his backfield, he doesn’t have much else handy to go forwards with. He makes what I think ends up being a critical mistake here, which is that after bringing the Destroyers down the table edge a bit on turn 1 to block my Eradicators and Inceptors, he leaves them where they are, with no really meaningful targets to shoot at. On my turn 2, I drop the Inceptors into the middle and lift the entire squad of Destroyers with them, with only the Lord surviving on half wounds.
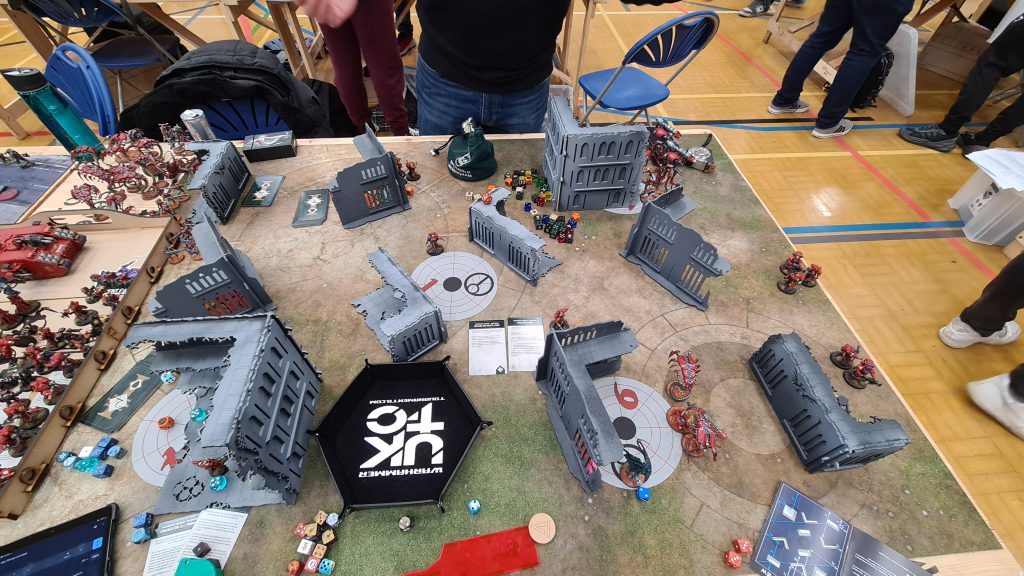
The game at this point devolves into a weird, grindy slugfest. After killing the Destroyers I think that with one big push I should be able to swing it, with the Company Heroes adding some oomph to the Wraith combat on my right while the Death Company continue to chip away on my left. At this point however Lee starts rolling the most incredible, out of this world saves you’ve ever seen from anyone. My dice are lukewarm at best, but I’ll do things like put 14 wounds on Wraiths with the Death Company and then he saves 10/14 and passes 66% of the Feel No Pains as well. Every Command Phase, he rolls exactly what he needs for Reanimation Protocols to get a Wraith back. In the other direction, he shoots at Doomstalker at my Inceptors in the middle, puts 3 wounds on them with Armour of Contempt active, and I fail 3/3 4+ saves to lose the whole squad. I am engaged with both his Wraith units from turn 1, and I destroy my first full unit of them on turn 5, after killing at least 50% more Wraiths than he initially deployed on the table. My Company Heroes, Bladeguard, and Callidus Assassin have all gone into the quagmire at various points, and I’ve gained nothing for it.
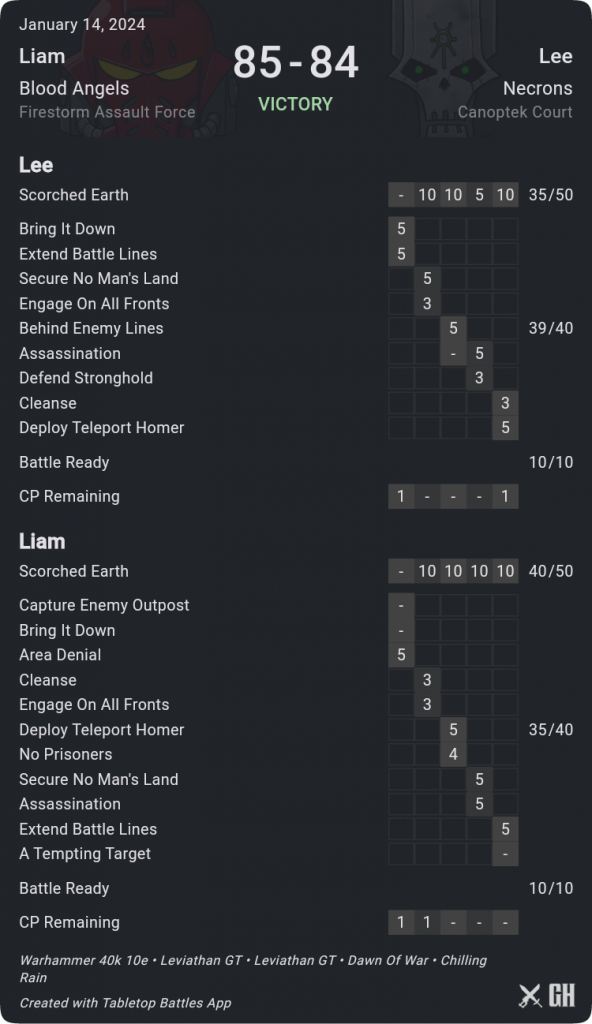
Despite my difficulties in killing the stupid Wraiths off, the scoring has stayed pretty tight, with the Callidus and Scouts proving their worth. I make a crucial play in turn 4 – he’s tried to use his Tomb Blades to burn the objective on my right, and my Company Heroes kill them off, stopping the action. At the time he controlled the left hand objective too, so he would have still gotten 10 on primary plus the 5pts at the end. Stopping him means that his score caps out at 84, while going into my turn 5 I’m sat on 70. There’s nothing that can stop me scoring 10 on primary, so I just need one card to go my way – and I draw Extend Battle Lines. The Death Company having finally killed off the Wraiths on the top left meant I automatically scored this, and so the game finished 85-84 to me. Incidentally, look at that utterly vile first round draw of mine:
Lee was a pleasure to play, and I think quite relieved that I didn’t lose my mind when the dice started going so hard his way. From my point of view it took some of the tension out, because when the dice are as out of control as they were in this game the play mistakes I pointed out earlier start mattering less – you can give yourself a bit of a break, because you might have screwed up some of the variables you can control but then the one variable you can’t control does something totally unreasonable like this and it changes the whole complexion of the thing.
Game 5 – Andrew, T’au Empire
Mission: Take and Hold
Deployment: Search and Destroy
Mission rule: Chilling Rain
++ Andrew's list - click here to expand ++ T’autal shit (2000 Points) T’au Empire CHARACTERS Cadre Fireblade (60 Points) Cadre Fireblade (40 Points) Commander Farsight (90 Points) Commander Shadowsun (100 Points) Commander in Coldstar Battlesuit (125 Points) BATTLELINE Breacher Team (90 Points) Breacher Team (90 Points) DEDICATED TRANSPORTS Devilfish (75 Points) Devilfish (75 Points) OTHER DATASHEETS Broadside Battlesuits (180 Points) Crisis Battlesuits (360 Points) Crisis Battlesuits (180 Points) Ghostkeel Battlesuit (160 Points) Ghostkeel Battlesuit (160 Points) Piranha (55 Points) Tetras (80 Points) Tetras (80 Points)
Kauyon
Strike Force (2000 Points)
• 1x Close combat weapon
1x Fireblade pulse rifle
2x Gun Drone
• Enhancements: Through Unity, Devastation
• 1x Close combat weapon
1x Fireblade pulse rifle
2x Gun Drone
• 1x Dawn Blade
1x High-intensity plasma rifle
• Warlord
• 1x Advanced Guardian Drone
1x Battlesuit fists
1x Command-link Drone (Aura)
1x Flechette launcher
2x High-energy fusion blaster
1x Light missile pod
1x Pulse pistol
• 1x Battlesuit fists
1x Cyclic ion blaster
3x Cyclic ion blaster
2x Shield Drone
• Enhancements: Exemplar of the Kauyon
• 1x Support turret missile system
• 1x Breacher Fire Warrior Shas’ui
• 1x Close combat weapon
1x Guardian Drone
1x Pulse blaster
1x Pulse pistol
1x Shield Drone
• 9x Breacher Fire Warrior
• 9x Close combat weapon
9x Pulse blaster
9x Pulse pistol
• 1x Support turret missile system
• 1x Breacher Fire Warrior Shas’ui
• 1x Close combat weapon
1x Guardian Drone
1x Pulse blaster
1x Pulse pistol
1x Shield Drone
• 9x Breacher Fire Warrior
• 9x Close combat weapon
9x Pulse blaster
9x Pulse pistol
• 1x Accelerator burst cannon
1x Armoured hull
2x Seeker missile
2x Twin pulse carbine
• 1x Accelerator burst cannon
1x Armoured hull
2x Seeker missile
2x Twin pulse carbine
• 1x Broadside Shas’vre
• 1x Crushing bulk
1x Heavy rail rifle
2x Missile Drone
1x Twin plasma rifle
1x Weapon Support System
• 1x Broadside Shas’ui
• 1x Crushing bulk
1x Heavy rail rifle
2x Missile Drone
1x Twin plasma rifle
1x Weapon Support System
• 1x Crisis Shas’vre
• 1x Battlesuit fists
1x Cyclic ion blaster
2x Cyclic ion blaster
2x Shield Drone
1x Shield Generator
• 5x Crisis Shas’ui
• 5x Battlesuit fists
5x Cyclic ion blaster
10x Cyclic ion blaster
10x Shield Drone
5x Shield Generator
• 1x Crisis Shas’vre
• 1x Battlesuit fists
1x Plasma rifle
2x Plasma rifle
2x Shield Drone
1x Shield Generator
• 2x Crisis Shas’ui
• 2x Battlesuit fists
2x Plasma rifle
4x Plasma rifle
4x Shield Drone
2x Shield Generator
• 1x Battlesuit Support System
1x Fusion collider
1x Ghostkeel fists
1x Twin fusion blaster
• 1x Battlesuit Support System
1x Fusion collider
1x Ghostkeel fists
1x Twin fusion blaster
• 1x Armoured hull
1x Piranha fusion blaster
2x Seeker missile
2x Twin pulse carbine
• 2x Tetra
• 2x Close combat weapons
4x Pulse rifle
• 2x Tetra
• 2x Close combat weapons
4x Pulse rifle
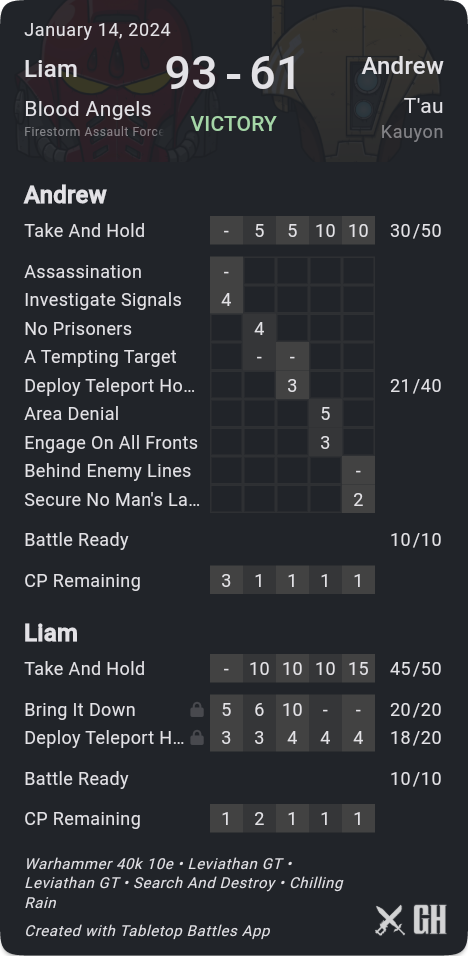
After such a tight game in round 4, I saw the draw for round 5 and felt a lot better. I couldn’t really have asked for a better combination of opposing faction, deployment, and mission – T’au have some scary firepower, but with the terrain as it is I can deploy to hide from substantially all of it. I can protect the two objectives on my left and put enough pressure on the centre that he can’t push onto it, and then if I can just hold down his primary for a couple of turns by bumping him off the right-hand objective we should finish up at 40-30. Meanwhile, I can pick fixed secondaries and take Bring It Down and Deploy Teleport Homers – because the ruins on UKTC allow you to be within 6″ of the centre and out of line of sight, I can deploy the Lieutenant there where he’s effectively untouchable by Andrew’s army and push the button every turn to trivially score 15, while the Callidus and Scouts give me an option to pick up a handful of extra points from his deployment zone instead if the opportunity arises. Although I’m not intending to go out and grab him by the throat, more or less his entire army is a vehicle of some kind, so if I kill anything I’m picking up points.
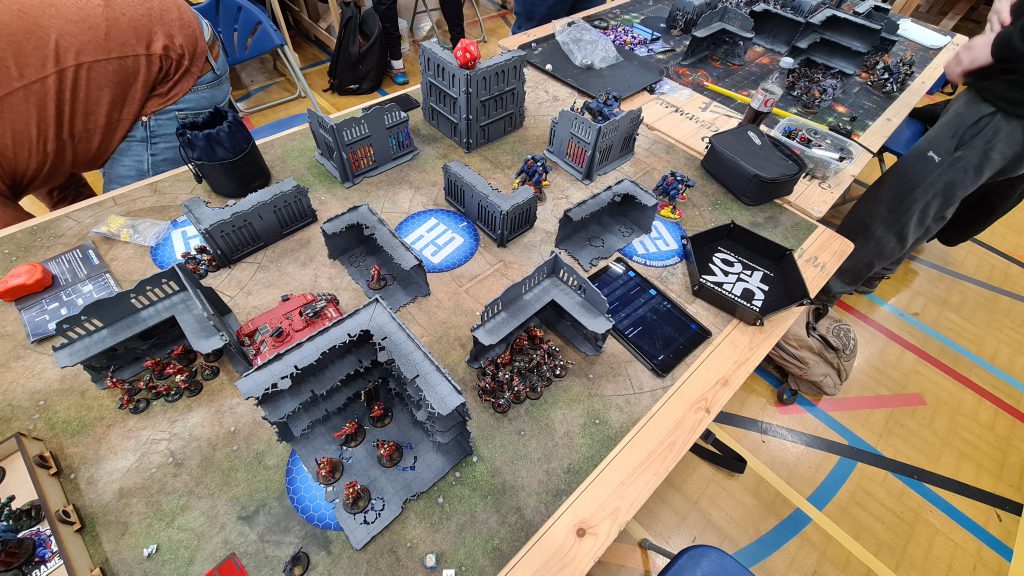
In the face of this, Andrew doesn’t have great options. He doesn’t have anything much going on with fixed objectives himself, so he picks tactical. There is a world where he turtles up, tries a similar strategy to mine, and hopes that his card draws pick up points without exposing his vehicles to me, but it’s not a good plan for him – it gives me all of the initiative, and I’ve deployed the Death Company in the medium ruin at the rightmost edge of my deployment zone, which means they’re in easy striking distance of both the central and bottom-right objectives, so he doesn’t have the same option to try and safely play for primary as I do.
With the set-up of the game already against him, Andrew then wins the first turn, which he absolutely doesn’t want. He draws Investigate Signals and responds by having Shadowsun cover his back corner and pushing one of his Devilfish to my bottom-right corner and jumping the Breachers out to score 4pts on it, and that’s about all he has available to do. On my turn 1, the Death Company leap across, charge and kill the Ghostkeel, and tag the Devilfish and Breachers (killing 7 of them in the process). The plan is working – he only scores 5 on primary this turn, and he’s down a Ghostkeel and most of an infantry unit he might have wanted to cycle on to this to try and keep up the scoring tempo.
In his turn he responds by annihilating the Death Company with the CIB Crisis bomb, without needing to overcharge – though as it shakes out he only just does it, and if I’d gone for Armour of Contempt there after all I might have saved them. At the time it seemed like weight of fire would make it irrelevant, but his dice were bad enough and mine good enough that it might have saved them. Oh well, they’re there for a glorious death, and they got it.
In my 2 I drop Inceptors onto that objective again, killing the remaining Breachers and the Devilfish, while in my top-left my Eradicators arrive and lift the other Devilfish as well. Andrew goes for a Rapid Ingress here to give Farsight and his pals an option on attacking that objective in the next turn, but he’s rapidly running out of options – he’s now committed his reserves to the table, is behind on scoring (and about to be held to a 5 on primary again), and I have substantial resources still available.
From here the game plays out pretty much as I was predicting. The CIB bomb removes my Inceptors, but a harsh Hazardous roll removes 3 of them in the process. Farsight and his team kill my Eradicators, but this merely moves them up to be shot and then charged by the Aggressors, while the Land Raider itself picks up his second Breacher squad. He just doesn’t have enough tools left to meaningfully change the score, and suffers some final indignities as well – the Coldstar Commander surprises us both by surviving a round of shooting from the Redeemer, although its accompanying unit dies, but then it tries a last-minute grab of my home objective and goes down hard to Overwatch. I drop some Scouts into his back corner to pick up extra points on Homers, and Shadowsun shoots and charges them and only kills three, before taking wounds in combat in return.
I do make one small mistake, which is forgetting to add up the primary scoring – I could have tried to grab the centre a turn earlier, or dropped the Callidus onto the bottom right which he no longer has anything to attack, and maxed my primary, whereas I only get 45. The game finishes like so:
 Despite the game being a bit of a foregone conclusion, it’s played in a good spirit and Andrew is a fun opponent. I’ve had a fortunate run in this event, playing 5 people in a row who I would all happily play again; it’s relatively rare that I meet anyone I would refuse to see across the table a second time, but this event has been particularly positive, so that’s nice. I also finish with 4 wins and 1 loss, my best record since winning the FactoruM GT back in June 2022, so I am well-pleased by my performance. I end up in 25th place of 345 (though by my count only about 332 or so actually played a game at the event, with the others being pre-round 1 drops), which is a result I’m very happy with – though if I’d gotten those other 5pts on the primary I would have been 21st or 22nd, so perhaps I should have looked out for the chance to pick up them up. Oh well – at an event this size, one or two places up or down doesn’t matter.
As ever with UKTC, the event is solidly run and the games are fine in terms of set-up and so on, but I wish that the mission set was a little more creative and that the terrain maps could be revised a little bit so that a Land Raider or Monolith could get around the table with reasonable ease.
Reflecting on the list, I liked it a lot – the Bladeguard were a last-minute bodge job, but they did meaningful stuff in every game, even if it was just hanging on to an objective somewhere. The one thing I can’t make my mind up about is the Eradicators – they did more in this event than they ever have before, but that still consisted of killing a Ravager in game 2, a Castigator at the tail end of game 3, a wounded Destroyer Lord in game 4, and a Devilfish in game 5. Except for the Destroyer that’s ok in terms of trades, and having them in Strategic Reserves does warp how opponents deploy and screen, but I could probably find something more useful to do with 180pts and I’ll be having a think about that in the next few weeks.
With that one in the books, what’s next? At the moment I have the following planned:
- Beachhead Brawl – February
- Goonhammer Open UK – March
- Oxford GT – April
- Bristol GT – June
- Goonhammer Open UK – September
- US Open Tampa – October, probably?
I’m keen to try and get to one of the Hellstorm events, and otherwise to fill the gaps there to keep up the tempo of a GT per month. I have to move house somewhere in the April to June range, so with events at the beginning and end of the time I expect that to happen I’m waiting a little to see whether or not there’s a good weekend in May or if I’ll have to hold off on that.
I’m really enjoying the Blood Angels, and I’m thrilled to have them painted and getting them out on tables even if it isn’t that different to playing Space Marines. Perhaps when the codex drops there’ll be something a bit more unusual to do with them. I also want to get my World Eaters onto the table, especially given that they’re in a strong spot right now, but I need to do some serious painting work on them so it depends on when I have that done – and with a dataslate imminent, the shape of them may change anyway, so I’m in no rush. I have it in mind that I might take them to the March GHO for a first go.
Speaking of the dataslate, the other thing that might happen is some kind of buff or change for Drukhari. I’m more interested in this now with the announcement of plastic Mandrakes at this morning’s LVO reveal – despite losing to them in this event, I’m not rushing to play mine yet because I simply don’t own 15 Mandrakes, and have no intention of buying the resin ones, even if they are fantastic for mission play. After playing them heavily in 9th edition it would be nice to get the evil elves back on the table, so perhaps I’ll try and take them to something later in the year.
In the spirit of what I mentioned above about putting more work into this website, I am of course writing this post, and committing to at least try and get a report out after each of my events this year. I’ve also put some work in this week on updating Start Competing: Space Marines, which is now in our new 10th-edition format – though the faction focus still needs updating for the codex. I’ve also written a detachment focus for the Gladius Task Force, with another to come shortly taking a look at the Firestorm Assault Force. With those out of the way I will get on to the other detachments, and by mid-February we ought to have a complete guide to Space Marines on this website once more. You can find it all on the new page here.
Next time, I’ll be writing up the Beachhead Brawl, and hopefully reporting another good run for the Blood Angels there – for now, thanks again to all my opponents in Nottingham, and thanks to both regular readers for persisting with this novella all the way to the end.
