Over the years the Goonhammer crew have put together a vast and expansive library of painting guides. Appropriately titled “How to Paint Everything” we’ve got schemes and recipes for 100s of models. They all, however, assume you know the difference between wet blending and glazing or what the hell “zenithal” means. Welcome to Hobby 101. This series will lay the groundwork to teach you the fundamentals and best practices to make your models shine.
The Hobby 101 series is sponsored by The Army Painter.
Welcome, neophytes. You began your journey to enlightenment by reading all about the intricate artifice of assembly. Now, come, gather around the fire while I regale you with arcane knowledge of something very very important.. That’s right, I’m talking about *dramatic strings* the ancient and mystical art of Priming.
Hey! Where are you going? Come back! It’s really interesting and important, I promise!
So you’ve clipped your models from the sprue and stuck them together with your adhesive of choice. They look beautiful, so inviting, you can hardly wait to put paint to plastic, but wait! Slow down, young one. Before you can get paint everywhere you need to prime your miniature. Priming might seem like a boring chore (and, to be fair, it often is), but it’s essential to getting a good, robust paintjob on your toy soldiers.
A primer is a special kind of paint that adheres strongly to glossy, smooth plastic and down at the microscopic level provides what’s known as a key texture for the rest of your paints to stick to. It’s not just plastic that needs priming either! From metal in cars, wood in furniture and construction, and your walls when you’re finally doing that decorating you’ve been putting off for two years now. All these surfaces need preparing to accept paint, and what’s a synonym of preparing? That’s right, priming.
Put plainly:
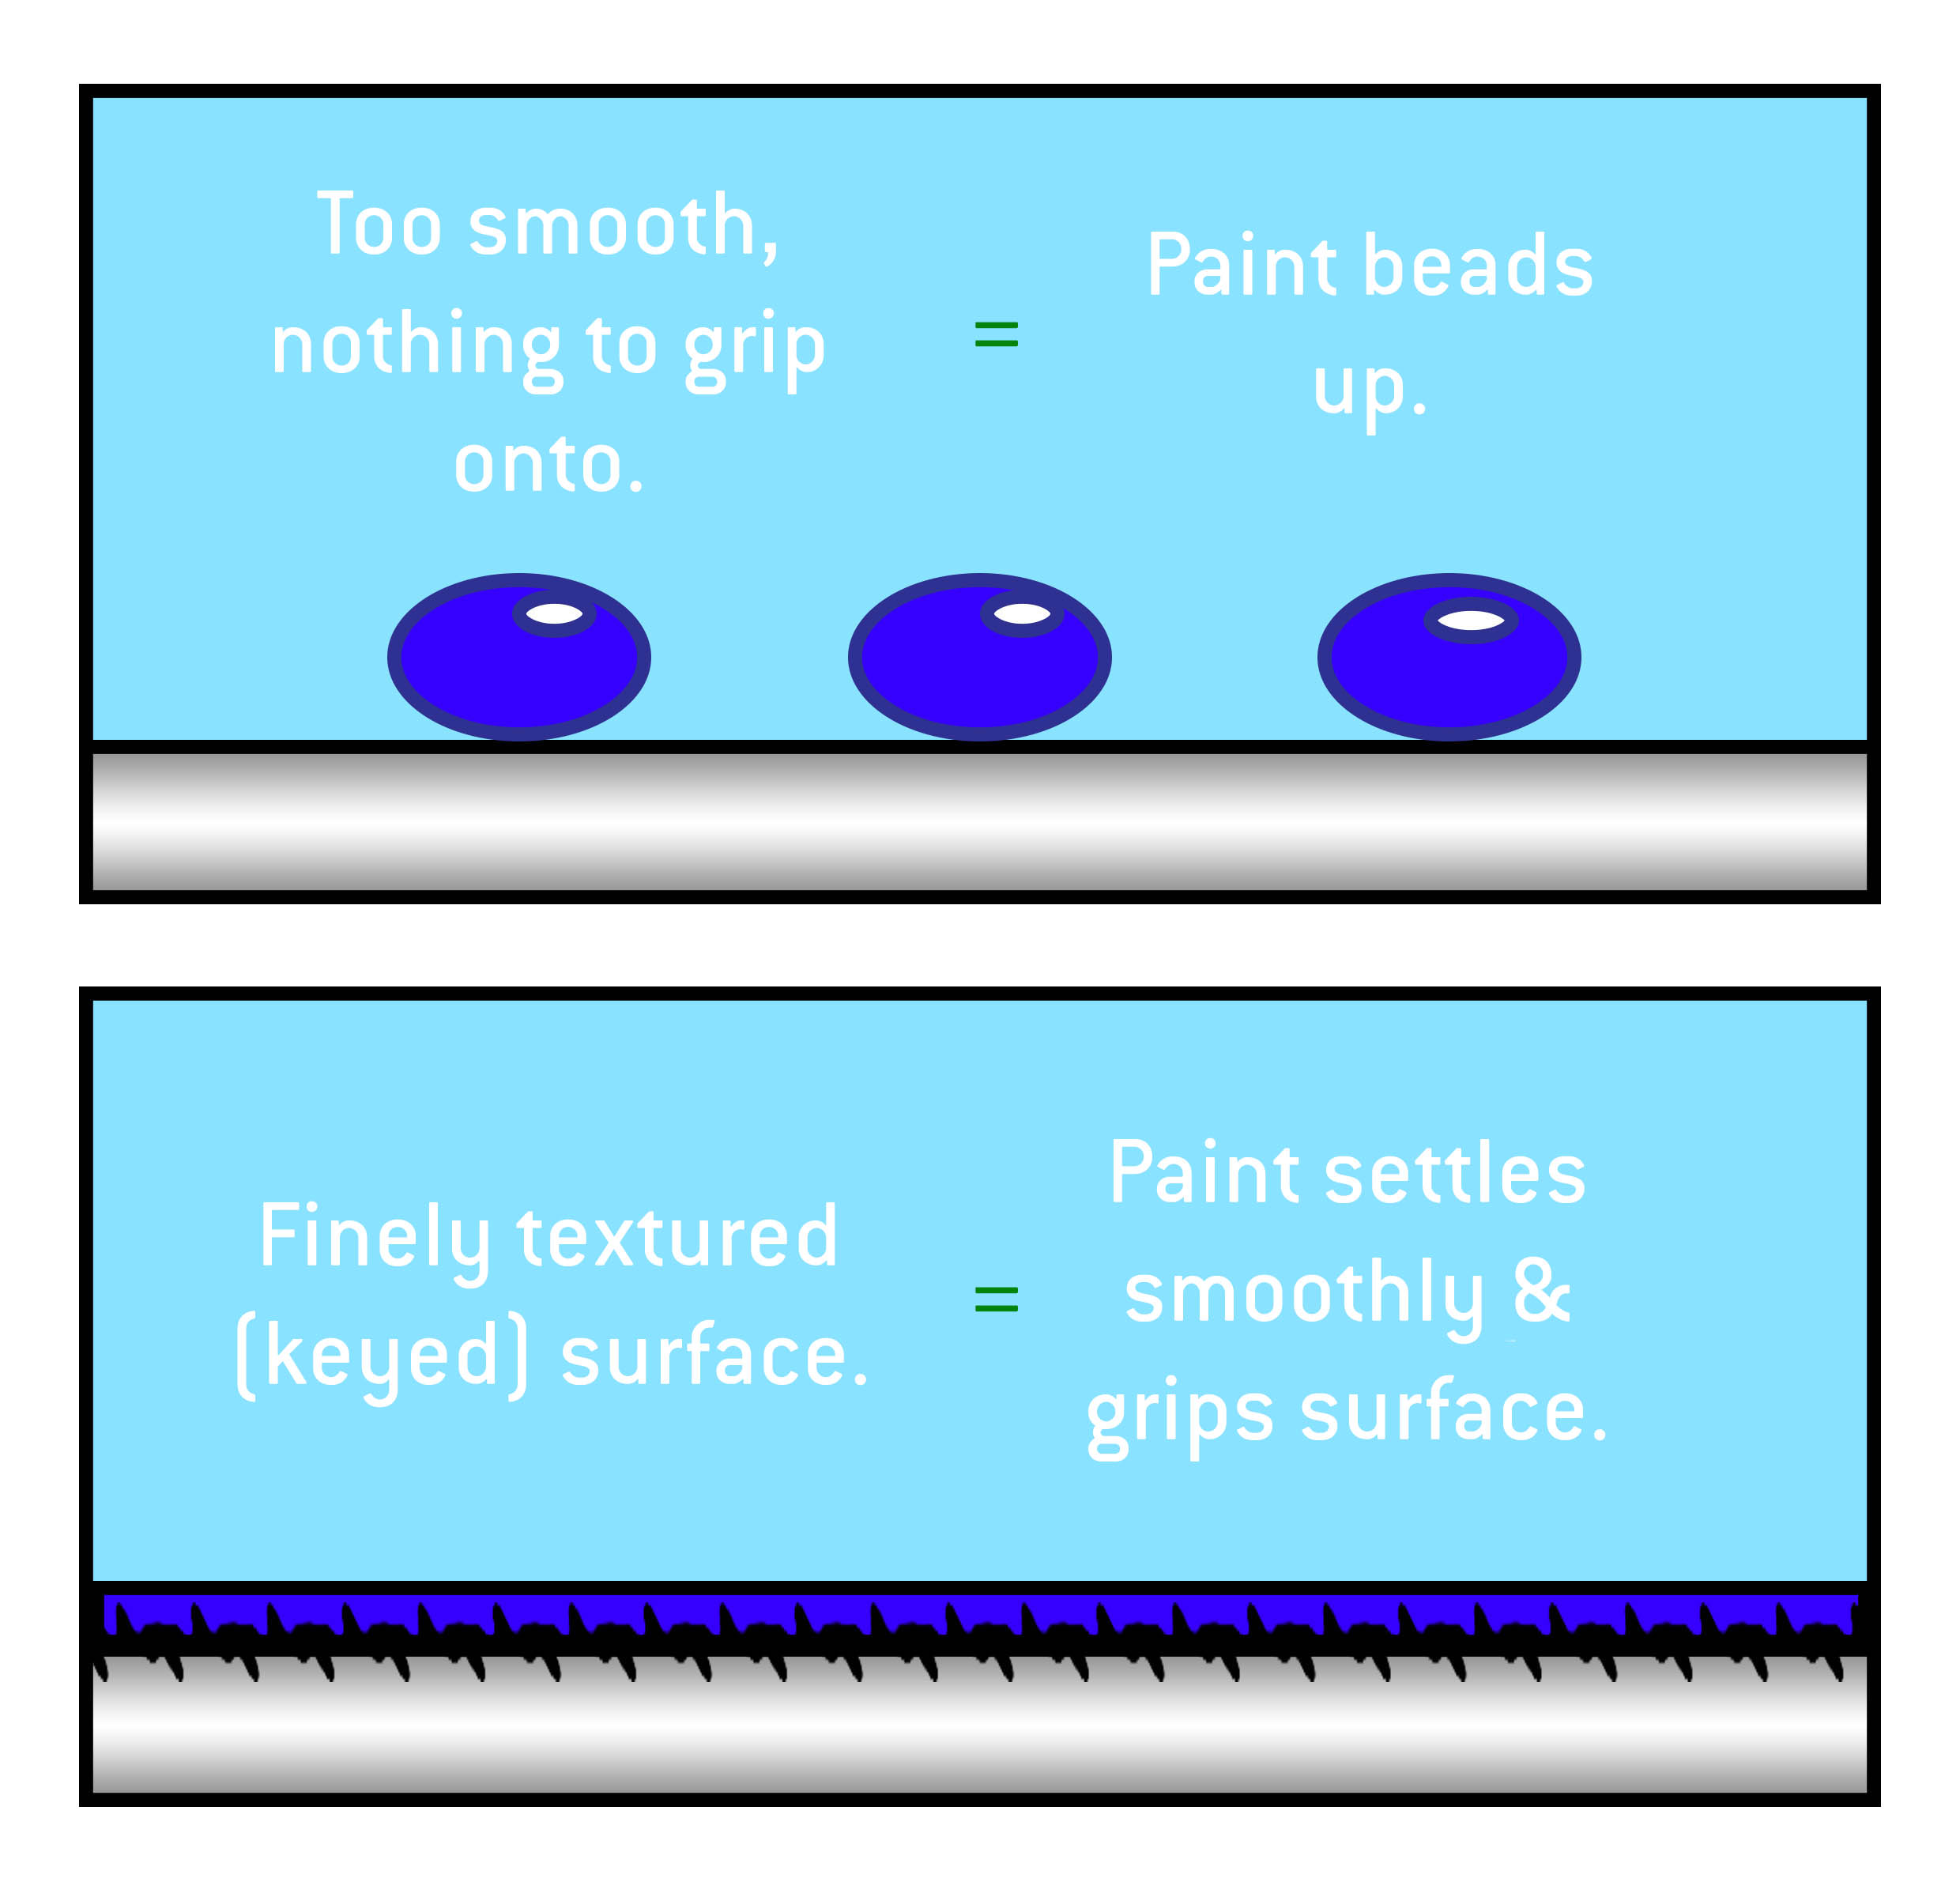
- Bare plastic = Slippery, paint beads up and doesn’t stick. If you paint onto bare plastic, even once it’s completely dry, you can often rub your paint off with just your fingers.
- Primed plastic = rough, relatively speaking, paint clings to the primer easily without beading up, and won’t rub off easily.
Let’s take a look through our very real microscope:

So that’s the why taken care of, but what about the how?
Priming With Spraycans/Rattlecans
By far the most common method of priming, beloved by novice and experienced hobbyist alike, the rattlecan has long been with us. Products in this arena span the gamut between dirt cheap automotive/hardware primer to the somewhat eye-wateringly priced cans sold by Games Workshop. There is a difference between these products, both in their formulations and design of the rattlecan, so while all are acceptable they have pros and cons.
- Army Painter – Yes they’re sponsoring this article, but no that has nothing to do with listing them first. Army Painter rattlecan primers are among the best rattlecan primers for miniatures. The flow speed is exactly what you want to avoid flooding the model, and they lay down smooth and easy. I’ve also found them to be easy to use in a broader range of ambient conditions than other brands. Matte Black and Matte White are classics, and they also offer a line of color primers that match their Warpaints line.
- Citadel – Citadel paints also lay down smooth and are designed for miniatures, but they are also quite expensive. They also notably do not advertise them as primers. According to a local GW manager this is because technically they do not use a primer formulation. So while they will work to provide the above key texture for paints they may not bind quite as strongly as others. One huge benefit, however, is perfect color matching to Citadel paints making quickly laying down base colors for your models very easy.
- Vallejo – Another solid choice, specifically designed for models.
- Hardware Store Brands – Your local big box hardware store likely carries lots of different spray paints from familiar brands like Krylon or Rustoleum. These will work and come in lots of colors however they are not designed for miniatures. The cans flow extremely fast, risking your details, and also take noticeably longer to dry, cure, and lose their vapor odors. Save these for terrain projects, where they can shine.
- Automotive Filler Primer – These are in the same category as your hardware store brands, but are worth a special callout for their use with 3D printed terrain. Do not use these on miniatures as the paint is mixed with a textured grit designed to fill voids. They work great, however, on large 3D printed terrains where they can help eliminate print lines.
Ok, so, how do you actually use a rattlecan to prime your models? Well, first things first, you need to rise from your hobby station and go outside. Do not, under any circumstances, try to prime things with a rattlecan indoors, your partner/spouse/parents/roommate/landlord will find you passed out from breathing in those noxious fumes, and then they will murder you for making a huge mess of whatever room you tried to prime in. Don’t do it, for our sakes, we don’t want Goonhammer to feature on a cause-of-death report. [Ed: keewa is joking, we take absolutely no responsibility for anything you do to yourself or others]
Once you’re outside, blinking in the dappled sunlight like a newborn fawn, you need to prepare some kind of spraying station. My advice would be to find the biggest cardboard box you’ve got and set it up so that the opening is to one side. With that done, get yourself some kind of flat stick and a bunch of either poster putty or double-sided sticky tape, I preferred the tape, but it’s really dealer’s choice, you use what you’ve got to hand. Affix the models to your stick with your temporary adhesive of choice making sure that there’s no less than one centimetre separating the bases. If the models are too close they will effectively cast “shadows” on one another when it comes to spraying, which will make things rather uneven and increase the risk of screwing up.
Next, we need to prepare the can. Always read the instructions on the back and shake the can for as long as it tells you to, to make sure that the paint is properly mixed. If the rattling is too noisy, you can swirl the can around by making circular motions with the bottom while keeping the top in one place. At this point make sure to check what the can says about temperature and humidity, I’ll come back to this later.
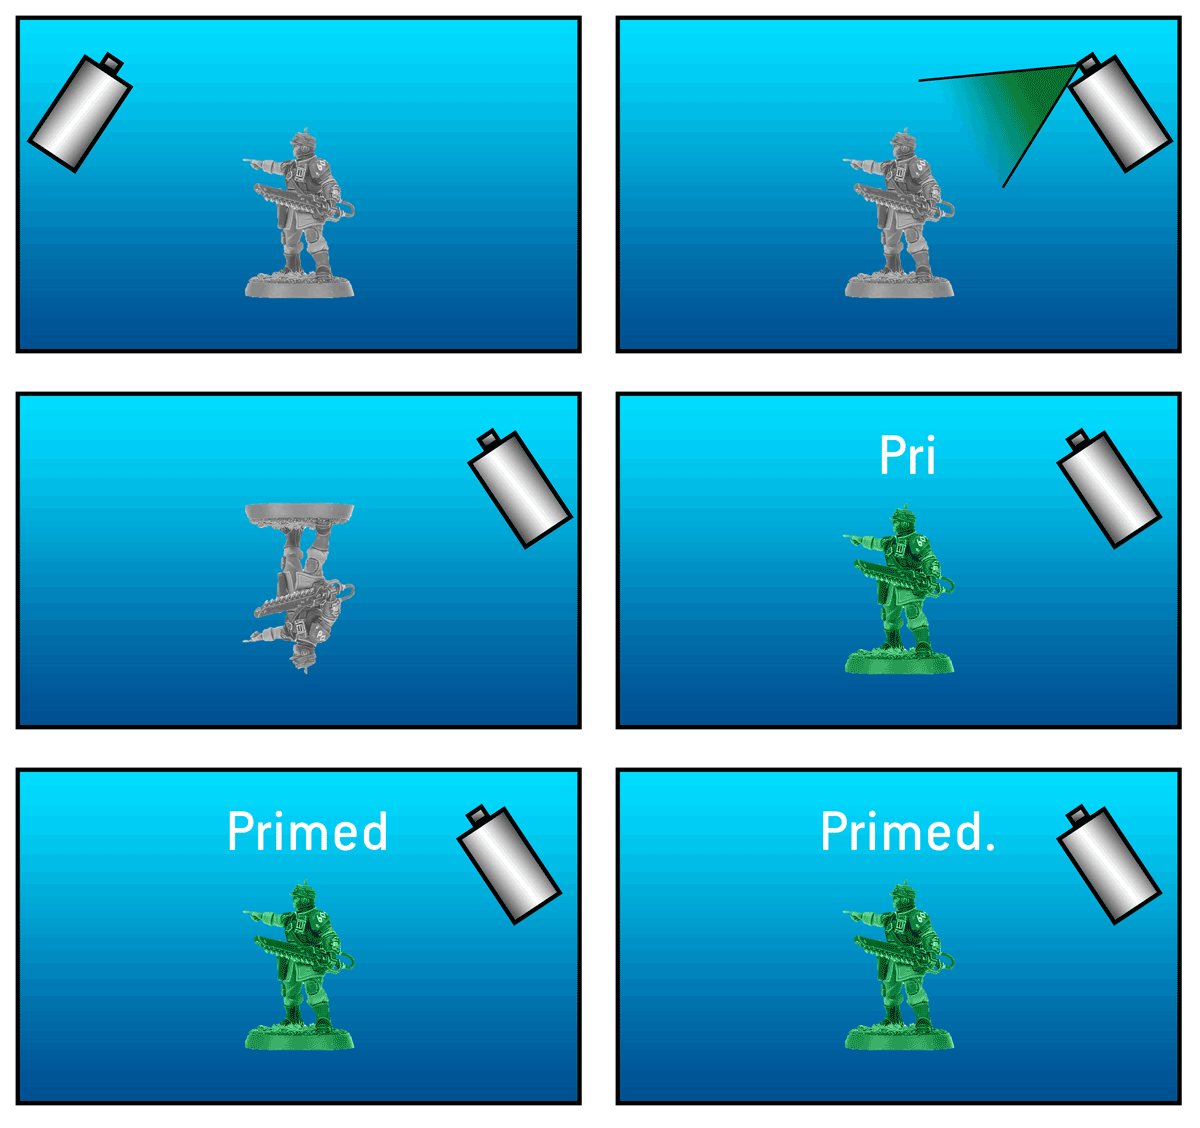
Don your rubber gloves like you’re a crime-scene cleaner and, holding the stick inside the box, spray the models, sweeping from side to side as you go, be careful not to linger on any one place. Don’t begin spraying while pointed directly at the model, start a little beforehand and sweep. You should also be gentle, don’t slam the nozzle all the way down like an angry gorilla every time, we want to give the models a light coating, not flood them with gunk and block up all the details. give all the models a pass in one direction, then turn them around and do the other direction, then from each side underneath. With these four strokes I find that I can generally prime a unit of ten models, with good coverage all over, and for little effort.

Rattlecans are, however, replete with drawbacks that complicate matters. They’re messy, they’re smelly, and they’re not exactly what you might call environmentally friendly, all of these problems aside, the biggest issue with priming by rattlecan is humanity’s oldest foe, our constant vexation: the Weather.
Rattlecans, you see, are rather picky when it comes to the atmospheric conditions in which they’ll do their best work. Did I say “rather” picky? I meant extremely picky. Temperature and humidity can make a huge difference to a rattlecan’s efficacy, too hot and dry? The paint will start drying in the air between can and model and your beautiful figure will look as though it’s covered in fuzz. Too wet and cold? The paint won’t start drying until it’s already been on the model for awhile, causing it to gloop up into the recesses and make your miniature look like it’s made of melting wax.
So what are these ideal conditions? Well, you want the ambient temperature to be between 10 and 30 degrees celcius (50-90 farenheit, in old money) and below 85% humidity, with the optimum being between 20-25 degrees celsius, that is a tight window for perfect conditions. If it’s raining? or snowing? Forget it, you are not priming, don’t even think about it. You can see why this might be a problem for our friends who live in places where ambient conditions are considerably outside these ranges for large parts of the year. In practical terms, that’s everywhere on this map that isn’t green or light blue.

So maybe you live in Siberia and you want to prime your models all year round, rather than just in June and July, that brings us to…
Priming With A Brush
Another option for priming your stuff in the comfort of your own living room/workshop/dungeon is with a good old set of bristles on a stick. Admittedly, this is more finicky than simply sandblasting everything with a rattlecan or an airbrush, but the results can be just as good. The main consideration to know when priming by brush is that you do not need complete coverage to prime your model. Let me say that again for the people at the back, you do not need complete coverage to prime your model.
“But Keewa, you Conjuror of Colours, you Baron of the Brush, how can this be?”
Cast your mind back to an earlier part of this article, the purpose of priming is not to basecoat your model, but to provide the key for your basecoats to grip onto, which is eminently possible on models with semi-transparent primer applied. Hell, if you’re absolutely barking mad you could even use matte varnish as a primer, the texture is what matters, not the colour.
How then, can you prime with a brush? Well, pretty much every airbrush primer can also be applied via brush, it’s why Vallejo dubs theirs “surface primer” rather than “airbrush primer”. Other purpose made options are Army Painter’s Brush-On Primer, or a product from your local craft hobby store called “gesso”.
Simply get your primer of choice, give it a very good shake, primers can separate in the bottle, and you want to be making sure that the binding agent is thoroughly mixed in among the pigment, otherwise you’ll essentially be painting your miniature with regular paint, which you shouldn’t do, despite what certain miniature and paint manufacturers will tell you. Primer is special paint, you can’t use any old paint as primer, remember that!
Get a good dollop of the primer on your pallette and get a brush you don’t really care about. You can thin the primer with a little water if you like, but it’s not really necessary, the primer will shrink itself to the surface of your miniature as the medium evaporates. Dab the model liberally with the primer, being careful to make sure it doesn’t puddle too much in the deepest recesses. You might notice something disconcerting happening while you do this, that’s right, bubbles might start forming in your primer. This can be a real problem, if the primer starts to dry before those bubbles have popped, you’re going to get a crater on your miniature, and you definitely don’t want that. Fortunately, bubbles are really easy to get rid of in a number of ways, you can either stab them with your brush, hit them with a puff of air from your pie-hole, or (what I do) tap the base of your miniature on your desk, the vibration is usually enough to pop all but the most stubborn of bubbles.
One coat’ll do it, as long as you’ve got some of it everywhere, and then you’re off to the races! Now that your model has that microtexture, you can go ahead and paint it to your heart’s desire.
Special Considerations
If you build terrain out of XPS foam and you try to prime it with a spray-can, the propellant in the can will melt the result of your hard work. Instead, try mixing black or white paint with thinned-down PVA glue and get it everywhere in two or three coats. If you’re a glutton for punishment, you can try priming it with an airbrush, but as us old heads know, priming terrain with an airbrush is a bit of an ordeal that will have you tearing your hair out in anguish.
US based readers can experiment spraying XPS and styrofoam with water-based spraypaints made my major manufactures like Krylon and Rustoleum. They won’t all work on every foam but when they do they can speed things up!
That concludes our primer on priming, go get ’em!
The Hobby 101 series will include tutorials and recommendations for all these products as well, so check back every Monday for more hobby 101 content. And if you have any questions or feedback, or just want some advice, drop us a note in the comments below or email us at contact@goonhammer.com.


