In our How to Paint Everything series we look at how to paint well, everything, with a look at different techniques and strategies. In this article we’re looking at how to paint the Chaos Space Marines of the Black Legion.

When death of Horus ended the Heresy, sending the traitor legions fleeing to the Eye of Terror. Horus’ own legion, the Sons of Horus, were among the hardest hit, left directionless with the loss of their primarch. When the traitor legions turned on one another, the Sons of Horus were nearly wiped out. That is until Abaddon the Despoiler , former captain of the Sons of Horus, stepped up and reclaimed the legion, renaming them the Black Legion. Under Abaddon the traitor legions would unite for a series of bloody wars and realspace incursions known as the Black Crusades.
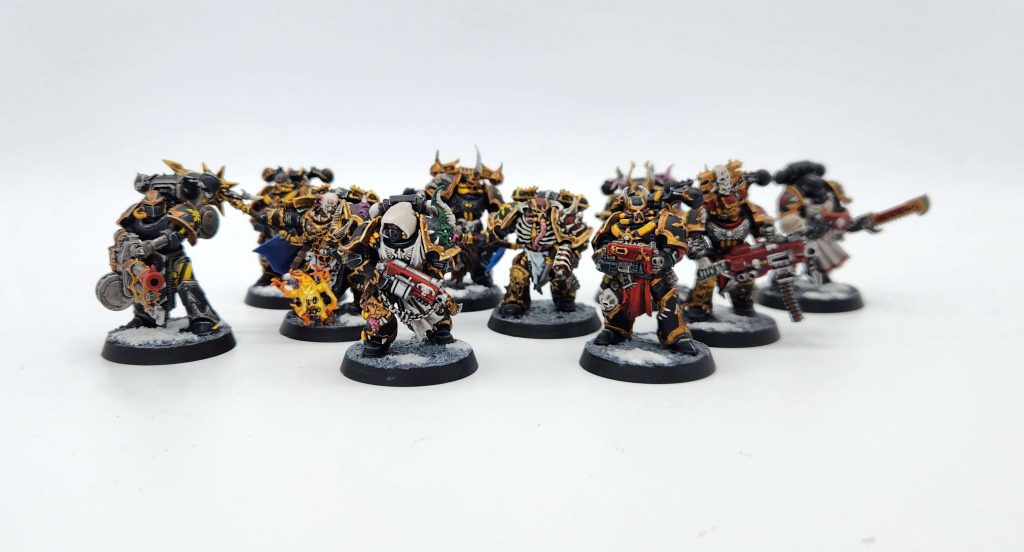
The Black Legion are the largest and most focused of the traitor legions, attracting warlords from across the traitor spectrum seeking glory and purpose. They’re the face of the Chaos Space Marines faction, sporting trademark black and gold armor and a pair of named special characters. They have some interesting heraldry, and their reputation for being a confluence of traitors (chaos marines from every legion have given up their former allegiance to join Abaddon’s cause), means they provide a lot of interesting conversion opportunities for players who want to model marines of different backgrounds, like a kind of evil Deathwatch.
Covered in this Article:
- Notes on the Heraldry of the Black Legion, including the way they incorporate cults devoted to different dark gods.
- How to paint the Black Legion, from black armor to gold trim, with different methods for painting them.
- How to Paint the Sons of Horus, the Heresy-era precursor to the Black Legion.
- How to paint the legion’s special characters, Abaddon the Despoiler, and Haarken Worldclaimer.

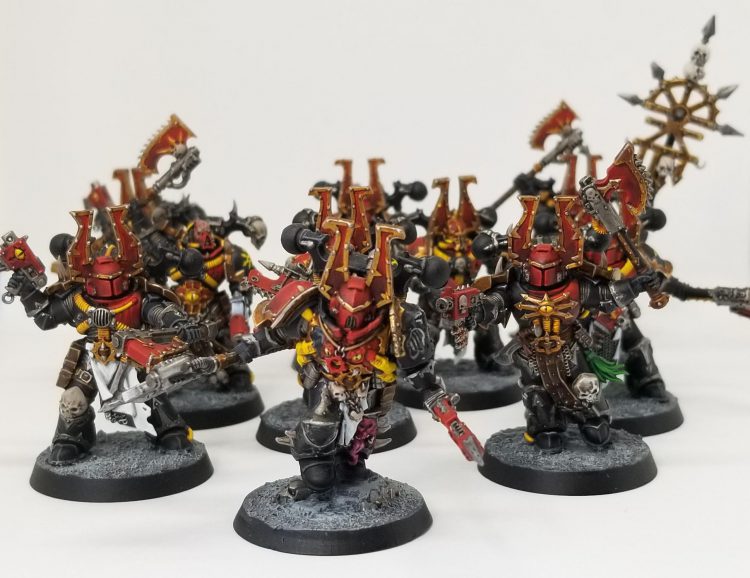
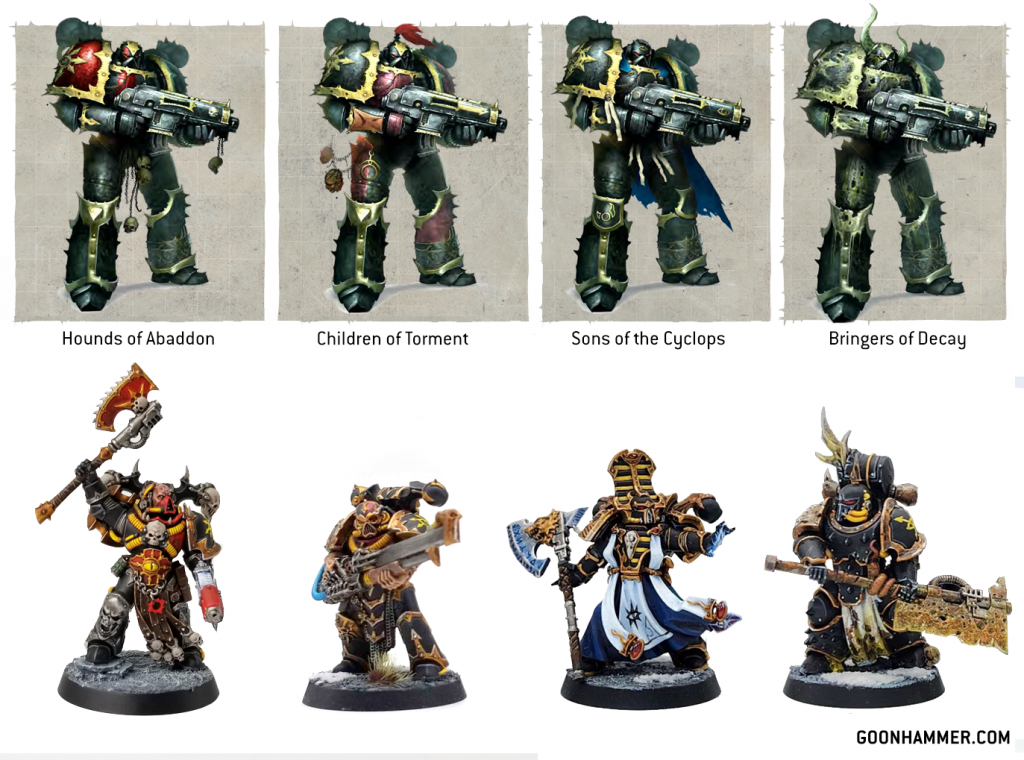
Black Legion Heraldry - Click to Expand The Black Legion wear black armor, often with gold trim. As with other traitor legions, they don’t maintain a chapter-like structure or have squad markings, but there are ways they denote rank and affiliation. In their initial presentation the Black Legion were shown with silver trim on their black armor, a trend which would continue into third edition. Later editions would show Black legion marines with a mix of silver and gold trim and all gold trim. While the current studio scheme has the legion exclusively donning armor with gold trim, you can work out an easy ranking scheme that adds variety to your Black legion. More specifically, the way this works is that standard marines have silver trim, squad leaders and champions have gold trim on their helmets and shoulder pads, while the highest-ranking members of the legion have fully gold trim. The Black Legion aren’t divided into companies, but instead a series of warbands, each led by a powerful Chaos Lord who has sworn fealty to Abaddon. These warbands will have their own heraldry and markings to denote them. Additionally there are four key subgroups of the Black Legion we should talk about, as these get special mention in the lore.Trim Color and Rank
Warbands of the Black Legion

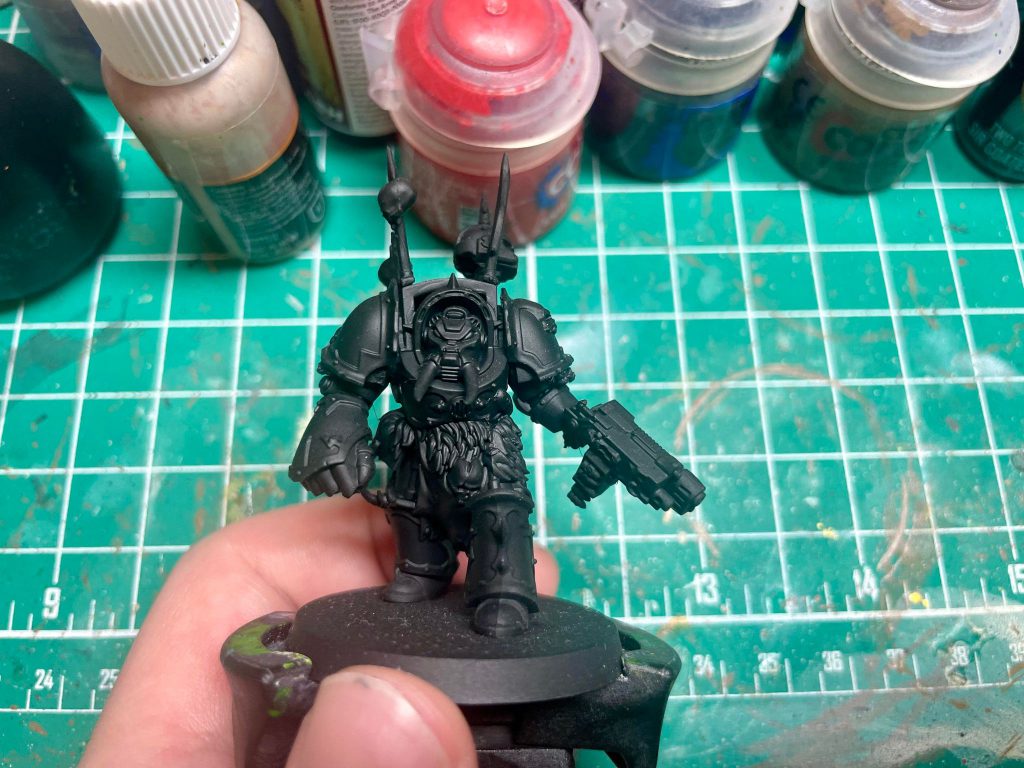
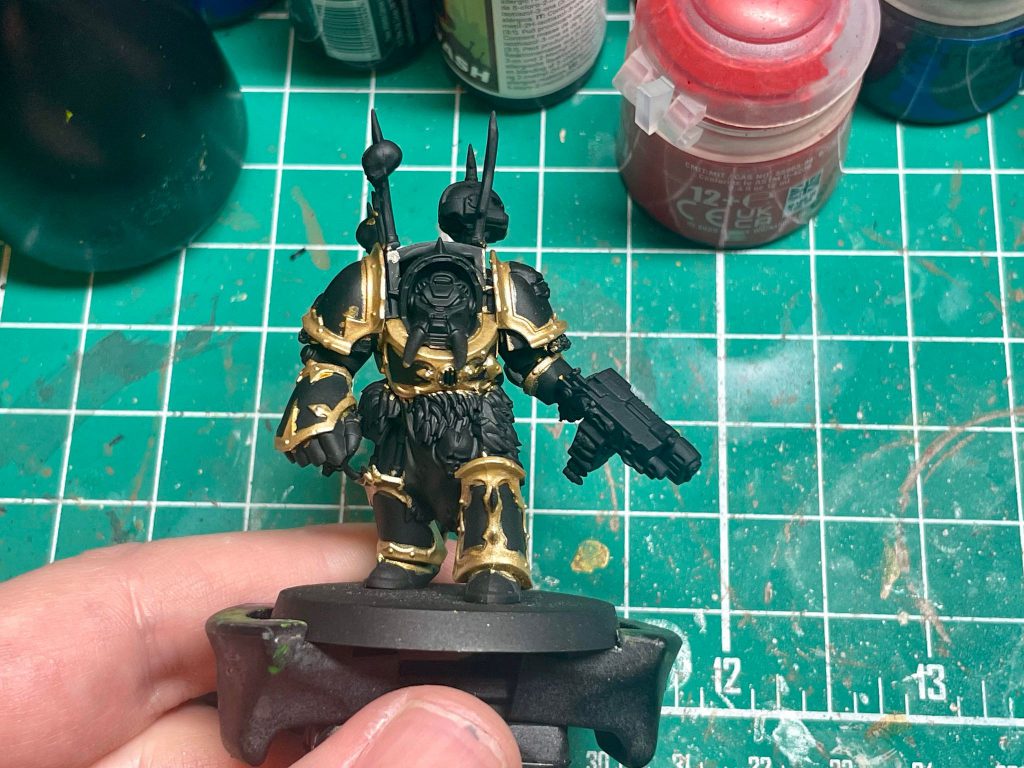
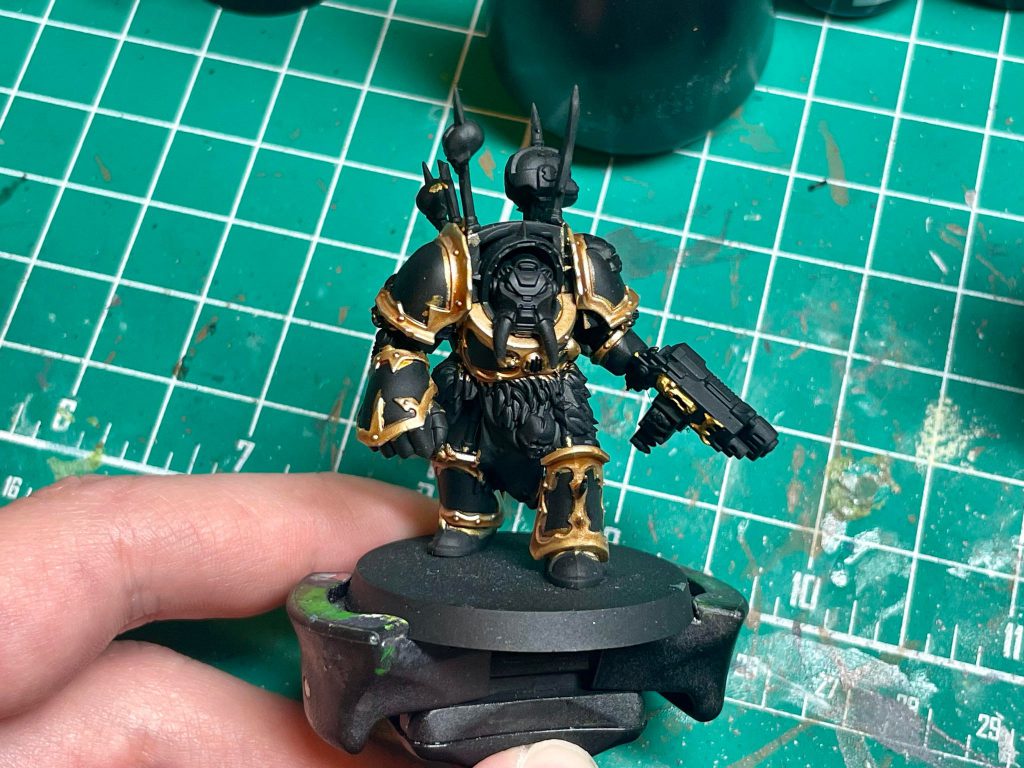
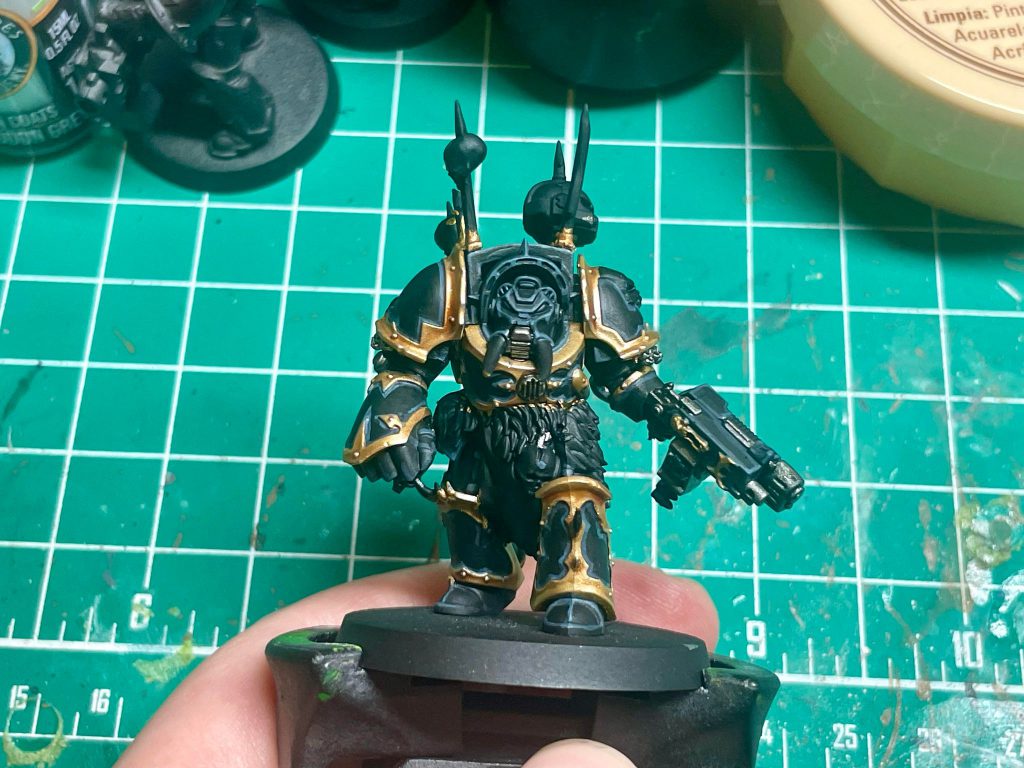
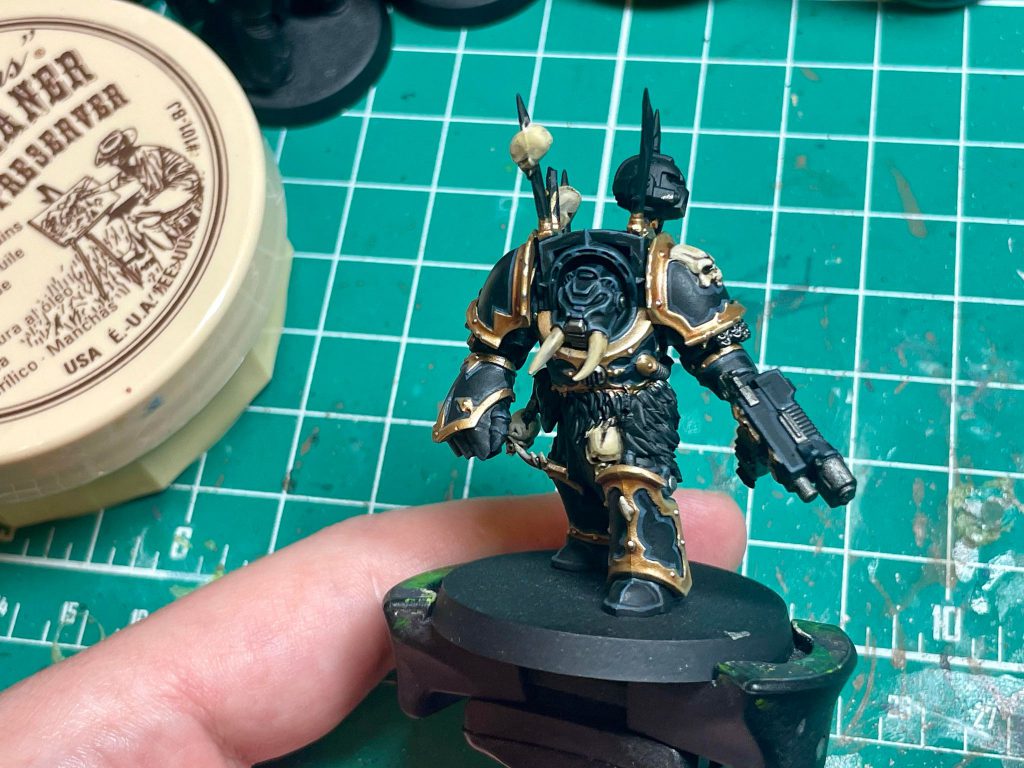
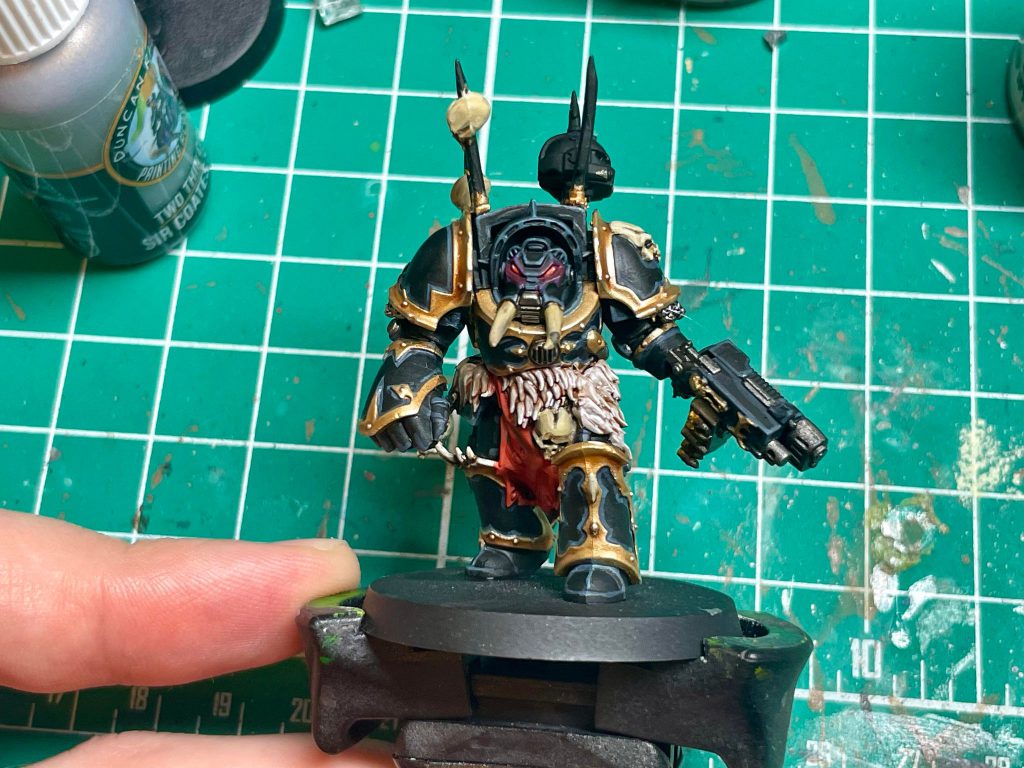
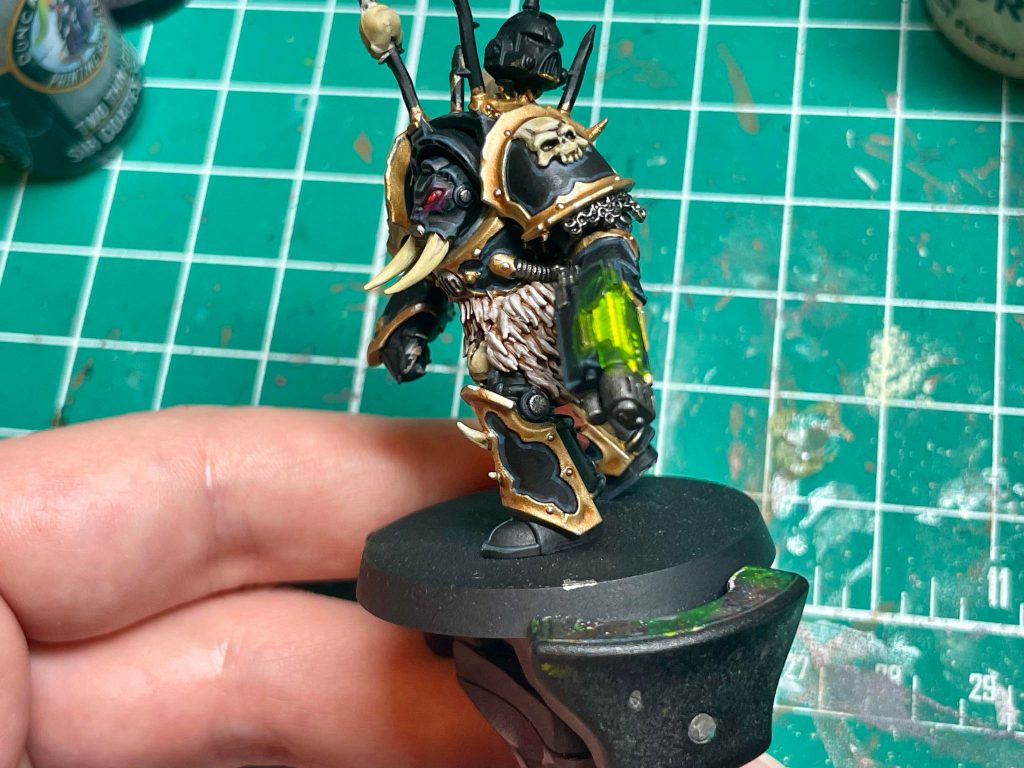
Swiftblade's Method - Click to Expand Swiftblade: The Black Legion isn’t my first Chaos Space Marine sweetheart. That honor goes to the Word Bearers when I first began collecting CSM in 2012. Being ultra-devoted to the dark gods was certainly neat and all, but once I read The Talon of Horus by Aaron Dembski-Bowden I was converted. So, from shame and sorrow I was cast, and when Chaos Space Marines got their range refresh in 2019 I was reborn in black and gold. The Black Legion paint scheme can be deceptively difficult. It combines two of the biggest headaches in painting miniatures: highlighting black and lots of trim. After a few years practice I’ve managed to get my paint scheme locked in for my Black Legion. I can’t avoid painting trim or highlighting black, but I can try and make it as easy as possible. I’ll share my scheme and methodology for painting the Black Legion scheme with one of my favorite models in all of Warhammer: the Chaos Space Marine Terminator. It’s a no-brainer. No reason to prime any other color here. In most cases, I think it’s smarter to base the armor before starting on the trim, but with the Black Legion the black primer acts as basically a base color for the armor. So, rather than painting the armor and then cleaning up the trim when we paint it, we will paint the trim and clean up the armor panels when we get to painting them. For the trim, I prefer a brighter gold for my Black Legion. I do this by basing with Retributor Gold, and then layering on Duncan Rhodes Glistening Gold/Liberator Gold. If you don’t have access to the Duncan Rhodes paint, Liberator Gold works just fine, but Glistening Gold is an easier paint to work with in my experience. Following this, I’ll shade with lightly-thinned down Guilliman Flesh Contrast, and then edge highlight with more Glistening Gold. Lastly, I hit the most raised edges of the armor and the studs with a spot highlight of Duncan Rhodes Plate Armour. First thing here is to clean the armor up from painting the trim, as well as make sure the armor is a nice and uniform shade of black. I hit the black areas of the armor with a coat of my special stuff: Black Legion Contrast. If you paint black frequently, I highly recommend this stuff. It’s very highly pigmented, so even though it’s thin like contrast paint its coverage is excellent. You’ll rarely ever need more than 2 coats to cover up a mistake and make it super black. Just be patient and let the paint dry before Next, I apply an edge highlight of Dark Reaper, followed by hitting the most prominent edges with a highlight of Thunderhawk Blue. Try to keep these edge highlights thin so that the model still reads as black after highlighting, but don’t panic if you make a mistake. You can always clean up a messy edge highlight with more Black Legion Contrast. All of the silver details for this model get the same basecoat of Leadbelcher. This includes the gun, chainmail details, armor joints and chains. For the armor joints, I use Basilicanum Grey as a wash to make the joints almost black with silver peeking through. The other silver details get a wash of Army Painter Dark Shade, followed by a touch up with Leadbelcher again and Duncan Rhodes Plate Armour. I base with Thondia Brown so that the recessed areas of the bones, like the eye sockets and nasal cavity, will stay nice and dark. Then I add a layer of Duncan Rhodes Skeleton Legion all over, avoiding the recessed areas. I shade the bones with Skeleton Horde Contrast before reapplying Skeleton Legion. I carefully highlight the bone areas with Duncan Rhodes Vampire Fang so that the bone details don’t look flat. For the fur, around the Terminator’s waist, I base with Rakarth Flesh, wash with Reikland Fleshshade, touch up with Rakarth Flesh again and highlight with Pallid Wych Flesh. You can make the highlighting process a little easier by using the side of the brush to catch raised details. The lenses are a pretty simple progression of red: Mephiston Red base, then a small highlight of Evil Suns Scarlet towards the center of the lens, and a touch of Wild Rider Red followed by a little white dot of Pallid Wych Flesh. I also add some thinned-down Doomfire Magenta Contrast to add a glow effect to the lenses. Finally, the tabard. I base with Mephiston Red, followed with a wash of Agrax Earthshade. I highlight the tabard back up with Evil Suns Scarlet, focusing on the raised parts of the tabard, and then highlight with Wild Rider Red. Adding plasma glow is one of the most fun parts of a paintjob for me, and my method for green glow is dead easy. I start with a layer of Moot Green before applying Duncan Rhodes Yellow Flame to the corner of the plasma coils and where the coils meet the gun casing. Then, I apply Tesseract Glow on the plasma and in the areas around the plasma for a quick-and-easy OSL effect. You can go deeper into applying OSL here (and we have a great guide how on Goonhammer!), but I think this simple effect will look great on the table. For the spikes on top, I apply Dryad Bark, wash with Army Painter Dark Shade, and highlight with Gorthor Brown. I decide to make the trophy helmet an Ultramarine, and start with Macragge Blue. I shade using Dark Shade as well, and highlight with Alaitoc Blue. For the red and silver details, I follow the steps I’ve already mentioned. That’s all I’ve got for how I paint my Black Legion stuff, folks! Painting Black Legion Chaos Marines may seem daunting, especially if edge highlighting isn’t your strong suit, but a good looking Black Legion model looks menacing as hell on the tabletop and can be a lot of fun to do.Step 0: Prime Black
Step 1: The Gold Trim
Step 2: Painting the Armor
reapplying more paint if a mistake is still visible after the first pass.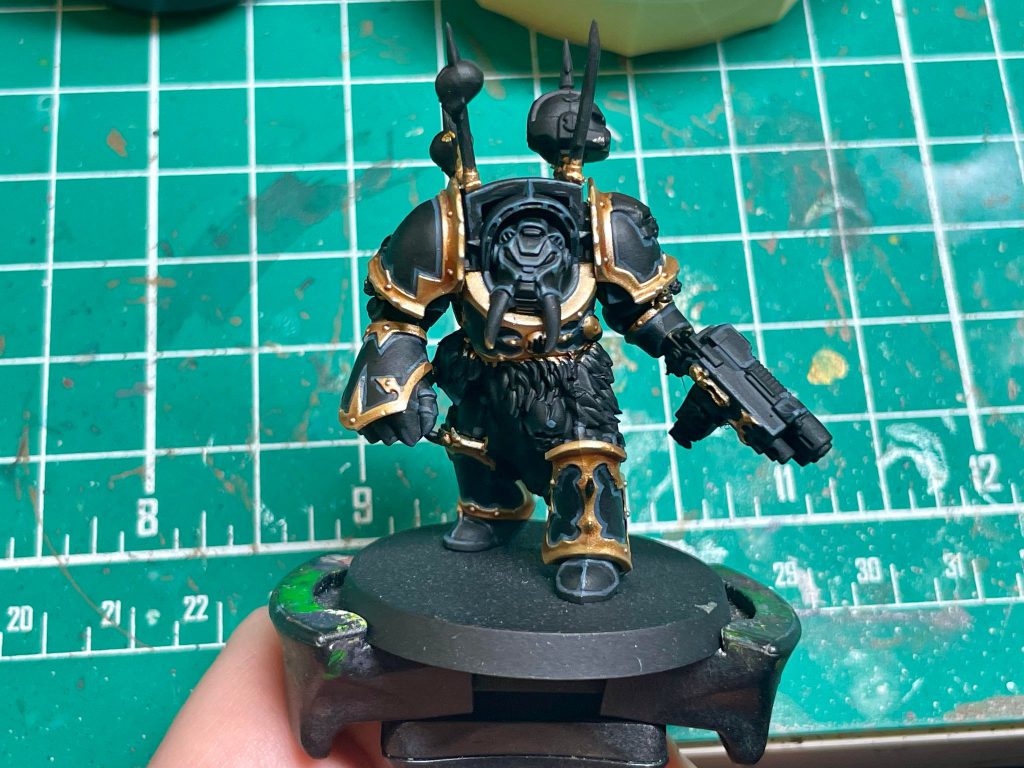
Step 3: Painting Silver Details
Step 4: Skulls and Bone details
Step 5: Fur, Lenses, and Tabard
Step 6: Plasma Glow and Other Details
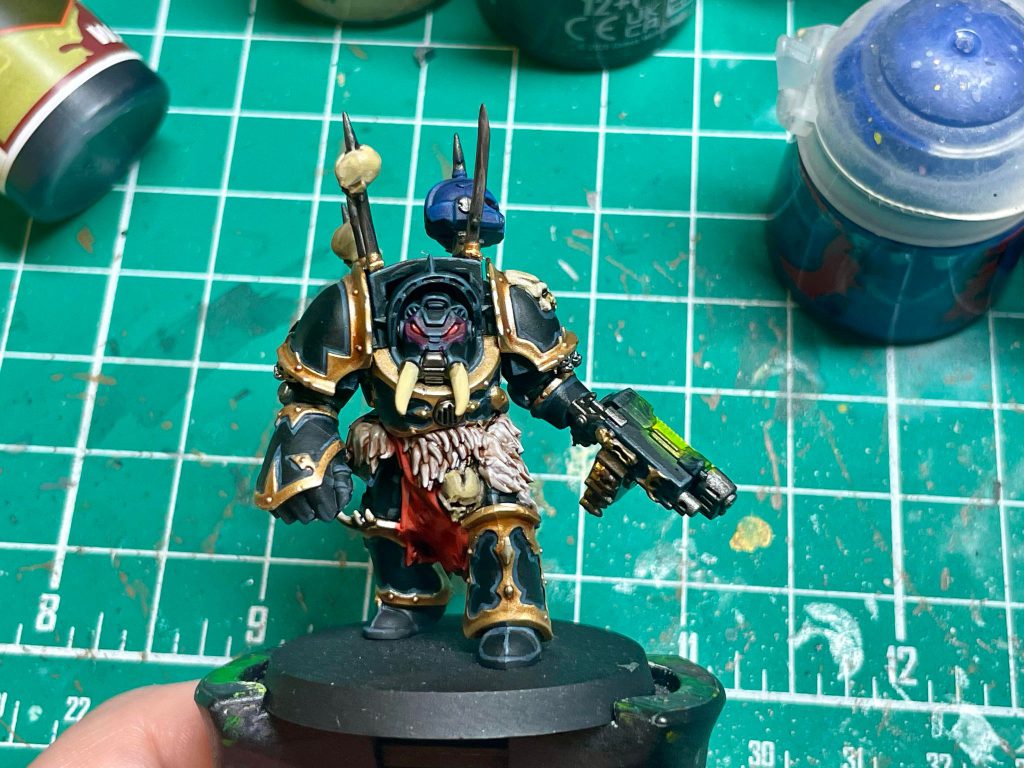
After basing the Terminator, making sure we give the ground a sinister red glow with a drybrush of Wazdakka Red and lightly touching it up with a drybrush of Screaming Skull, we are finished!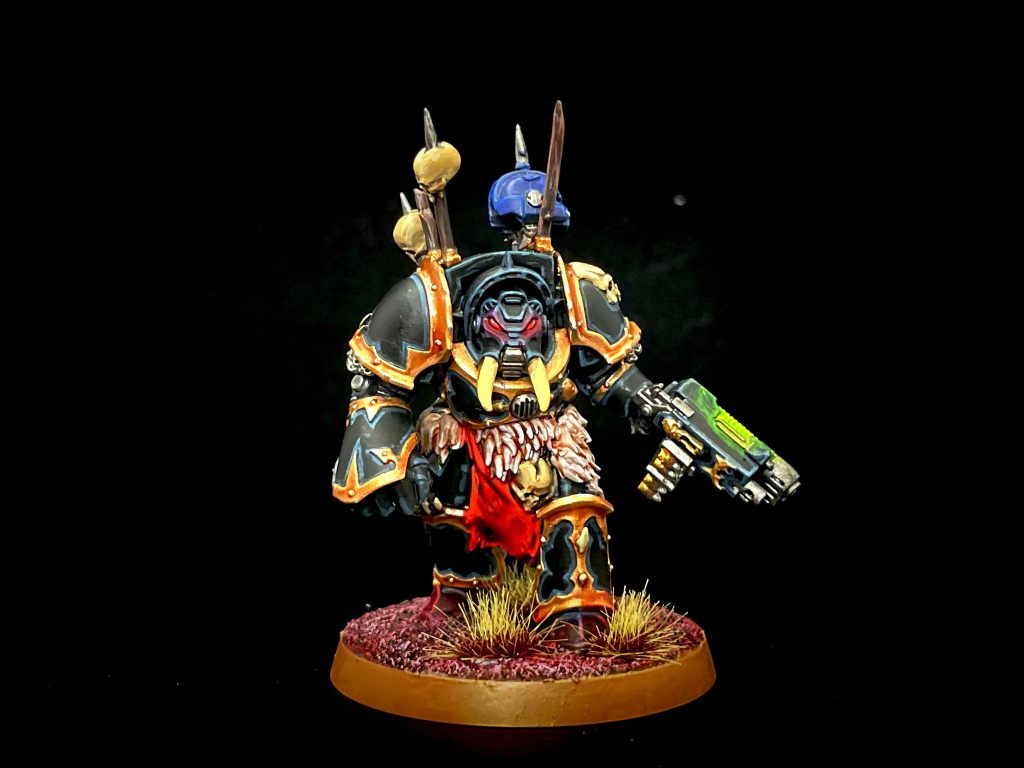

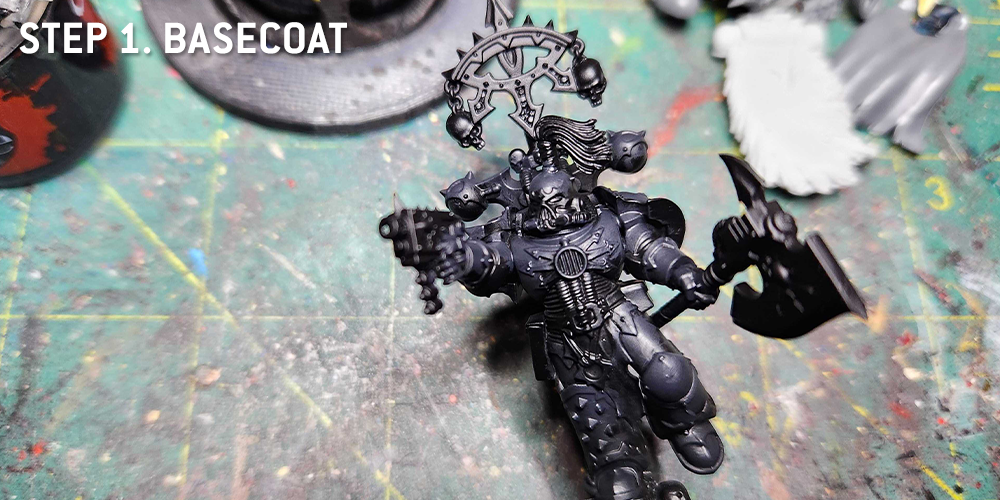
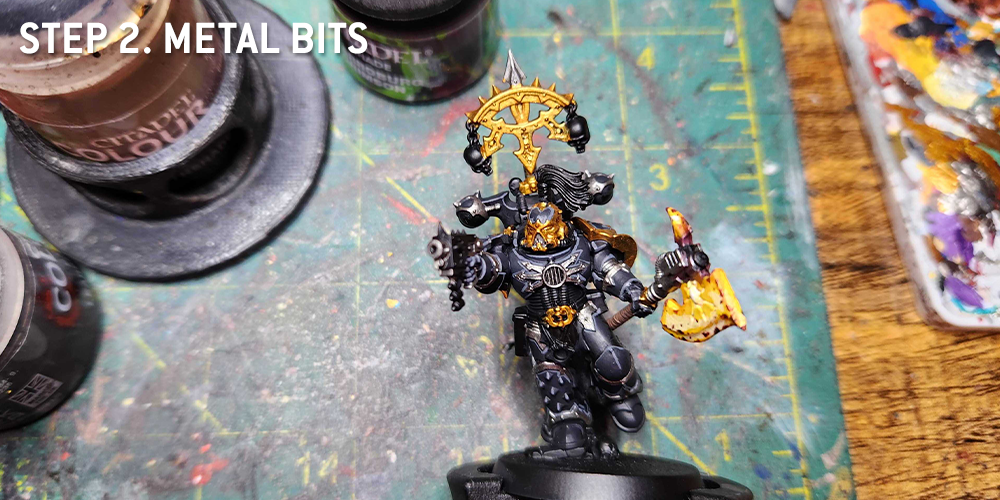
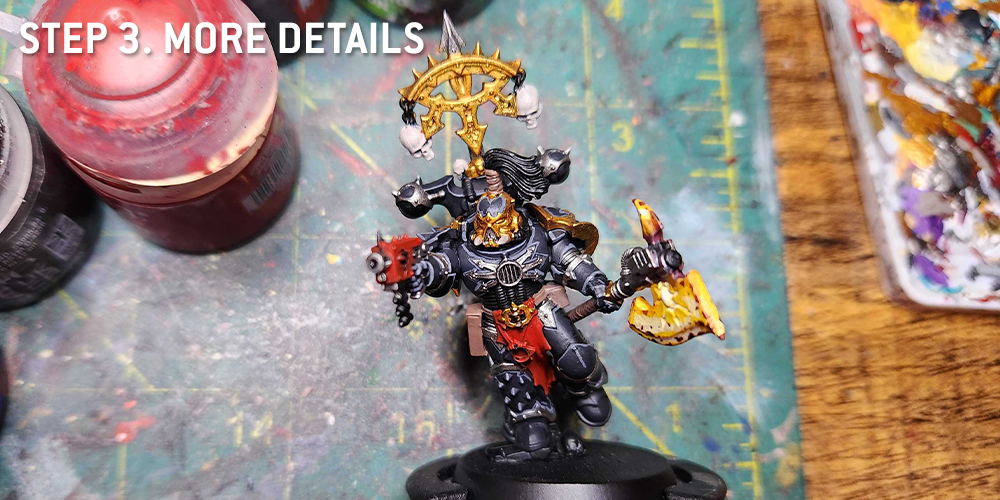
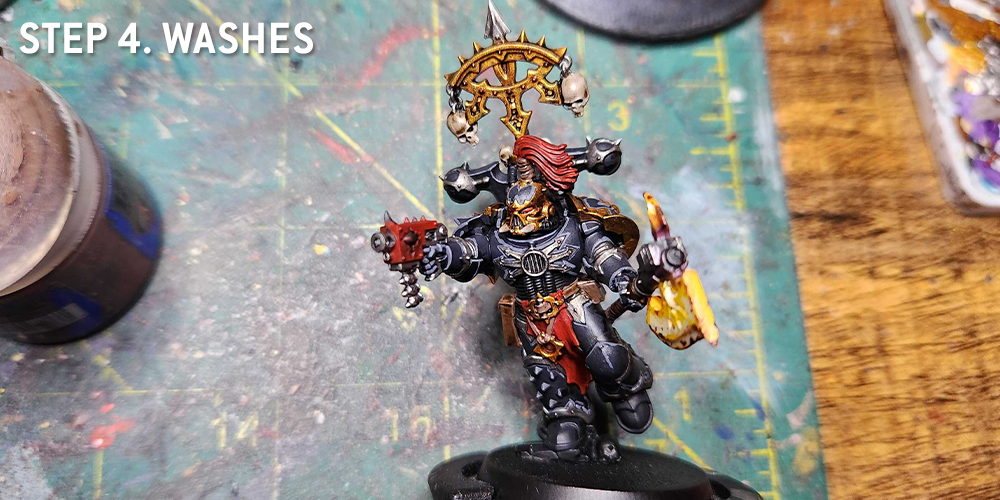
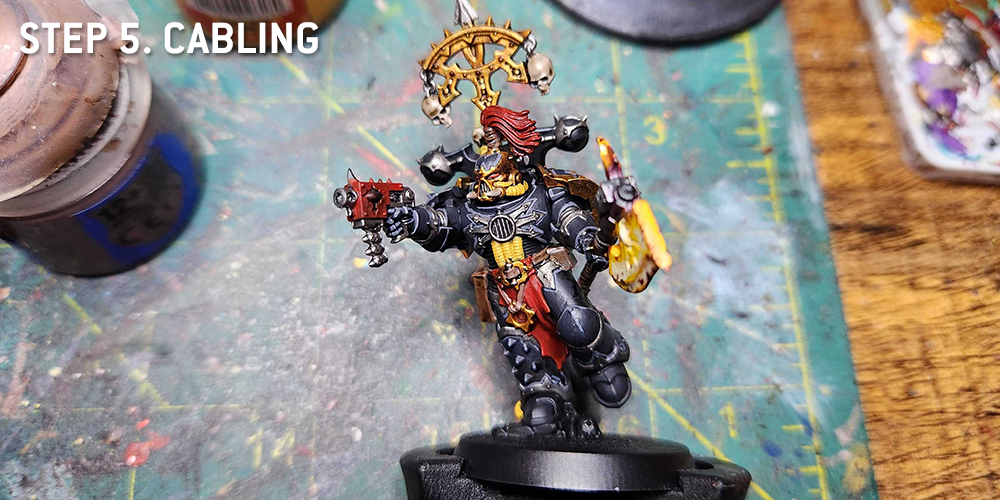
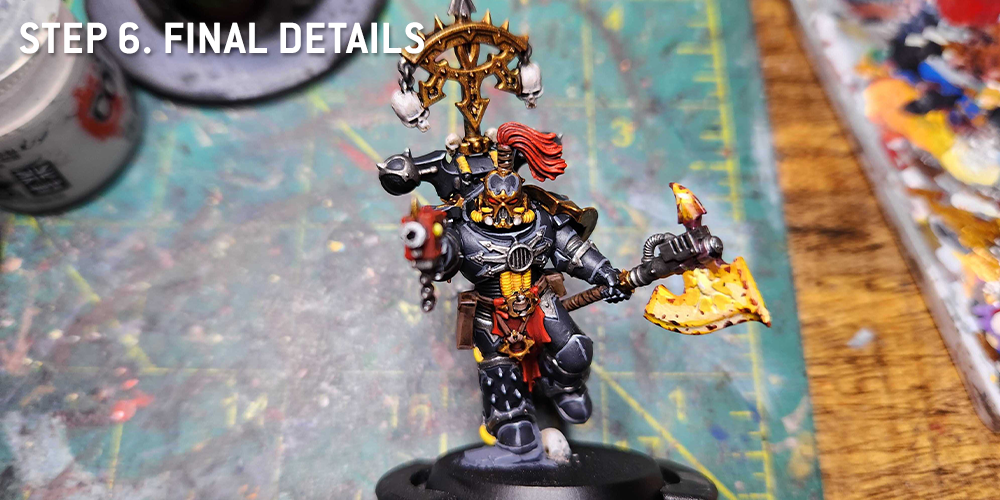
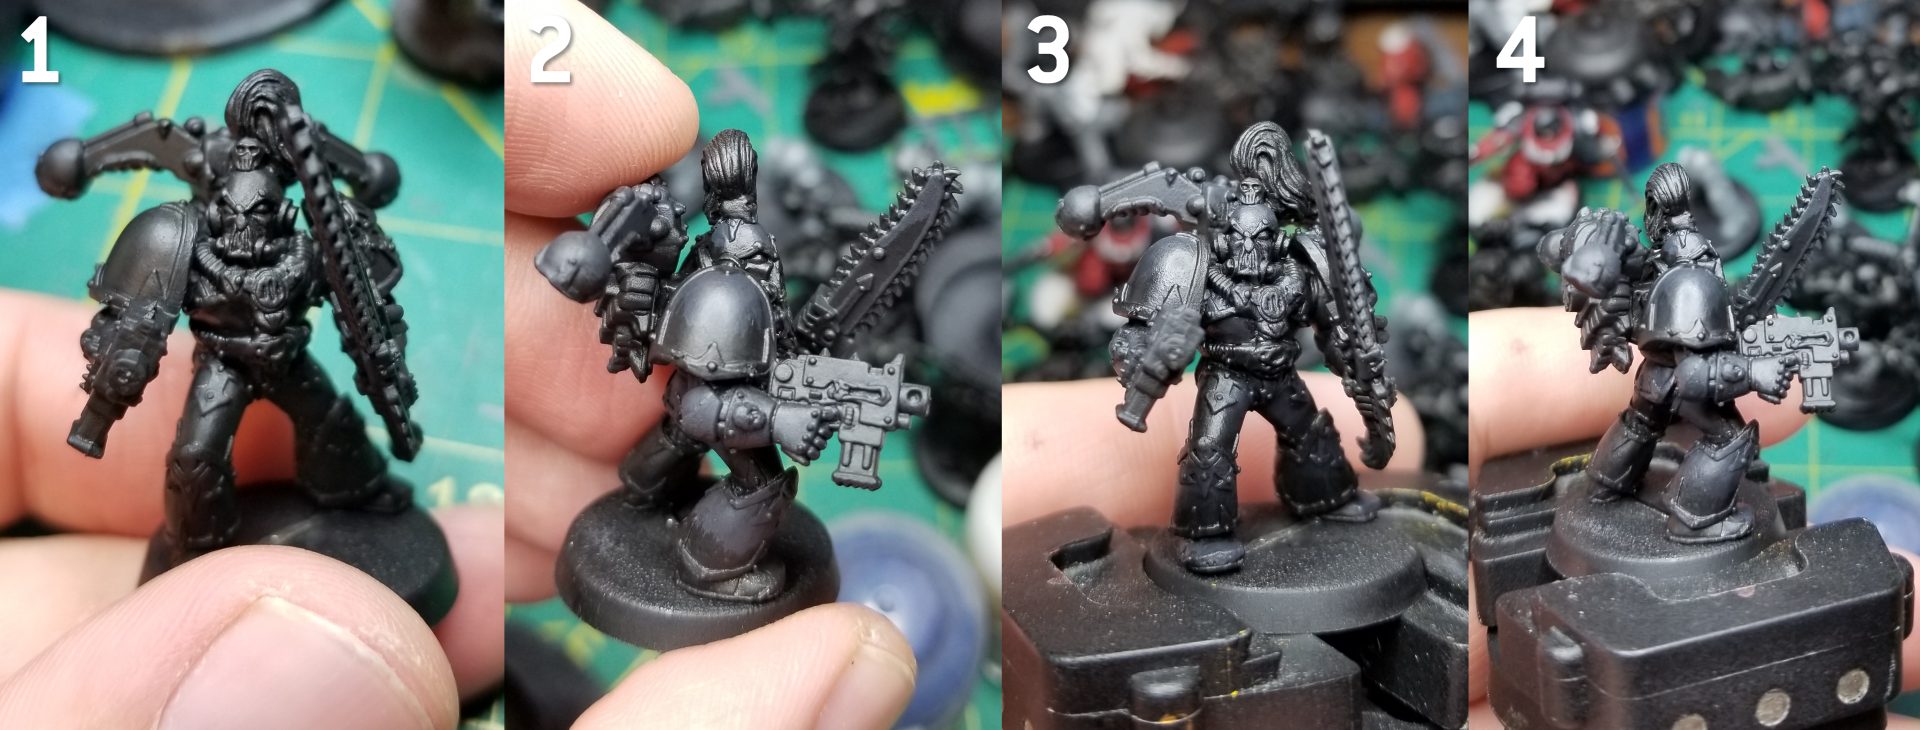
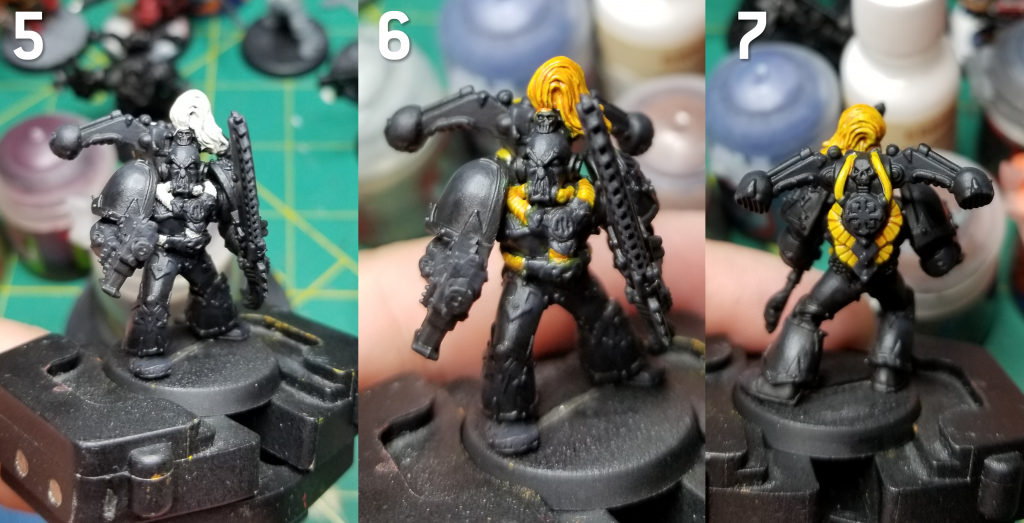
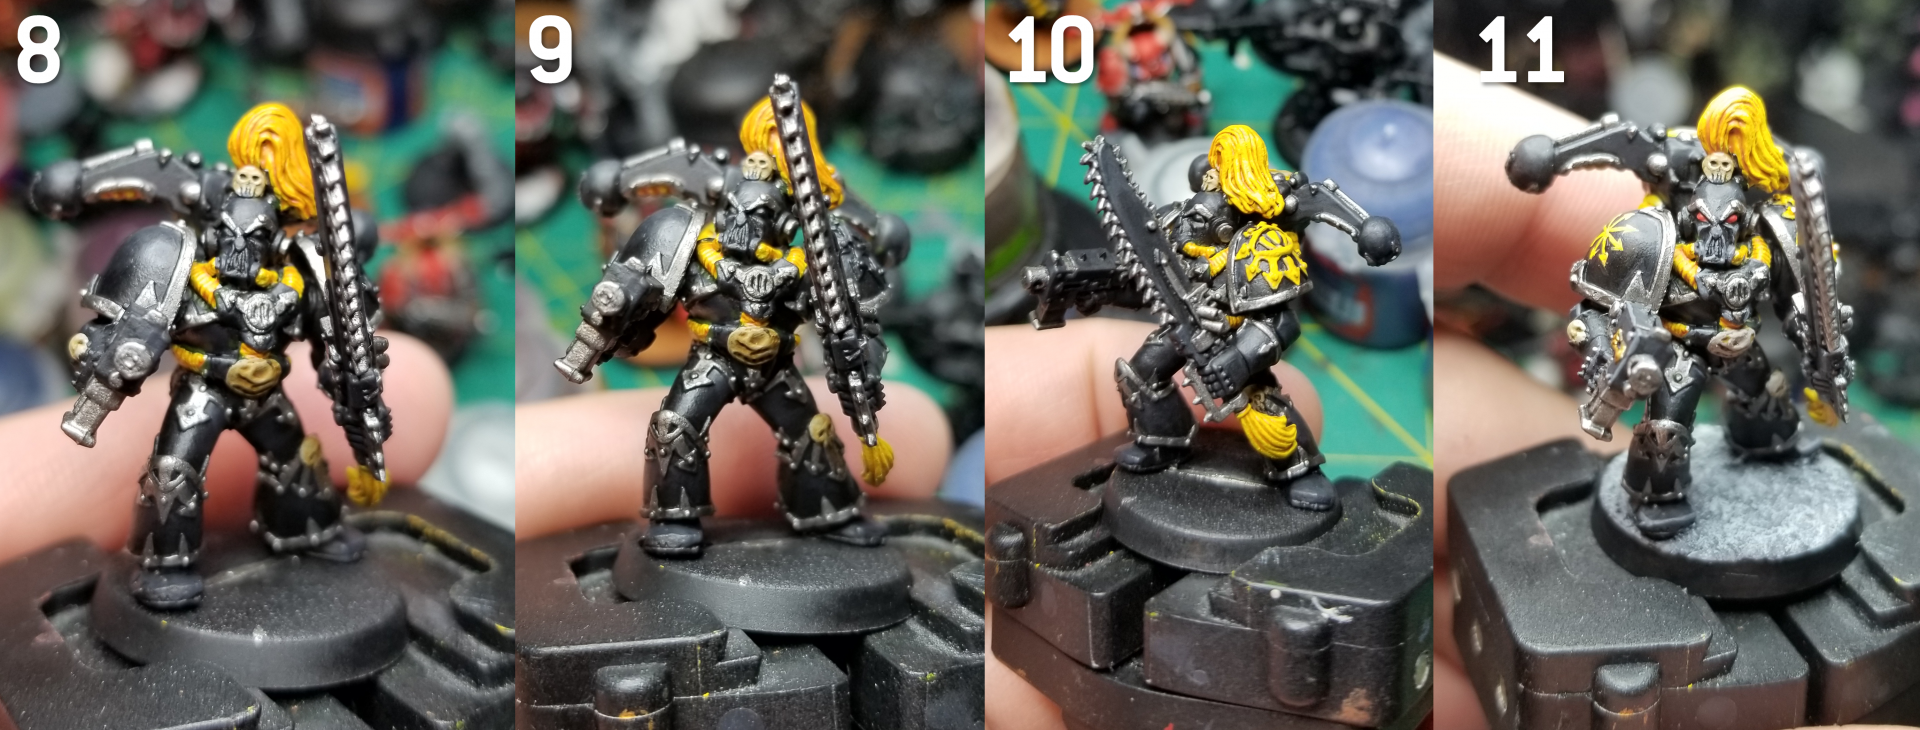
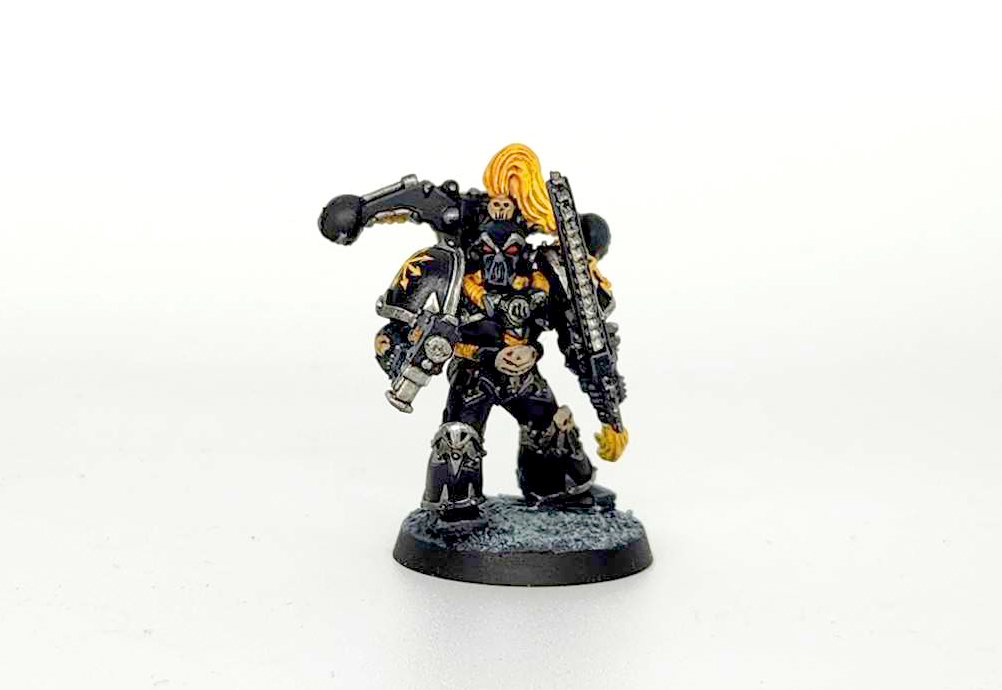
TheChirurgeon's Method - Click to Expand My Black Legion scheme is very similar to my 2nd edition scheme, because I really like how that take on the legion looked. The big differences are in how I do cabling and in the trim. As mentioned in the Heraldry section, I vary the color of my models’ trim based on their rank, with basic legionaries going all silver, and higher ranking models like Chosen getting all gold. For this particular model I chose to do an aspiring champion, so he has silver trim on most of his armor with gold trim on his helmet and shoulder pads. I started by priming the model black. This starts with the black armor, the most important part to get right. You don’t want to go full black here; that will make the models look flat. So you need to find an effective way to shade/highlight black. I use Corvus Black for this, blending it up from the base color by mixing it with Black Legion Contrast Paint. The goal here is to get a smooth transition from black to a lighter color. This is a big step, and it’s a two-part process. First I use a 5/0 brush to edge highlight the black portions of the model with Mechanicus Standard Grey. This is a meticulous process, but doing it before the trim makes it easier to fix any mistakes since it means just touching up the black armor. Once that part’s done I go through and do the metal trim and any other metal bits on the model. This guy is an aspiring champion for a regular unit, so I did silver trim on his body (Leadbelcher) and gold trim (Retributor Armor) on his shoulder pads and helmet. You’ll also notice the axe here. I did a molten-style axe on this guy. That process is pretty straightforward: You start with the axe painted Leadbelcher, then blend that into Khorne Red. From there you start highlighting, leaving visible edges, going to Evil Sunz Scarlet, Fire Dragon Bright, Flash Gitz Yellow, Dorn Yellow, and some Reaper Pure White. The center of the axe is going to be the brightest/hottest here, with the yellow/orange/red transitions toward the edges. You want the reddest spots to be toward the axe, with some yellow/orange along the other edges. Once that’s laid down, I use Word Bearers Red to lay down a series of small spots in varying sizes and colors around the edges, with a few extra along the contours of the axe edge. Then I go back and do spots of Rhinox Hide inside those to give them a bit more depth. I like to lay down all my base colors before I start washing, so here’s where I do the rest of those. The red is Mephiston Red, the leather parts are Cygor Brown, and the bone parts are Rakarth Flesh. Time to add some shading! I wash the bone, leather, and gold parts with Agrax Earthshade. I’ll usually do a second pass on the gold parts during this stage in the corners to darken and dull it a bit further. The red parts get washed with Carroburg Crimson. And the silver parts get washed with Nuln Oil. After I wash the loincloth, I’ll come back and paint the Chaos star he’s got dangling between his legs. Before we get to the final details we have to address the power cabling. I do bright orange and yellow cabling for my Black Legion guys, similar to the 2nd edition scheme, though how I do it is a bit different here than in my 2nd ed scheme model. If you wanted, you could do it that way (paint wraithbone, wash with Iyanden Yellow Contrast Paint), but here what I do is paint the cables with Averland Sunset, then wash them with Fuegan Orange. After that I come back and highlight the raised parts with Averland Sunset and Flash Gitz Yellow. Time to hit the final details and highlights. The loincloth gets highlighted with Mephiston Red and Evil Sunz Scarlet, and the same goes for the gun casing and the topknot. I’ll come back and highlight the gold with Retributor Armor and edge highlight it with Runefang Steel, and use Runefang for the rivets and edge highlighting on the silver trim. The leather parts get an edge highlight of Cygor Brown, and the bone parts get highlighted with Rakarth Flesh and Reaper Polished Bone. I’ll also come back and do a second pass on the black armor edge highlights, hitting corners and raised spots with a tiny bit of Celestra Grey to make them a bit more dynamic and finish off the model. And that’s it! Overall it’s a lot of steps but not super difficult. There’s a lot of detail on the models but they’re not toob ad to paint, and adding yellow cabling and bright topknots/loincloths/capes helps break the models up and avoids the monotony you can get with an army in black armor.Step 1. Basecoat
Step 2: Edge Highlights and Metal Trim
The Axe
Step 3. More Details – Red, Leather, and Bone
Step 4. Washes
Step 5. The Cabling
Step 6. Final Details
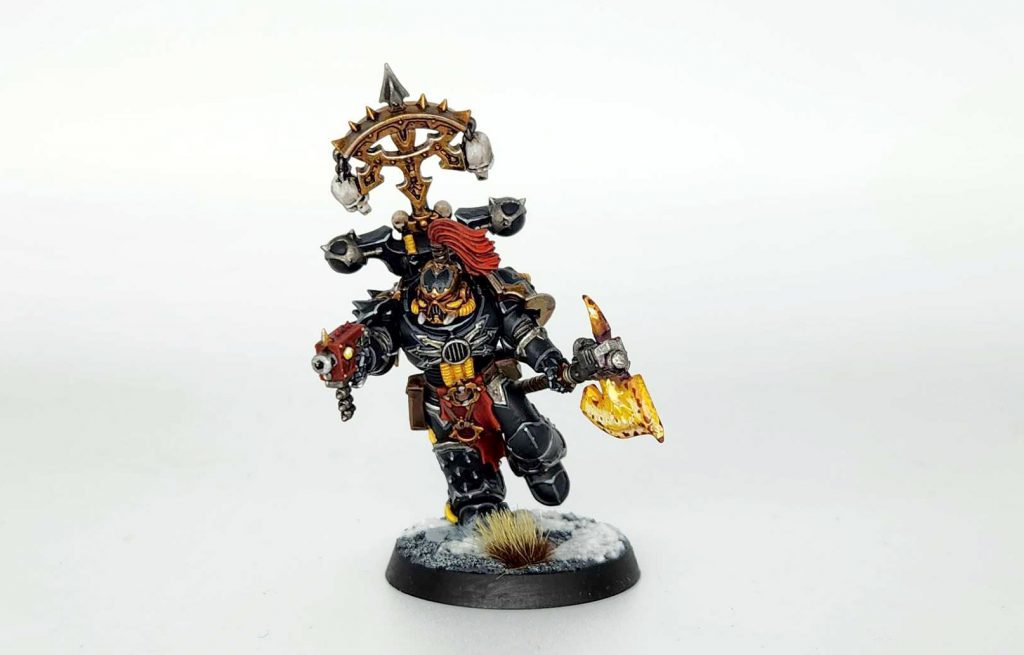 As an added note, I picked the bits for this model carefully – the spiked greave and shoulderpad were reminiscent of the old Justaerin models, and the topknot is also a common visual element for the Sons of Horus. One thing I like to do when making new Black Legion models is convert them to be visibly related to other legions, to show that the Black Legion aren’t just former Sons of Horus but rather traitors drawn from across the eye to a common cause. I like to use bits and armor choices to mix in Fallen, Iron Warriors, Alpha Legion, etc. It’s a great way to put that bits box to work!
TheChirurgeon's 2nd Edition Black Legion - Click to Expand Clad in black armor, the 2nd edition black legion scheme gives the faction steel colored trim over gold, giving them a grungier, darker look compared to today’s black-and-gold styling. They’ve also got bright orange power cables that stand out against their armor. Traditionally, the ‘Eavy Metal team paints black by mixing a 50/50 mix of Chaos Black and Regal Blue, the closest analogs of which today are Abaddon Black and Kantor Blue. This gives you a dark color that you can use to shade your blacks and give them a bit more depth. What I’ve found however is that you can get a very similar effect by just using Corvus Black to get a lighter shade of black on your legion. I’ll end up doing that, since it ended up looking pretty much the same. Painting these guys starts with getting the blacks right. I started by priming black and then coating them with a coat of Abaddon Black and then highlighted that with Corvus Black. Then I used Nuln Oil to blend the two, which is pretty quick and worked very nicely. This gives it a nice, blended bluish black look that matches the models in the codex well. Next up are those distinctive orange/yellow tufts and cables. There’s a more involved way to do this where you start with orange and shade up but what I’ve found is that you can solve this same problem much easier and more quickly now using contrast paints. I painted the cables and tufts with Wraithbone and then slathered them in a few coats of Iyanden Yellow to get the bright yellow/orange coloring. Time to finish this bad boy off. The codex Black Legionnaires have black weapons so I went with that but these days I paint red weapons on my marines because it gives them a spot of color. The metal trim is done with Leadbelcher and shaded with Nuln Oil while the skulls are done with Rakarth Flesh and shaded with Seraphim Sepia (normally I use Agrax but 2nd ed has much warmer skull colors). Then I went through and edge highlighted the black parts with Mechanicus Standard Grey and the Metal parts with Runefang Steel. The eyes are Mephiston Red and Evil Sunz Scarlet, while the shoulder insignia are done with Averland Sunset and Yriel Yellow. The final model is one I’m very happy with, and that I think very effectively matches up with the 2nd edition codex style.

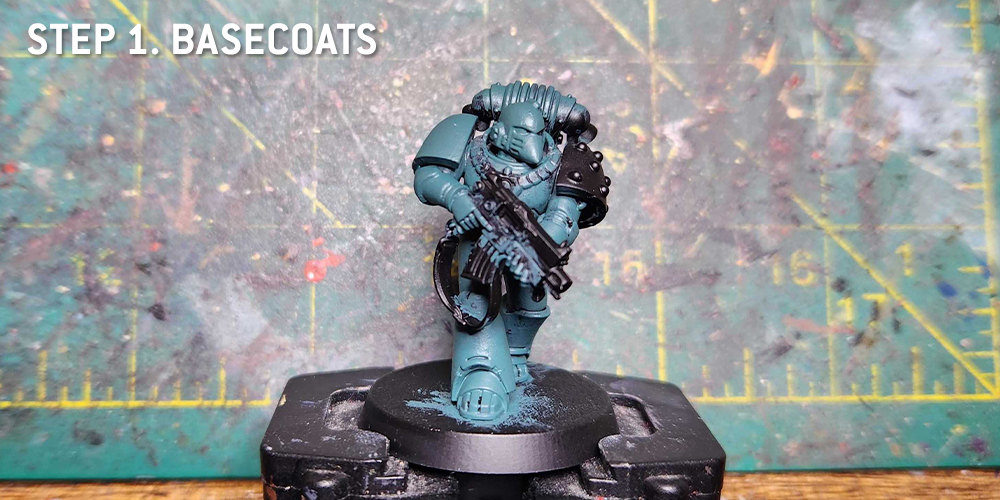
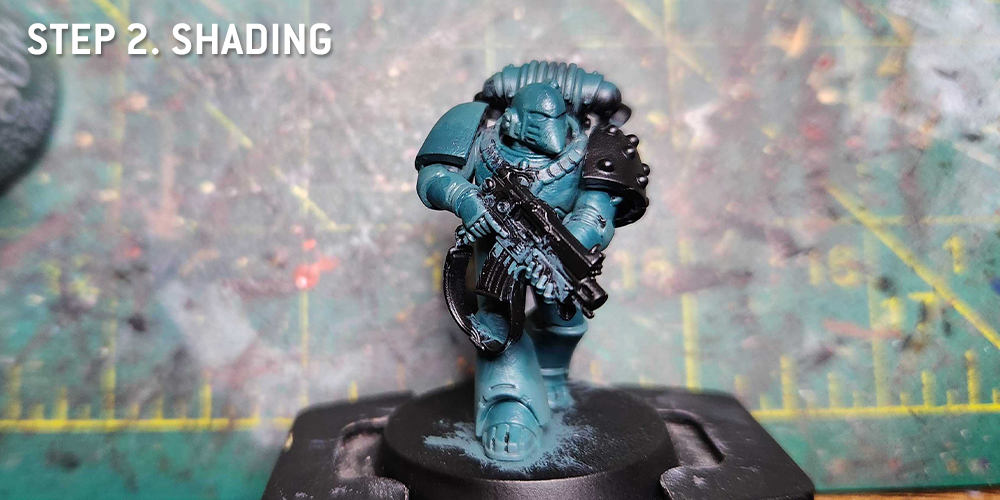
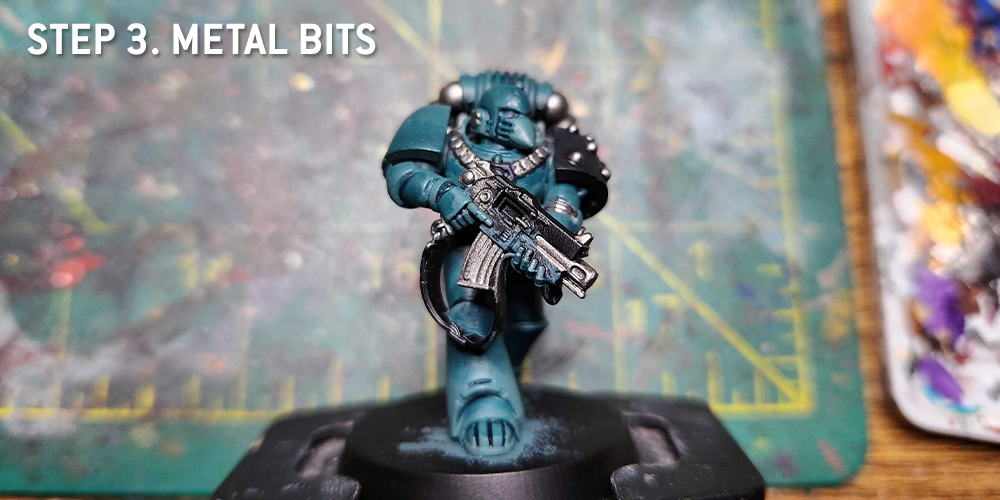
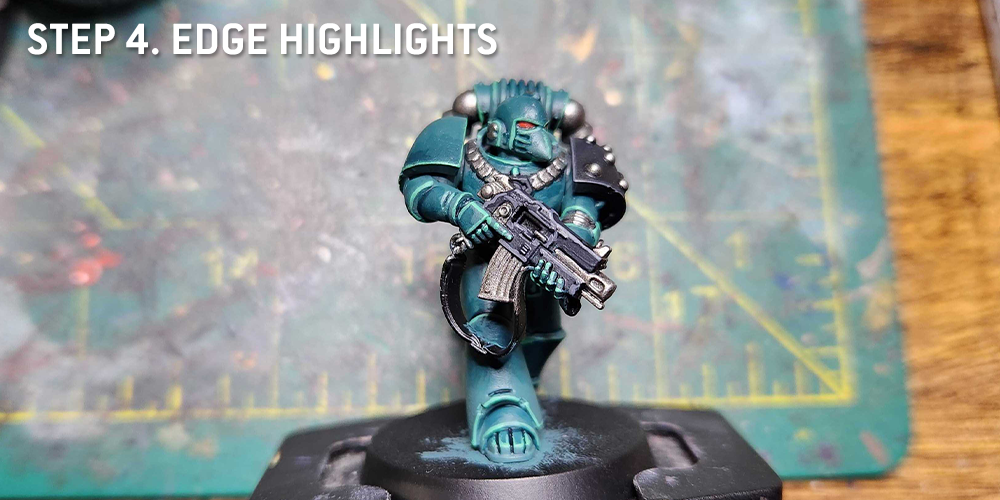
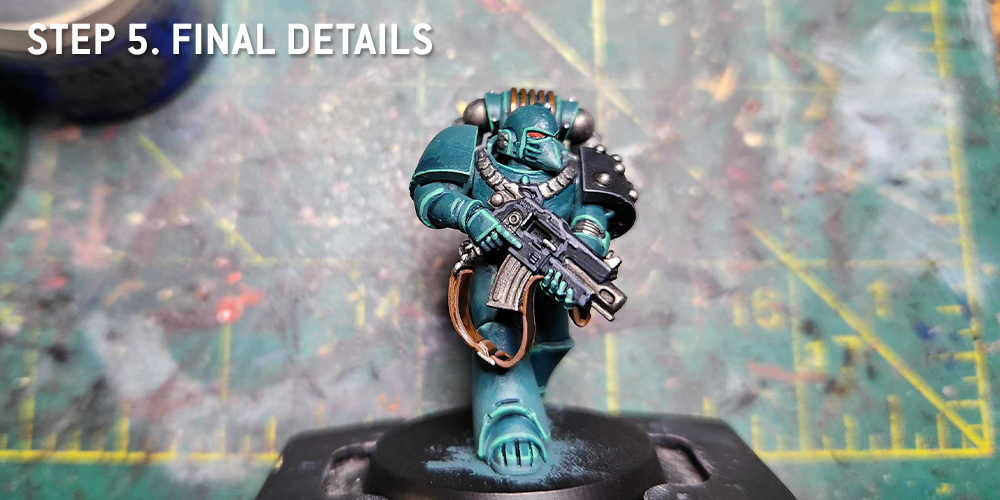
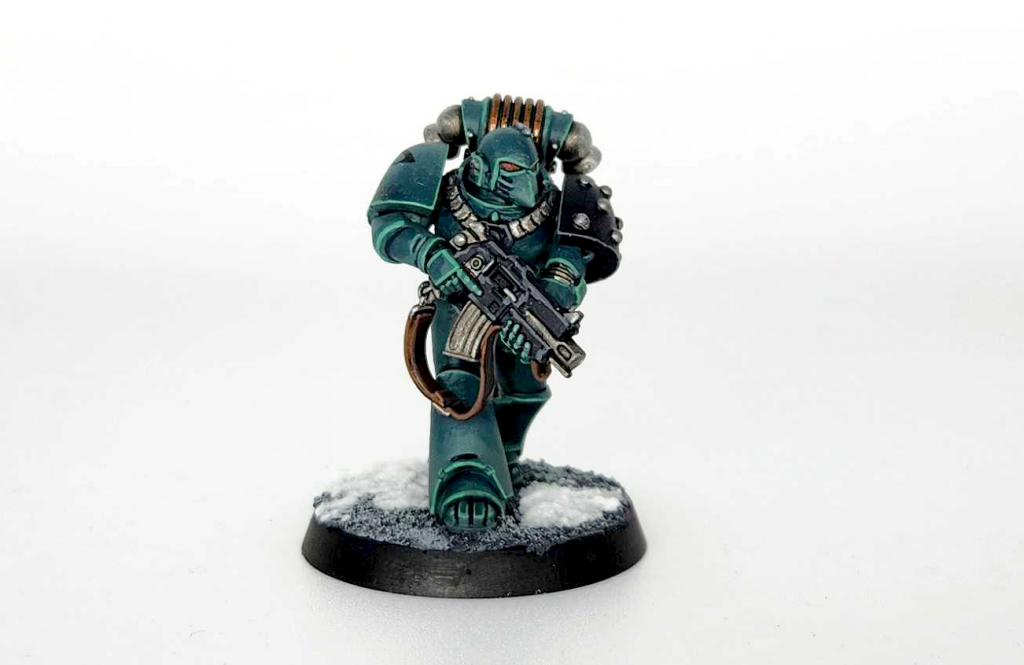
TheChirurgeon's Sons of Horus - Click to Expand While the Sons of Horus will get their own article, it’s worth including an example of them here just for completeness’ sake. The precursors to the Black Legion have an entire different (but very striking) paint scheme, using a blue-green color for their armor with a single black shoulder pad. I started by priming this model black. The big thing here is the armor. I start with a basecoat (really 2 thin coats) of Citadel’s Sons of Horus Green paint. I usually balk at using the named color but here it’s the perfect blue-green to start with. Next up it’s time to shade that armor. I’ll highlight the black parts – particularly the shoulder pad – with Corvus Black, and mix it with Black Legion Contrast to do progressive shades to make a smoother transition. For the armor I take a similar tack. I’ll shade the darker parts with a mix of Sons of Horus and Terradon Turquoise Contrast paint. In similar fashion I’ll come back and do progressively darker mixes to great a smoother transition and blended effect. Terradon Turquoise will also be perfect for hitting the recesses, though Drakenhof Nightshade will also work for that in a pinch. Time to get those metal bits. These are painted with Leadbelcher. This is also where I’ll paint the eye lenses. There just Mephiston Red with a small highlight of Evil Sunz Scarlet. This is where it comes together and the model really starts to pop. I edge highlight the armor with Sybarite Green. The black parts – the shoulder pad and gun – get an edge highlight of Mechanicus Standard Grey. Time to add those finishing touches. The metal bits get washed with Nuln Oil and then edge highlighted with Runefang Steel. The leather strap is Mournfang Brown washed with a mix of Agrax and Darkoath Flesh contrast, then edge highlighted with Cygor Brown. The coils on the backpack are Balthasar Gold with a slight shading of Agrax Earthshade. And that does it. The shading is a bit more complicated than I’ve done on most Heresy marines, but the overall effect is worth it, and it’s fairly easy to paint Sons of Horus that look great – it’s a very pretty scheme and shade of blue/green to work with.Step 1. Basecoats
Step 2. Shading
Step 3. The Metal Bits
Step 4. Edge Highlights
Step 5. Final Details
 The Black Legion have two special/named characters to work with, the Warmaster of Chaos and his Herald of the Apocalypse. Below you’ll find notes on painting Haarken and a link to an article on painting Abaddon the Despoiler.
Click here or on the banner above to visit How to Paint Everything: Abaddon.

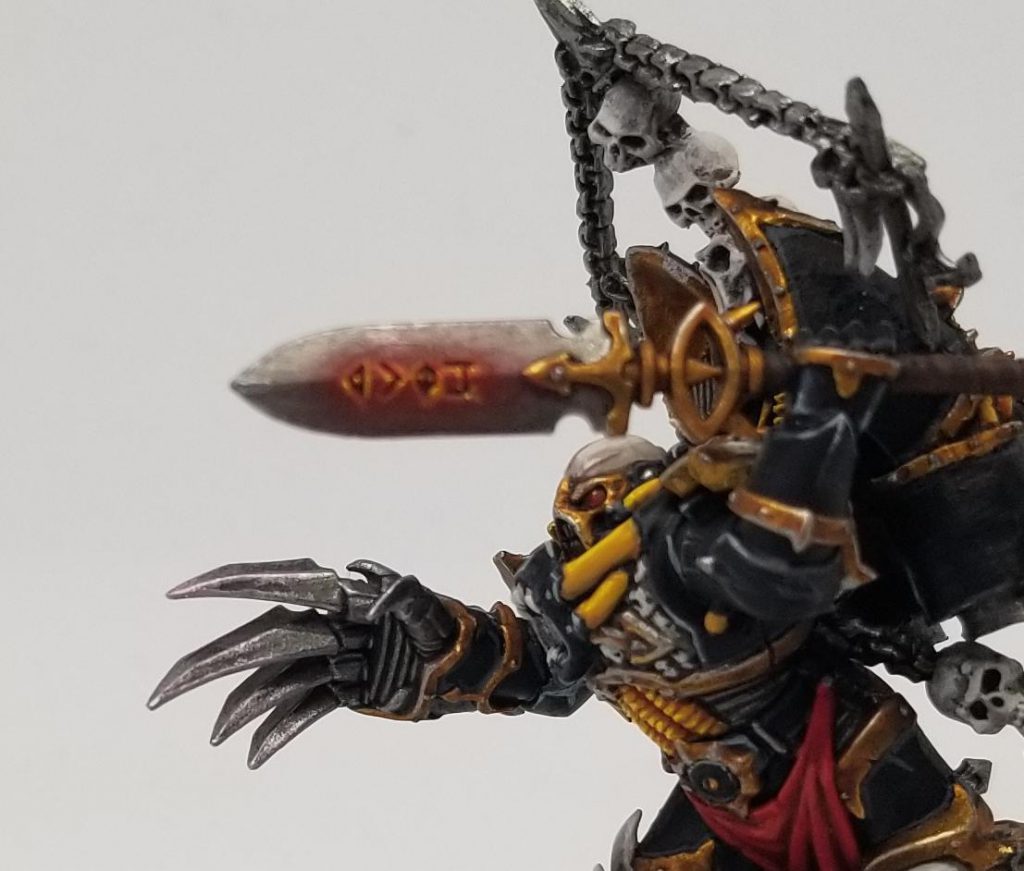
How to Paint Haarken - Click to Expand Haarken has a cool model but ultimately he’s not super different from any other Black Legion model when it comes to painting him – he just has more details and skulls than you’d normally see. There are a couple of notable areas here, though. The first is Haarken’s spear, the Helspear: These aren’t too bad to paint. I started here by painting the blade with Leadbelcher, then shaded it with Nuln Oil and highlighted it with Runefang Steel. For the runes I did a blend of Mephiston Red and Leadbelcher but these days I’d probably use Blood Angels Red contrast instead. The goal is to blend the metal into the red so you get an organic heating look. Paint the runes themselves with Blood Angels Contrast, then come back and edge highlight them. First with Fire Dragon Bright and then with Yriel Yellow and a touch of Flash Gitz Yellow. The brightest spots should be toward the middle of the blade. The other note is that my Haarken is using a resin backpack from the Finecast Chaos Lord with Jump Pack model; this is to make him fit visually with my Black Legion Raptors, who use the older metal models as opposed to the current plastic models.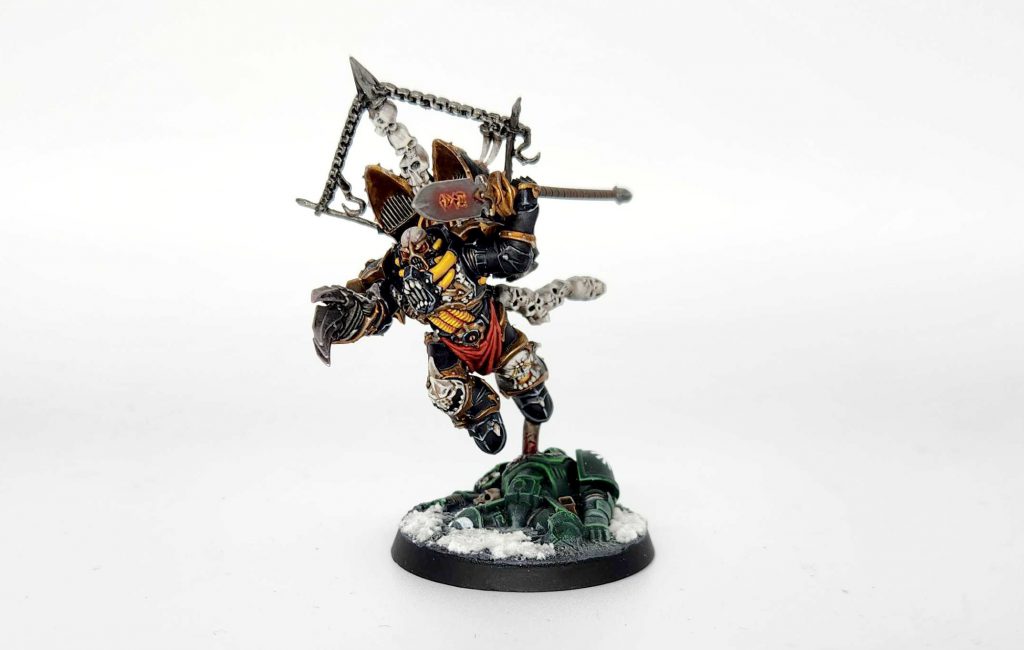
Final Thoughts
The Black Legion are a fun faction to paint, but an even more fun faction to convert. Despite what their black and gold appearance may suggest, they’re much more interesting than many other poster children factions when it comes to their heraldry and what you can do with them. If you keep in mind the various subfactions and warbands within the legion and how they interact, you’ll never run out of inspiration for how to paint your own.
Have any questions or feedback? Drop us a note in the comments below or email us at contact@goonhammer.com. And if you want regular updates in your inbox, subscribe to our newsletter.
