In our How to Paint Everything series, we look at how to paint well, everything! We look at different models and techniques and have multiple approaches to specific models. In today’s article, we’re looking at how to paint the superheroes and villains of Marvel’s Crisis Protocol.
The models in Atomic Mass Games’ Marvel Crisis Protocol (MCP) are, in short, a delight to paint. They are a slightly larger scale than many traditional tabletop minis – roughly 40mm or 1:43 – allowing for more detail and a bigger canvass to work on. The models are hard plastic that holds its details very well under primer.
The sculpts themselves are very clean and faithful to the characters, with the caveat that for the most part these are the comic book versions rather than the movie/tv versions. In most cases there’s very little difference thanks to corporate synergy but on some (Valkyrie in particular) it may be a little jarring. The good news is that there is certainly no shortage of reference images online whichever version you may prefer, or you can mash them up or create your own schemes.
Although painting the models is very enjoyable, assembling them can be significantly less so. The instructions included with some of the earlier releases (including the core box) did not include part numbers in the illustrations. Fortunately AMG has the assembly instructions available on their site. Armed with the instructions the pieces for together very nicely and they take any type of superglue or modeling glue you prefer to use.
But why, you may ask, do I need instructions? I’ve put together more little plastic dollies than you’ve had hot lunches, punk! The answer is that AMG has some kind of sadistic fetish for using teeny tiny bits. That’s not entirely a bad thing since having separate parts on the sprue allows for great detail, but some of these models are a serious pain in the ass to assemble. Shuri is the long standing champion of this category, with her hair being two separate pieces (not including her actual head) and her panther gauntlets having separate bits for the jaws. Baron Zemo has two tiny elbow pads for his jacket. Toad’s tongue is a separate piece from his head. The best advice when assembling these models is to only clip one bit off at a time, and think if you’re better off gluing any given piece while it is still attached to the sprue.
So with that out of the way, let’s look at some of the styles and techniques that some folks loitering around the Goonhammer office used on their heroes and villains of MCP!
Head58’s Comic Book Style
When I started painting my MCP models I decided I wanted to try something different. Since these are comic book characters I wanted to try making them look more comic bookish. I took a lot of inspiration from painting videos from Epic Duck Studios and Sorostro but it’s important to note I’m really not very good at painting. I wanted to push my highlights hard, use brighter colors than usual, experiment with black lining, and try non-metal metallics. I’m going for the classic costumes from the comics more than the look of the films in most cases, as I’m a dusty old mummy who has been a comics nerd since the mid ‘70s. My basic rules for MCP are no washes, Contrast, or metallic paints. I have painted about 35 models, and I have frequently regretted setting these rules.
Here’s that theory in practice on Magneto. I love the model, with his classic “I’m gonna murder a whole lot of Homo Sapiens” pose. Magneto’s cape is attached to the girders he’s lifting up behind him, making it look like the model is levitating. Nice.
First piece of advice on Mags: don’t attach his body to his cape before painting. It’s much easier to paint his back and the inside of the cape if you leave them separate (and if you didn’t, put him in the freezer for a bit and if you used superglue you may be able to pop him off. I’m speaking from experience here).
I started with a base of Khorne Red. I know I said brighter colors but since I’m not using washes this will give me the darker low points on his costume. For the purple parts I used Xereus Purple.
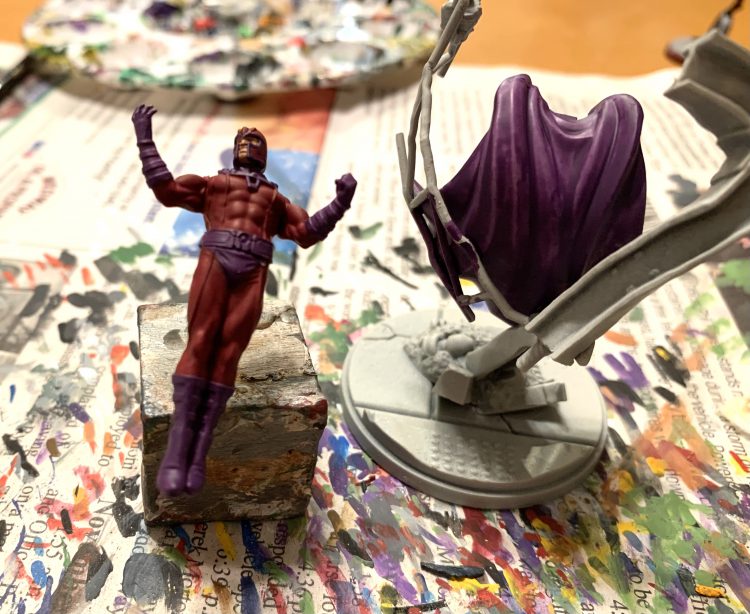
For my first layer of highlights I moved to Mephiston Red and Vallejo Model Color Royal Purple. Then smaller highlights with Evil Sun Scarlet and Genestealer Purple. I don’t do any blending on these models, preferring to keep colors blocky more like a comic book.
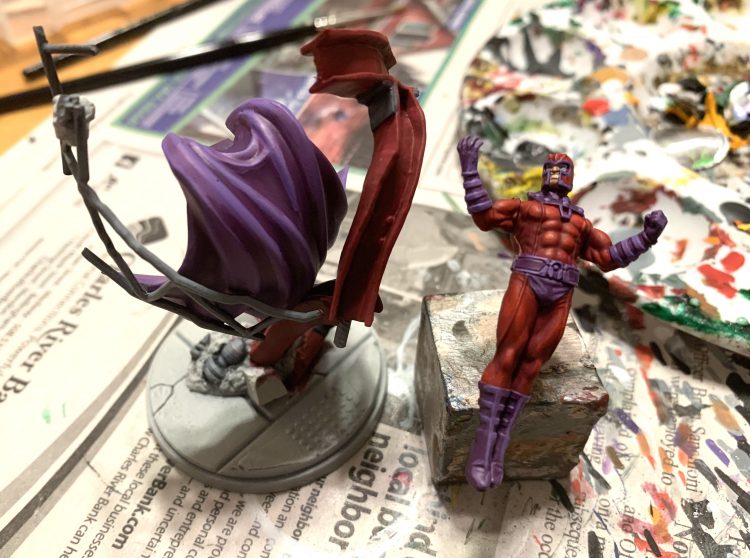
Third highlights were VMC Scarlet and VMC Blue Violet. Again the highlights are smaller each time, on the spots that would get the most light. I touched the rivets on his collar plate lightly with Vallejo Model Air Pale Blue Grey – they’re raised hard surfaces and would be more reflective than the plater they’re on.
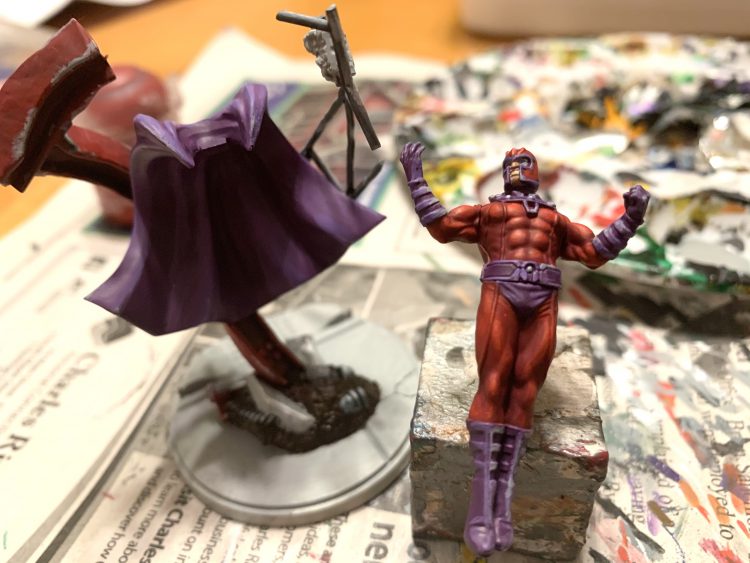
Now the black line work. I use Pigma Micron micropens to basically outline anywhere there’s a transition from one color to another and any parts that I want to stand out, like the vertical lines on his costume and his collar rivets. I started off using black ink and a small brush for this but I don’t have the fine control and ended up doing a LOT of cleanup. The pens do gum up after a couple models, but they’re not that expensive and I’m not doing hundreds of models here.
I also use black ink (Vallejo Game Ink) for larger shadows inside Magneto’s cape, under his arms, and behind him. I let the ink come about 60% of the way around his legs so you can see a black outline when looking at him from the front. This is one of those tricks I picked up from watching videos, I’d have never come up with it on my own.
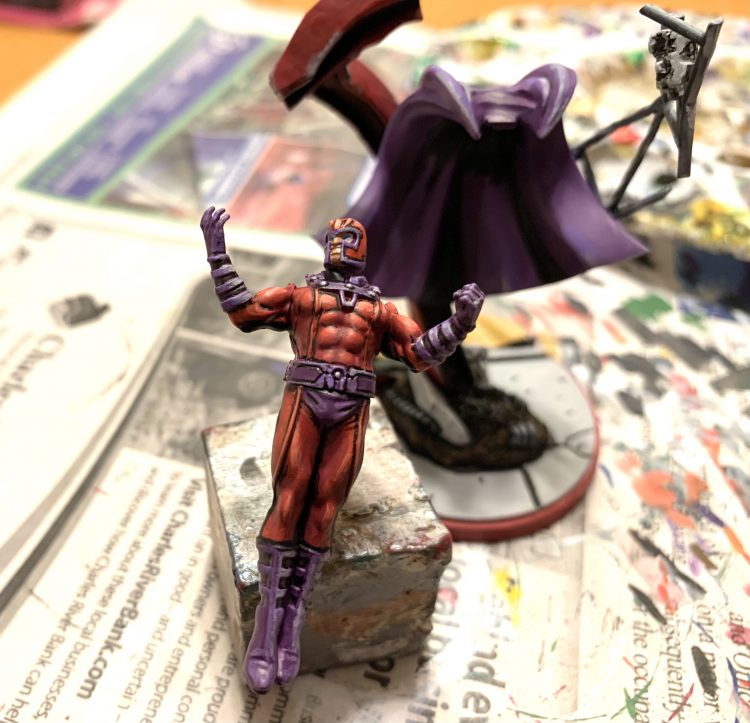
Once the ink was dry I did some touch ups and did the final highlights. I mixed the VMC Scarlet with a bit of white for the crest on his helmet and some other very small marks on the most reflective bits of his costume. The gloves, cape, and broker of his helmet got small highlights of VMA Pale Blue Grey.
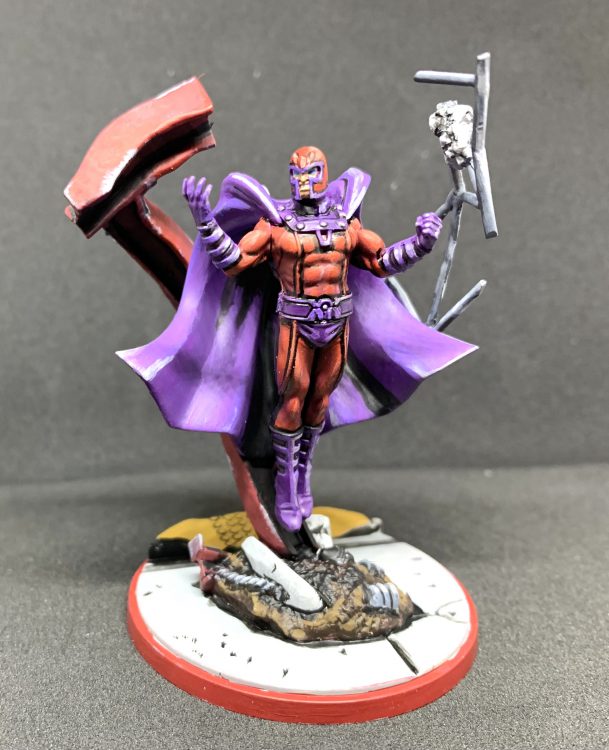
I’m not happy with the NMM on the metal rebar behind Magneto, I’ll probably go back and redo that but the rest gives the comic book effect I’m looking for and looks pretty decent at three or four feet away, which is about the best I can hope for!
Zuul the Cat’s “Simple But Effective” Method
One of my favorite things about painting the MCP models is that they’re based on comic book characters and in my opinion, that means they should be bright and vibrant. To that end, all the models I’ve painted are done by using a handful of primary colors over a zenithal base, lightened, and layered with more and more white mixed in as you go. The final step for all models is giving them multiple layers of Ammo by MiG’s Lucky Ultra-Matte Varnish applied through an airbrush with no dilution. The steps below seem very simple, but in the end it’s effective! In addition, the only wash I’ve used on any of these models is Aly’s Brown Liquid, for which you can find the recipe here: https://alystoysoldiers.blogspot.com/2017/08/the-war-of-spanish-succession-prussian.html
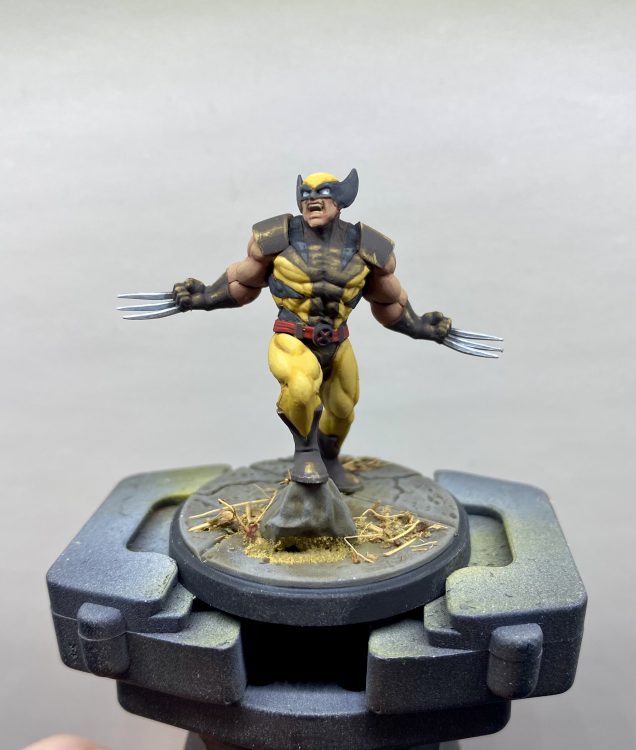
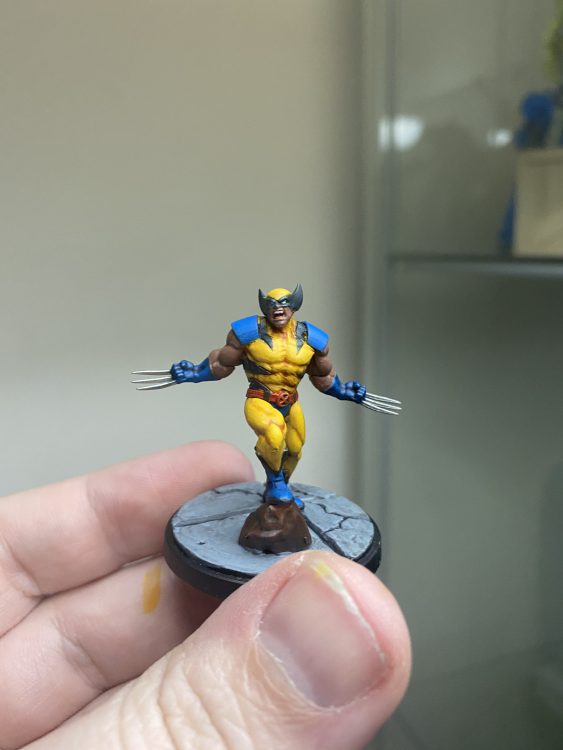
Wolverine & Sabretooth: These models are largely the same. For the yellow, I simply did a base layer of Averland Sunset then washed it with Aly’s Brown Liquid. Following that, I brought up the raised areas where the sun would hit with Averland Sunset again then successively layered Averland Sunset mixed with White Scar until I reached a vibrant yellow on the highest points.
For the browns, I didn’t want them to exactly match so I used two different ones. On Wolverine, I used Vallejo 70.740 Camouflage Middle Brown, washed once again with Aly’s Brown Liquid and layered the same base color mixed with more and more White Scar until I reached a happy point. For Sabretooth, I wanted his brown to be a little warmer, so I used Vallejo 70.940 Saddle Brown mixed with just a tiny bit of black to darken it down a bit. Washed with Aly’s Brown Liquid then layered back up with the base color and highlighted with more White Scar mixed in.
For the skin tone on both, I simply used Bugman’s Glow, washed with Aly’s Brown Liquid then layered back up with Bugman’s Glow mixed with White Scar.
For the final details on each: The fur on Sabretooth was just Corax White washed with Aly’s Brown Liquid. No layering on that one. For Wolverine’s belt, Mephiston Red washed with Aly’s Brown Liquid. Also, no layering on that! Lastly, Wolverine’s Claws were done by doing a base coat of Scale 75’s Scale Color Speed Metal and highlighted with Scale 75’s Scale Color White Alchemy.
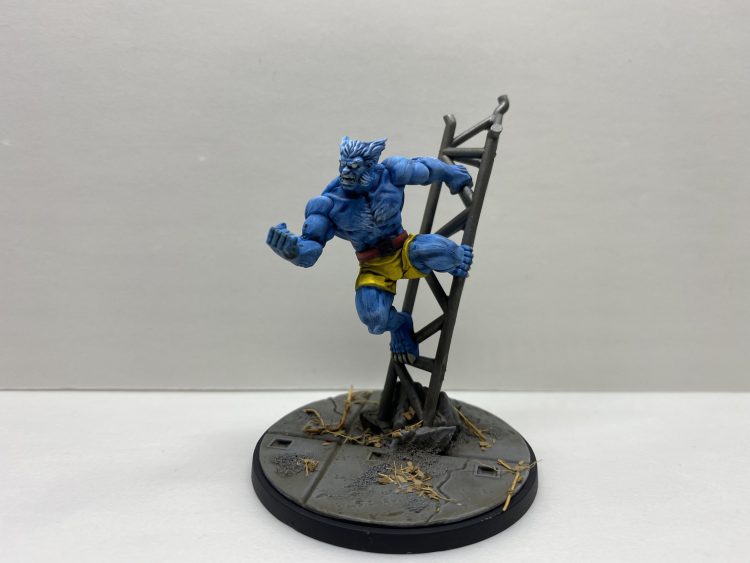
Beast & Mystique: For both Mystique & Beast, I decided to airbrush their base tones because both of their models were primarily blue. Using Badger Minitaire Airbrush Nautilus Blue paint as a base tone, I coated beast for his base coat. For Mystique, she got the same base color mixed in with some Vallejo Air White to lighten it up considerably. Beast was then given a wash of Aly’s Brown Liquid mixed with a little more Drakenhof Nightshade (2-1 ratio). The raised areas were then layered with Nautilus Blue mixed with a little White Scar. Finally, as a last step, I loaded up my dry brush with a nearly white mix of Nautilus Blue and dry brushed the fur areas on Beast. For Mystique, her skin tones were simply layered with Nautilus Blue and White Scar. Since her skin is mostly smooth with no recesses, I didn’t give her a wash at all.
For Mystiques clothes, I gave them a base coat of Corax White, washed them with Aly’s Brown Liquid diluted with Contrast Medium (2-1 ratio) then layered up with just a single layer of White Scar. Mystique’s hair was Jokaero Orange mixed with Mephiston Red then washed with Aly’s Brown Liquid. Her lips (which were hard to do!) are just Mephiston Red. Lastly, her eyes were done by doing a dot of White Scar in the middle of each then doing a thin layer of Contrast Talassar Blue.
For Beasts shorts: I followed the same method as listed above for Wolverine & Sabretooth’s yellows. His fingernails & toenails (claws?) are Karak Stone washed with Aly’s Brown Liquid then layered back up again with Karak Stone.
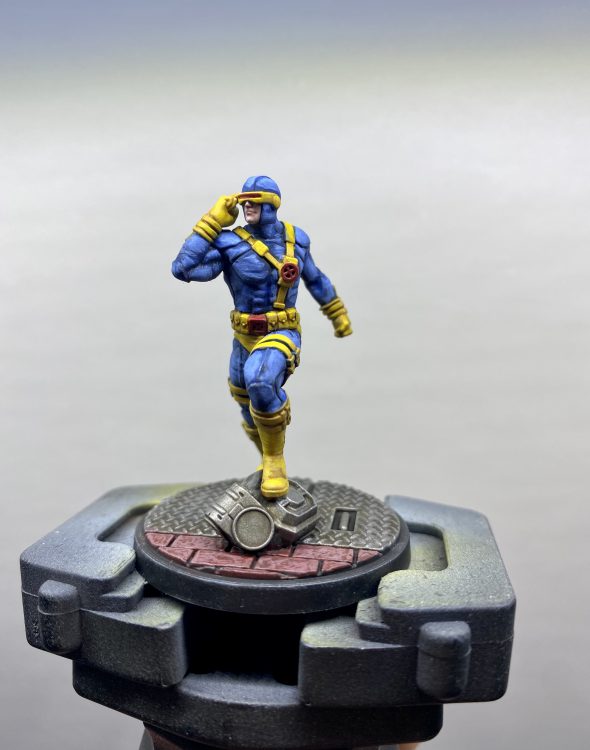
Cyclops & Storm: Out of all the models I’ve painted so far, I think I did the best with Cyclops. Following the same pattern above, I decided to stick with a primary color and just highlight by adding white into the mix. For the yellow, I followed the same pattern as above for Wolverine & Sabretooths yellows. For the blue of Cyclops’ suit, I used Caledor Sky thinned with a bit of acrylic thinner and applied over the Zenithal highlight. The skin tone was a Bugman’s Glow base which I then layered with White Scar added in prior to washing the entire model with Aly’s Brown Liquid, and then layered the raised areas of the blue suit by adding in White Scar to the Caledor Sky. Lastly, the reds on the model were just Mephiston Red with no highlight.
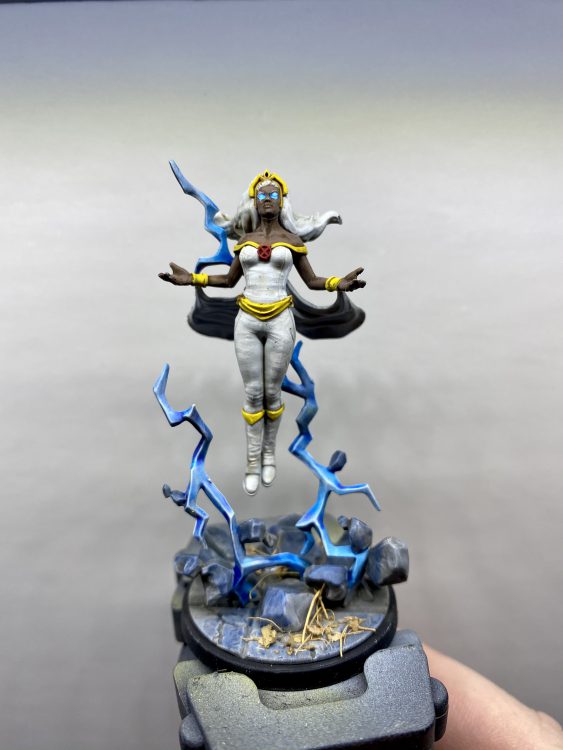
Storm was by far the easiest model of the lot so far. For her hair and outfit, the white is a Corax White base coat washed with a thinned down mixture of Aly’s Brown Liquid and Contrast Medium (1-3 part ratio) and layered back up with White Scar. The yellow is the same as all the other yellows. For Storm’s skin, I used the base tone of Vallejo 70.822 German Camouflage Black Brown. I then layered the base coat by adding in some White Scar before doing an undiluted wash of Aly’s Brown Liquid. For her eyes & lightning, these were done by adding the Contrast Paint Talassar Blue over Corax White.
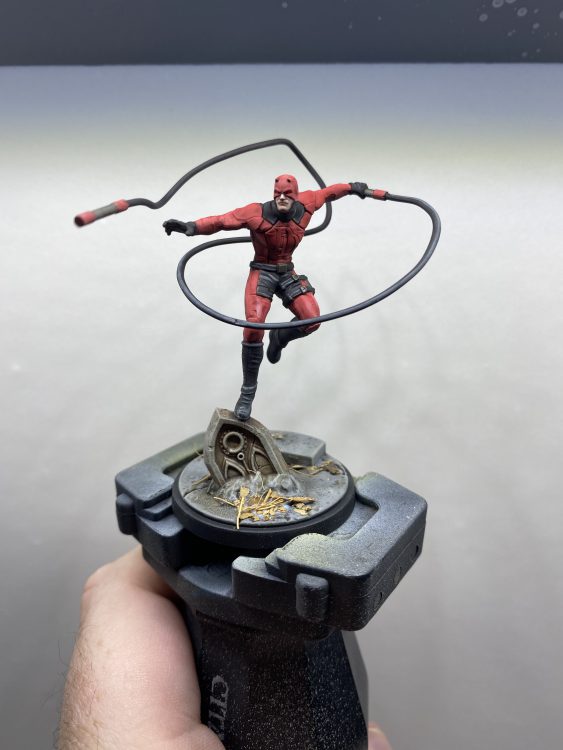
Daredevil & Bullseye: I’m a huge fan of the Netflix Daredevil show and so I wanted his costume to be inspired by the one from the show. For the red, I a few thinned layers of Vallejo Model Air 71.003 Ferrari Red to achieve a really vibrant look. That was as far as I went for the red, allowing the Zenithal priming to highlight it for me. For all the black parts I mixed a little bit of Vallejo 70.898 Dark Sea Blue with Vallejo 70.950 Black. This was then highlighted by adding some White Scar into the mix. Lastly, for his flesh, I base coated with Bugman’s Glow, washed with Aly’s Brown Liquid and layered back up by mixing in White Scar to Bugman’s Glow.
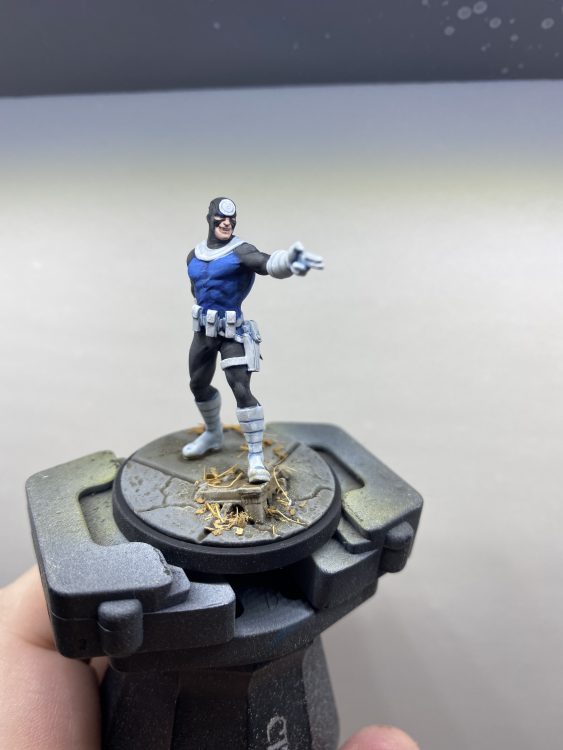
For Bullseye, I decided to do another costume of his I found online which was a blue/black/white outfit. The white parts were done last. For the black, I once again mixed some Vallejo 70.898 Dark Sea Blue with Vallejo 70.950 Black. For the blue, I used Kantor Blue. The skin tones were then applied following the same as some of the models above, of a base of Bugman’s Glow. The entire model was then washed with Aly’s Brown LIquid and layered back up by adding White Scar into the base colors to achieve a highlight. For the black areas on Bullseye, I didn’t do as many highlight layers as I did on other colors because I wanted a subtle color change that wasn’t too bright. Lastly, for the white areas I base coated them with Corax White and then shaded the areas using Contrast Paint Apothecary White. These were then highlighted with a thinned down White Scar.
Ryolnir’s “Trying Out New Things” Method
A large majority of my life has been consumed by Marvel and its properties, including their various plastic forms. I’ve worked on Marvel projects, collected Marvel toys, played Marvel games, and watched Marvel comics in some form for most of my life. As soon as MCP came out I bought the Core set and expansions and then… it sat there on my shelf! I was in the middle of my big Crimson Fists project of the last two years and didn’t take a break for my beloved Marvel Heroes. But I kept buying the expansions! And I even played some games! But the only model I ended up painting was Venom.
Starting two weeks ago, I started on my Crisis Protocol journey again! I went out and bought a bunch of new Vallejo paint and set out to complete a new goal: paint all these models – and flex my painting muscles in ways I never get to with Space Marines. So here’s some examples of the fruits of my labor and some guides.
MODOK, Wasp, and Wolverine – Learning to Paint Yellow
My first project with MCP was learning how to paint yellow. I’d watched Goobertown Hobbies “paint yellow by priming pink” video a ton of times and wanted to give it a try, so I set out and purchase Badger’s Stynylrez Pink primer, Liquitex Muted Pink ink and two shades of Daley Rowney’s FW inks: Indian Yellow and Brilliant Yellow.
My goal for these three was to use the yellows uniquely for each one. I wanted MODOK to have a transition of dark to lighter yellow, Wasp to pop with a nice bright yellow, and Wolverine to have a bit of a transition. I found success on MODOK and Wasp, but I wasn’t super happy with Wolverine as I made some tactical errors in application that I can show off. I think he still looked cool, but I ended up repainting him entirely which I’ll show below.
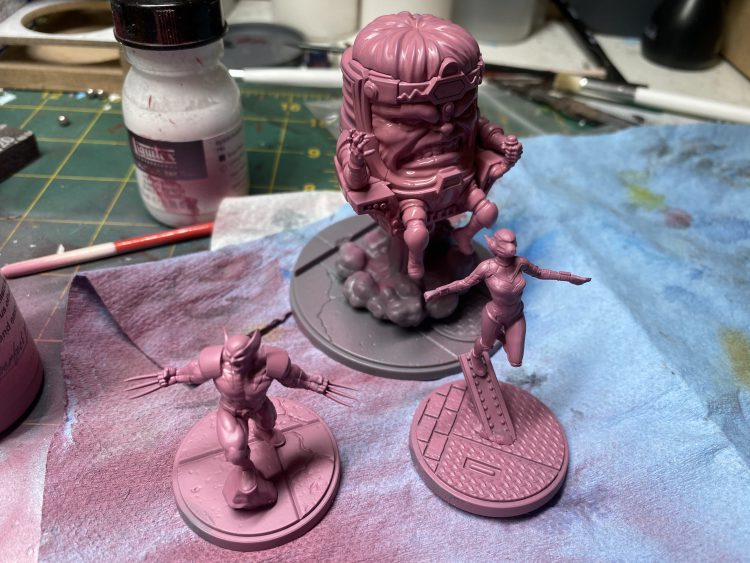
I primed them pink, then used Liquitex Titanium White to establish highlights. From there, I use Muted Pink to establish shadows. Wherever you paint the Muted Pink you’ll find your yellow will be darker and leaning towards orange. If you’re going for a yellow that really pops, use it sparingly, under limbs, between legs, etc. Give the inks some extra time to try over normal paints – they’re thin and quite wet.
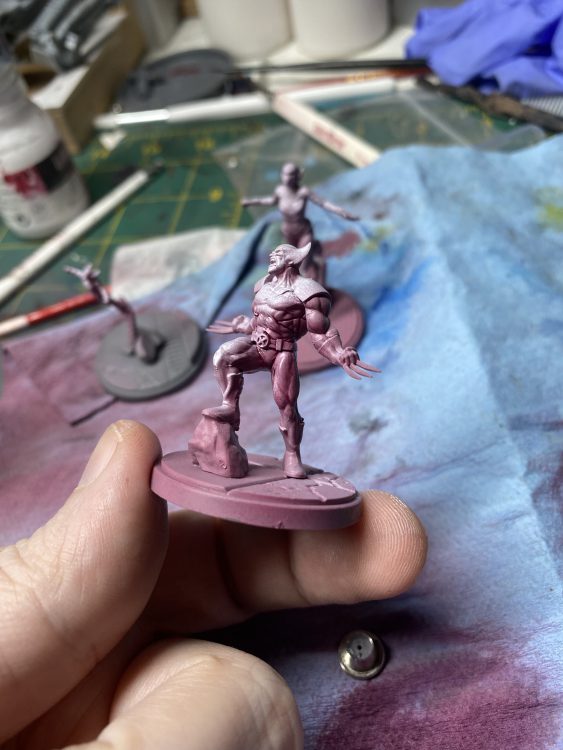
From there, I started with Indian Yellow on MODOK and Wolverine’s entire body. From there, I should have let Wolverine dry for longer before spraying over with Brilliant Yellow, but I didn’t and it sort of wet blended, resulting in him being a bit splotchy. Let your models dry!
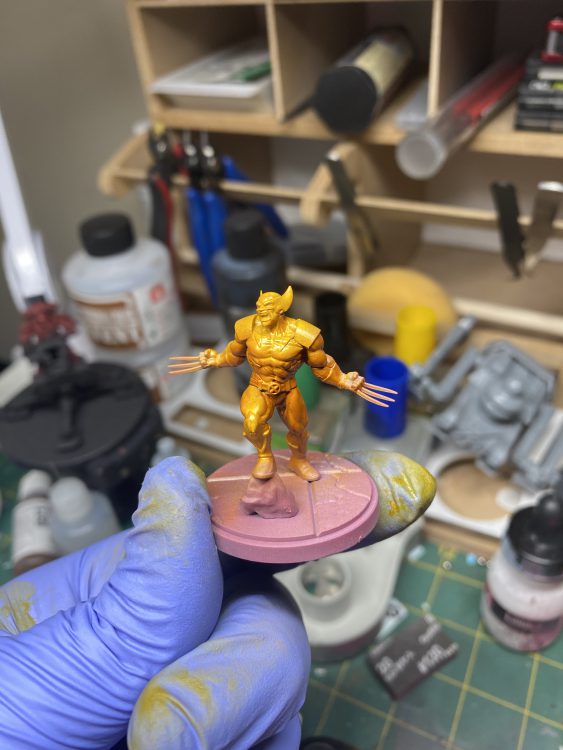
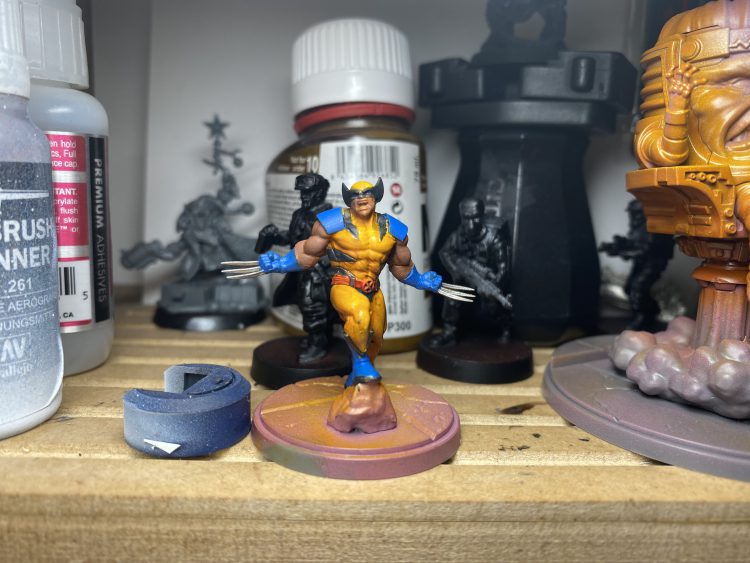
For Wasp, I simply sprayed her with Brilliant Yellow as I wanted her to be much brighter and her yellow area was much smaller, so I wasn’t interest in creating a transition.
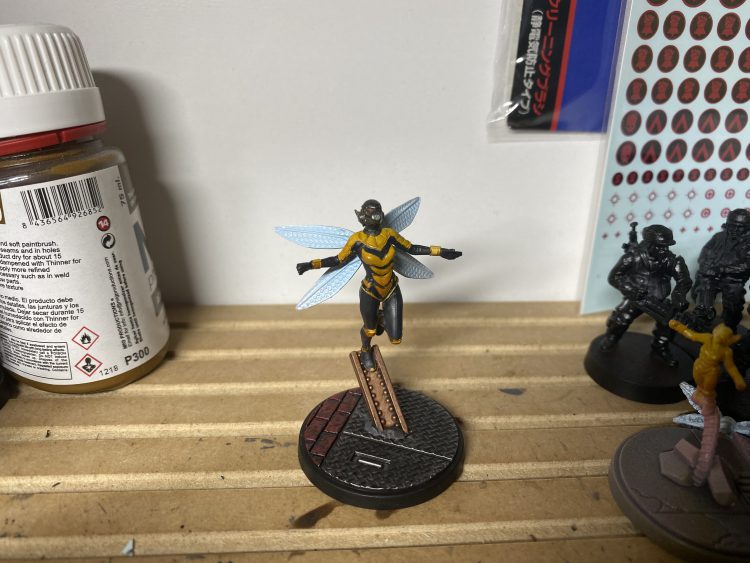
As an epilogue for Wolverine, he turned out pretty cool with the Indian/Brilliant Ink blend but I wanted to go a different direction with him. I ended up hand-painting over his ink yellow with a mix of Citadel’s Averland Sunset & Yriel Yellow. I made sure to paint around the blended ink yellow in the recesses of his muscles which created a lovely effect that I’m quite happy with.
Hulk & Thor – Going Further Beyond
The next two heroes were much simpler but were more about pushing what I usually do. With my Crimson Fists, I have a very regimented color scheme that I always paint the same way. I never push highlights, do any blending, or anything. I am happy with the way they look as an army and I don’t want them to stand out.
For Hulk, I primed him with Stynylrez Black (I would recommend grey but old habits die hard from painting dark blue Space Marines), hit him with a heavy Zenithal highlight all over any parts you think light should hit harder, and went to town mixing paints.
My final green mixture ended up being a full basecoat of Vallejo’s Medium Olive, and then spraying a mixture of Vallejo Model Color Intermediate Green and Vallejo Game Color Escorpena Green. How you formulate this green is entirely up to you, but mixing two greens like this allowed me to formulate my own highlight paint just by changing the ratio.
For his pants, I masked off the entire green lad and airbrush some Vallejo Royal Purple and some Alien Purple. Royal Purple is quite dark so I wanted to give it a little bit of light. I then highlighted it with pure alien purple. Be careful removing the tape and be sure to let your models cure for a full 24 hours after priming them. I definitely goofed up and ripped some paint off Hulk, even through his primer. Thankfully Stylnylrez Black brushes on beautifully and self-levels.
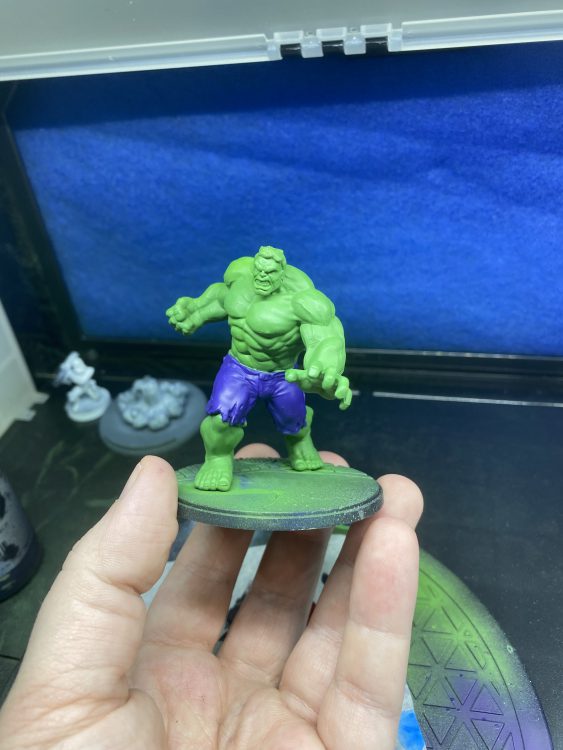
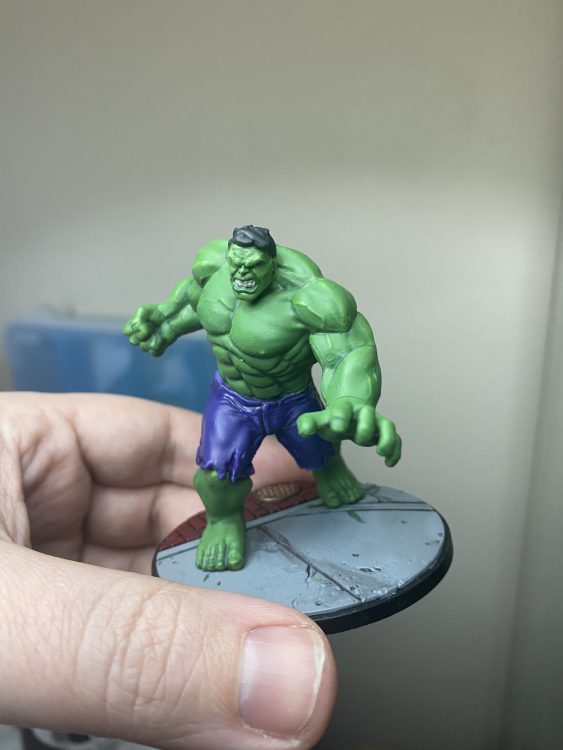
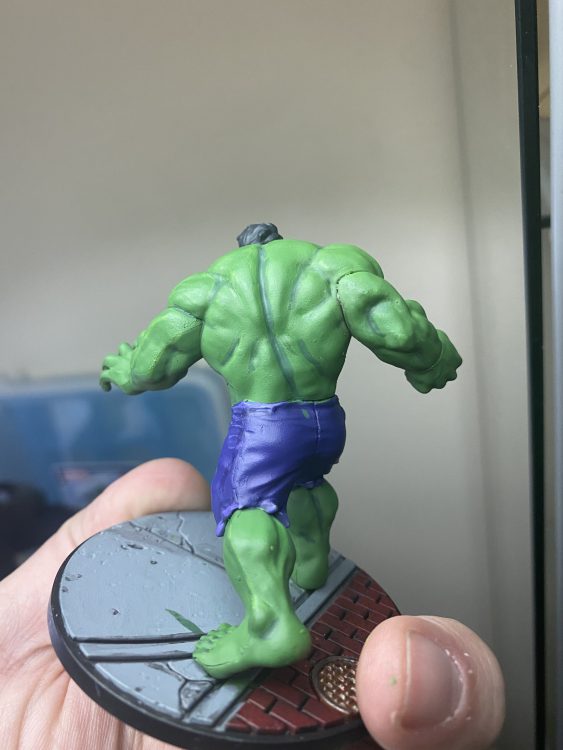
Where I really struggled with Hulk is how to shade his muscles! I’ve rarely ever shaded muscles before, let alone green ones. Goonhammer’s own Brin encouraged me to try mixing my green with dark blue, so I mixed a heavily thinned Night Lords Blue and VMC Intermediate Green. I ran it into the recesses of his muscles and cleaned up. From there, I used more Escorpena Green in my green mixture to create a highlight color for his muscles and face.
Lastly, Thor! I don’t have much special to say about Thor. I primed him black, hit him with a Zenithal highlight, and then created a blue-black with Vallejo Model Color’s Black-Grey, VMC Black, and VMC Turquoise. I actually prepped a group of models like this all at once as you can see.
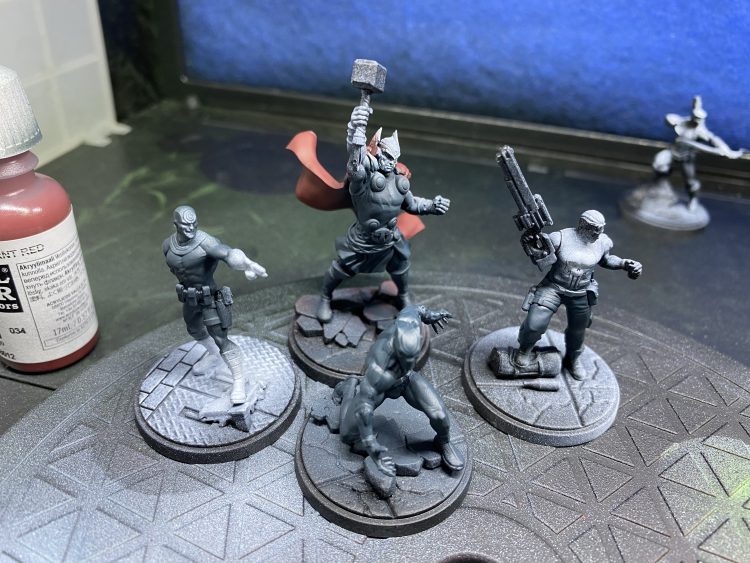
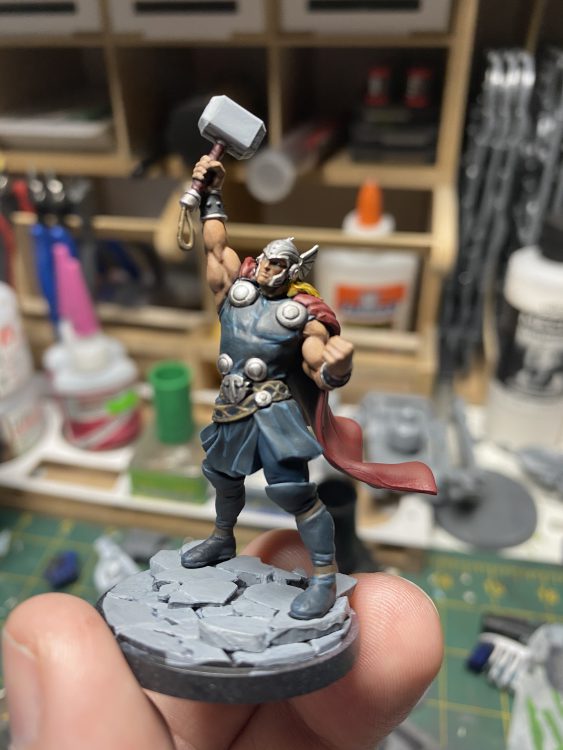
For Thor it was just about fundamentals and pushing them. His skin was Vallejo Game Air Barbarian skin, and then a mix of Knight Questor Flesh and Cadian Fleshtone over it. Between those layers, I used a smaller brush to paint Guilliman Flesh into the recesses of his muscles as a wash and then carefully painted around them. I finished with a highlight of just Cadian Fleshtone towards the upper parts of his muscles and face. His cape is Vallejo Burnt Red highlighted with Gory Red and then Wazdakka Red. I did not push these are far as I could have, honestly. Be better than me.
His cloth is highlighted first with a mixture of Black-Grey and Turquoise (taking the pure black out of it), and then finally with Citadel’s Thunderhawk Blue. His golden hair is just Wraithbone, Iyanden Yellow contrast, and an all-over wash of Seraphim Sepia. For his eyes, I used Hoeth Blue and then a line highlight in the center of Blue Horror. His belt is VMC Burnt Umber and then highlight with a mix of Burnt Umber and Yellow Umber. The big lesson here was just to push push push highlights. See that muscle? Could it be highlighted more? What about that nice fold in his tunic? Make it glow, baby! (I was a coward and did not make his hammer glow. Sorry Zuul.)
PaintVagrant’s Video Tutorials on the Black Order
Goonhammer author PaintVagrant has his own YouTube channel where he occasionally covers painting models from different game systems. He’s done three videos on how to paint Thanos and The Black Order, which you can find below. He’s done a great job with these, except for his Skrull green Thanos, which is an affront to nature, even if it was part of the Earth X canon for Thanos.
We hope these examples have given you some inspiration for painting up your own MCP models. As always, if you have any questions or feedback, drop us a note in the comments below or email us at contact@goonhammer.com.


You must be logged in to post a comment.