So you’ve seen the movie and now you know with absolute certainty where Napoleon went wrong. You can, and will, do better. It’s time to get into real wargaming. Welcome to Napoleonics.
This article is part of our Getting Started: Napoleonics guide.

If you’re playing Napoleonics, you probably want to be painting some French. Of all the combatant nations, they’re the one that defines the period – Napoleon’s succession of triumphs, follies, victories and shattering defeats were all played out by the soldiers of the Grand Armee.
The French Army was highly varied between the War of the First Coalition (1792-1797) and the Seventh Coalition (The Hundred Days – 1815). They took to the field in many forms – an elite, highly trained force, a mix of young conscripts and grizzled veterans, a rowdy citizen army and a hastily mustered last-gasp of whoeever could be brought to arms under the tricolore.
In all that time, uniforms and colours varied by unit type, regiment and era, but the core French infantry uniform remained at least superficially similar. This guide will address the classic French blue of Line, Light and Veteran infantry, which can also be used for artillery crew.
As in all of our Napoleonics painting guides, we’re going to recommend picking up a Uniform guide from Osprey. Different units had different colours, facings and details, so if you’re aiming for historical accuracy, get a reference book for your army first!
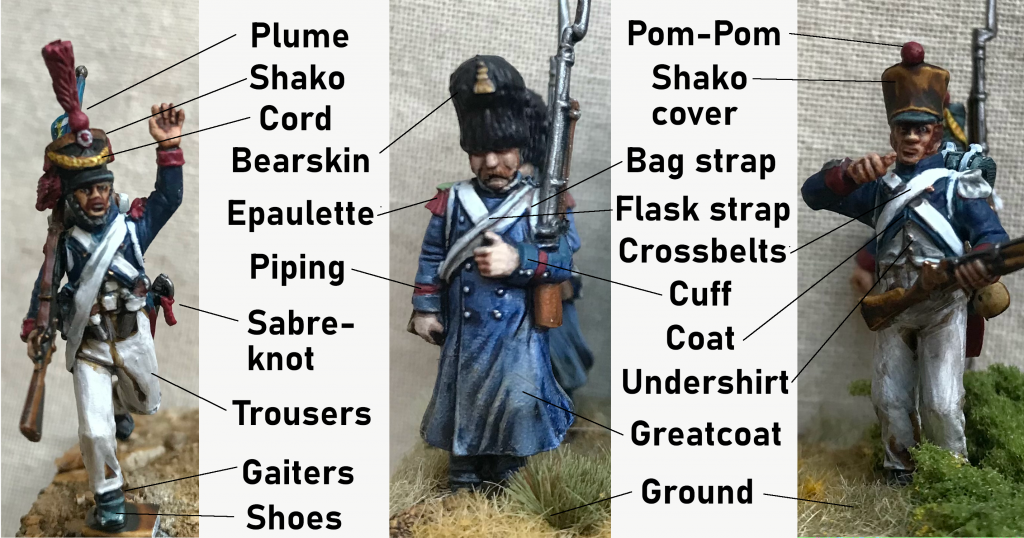
We will use a little Napoleonic uniform terminology in this article, so here’s our handy French Uniform reference card for guidance.
Lenoon’s Batch Painting Method
The French line of red, blue and white looks better than any other Napoleonic army, and for visual impact you’ll not do better than France! This scheme will give you a classic French look quick enough to batch paint in battalions of 20-30. We’ll paint this example as a line Fusilier of the 2nd Company of his regiment, with a nice bright blue pom-pom. I started him off before noticing the ENORMOUS mould line around the arm, so please forgive that!
Click to Expand Lenoon's Batch Painting MethodStep 1. Basecoats
I primed my examples with Citadel Wraithbone. This provides a good light primer colour for basecoats, but it also provides our base colour for cotton, wool and white areas on the model.
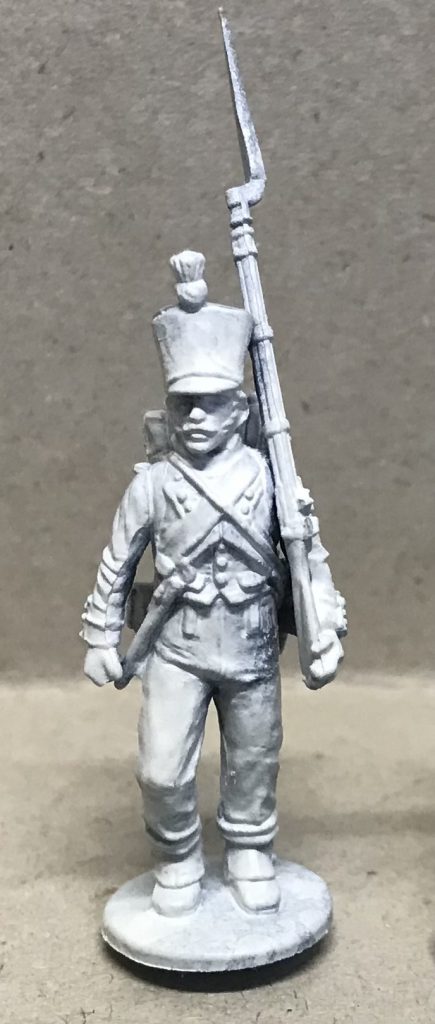
Block in the colours starting from the Trousers and then moving on to the jacket. Be careful with painting the jacket – it’s overlain by several areas we’ll eventually have bright white, so try to be neat otherwise there’ll be a lot of clearing up to do.
Jacket (habite, or habite-veste depending on the Uniform) and Pom-Pom – Citadel Stegadon Scale Green
Trousers – Citadel Contrast Aggaros Dunes
Wood (Gun) and Backpack – Citadel Contrast Snakebite Lieather
Shoes – Abaddon Black
Shako, Gun Metal and Cartridge Box – Citadel Black Templar
Cuffs, Turnbacks and Collar – Citadel Word Bearers red
Lapels and straps – Citadel Nuln Oil
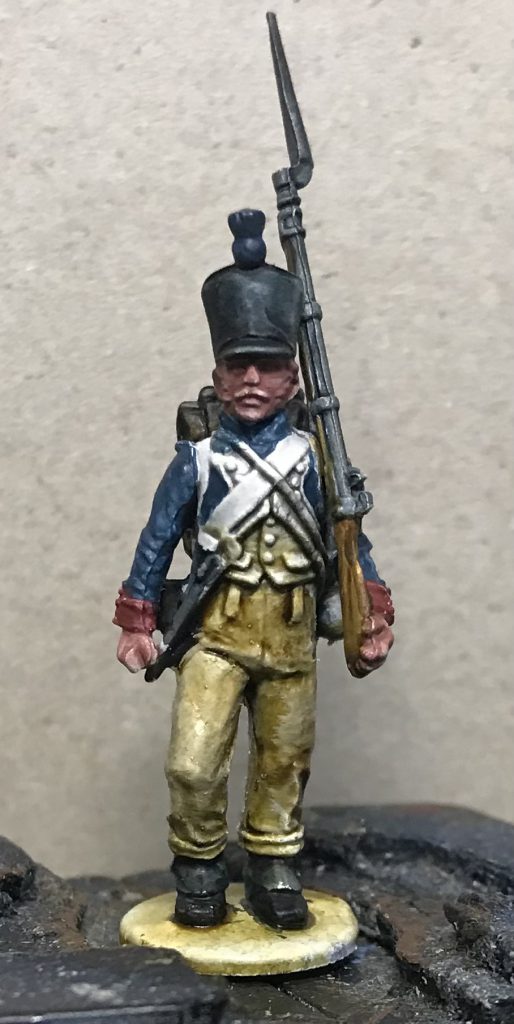
Using Nuln Oil on the straps helps to give them some definition which will make painting a lot easier, as well as shading the recesses between bag straps and cross belts. It’ll also show up any areas of jacket you’ve missed, so once the Nuln Oil is dry, go back to fill these in with Stegadon Scale Green.
Step 2. Colour
Here we’re going to go back to most of the colours we’ve blocked in in order to make them more intense. If this was a scheme for a smaller army, it’d be all about highlights, but instead this is about making a block look good as a whole, so every colour is saturated, clear and distinct.
Jacket – Contrast Ultramarines Blue
Red areas – Citadel Evil Suns Scarlet
Lapels, Bag Straps and Cross Belts – highlight with Citadel White Scar
Trousers – highlight (messy!) with Citadel Wraithbone
Pom-Pom – citadel Ahriman blue
Gun metal – Citadel Boltgun Metal
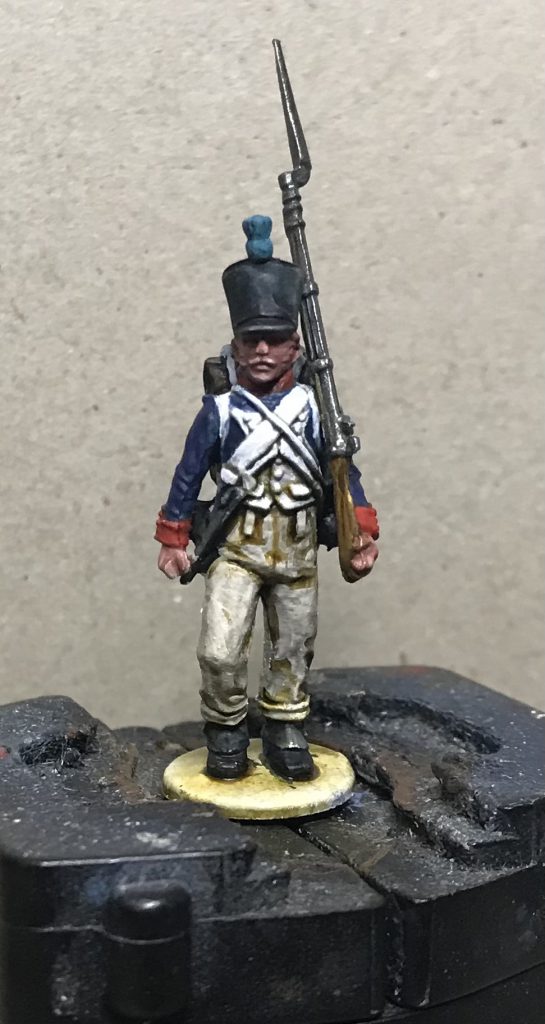
Don’t worry about highlighting the Red areas, just layer on with Evil Suns Scarlet. When applying the white be careful to let the gaps between lapel, strap and cross belt keep some of the shade applied with the Nuln Oil. Otherwise they’ll end up a mass of flat white – if this does happen, just apply some watered down Nuln Oil, because that generally fixes all hobby ills.
Using the Contrast Blue is an interesting one – it’s lighter than the basecoat, so it doesn’t provide shade, but it’s not light enough to pool in the recesses and produce weird reverse-highlights. Instead, it’s blue enough and transparent enough to just really up the intensity of the blue, and the jacket has gone from dark and faded to a deep and striking blue.
Step 3. Colour detail and Skin
Time to add the same level of colour depth and detail to smaller areas of colour. This is where neatness really starts to come in handy, so while this is still a quick scheme, take your time over this one, particularly with the roll straps on top of the bag. You can actually see in the picture I took of this stage “complete” that I had to go back and fill in one of the straps later – it’s things like this that really take the wind out of your sails when batch painting.
Red areas – wash with 1:1 Fyreslayer flesh and water
Skin – light highlight with Army Painter Barbarian Flesh
Bayonet Scabbard – Black Templar Contrast
Roll Straps – White scar
Turnbacks – Fill in Wraithbone then white*
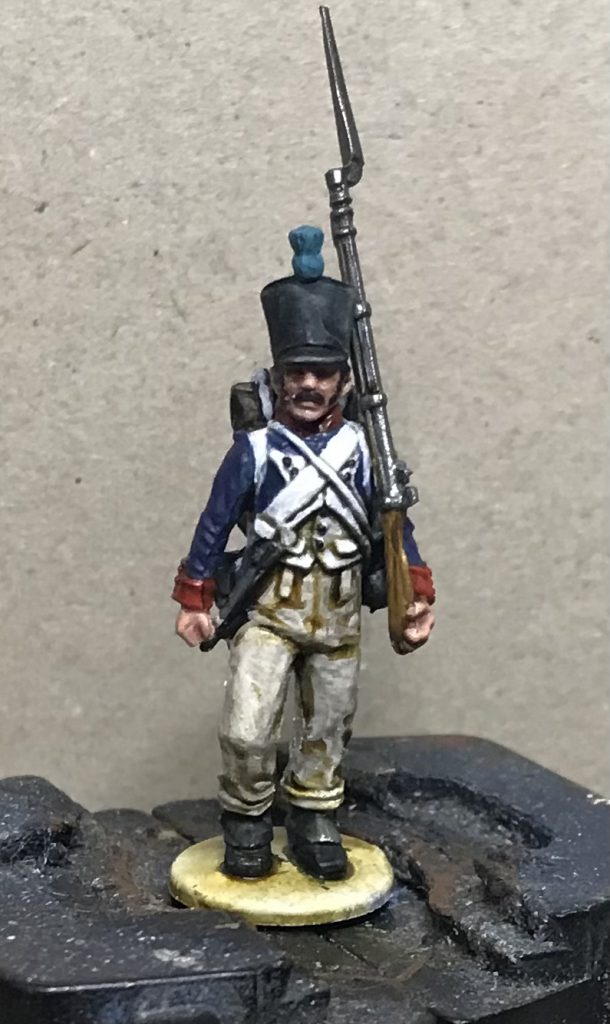
At this point for some reason I also did the buttons on the lapels and undershirt and the facial hair – straight black for those!
*I’ve added this step because I hate painting turnback piping – doing things this way makes a crisp red piping a lot easier.
Step 4. Fine detail
If you’re batch painting a large batallion, you could finish here and en masse I’d be happy with the result. If you want to go one step further, there’s some smaller highlights and details to do that will make your French really stand out. For the Metal, Red and Pom-Pom highlights, just apply a little paint to the raised areas.
Backpack – Wraithbone, Nuln Oil and White Scar
Metal Highlights – Stormhost Silver
Red Highlight – Evil Suns Scarlet
Pom Pom – Hoeth Blue
The backpack is a little more complicated. French backpacks came in all sorts of shades, but I tend to do mine as classic “brown and white spotted cow”. Blotch on some Wraithbone, then once it’s dry add Nuln Oil followed by flecks of white as a final highlight 0 it’s quick, simple and says “yep, this is cow alright”.
Step 5. Final Touches
If you really want to get every detail painted, there’s a final step here. Most of it is the piping. Piping is the bane of the Napoleonics painter – depending on the uniform it could be inches of very fine piping around cuffs, buttons, flaps, lapels and collar. I tend to skip collar piping (because it’s a pain in the arse), and focus on the lapels. To get the piping to stand out, paint it with a very fine line of White Scar followed by the piping colour – in this case Evil Suns Scarlet again.
Most buttons can be painted with a little Black and then Silver. The buttons on the cuffs require a little more attention – filling in the button cuff area with Stegadon scale green carefully to leave the cuff piping red, then dotting the buttons with Stormhost Silver.
Eyes – Wraithbone followed by Black
Piping – White Scar followed by Evil Suns Scarlet
Cuffs – fill in with Stegadon Scale Green
Buttons – dot with Stormhost Silver or Fulgurite Copper
With that, you’re done!
French Elite Companies (SRM’s Method)
I recently reviewed the French Elite Companies box from Perry Miniatures for this here website, and painted up a few in the colors of the 3eme Ligne Voltiguers circa the battle of Teugen-Hausen in 1809. I looked at tons of reference material and matched colors based on what was closest in my paintbox. Yes, this means I may not have the “correct” shade of bleu for April 1809, but no court will convict me for my crimes. I kept things pretty simple, as there’s a lot of these guys in a box and I have no shortage of models to paint blue this year. Most of this is just some basic layers and recess washing, but the odd line highlight for definition. All colors are Citadel unless stated otherwise.
Click to expand SRM's Elite Company Method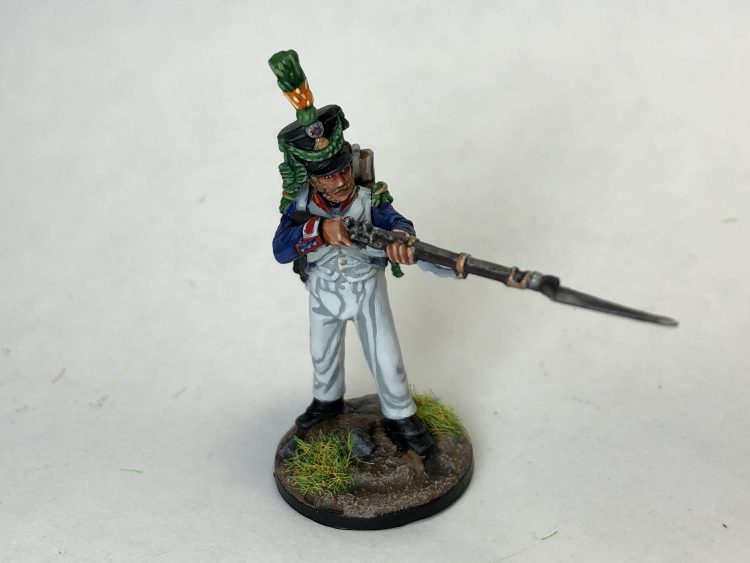
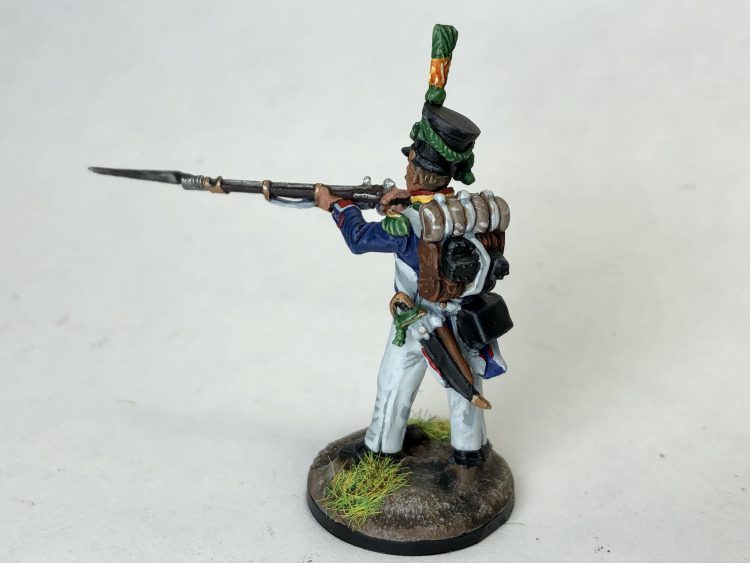
The Uniform
I started with white as, while blue is the color we associate with the French uniform, there’s more white on the model all told. This was used on the pants, straps, cuffs, shoulder belts, cockades, and jacket interior. You could crank this up with an extra highlight of White Scar at the end, but this will do for your rank and file.
Primer:
- Army Painter Uniform Grey
White:
- Celestra Grey
- Ulthuan Grey, leaving Celestra Grey in the recesses
The blue is only slightly more complex, but still very straightforward. It appears on their jackets as well as the cockades on their hats. I’ve also supplied a light blue option, as in my research I often saw cornet musicians in a lighter blue uniform. The technique is the same regardless of which blue you choose.
Blue:
- Macragge Blue
- Drakenhof Nightshade in the recesses
- Altdorf Guard Blue highlights on the raised edges
Light Blue:
- Teclis Blue
- Drakenhof Nightshade recess wash
- Lothern Blue highlights on the raised edges
There’s a bit of red on these garçons as well, on their cuffs, collars, cockades, and the piping on their jackets. I use Nuln Oil in this step, on the piping this will serve to further define the color border, while on the more solid fields of red it will provide shading.
Red:
- Mephiston Red
- Nuln Oil recess wash
- Evil Sunz Scarlet highlights
Equipment
These tend to be leathers, woods, and metals, and introduce some more neutral tones into the paintjob. I’ll put in two black recipes, one to cover the more standard black leather of their boot, scabbards, pouches, and shakos, and a slightly brown one that will provide a textural difference on bearskin hats. Bearskin hats tend to be modeled in such a way as to facilitate drybrushing, but you can line highlight instead.
Black Leather:
- P3 Thamar Black
- Eshin Grey highlights
Black Fur:
- P3 Thamar Black
- Skavenblight Dinge highlights
I used a more ruddy brown instead for their backpacks, washing it all over to give the details some depth, and I then highlighted the edges. As leathers can have plenty of natural variation, try some different browns or washes to give your units some variety. I based the bedroll at the same time as the backpack and washed them both together to save a little time, then highlighted them both up separately.
Brown Leather:
- Mournfang Brown
- Agrax Earthshade all over wash
- Skrag Brown highlights
Bedroll:
- Rakarth Flesh
- Agrax Earthshade all over wash
- Pallid Wych Flesh highlights
Similarly, you can probably get in some variation on the woods for the muskets, which are the next step. They tend to be fairly flat on most models, so I generally painted the wood a solid color and left them be. The metallics I kept pretty plain, as I didn’t want to make them look too parade-ground polished. There are some brass details here as well, which you’ll find on the basket hilts of the swords as well as in some details on the musket.
Musket Stock:
- Dryad Bark
- Agrax Earthshade if you want I guess, could add a little definition around the rings further along the gun
Musket Barrel, Flintlock, etc:
- Ironbreaker
- Nuln Oil all over, this will add depth to complex parts like the flintlock, but can also further define the barrel as it runs along the wood of the gun
Brass:
- Liberator Gold
- Seraphim Sepia in recesses
The Details
Here’s where things go from colorful to technicolor, with the sashes, epaulettes, pompoms, shako cords, buttons, and more. For the buttons, just use the brass technique from the equipment section. On the particular models I painted, I found edge highlights to be better looking than drybrushing for the pompom and epaulettes, but your mileage may vary. For the sash on the sword, the pompom, epaulettes, and shako cord, I used the same green technique.
Green:
- Warboss Green
- Thraka Green all over wash
- Skarsnik Green highlights
Lastly, there isn’t much yellow, but you’ll find a bit on the collar as well as the pompoms. I kept this nice and saturated, as it’s such a small detail that it should be called out. I went all over the yellow on the pompom with the wash, but didn’t really use it on the collar. You could use it to define the color barrier between red and yellow but it’ll be kind of hard to see. You could also use it for sergent or corporal stripes on the uniforms.
Yellow:
- Yriel Yellow
- Fuegan Orange wash
- Dorn Yellow highlights
That should get you through these ligne Voltiguers just fine, and those techniques will apply to anybody else in the regiment. And yes, I know I just painted Ultramarines again.
There are as many ways to paint French – and different French uniforms – as there are wargamers who play them! We’ll continue to expand this guide alongside our Napoleonics coverage.
Questions, Comments, Suggestions? Got a really good way of painting French Blue to share? Get in touch at contact@goonhammer.com or leave a comment below.


You must be logged in to post a comment.