Greg Chiasson: As a Big Titan Warhound Appreciator, I’ve been debating posting this for a while. I wasn’t sure how useful a post about a six hundred dollar resin model that takes ages to build and paint, and then melts into slag against half its points value on the tabletop would be, but people kept asking, so here we are. I won’t lie to you: this thing is a serious commitment to build and paint, and it will take up a massive amount of space, but when you’re done, it has a presence on the shelf that can’t be matched. Except by other, larger, Titans.
Robert “TheChirurgeon” Jones: Agreed. My first experience with this big resin asshole was the Chaos Warhound titan Greg drunkenly bought me as a “gift” in thanks for buying him a bunch of terrain kits for his hobby room. It took me over a year to finally sit down and start tackling it, because it was such a daunting model to work with. At that point, I had very little experience working with resin – my only resin model before the Warhound was a Chaos Decimator I’d bought maybe six months prior.
Greg: If you’ve never worked with resin before, don’t worry. Neither had I, and my build came out (arguably) fine – at least in the sense that I haven’t broken any parts off of it yet. Similarly, while I won’t deny that the thing takes a lot of painting, it actually goes surprisingly quick – the model is so big that it doesn’t need a ton of detailing, unless you want to, and the skeleton can get most of the way there with just metallics and washes.
TheChirurgeon: Yeah I was surprised at how easy the thing was to paint when I actually sat down and started working on it. Assembly was definitely the hardest part, and still continues to haunt me in ways that I’ll discuss later.
List Of Materials
First things first, let’s look at the hardware you’ll want here. Start with the usual: superglue (this is resin, so no plastic glue), a hobby knife with a fresh blade, clippers, and it can’t hurt to have greenstuff or sanding sticks handy but I didn’t bother with them.
Beyond that, you’ll need (Note: these are Amazon links for the things I bought, but they aren’t affiliate links and I don’t make any money, or care in any way, if you buy them or something else):
- A power drill. I use an 18-volt DeWalt that I originally bought for putting holes in my house, but a Dremel could work here too. If this seems excessive, trust me, it’s not. You can’t get by with just a pin vise.
- Various drill bits, roughly the same size as the pins you’ll be using.
- Some brass rod, in a few random sizes that you got because it was all in one cheap pack.
- A cool saw, and plenty of spare blades. You’ll need this to clean the gates off the resin blocks, and also to cut the brass rod.
- Bob Smith Industries 5 minute epoxy.
- Disposable materials for mixing and applying epoxy. I used styrofoam cups and take-out chopsticks, because that was what I had, but expect to ruin a fair number of whatever you use.
As a general rule, I used the two-part epoxy for anything load-bearing, and superglue for smaller details (pistons, shield generators, etc). The armor plates you can probably attach either way, but I think I used epoxy for them just to be on the safe side.
Working With Resin, for First-Timers
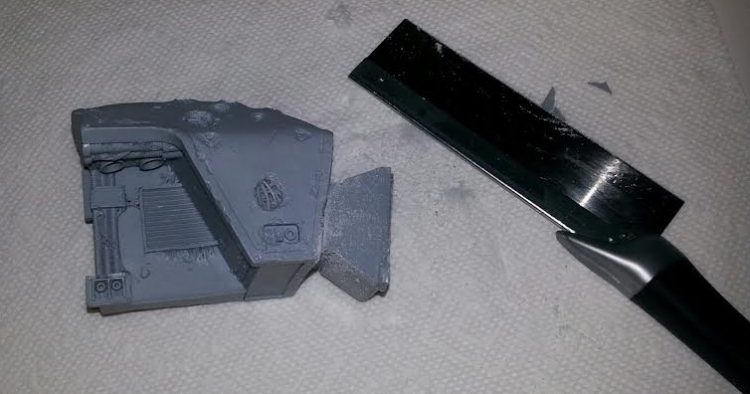
TheChirurgeon: For a kit the size of the warhound, you’re going to need a razor saw handy to cut off the massive blocks of resin left over from the molding process. Wear a mask when you do this. GW’s resin isn’t toxic, but you don’t want to breathe that shit in. And you especially don’t want to breathe in any of the foul-smelling shit you get from shady recasters. Don’t buy recasts, kids.
Greg: Before starting, you’ll need to wash the parts in warm soapy water to get the mold release off of them. This is notably a bigger problem with ForgeWorld than most resin kits you may have worked with, but a necessary step regardless. Take all the parts and yeet them into a big bowl of dish soap and water, stir it around, let it sit, and then dump it out into a colander and drain/rinse the whole thing a couple of times before letting it air dry. This is also a good time to make sure you didn’t lose any of the parts, particularly if you used a colander with particularly loose mesh.
TheChirurgeon: I fuckin loathe this part. I spent a good evening individually scrubbing every part of mine with an old Sonicare toohbrush and then letting them air-dry. Even then, I think I still probably missed a spot or two of release agent, but using a coat of varnish pre-paint has helped immensely.

Greg: The other difference with resin compared to plastic (and especially metal) is that it is brittle as hell. You can probably see the ugly seam line on the top carapace of my Titan here, which is from jamming the thing on a little too hard, and snapping the side off. Resin isn’t soft – it’s harder than plastic, which is part of why it holds detail so sharply – but when it does give out, there’s very little flex, and it just explodes. So, uh, be careful.
TheChirurgeon: Well, there’s some flex. When resin heats up, it becomes very soft and bendy. Which is handy because usually at least one of the resin parts you get from Forge World is going to be warped. What I do for these is I heat a shallow bowl of water in the microwave for about a minute and a half, then I’ll dip the resin parts in the hot water and slowly, carefully bend them into the shape I need. You’ll have to do this for the cables and tubing for certain guns. hold them in the shape you want, then while holding them, run them under cold water to keep that shape.
Gimme the Feet Boys, Let’s See Them Soles / I Wanna Get Lost In Your Resin Toes, and Sniff Away
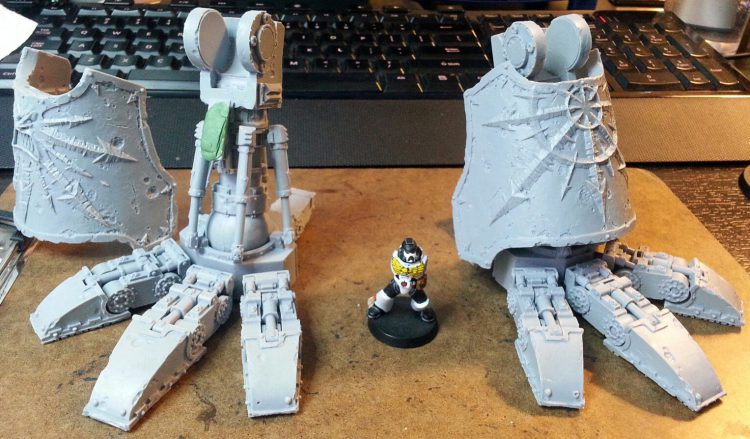
TheChirurgeon: OK this is one of the few times I’m gonna get to be the Goofus to Greg’s Gallant, and that’s because he did his Warhound after mine and go to learn from my mistakes. The feet are one of the most important parts of the Warhound, because they basically hold the rest of the model in place. They’re also made of many parts that have to be cut, and are incredibly poorly-engineered. You can pose the toes and feet however you want, cutting the pistons as you like, but I’m not really a “model your Warhound stepping on a Land Raider” kind of guy so I went with basic standing. It also reduces the amount of space the thing takes up. Anyways, I just used a mix of green stuff and superglue for the toes and this was a mistake. The toes break off all the damn time.
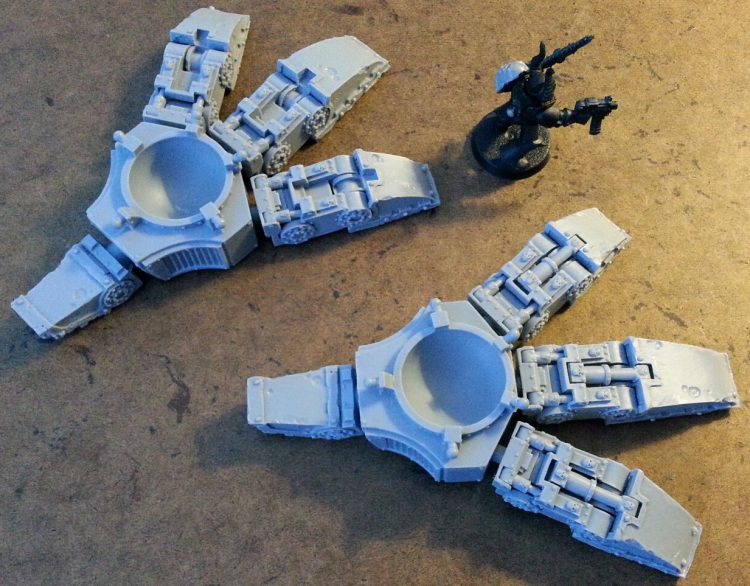
Greg: OK, so, following the instructions, we start with the feet. These inexplicably contain about 40% of the total parts used in the kit, mostly because of all the many fiddly pistons, but don’t worry about those for now, we’ll be focusing on the load-bearing parts here. And keep track of which toe goes where, because it very much matters.
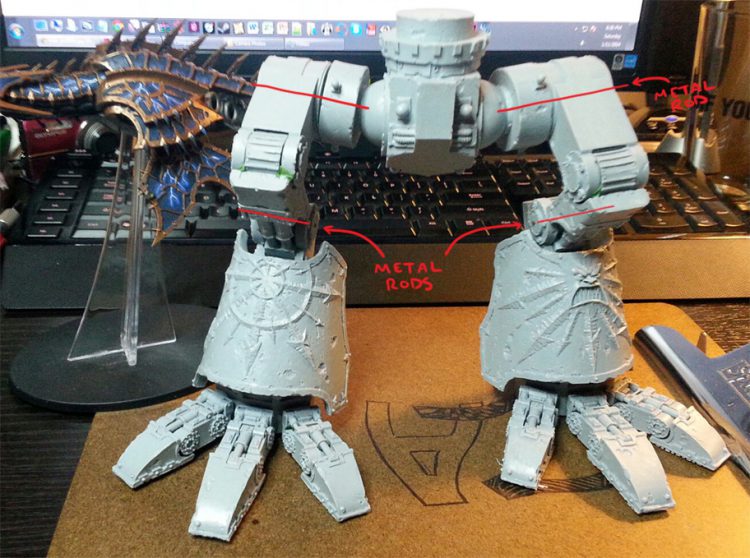
I didn’t take great pictures while this was in-progress, but I tried to annotate where the pins went. I did this using a laptop touchpad and Preview, so yes, this image sucks:
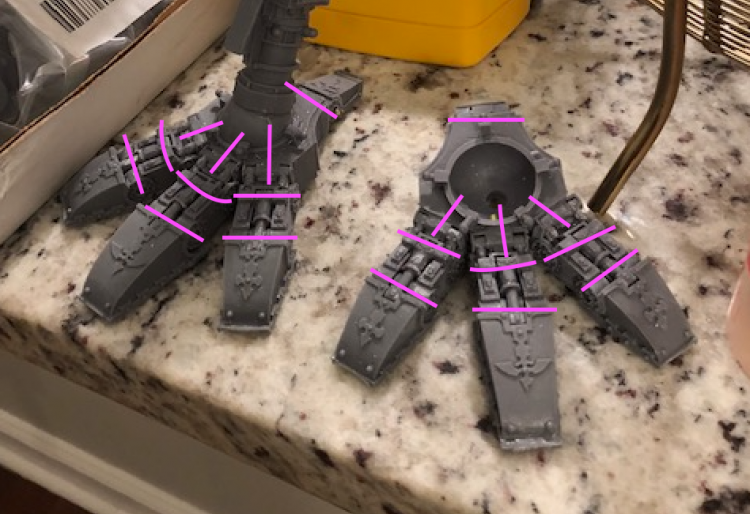
Greg: All of those cylinder looking things at the joints? Those are where you want to drill. Find a pin (and drill bit) that fits mostly inside there, and bore it all the way across. They don’t have any surface detail on them, so you aren’t ruining anything, and if you match up the size of the pin to the circular detail, it should be invisible-ish in the final product. Once the hole is drilled, dry-fit a pin into it, and cut it down to size with the saw.
Other useful tips? Use a drill bit slightly bigger than the pin is, to leave room for the glue, and don’t drill around your cat. I got exactly one hole drilled before my cat flipped out and took a chunk out of my arm, and then I had to stop building and go to the ER after it got infected.
TheChirurgeon: That’s not a regular part of the process, btw. Feel free to not get cut up and go to the ER while you assemble your Warhound.
TheChirurgeon: Also, dry-fit everything before cutting and gluing. The old adage fits very well here: Measure twice, cut once. And have green stuff handy to fill gaps.
Greg: There’s also an internal pin, that runs out from the sole of the foot until almost the end of the first toe segment. You can’t drill all the way down because you’ll hit the cross-ways piece at the joint, but this pin keeps the toes from snapping off later. The feet are going to be carrying a lot of weight later, so it’s good to get them really solidly built.
Once you have the pins drilled and dry-fitted, and decided on a pose you like – I went with stepping slightly forward, but keep in mind that most of the mass of the thing is overhanging toward the front, and stability will matter – and you can start gluing. If you want to stomp around your room and make robot noises, I certainly won’t stop you.
Mix up a 50-50 of the two epoxy parts – I just eyeballed the quantities here, and it went ok – and get to work covering the pins in it, before stuffing them into the holes. You probably won’t need as much glue as you think you will. Mix less of it, you can always add more.
Then fit the pistons, which have to be cut to size and superglued in. This part is pretty boring, so that is left as an exercise to the reader.
Legs Up To Here
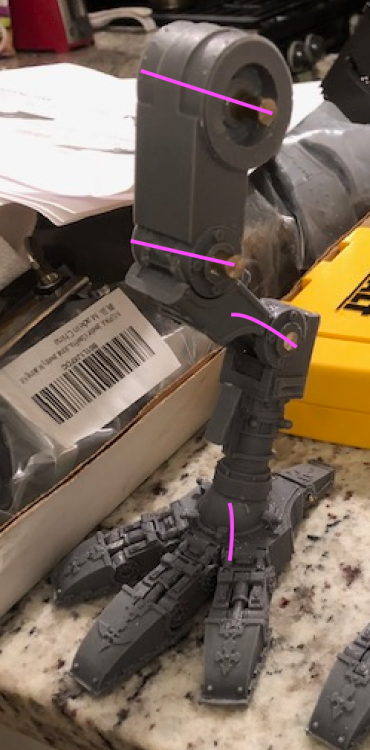
Greg: Fewer, but larger, pins here. Bore out both knee joints, and install another pin from the sole of the foot into the lower calf. That top pin, at what’s going to end up being the hip, is left hanging out so it can lock into the ball joint that goes in there. I considered drilling straight across the entire assembly, but I didn’t have a pin long enough.
This is a really good time to double-check your posing – the legs should be roughly the same height, and here is the only actually good advice I’m going to impart in this article: get the groin block level – both back to front, and side to side – this is hugely important because there’s no articulation in the top half of the Titan, so any wobble or tilt you introduce here is going to impact the entire rest of the model. I caused a terminal fuck-up on mine because the glue wasn’t set in the legs and one of them sagged as it dried. To get that down to even a minimal lurch, I had to stack one of the foot-bases about three times higher than the other, and it still isn’t right.
TheChirurgeon: I didn’t go quite as crazy here, but I did pin the legs. I was very worried I was gonna have issues with the joints on each of these, and so I used large pins/rods (think coat hanger thickness) to secure these joints. The cool thing about working with a model this size is that i was free to just use real tools in the assembly — in this case I used my DeWalt hand drill to drill everything, rather than having to rely on any tiny specialty tools.
The Hips
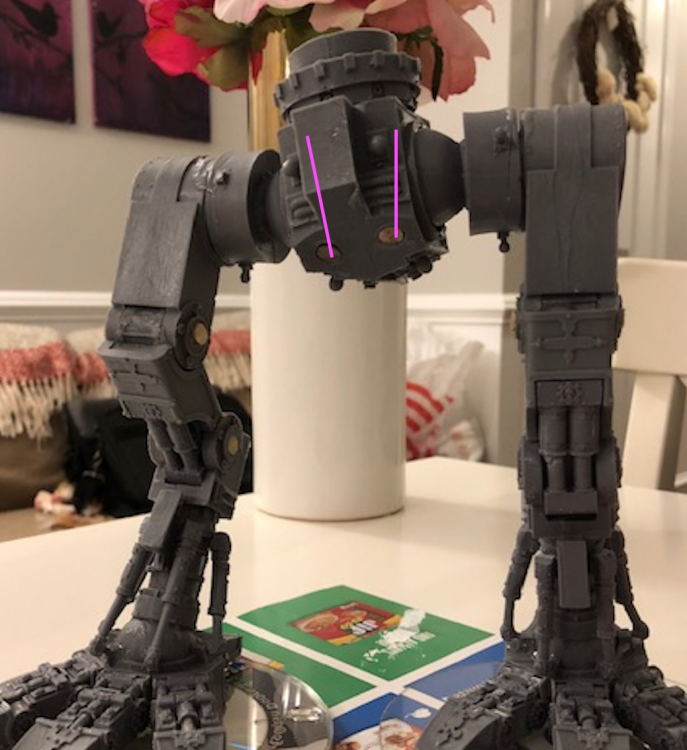
Greg: See? Crooked as hell.
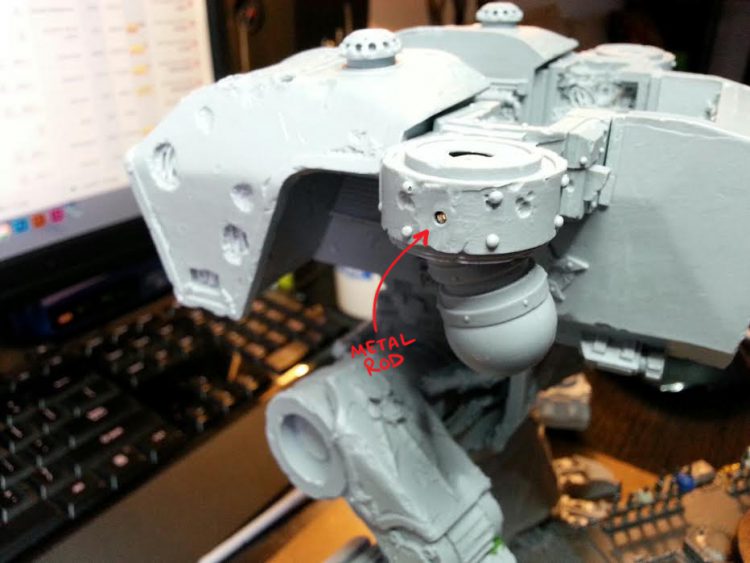
Still, things are getting easier now: two pins, one each from the groin piece into the ball joints. Putting these in is going to lock the entire assembly together, so just as a reminder, be careful. The reason for drilling these on the front, by the by, is because an armor plate gets glued directly over the top of there, and it’ll hide the pins. Which, I realize I should stop calling these “pins”, since they aren’t exactly snipped-off paper clips, and go with something more scale-appropriate, like “rebar”.
Anyway, another good idea at this point is to sink a piece of rod into the back of that big knob on top, through the collar on the body piece that sits on top of it. Don’t glue that pin in, though, and leave it hanging out a little ways. I actually only did this on mine because it was the only way to keep the top half from falling off, but in a happy accident, now I can remove it to separate the two halves, and give myself even the faintest chance of actually fitting this bad boy into a case.
TheChirurgeon: I used two metal rods in the construction of the legs and hips; through the lower knee joints where there was due to be a lot of torque from the model’s weight, and then a pair through each side of the hips to connect to the ball-and-socket joints. This has held up very well and didn’t need quite as much support as Greg’s setup implies. Going in sideways required a longer drillbit/more rod, but also freed me up to do the assembly with glue first and then do the drilling.
The Body
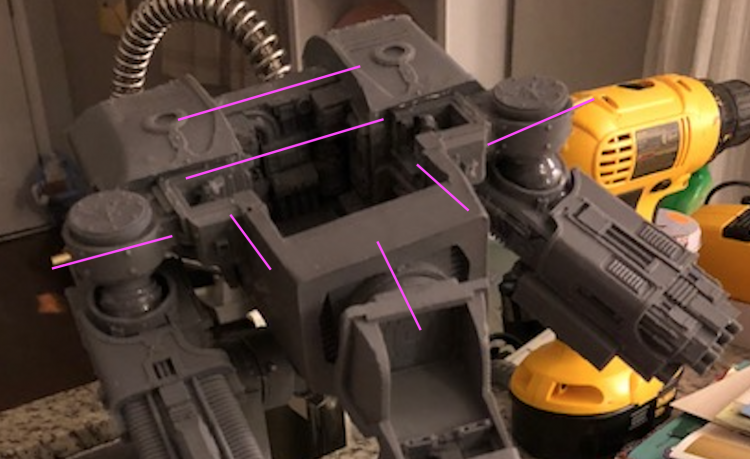
Greg: This is another spot where I went inexplicably hard in the paint. The engine blocks on the sides are secured to the central body by two pins that run clear across all three pieces. One of them is under the shoulder, in the hollow below the arm, which you can barely see if you’re looking because I drilled entirely through, and the other goes across the center and into each block from the inside. Then there are two pins connecting the front of the hull to the back, and one long one through the neck, up into the base of the head.
Most of these parts aren’t posable or articulated, so who cares, just jam them together as close to flush as you can, but the head is one where you want to get it lined up in the pose you want, before you drill. I’ve also illustrated the arm pins on the shoulder, but that’s something we’ll talk about a few paragraphs down. Note that the shoulders themselves aren’t actually pinned – they should be, and I’m not sure why I didn’t, other than being lazy (at this point I was maybe 10-12 hours into the build and I had no patience for more work) or starting to run out of brass rod. At any rate, it hasn’t been a problem, that part is sandwiched in three directions with other pieces and epoxy, so despite holding up those big gun arms it’s been rock-solid.
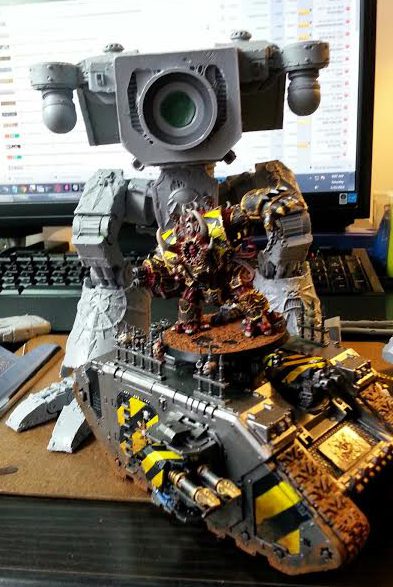
TheChirurgeon: Here’s where I think the model’s engineering is an issue. It’s an incredibly front- and top-heavy model, and the join for the torso to the waist is further back on the model, putting a lot of downward force on the front of the model that results in torque on the waist and the feet. this will result in warping over time if you aren’t careful, as the resin in the model will bend due to the weight, and this will primarily be seen in the toes and waist. This is my biggest regret about not using more metal rods in the assembly for reinforcement.
When I assembled my Warhound, I used a single brass rod from the waist to the body, going up through the pilot’s room. I didn’t glue the torso to the legs, instead thinking it’d be easier to transport in two parts. It was, but this would come back to haunt me years later when I found the model slowly lurching forward and in danger of falling, and I’d have to break off and re-glue his toes and completely rework the midsection, filling it with greenstuff to straighten it.
You Know I Keep That MF Thang On Me
Greg: Rob and I actually took the exact same approach to the arms, only he took better pictures and wrote up his part first, so I won’t repeat myself. He’s absolutely correct about the gigantic arms being heavy and positioned so far forward that they’re going to want to torque themselves off and pull the entire Titan down with them, which is why I massively over-built the legs on mine. Not only are the legs more stable with all that metal in them, it added probably a half-pound of mass to lower the center of gravity and help stabilize the model.
TheChirurgeon: When I first looked at how this thing went together, the arms were the thing that most terrified me, being ball-and-socket joints that hung down from the model. The guns are pretty heavy blocks of resin and I knew it was too much to ask that superglue alone be the means of holding them in place. So I put them in place and then fixed them with a pair of brass rods drilled from each side.
TheChirurgeon: I didn’t pin the guns to the lower socket, and this ended up working out just fine with greenstuff and super glue. You could probably magnetize these to good effect, but I hadn’t started working with magnets yet and Forge World only released two gun options for Chaos Warhounds, so whatever.
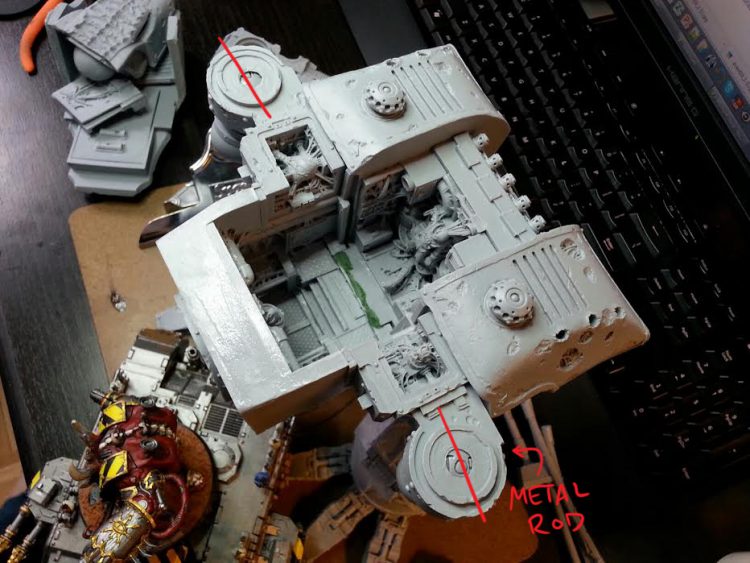
Greg: Filling the entire arm-gun socket joint with epoxy worked fine for me here, though you do have to be careful holding it steady while things set, otherwise the giant block of resin will pull it down, which isn’t probably what you want. This is the other good thing about the Insane Clown Pinning approach, is that it (mostly, see above re: where I goofed up the legs) holds the parts in position until the epoxy hardens.
The Head
TheChirurgeon: I did a Greenstuff mould-fit of the head into the torso socket, then just superglued it in place. It has held extremely well ever since. While I glued the top plate onto the torso and skipped painting the interior (the model is really not set up or fit together well enough to continually remove the top plate at all), I did avoid gluing the top of the head, so I can take that off and see the fused pilot inside, who’s metal as hell.
Greg: I explained my approach above – put a giant pin through the base of the neck and epoxy that sucker within an inch of its life – and it’s broadly similar to Rob’s, but I glued the head armor on. Reason being that I drilled through the entire wall in a few spots, so the inside of the Titan looked like a construction site. I wasn’t realistically going to paint the inside anyway – this is more than enough work without adding the entire interior to my backlog, thank you very much – so this isn’t really a loss in any way that I care about.
Basing
TheChirurgeon: I am full-up not a fan of doing big-ass bases for the Warhound that take up half a table. I left mine base-off, since vehicles shouldn’t have bases anyways. This may have been a mistake from a stability standpoint, and it was certainly a mistake from the “will one toe break off every time you transport this” standpoint.
Greg: I’m a big proponent of making one tiny base for each foot, instead of one giant one. Your call, but if you do it this way, the 130mm bases from Onager Dunecrawlers are perfect for it. Or steal some blank CDs from work or whatever, they’re almost exactly the right size.
Painting
Greg: At this point the skeleton should be assembled, and all the load-bearing parts locked firmly in place. Now we can go back in and add the armor plates, right? Wrong! Paint the thing first.
TheChirurgeon: I strongly recommend spraying the thing down with a layer of matte varnish before you prime, just in case you missed any spots with release agent.
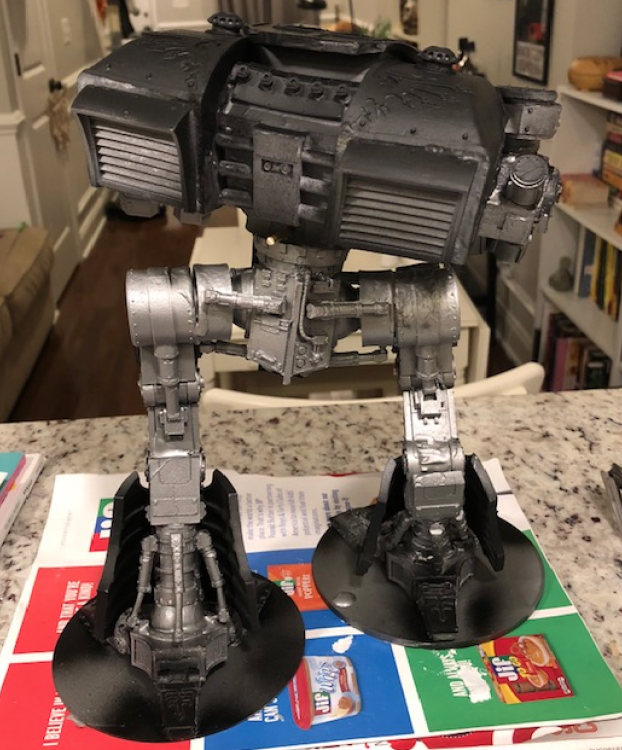
Greg: This is a good idea, and something I didn’t do, which is probably why my spray didn’t adhere properly. Anyway, what I did was hose down the skeleton in metal (I used the Army Painter one, but I’m sure Citadel’s is fine as well), then paint the armor panels black before attaching them. The backsides of them will stay like that, the back-masking breaks up the color nicely, but the outsides are going to get properly painted. I may also have poorly sprayed a couple of parts twice, to get a rough blocking-in of base coats on them (the toes being armor that has to be built onto the skeleton before painting, for example), but I can’t confirm or deny that I’m that clumsy. Probably an airbrush would have helped here, but I didn’t have one. It would also have helped later, when I had to paint the thing for real, but I still didn’t have one then. Still don’t, actually.
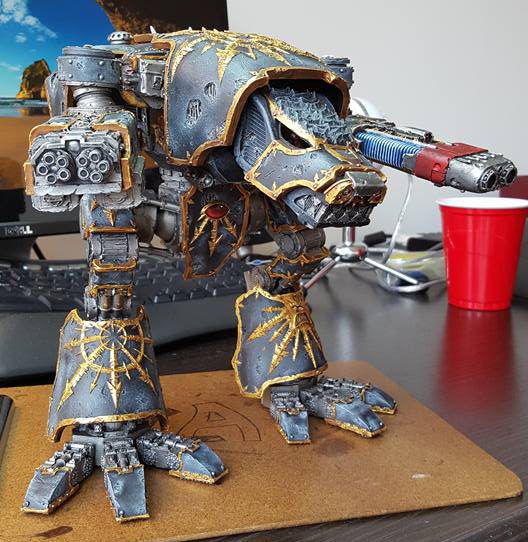
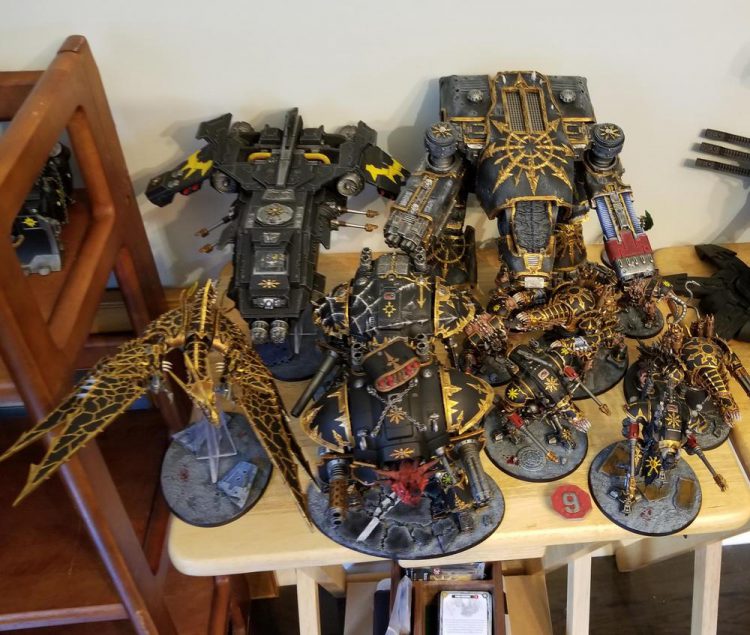
TheChirurgeon: I wanted my Warhound to match my Black Legion, so I went with a more standard black-and-gold approach. This guy may be a member of whatever fallen house or Titanicus nobles, but first and foremost, his allegiance is to the Warmaster.
The general process:
- Spray with matte varnish
- Prime black
- Abaddon black on the armor plates, drybrushed with Mechancius Standard Grey and Celestra Grey
- Leadbelcher on the metal parts, washed with Nuln Oil
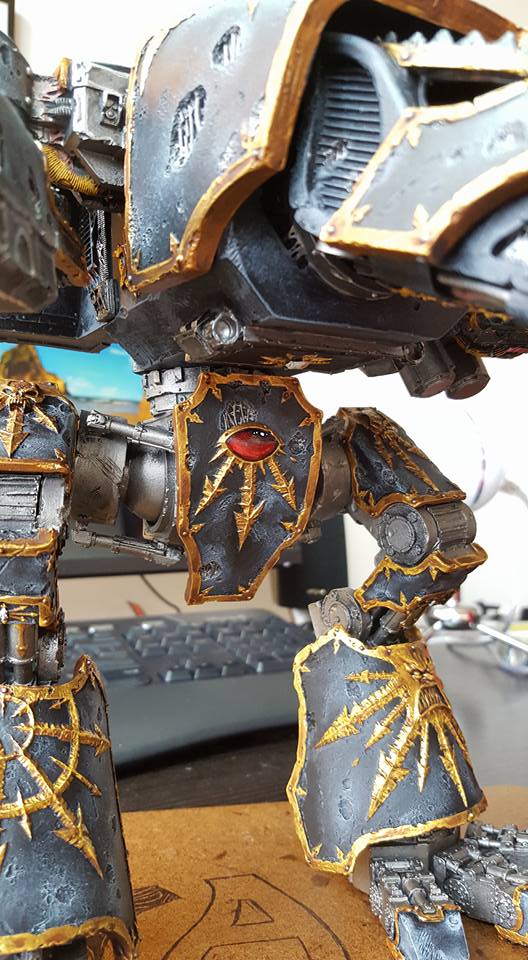
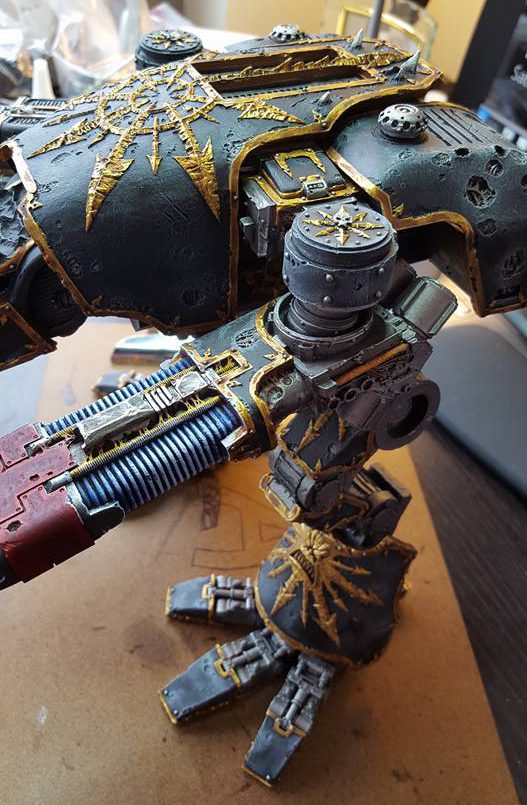
- The Gold trim is done with a base of Balthasar Gold, then layer on Gehenna Gold, wash with Agrax Earthshade, highlight with Auric Armour Gold and edged with Runefang Steel
- Metal studs done with Runefang
- The Red on the cannon is done with Khorne Red, layered up to Mephiston Red, washed with Carroburg Crimson, highlit with Evil Sunz Scarlet
Overall it was a pretty quick process, especially after the nightmare that was cleaning and assembling the stupid thing.
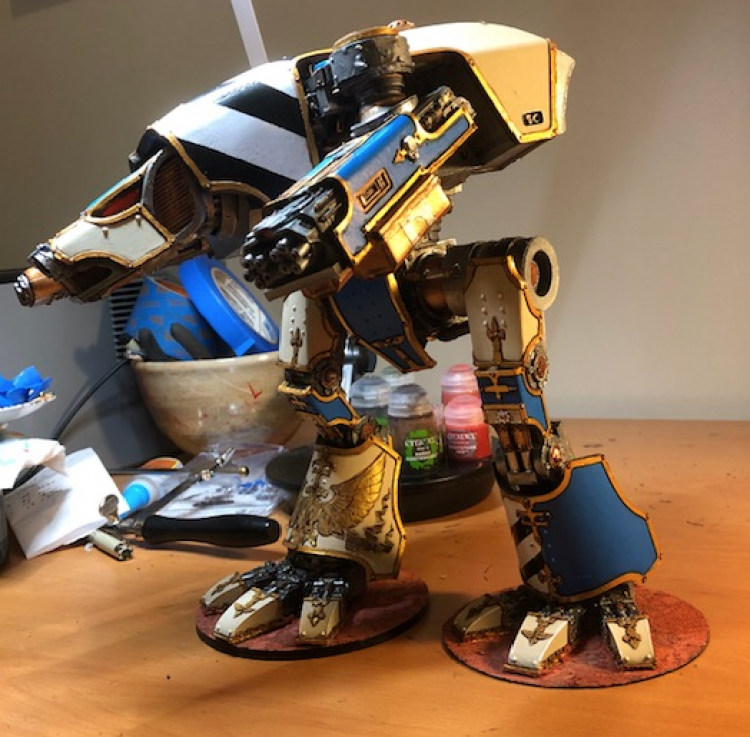
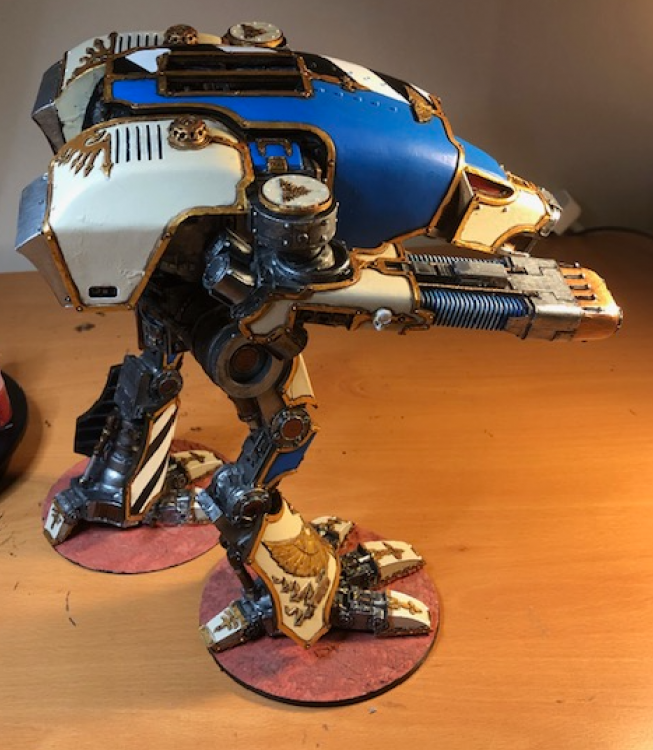
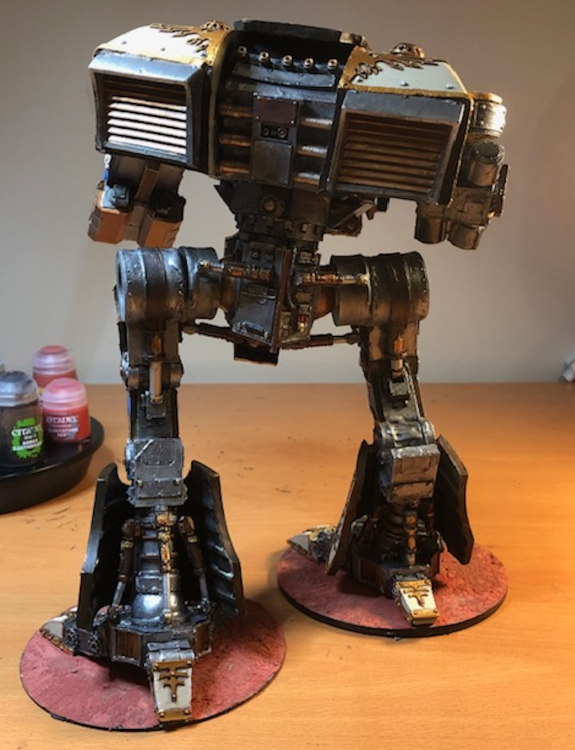
Greg: I hope you like painting trim, because dang there’s a lot of it. I used Vallejo Game Color paints for mine, and basically ran their entire gamut of metallics on the mechanical parts. There’s a ton to be gained from picking out details with random colors, from copper to brass to straight gold, and while you can get away with just washing with Nuln Oil and dry-brushing, the pay-off for detailing all the little pipes and pistons is really strong.
The carapace is a a mix of VGC Magic Blue, which lives up to the name, VGC Bone White, and white/black stripes that I painted white before masking off with painters tape and filling in the black. The trim is just various layers of gold, washed with Agrax, and I did a Nuln Oil pin wash along the recesses and panel lines.

Transporting the Thing
Greg: Remove the pin from the waist. stuff the entire thing into a box of styrofoam peanuts. Pray.
TheChirurgeon: This is also basically my method. It works pretty well, aside from the occasional broken toe. It sucks, but there’s not much else you can do.
TheChirugeon: Also note that when you play with this thing in 8th edition 40k, it sucks ass. It’s better in Apocalypse, but it’s going to get destroyed on turn 1 in every game you play with it. Still, find the excuse to go out and play some games of apocalypse with it, cause Warhounds look rad as hell on the table.
Go Buy Your Own Large Resin Son
There you go. Assembling and Painting a Warhound Titan, in both flavors. Join us next time when we have Jack “BenBooley” Hunter talk about assembling and painting a Reaver Titan, which he basically did in a week, because he’s insane.
And if you have any questions or feedback, drop us a note in the comments below or email us at contact@goonhammer.com.


You must be logged in to post a comment.