In our How to Paint Everything series we look at how to paint, well, everything, with a look at different approaches from different painters and some of the special techniques for painting. In this article we’re looking at how to paint Alpha Legion Chaos Space Marines.

The last (or among the first, depending on which source you read) of the legions to find its primarch, the origins of the Alpha Legion are shrouded in mystery, in part intentionally. The legion itself had not one primarch, but two – Alpharius and Omegon – who reportedly shared a single soul. In battle the Alpha Legion were known for their constantly shifting tactics and covert operations.
In the official telling, Horus discovered Alpharius and kept him hidden from the Emperor for a time, leaving a lasting mark on his brother that would ultimately lead to the Alpha Legion following Horus. Whether this origin is true is unclear, but what is true is that during the Heresy the Alpha Legion sided with Horus, taking on clandestine missions and reveling in the opportunity to test their skills against their brothers in the more established legions.
What happened to the legion in the final days of the Heresy are unclear – some reports suggest Alpharius was killed by Dorn, while others suggest Omegon was killed, or that both died, or that both may have lived. The Alpha Legion were tricky like that, standing in for each other and always claiming to be Alpharius.
The XX legion would don blue-green armor with silver trim, though they’d often make use of camo-cloaks and cloaking technology, or disguise themselves as other legions to confuse their opponents. They’ve kept that color scheme, though added a bit more green to it and other elements like scales, tusks, and horns.
Covered in this Article:
- How to paint Alpha Legion Chaos Space Marines, with multiple examples of how to paint their blue-green armor and how to paint 2nd edition Alpha Legion marines.
- Notes on the heraldry of the Alpha Legion.
- How to paint Heresy-era Alpha Legion marines with Contrast paints.
- How to paint notable elements of the Alpha Legion, such as scales and the “decloaking” effect popular on social media.

Alpha Legion Heraldry - Click to Expand The Alpha Legion have always favored subterfuge and misdirection over blunt ferocity and have no problem changing their armor and heraldry as needed to suit their purposes in battle. For the Alpha Legion, anonymity is a potent weapon in its own right – they purposefully occlude the data signifiers on their weapons and armor to confuse enemies and go into battle fully helmed to a man – their foes cannot identify the rank, role, or physical appearance of their enemies. So yeah, the Alpha Legion aren’t big on squad or company markings. That said, the Alpha Legion have changed their heraldry over time – their Heresy-era scheme was a much bluer shade, featuring silver trim. Comparatively they now don armor of a greener color, and often adorned in scales similar to that of the Lernaean Terminators of their Heresy forces.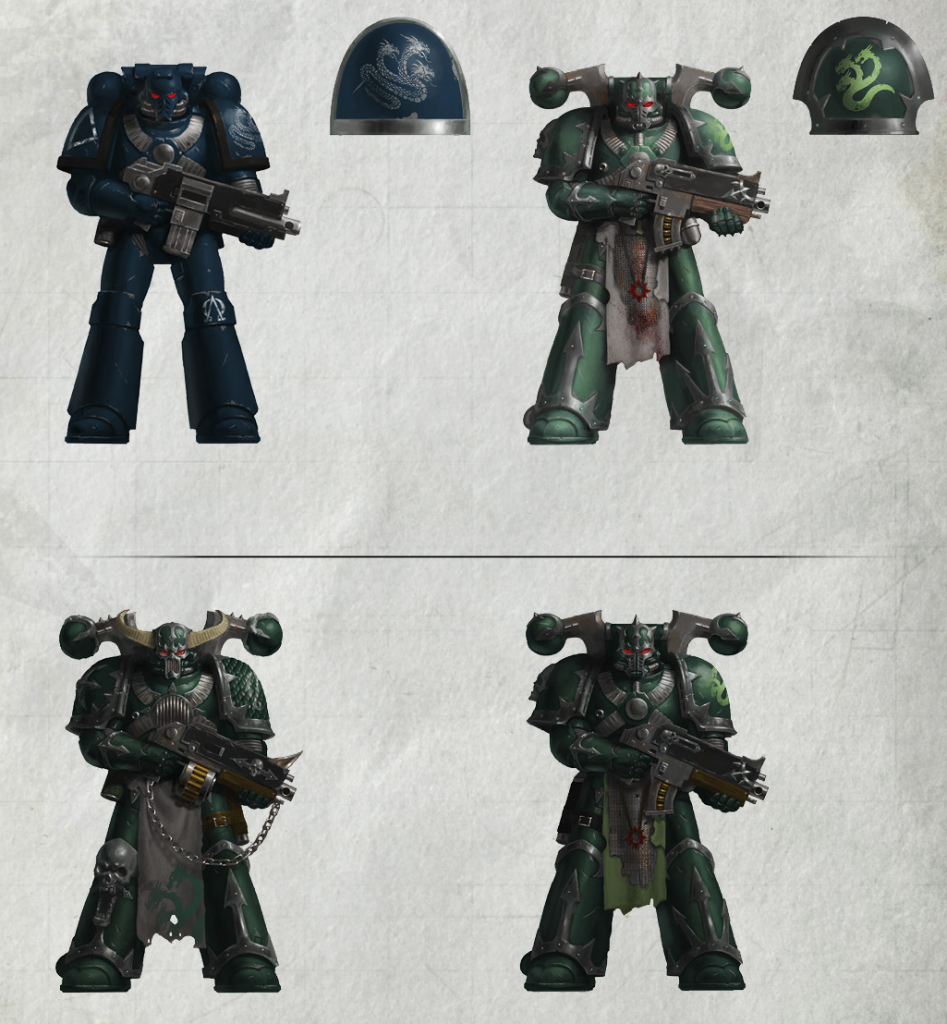
Painting the Alpha Legion
The Alpha Legion have one of the most interesting paint schemes in 40k, owing in part to the fact that they can be blue, or green, or any shade in-between, including a gradient transition between the two. We’ll look at each of those in this article, as well as a few unique effects for the painting the faction.

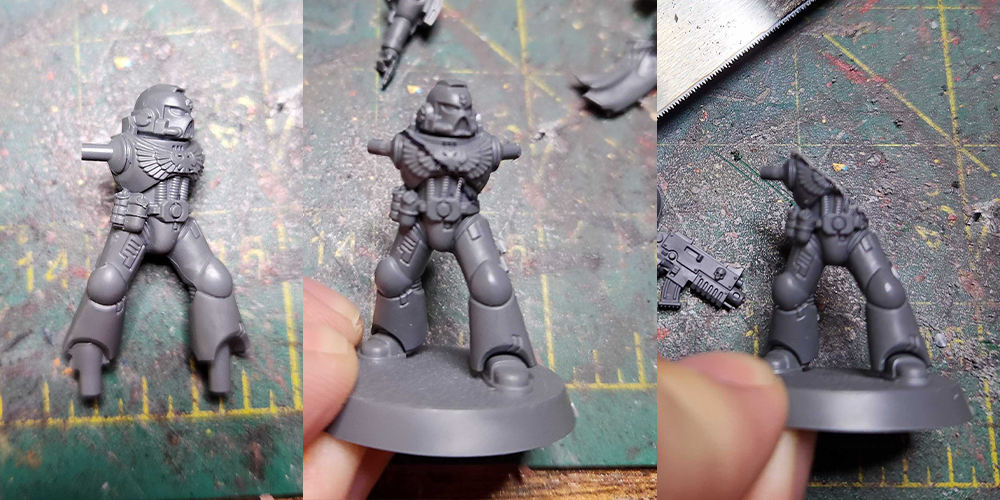
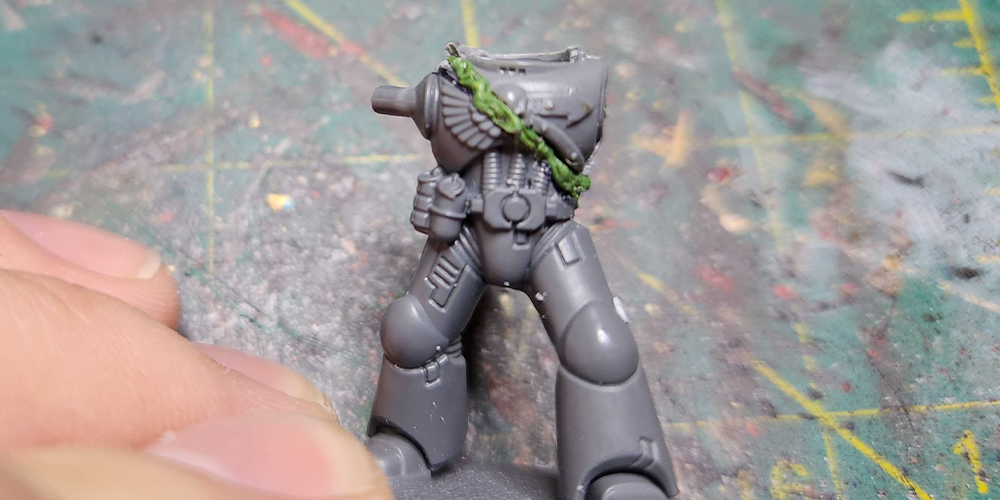
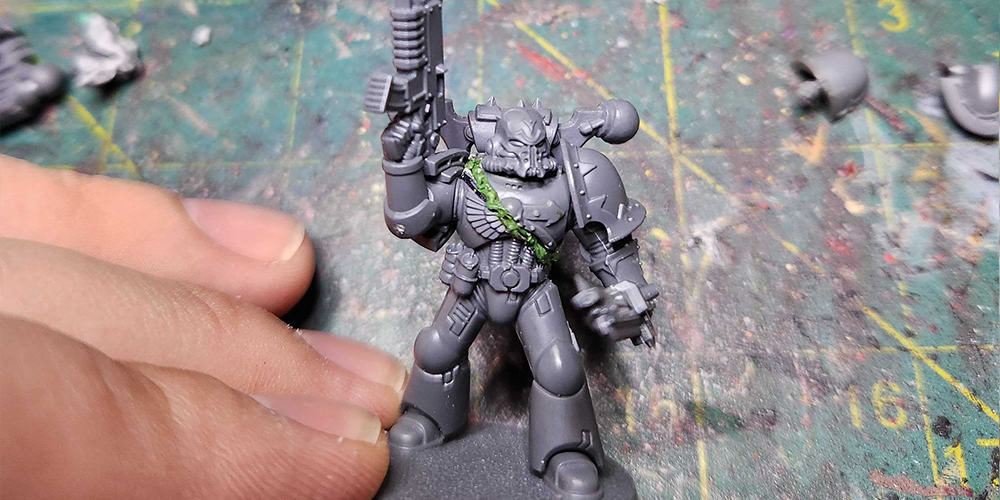
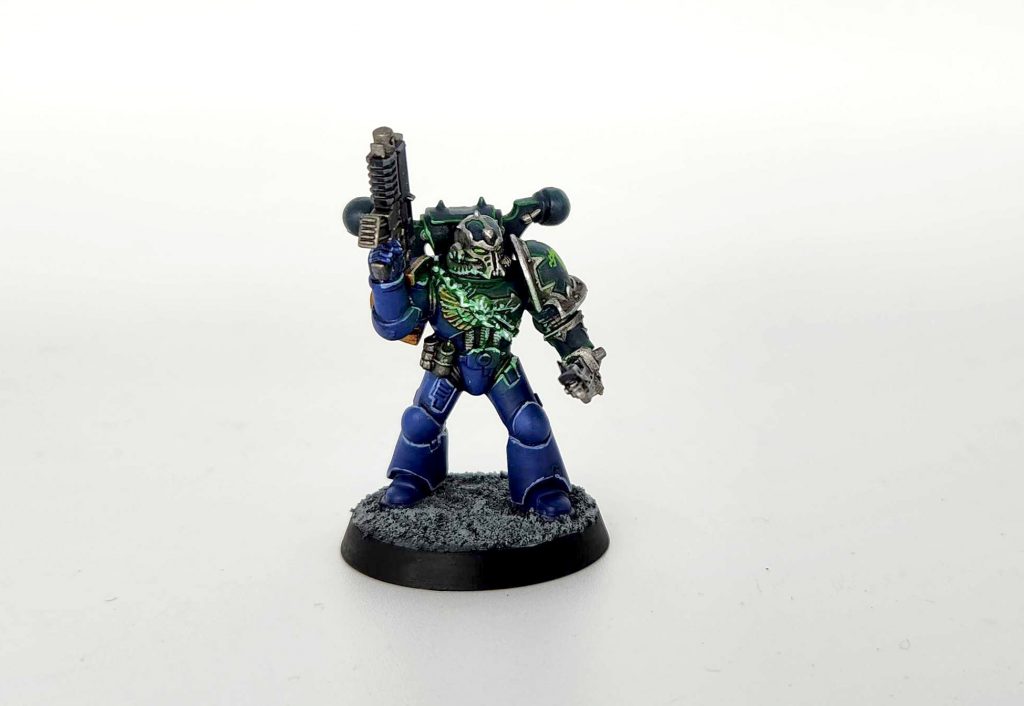
Decloaking Effect - Click to Expand If you’ve hung around on social media long enough, you’ve likely seen an example of an Alpha Legion model using a “decloaking” effect. These models typically feature a model that is part Alpha Legion, part loyalist marine, with some kind of electrical/light effect between the two parts to give off the impression that the model is dropping its cloak and shifting visually back from a loyalist marine to its true form as an Alpha Legionaire. There are basically two ways to achieve this look. First, you can just do it with paint, and paint a loyalist marine with two schemes and a light effect between them. This is the easiest way. The hard way is converting the chaos half, either by adding bits to it, or just cutting two models in half. For this example I’m going to do the harder way. Believe it or not, cutting is the easy part – the hard part is finding bits that match up. This is especially the case for legs, and with primaris models. The modern CSM kit is a little too big for tactical marines, and a little too small for primaris marines. Chosen are a bit better for this, but their legs and arms are still a little too short, so you’ll want to do what you can to hide the differences. For this model I had some extra build-and-paint marines around, who are a little taller than older tac marines, so I used them. The process starts with making a line where I want to cut – in this case diagonally down the torso – and sawing it off, using a razor saw. My plan here is to use older CSM bits from my bits box, which match up better in size to the older marine torso. I glue those torso halves together, then cut that chest part, and glue the two pieces together. This isn’t super clean, so I fill the gap with green stuff, then I use a damp sculpting tool to rough up the line. I want it to be super visible and prominent, and to resemble a ring of electricity – this will give the object some depth later and it’s great for hiding the ugly ass line where the two models meet. Next I just add the arms, head, pauldron, and backpack and it’s good to go. The effect works pretty well. Note that I intentionally opted to use a helmet without horns here to suggest there’s a limit to what the cloaking can do, and the marine needs to maintain a similar silhouette to his target to pull off the look. Now it’s time to paint the guy. I primed him black. I paint the marine part with Macragge Blue and the Alpha Legion part with Incubi Darkness. I’ll repost this later, but this is yet another way to paint Alpha Legion armor from the one I originally posted and I think it works very well while also being super easy. Wash the model with Drakenhof Nightshade. This is especially important for the lower parts of the Alpha Legion armor, where I want it to have more of a blue hue. Highlight the marine armor with Macragge Blue again (you can do a second shade up by mixing it with Altdorf Guard blue if you like), and highlight the Legionary armor with Incubi Darkness. To add some green, I did some highlights with a lighter shade I got by mixing Incubi Darkness with Sons of Horus Green. Most of this is painting the metal parts. The silver parts and trim are painted Leadbelcher, which is then washed with Nuln Oil. The gold parts – the aquila and trim – are painted Retributor Armour and washed with Agrax Earthshade. The gun casing is Corvus Black. Time for the decloaking band and some Edge Highlights. Another step with more going on than it seems. The light blue edge highlights on the marine armor are done with Reaper Snow Shadow, a light blue I use a lot for blue edge highlights. The edge highlights on the legionary armor are done with Warpstone Glow, while the trim highlights are Runefang Steel. I also hit the eye lenses with Moot Green. Then the band itself – this I painted with Warpstone Glow, then highlighted it with Moot Green. Time to finish him off with some OSL to really sell the decloaking effect. I start by painting the areas around the band with Tesseract Glow, a technical paint that’s like a green glaze. It’ll tint the areas around the band, and I work on a few spots that are likely to be lit by it. It’s great for tinting the armor in a way that suggests ambient light. Then I hit the inner parts of the bad with Gauss Blaster Green, and in that process I paint some thin lines snaking out across the armor from the band and do some edge highlights on nearby surfaces to sell the OSL effect. The effect is done at this point – pretty easy and the end result looks pretty cool. It’s definitely more than I’d ever want to do on a full army, but for a single squad of something like Chosen it could be cool.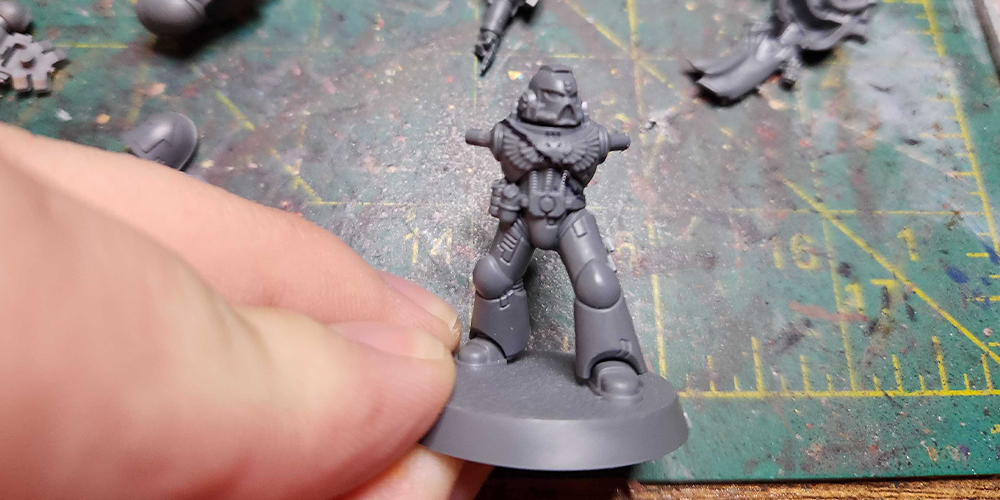
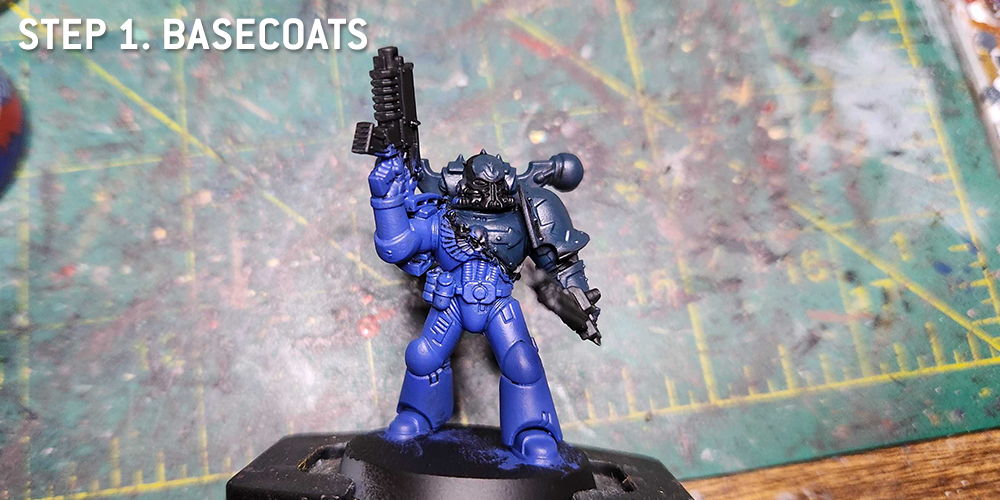
Step 1. Basecoats
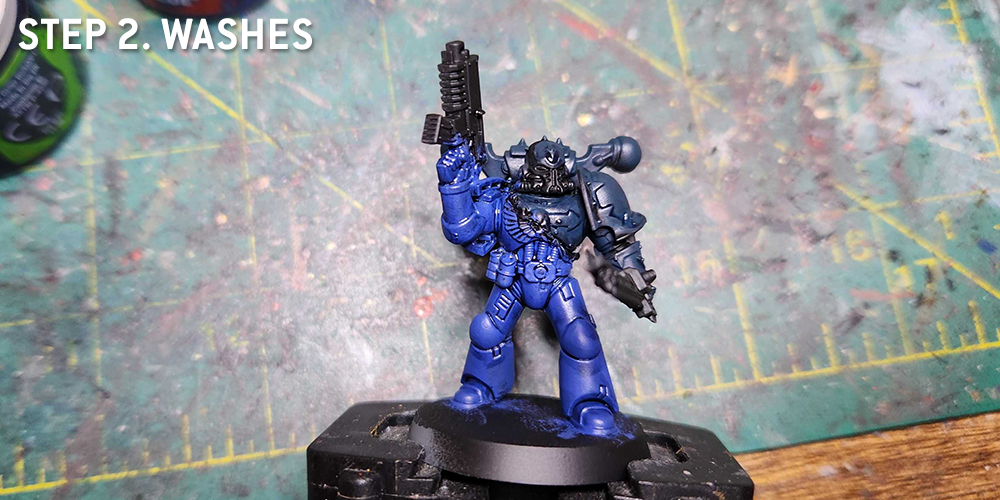
Step 2. Washes
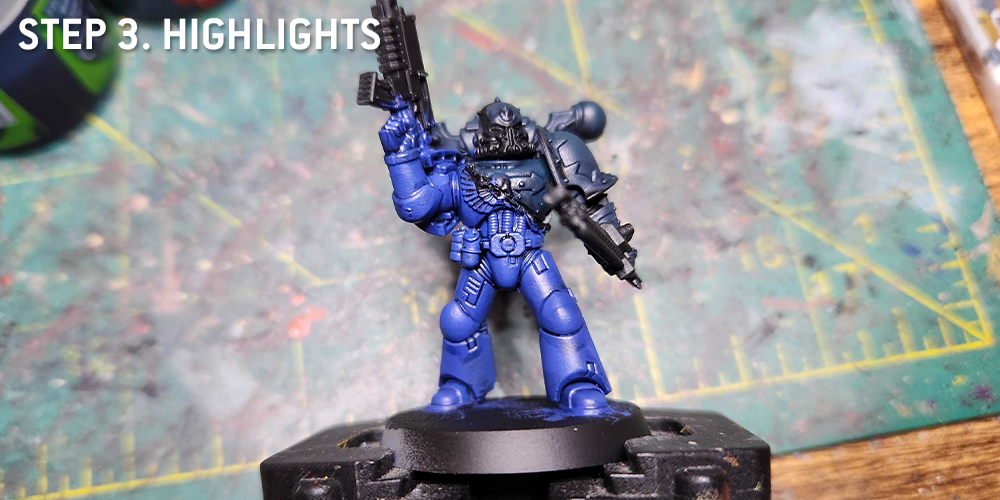
Step 3. Highlights
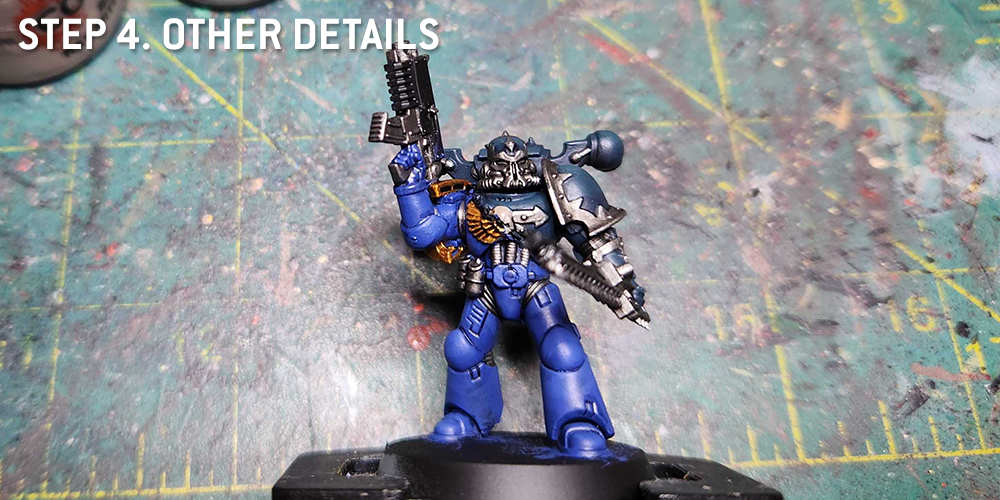
Step 4. Other Details
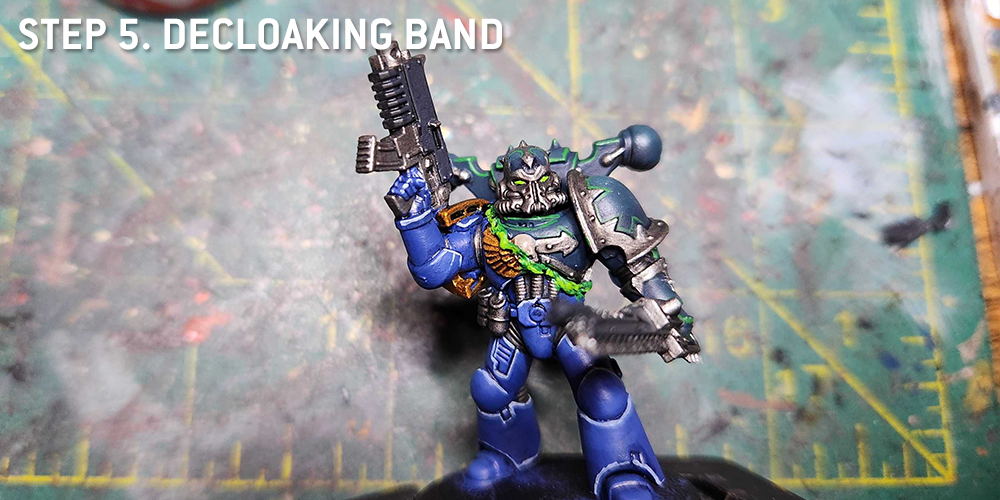
Step 5. Decloaking Band and Edge Highlights
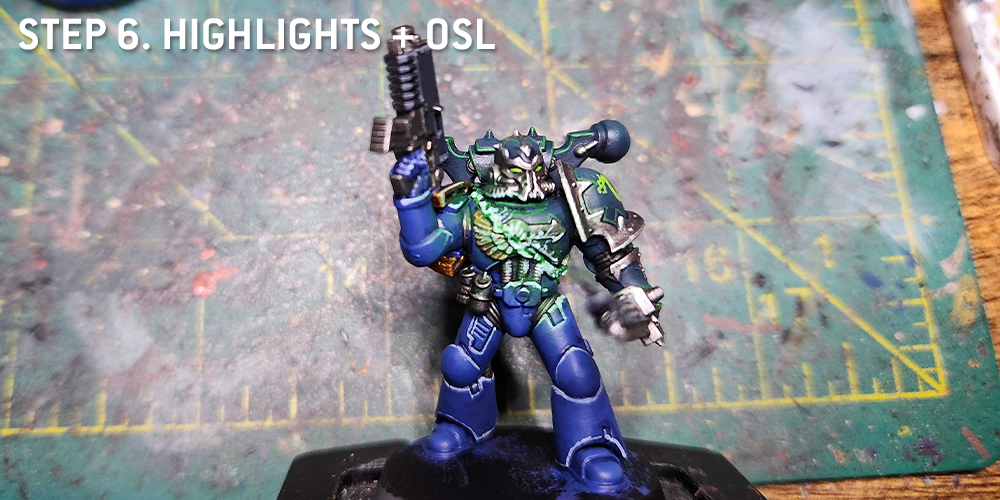
Step 6. Highlights + OSL

Scales - Click to Expand For Alpha Legion models lacking a scale texture where you need it, you can paint scale designs on the model to replicate the effect. This is easier to do than you’d think, and helps add a ton of flavor to the model while breaking up the armor nicely. This is essentially a two-step process, done after you’ve completed painting an armor panel and finished the shading/highlight process. Start by painting a number of “U” shapes in your edge highlight color, painting two to three offset rows. Then make a second pass with your secondary highlight color, hitting the bottom third or so of each U shape. For this example I started painting the scales with Warpstone Glow and did a second highlight of Moot Green. That’s it! Like I said, pretty easy, and it’s worth practicing your U shapes on another surface if you’re not super confident about your freehand skills. That said, the shapes are simple enough and you draw them all the time when writing so a couple of practice attempts should be all you need.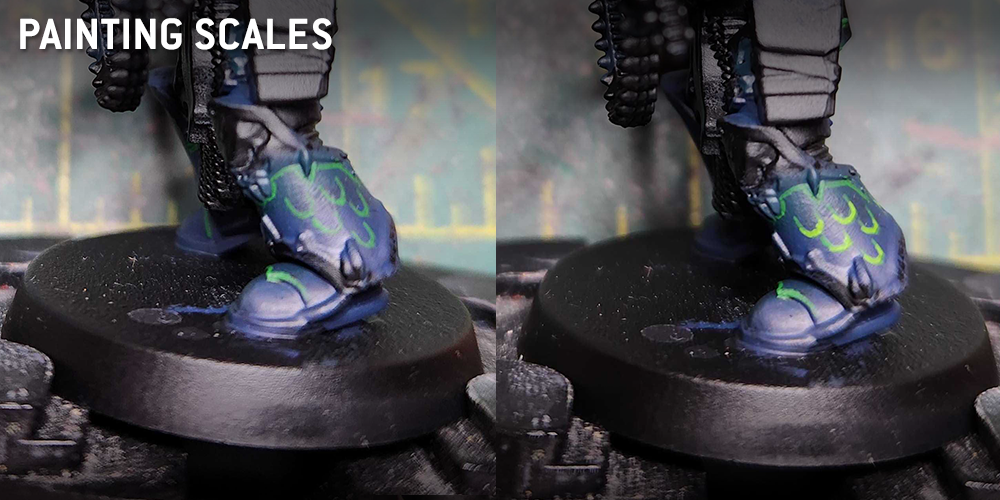

TheChirurgeon's Method - Click to Expand The most interesting thing about painting Alpha Legion is deciding how blue or green you want to go. For this one I decided I wanted to do a full transition, going from a deep blue to a green. This is basically going to mean painting the lower parts blue and wet blending them up to green before painting the trim. I started by priming the model black. I need something halfway between blue and green but dark, so I started with a basecoat of Incubi Darkness. Next comes the blending. This goes two directions – I add some Kantor Blue to the lower parts and toward the top parts I paint with a blend of Incubi Darkness and Kabalite Green. The goal here is to finish with a solid gradient of dark blue up to a lighter green. Next comes the edge highlights – these are all done with Warpstone Glow. With the hardest parts done it’s time to tackle the other details. The metal trim and metal parts are painted Leadbelcher, then washed with Nuln Oil. The gun casing is Corvus Black. The loincloth is painted Grey Seer, highlighted with pure white. The leather bits are Gorthor Brown, washed with Agrax Earthshade. Time to finish the model off. The eye lenses are Moot Green. The edge highlights on the gun casing are Mechanicus Standard Grey, and the edge highlights on the metal trim are Runefang Steel. I use Gorthor Brown again to edge highlight the leather bits. And that finishes the model off. The blue-green effect is subtle, and hard to photograph, but it works well and I’m happy with how it turned out. On future models I’ll add a step washing the armor with Drakenhof Nightshade after or during the blends to add some dark lines around the lower trim parts. I put the full method for this in the earlier section on painting the Decloaking effect, where I used a different method for painting Alpha Legion armor. There I started with Incubi Darkness, then washed the armor with Drakenhoff Nightshade before coming back to highlight with Incubi Darkness again and blending that up to a mix of Incubi Darkness and Sons of Horus Green. That produces a greener armor, since Incubi Darkness is as blue as it gets, and it’s a bit less time-consuming to paint.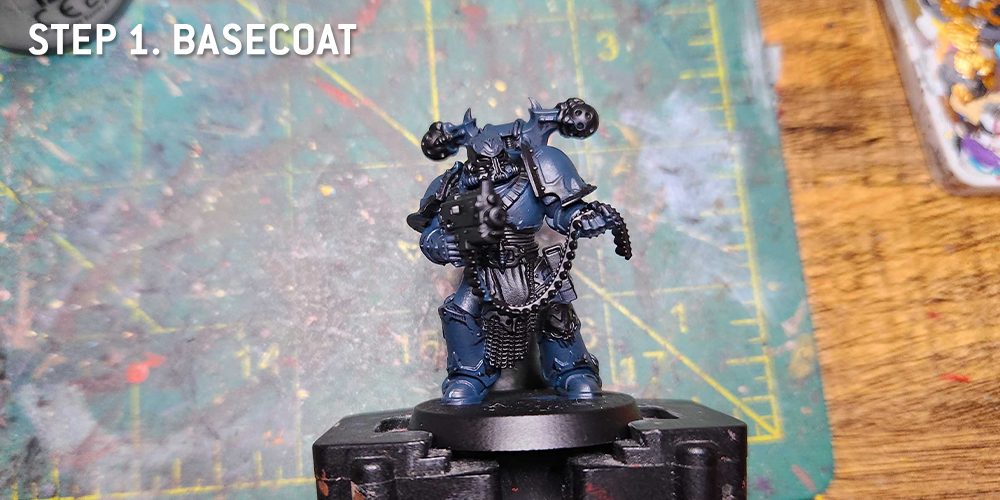
Step 1. Basecoat
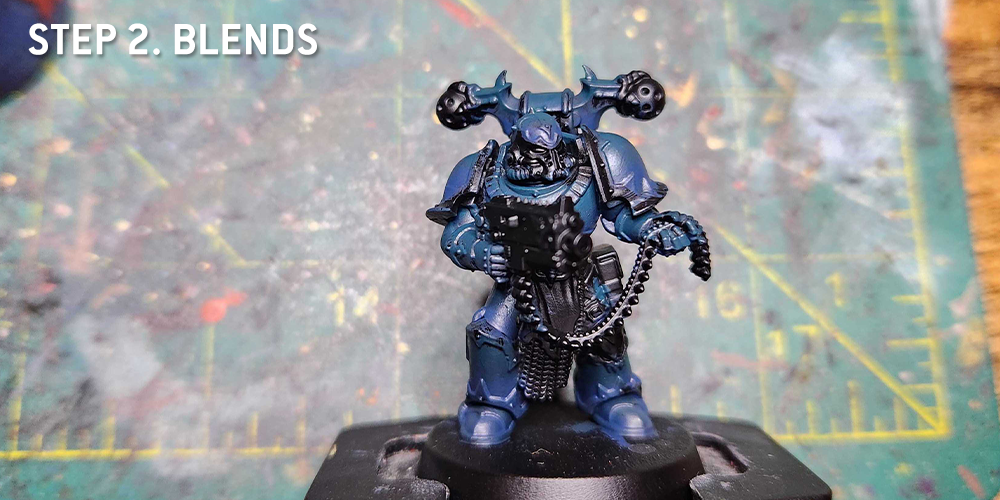
Step 2. The Blends
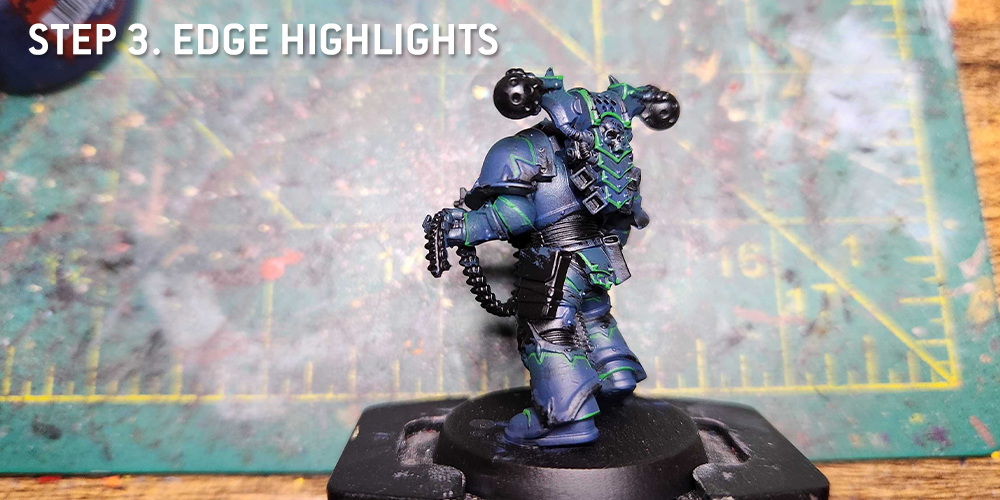
Step 3. Edge Highlights
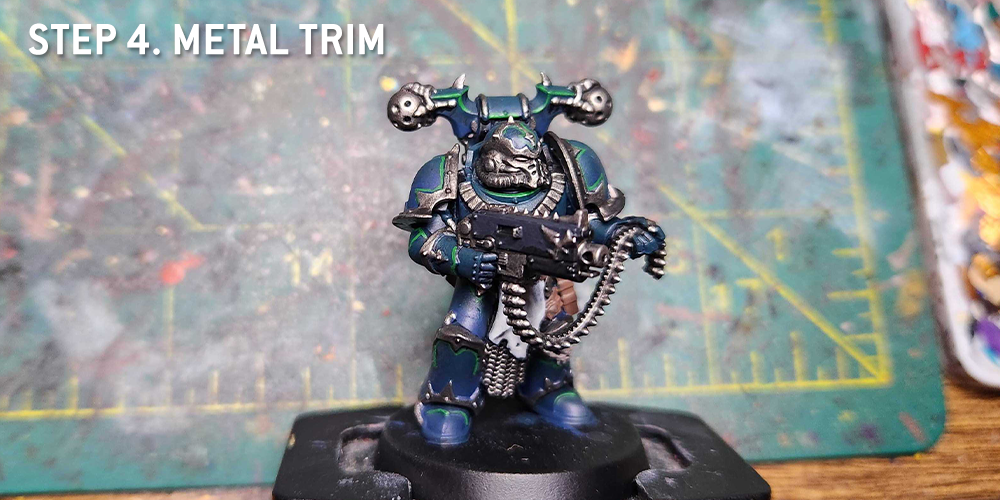
Step 4. Metal Trim
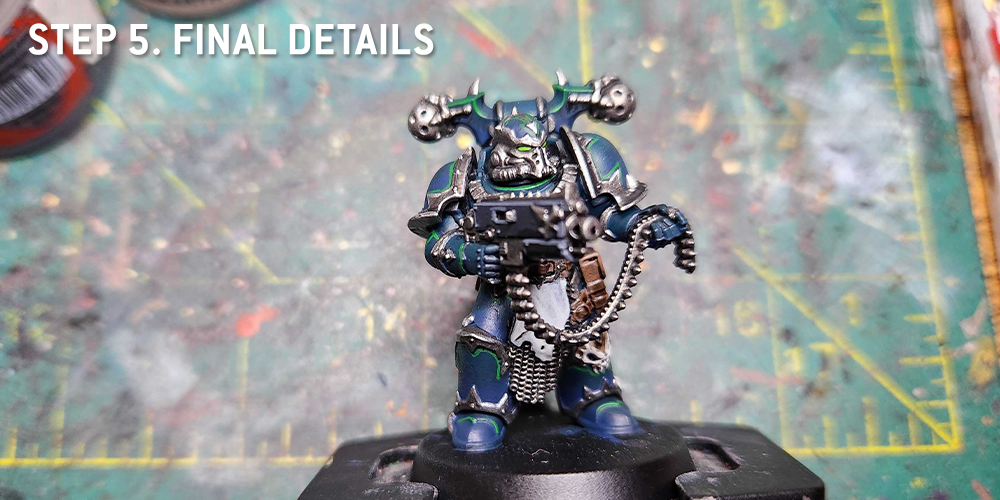
Step 5. Final Details
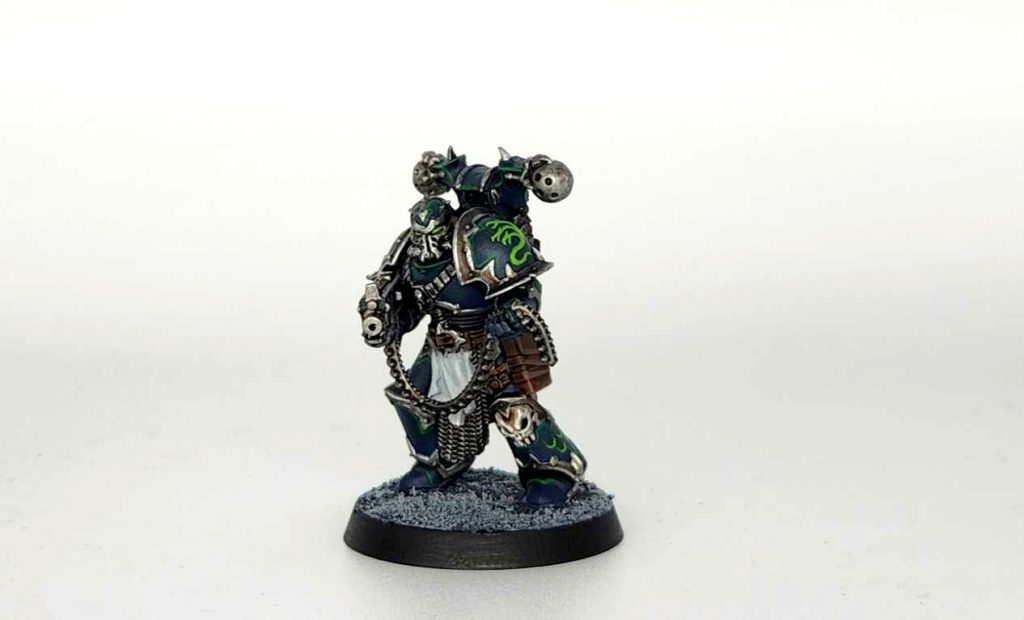
Another Way to Do It


Heresy-era Alpha Legion - Click to Expand The Heresy-era Alpha Legion use a much more blue scheme with a metallic tint, and it’s both easy and fun to achieve this look using contrast paints. I started by priming this model with Leadbelcher spray. This process starts with undercoating the model to add some texture and depth to the color before we put down the contrast paint. This means washing the model with Nuln Oil, then highlighting it again with Leadbelcher and drybrushing the model with Runefang Steel. Paint the armor with the blue-green shade you prefer. I used Kroxigor Scales for the armor here. Try and using too much paint here and keeping the paint from pooling so you can get a consistent thin coat. From here it’s just some standard details. The leather strips are Mournfang Brown, washed with Agrax Earthshade and edge highlighted with Gorthor Brown. The gun casing is Corvus Black, edge highlighted with Mechanicus Standard Grey. And I’ll end up edge highlighting the armor trim with Runefang Steel and painting the rivets. Finally I’ll edge highlight the armor with a bit of Baharroth Blue. And that wraps it up for the Heresy Alpha Legion. This was pretty fast and easy, but using Contrast paints makes it a little difficult to fix errors and do good edge highlighting, so it’s not my favorite method.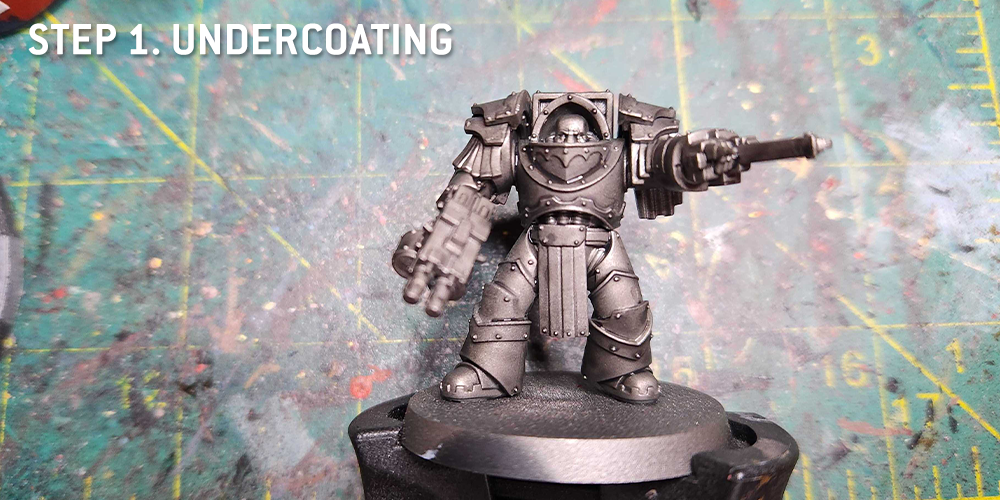
Step 1. Undercoating
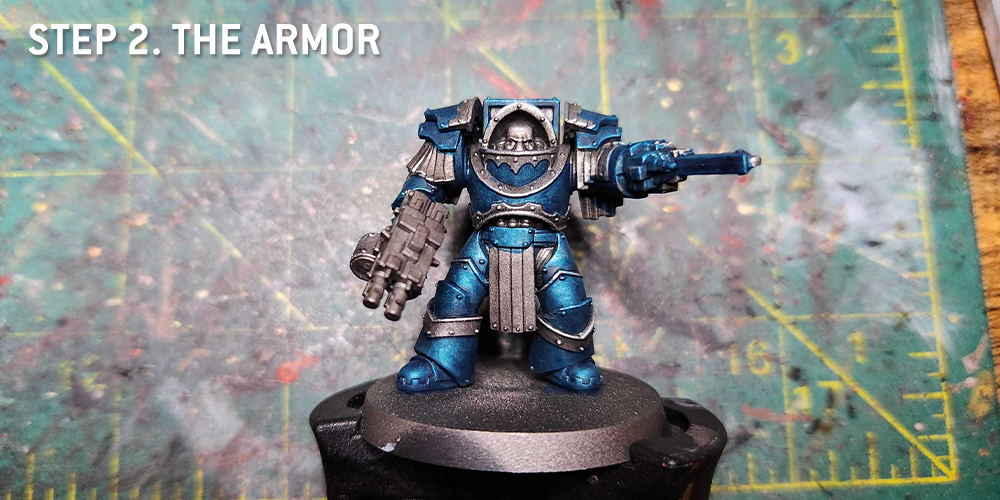
Step 2. Contrast Paint on the Armor
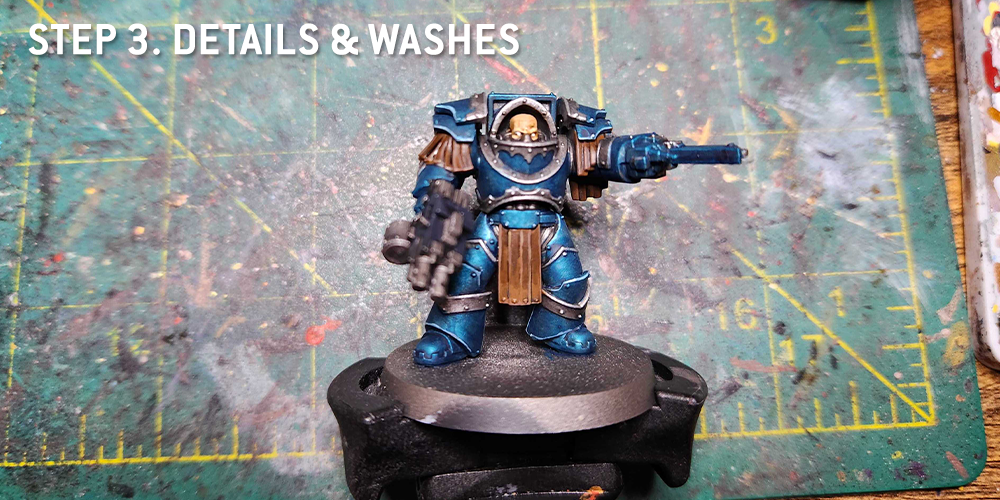
Step 3. Details and Washes
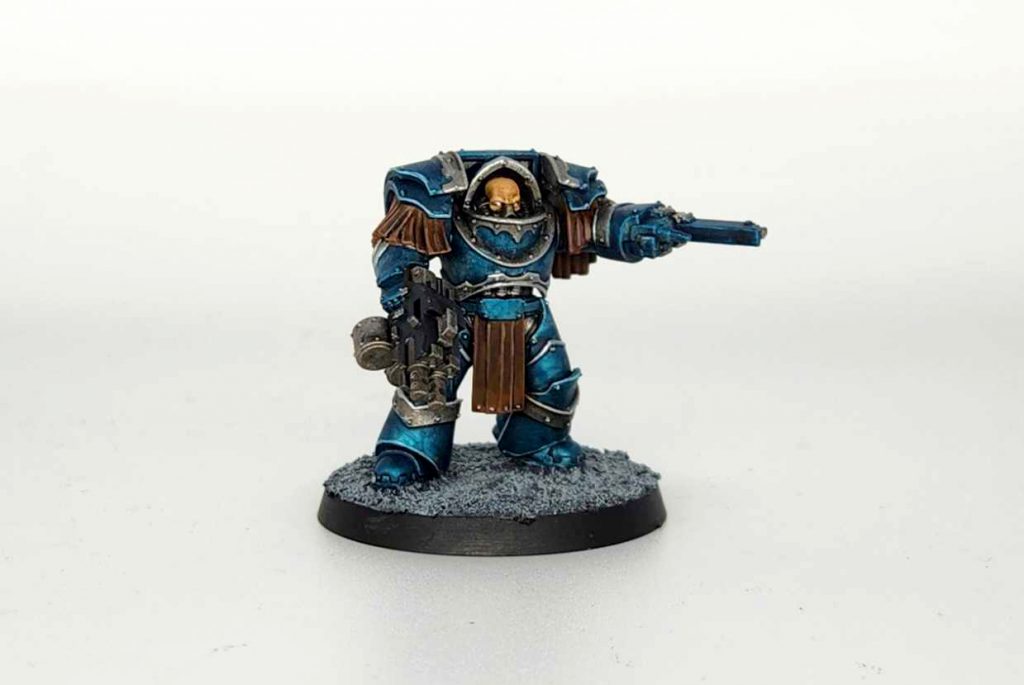

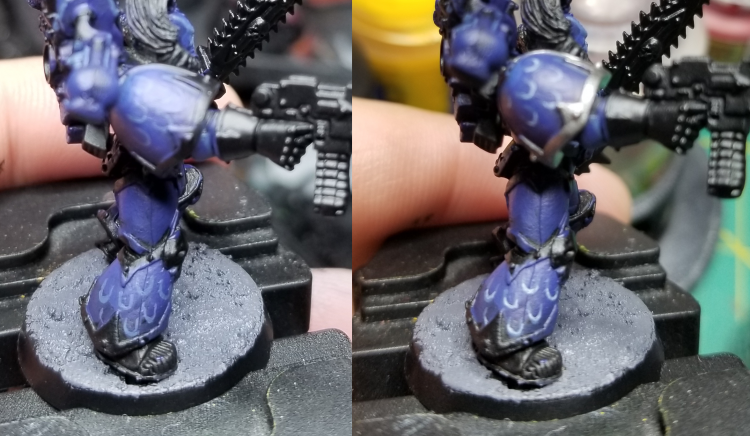
2nd-Edition Alpha Legion - Click to Expand First introduced proper in the 2nd edition Codex: Chaos, the Alpha Legion have become a bit of a fan favorite since, thanks to some cool backstory elements and fluff establishing them as the sneakiest chaos marines, and some very good rules in the 8th edition Codex: Chaos Space Marines. Although newer schemes for them give them blue – green armor with a fade and green highlights, and the Horus Heresy variant uses metallic blue-green shades, the original paint scheme for the Alpha Legion was a much deeper blue – almost indigo. I’ve tried to replicate that here. The model starts with a basecoat that’s mostly Kantor Blue with a healthy drop of Naggaroth Night in it. This gives it the more purplish tint I’m looking for and there isn’t really a GW paint that captures this color well. I shade this up a little bit with a speck or two of white and a second coat. Then it’s time to paint the metal trim – Leadbelcher, which gets shaded with Nuln Oil, and then the cabling – The Fang, washed with Drakenhof Nightshade and highlighted with the Fang and Reaper Snow Shadow. In this step I also do the base colors for the bone and tufts. The bone is Rakarth Flesh washed with Seraphim Sepia while the tufts are Wraithbone that I’ll hit with Iyanden Yellow contrast paint for a quick and easy solution. I also edge highlight parts of the armor with The Fang and a mix of the Fang and Reaper Snow Shadow. The eyes are Mephiston Red with spots of Evil Sunz Scarlet. The shoulder pad uses almost as many colors as the rest of the model – the Green is Warboss Green washed with Biel-Tan and then highlighted with Warboss Green and Skarsnik Green. The tongue is Pink Horror highlighted with Emperor’s Children. The horns are Rakarth Flesh washed with Agrax Earthshade and then highlighted with Reaper Polished Bone. And the eye is just a dot of Reaper Pure White. I miss those old metal shoulder pads – they had so much detail and they looked great. The scales are one of the defining features of 2nd edition Alpha Legion army. I painted these by freehanding thin “U” shapes on the model’s greaves and shoulder pad with The Fang, then I highlight them a bit at the bottom of the U with Reaper Snow Shadow.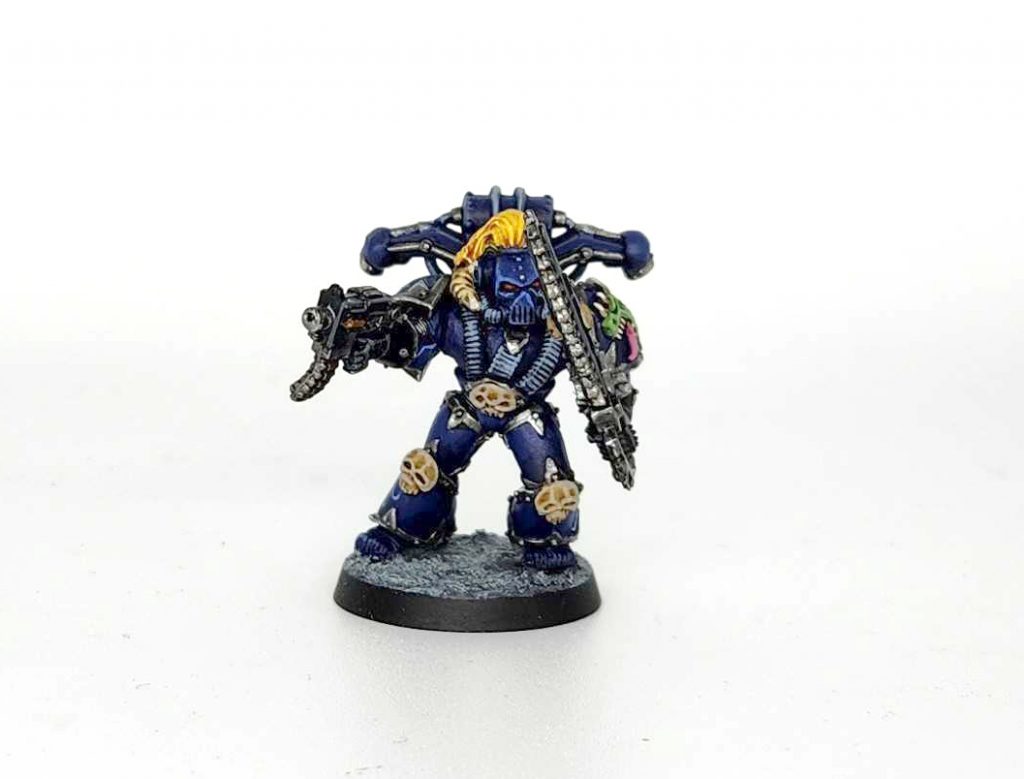
Final Thoughts
That wraps up our look at the Alpha Legion, who have one of the most interesting and diverse schemes of the traitor legions. Hopefully we covered a method or two for painting them that will work for what you’re trying to do, but whether you go green, blue, or gradient, there’s no wrong way to paint these guys.
Have any questions or feedback? Drop us a note in the comments below or email us at contact@goonhammer.com. Want weekly updates on when articles like this one go out? Subscribe to our newsletter.

