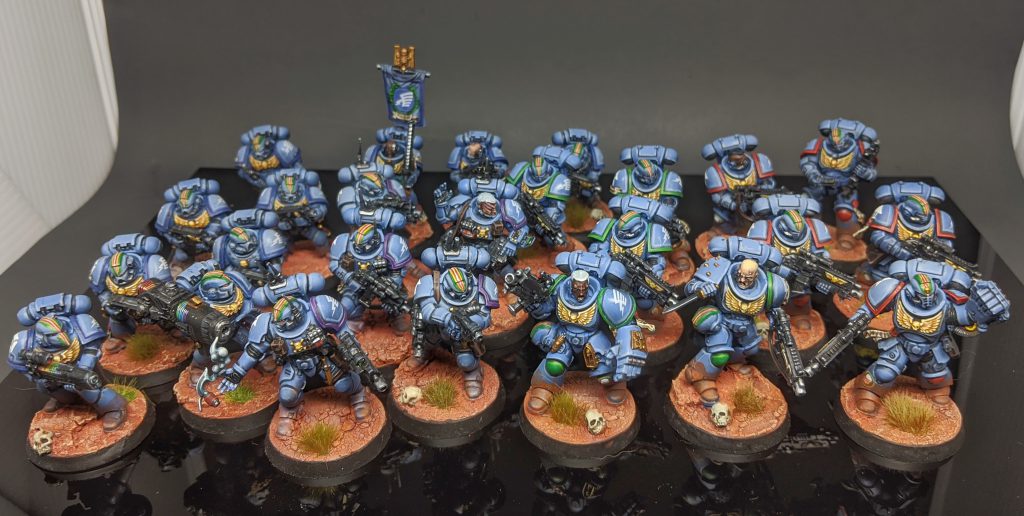
In our How to Paint Everything series, we look at how to paint well, everything, with tutorials by different authors covering multiple methods. This week, we’re looking at a number of key freehand details for heraldry, focusing specifically on checker patters, zig-zags, hazard stripes, and other details.
Table of Contents
Checker Patterns
Checker patters are more commonly seen on 40k armies in older paint schemes, but still show up fairly often in Ork armies and for specific chapters, with the Dark Angels (and their Fallen brethren) being the most prominent.
Skails’ Method
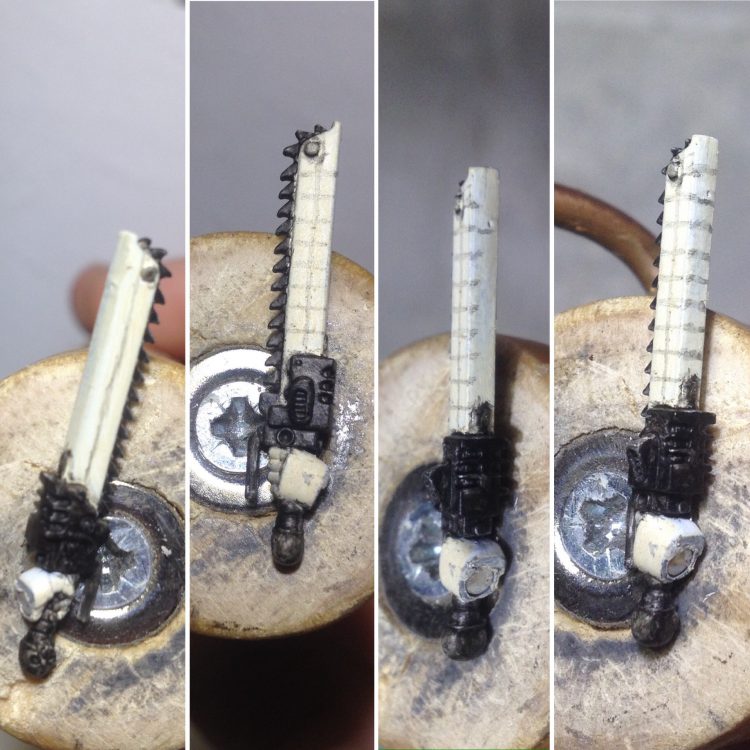
First, from left to right, I broke the larger field in half vertically using thinned black paint. Get this line as straight and centered as possible, but it will be fine tuned later in the process. (Doing a larger field I’d start with vertical and horizontal lines crossing in center of area).
Second I broke the area into squares with horizontal lines. These were done on both sides starting at the top so they would be approximately even.
Third is bringing a bit of paint around the edge of sword so that I can see where to line up with other side.
Fourth in this set is connecting the dots across back after both sides are done to step three.
The next steps are filling the squares still using somewhat thinned paint. I started with the spine and worked out to both sides. Here you can start to sharpen up areas that look wobbly or off. I spent some time here fine tuning the corners of the squares, the sharper they are the more even everything will look. From here it’s getting things as clean as you want them.
I’ve seen some of the studio paint jobs doing a slight highlight along the top and one side of squares.
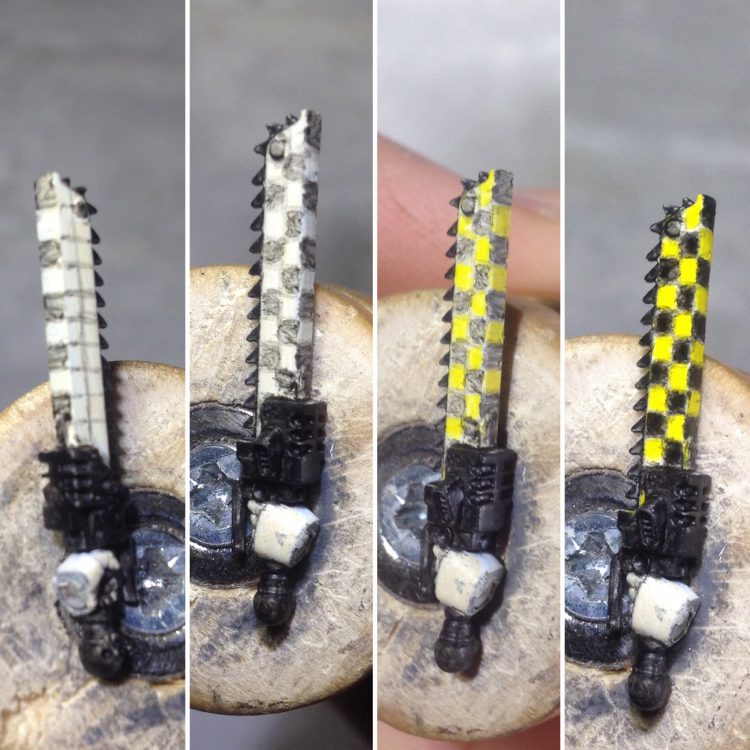
Here is the finished sword on my Excoriator intercessor Sgt.
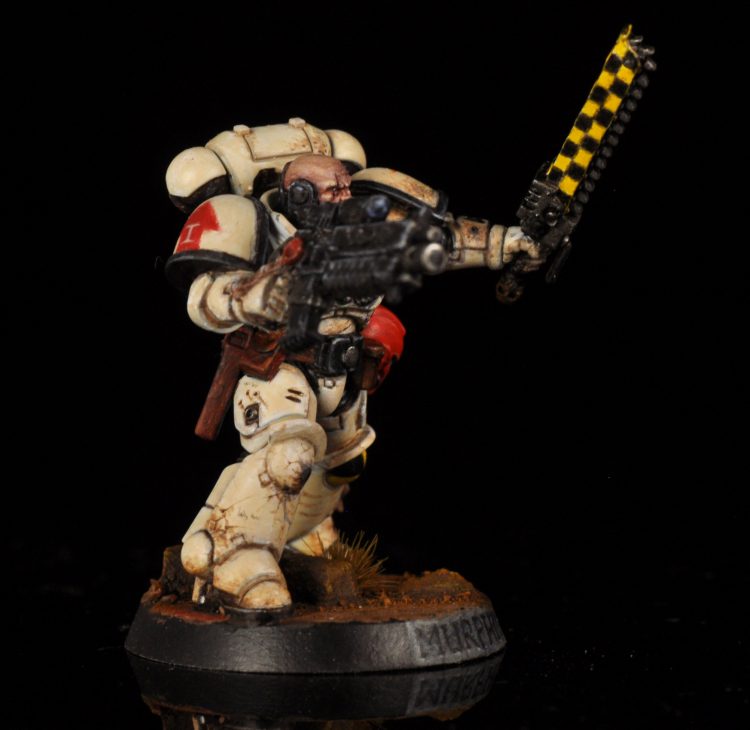
SRM’s Method
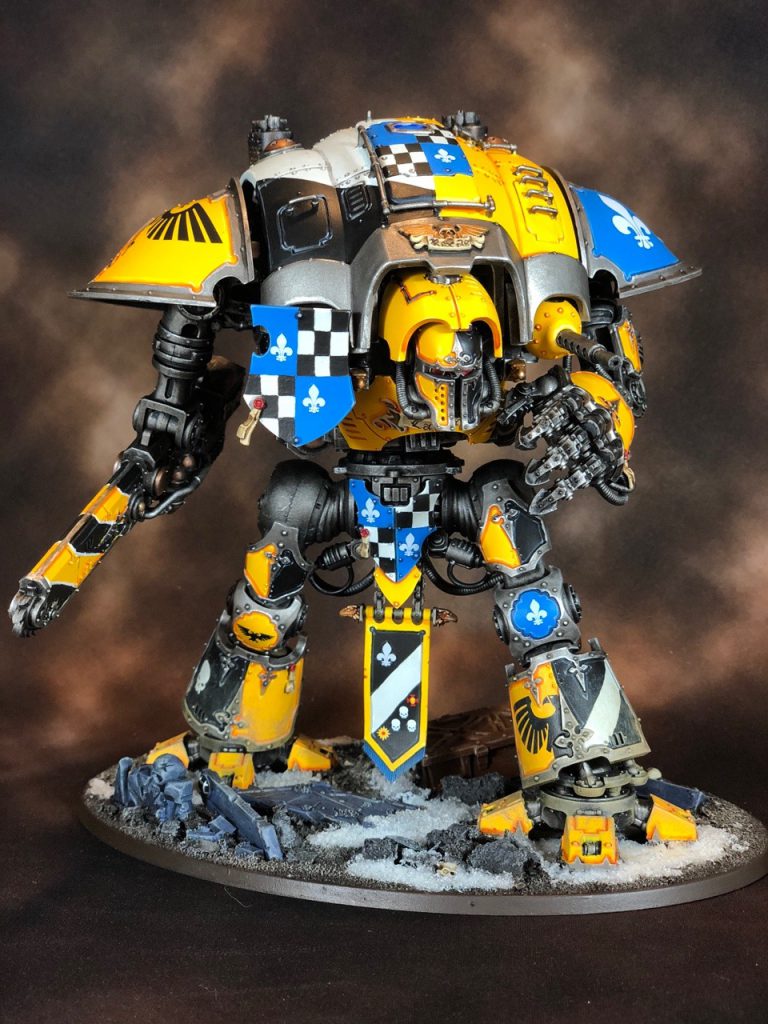
The simplest patterns are going to generally be halved or quartered heraldic designs. These divided fields can be as simple as solid colors, or they can incorporate transfers, freehand, or even other patterns within them.
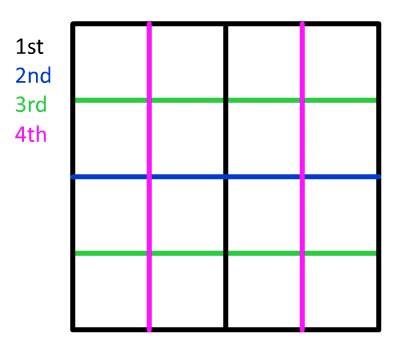
When I’m doing any sort of pattern, be it stripes, checks, or dags, I always start from the center and work my way outward. I would follow a similar pattern to Skails’ above, but draw a line at the center point of the design, then a line at the center of each side, subdividing again and again until I have an even number of designs on both sides that I find workable. I’ll draw it out in this extremely rudimentary diagram below, which displays how I would paint one line of checks, such as on a chainsword:
And then if you want to go one step further and do checkers over a larger surface, you apply the same principles:
Hazard Stripes
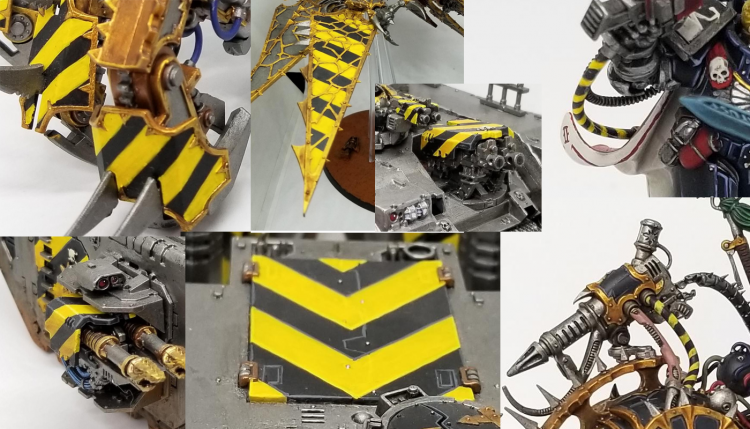
Also more commonly seen on older paint schemes, Hazard Stripes still show up often on modern 40k armies, particularly on Iron Warriors chaos space marines, but also commonly on weapons and vehicles where you might want to bring attention to a particular element with a pop of color, or mark that something is dangerous.
Skails’ Method
The method I use for hazard stripes is essentially the same, using thinned paint to mark the lines. These two pictures show weathering applied to hazard stripes. After the black and yellow was painted solidly, a wash of Seraphim Sepia was applied to the whole surface. Then black paint was applied with a brush in small random splotches as chipping. Next black paint was lightly sponged along the edges (I used foam from an old blister pack). Finally leadbelcher was sponged along the edges as well. I built this up more in the middle of the blade on the chain side where I’d imagine it would have more wear (Credit to forums user Ijyt for this process).
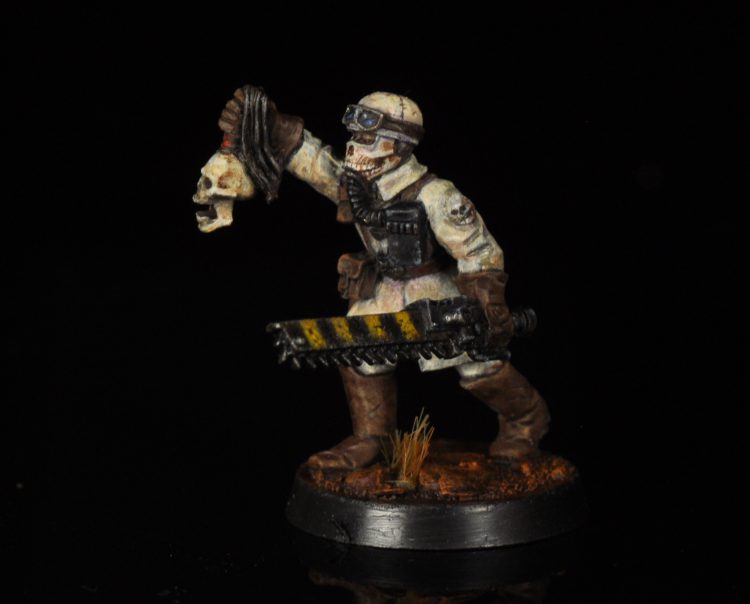
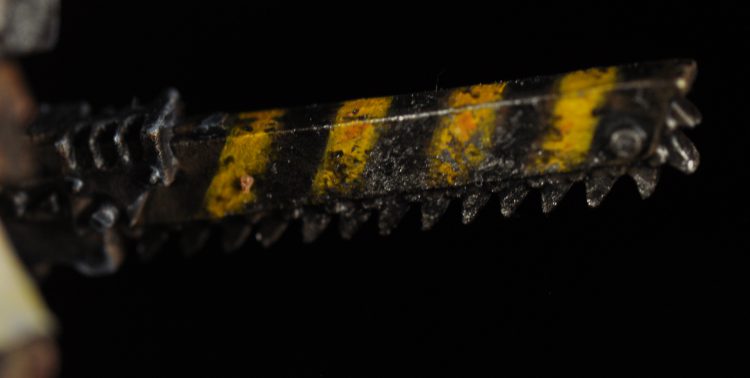
SRM’s Method

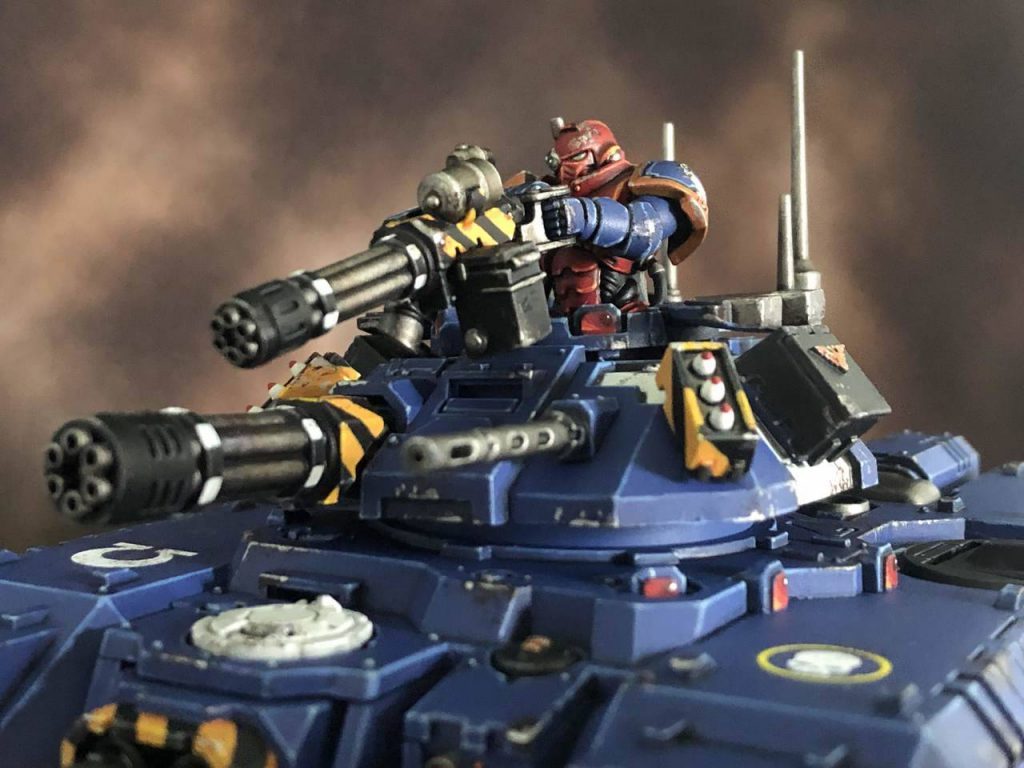
For caution stripes I’ll follow the same principle as my checkers diagram (above), but I find it good to anchor the lines with a detail on the model if possible. If you look at the stripes on my Repulsor turret, you’ll see a number of them line up with a rivet or corner pretty neatly. When painting these, I almost always paint the lighter color first, and use thinned lines of the darker color to sketch out the design. I then fill it in with a more solid coat of the darker color before cleaning up with the lighter color, then highlighting the edges.
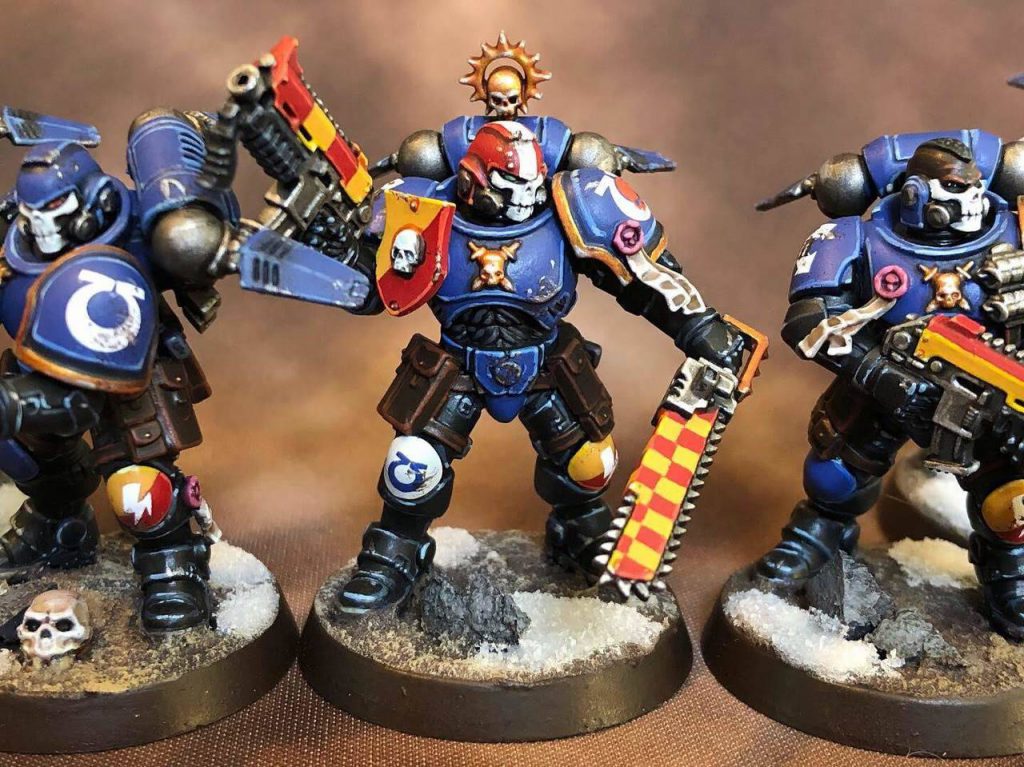
These details are extremely fun, but can feel really out of place if you choose the wrong colors. For my Reivers, I utilized bright heraldic reds and yellows over the moodier blues and blacks, but by weathering them the same as the rest of the armor I knocked back some of the potential garishness. I also made a point to balance the colors against each other by having them appear in multiple places on the models, such as their weapon casings, tilting plates, and heraldic knee designs.
TheChirurgeon’s Method
I prime everything black, which means that I usually already have half the work done when I’m painting hazard stripes. On the other hand, it makes adding the yellow parts a lot more work. The key here is to start by outlining what you want to do. For my Iron Warriors, I start by laying down thin outlines of where my stripes will go using thinned Averland Sunset yellow paint, then I block those areas in. Once I’ve done that, I cover those parts with 2-3 thin coats of Flash Gitz Yellow to get the proper yellow shade I want. This is probably more work than starting with yellow and laying down black, but it’s a method I prefer to trying to cover white areas with black paint. I freehand my designs exclusively, which takes a steady hand. If you’re doing larger work and aren’t comfortable with that, painter’s tape is a great way to make sure you get cleaner lines.
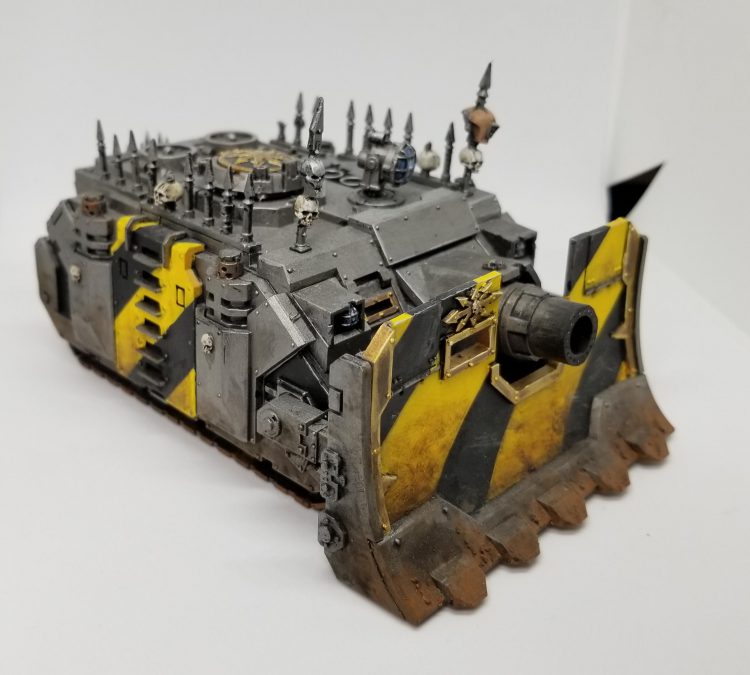
Weathering hazard stripes is super easy, because warm browns add a lot of easy depth to the effect and can make your model pop without a ton of investment of time. The Vindicator above was done with some drybrushing/sponge work using the now-out of production Blackfire Earth technical paint. Though Typhus’ Corrosion or another ruddy brown will work just fine. I also sometimes use my finger to smudge or spread paint around when I’m trying to make something look gross and corroded.
Something to be really mindful of when you are doing your Hazard stripes is how they’ll change/move when you have to paint them around corners and curved surfaces. This is where some planning will help you significantly, otherwise you’ll quickly find that your lines are overlapping in ways you don’t want. When you do this, you can either have the stripes meet in a chevron pattern, or continue to wrap around a tube or curved surface. The key is to make sure that your stripes always run parallel and equidistant. If you’re doing this on a tube or cable, this will mean that your stripes run the length of the tube in a spiral pattern, which can require some precise lines.
Flames
Whether you’re panting a sweet van or an incredibly fast dakkajet, sometimes you want to add flames to your minis. There aren’t quite as many reasons to add flames to your minis as there used to be now that the Legion of the Damned have gone the way of Legends, but they still see lots of use on Orks and Salamanders models.
SRM’s Method
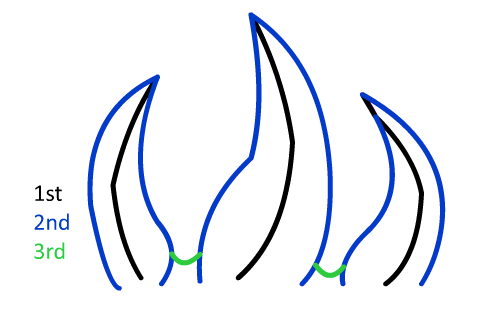
I’ll go one step further and outline one last technique useful for Ork players especially: flames. These aren’t realistic flames like the ones molded on a torch, but the kind of hot rod flames you find in a lot of old school ‘Eavy Metal paintjobs. Using the tip of your brush, draw a wavy line away from the tip of where you want the flames to be, gradually getting wider as you get closer to the base of the design. Leave a little room between each tongue of flame so they have room to breathe. Fill in the design and then connect the flames with a curved line to unite the design. Here’s another rudimentary diagram:
You’ll want your paint to be fairly thin for this as well, and be prepared for a bit of cleanup here. However, since this is a bit less regimented than some checks or hazard stripes, you can afford to be more loosey goosey.
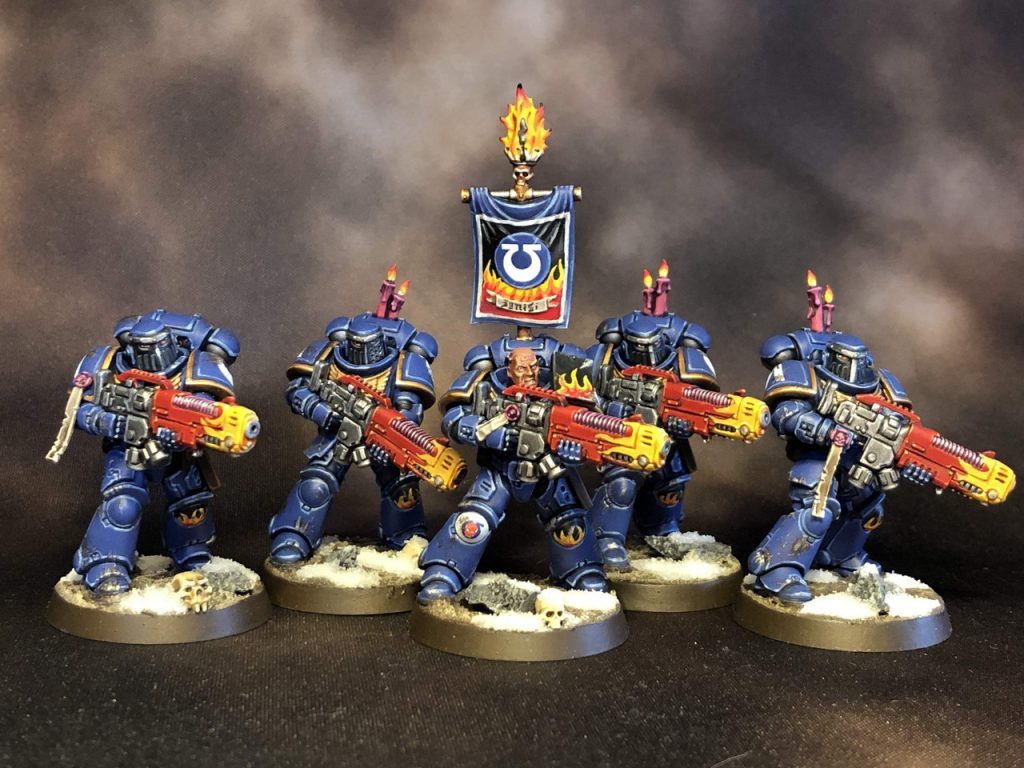
It can take a while to get the hang of it, but designs like these come together fairly simply and with practice you’ll want to experiment more and more.
Other Stripes
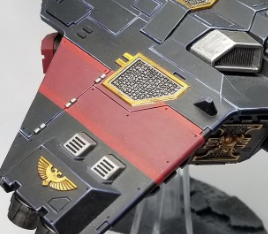
TheChirurgeon: The methods don’t really change for other stripes. I do the red stripes on my Deathwatch using Khorne Red and Mephiston Red as the brighter color. For the stripes on my Corvus Blackstar, I used layers of painter’s tape to get the lines extra straight.
TheChirurgeon’s Black Legion Markings
Before they went all mainstream, the Black Legion used to have some sick designs in Index Astartes that had them covered in large yellow and gold Chaos stars. I knew when I started doing my Black Legion that I wanted to emulate those designs as a way to have my vehicles really stand out and not just appear to be flat black. The process for these is the same as hazard stripes, where I plot out what I want to do using a thin line of Averland Sunset, followed by blocking in the shape and covering with 2-3 thin coats of Flash Gitz Yellow. Then once I’ve done that I’ll come back and hit parts with black to add corrosion and spots, giving it a more chaotic feel. These look harder than they are — you don’t have to be exact with them, and that makes painting them a lot easier than they look.
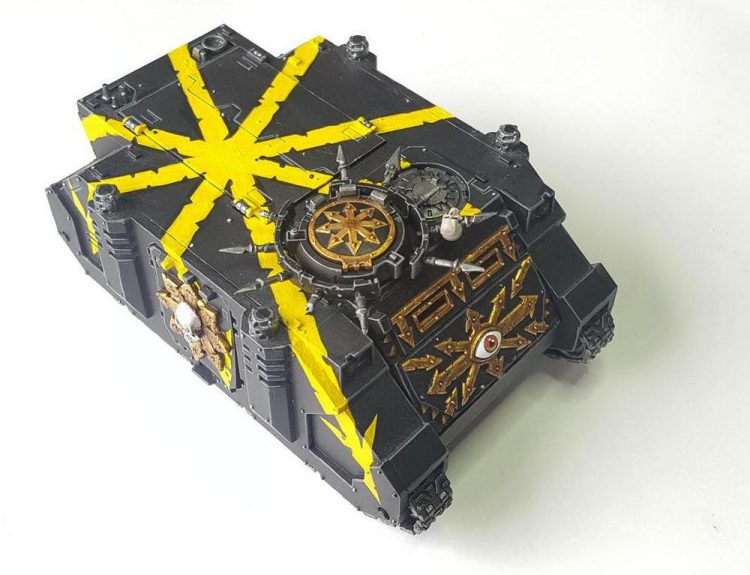
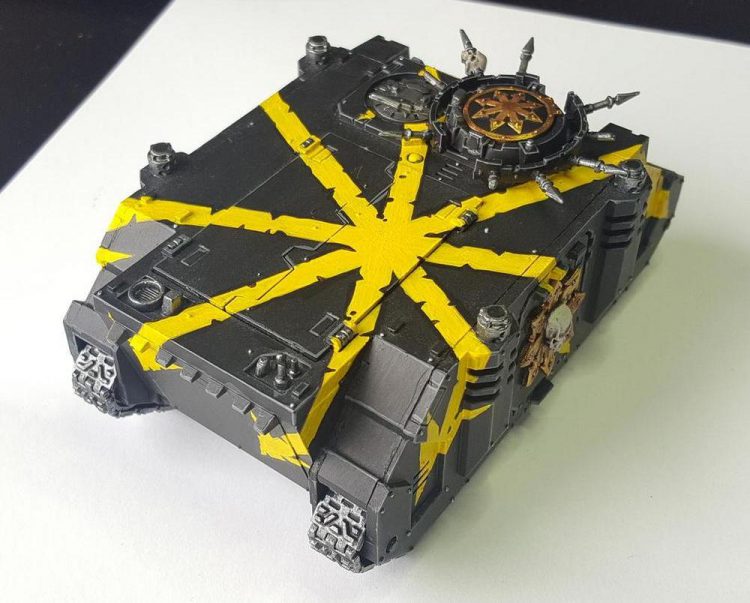
This can be extended and replicated in different ways on other models, giving a lot of possible variation where what’s important is the overall shape and how I’m blocking it out rather than getting a specific line exactly right.
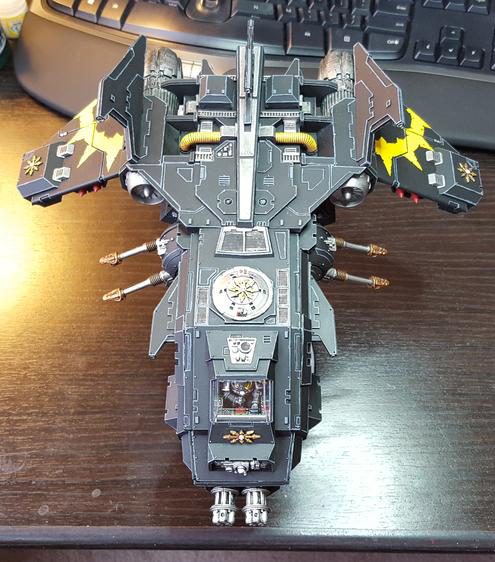
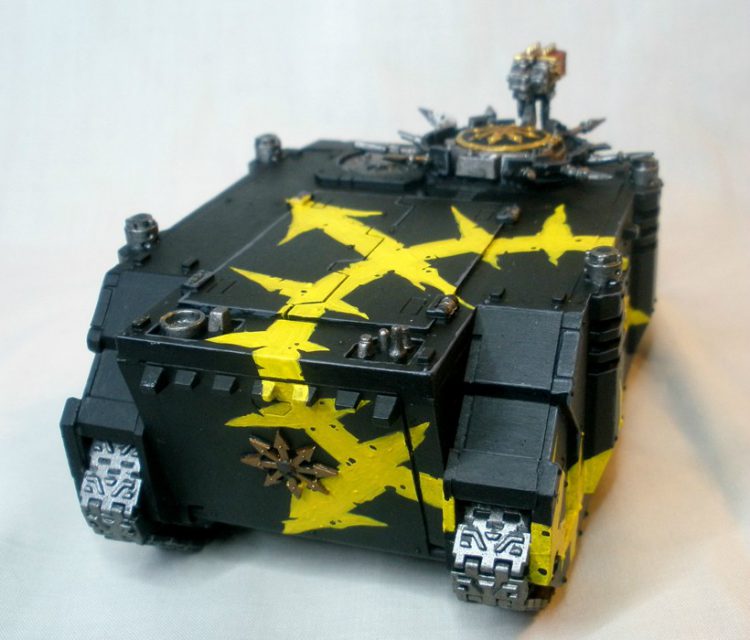
Rainbows
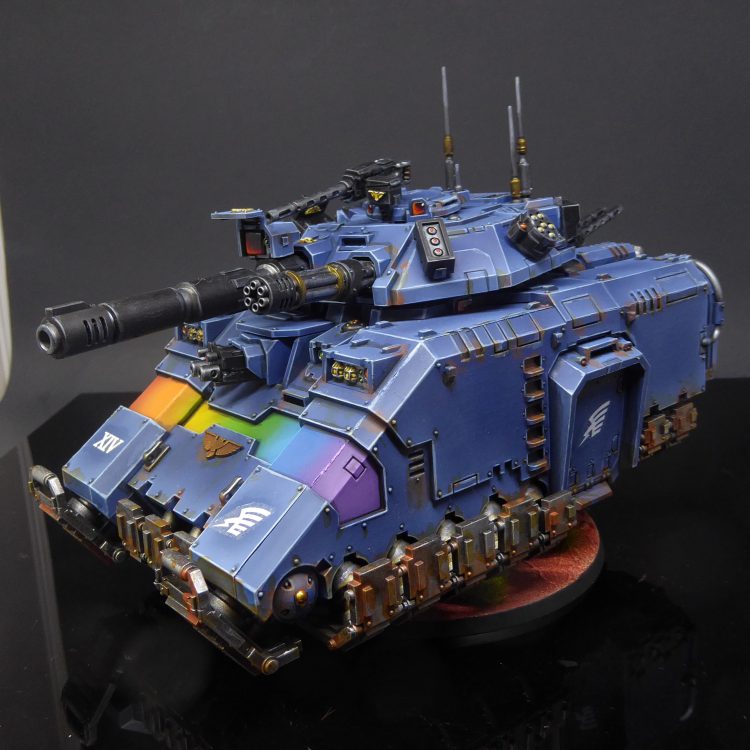
MasterSlowPoke: I take two approaches when painting the rainbows on my Rainbow Warriors. On larger areas, like in the recessed panels on Space Marine vehicles, I use an airbrush. If possible, I do this before painting the regular armor around it – it’s usually easier to mask inside the recessed area with poster tack than to try and mask around it. As there’s a lot of color switching going on, batching multiple vehicles at the same time is a good idea. I will go from red to violet, constantly changing colors. You will want to cover roughly 1/5th the area you’re trying to cover with each color, overlapping slightly the previous color. On even larger areas, like a Repulsor, I go through and spray a small amount of the highlight color roughly in the center of each color patch. You don’t have to be perfect, the effect will still come through!
On the helmets of the marines, such a small area requires a smaller amount of colors. The rainbow warriors are already blue/indigo, so I start with green, and cover a straight line down from the back of the head to the top of the helmet break before the faceplate. This first line should be slightly wider than the ridge that’s on the top of most Space Marine helmets. Next go in with your yellow, and do a slightly less wide stripe. Red comes next, and you’ll have a line roughly two brushstrokes thick at this point. The effect is completed with a thin, thin line of Screaming Skull – pure white is just too distracting. At the end, you’ll probably have a mess of lines of varying thickness. That is ok! Now go back through with the colors in reverse – use the red to correct any meandering Screaming Skull strokes, then the yellow, and etcetera. The areas are generally small enough that there’s no need to highlight, but for characters or if you want to go the extra mile, use a thin dash of the highlight color down the lines near the edge of the helmet crest and the edge of the faceplate.
The colors I use are:
- Base -> Highlight
- Red: Mephiston Red -> Evil Suns Scarlet
Orange: Jokero Orange (airbrush)/Troll Slayer Orange(regular brush) -> Fire Dragon Bright - Yellow: Averland Sunset -> Flash Gits Yellow
- Green: Warpstone Green -> Moot Green
- Blue: Teclis Blue -> Temple Guard Blue
- Indigo: Altdorf Guard Blue -> Hoeth Blue (Indigo can be skipped in smaller areas! It’s barely a color)
Purple: Xereus Purple -> Genestealer Purple
Go Experiment
Hopefully this has given you some techniques and strategies for taking on some of the more difficult freehand projects you’ve been contemplating. We’re confident that, with careful planning and practice, you’ll be doing your own amazing hazard stripes, checkers, and other freehand patters in no time. And as always, if you have any questions or feedback, shoot us a note in the comments below or email us at contact@goonhammer.com.

