In our How to Paint Everything series, we take a look at different armies of the Warhammer universe, examine their history and heraldry, and look at different methods for painting them. In this article we’re looking at how to paint the Adepta Sororitas, also known as the Sisters of Battle.

The Adepta Sororitas are the militant arm of the Imperium’s Ecclesiarchy and also form the Chamber Militant of the Inquisition’s Ordo Hereticus. These religious warriors take to the field armed with bolter, flamer, melta, and faith in equal measure. Clad in the finest power armour and weapons available, the Sisters are selected, religiously indoctrinated and trained to extremely exacting standards. That alone would put them at the upper end of the Imperium’s elite forces, however, it’s their faith and mission that not only sets them apart but elevates them beyond similarly equipped forces like the Adeptus Astartes and Militarum Tempestus Scions. Their force of will actively manifests on the battlefield in the form of miracles. Bolter shots that should be easily turned aside by Terminator plate find weak points. Psykers hurl lightning from their fingertips, only to find it dispelled by flashes of golden light. Sisters that fall in battle to grievous wounds return to life and take up the bolter and blade anew.
The Sisters originally formed due to the Decree Passive, which is a restriction placed on the Ecclesiarchy forming military forces after the Age of Apostasy, a civil war that engulfed the Imperium some time after the Horus Heresy. However Sebastian Thor, the new leader of the Faith, argued that the Imperium’s religion needed force to defend it and who better than the fighting force that ended the war, the Daughters of the Emperor.
That force would go on to become the Adepta Sororitas, tasked with protecting the faith from within and without.
Where To Read More
With all the recent attention on Sisters, they’re getting some new fiction, and it’s pretty good! Rachel Harrison (of Severina Raine fame), recently released Mark of Faith that tells a story from the perspectives of a newly minted Sister Superior and an Inquisitor and it’s quite good! (Corrode: at time of writing I’m still reading this. Check back for a review in a few weeks.) Celestine: The Living Saint by Andy Clark is also not a bad read and delves into what it truly means to be a living saint.
If horror is more your jam, Peter Fehervari released Requiem Infernal earlier this year, focused on an obscure order of Adepta Sororitas and one of its wayward daughters, it’s quite strange and interesting!
James Swallow also wrote some Sisters novels at some point. They’re ok if you have nothing else to read.
Covered in this Article:
- How to paint the forces of the Adepta Sororitas, with a look at each of the major Orders shown in the Codex, as well as a few minor orders created by Goonhammer authors.
- Techniques for painting common elements of the Adepta Sororitas, such as purity seals, power weapons, and flames.
Painting the Adepta Sororitas
The Adepta Sororitas have a lot of the gothic armor and trappings of Space Marines, and share a number of the same vehicles. That said, they tend to run smaller and slimmer with their power armor, and the army incorporates a much heavier dose of the religious and gothic imagery – that means more purity seals, braziers, robes, and filigree. Here are a few common elements you’re sure to come across when painting the Sororitas, and how to tackle them.

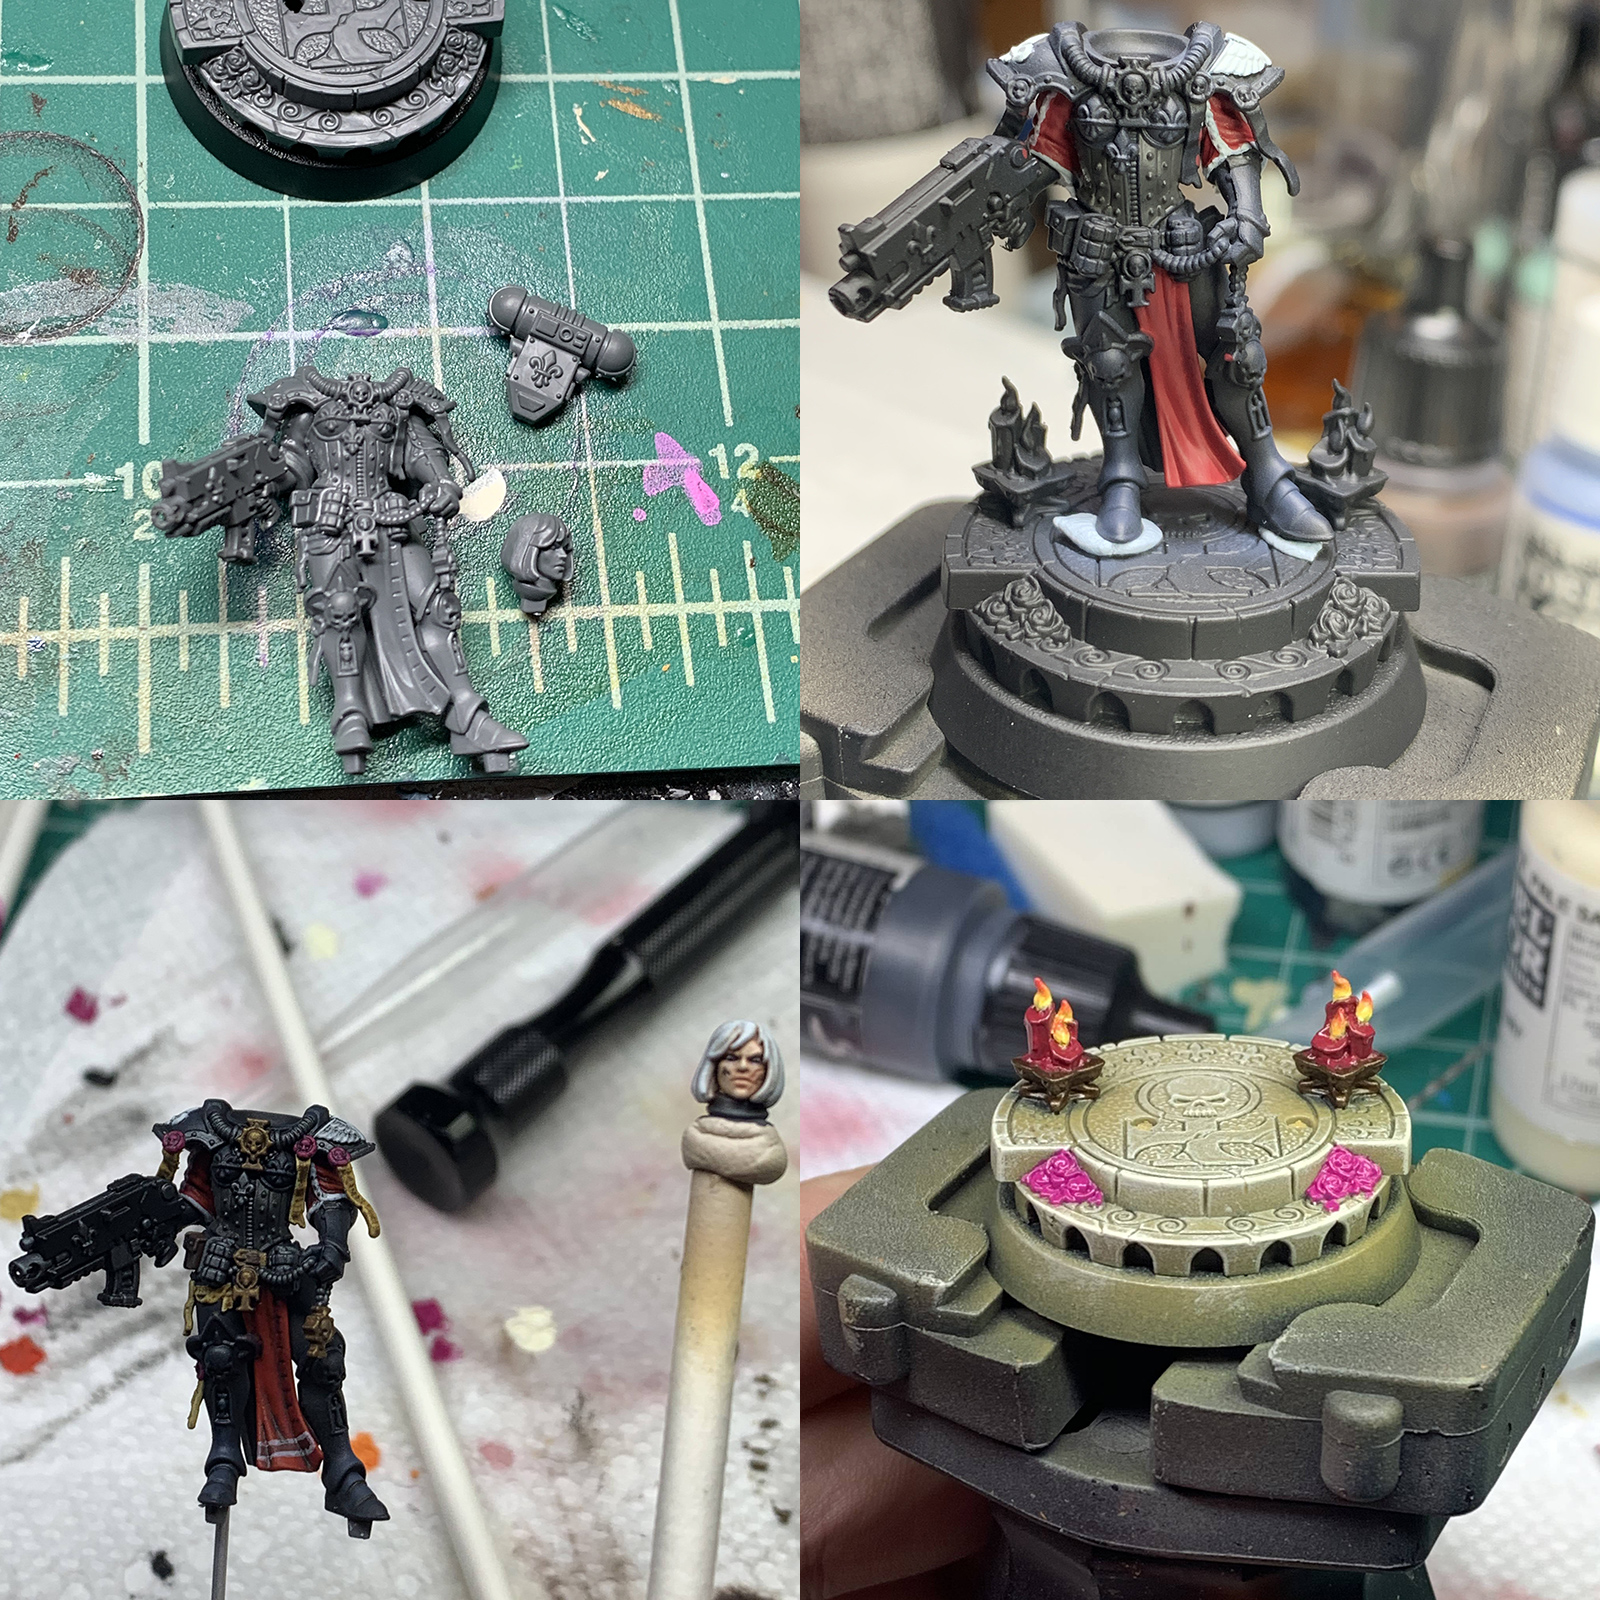
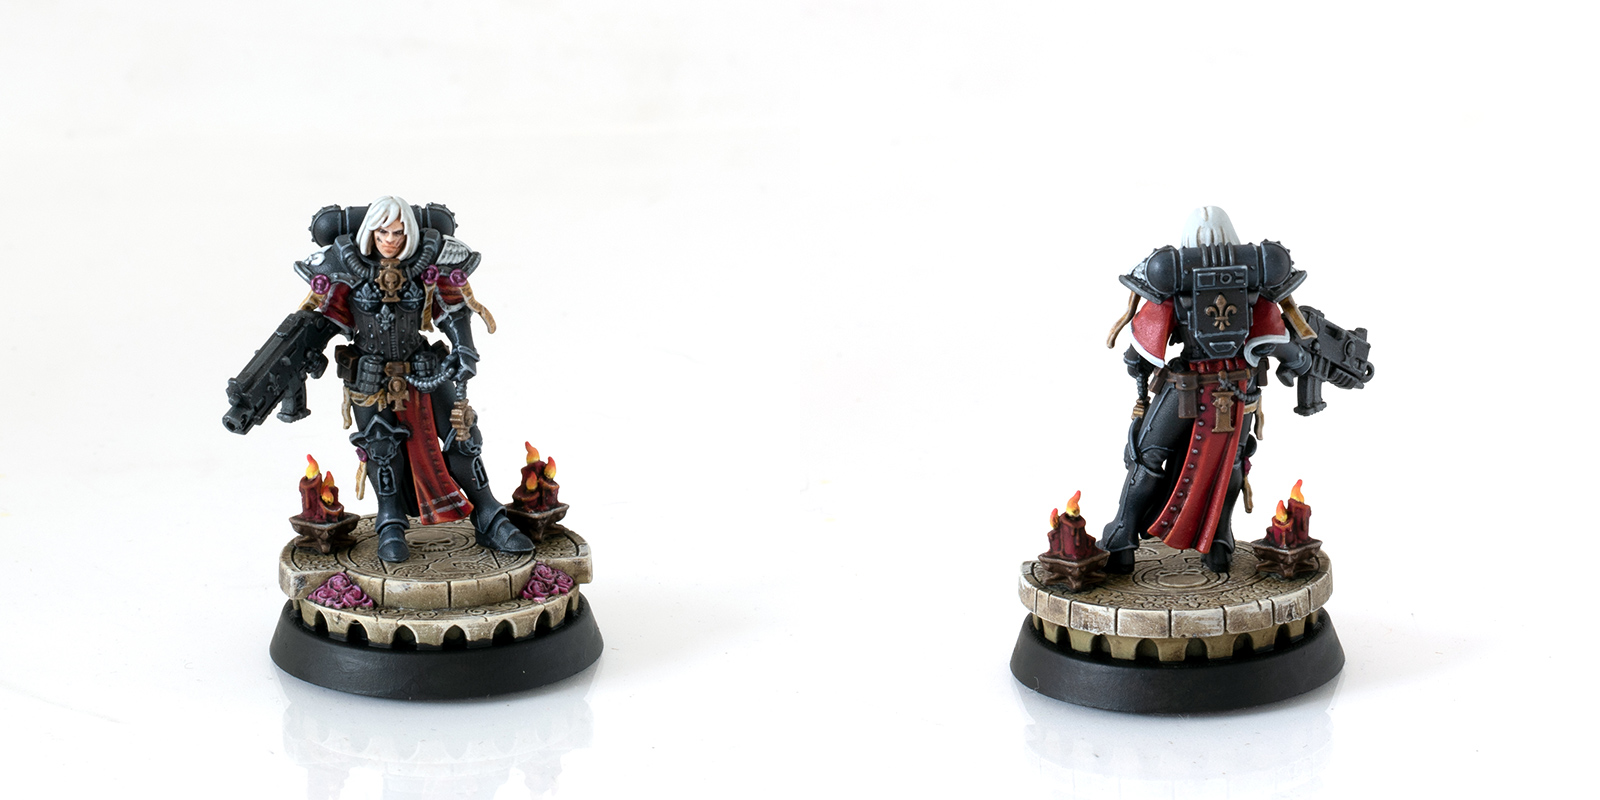
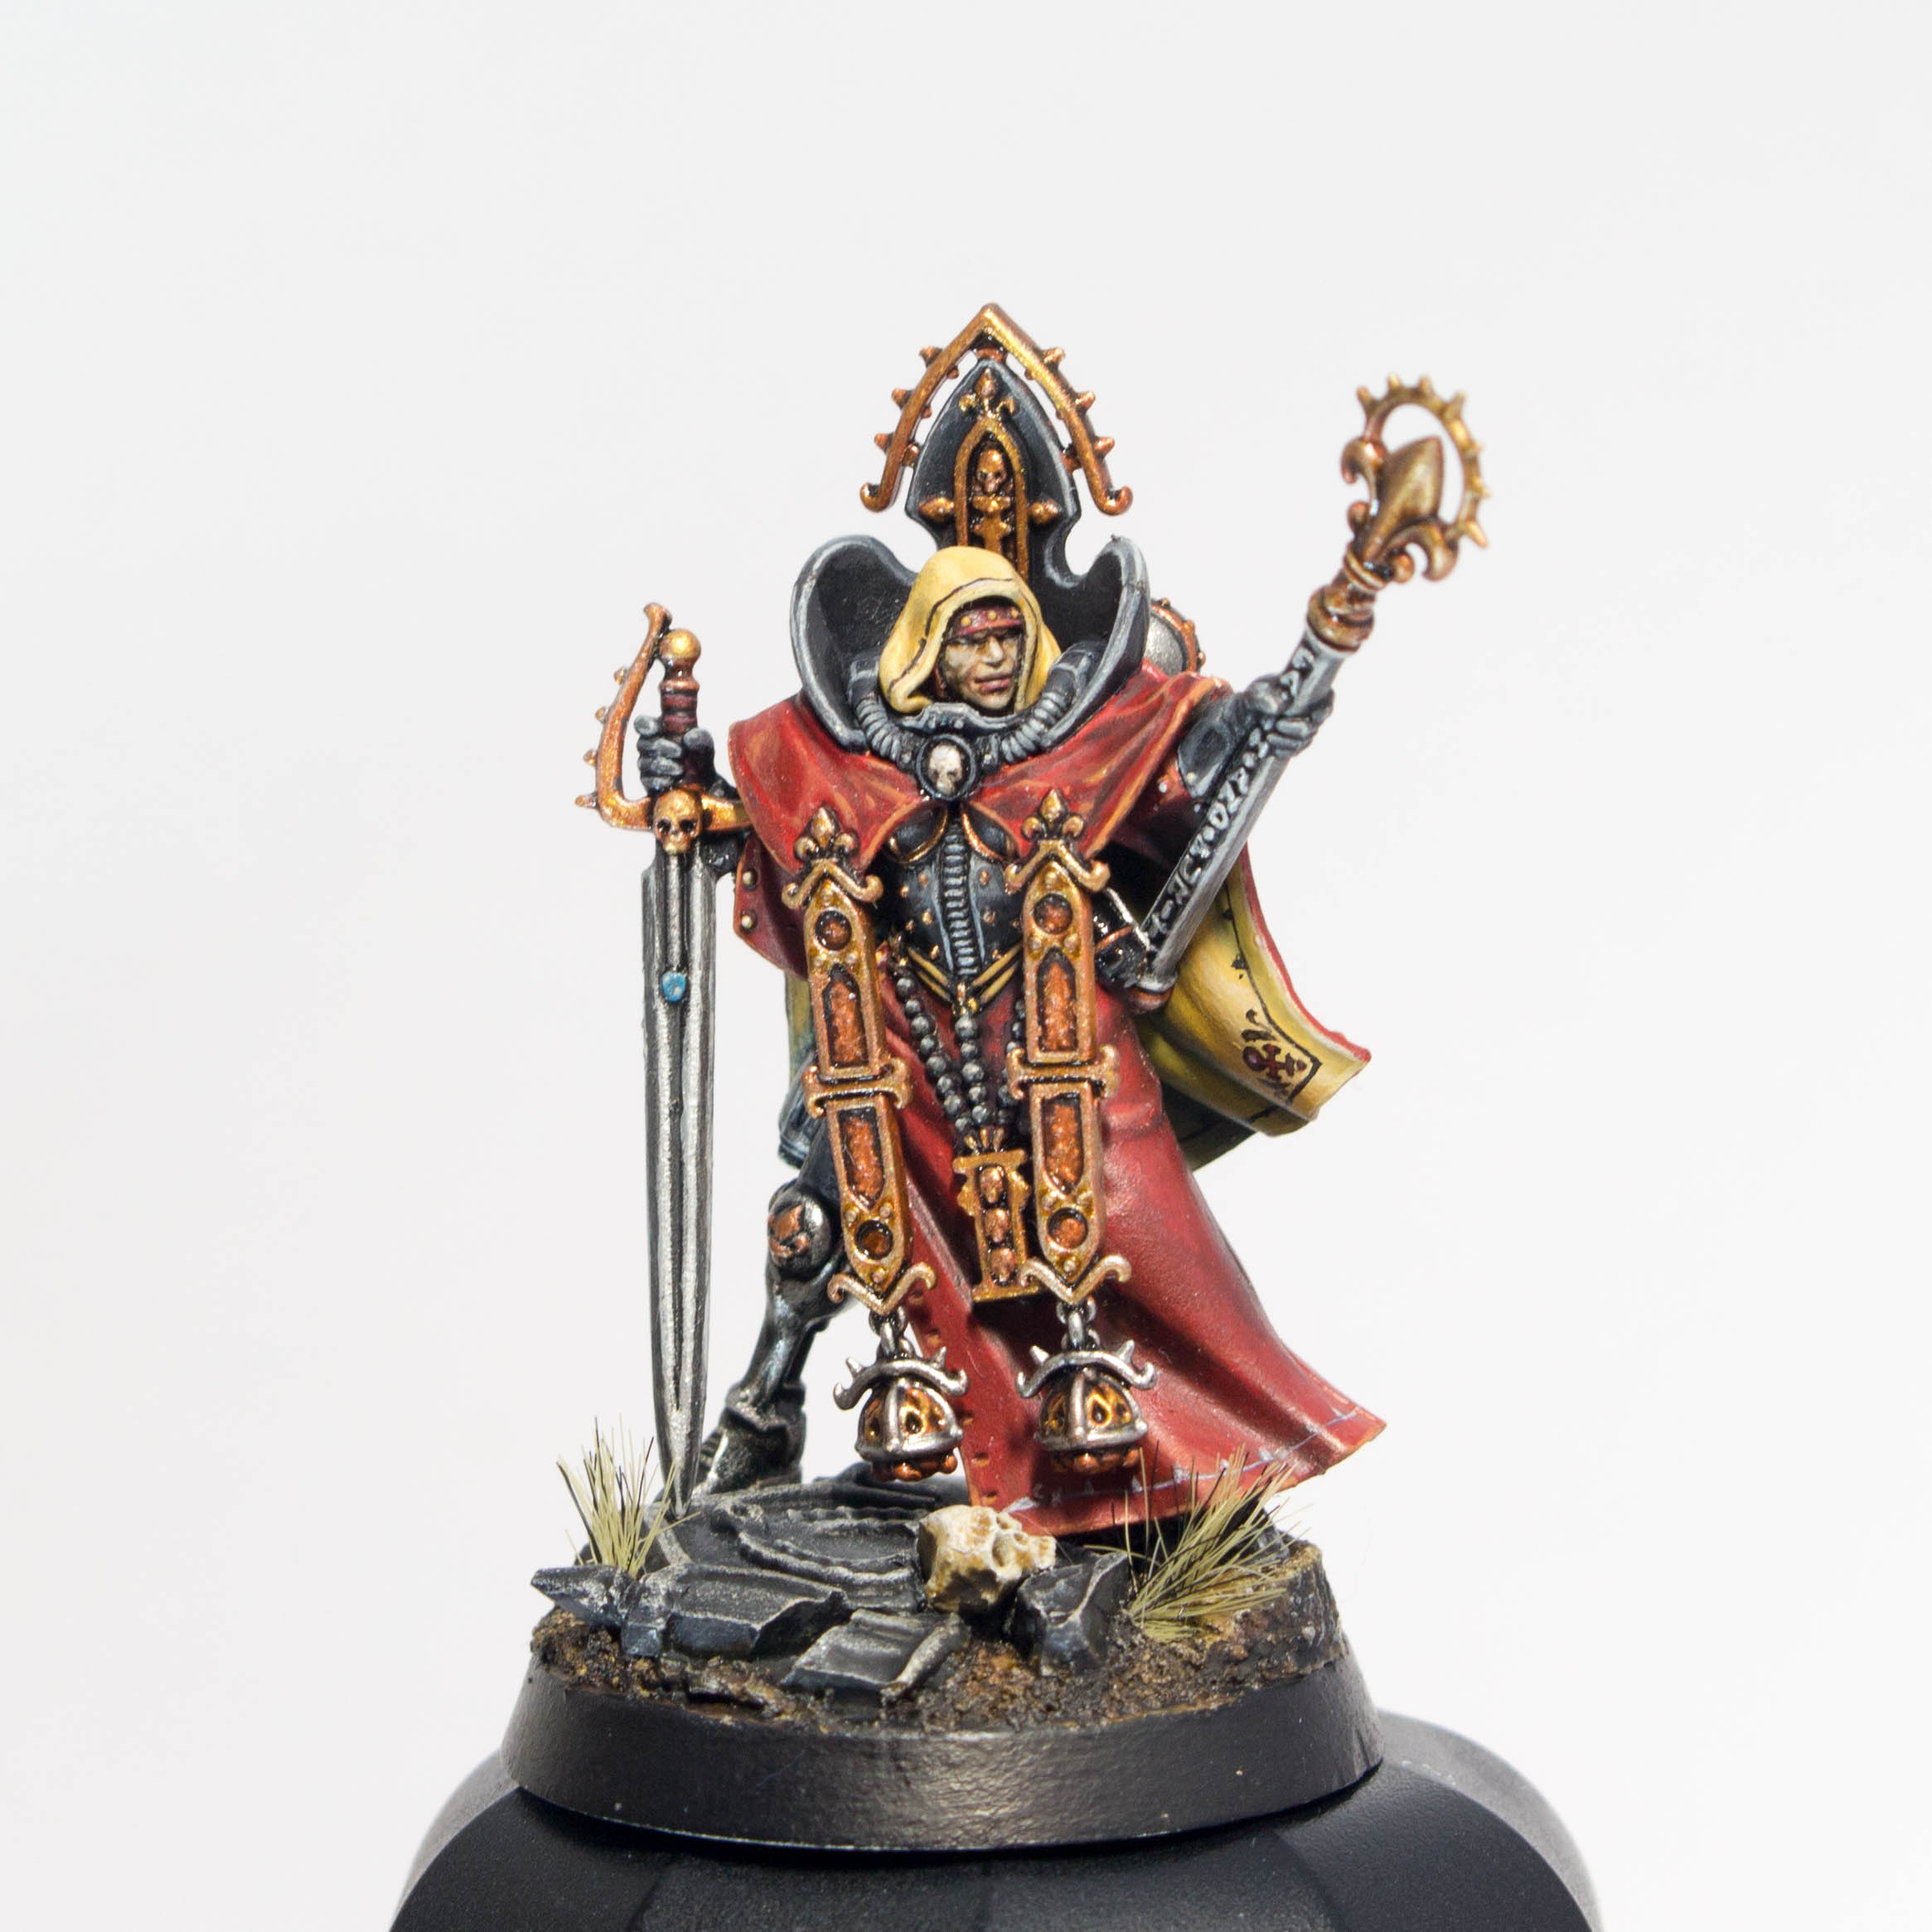
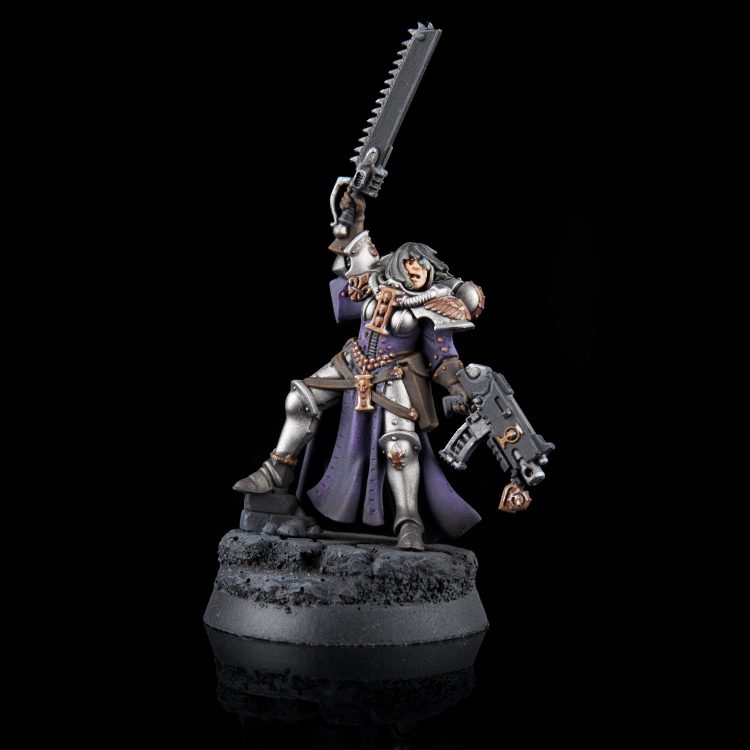
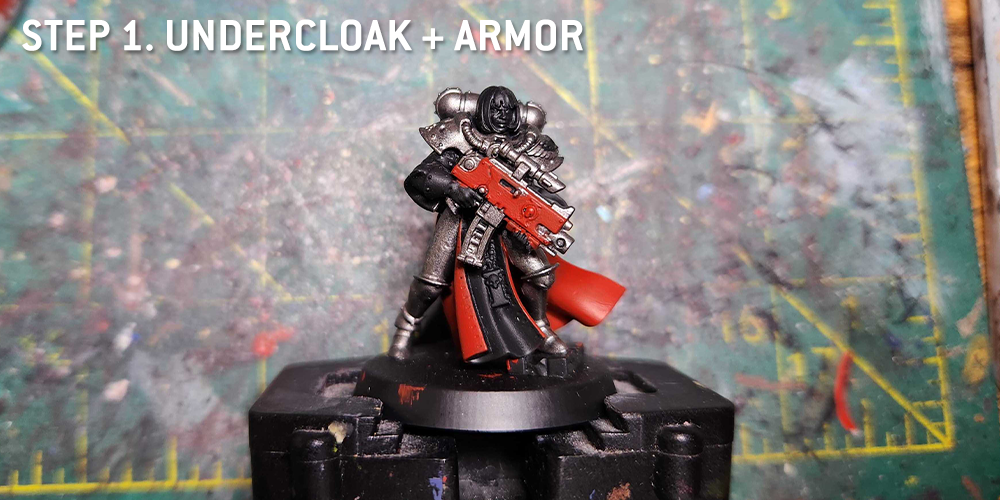
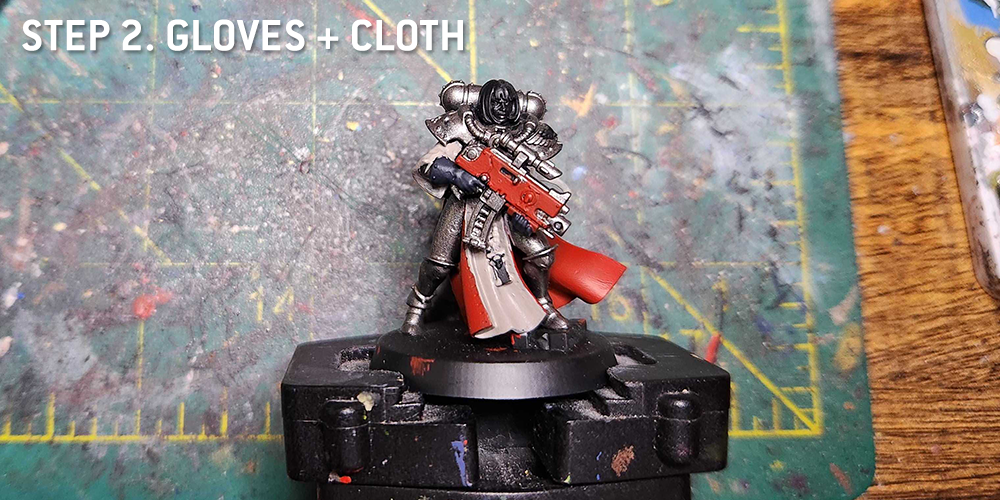
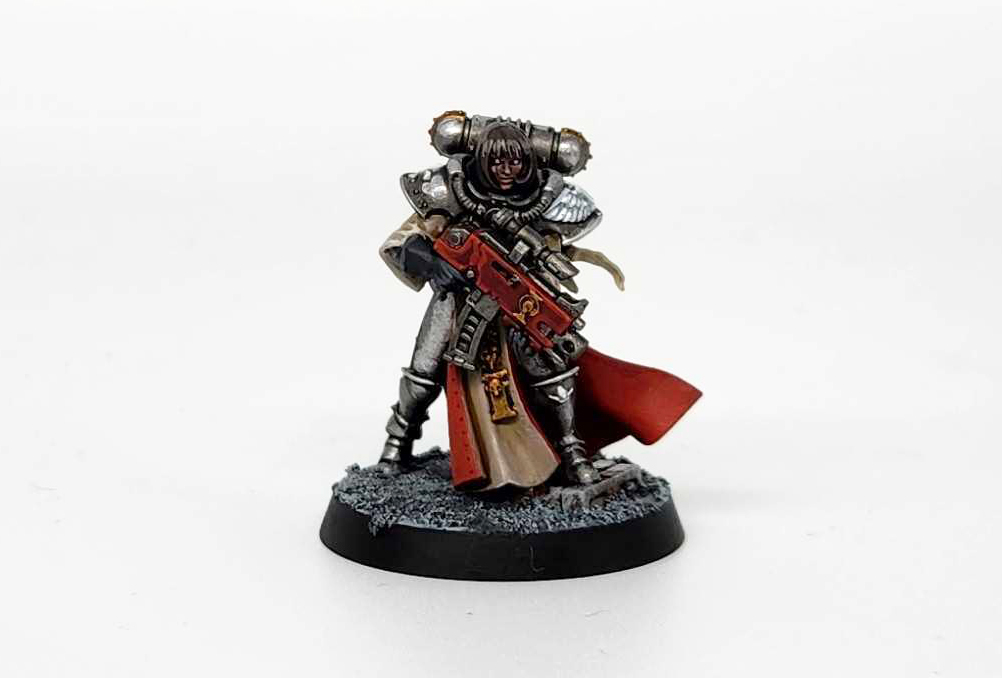
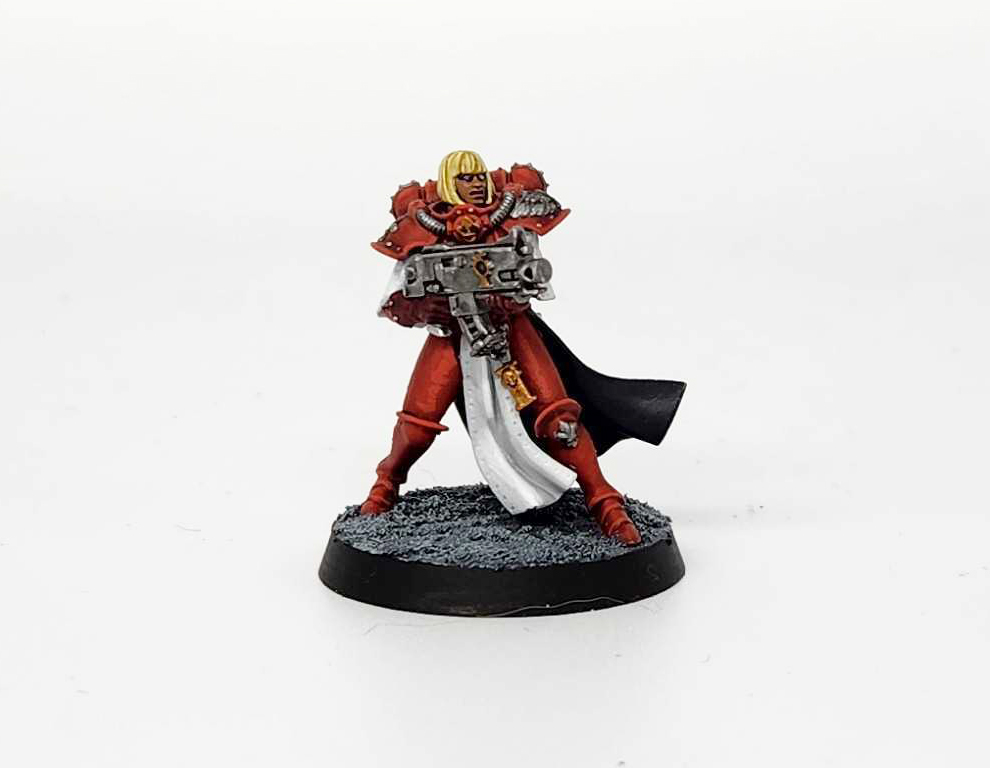
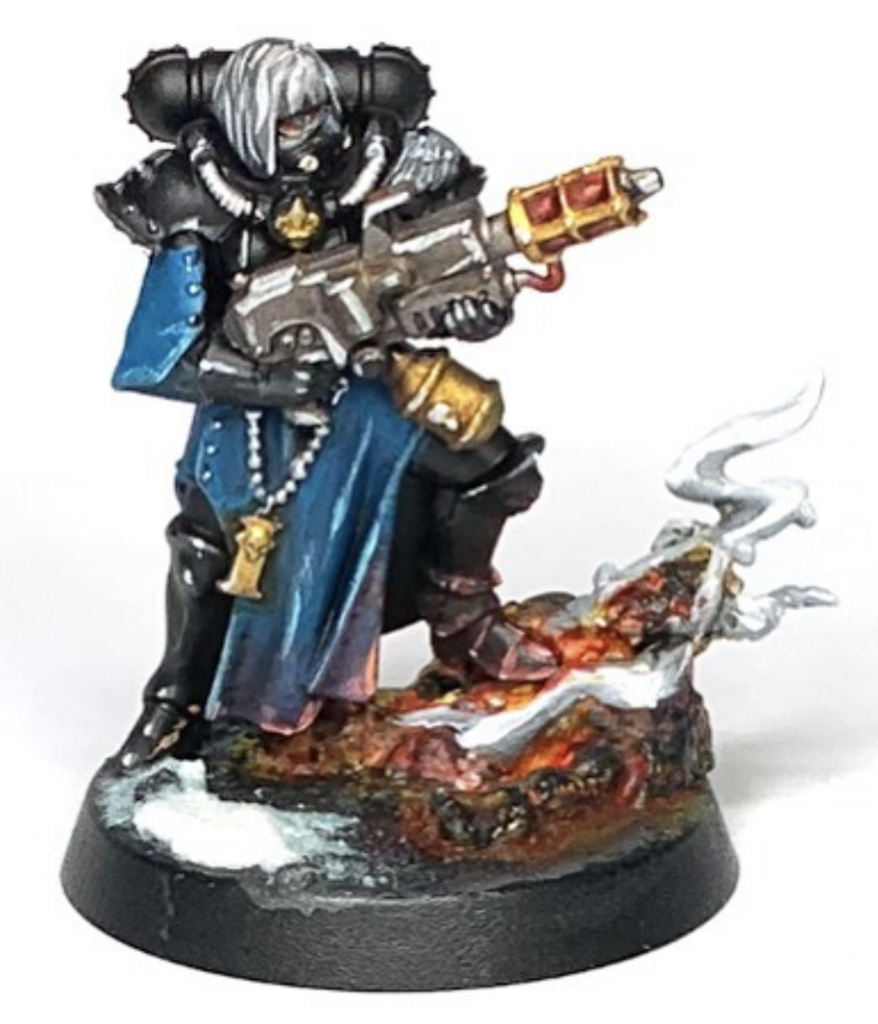
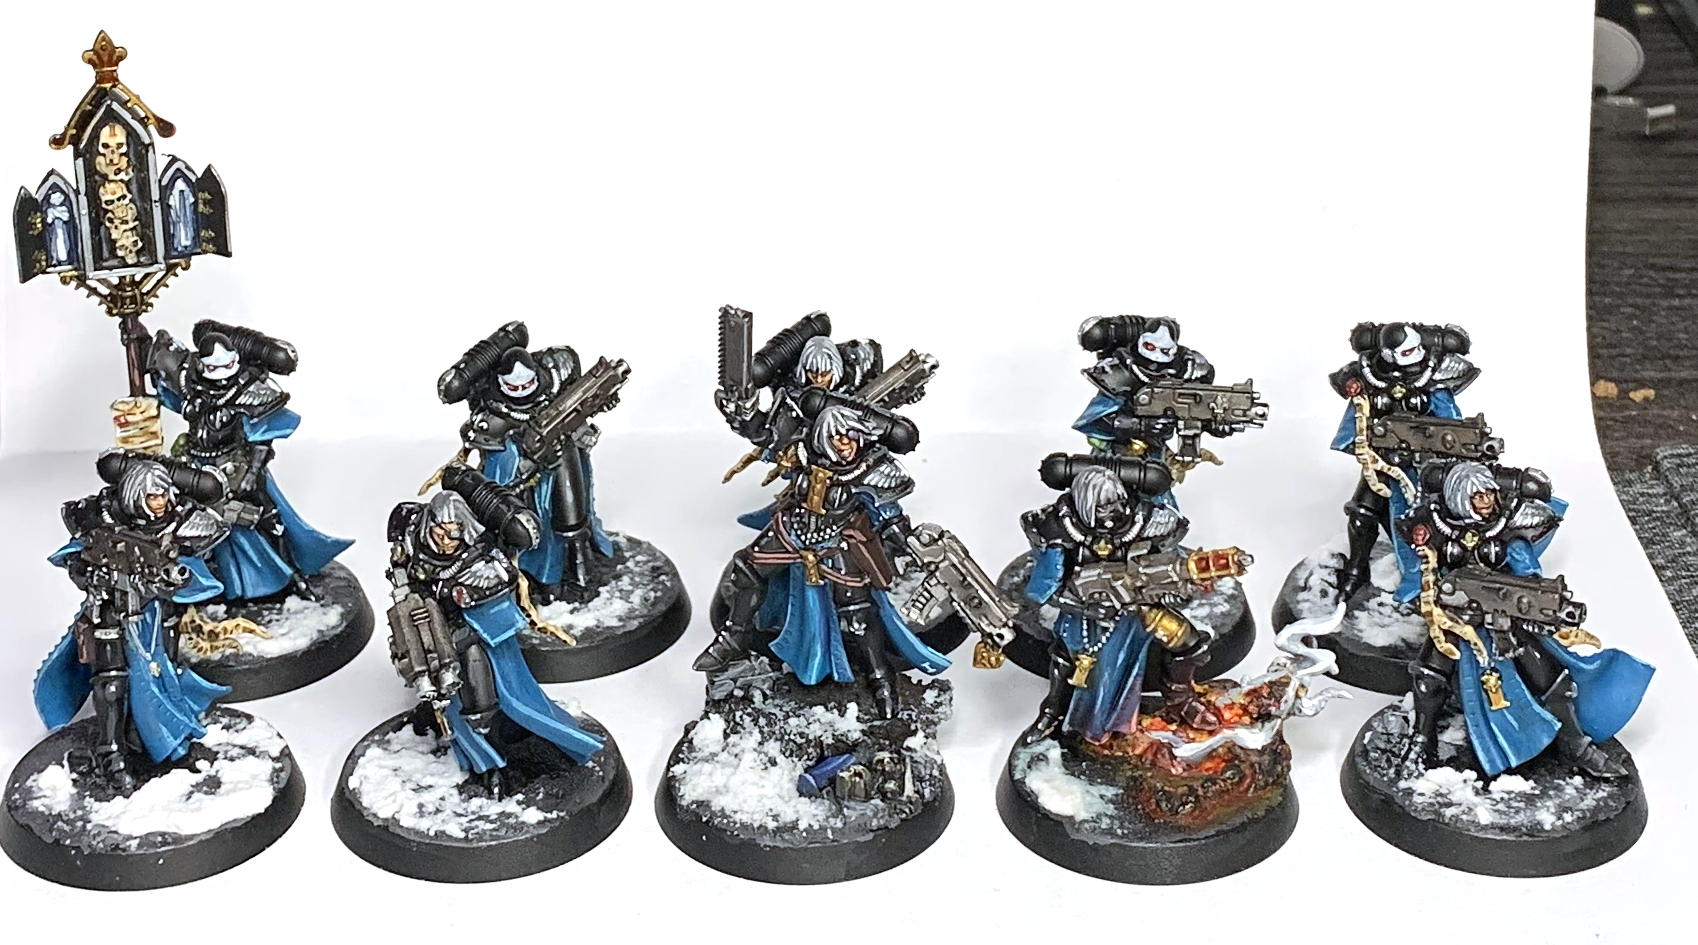
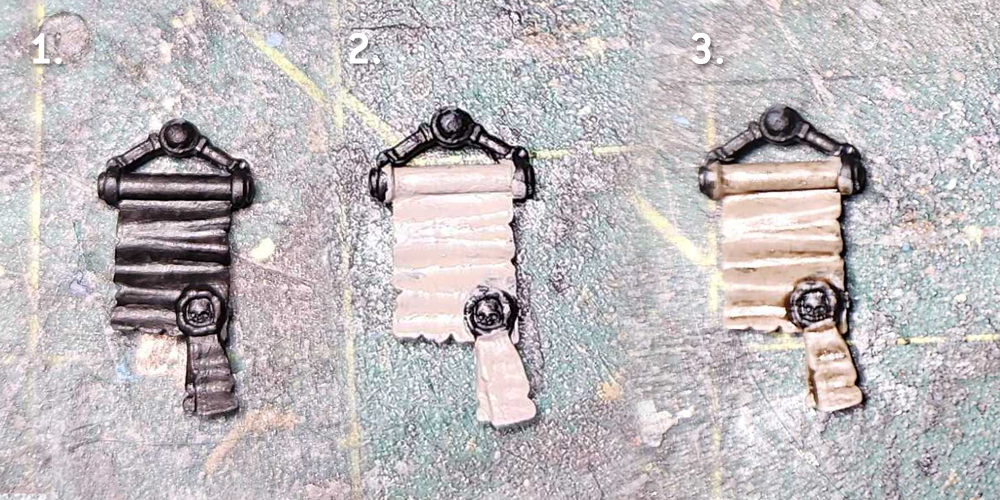
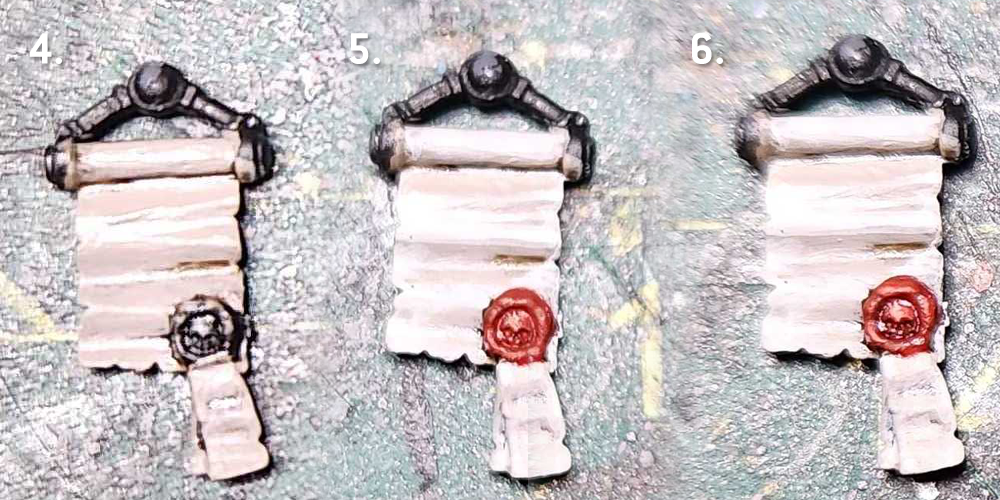
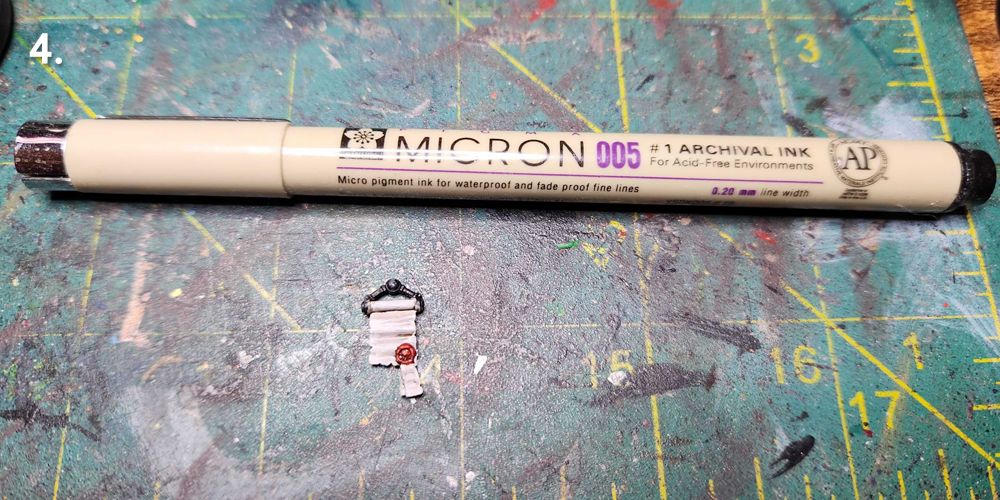
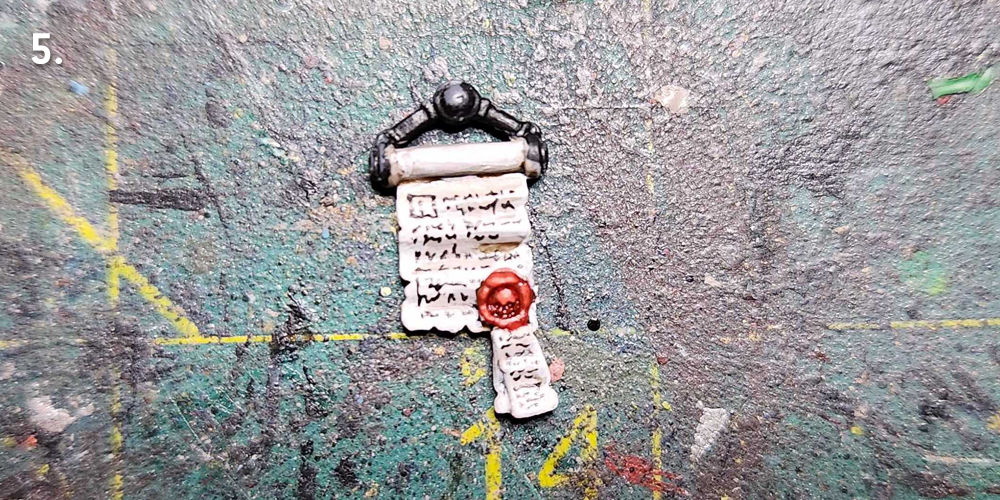
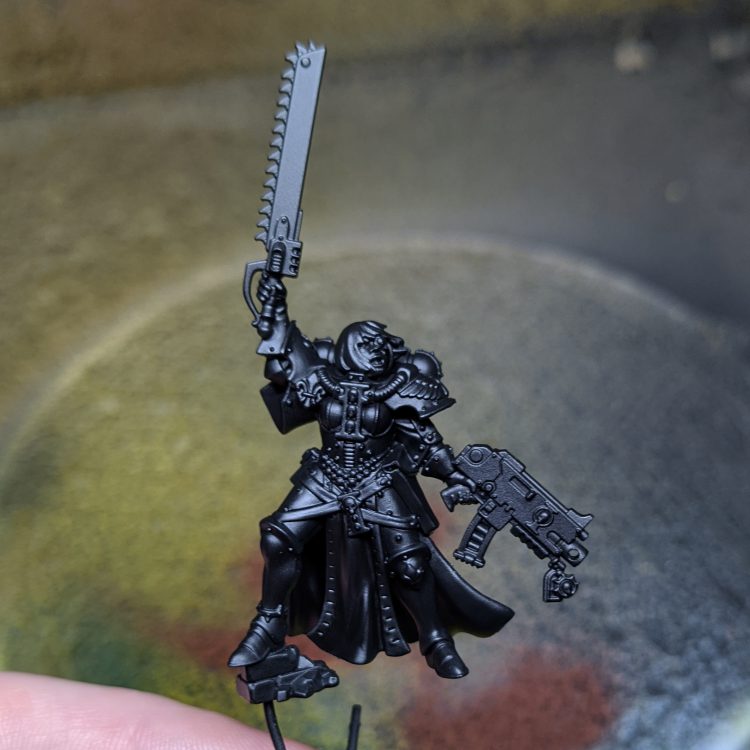
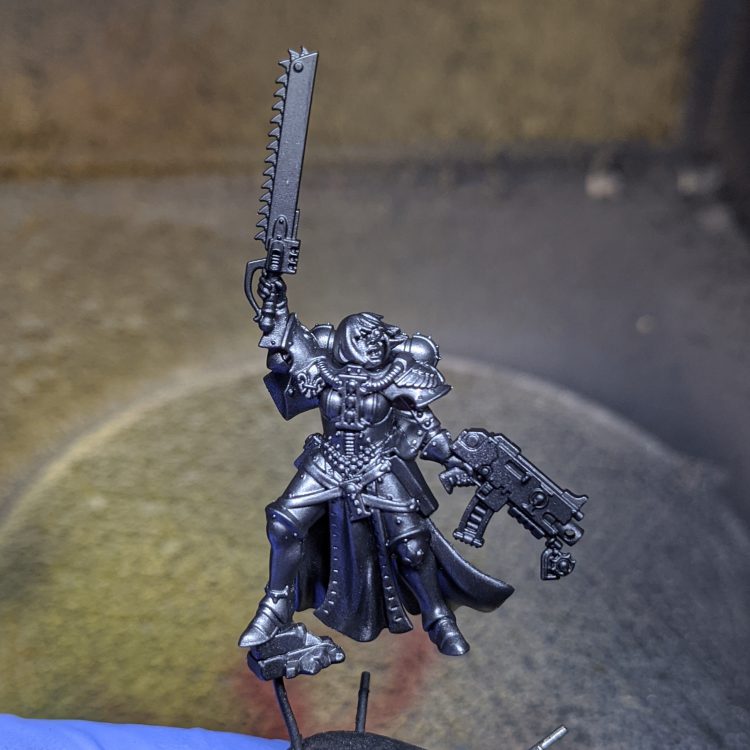
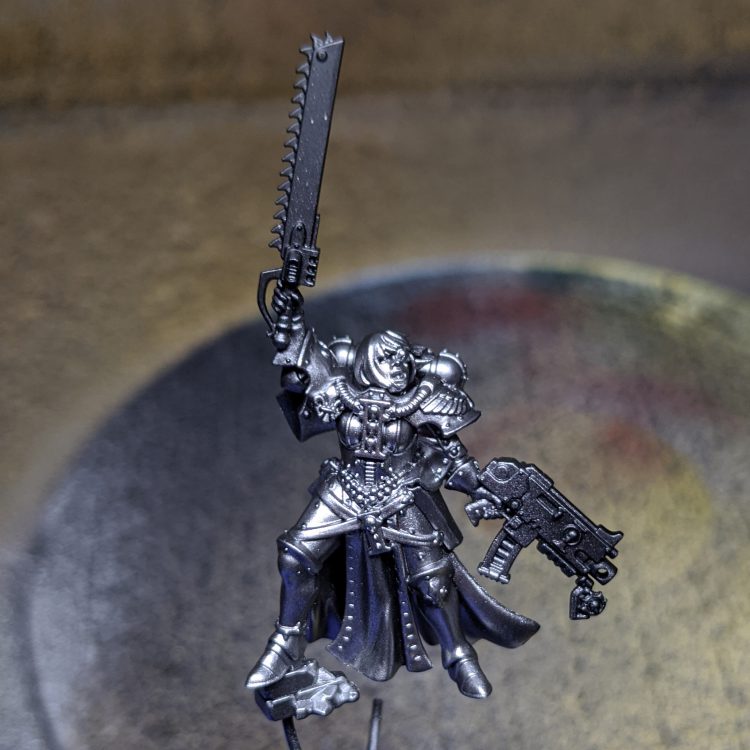
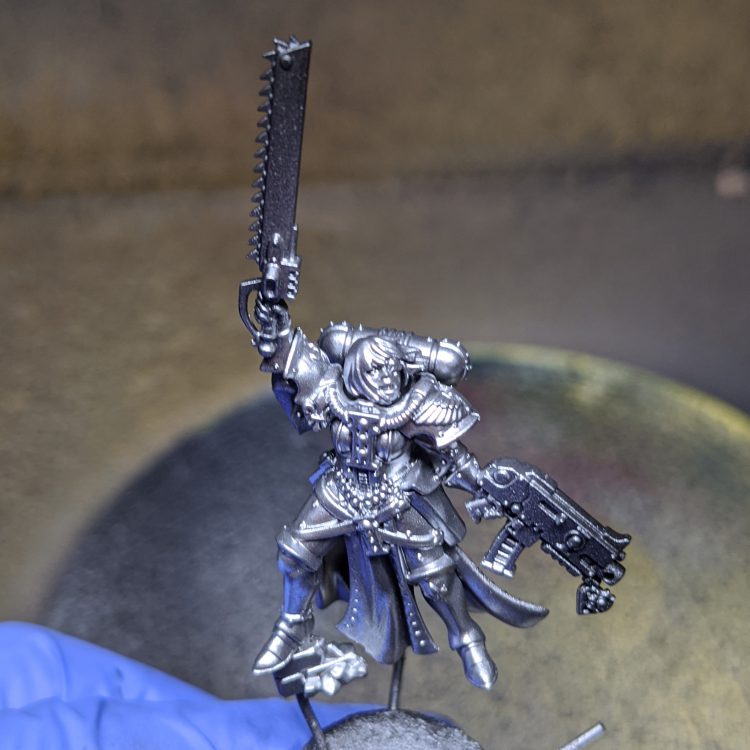
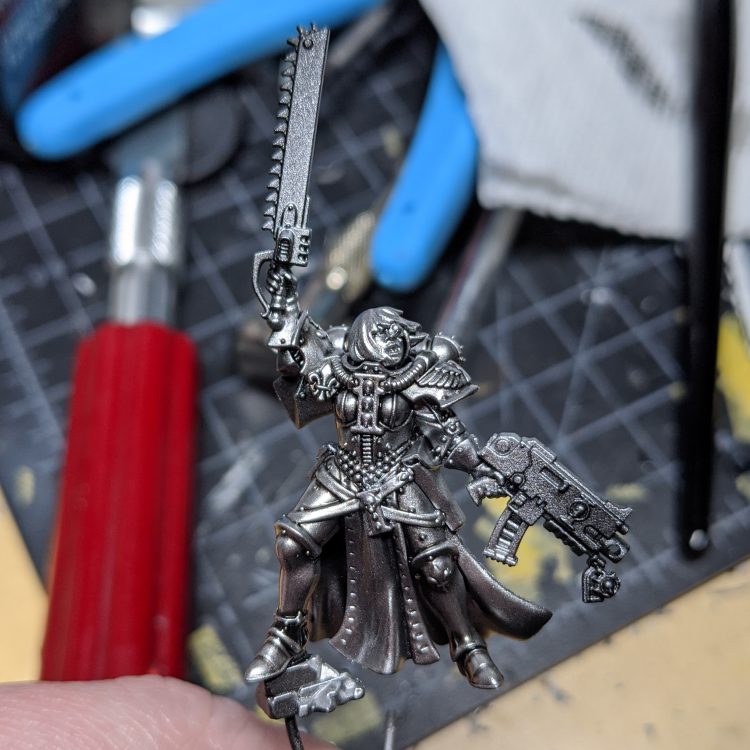
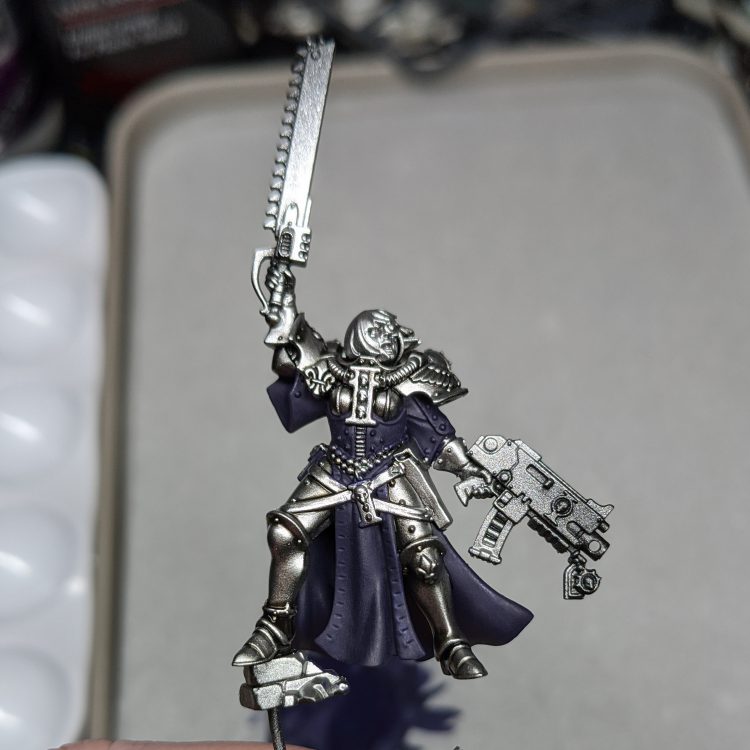
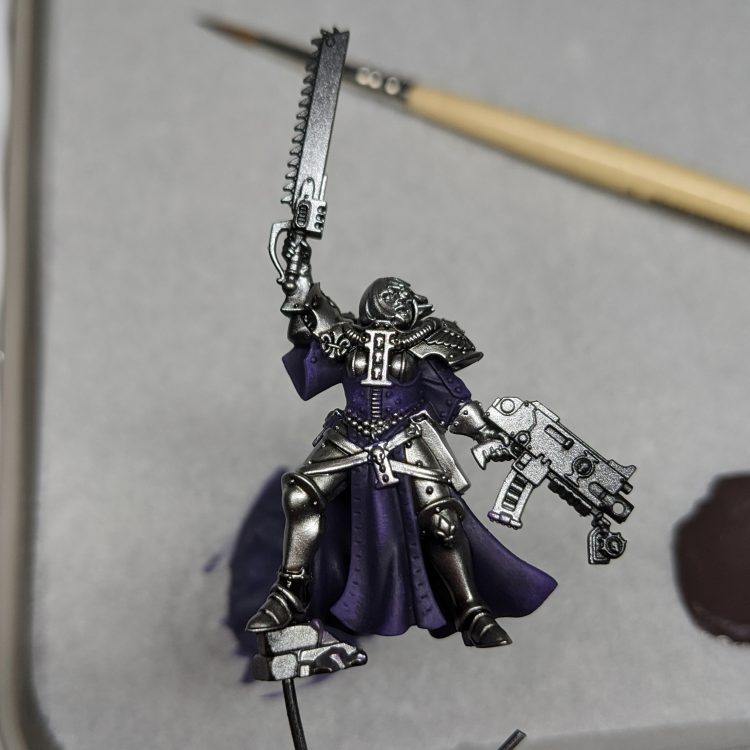
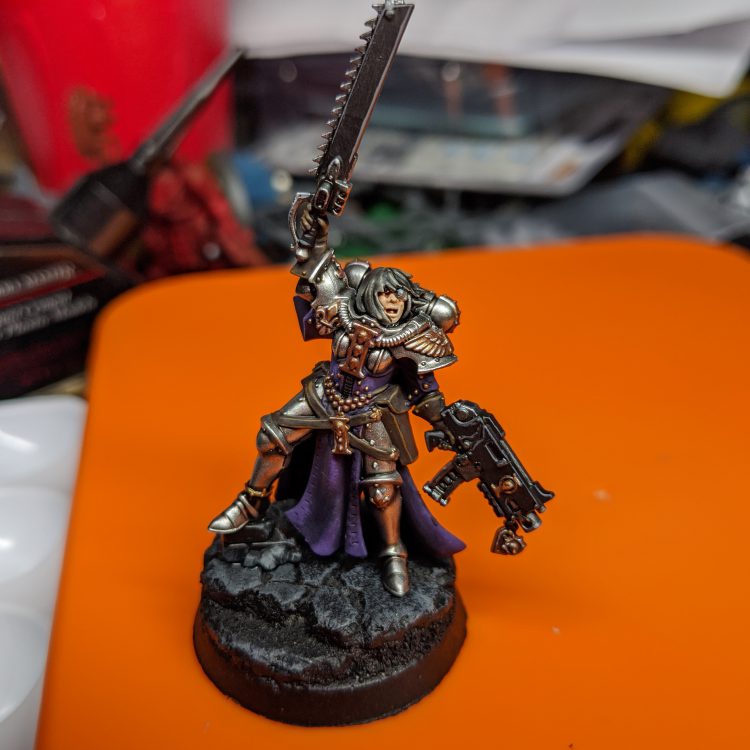
Scrolls and Purity Seals - Click to Expand If your marine chapter is composed of particularly pure warriors burdened with an excess of faith, they’re likely to be covered in purity seals and parchment that chronicles their great deeds. Painting these is pretty straightforward, but can be daunting since painting good purity seals means creating small lines to suggest the presence of writing. The good news is there’s an easy way to make this effect stand out. While Purity Seals are lighter in color, they’re usually going to be attached to a model you want to prime black. Either way, I start by painting them with a couple of thin coats of Rakarth Flesh. Once that’s dry, I wash the whole thing with Agrax Earthshade. Next I go back and highlight that with Rakarth Flesh again and then highlight a second time – including the edges – with Reaper Polished Bone (Wraithbone in GW paints, give or take). This is also when I paint the wax seal – it’s Mephiston Red, and I’ll wash that with Carroburg Crimson and then highlight it with Evil Sunz Scarlet. Now it’s time for the lettering. The “correct” way to do this is to use a very fine pointed brush and and paint lines with a dark brown. But if you want to go faster and have an easier time with it, I’ll let you in on a secret: Micron pens. The .005 pen gives you a very small point and is perfect for drawing the lines that work on something like this. Using the pen start marking small lines (squiggles if you’re feeling brave), leaving the occasional space> your wording should have an “F-shaped” patter more or less, as that’s just how people read in English. One Last Tip: Watch out if you paint over the micron ink. Water can reactivate it, causing problems like smearing. Power Swords - Click to Expand If you’re painting Zephyrim or a Cannoness, you’re going to eventually have to paint some power swords. For more on how to paint power swords and glowing weapons, check out our guide on painting power weapons here. Alfredo's Method - Click to Expand I’ve chosen to paint my Sister Superior in the box scheme, corresponding to the Order of Our Martyred Lady. Black and red are great colors that make for a striking army and from a rules perspective, it gets me access to all the fun special characters that GW is releasing. For Amalia in particular, I wanted to match the art she’s based off as best as I could. And the final result: TheChirurgeon's Our Martyred Lady - Click to Expand The de facto faction for the Sisters of Battle have a very solid red-and-black color scheme but it’s far from my favorite for the faction. It’s one of the easier ones to paint, however. I started by priming this model black. The process starts with shading on the black armor. I go back over the model with a coat of Black Legion Contrast to hit any missing spots and give the model a nice, deep black base on the armor. Then it’s time to highlight. This is a multi-step process; I want something that reads as black but has more of a bluer tone. I shade up to Corvus Black first, mixing that with Black Legion, then I highlight that with a mix of Corvus Black and The Fang. This adds a bit of blue and creates a much more dynamic shading to the model which you can see in the overexposed photo above, but looks much more subtle in person. The goal here is to do thin lines of your lightest color/edge highlight color on the thighs and raised parts. You can go lighter and higher contrast on this if you want less of an armor and more of a latex/patent leather look. This is pretty straightforward: Just paint the cloth parts with Mephiston Red. I wash the red cloth parts with Carroburg Crimson, usually doing 2-3 coats in the recessed parts to create some nice shading in the folds. I’ll also do a little bit of shading on the black armor with Nuln Oil. I come back and paint the raised parts of the cloth with Mephiston Red, and I’ll edge highlight the cloth with Evil Sunz Scarlet, hitting the tops of folds. This is also when I painted the face, using Kislev Flesh. A lot of details get painted here, just laying down basecoats. That’s Leadbelcher on the gun, piping, and grenades, Retributor Armour on the gold bits, and Mournfang Brown on the leather parts. The hair and iconography – the shoulder insignias – are painted with Grey Seer. All of those basecoated parts get a wash. The leather and gold parts are washed with Agrax Earthshade, the Leadbelcher parts get a wash of Nuln Oil, the skin gets a wash of Reikland Fleshshade, and I wash the white parts with Apothecary White Contrast. I then come back and wash around the eyes with a tiny bit of Druchii Violet. I add two white dots for the eyes and then paint the lips with Bugman’s Glow. Time to cover some final details. I paint the rivets on the armor using Retributor Armour, and I come back and highlight the metal parts with Leadbelcher. The belts get a highlight with Gorthor Brown, and I highlight the white parts with Reaper Pure White, leaving lines of grey on the hair. Finally this is when I edge highlight the armor, doing a thin line of The Fang. And that’s it! It’s a hard scheme to photograph because of all the black armor but I’m pleased with the result – the shading on the armor looks great in person and it goes well with the red and gold. A classic Battle Sisters look. Dionycia's Method - Click to Expand Dionycia has chosen the traditional black and red scheme but approached it in a very different way, there’s so much room for individual process in painting! Check out her other work on instagram I’ve only just started the hobby for myself, however I’ve been painting some of my partner’s Ad Mech and have a background in art. Most of my process is a lot of trial and error or making things up as I go along! I have a small collection of original Sisters of Battle following the Order of Our Martyred Lady scheme with a few minor tweaks. I always prefer to paint with subassemblies, especially on a model like the canoness because there are large areas that would have been impossible to reach if she was fully glued together. There are of course disadvantages to doing this, especially with a two-part cloak, which can end up with bad gaps and inconsistent shadows/highlights. The primer I used was Citadel Wraithbone spray. As a first step, I mapped out and prepped the larger areas on the model such as the cloak and armour. The armour areas were painted black. The cloak uses a base coat of Jokaero Orange and a layer of Mephiston Red. Generally, I have an order in which different areas are painted. The cloak and any cloth parts are the hardest and most messy to do, so I always tackle those first. It’s much easier to map out the shadows first by holding the model under a light source and seeing how they fall. Similarly, the same thing is done with the highlights. The wet-blending technique will work best here and is a combination of Mephiston Red, Jokaero Orange, and Averland Sunset (blended into the highest point of a crease) and a tiny bit of Mephiston Red with Matt Black for shadows. Jokaero Orange is used for edge highlights. The lining of the skirt is black with a wet blend of lighter greys in areas that are visible. The underside of the cloak and hood was done with the same technique using Averland Sunset, Matt Black and Pallid Wych Flesh. I made sure to put the model back together to really assess where the highlights on the inner portion would be and what should be in deep shadow. To draw the cloak details, I marked a straight line around the edge where I wanted the decoration to go with a pencil first. At the bottom of the red skirt, I used Pallid Wych Flesh for the line, and inner cloak is done with black and Mephiston Red. Gold detailing in various locations was done with a base coat of Screaming Bell. Once dry, wash with Gloss Nuln Oil, possibly going over deep recesses twice. Raised areas were brushed over with a thin layer of either Retributor Armour or Gehenna’s Gold followed by a wash of Seraphim Sepia. The sword was painted black initially, dry brushed with Necron Compound and edges highlighted with Runefang Steel. The gem on the sword was a mixture of Lothern Blue, and for dimension a mixture of black and Pallid Wych Flesh in certain spots. The staff was painted with Pallid Wych Flesh and heavily washed with Nuln Oil especially towards the bottom portion. Once dry, Pallid Wych was carefully used again to highlight the letters and edges. The armour was one of the last steps, except for the corset and beads which were done right after the cloth portion in the beginning. The beads were coloured with Army Painter (AP) Uniform Grey followed by Ash Grey (AP) for the top half of the bead and a dot of Pallid Wych for highlight. The armour and backpack generally followed the same steps. Initially painted black going to lighter tones – Necromancer Cloak (AP) all over except for the deepest recesses, followed by Uniform Grey (AP) on highlighted flat areas, with edge and extra spot highlights done in Ash Grey (AP). The bionic leg had a base of Ironbreaker, followed by Gloss Nuln Oil and highlights with Runefang Steel. Certain areas were spot washed with Seraphim Sepia (bolts and hinges). After the cloth and armour portions were done, I outlined various elements of the model with a thin black line, especially in the deeper recesses (e.g. under cloth folds, in-between the rope belt, under her beads, inside hood at side of face, etc.) to make the contrast of colours sharper. A Nuln Oil wash does this, but I didn’t want to do this as it could look messy. The face was left at the Wraithbone primer colour with careful layers of Flesh Wash (AP) and Agrax Earthshade for shadow areas. Highlights consisted of Pallid Wych mixed with a little Agrax. The base is constructed with corkboard, a GW skull, Army Painter tufts, and tombstone and paving cast using Sculpey from GW Scenery (Sigmarite Mausoleum). The Sculpey parts were broken up for effect and to fit with the model better. To fill the space between the corkboard and other elements, I used Armageddon Dunes. The skull was painted in Pallid Wych followed by Skeleton Horde contrast paint. The earth was a wet blend between Black and Mournfang Brown. Tombstone and paving were painted black. The entire base was then dry brushed with Wrack White. The earth was washed with Agrax Earthshade and stone elements with Nuln Oil. A final light dry brush with the Wrack White can be a good idea over the stone. Jack Hunter's Argent Shroud - Click to Expand As soon as GW started showing off the new Sisters models I knew I needed to buy them – the models are as 40k as it gets. I don’t have any long history of playing them or really know the fluff surrounding them particularly well, nor do I have any real idea how their rules will shake out yet. Not being attached to any of the “official” orders opened me up to figure out a custom scheme that I could use with any set of rules I wanted, and I could pick colors to work well with the rest of my armies. Though they’re unlikely to take the field at the same time as my Imperial Fists or Blood Angels, they may still find themselves getting support from my Knights. Knowing I want a neutral color for the armor and that I’d be basing them on the same dark urban bases as the rest of my army, I immediately gravitated towards a bright silver. It was going to be very simple to paint, a big plus since Sisters are looking like a fairly model-heavy army. The next color to pick out is for the robes. It needs to be distinct from my red or yellow armies, but still a color that works well with them. I was immediately drawn to blues, but RichyP was already painting sisters with blue robes, so I shifted around the color wheel towards red and landed on purple robes. As a bonus, purple works well thematically with the army of the church, and I already knew how I wanted to paint it from working on my titan. Prime black. Pretty self explanatory, just make sure its a nice smooth coat. If you want super shiny silvers this can be a gloss primer – personally I prefer a more subtle sheen and end up matte varnishing everything anyways. Basecoat: Airbrush the entire thing in Vallejo Metal Color 77.711 Magnesium. Airbrush from about 2/3 above with Vallejo Metal Color 77.703 Dark Aluminum. Airbrush from almost directly above with Vallejo Metal Color 77.701 Aluminum. Running through all three of these silvers gave me a great transition from darker metals in the shadows to brighter silvers on top, cutting down on the steps I’d need to do later. Wash: Cover the entire thing in Citadel Nuln Oil Gloss. The Vallejo Metal Color paints go on extremely smooth, leaving a perfect surface for the gloss wash to run right into the crevices and pick out all the details. Robes: Basecoat all the robes with Reaper Master Series 09265 Deep Twilight. Using a soft brush, carefully drybrush Reaper Master Series 29819 Twilight Purple and 09296 Malvernian Purple over the robes. Drybrushing this is both quick and gives a little bit of texture, perfect for fabric. Paint the owl. Drop her on an urban base, toss a bit of weathering pigments at the feet, and varnish. On this model I started with her head glued into the body – in hindsight I would’ve kept it separate and glued in at the end. Given the presence of dangly robes I strongly suggest working with her pinned to a cork rather than directly attached to the base, the inside of some of the robes is very visible but also difficult to get a brush to from above. TheChirurgeon's Argent Shroud - Click Expand The Argent Shroud are one of the easier schemes for the Sisters, but still a striking one. The canon paint scheme for them uses red and bone-colored robes. I started by priming the model black. I start by painting the undercloak areas with Mephiston Red, and while I’m at it I Paint the bolter. Then I hit the armor with Leadbelcher. Next I highlight the gloves with Corvus Black, then I hit the top/outside parts of the cloak and cloth with Rakarth Flesh. The whole model gets washed with various colors – I wash the cloth parts with Seraphim Sepia on the bone sides and Carroburg Crimson on the red sides, and wash the gun with Carroburg as well. The armor gets a thorough wash with Nuln Oil. I paint the face with Gorthor Brown, then wash it with Druchii Violet. I come back and highlight it with Gorthor, then dot the eyes with white and paint the lips with Bugman’s Glow. The hair is Dryad Bark washed with Agrax Earthshade and highlighted with Dryad Bark and a mix of Dryad Bark + Wraithbone. This is also when I do highlights on the gun and cloth. The red cloth gets highlighted with Mephiston Red and then Evil Sunz Scarlet, while the bone parts get a highlight with Rakarth Flesh and Reaper Polished Bone. Then it’s just a matter of finishing off the model. I edge highlight the bolter with Evil Suns Scarlet, do some highlights on the gloves with Mechanicus Standard Grey, and paint the gold parts with Retributor Armour, then wash it with Agrax Earthshade. The White parts are painted Grey Seer, washed with Apothecary White, then highlighted with Reaper Pure White. TheChirurgeon's Order of the Bloody Rose - Click to Expand The order of the Bloody Rose aren’t super complex visually but they have a striking scheme with lots of blood red armor. They were also all over the place at the end of Ninth edition when they suddenly had great rules, but I rarely saw armies painted in the Bloody Rose style, which is a shame. I started by priming this model with Grey Seer, which was the right call as the Order of the Bloody Rose have white cloth, but created a common problem for Sisters models. I am going to level with you: I hate the Battle Sisters kit. Every model has a flowing cloak and there’s very little space to get in there with a brush. For some models – like the one I’m using here – you can get in there but as we’ll see on others, you have to do a subassembly to get things done right, and that’s insane for a model with this size and points cost. Anyways, I primed the model white for the outer cloth, and that means I needed to paint black on the inner cloth. This was a couple of coats of Black Legion Contrast, which I then highlighted with Corvus Black. Next up was the red armor. This is a coat of Blood Angels Red Contrast paint. Though if you prefer, you could also do Mephiston Red with a wash of Carroburg Crimson. I come back and highlight the larger, flat parts of the armor with Mephiston Red, then highlight that with Evil Sunz Scarlet. The final level of highlights and the edge highlights are done with Wild Rider Red. There’s a lot going on here visually, but not as much as it looks. I painted the cloth again with Grey Seer, covering up any mistakes, then I painted the metal bits with Leadbelcher, the hair with Imperial Fists Contrast, and the skin with Cadian Fleshtone. I also got ahead of myself and washed it with Reikland Fleshshade. This is also when I realized the gloves were supposed to be red, so I painted those with Blood Angels Contrast. I’ll then wash those with Carroburg Crimson. More details work and some shading going on here – I wash the metal parts with Nuln Oil, and I shade the white cloth with Apothecary White, doing some blending with that and Grey Seer. I wash the hair with Casandora Yellow. The gold parts are Retributor Armour. I do a little wash of Druchii Violet in the eye recesses of the face, then add two white dots. I hit the lips with Pink Horror. For the hair, I paint lines using Dorn Yellow. I do some highlights on the cloth using a mix of Reaper Pure White and Grey Seer. The gold parts are washed with Agrax Earthshade. Just a few final details to go – I edge highlight the metal parts with Runefang Steel and use the same color to pick out the rivets. And that’s it! It’s one of the easier Sisters schemes, though it has the two-toned cloth which makes things a bit more complicated – Our Martyred Lady definitely avoids this problem. If you still want to paint red, white, and black, but don’t want to paint black armor, they’re a good alternative. TheChirurgeon's Ebon Chalice - Click to Expand The Ebon Chalice are my favorite scheme for sisters, with white and red robes that just look amazing next to the black armor and gold details which really pop. They’re harder to paint than the Order of Our Martyred Lady but worth the extra effort. I started by priming this model black, which caused problems but I’d rather paint white robes over black than black armor over white. Any time you have a different color on the underside of the cloak you want to make that your first priority. It is way easier to fix mistakes on the armor and you’re going to make more mistakes when you’re painting the cloak than the armor. Anyways this was done with a couple of thin coats of Mephiston Red. Now it’s time to lay down the white parts. I do this with 2-3 thin coats of Grey Seer. We’ll work up to pure white. I hit the tabard, sleeves, and back of the cloak. This will be shaded with Apothecary White Contrast and then highlighted with mixes of Grey Seer and Reaper Pure White. I shade the red cloaks with Carroburg Crimson, then highlight them with Mephiston Red and Evil Sunz Scarlet. Next up I shade the armor and add some additional basecoats on the other details on the armor. The armor is highlighted with Corvus Black and then a mix of Corvus Black and Thunderhawk Grey, though The Fang would also work here just as well. The gold details are painted with Retributor Armour and the metal bits like the boltgun and the piping are painted Leadbelcher. Time for the final details. I shade the metal bits with Nuln Oil and shade the gold parts with Agrax Earthshade.I paint the rivets with Retributor Armour. The eye lenses are Mephiston Red highlighted with a spot of Evil Sunz Scarlet. And that’s it! It’s a striking scheme and if I were painting an entire army this is the scheme I’d go with. TheChiriurgeon's Valorous Heart - Click to Expand The Valorous Heart aren’t the most visually interesting of the canon Sisters Orders, but they do have some fun quirks. Their most distinct visual feature is the lining on their cloaks, which makes them a bit more work to paint. I started by priming this model black, but then had to break it apart to reach the underside of the cloak. This was mostly so I could get a proper angle on that inner cloak. The Undercloak hast to be fully painted at this point. That’s Grey Seer, then shaded with Apothecary White and highlighted with Grey Seer and Reaper Pure White. Next is the red striping on the interior of the cloak. This is a hand-painted line of Mephiston Red, highlighted at the edges with Evil Sunz Scarlet. Time to put the model back together. Step 4. Black Armor + Cloak Time to highlight the armor. That’s two-step process of Corvus Black and then a mix of Corvus Black and Thunderhawk Grey. At this point I also do more of the white parts – the Gloves, Helmet Visor, and icons are all painted with Grey Seer. I also use Grey Seer to paint the line around the edge of the black cloak. The Metal parts of the model are painted with Leadbelcher, then washed with Nuln Oil. And now for the final details. The leather straps are Gorthor Brown, washed with Agrax Earthshade, then edge highlighted with Rakarth Flesh. The gold parts are Retributor Armour washed with Agrax Earthshade. The white parts are washed with Apothecary White, then highlighted with Grey Seer and edge highlighted with Reaper Pure White. The metal parts are edge highlighted with Runefang Steel and I use the same color to do the rivets. The eye lenses here are Mephiston Red with a spot of Evil Sunz Scarlet. TheChirurgeon's Order of the Sacred Rose - Click to Expand The Order of the Sacred Rose offer a major departure from the more standard Sisters schemes. Oh they still use red, white, and black, but the difference here is the white armor. White armor is tricky; it’s hard to shade and highlight well and so my cheat is that I almost never actually paint things white. Instead I opt for an off-white, which allows me to both shade and highlight the model more easily (I can edge highlight with white) and is easier to lay down as off-whites usually have better consistency. On top of that, when you put off-white next to black like we will on this model, it will look all the brighter. I started by priming the model with Grey Seer. I start with the undercloak as usual, but hit all of the black parts with a few coats of Black Legion Contrast. Next it’s time to highlight that. Pretty easy method I use most of the time I highlight black – shade up to Corvus Black, then highlight that with a mix of Corvus Black and Thunderhawk Grey. For this model, I’m edge highlighting black parts with Mechanicus Standard Grey. Time for the metal bits. They’re all painted with Leadbelcher. I’ll use Apothecary white to shade key parts of the white Armor, like just under the helmet visor and under the rounded kneepads, then I come back and clean that up with Grey Seer and do an edge highlight with Reaper Pure White. The metal bits get a wash of Nuln Oil. The eyes are Mephiston Red with a dot of Evil Sunz Scarlet. Just a few odds and ends. I edge highlight the metal bits with Runefang Steel, then use Runefang to do the rivets. I edge highlight the cloth and gun with Mechanicus Standard Grey. And that’s it! Pretty easy, but it looks great on the table. That said, they definitely have more of a gray look than white – if you want a brighter look, you can highlight the armor panels after step 3 using a progressive mix of Grey Seer and Pure White to get a brighter look. RichyP's Order of Barry - Click to Expand I wanted to try and get the box done within a week of launch because that’s now my thing apparently, so I needed a quick and easily reproducible paint job, my other cross to bear is that it’s also expected that nearly everything I paint have Baharroth Blue involved… Presenting the Sisters of Barry I don’t have step by steps for this one sadly as I was to eager painting them all in a crazy rush to remember. Fortunately it’s a really easy process to follow. For the power armoured Sisters I had to hold my nose and prime black. For all the other units (except the Penitent Engine) I primed in Wraithbone. Paint the face, hair, flour de lis, visors on helmeted Sisters and raised parts of the armour in Eshin Grey. Paint the Cloth areas in Thousand Sons Blue, it’ll take a couple of coats over black. With the 2nd coat of Thousand Suns blue still wet, paint some neat Baharroth Blue into it to blend in some variations, pull the Baharroth towards the brightest areas. Highlight the Eshin grey areas with Dawnstone Grey (selective amounts) Draw lines in the hair with Dawnstone Grey Paint the skin in Kislev Flesh. Paint metals in VMA Steel and S75 Elven Gold Do a couple of edge highlights of Baharroth Blue on the creases to exaggerate the highlights Paint a few dots of white on the shiniest parts of the black armour e.g. Toe caps, knuckles, centre of knees and so on. Using the same white to draw some more lines in the hair, and to dot the eyes. Highlight faces with Wraithbone + Kislev flesh (about 1:1) and quickly blend in Darkoath Flesh Wash the eye sockets with Druchi Violet, (also paint some under cheekbones and where the hair meets the skin. Paint Drakenhof Nightshade into the folds of the blue. Tidy up some of the highlights with thinned Thousand Sons Blue, and thinned Abaddon Black. Wash the steel metals in Nuln Oil and the gold in Skeleton Horde. I include this one because I’ve been asked a few times from people how I did the smouldering corpse. Paint the whole thing in Wraithbone (sounds counter-intuitive I know), dab In some thinned pure white so that the recesses are brighter still. Wash with Casandora Yellow, again with Fuegan and finally with Blood Angels Red in various places over the whole area (mix for variation). Once it’s dry, drybrush with Abaddon Black and finally Eshin Grey. [Optional fake OSL]: hit the surrounding area with thinned Blood Angels red and highlight brightest parts of armour with Luganath Orange. Here’s the completed unit, based with Valhallan Blizzard: And with their pals: Greg's Order of the Gilded Thorn - Click to Expand Greg “Klobasnek” Narro has painted some lovely sisters for a minor order of his own creation – the Order of the Gilded Thorn. White Armor. Prime the model white. I live in the very hot and humid American gulf coast, so I use Stynylrez White primer through an airbrush rather than risk a spray can. After priming, I spray the whole model Ulthuan Grey, before applying a coat of Apothecary White Contrast over the entire model. If you live somewhere less sweaty, you could probably substitute the two airbrush steps for just priming with Grey Seer. Black inner robes. This part is annoying, because a lot of these robes are quite tricky to get a brush to, but I find it’s worth it for the extra contrast. Don’t worry too much about these highlights or making sure you have 100% coverage of the robes, a lot of this isn’t really visible from the table. Orange outer robes. When I first started this army in the metal model era, this was a simple basecoat wash layer highlight job, but I’ve found that many of the robes on the new plastics are too smooth and flat to take to washes well. That means it’s time for the voodoo magic of wet blending. Wet blend your shadow color (I’m using a discontinued AK 2nd Gen paint, Dark Rust, but any terracotta color should do) into the recesses by placing a line of the shadow color in the deepest part of a fold, placing a line of Jokaero Orange on an adjacent ridge, and smooshing the paints into each other in between, running your brush parallel to the fold. Repeat from one side of the model to the other. Leather. In addition to the belts and gloves every Sister wears, don’t forget to paint the sword hilt like this dummy did. Aged gold. This is intentionally a colder, less yellow gold to make it a bit more visually distinct from the orange robes. The finishing details. Some of these will be different model to model, but here’s the common bits: Collar piping: Black Metal (Scale75) Purity seal parchment: Zandri Dust, Agrax Earthshade, Birch (Scale75) Purity seal wax: Wine Red (AK), Druchii Violet, Wazdakka Red Ornamental leather (scabbards, books): Royal Cloak (Two Thin Coats), highlighted by mixing in small amounts of ivory. This is also the time to clean up any messes on the armor with Ulthuan Grey, and to do a final edge highlight of the black parts with Uniform Grey (Army Painter). You will also obviously need to do the hair and face, but there’s a whole HTPE for that. Basing. This army goes on resin bases that I apply a marble effect to using my airbrush and used dryer sheets. There are a ton of ways to paint Sisters of Battle and we have only touched on a couple, hopefully you’re inspired to move ahead and paint your Sisters Battle Box in one of our schemes or another of your choosing. Ultimately, Sisters are like Marines with a lot of robes and elements which add visual flair, and with that flair an opportunity to get creative with patterns and freehand on all that cloth canvas. Have any questions or feedback? Drop us a note in the comments below or email us at contact@goonhammer.com. Want articles like this linked in your inbox every Monday morning? Sign up for our newsletter. And don’t forget that you can support us on Patreon for backer rewards like early video content, Administratum access, an ad-free experience on our website and more.



Step 1. The Black Armor
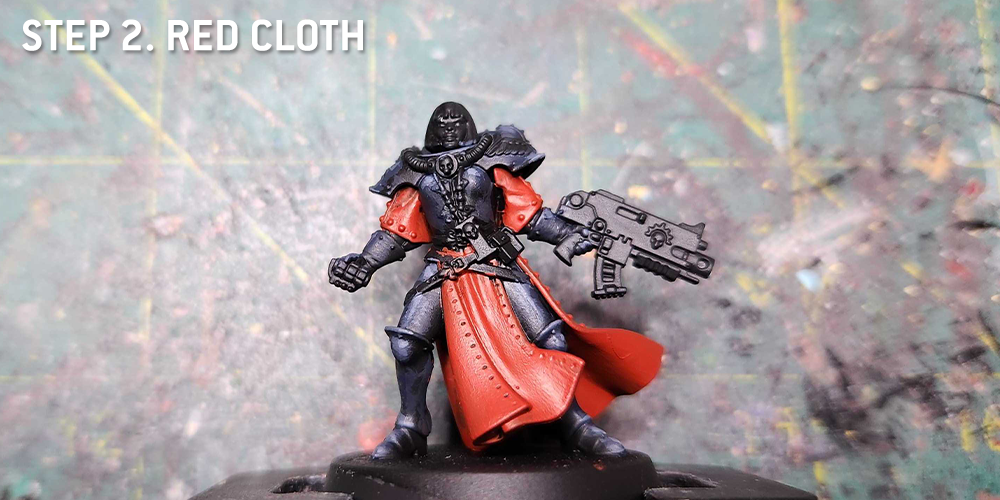
Step 2. The Red Cloth
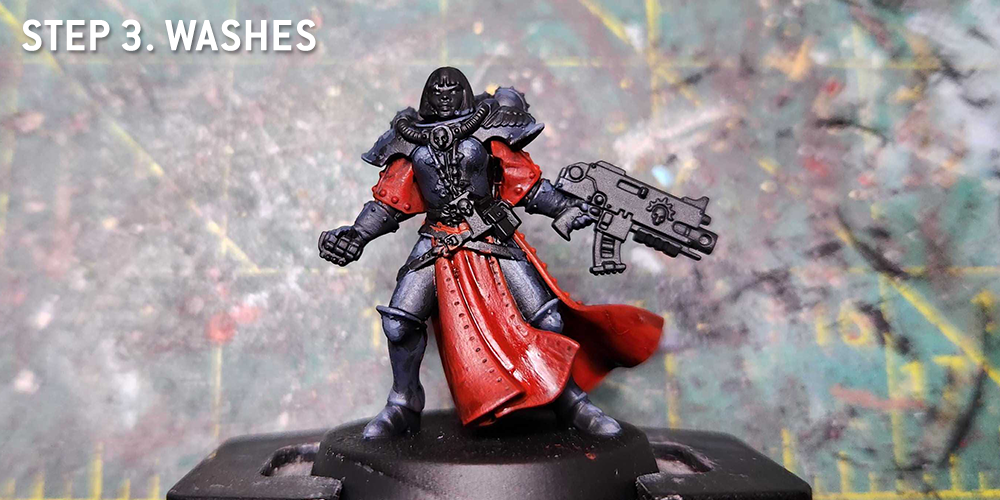
Step 3. Washes
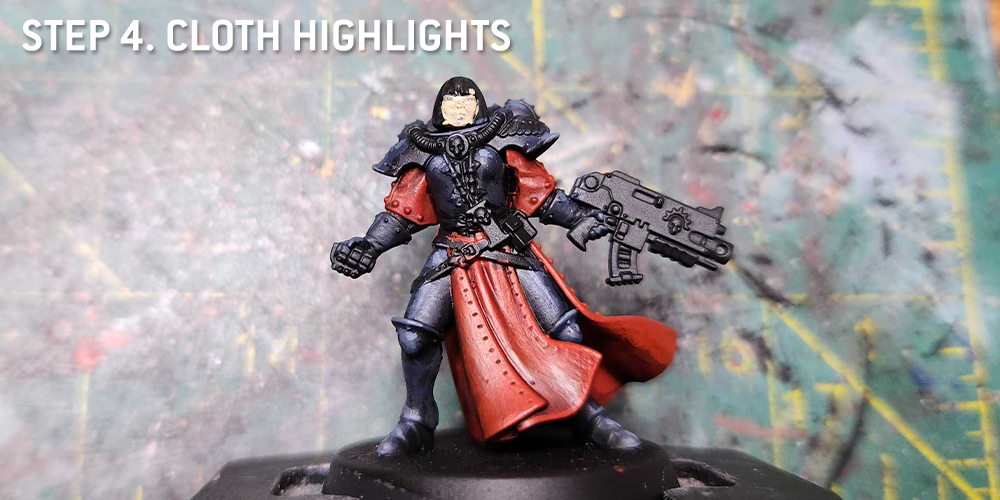
Step 4. Cloth Highlights

Step 5. Other Basecoats
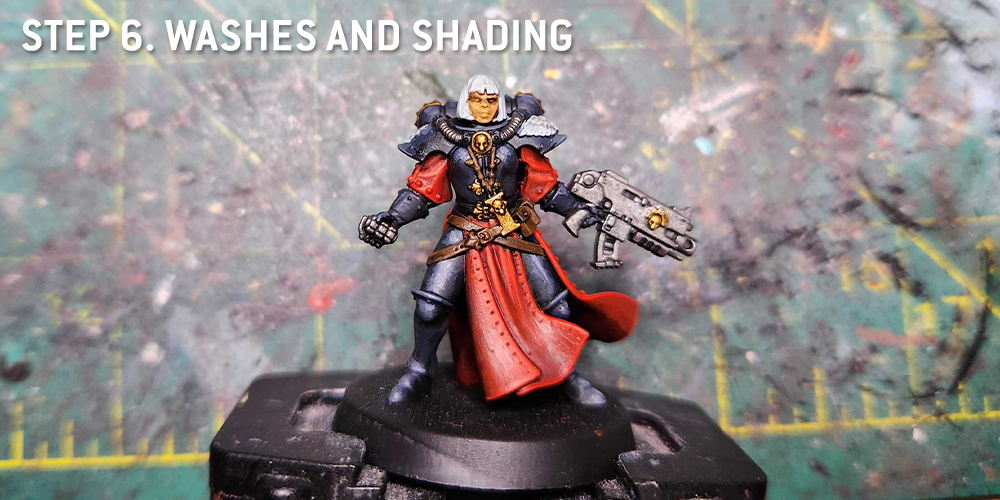
Step 6. Washes and Shading
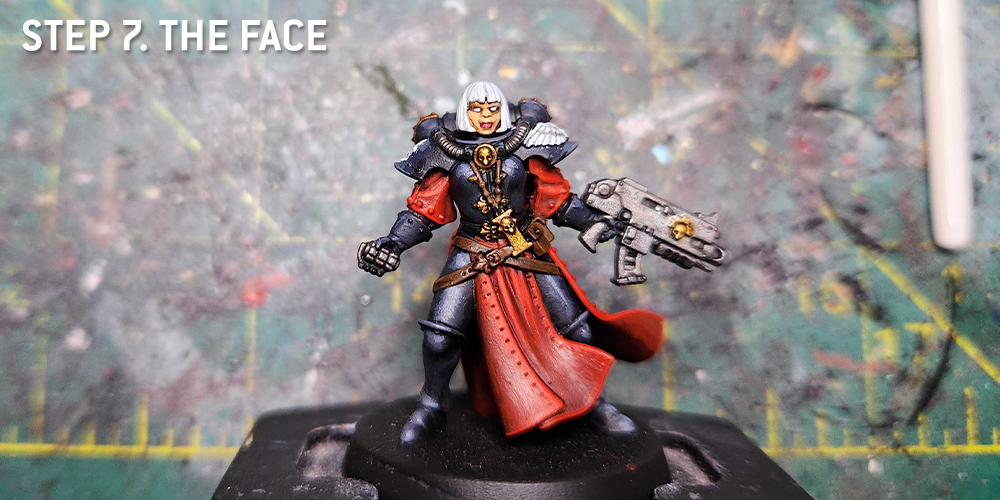
Step 7. The Face

Step 8. Final Details
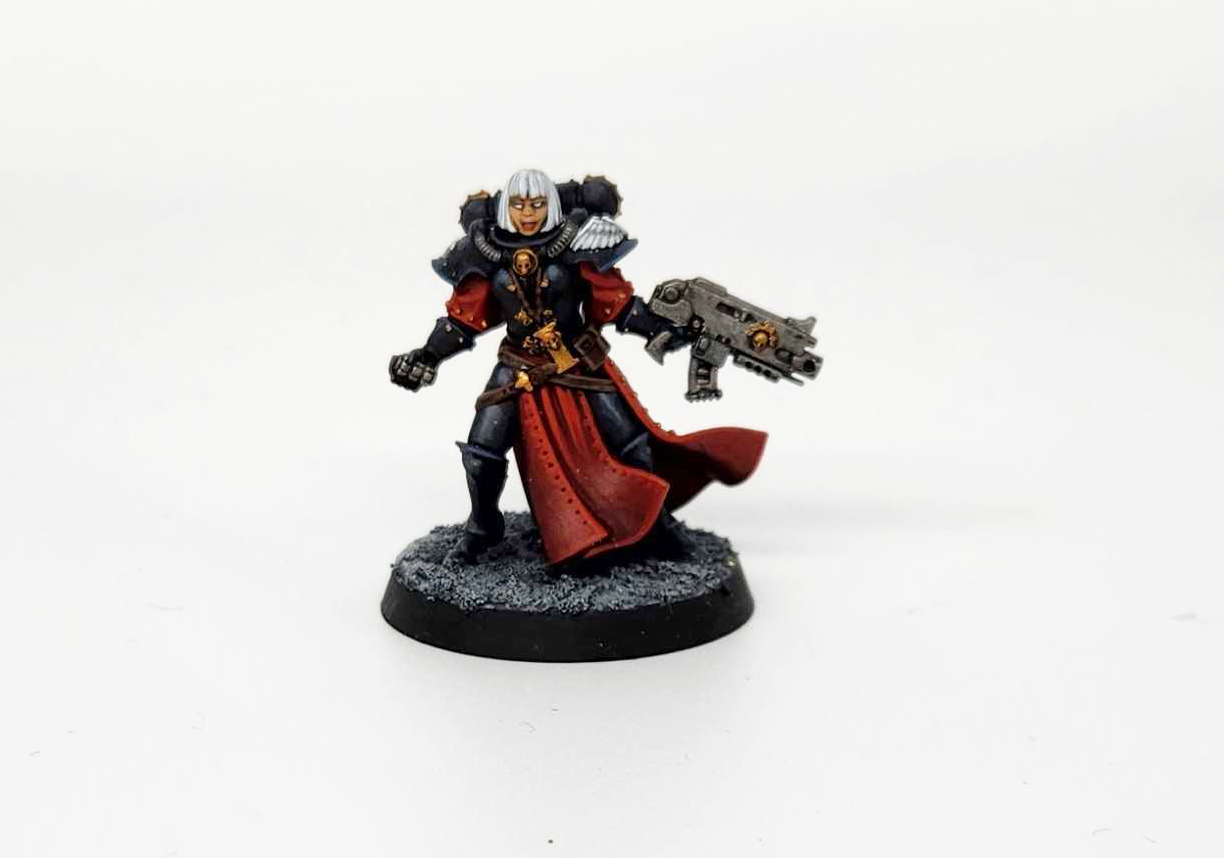


Cloth
Gold Detailing, Sword and the Staff

Armour and Backpack
Finishing Touches
The Base


Step 1. Undercloak + Armor
Step 2. Gloves + Cloth
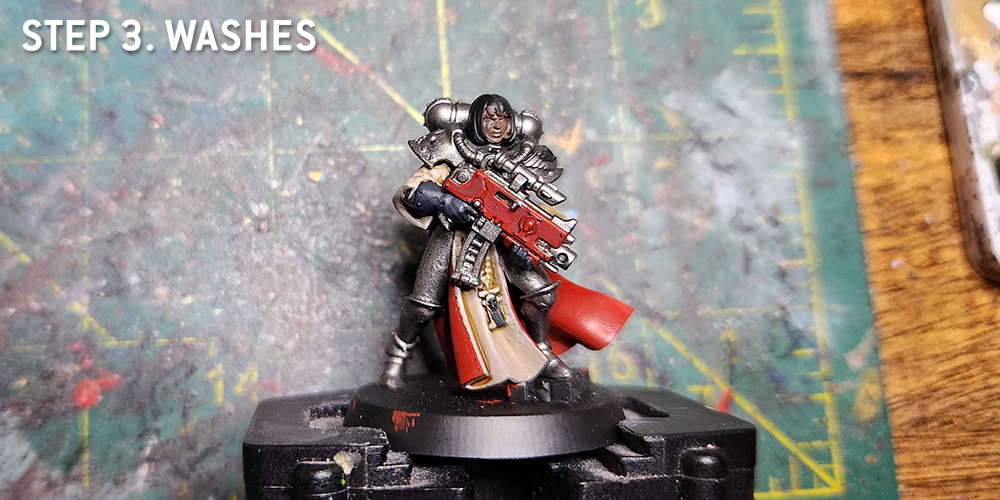
Step 3. Washes
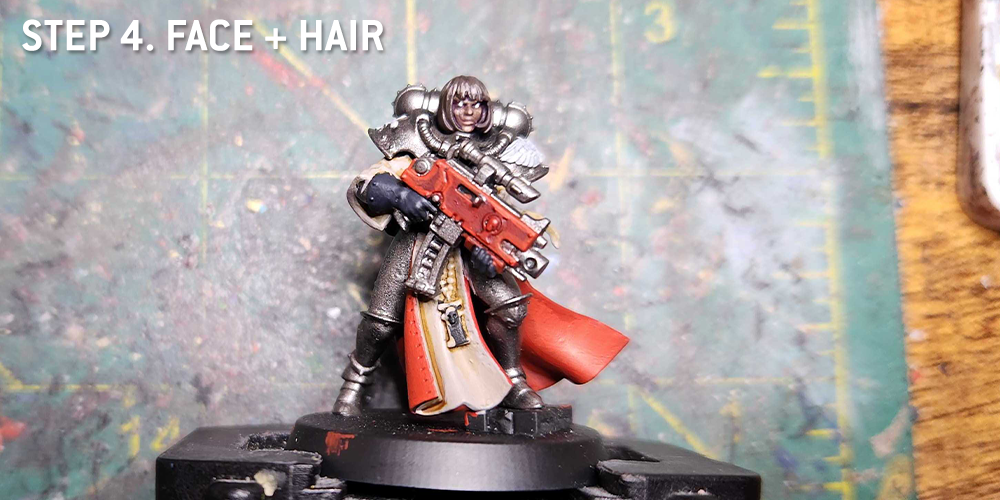
Step 4. Face + Hair
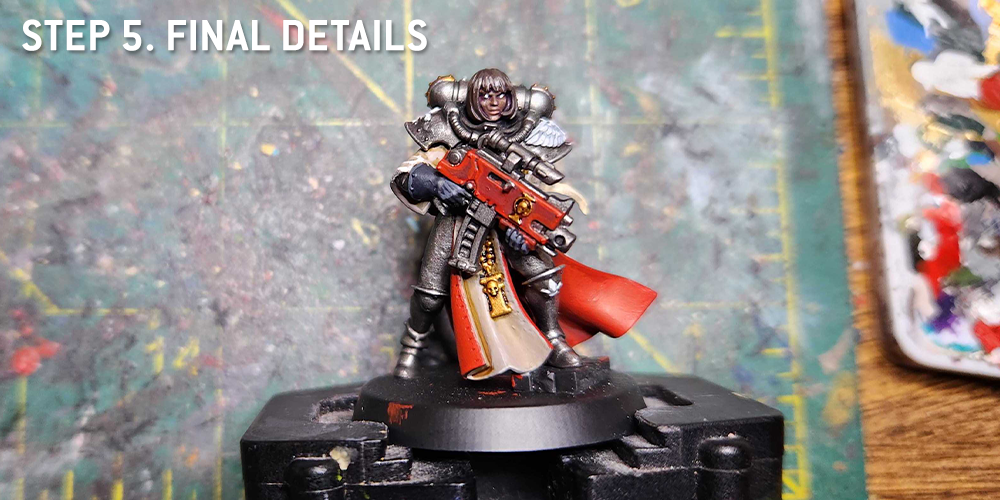
Step 5. Final Details


Step 1. The Undercloak
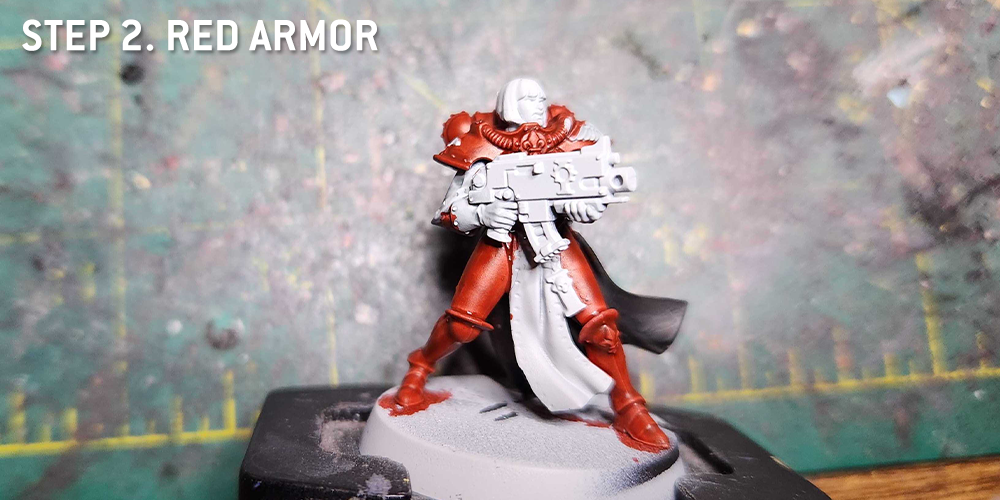
Step 2. The Red Armor Base
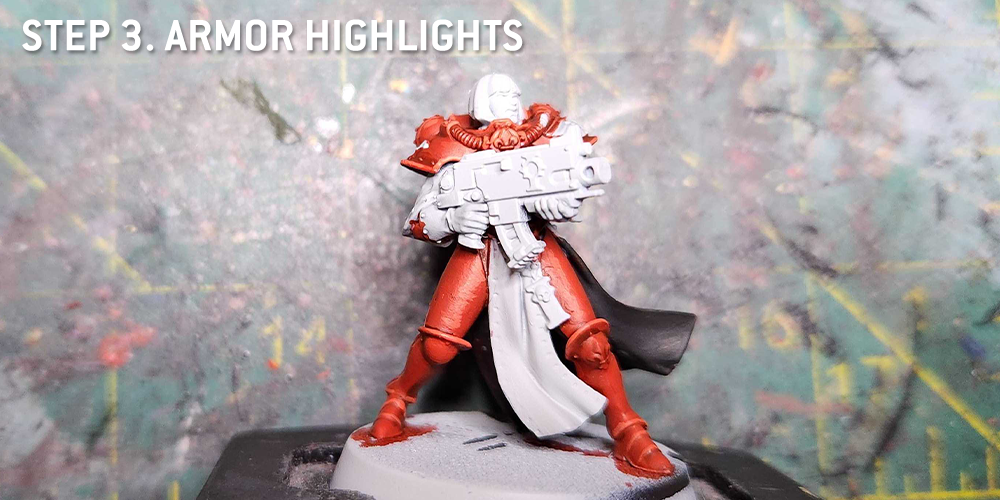
Step 3. Red Armor Highlights
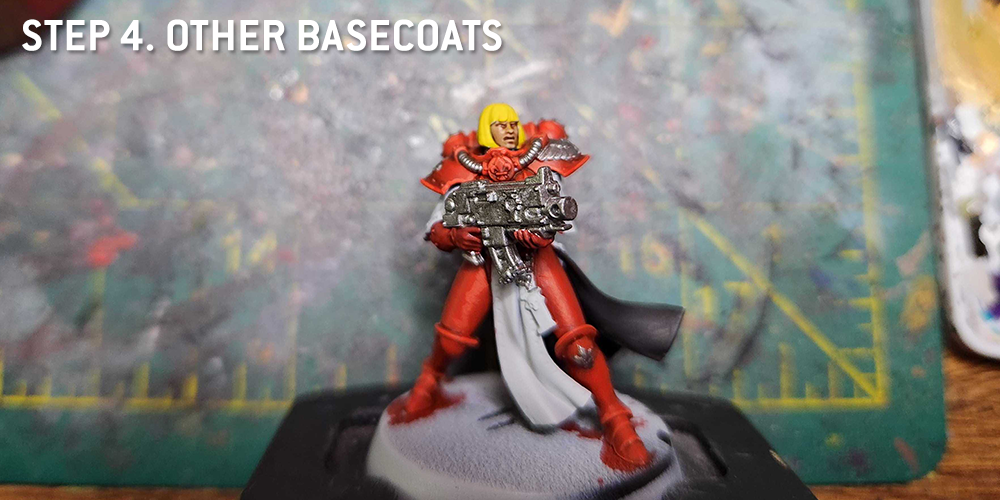
Step 4. Other Basecoats
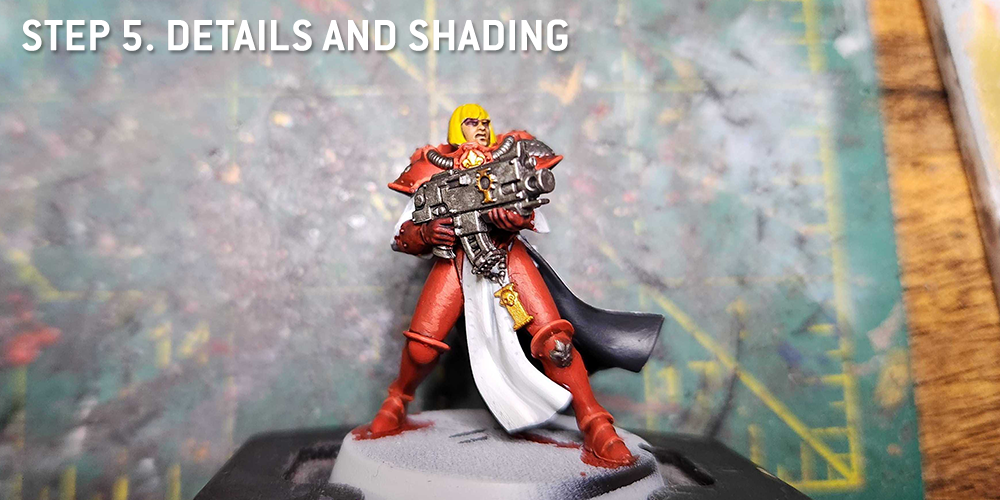
Step 5. Details and Shading
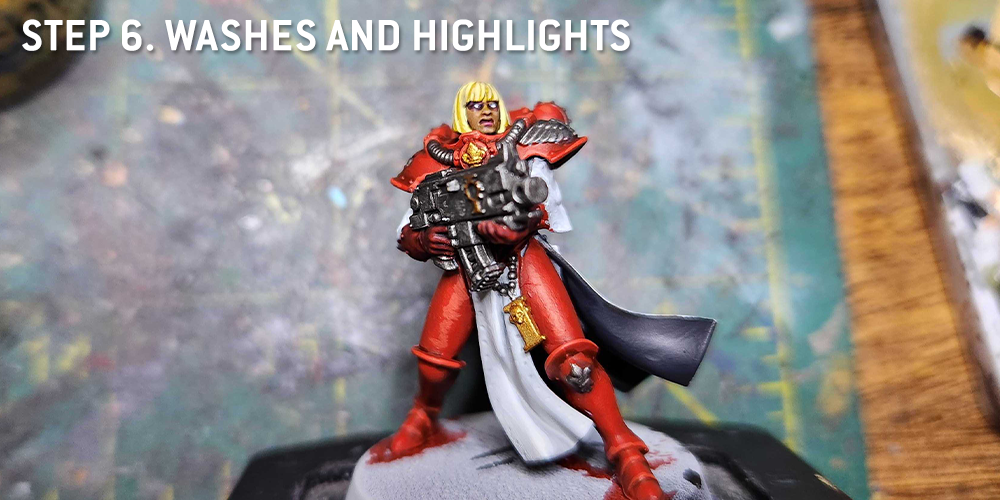
Step 6. Washes and Highlights
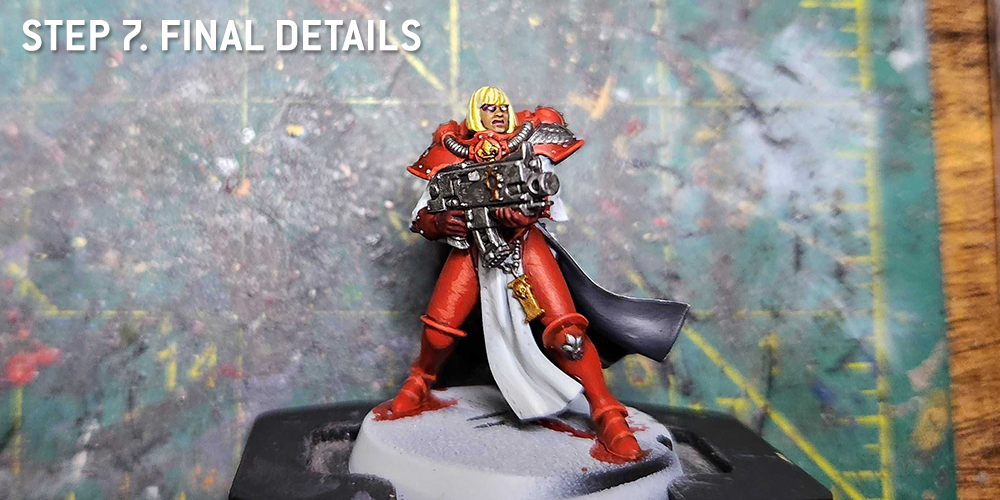
Step 6. Final Details

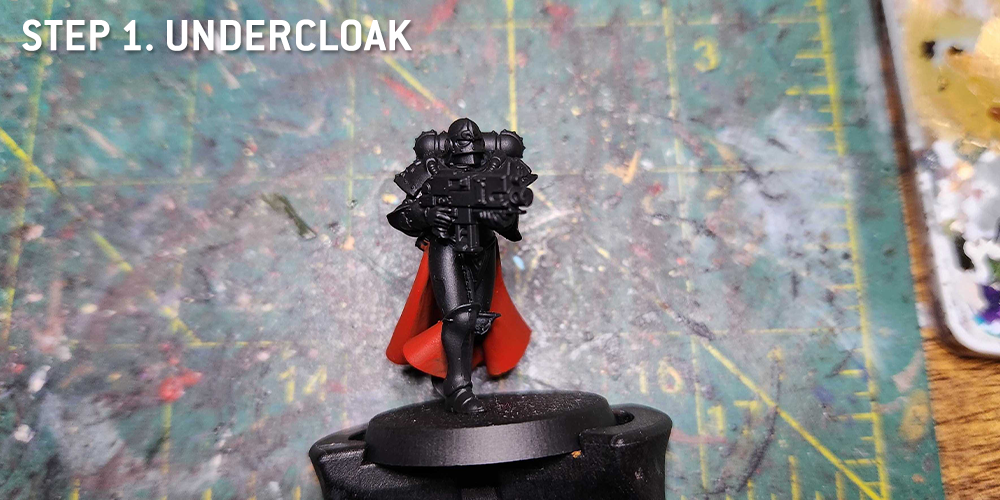
Step 1. Undercloak
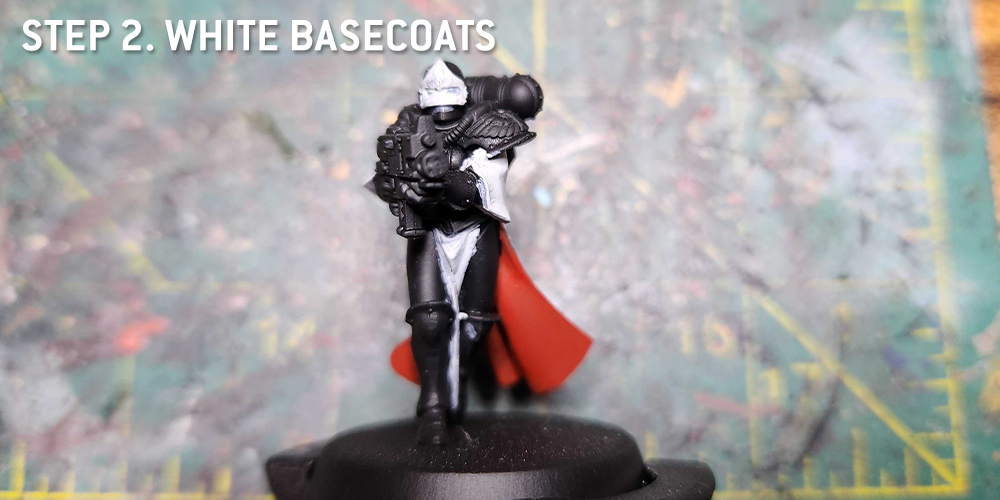
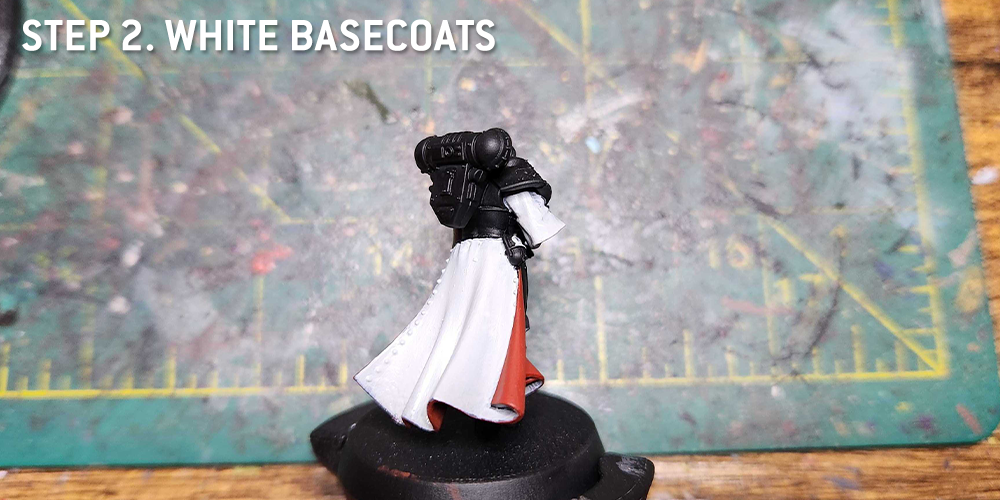
Step 2. White Basecoats
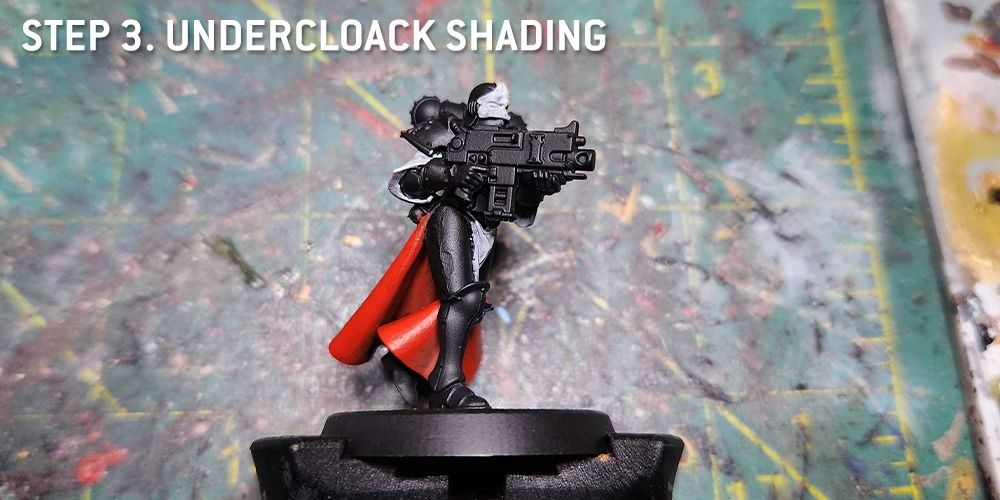
Step 3. Undercloak Shading
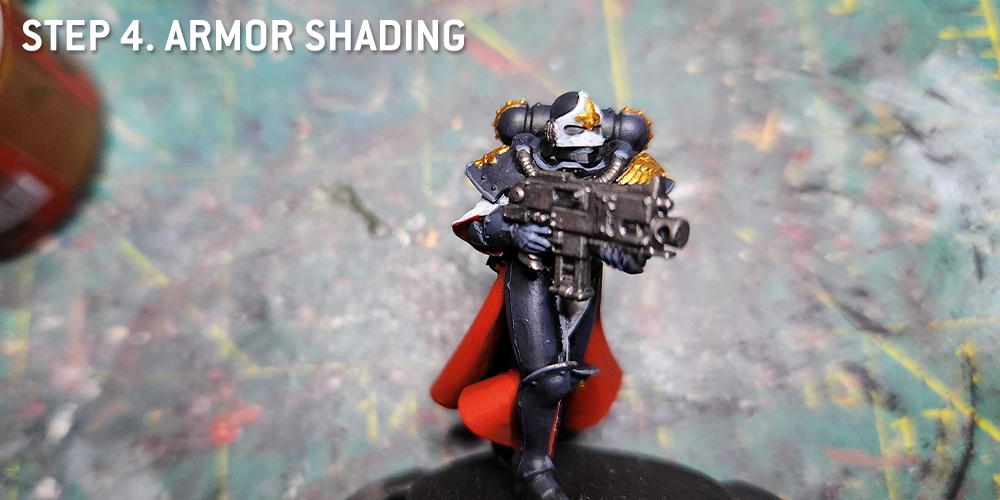
Step 4. Armor Shading and more Basecoats
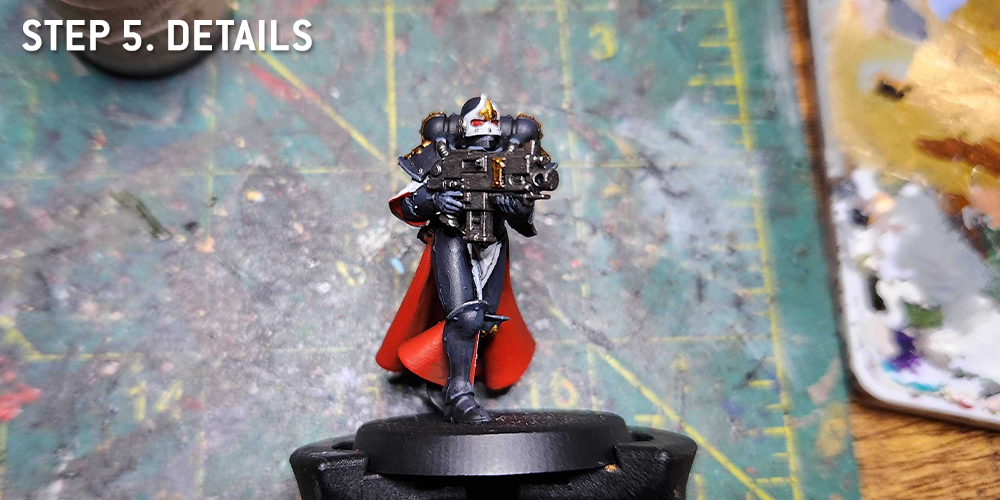
Step 5. Final Details
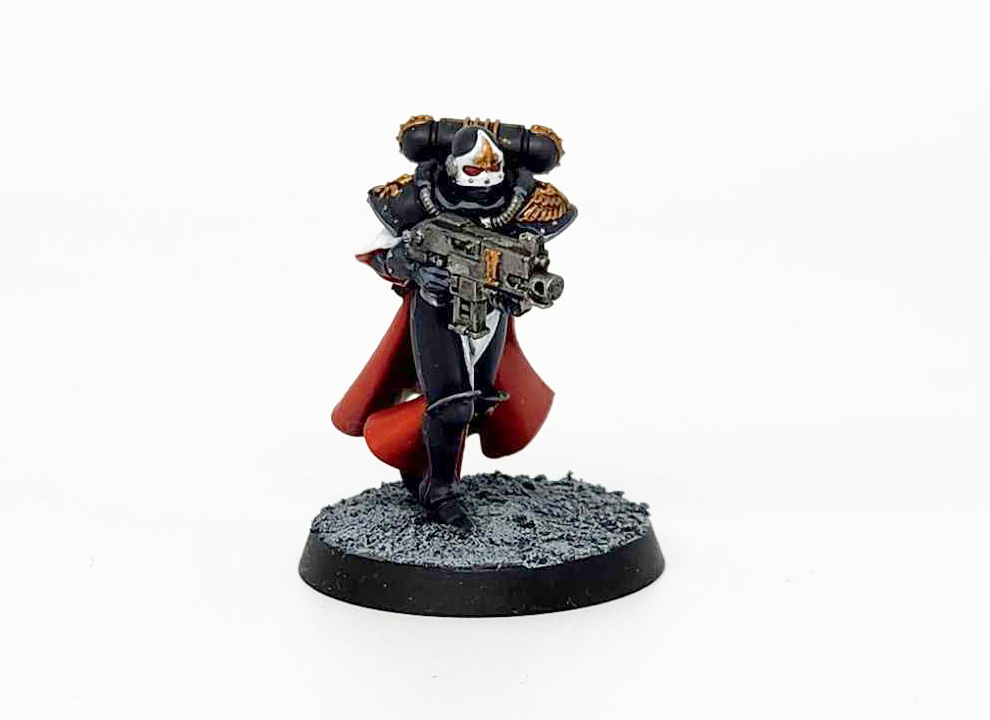

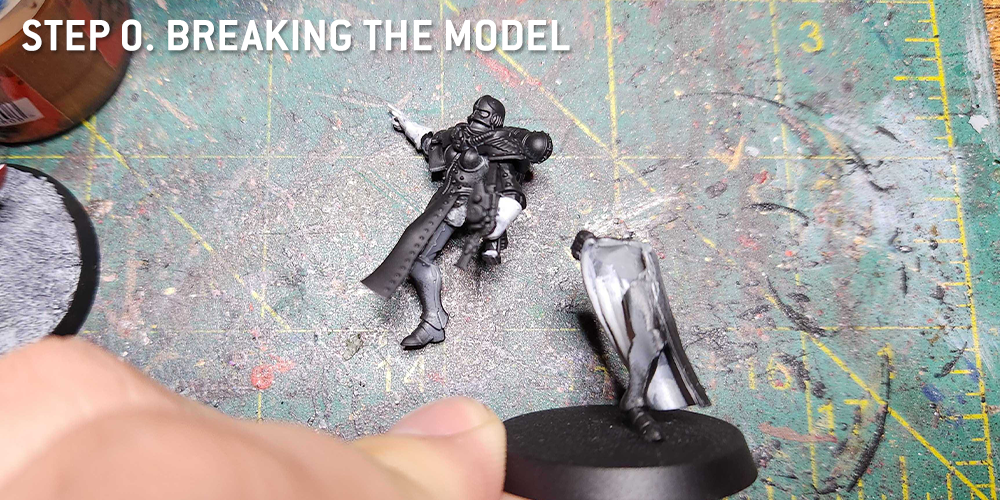
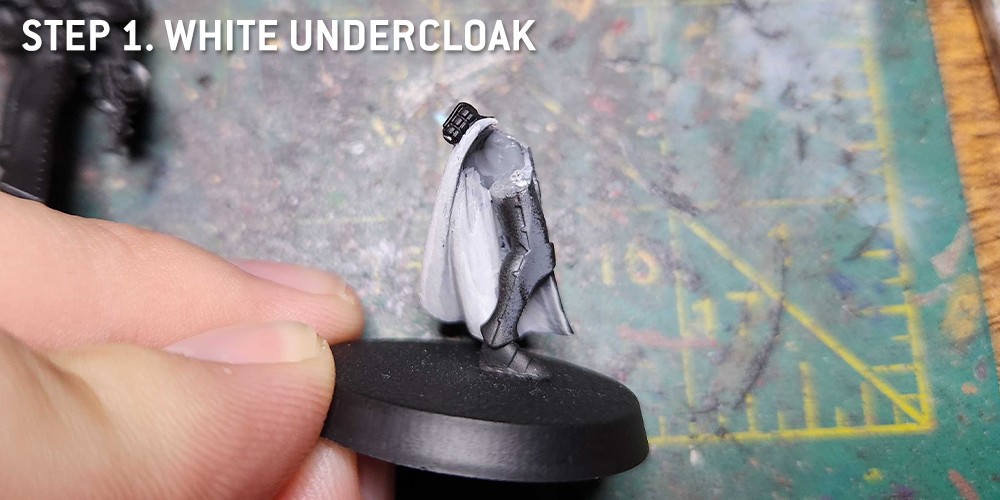
Step 1. The Undercloak
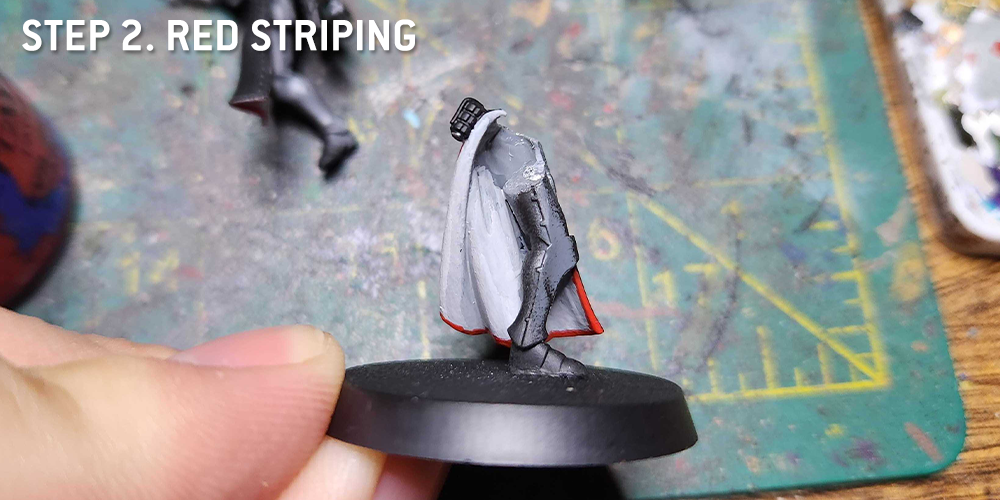
Step 2. Red Striping
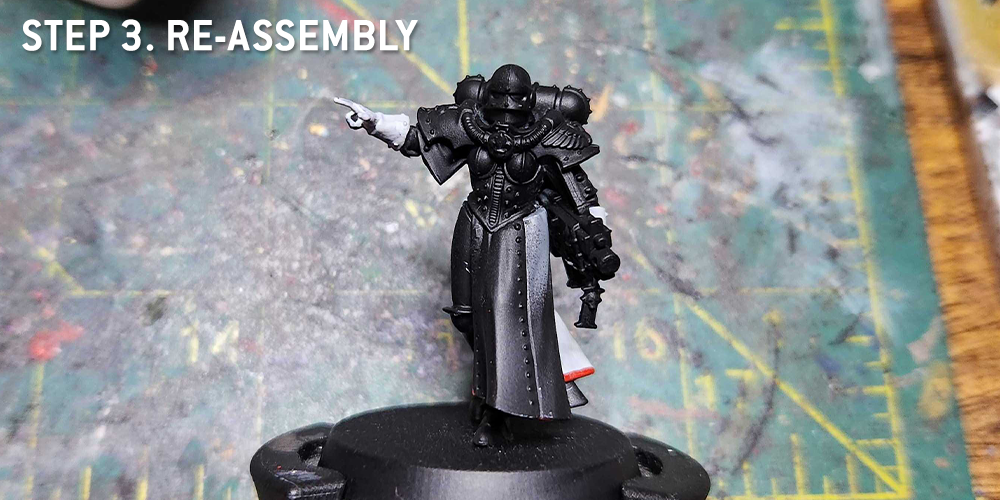
Step 3. Re-Assembly

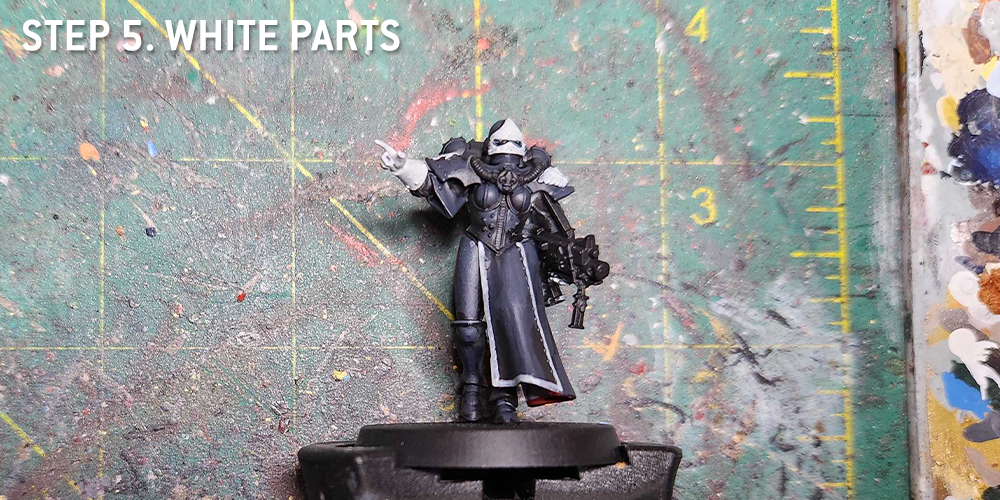
Step 5. White Parts
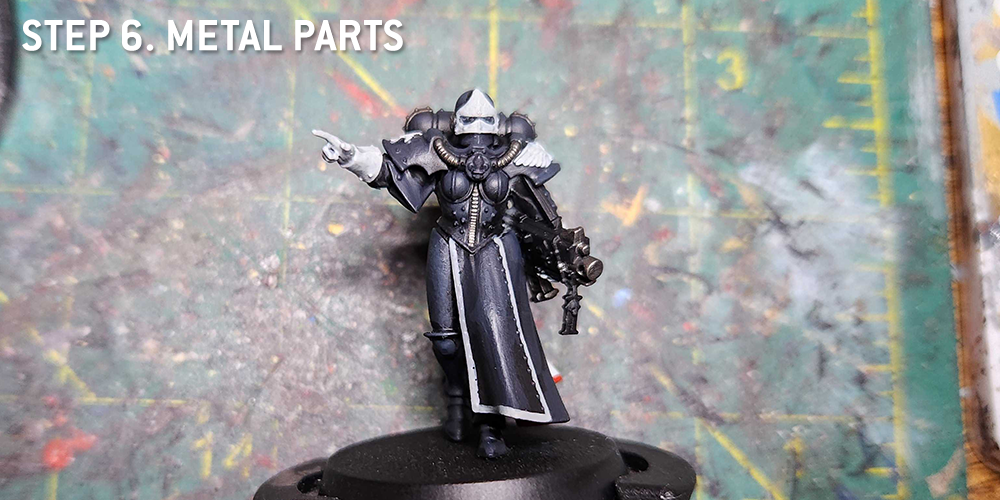
Step 6. Metal Parts
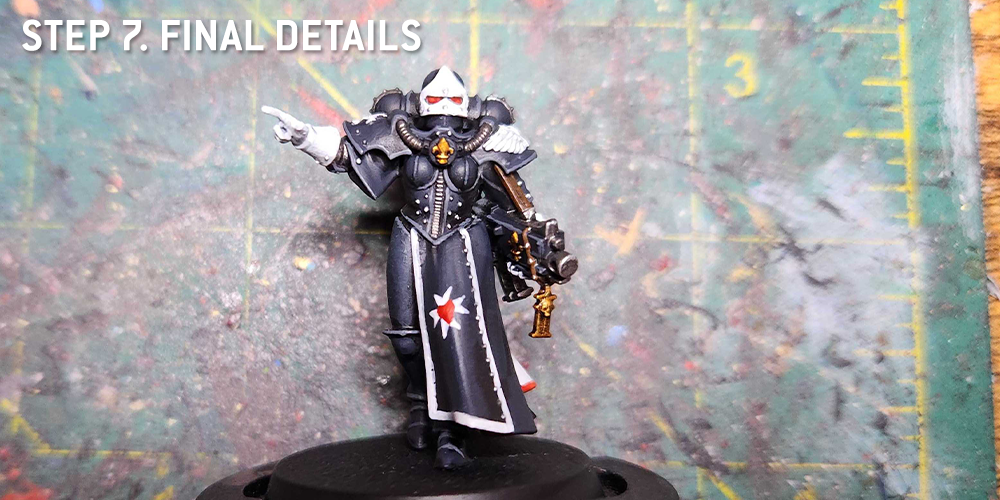
Step 7. Final Details
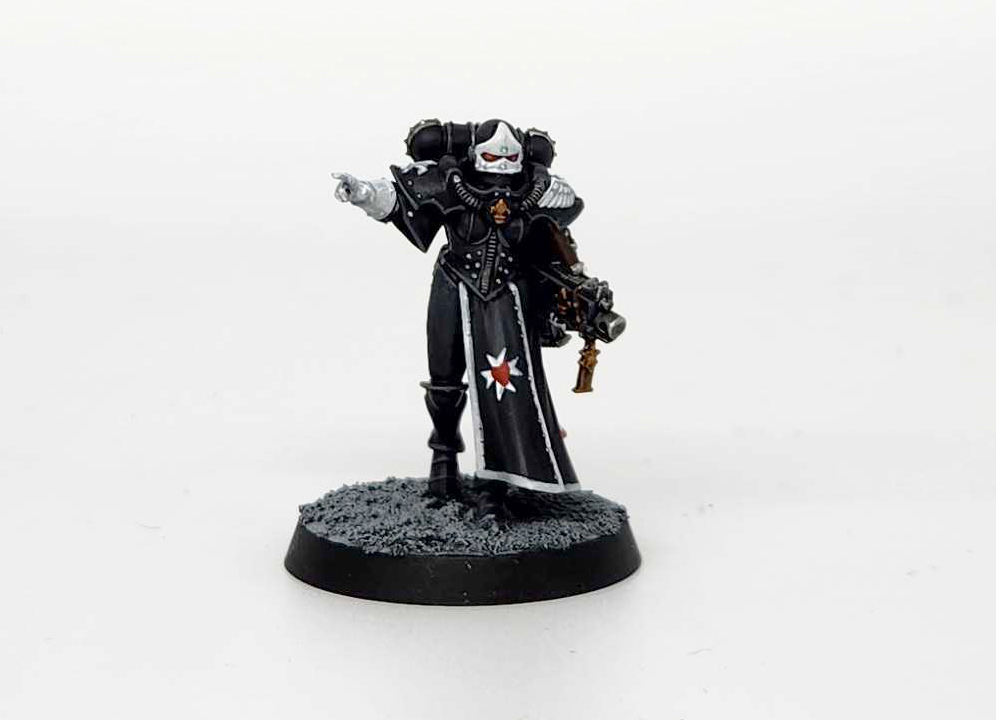

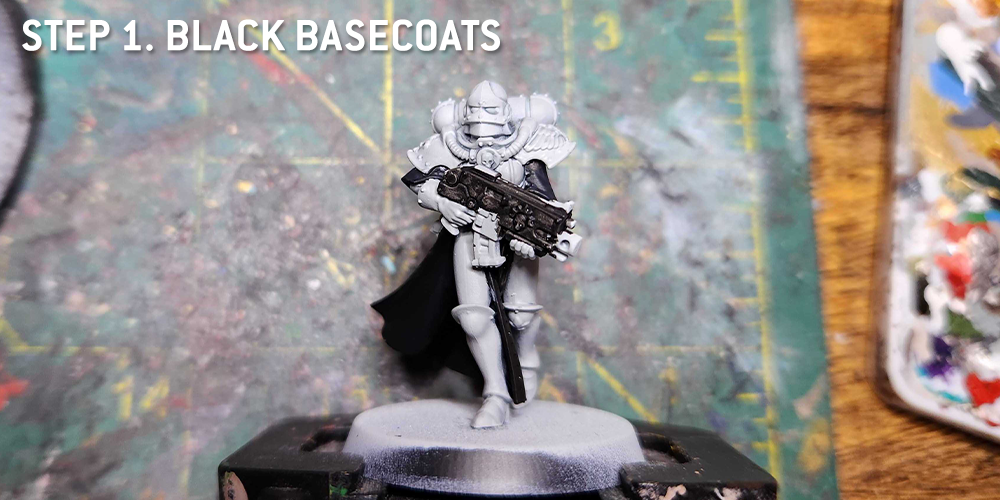
Step 1. Black Basecoats
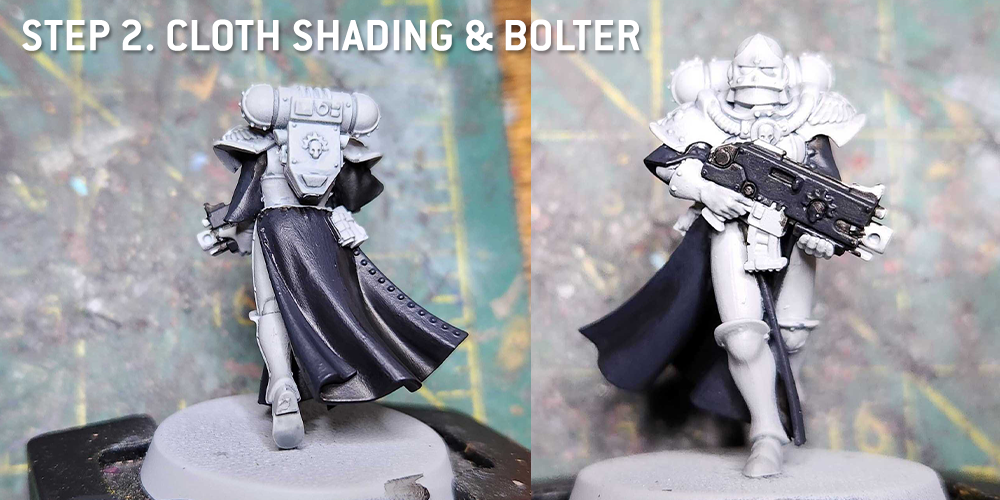
Step 2. Highlighting the Black
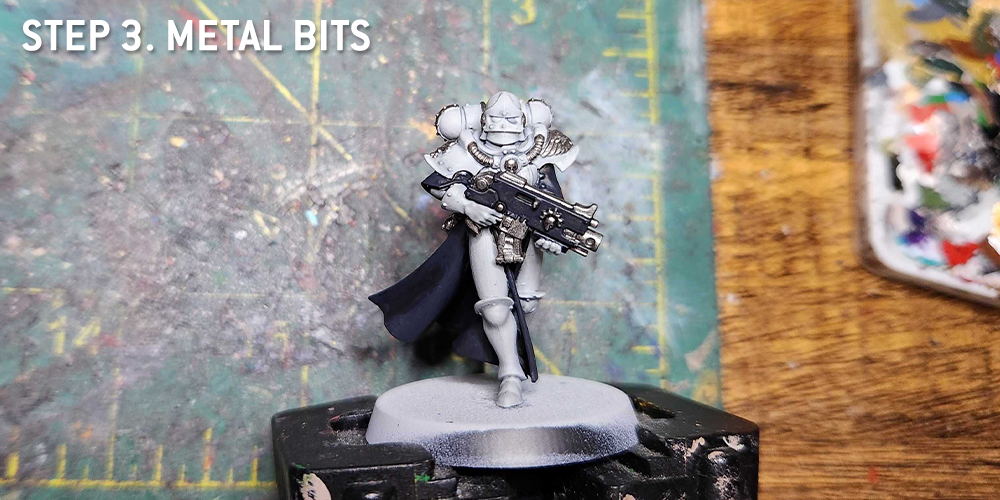
Step 3. Metal Bits
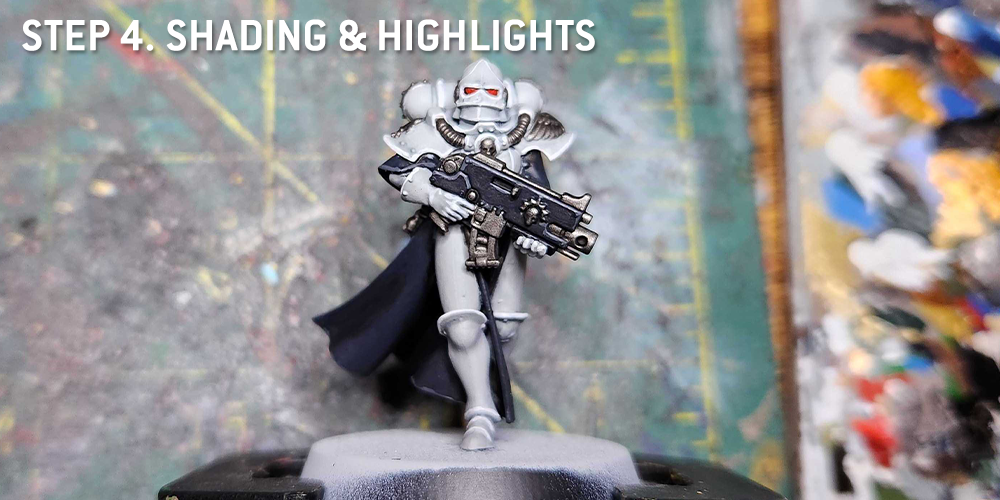
Step 4. Shading & Highlights
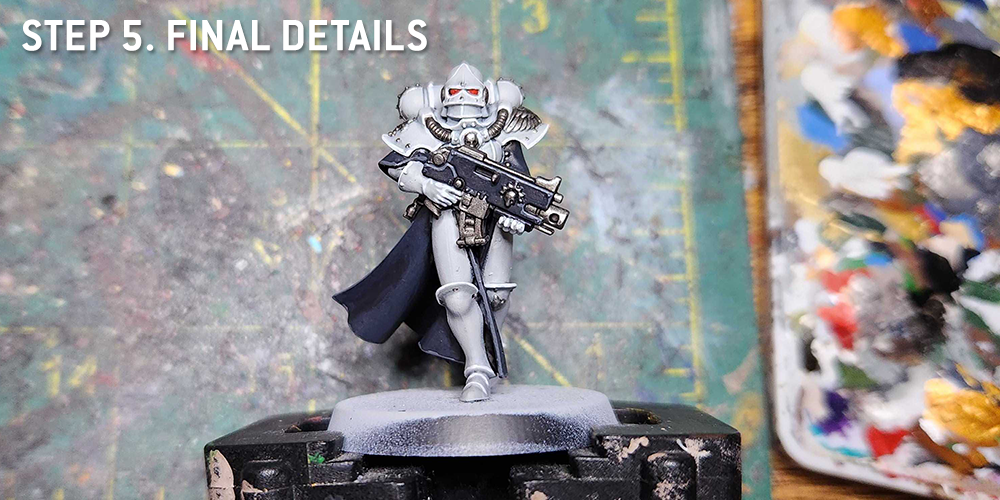
Step 5. Final Details
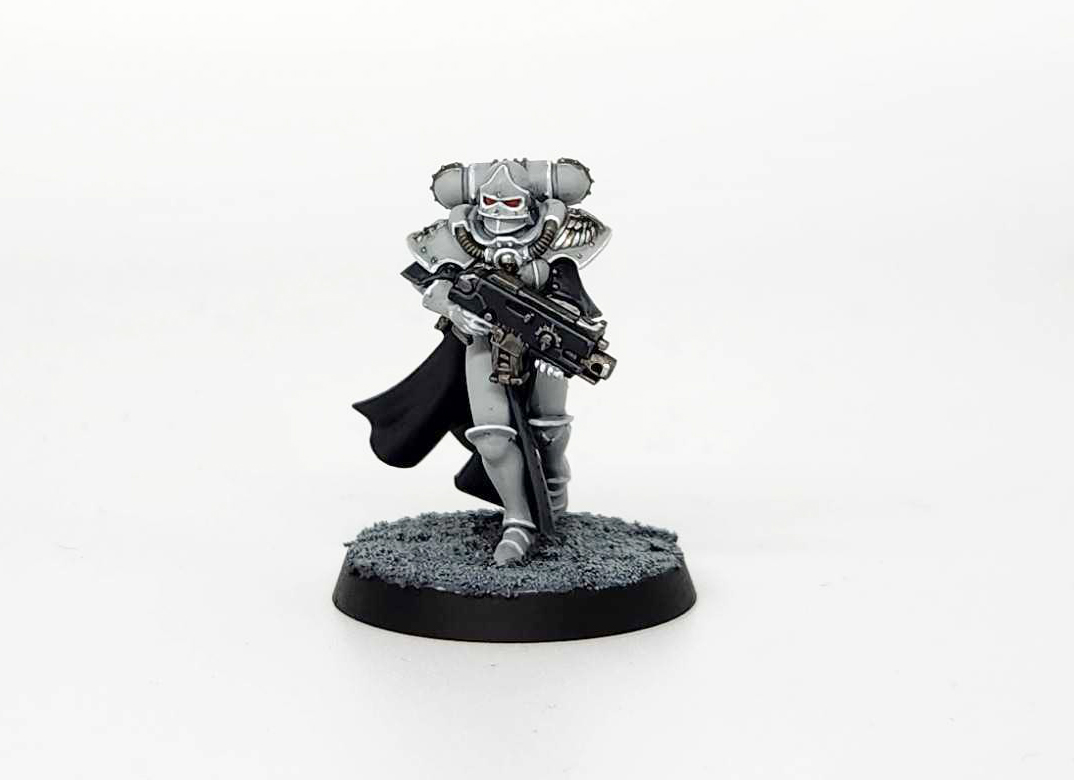

Step 0: Primer
Step 1: Base Coats
Step 2: Highlight 1
Step 3: Highlight 2
Step 4: Final stage
Bonus: Smouldering Corpse


Time to Work Some Miracles



You must be logged in to post a comment.