With the recent release of Firelock Games’ “Raise The Black” expansion for their flagship Blood & Plunder game, we thought it was high time to put out some pirate-based content to get everyone in the mood to raid the high seas!
Blood and Plunder (first released by Firelock Games in December of 2016) is a 28mm skirmish-level game originally set in the Caribbean in the mid 1600s. Later supplements (No Peace Beyond the Line in 2017 and Fire on the Frontier in 2020) extended the game into the mid-1700s and expanded its scope to include colonial North America. And with the newest release (Raise the Black), the action focuses on the golden era of the Age of Piracy.
There are lots of 28mm skirmish games out there, but what really distinguishes Blood & Plunder from the competition (and what really caught my eye when I first saw a demo of the game at GenCon in 2017) are the ships. Because while Blood & Plunder lets you do raids and ambushes and prison breaks and daring escapes on land just like any other tabletop skirmish game, it also lets you play games set entirely on the high seas. Vicious broadside cannonades, desperate boarding actions, puckle guns, chain shot, buccaneers firing down from fighting tops in the rigging – all these are represented in Blood & Plunder in a way that is almost unique in tabletop gaming.
In addition to the regular line of 28mm miniature figures (originally in metal and now increasingly with multi-part plastic kits), the game has a range of sea-going vessels of varying sizes. This includes everything from canoes and long boats (for natives and/or landing parties) to the massive galleons and 6th Rate frigates and almost everything in between. The hulls of these vessels are enormous hunks of resin – my Brigantine measures 11″ long at the waterline and 13″ long at the gunwale – though the new Raise the Black expansion includes two smaller “Bermuda Sloops” with plastic hulls. With each ship kit, you also get a set of dowels of various sizes to represent the masts and spars, as well as a set of laser-cut wood pieces to hook them together. Finally, the kit will include a good amount of black elastic cordage that you can use for the ship’s rigging, along with instructions about how everything goes together. Fully painted and assembled, the ships make for gorgeous gaming pieces and look utterly fantastic on the tabletop.
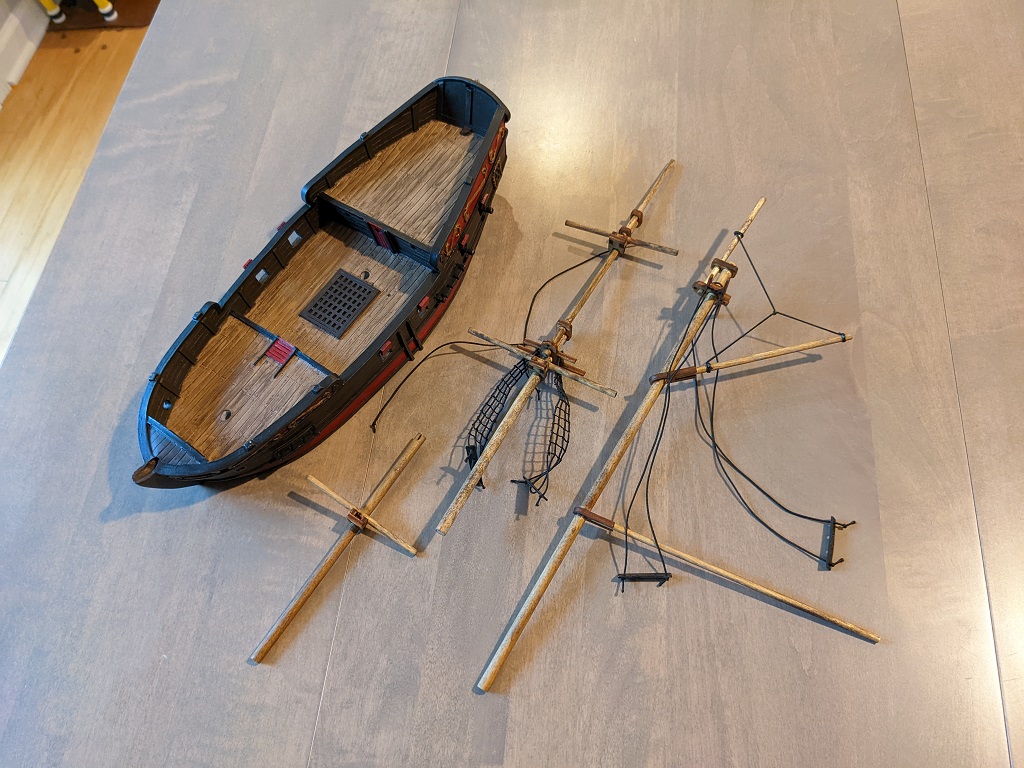
The drawback to the standard method of assembly, however, is that it sort of assumes that you are putting your ship together in a more or less permanent fashion. While this might be fine for display and game-play purposes, for storage and transport it’s an utter nightmare. While the hulls are incredibly solid, the masts, sails, and rigging are the very definition of spindly, which makes getting your ship model from your house to your gaming venue intact a GW-Nagash-level exercise in “what will break this time?”
But fear not! With a few easy steps, you can set up your Blood & Plunder ships such that the masts and rigging are modular and removable, which makes storage and transport a (warm Caribbean) breeze!
Step 1: Prepping the Hull
Depending on the size of your vessel, the holes in the deck into which the mast dowels are inserted may or may not be drilled all the way through the hull. For smaller vessels like the Bark (or “Barque” if you’re French!), the mast holes will have a bottom to them and you won’t need to do anything special. But for some of the larger vessels, you’ll need to do something to give the masts a secure base such that they don’t go shooting out the bottom of the vessel every time you pick it up. This was definitely the case for the two-masted Brigantine, which was the first Blood & Plunder vessel that I worked with.
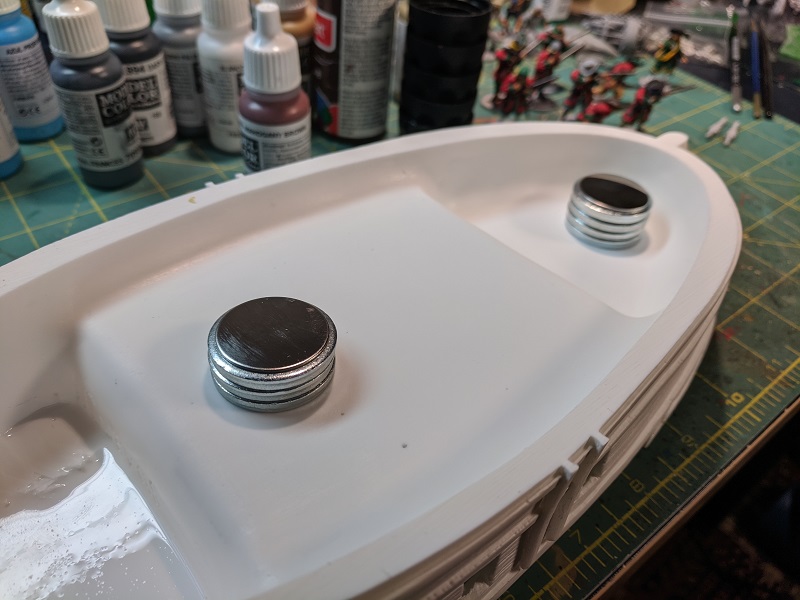
To solve this problem, I went to the nearest hardware store and found washers whose internal diameter was the same diameter as the bottom parts of the masts. In that ship’s particular case, these were 1/4″ dowels. Using super-glue, I glued these together in a stack (along with a little circular flat metal plate I had lying around in my bits box – you could just as easily use a piece of plastic or a left-over sprue bit) to make a sort of “cup” that I could then affix to the underside of my ship’s hull. This gave me a nice, deep socket into which the bottom of the mast would sit, keeping it upright and secure.
Whether or not you need to create a socket for your masts, the next step is absolutely required if you want to do modular rigging, and that is modifying your “chains,” preferably before you affix them to the hull. A ship’s “chains” (sometimes also referred to as its “channels”) are the blocks extending from the side of the hull into which the shrouds are passed, and the shrouds are the lines extending from the mast to each side of the ship to provide lateral stability to the mast. For the Blood & Plunder ship kits, the chains are laser-cut wooden pieces, cut from 1/8″ thick plywood. They will have a varying number of holes in them, with larger ships and taller masts generally having more holes to accommodate more shrouds, as the shroud lines will be tied off through those holes.
Ultimately, these little blocks of wood will get inserted into small channels cast into the sides of the hull. But if you want to make your masts removable, you’ll need to make a minor modification to your chains/channels, cutting out a groove all the way in from the outside edge for each hole. I used a Dremel tool with a cutting wheel attachment to do this work, but you could just as easily use a razor saw or even a small file. The important part is to be careful and go slowly. In the end, your chains/channels should look something like this:
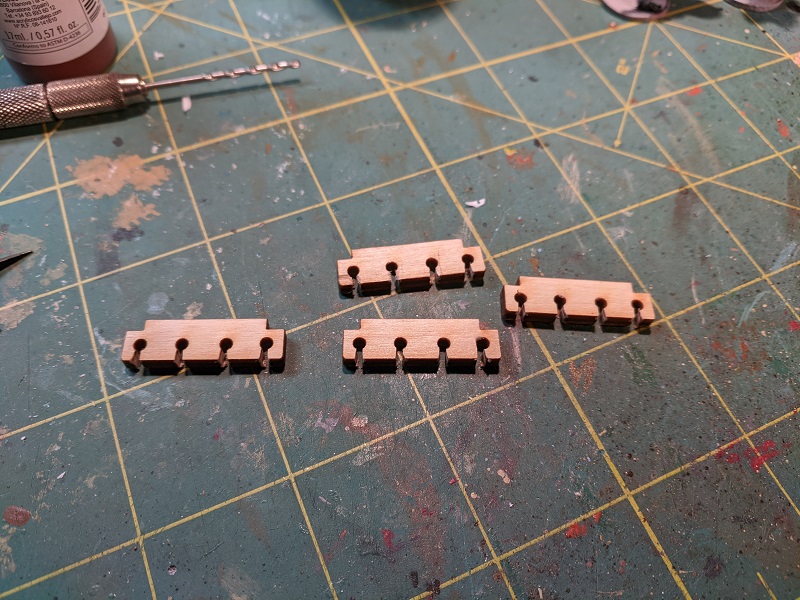
As you can see you don’t need to be super precise here, just make sure your grooves get all the way in to the original holes.
Extra Credit: Magnetizing your Swivel Guns!
I never saw a model I didn’t want to magnetize, and the Blood & Plunder ships are no exception. You see, they have these spots along the gunwale where you can attach swivel guns, and each kit will come with some number of said guns. But equipping those guns on your ship will cost some number of points that you might not want (or have) to spend for any given game, and as such I wanted to magnetize them to make them easy to add or remove as the situation dictates. I am WYSIWYG-obsessive, it’s my cross to bear.
Anyway, these models are super easy to modify to handle this kind of magnetization. In the center of each swivel block I just drilled out a 1/8″ hole roughly 1/16″ deep using a pin-vise. Into this hole I glued a round magnet of the same size to be flush with the top of the swivel block, like so:
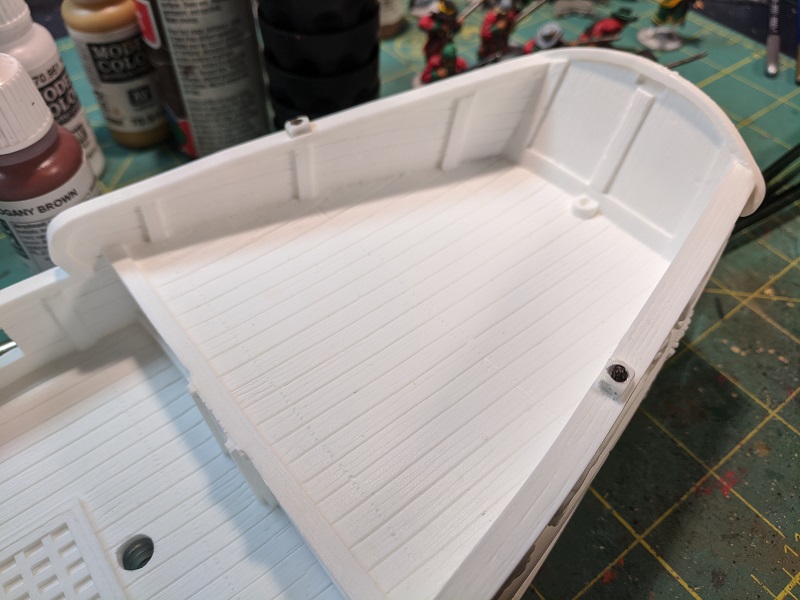
Once that was done, I did a little surgery to the swivel guns themselves, removing the post that’s supposed to go into the little hole that was originally cast into the swivel block. After filing the body of the gun flush, I drilled out a small 1/16″ diameter hole in the bottom of the body of the gun and put another small round magnet in there. This might be overkill, you could probably just glue the tiny magnet to the bottom of the body of the gun and it would be fine, but see above under how I am obsessive about this stuff.
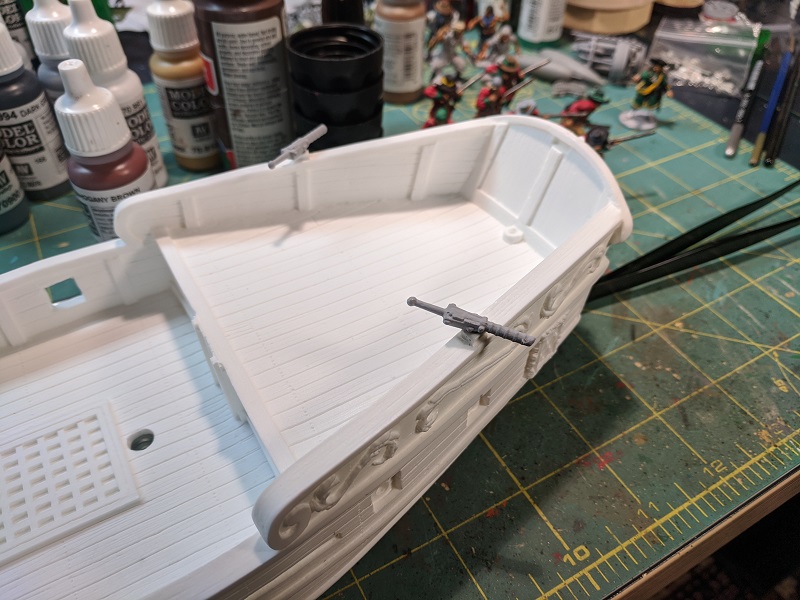
As always, when you are working with magnets you need to take care that the polarity is correct before you glue anything in place. So long as you are consistent, any swivel gun will be able to mount to any of the positions along the gunwale. And if you keep your polarity consistent among your ships, you can use any of your swivel guns on any of your ships. This is a convenience/quality-of-life thing, and it just makes playing games with your models easier.
Anyway, once you’re all done, you have modular swivel guns that you can mount or dismount as suits your scenario or force, which will look something like this:
Step 2: Assembling the Masts
For the most part, mast assembly is easy. You have some number of round dowels and a bunch of little bits and bobs you’ll use to hook them together. The kit will come with directions on how everything fits, and assembly is actually pretty straightforward. You’ll need to take some care to keep things straight and/or level during this step and there are a few cases where it can be a little frustrating, but for the most part it’s pretty easy.
Given that these are wooden components to start with, they have a fantastic natural grain and variability that responds very well to stains and washes. I used a very simple oil wash made from mineral spirits and a 2:1 mix of Windsor & Newton Burnt Umber and Lampblack oil paints that I used both for my masts as well as to weather the decks of my ship after I have painted them tan. However, do not make the mistake that I made on my first ship: Unless you plan to actually prime and/or paint your masts, you’ll probably want to wash or weather the individual pieces before you assemble them.
The reason for this is that any glue you use will generally form an external barrier which will prevent your wash (be it oil or water based) from soaking into the wood. This will result in areas where the wood of the masts or spars looks all shiny and new right next to a more natural, weathered area. This is purely an aesthetic concern, but I wanted to raise it as a potential issue if you care about that sort of thing. If you are going for a “tar washed” approach and plan to paint your masts black, then you’re probably fine to go nuts and assemble them before painting.
Step 3: Rigging the Shrouds and Stays
Here’s where the magic happens. Rather than passing your shroud lines through the holes in the chains/channels, you are instead going to make your own piece to fix the lines. This will sit underneath the chains/channels and be kept in place using the tension of the elastic shroud lines. I just used a little piece of sheet styrene made from an offcut in my terrain bits box, but almost any kind of small plastic plate will work here. You’re going to want to cut it to the same size as the part of your chains/channels that protrude from the hull of your ship, and you’ll want to drill holes in it in the same location as the holes in the chains/channels themselves. This is kind of hard to describe in text, so I’ll just show you a picture:
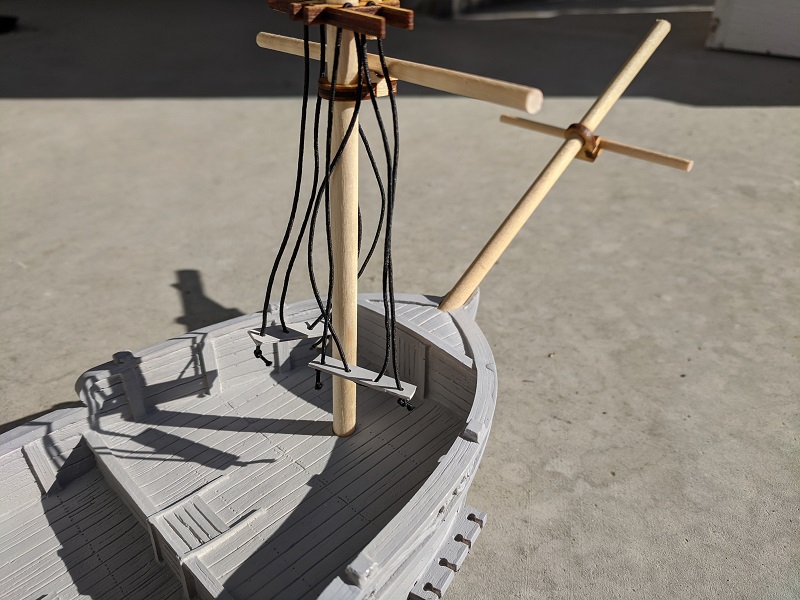
As you can see, in this case there are four holes for the shroud lines in my little plate and four holes in the mast bit that attaches just above the spar in the above photo. But really, this is just one piece of elastic thread run up and down through the holes and tied off below my base plate, like so:
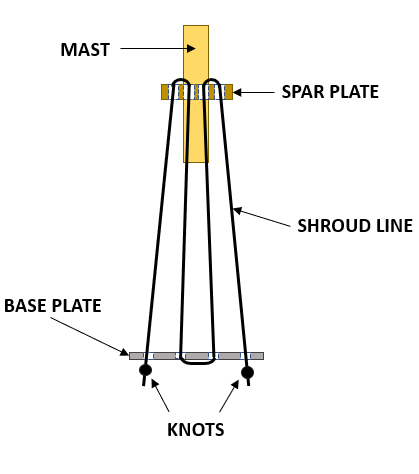
But this raises the question: how much line should you use? Well, the elastic line provided with the kit is pretty stretchy. I measured the distance between the chains/channels at the bottom and the mast plate at the top, which for my case was almost exactly 5 inches. Given that there were 4 shroud lines, that gave a total distance of 20 inches. In order to get a comfortable amount of tension, made the line 25% shorter, for a grand total of 15 inches to make that entire set of shroud lines.
Once you’ve run your shroud lines through the holes on your base plate and the holes in the piece on the mast, you’re ready to go. Now, attaching your mast is as simple as putting your base plate underneath your chains/channels and running the lines through the grooves you’ve created. When it’s attached, it will look like this:
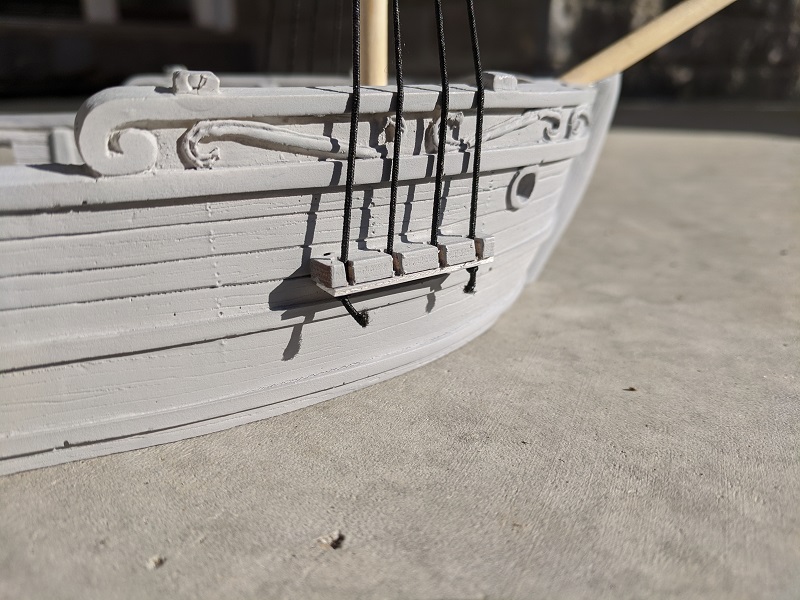
Congratulations, now you have a removable mast!
Just as shrouds are designed to provide side-to-side stability to the mast, “stays” are used to provide fore-and-aft stability to the mast. For my Brigantine, I used two stays, one between the foremast and the bowsprit (which is the pole that sticks out of the front of the ship) and one between the mainmast and the foremast. If you wanted to, you could just tie the stays off in the appropriate places, but if you do that then all of your masts will be removable but are all effectively a single piece. This may not be an issue for smaller vessels, but I’d hate to try to untangle the bowsprit and all four masts of a galleon, for instance.
To get around this, I used the same kind of approach for the stays that I used for the shrouds – grooves and knotted lines. Here’s an example of how I rigged the stay between the foremast and bowsprit on my Brig:
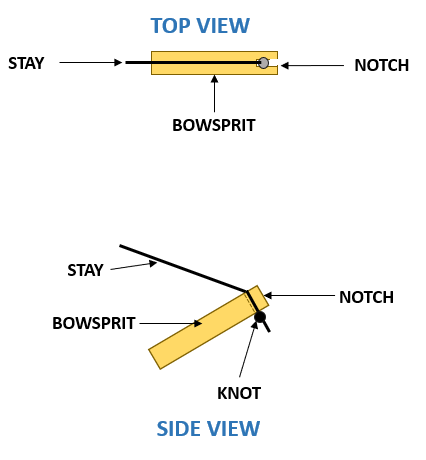
Thus, the stay is permanently tied to the foremast, but the far end of it can slip through the notch at the end of the bowsprit. I used the same 75% approach to figuring out how long my stay line should be. The stay line between the foremast and mainmast was done in a similar fashion, and there was a handy little place on one of the plates near the top of the mainmast to make a suitable notch there as well. Voila, now your masts can be separate pieces, all removable and easy to store.
At this point, any reasonable person might stop, secure in the knowledge that their model is set up to accommodate their storage and transportation needs. But when have we at Goonhammer Historicals ever claimed to be reasonable?
Extra Credit: Rigging the Rat-Lines
If you want to get crazy and make your ship really look cool, you’ll want to add rat-lines. The rat-lines are the ropes that are tied horizontally between the individual shroud lines. They form the “ladder” that sailors use to climb up the masts and are an iconic feature of tall ships.
Right, so how do we tie rat-lines? For this step, we’re actually going to step outside the materials provided by the kit itself, but fear not – it’s not complicated, we’re just going to use some basic black thread. In the example here, my four shrouds span a horizontal distance of about an inch near the gunwale and decrease as you go upwards toward where they attach to the mast. To make an individual rat-line that stretched across all 4 shrouds, I cut about a 6″ piece of thread. This is way more than you’ll need, but this step involves weaving and twisting that thread back and forth before ultimately tying a knot off, all of which will be easier on you if you have some extra slack to work with.
IMPORTANT: we’re going to do this with the mast and shrouds in their attached position, affixed to our ship and with the shroud lines under tension.
The actual process itself is pretty easy once you get going. Starting at the one of the outer shrouds (your choice, I started at the back and went forward but you can do it however you like – though it helps to be consistent!), you’re going to wrap the middle of your piece of thread around the shroud in a single loop. Then you’re going to twist the ends of your thread around each other a couple of times and this is where things get a little tricky; because the distance between the shrouds changes as you go up, each successive rat-line may vary in the number of twists you apply between each shroud. In my case, I was doing like 6 or 7 twists for the first few rat-lines, but only like 3 between them when I got near the top.
You can gauge how many twists you’ll need by pulling them tight and seeing how much space they take up. Once that space is about the distance between the shrouds, you loop the ends of the thread on either side of the next shroud and start twisting again. Make sure you’re always twisting in the same direction. Repeat this process until you get to the last shroud, at which point you’ll loop the ends of your thread around that last shroud and tie a single small knot.
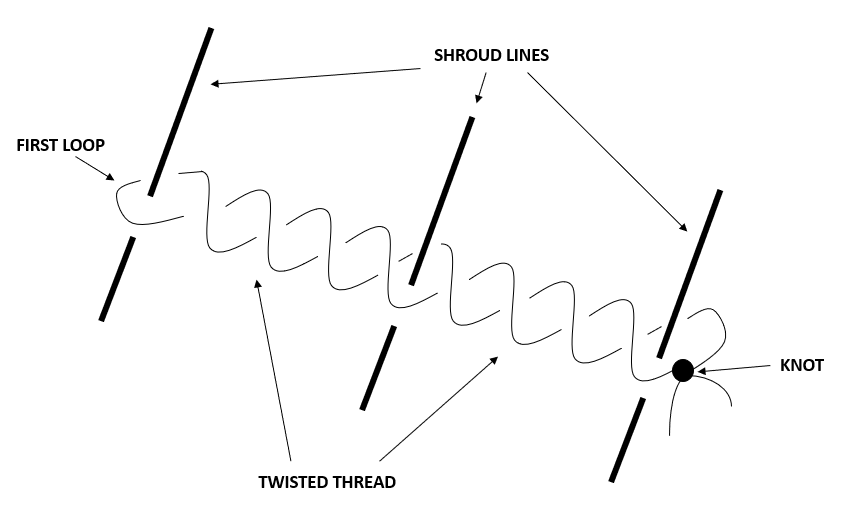
At this point, you can poke and prod and adjust the vertical spacing of the rat-line to make it level across all of the shrouds. I then used a toothpick to apply a tiny bit of superglue to the point where the rat-line wraps around each of the shrouds, also making sure to get a tiny bit of glue on the final knot. This permanently set the rat-lines in the place I wanted them. I did this on the “inside” (i.e. the side facing the mast) so it was less visible if I got a little heavy-handed. The superglue will soak into the thread and harden in a matter of minutes. Once it does, you can use a small pair of scissors or a pair of flush-cutters to remove the excess thread from the knot end.
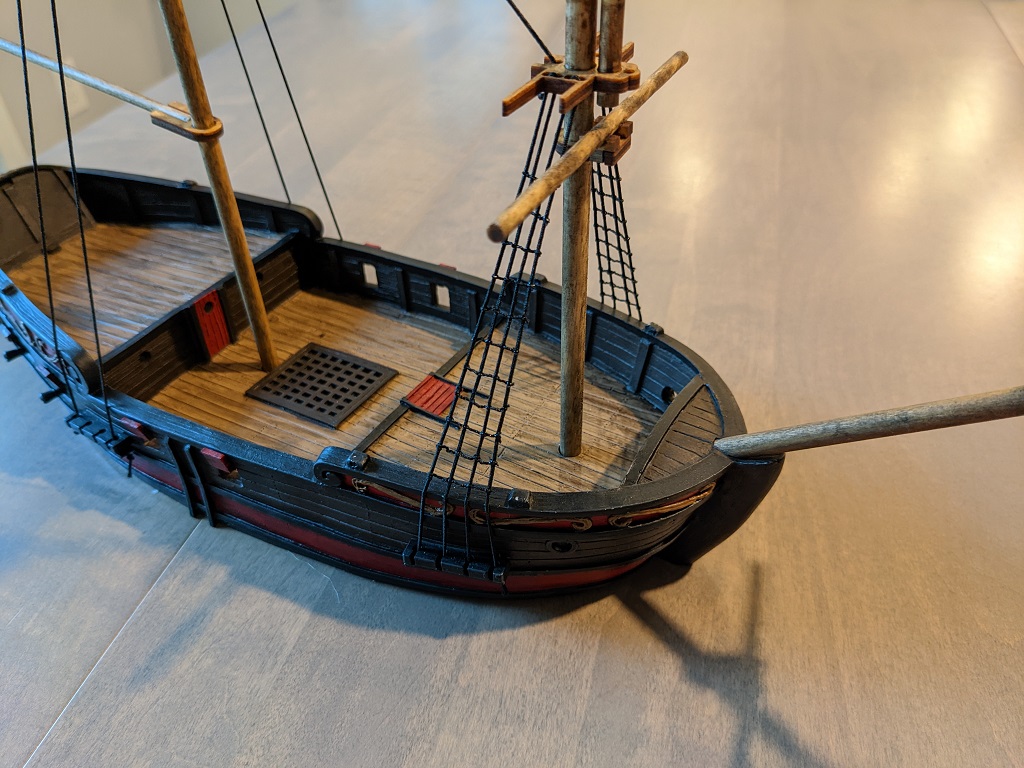
Now cut yourself another piece of thread and go to your next rat-line. In general, I think it’s probably easiest to start from the bottom and work your way up. Once I got into the groove, I’d do a rat-line on one side of the ship, glue it in place, then move on to the rat-line on the same level on the other side of the ship. By the time that one was done and glued in place, the glue on the previous one had dried hard as a rock and was ready to be trimmed. This let me work back and forth all the way up one after another and went surprisingly quickly once I got a little practice. And when you’re done, you’ll have rigging that really looks the part, making your model much more visually striking on the table.
Next Time…
Sails, baby! Let’s make some sails!
Have any questions or feedback? Drop us a note in the comments below or email us at contact@goonhammer.com.
