
Welcome back to another Star Wars Shatterpoint Squad Pack Review!

This week we’re going to be looking at the Plans & Preparation Pack containing Jedi Master Luminara Unduli, her Jedi Padawan Bariss Offee and two Republic Clone Commando’s. Luminara and Bariss do both feature in the live action Star Wars films but will be far more recognisable to those who’s watched the Clone Wars animated series. Clone commandoes are one of the lesser seen armour types within the series but they do pop up from time to time. In Shatterpoint however I feel they’ll be one of the more common units seen on the table in almost every instance where you want a 4pt Supporting Clone unit.
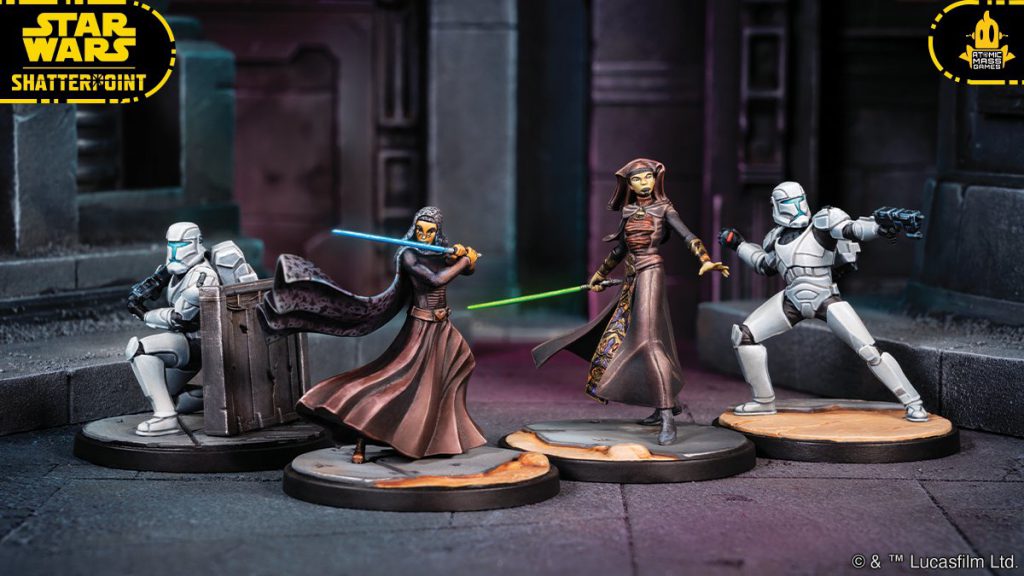
The models are another slam dunk from Atomic Mass Games. With Luminara displaying a calm and collected pose ready for battle while Bariss takes up a similar stance to that of Obi-wan getting ready to defend using a two handed Soresu stance, very similar to that of her master. The Clone Commando’s are study built and both in action poses, ready for the fight which is already going on around them.
Jedi Master, Luminara Unduli
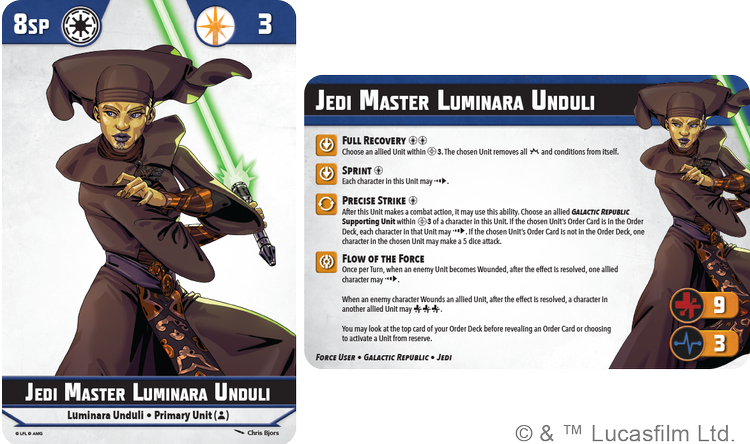
Luminara plays a supporting role in the Clone Wars often being paired up with Obi-wan or Anakin during the Animated Series, but don’t let that fool you. You don’t reach the rank of Jedi Master without being more than capable with a Lightsaber and knowing your way around tricky situations. At 8SP and 3F you’re looking at the baseline for most Primary Characters and while 9 Health is on the low side she however has 3 Stamina so it’s very unlikely that she’s going to be removed from the board anytime soon.
Full Recovery – Removing all the Damage from another unit within range 3 is a massive ability and instantly the first thing you’re drawn to on her card. In Shatterpoint the key thing seems to be how quickly you can reduce a character from Full to Zero in terms of objective control, and while some characters can do that (Anakin for example) actually doing that with a lot of units in the game just can’t happen, even with both characters in a supporting unit attacking and good rolls. So in theory being able to replenish a units health at a key time is going to be outstandingly useful, but it does mean drawing Luminara at the right point or using the Shatterpoint Card on her. In addition it’s a drain on, what is most likely going to be a Clone based teams Force resource and when they’re already wanting to use Defensive Manoeuvres on a regular basis plus anything else you want to do with Primary or Secondary characters this might not end up being used that often. But it does look like when you do get chance to use it it’s going to be game deciding.
Sprint – Let me say that any kind of bonus movement is great, so any character which has access to it is automatically good. But in a world of full advances, full advances with scale and jumps a character with just a bonus dash is slightly disappointing. So, bonus movement great, but this is the worst kind of bonus movement we’ve seen in the game.
Precision Strike – The 3rd ability on this card with a Force cost associated with it. But it’s a really good ability for a single Force. It’s a little situational though in that depending on what unit you pick depending on where that units Order Card is you get different effects. Getting a bonus move is of course, brilliant and the other option for an additional attack is also useful. It’s just about trying to make sure you get the right trigger on the right unit at the right time. Do that and you’ll be making the most of this.
Flow of the Force – Now we’re talking. This is Luminaria’s Identity and it’s up there with Obi-wans in terms of impact it provides to the Strike Team. First off, when you wound an enemy unit you can Dash one character. Remember when we spoke about bonus movement? This is the Identity with most bonus movement. You’ll wound enemy units maybe once every other activation as the game progresses so even on a short 2 Struggle Scenario you’re looking at around 4-5 bonus dashes, just for Luminara being on the field.
The second part of this Identity allows you to heal 3 with one character when a different friendly unit is wounded. There are restrictions on how you heal in the game but as the game progresses you’re again looking at a lot of healing. Presuming that you’re working on the same rough pattern as before where an enemy unit wounds one of yours every other activation then you’re looking at maybe 15 healing over the course of a short game, more over a longer one. That’s just amazing. Enemy Chip Damage and Conditions are now a thing of the past.
But wait, there’s even more to this. The first part of the Identity was good, maybe even good enough by itself, but it was a little bit win more. The second one is just amazing, now you have a catch up mechanic built in as well. This last ability allows you to no longer gamble on removing your unit from reserve instead of getting the next from the Order Deck. The more information you have the better decisions you can make and this just gives you more information, information you can use to your advantage in the game. Combine this with abilities such as Obi-wans Patience and you can really leverage your deck manipulation.
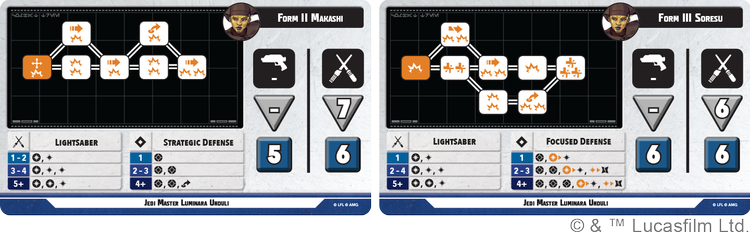
Form II Makashi is Luminara’s more offensive stance with reasonable offensive expertise and OK defensive. With 5 defence dice against range and a very respectful 6 in melee she’s fairly survivable in this stance and 7 dice on that Lightsaber is about what you’d expect as a minimum. The big selling point of this tree are the early access to shoves on 2 and 3 results respectfully allowing for decent success rates when trying to move enemy off the points along with a reposition on a single success, which is great when combined with an Advance and her Dash for getting where she needs to be. Of course this stance can also pump out 8 damage but you’d do well to make your way through the tree to achieve this result.
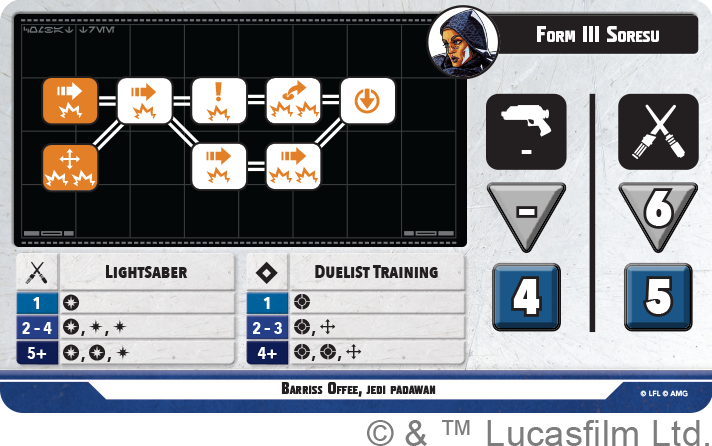
Form III Soresu is the more defensive stance similar to what we’ve seen on Obi-wan. with a really good defensive stat line of 6/6 and a brilliant defensive expertise track. With the ability to heal 2 early in the tree and capping it off with 3 more at 5 success you an really take a support unit from the brink to fully functioning in the blink of an eye. This side caps out at 6 damage but you’re not really using it for that aspect, more the early heals and pin you can inflict when needed reliably.
Barriss Offee, Jedi Padawan
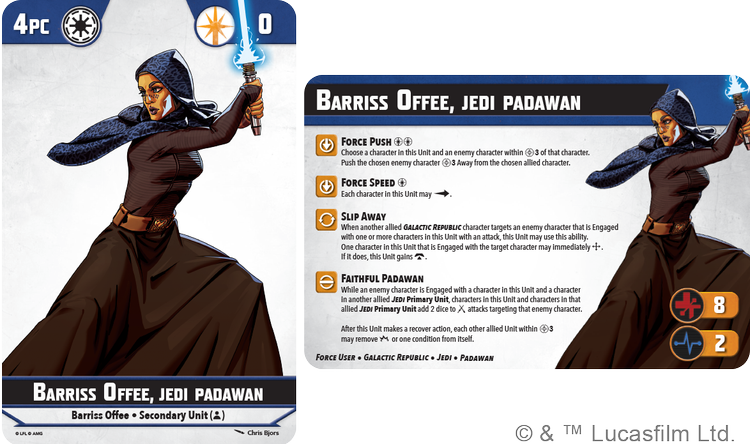
Barriss like her master is mainly a Clone Wars series character but I do have a sneaking suspicion we might be seeing her in live active before long. Costing 4 with 8 Health and 2 Stamina we’re looking at a pretty standard secondary in terms of numbers.
Force Push – One of the best abilities from the Primary characters in the core set makes a return here on a Secondary character and it’s great to see the light side of the Force getting access to this powerful skill. With a really great activation range and a really big push effect you’re spending 2 force to remove an enemy piece without large movement bonuses out of the game. It’s a heavy investment, especially if you’ve got a Force intensive team as you haven’t got a way to recharge the Force Pool for Jedi themed forces just yet but there are times when the high cost is easily worth paying. I say more good stuff about Force Push in our Core Set Review Here
Force Speed – I keep saying it, but movement is good. A full advance is great (but no jump) but you just need to make sure that you place her in a place on the board where the lack of a jump isn’t massive detrimental. She’s really able to shift, especially when combined with her Stance Card you’re able to get 3 full advances a turn and that’s a boards worth of movement.
Slip Away – This ones a little different to most skills and does require you to read it a few times. The first bit is important to note that it only triggers around Galactic Republic characters and allows her to reposition on another characters activation. In effect the enemy gets distracted by the incoming attack and Barriss takes the chance to disengage and get to another location. As a bonus on top of that she also gains a Hunker Token which we all know synergies well with a certain Jedi Master who survived order 66.
Faithful Padawan – This ability represents Barriss working well with another Jedi adding dice to their attack pool as dealing with 2 Jedi is clearly more difficult than 1. When Barriss and Primary Jedi are engaged with the same enemy model both Barriss and the Jedi gain 2 additional dice on melee attacks. Brilliant little bonus, Obi-wan rolling 12 dice on attacks? Seems Ok right?
The second part of the ability allows you to (at worst) double up on recover actions. So when she makes a recover action each other allied unit within 3 can also heal one or remove a condition. So if she’s making one and is in the middle of the your force then you’re maybe getting 4-5 additional damage or conditions removed, no ones saying that’s a bad thing right?
Studying under Luminara has led Barriss to study Soresu as well. Offensively she picks up an early Crit and her 2-4 results are pretty well just positive dice, only on the 4 dice do you actually lose out on dice, every other result from 1-3 you gain a bonus from expertise, very few Secondary Characters have this that far up the tree. Defensively she’s not going to tank much, but against chip damage chances are you’re going to triggering at least an additional block, most likely a reposition as well really allowing her to get where she needs to be. Maybe allowing her to get in position to trigger Faithful Padawan easier as well?
With 6 melee dice you’ll get a handful of results most of the time and again we have a Reposition on the first result if needed, she’s like a walking reposition, gets loads of them. But it gets better, instead of that you can shove and shove again on the 2nd point, shove again on the 3rd and the 4th? You won’t usually get that far down, but if you’re going on an exposed character it’s a maybe and moving a character that far can effectively remove them from the game, especially if they’ve activated early in the current round of the Order Deck. Finally the 5th result is a free ability which does solve your Force Supply problem a little, but you’d do well to hit that result on the tree.
Republic Clone Commandos
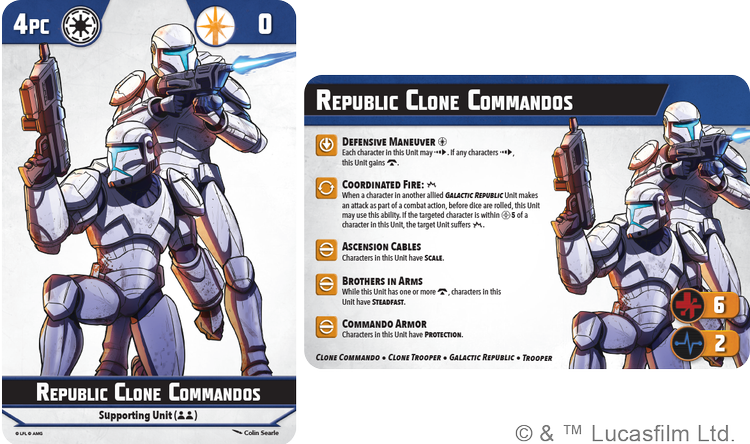
Somehow, despite everything I’ve written on this article so far we’re now getting to what will be the most commonly used selection in this box. The Commandos outdo the 501st and 212th at almost every turn. With a points cost of 4 we’re again in the standard ball park area but we only find 6 Health in their pool. However due to some of their rules that’s not as bad as you might think.
Defensive Manoeuvres – Not going to keep repeating myself, but it’s great. Read about it lots of times in our Obi-wan review box here
Coordinated Fire – Similar to the other versions of Coordinated Fire triggering in the same way when another units makes a combat action within 5 you can apply the effect, in this case damage, to the effected enemy unit. Doesn’t sound a lot but it’ll soon at up over the course of a game.
Ascension Cables – Scale is a brilliant ability which lets you change upwards elevation as a Climb when you would be forced to Dash or Advance through abilities. Just be aware that this changes the type of move to a climb, instead of it’s original type of move. As a result Clone Commandos can climb as part of a Defensive Manoeuvres but if it does so they don’t get the hunker as they haven’t Dashed.
Brothers in Arms – Steadfast when you have a hunker, just great, always has been always will be.
Commando Armor – This grants the Clone Commando’s Protection which actually helps their survivability a lot. At worst it’s the same as 7 health, easily counteracting the 6 pool they have on their card. If you’re taking chip damage, especially if you’re finding wants to gain Hunker Tokens and Obi-wan in the list for his Identity you’re maybe looking at 2 if not 3 extra health over the course of each stamina point, and that’s a big difference over a game. They’ll stick around and hold or contest objectives longer and that’s always good for the controlling player.

Overall you’ve got yourself a ready made squad, which while Force heavy offers a lot of options. But what you’re really got here area great Primary, a decent Secondary and a brilliant Support unit to put into different squads and strike teams over the coming months.
Let us know your best success stories or achievements with the contents of the pack in the comments below.
