
Armada’s delicious dice reflect the game’s core design: tight core mechanics supported by great depth beyond the rulebook. Following on from Dice 101, I want to talk about the deeper elements of the game’s dice.
Forces for Change – “Page-turners they were not.”
I’m gonna recap some stuff from the 101 article here for reference.
Firstly, a quick reminder on what each die face does at its most basic level.
Hit (opaque hitsplat) – Each hit icon adds 1 damage to the total damage pool against a ship or squadron.
Critical (slashed hitsplat) – Each critical icon adds 1 damage to the total damage pool against a ship. It also adds a critical result of the corresponding colour to be resolved by special abilities. No effect against squadrons unless otherwise stated.
Accuracy (reticule) – Each accuracy result can be spent to target a defence token on the defender and prevent its usage during this attack.
Blank – No effect.
Secondly, the handy table of dice types and results.
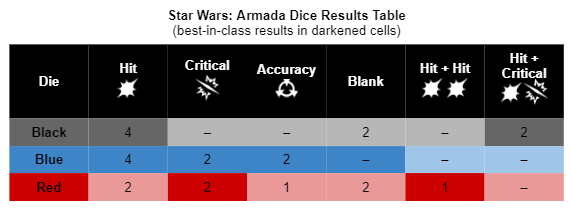
Take note of the general characteristics of the three dice. Black dice only have blank and damage-dealing faces, including two devastating hit + crit faces. They have extraordinary damage potential, but no way to generate accuracy results. Red dice have blanks, singles of each face, and a double-hit. They are versatile, but super inconsistent. Blue dice have a result on every side and the largest number of accuracy faces, but no double results. They are incredibly consistent and a favourite source of accuracy icons.
The Squadron-Ship Divide
Armada uses the same dice to represent squadron and ship attacks, despite the two unit types operating on vastly different scales. Several important rules dictate how ships and squadrons are affected by the dice to maintain game balance and lore cohesion.
Where ships are concerned, the full capabilities of all dice are in play. All possible results apply by default, and ships can take upgrades that use critical results to great effect. When ships are receiving damage, their multi-layered defences (defence tokens, shields, hull) are available and interact with the dice results. Perhaps most importantly, ships use the range side of the range ruler to determine range for attacks. Ship dice have variable range and cover the full length of this Armada-standard measuring tool. Black dice are short-ranged, blue dice work up to medium range, and red dice work at all ranges for ships.
Ships engage other ships using their battery value, represented by the number of dice on the arc (hull facing) that is used to make the attack. Ships use their anti-squadron value to engage squadrons. The anti-squadron value is static and does not change based on the arc used to make the attack, but anti-squadron attacks hit every eligible squadron caught in that arc. This can be visualized as a ship’s hosing down enemy squadrons coming from a given direction with its point defence batteries. Just as squadrons do piecemeal damage to ships but are punching well above their weight with each point of damage, ships deal piecemeal damage to squadrons, but deal area-of-effect damage. This has potent implications for how squadrons should be positioned when engaging ships.
Squadrons are secondary to Armada’s core gameplay (it’s Armada, not X-Wing). The squadron dice mechanics can mostly be described as just use the dice ship rules, but…
Squadrons do not use critical icons and effectively ignore them when attacking. Without special rules backing you up, just treat critical icons as a whiff. They use all of the other icons as normal. This rule ensures that squadrons can’t just annihilate ships using critical hit results without being specialised into the role as bombers, and reduces the lethality of squadron-versus-squadron combat. Squadrons use the distance side of the range ruler to measure their default attack range. This is conveniently marked with all three dice colours at Distance 1, so that you always know which dice squadrons can use at what range (it’s any kind of dice, at Distance 1).
The Good Stuff – “This is where the fun begins.”
These are all rules straight from the manual. Core rulebook stuff. The essentials. Just like other games, Armada also has a rule where additional materials and supplements override the core rules. Basically all of the rules and characteristics I wrote previously could be prefaced by ‘Unless specified otherwise’. In an earlier draft, they were, and it made the article way too bulky.
Star Wars Armada doesn’t derive its depth and nuance from the core rules. The basics are a solid foundation of game mechanics that hold the game together, but they’re really just pillars on which the fun is built. Exceptions. Special abilities. Unusual interactions. That’s where the extrapolation of lore onto the tabletop really happens. That’s where it gets interesting.
Pre-Roll Effects
Any roll begins with gathering dice in your hands in preparation. Star Wars: Armada always mentions ‘gathering dice’ or ‘before rolling’ for effects that occur before the dice are rolled. This works from Commander Sato to Heavy Fire Zone.
Pre-roll effects can be pretty dramatic, such as the case of Thermal Shields or Commander Sato. They often affect the nature of the attack in its totality, and set the stage for whatever shenanigans follow. Despite the terror that Thermal Shields bring to Armada, the most common pre-roll effect is just obstruction. That’s Armada’s equivalent of a ‘cover’ mechanic and consists of removing a die from the hand before the initial roll.
When rolling, always look out for anything that says ‘gathering dice’ or ‘before rolling’, and you’ve cleared your burden of pre-roll effects. Don’t worry too much about the timing of Thermal Shields. That’s your opponent’s problem – just don’t be surprised if they interrupt you while you’re picking up dice.

Dice Modification
Armada clearly defines what constitutes dice modification, and we’re all thankful for it. I summarised this in Dice 101, but the relevant part is pasted below for reference.
Briefly, dice modification is anything that can impact the pool of dice after it’s been rolled. Things that affect the pool before its initial roll like Obstruction and Thermal Shields don’t constitute modification because you can’t modify something that hasn’t been rolled yet. The main purpose of dice modification is to bring order to the inherent randomness of dice games. The unpredictability of dice rolls creates incredibly spicy encounters, but game design must respect the difference between drama and frustration. Players get frustrated when they lack agency over randomness in a game, but get bored if they can control everything. We’re such bitches, honestly.
In Armada, the most important rule of dice modification is that it only happens after the starting pool is rolled. When attacking, an initial pool is assembled and rolled consisting of the base attack value (the unit’s ‘printed’ value). Pre-roll modifiers like the aforementioned Obstruction and Thermal Shields are also applied. That pool is then rolled. Then, you exit the ‘Roll Attack Dice’ step of attacking and enter the Resolve Attacks Effects Step. This is when you modify dice. Including the rules that ‘add’ more dice to the pool.
There is no prescribed order for dice modification (unless… you know, otherwise specified). Always take a moment to think about how to use the available rules to your advantage. Let’s say you’re firing External Racks with Admiral Screed in command. It’s a good idea to add dice with External Racks first to develop a pool of results you can then affect with Screed. You might generate a couple of blanks. Spend one of those blanks with Screed and turn the other into a hit + crit result. If you used Admiral Screed earlier in the sequence, you may end up spending a die with a useful result to get a hit + crit, then roll the External Racks dice and get more blanks.
Modifying dice smartly
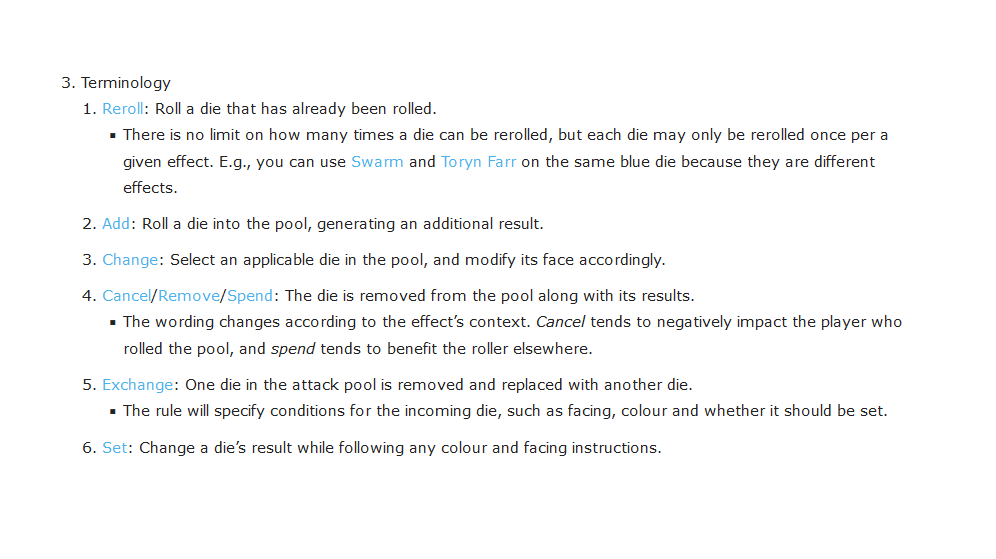
A rule of thumb for attackers is to Add → Reroll → Spend → Exchange → Set/Cancel/Remove
This guideline is ordered from actions with the most randomness to least randomness. Since the main purpose of dice modification is to control randomness, you want to get the randomness out early and leave yourself with as many tools for control as possible.
- ‘Add’ is completely random – a literal dice roll. You add early so that you can get a better read on where your results are trending. Did your MC30c just bollock its roll and throw up 4 blanks or have you already one-shot the target?
- ‘Reroll’ is familiar to tabletop gamers. It’s the simplest probability control, but you can roll into another useless result. Your Hyena is attacking a ship and just re-rolled a useless accuracy icon into a blank. Fine work, droid.
- ‘Spend’ effects in Armada usually pay for a possible benefit. It’s advisable only to spend after you have an idea of where your results stand. That means you’ve added all possible dice and have used up your first rerolls. Upgrades like Leading Shots benefit from affecting as many dice as possible with a single spend action, so it’s good to have a large pool on hand.
- ‘Exchange’ is a weird one that only exists due to Gunnery Chief Varnillian. The same logic applies: before you use her ability to exchange a die, it pays to see what your options are.
- ‘Set/Cancel/Remove’ come last because there’s no probability involved. By now, you’ve exhausted your options for mitigating randomness and can set dice for maximum impact. ‘Cancel’ and ‘Remove’ rules are usually bundled with other effects that would resolve earlier or later, when there’s no element of chance.
You’ll probably never need to think about the entire sequence as a whole, because most attacks are less complex than the entire spectrum of possible dice modifications. It’s bits and pieces, like managing a reroll next to a spend, or adding a die while setting another one. Even so, dice modification is critically important because they make your attacks deadlier and your opponents more threatening.

Defender’s Agency
Armada’s attack sequence is a back-and-forth process between the attacker and defender. The attacker has agency during the first three steps where they declare a target, roll dice, and apply attack effects. Agency shifts to the defender during the spend defence tokens step. As the name suggests, this step is used on available defence tokens.
Dice modification doesn’t just end, though. Defence tokens like Evade and Scatter apply dice modification rules. This is the defender’s opportunity to use special abilities to modify dice to the attacker’s detriment. The Spend Defence Tokens step of the attack sequence is where the attacker sits glumly while their painstakingly shepherded pool of dice is abraded to nothing via smart use of defence tokens and dice modification.
Upgrades like Captain Brunson and the phenomenal Point Defence Ion Cannons turn dice modification against the attacker. The defender also gets to line their special rules up and use them in the optimal fashion. I don’t prescribe an order of operations for defenders because it’ll vary wildly from ship to ship. Lando Calrissian (officer) loves to be used last because the rerolls you forced on the attacker can still come out deadly. Commodore Agate’s potent discard ability depends on which token you want to use. An Evade should be swiftly used on a hit + crit or double-hit result. Conversely, using her ability on a Brace must be weighed against the odds of your opponent ending up with more damage after you’ve exhausted your other options. Sucks.
After the defender has had a chance to ruin the attacker’s moment, they go on to Resolve Damage. The dice basically vanish at this point. The Resolve Damage step basically turns the dice into arithmetic to perform damage calculations. The damage pool is calculated and critical effects are resolved, but none of these modify ‘dice’ anymore because there are no dice. At least, I couldn’t find any evidence of dice modification after the Spend Defence Tokens step. I’m always happy to be corrected, though.
Chance Cubes in Action – “Like you trained his father?”
That’s a lot of theory, but Dice 102 is more than just rules. It’s putting the knowledge to work. Your first encounter with these concepts is fleet-building, where rules that bend probability are the absolute standard. Numerous commanders are built on dice modification, and most weapon upgrades fiddle with dice on some level.
Whether you’re assembling a fleet or playing the game, dice modification should exist to your benefit. Barring unusual non-competitive play, you’re using it to gain an advantage. Even when the ability has a built-in cost, it should result in a net gain for you. To that end, it’s important to differentiate different forms of dice modification and recognise their benefits.

For volume
‘Add’ is one of the simplest and most satisfying dice modification rules in Armada. Adding more dice to the pool increases your damage output. An extra point of damage, crit, or accuracy might be the thing you need to crack into a ship’s hull or delete a squadron. A clutch accuracy result that denies an enemy Scatter token can spell the end for many units. ‘Add’ is the reason that Admiral Ackbar has never lost his flair. Combining him with a Concentrate Fire dial results in three extra dice per attack. This punts the side arc of your Scout Frigate up to Star Destroyer levels.
The addition of a single die is worth a lot. Based on the cost of upgrades that do exactly that, adding a die is worth 6 to 10 points, and most upgrades of this type come with drawbacks. For reference, combat-oriented warships start at 36 points, so 6 points is steep. Commanders like Mar Tuuk, General Romodi, and Admiral Ackbar who add dice are the Armada equivalent of Space Marine dreadnoughts: no matter how the meta turns, they’ll never be a bad choice. Increasing your volume of fire is the simplest way to get more value from each attack, but volume of fire is best paired with control, which is what the next bits are about.
For consistency
Dice control is familiar to any competitive wargamer. Reducing randomness makes the game more predictable and enables safer execution of your strategy. Games like 40K are replete with re-rolls. Variations on the subject like ‘exploding’ attacks and ‘ignores x crucial save’ also manage probability in creative ways. Being a Fantasy Flight Games product in origin, Armada relies less on traditional table-and-sheet rules, and more on self-contained cards. One benefit of this is that the rules can get creative without feeling overwhelming.
Rerolls are the most basic dice control mechanism, and they crop up in numerous basic rules of Armada, such as Swarm and the Concentrate Fire token. Rerolls are baked into some of the best upgrades in the game. They represent a second chance. An opportunity to turn an undesirable outcome into something you need. It’s incredibly rare to roll a pool so awesome that it wouldn’t benefit from a reroll. Always acquire rerolls if you can.
There’s an interesting fact about Armada rerolls: the simplest ones are typically the best. The aforelinked Ordnance Experts and Linked Turbolaser Towers get stapled to many builds despite the fact that they’re ‘just’ a reroll or two. There are more complex alternatives like Caitken and Shollan, or Veteran Gunners that have greater potential by affecting more dice, but they’re specialised. Those upgrades can save a truly terrible roll, but generally, a roll is satisfactory and you just want to adjust one or two blanks.
Getting consistency out of your dice is often tied to other special rules. Admiral Screed and Leading Shots require spending a die from the pool for dice control. Darth Vader (officer) can save a terrible roll by straight up murdering one of your subordinates. Shu Mai gives you superb reroll power proportional to your ability to predicate the battlespace. The ability of Turbolaser Reroute Circuits to guarantee a double-hit with each attack earned it a well-deserved nerf.
One of the first steps to becoming a more capable player in any game, much less Armada, is viewing the game more mathematically. I’m not saying that anyone should turn themselves into emotionless robots who only think of winning. But playing competitively means stepping back to view the game as a cost-benefit analysis, rather than solely Rule of Cool. Once you take that step, Darth Vader (officer) starts to make a lot of sense. The Empire is replete with cheap, single-use officers and has a persistent need for dice control (everyone does). So why not have your officers pull double duty as fleet functionaries and… gunnery encouragement?
For obstruction
Dice manipulation isn’t just about bolstering your forces. It’s about screwing over the opponent. The bog-standard Evade token is a dead-simple means of turning dice modification rules against the opponent. Point Defence Ion Cannons are a flagship example of dice modification-as-pain, but there are plenty of others. One stand-out example of manipulating dice against the opposition is General Romodi. Gaining obstruction (AKA taking cover) is normally beneficial for understandable reasons. But if your opponent brings Romodi, you have to fly counter-intuitively away from cover to avoid getting hammered by heavy fire. And that’s before the Romodi player brings an Interdictor with Grav Shift Reroute to twist the terrain in their favour.
For victory
I can’t elaborate on all of the possible ways to use dice in in this game, but I hope some of the talk in my other articles make more sense now. Where Dice 101 was about the bare basics of Armada’s chance cubes (they’re not even cubes…), Dice 102 is about understanding the ways they impact fleet-building and gameplay. It’s recognising that there is a difference between running a Gladiator with no dice control or running it in a fleet with Admiral Screed. It’s also about weighing out the pros and cons of taking Screed for fleet-wide dice control that dictates your entire strategy, or just picking Ordnance Experts to manage the issue locally. That is the heart of the brutal arithmetic of plastic spaceships.
The Sum of It – “Persistence reveals the path.”
Dice modification is vital to Star Wars: Armada when it’s happening. Much of the game is spent plotting your next movementor or figuring out tokens, but when the dice are flying, they’re the star of the show. Whether you’re defending or attacking, engaging thoughtfully with the dice is essential.
It’s nice to have a game where defenders don’t feel left out – it’s no fun having your units explode without a chance to defend yourself (I’m looking at you, 40K and your slew of ignores invulnerable save rules). Sometimes, the only satisfaction you can squeeze from a rough attack is to frustrate the attacker.
Have any questions or feedback? Drop us a note in the comments below or email us at contact@goonhammer.com.
