In this article McBill shows us how he painted the Light Side of his Shatterpoint Core Set. To see his tutorial for the Dark Side follow this link, and for our review of Shatterpoint click here!
Welcome back to our two-part series on speed-painting the Star Wars: Shatterpoint Core Set models. In part one, I walked readers through my prep and painting processes for all the villain models for my game store’s demo copy. In part two, I’ll walk you through how I speed-painted the hero half of the box, as well as how I did the bases for everything. As with the rest, the goal was to get these painted as quickly as possible while still producing eye catching models for store demo games. First up, we’ll cover the Chosen One himself.
Anakin Skywalker
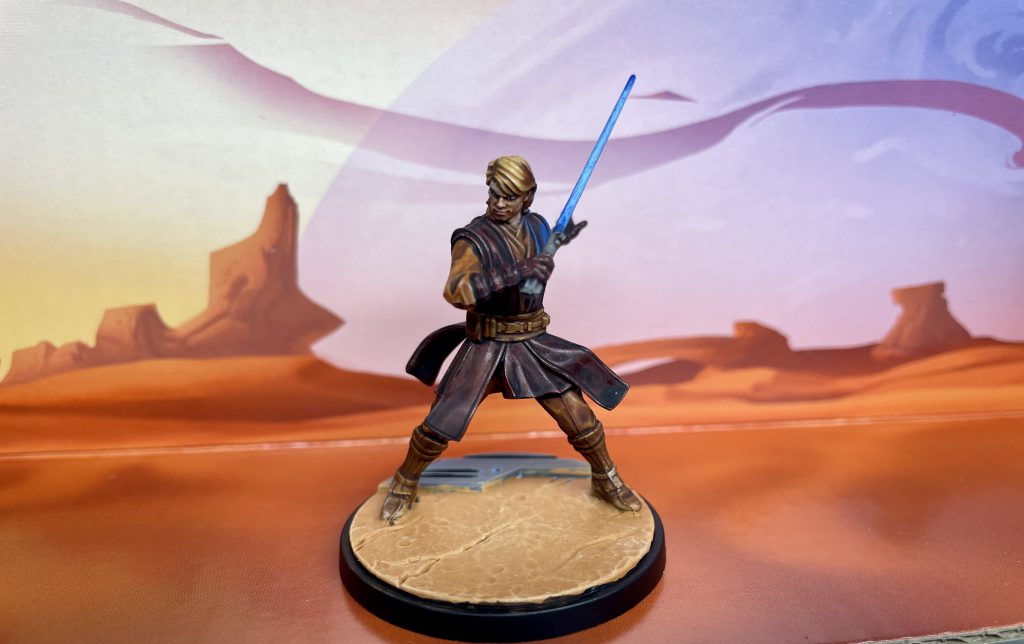
Anakin was a weird case for me because in my mind, the studio model had a scheme that was very red-shifted. However, in writing this article it turns out he’s not, necessarily?

As you can see, in one photo the model has a distinct red tint while the other does not. It appears to be the same image of the model cropped differently, but could be different studio models as well. (The model I saw at Adepticon looked like the one on the left, according to my photos from the show floor.) No prize for guessing which one I found and used as a reference. I wasted a good bit of time figuring out how I would approach that reddish scheme, but ultimately gave up and inadvertently did something closer to the non-shifted one instead. There is some reddish pigment through much of the model, but it’s not nearly as prominent.
For the leather bits (such as the boots and belt), I mixed P3 Umbral Umber approximately 1:1 with P3 Bloodstone. After a basecoat of that, I washed all these bits with Reikland Fleshshade. The light colored fabric was based with just P3 Bloodstone, then washed with Reikland Fleshshade. I didn’t like that result as it was a little too red. I hit these areas with Agrax Earthshade, and was much happier with how it looked after.
The darker fabric in the outer layers was based with a 1:1 mix of Contrast Black Legion and Contrast Fleshtearer. This was then washed with Nuln Oil. Depending on how you want it to look, you might like to do a second wash with Nuln Oil here.
Anakin’s skin was painted Contrast Guilliman Flesh. A little bit of Reikland Fleshshade around the mouth gave some definition and color there. His hair was painted with a roughly 1:1 mix of Contrast Darkoath Flesh and Contrast Nazdreg Yellow.
Finally, I painted the lightsaber. The hilt was painted with Dawnstone then washed with Nuln Oil. The blade was based with Caledor Sky, then I used the technique outlined in part one with some Lothern Blue mixed with VGC Ivory to represent the glow, followed by a glaze of blue ink to tie it in.
With that, Anakin was done surprisingly quickly. Despite wasting time trying to match that red tinted version, Anakin came together easily. Ultimately most of the model is just shades of brown, so he can be finished very quickly if you want. I like how his clothing came out enough that I will do some version of that on my personal model as well.
Captain Rex and 501st Clone Troopers
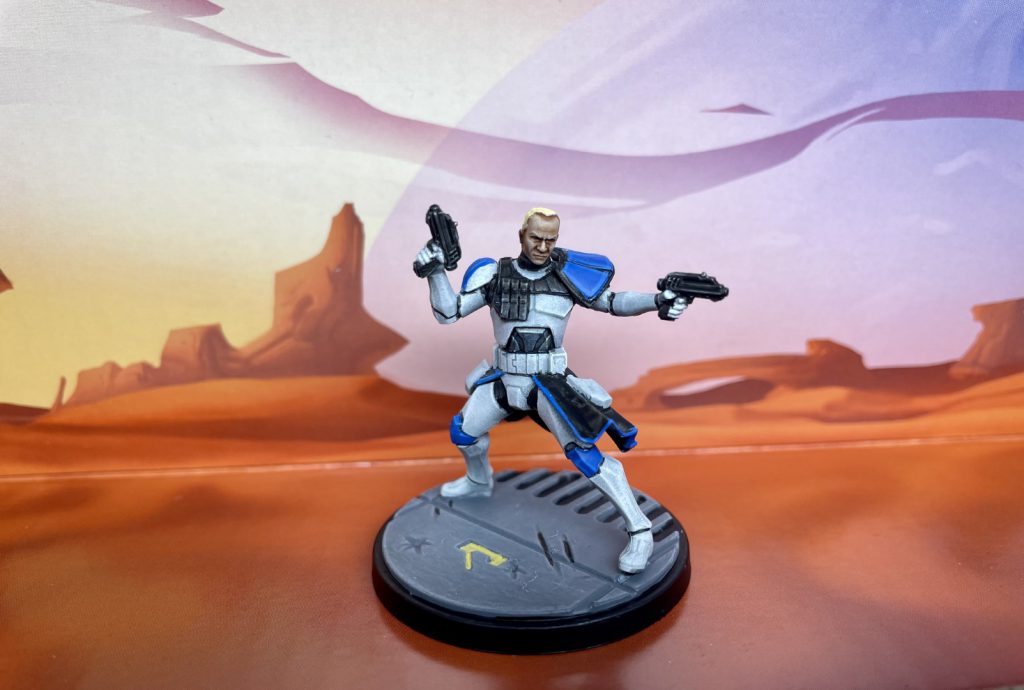
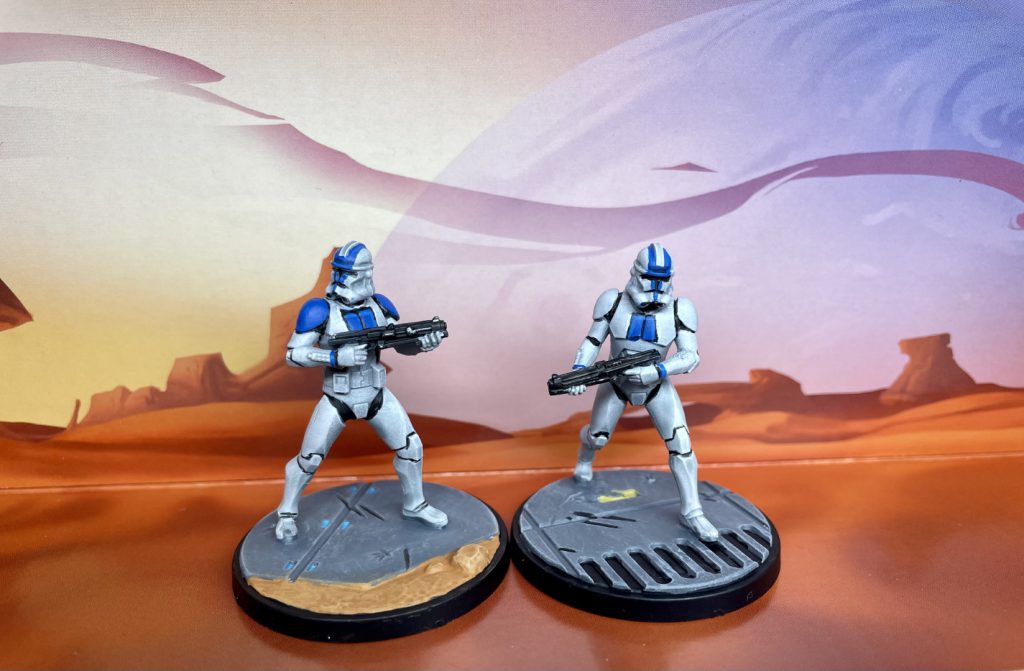
I next moved to Anakin’s fan club / eventual personal army. I’d been putting off doing the clones, as I was worried about painting the white armour quickly but keeping it looking at least decent. Folks, I’m here to tell you that Contrast Apothecary White is an absolute godsend for stuff like this. I’d bought a bottle some time ago, but never used it. I decided to give it a whirl here, and it worked great especially for a speed paint situation. Here’s how it looked just after drying:
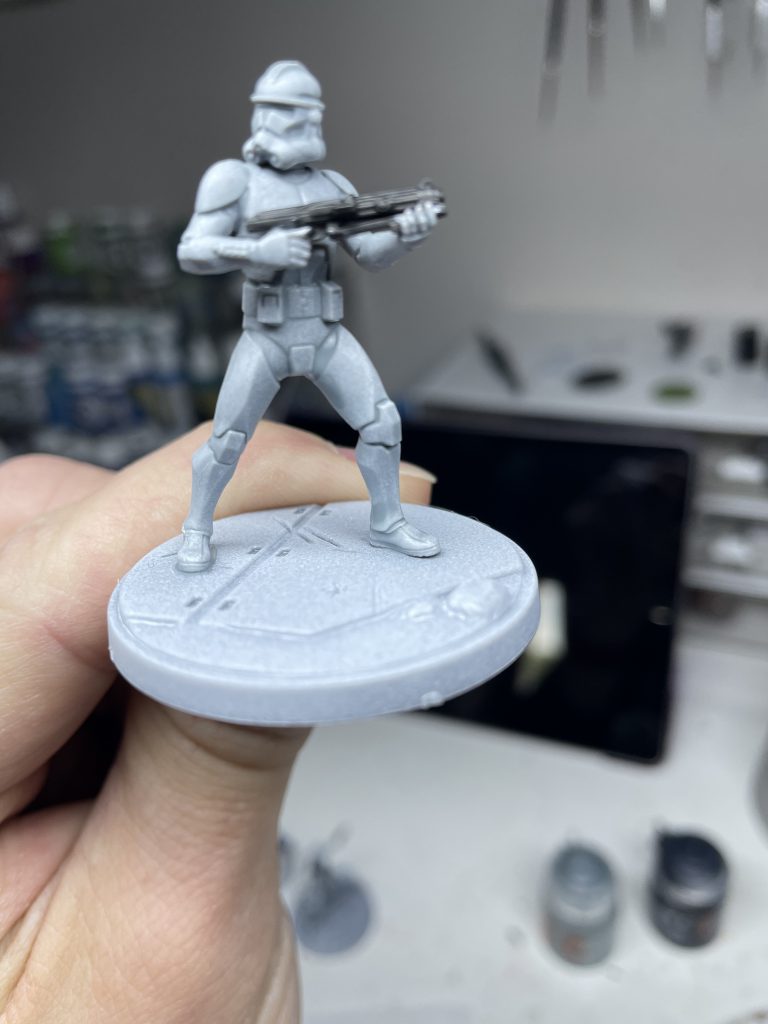
So, not bad especially for how easy it was! I wanted a little more definition, so I did follow this with a heavy drybrush with VGC Offwhite. This gave some needed highlighting and helped the armor pop some more. I also knew that once I got other colors on the model, the armor would look much more white in comparison.
I next did the underarmour and bits of trim in black. You can use Contrast Black Legion here, but it probably won’t give the shading/highlighting effect very noticeably on the regular troopers. In my case I used a regular black paint, specifically Army Painter Matt Black (yes, there’s no e on the label) if you’re interested. I did use Black Legion for the more prominent black areas on Captain Rex, with a drybrush of Mechanicum Standard Grey. Painting black around all that finished white armor is nerve wracking for sure. Take your time, steady your hands, and relax. If you do get some black on there, you can try covering it with a light grey then drybrushing white. Or, consider turning it into battle damage with a little bit of metallic silver in the middle. I somehow managed to avoid any mishaps here, much to my relief.
Like on other models, I painted the guns with Contrast Legion Black. A little drybrushing of grey was done (my notes fail me, probably Mechanicum Standard Grey again here) for some highlights, then I picked out a few greeblies on the guns with a metallic silver just for something different.
Blue trim and armor panels were based with Caledor Sky. I planned to leave it at that, but when I was finishing the models, the blue just looked very flat. So, I broke my ‘good enough’ rule and did some edge highlights with a 1:1 mix of Caledor Sky and Lothern Blue. I also blacklined the blue panels on the 501st. But looking at it now, I think I would skip that as it’s a little too harsh looking.
Finally, Rex has some different bits, mostly with the bare head option he was built with. The metallic armor plating on his abdomen was basecoated with Scale 75 Heavy Metal. I washed it with Drakenhof Nightshade (like with Darth Maul in part one), but didn’t like that look here. I went back over with a wash of Nuln Oil and was happier with that look. I wanted some more color to his skin, so the face was painted with a 3:1 mix of Contrast Guilliman Flesh and Contrast Darkoath Flesh. His hair is interesting, as the official model has a very stark, almost white, blonde cropped hairstyle. I didn’t get it quite as desaturated as I hoped, but again, ‘good enough’ for a demo copy. I went with a roughly 5:1 ratio of Dorn Yellow and Tau Light Ochre for the basecoat. I then drybrushed first with just Dorn Yellow, then a mix of that with VGC Ivory.
With these guys done, I was nearing the end of my breakneck painting project. Contrast Apothecary White was a huge time saver here. I definitely recommend considering it for any model with lots of white armor.
Bo-Katan Kryze and Clan Kryze Mandalorians
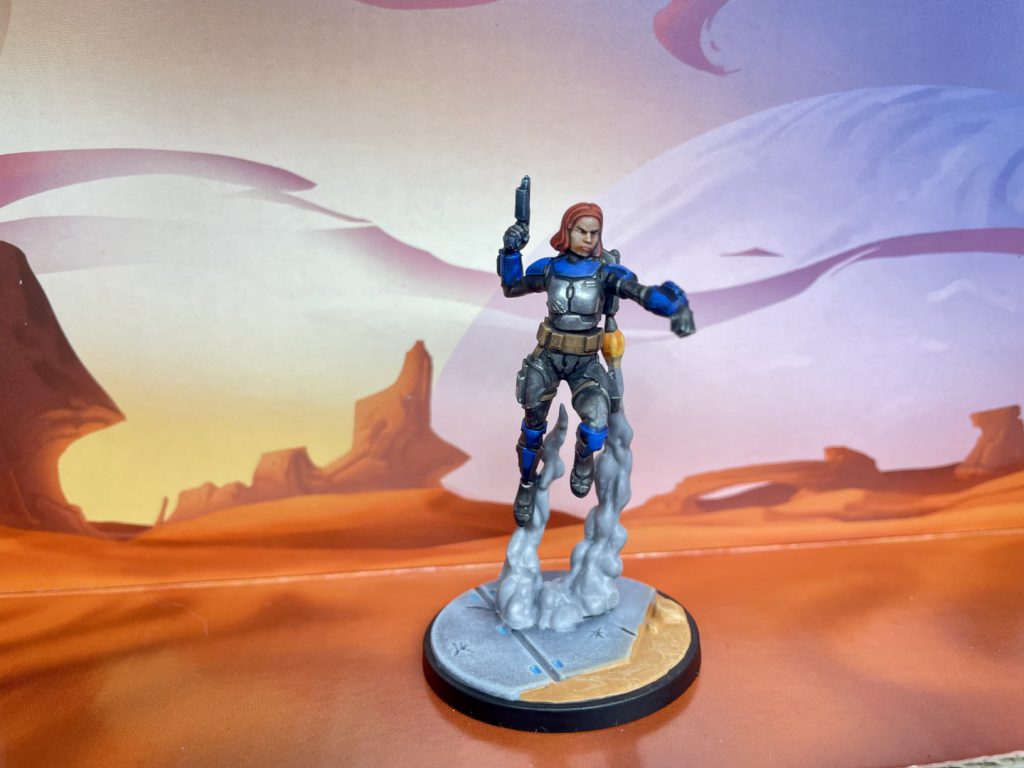
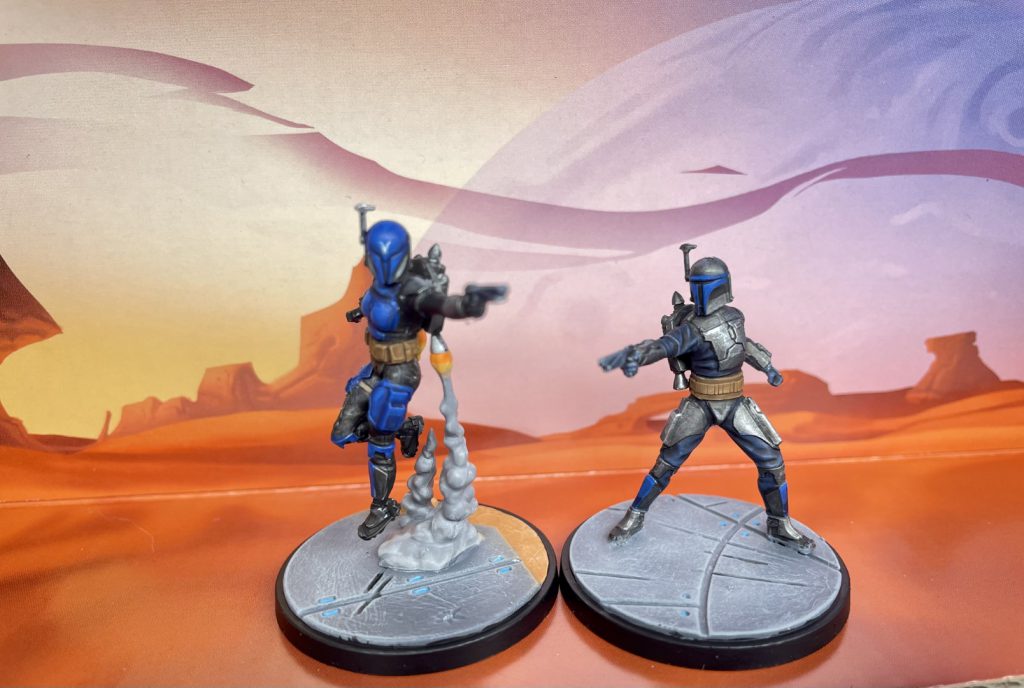
These models, like Gar Saxon and the Super Commandos, or Rex and the 501st, were best painted in one batch since they shared similar colors. These models share similar color schemes, but applied in different ways. These models implicitly let me play a little more with color that I could interpret how I wanted, as Mandalorians vary so much in how their armor appears. So there’s a little more variation from the studio models here.
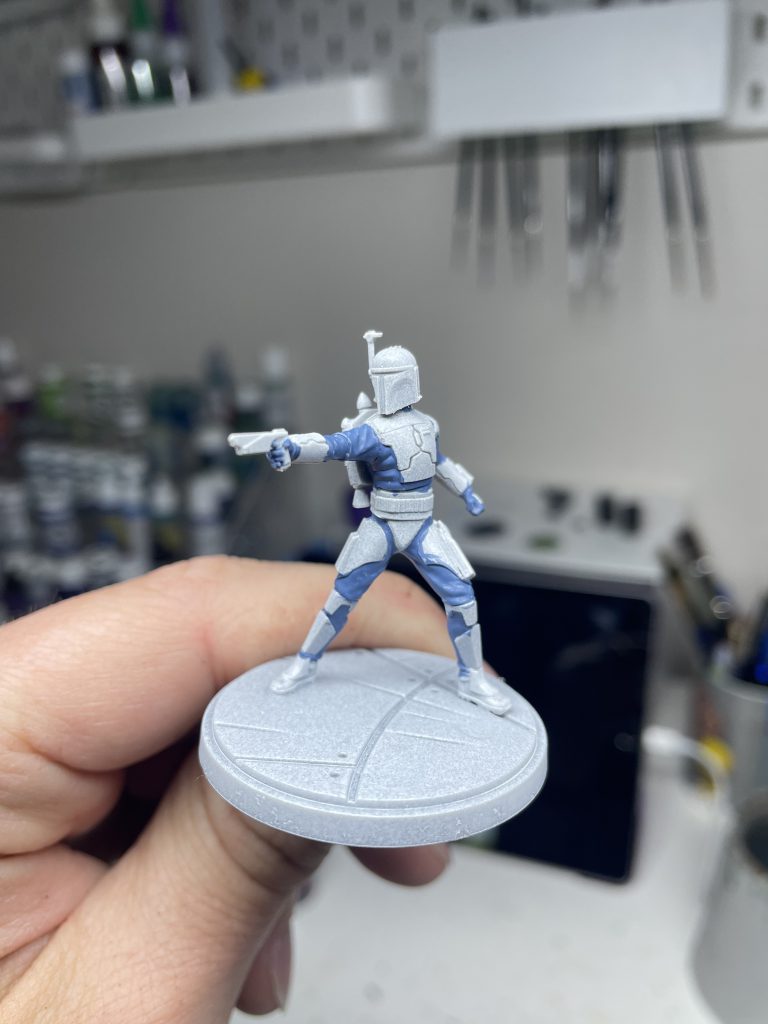
The studio models appear to have different bodysuits under the armor, so to reflect that quickly I relied on various mixes. The male model got straight Shadow Grey as a basecoat that was then washed with Nuln Oil. Depending on the results you want, a second wash of Nuln is not a bad idea. Shadow Grey is sadly OOP, but some internet searching suggests VGC Sombre Grey or GW’s The Fang as replacements. It’s a lovely color I use for many purposes, so if you can find a dupe of it, I definitely recommend it! It particularly takes washes well, and will shift responsively depending on what you use (e.g. more blue, more grey/black, etc.) Here’s an example of it prior to washing:
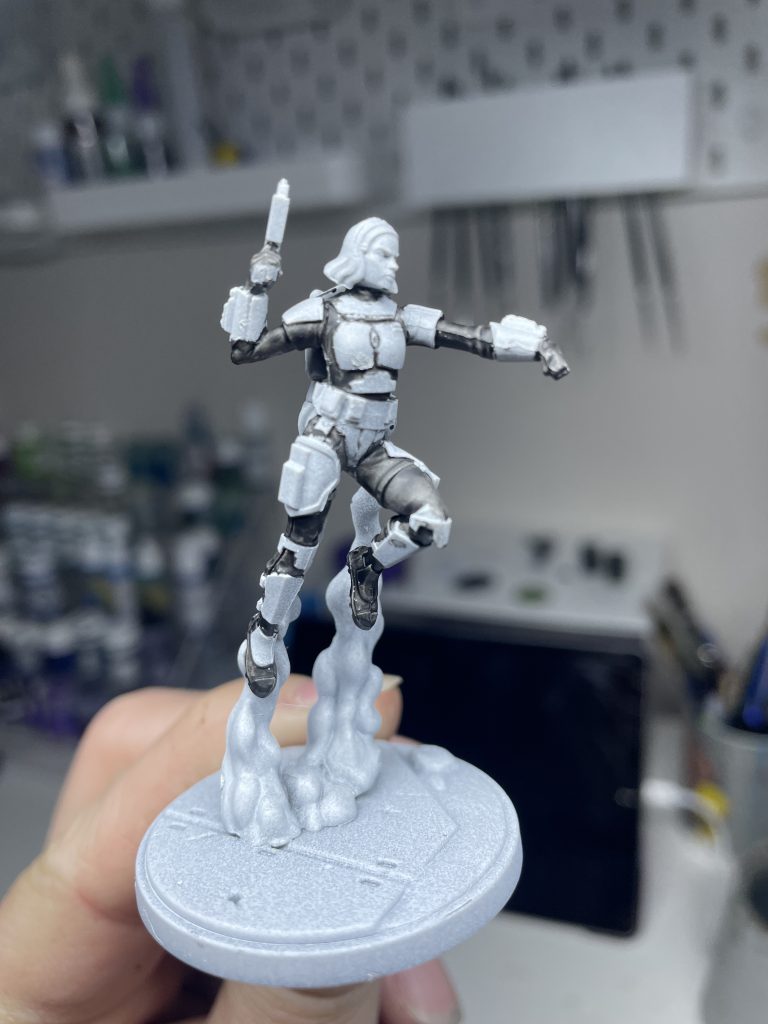
The female model got a 1:1 mix of Shadow Grey and AP Matt Black, again with a Nuln Oil wash. Finally, Bo-Katan got a2:1 mix of Contrast Black Legion and Contrast Apothecary White as a base, mostly as an experiment. It came out ok, and as I was approaching my deadline, it was good enough to move on:
The armor on these models was either a bare metallic color or painted blue. I thought about painting the bare metal some shade of grey, as I’d generally been avoiding metallics in this commission job. But ultimately I used metallic paints here to really push that whole ‘Mandalorian Beskar’ thing. So any bare/silver armor was basecoated with Scale 75 Black Metal. I then washed it with Nuln Oil, followed with a drybrush of Scale 75 Heavy Metal. My metallic work is messy, especially with drybrushing, hence doing it after the lower bodysuits (easy to fix any paint that gets where it shouldn’t on the bodysuit) but before any other parts of the model.
Blue armor panels were based with P3 Cygnar Blue Base, then washed with Drakenhof Nightshade, being careful to not let the wash pool too much on flat surfaces. I then highlighted with a 1:1 mix of P3 Cygnar Blue Base and Cygnar Blue Highlight. Finally, some edge highlights were done with pure Cygnar Blue Highlight. Like with the clones, this was more work than I anticipated for these parts, but the blue just looked too flat and boring otherwise.
Bits of leather, such as the belts and armor straps, were painted P3 Gun Corps Brown, then the belt was washed with Agrax Earthshade. I did not wash the straps as these didn’t have texture that would benefit from the wash, and the wash was unlikely to stay where I wanted it anyway. Guns were painted with the same P3 Coal Black technique as the Super Commandos in Part One.
After cleanup and some black lining (e.g the visors), I did a few details such as markings on helmets, then finished by doing the flame exhaust from the in-flight models. You can again refer to Part One for details on how I did this.
With this models done, I only had Ahsoka left to finish this mad sprint of painting!
Ahsoka Tano, Jedi No More
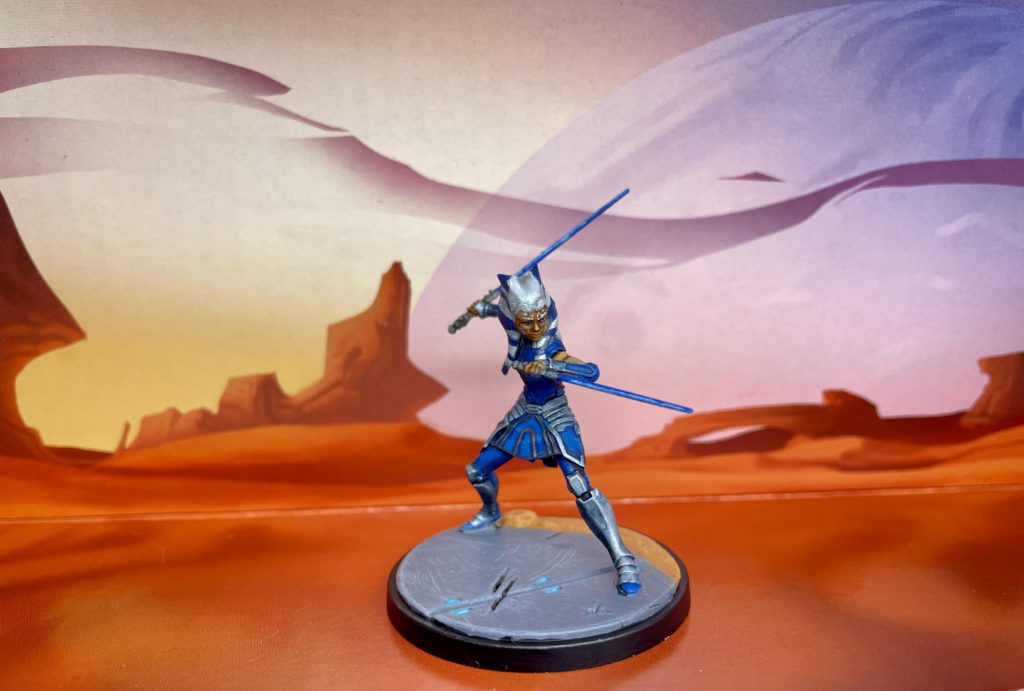
The end was in sight, but I was definitely not looking forward to all the detail on Ahsoka, including all the white facial markings. As it turned out, she really wasn’t that bad to paint at all! I was pleasantly surprised with how quickly she came together.
Most of the model is a relatively simple blue and silver scheme, which I knew I could do quickly with basecoat+wash. Blue armor was basecoated P3 Cygnar Blue Highlight. I could be a little quick and sloppy there, as next step would correct that. Silver armor and trim was based with Scale 75 Heavy Metal. A simple wash of Drakenhof Nightshade was applied to both the blue and silver portions. I was happy with the end result here. The brighter starting point for the blue meant the wash had a more dramatic effect, which avoided the flat blue I dealt with previously. A similar result occurred with the metallics, as I’d started with a brighter color to begin with. There were some areas of grey trim on the skirt/robe under the armor. I quickly painted that with Eshin Grey and called it good. So there was more than half the model effectively done!
I next painted her skin with a base of Tau Light Ochre followed by a wash of Agrax Earthshade. I went back and did some highlights with the Tau Light Ochre, and that was the skin done.
The head was going to be a little annoying by this point unfortunately. Washes of Agrax had spilled over, and random bits of ochre and blue had gotten on there by accident. I knew I wanted to use Contrast Apothecary White here, but I needed a bright, uniform surface for it to work. So I got to work applying several layers of thinned VGC Offwhite until all the runoff was covered. (In between layers I started working on bases. Efficiency was my friend with this project!) Once I had that base again, I covered the whole of the head andtails with Contrast Apothecary White. I was happy with the result again, especially after a quick drybrush with the Offwhite for some additional basic highlighting. I then very carefully applied P3 Exile Blue to the blue stripes. Facial markings were picked out with VGC Stonewall Grey. (This is a great base for white, and can even sub in for it when it’s contrasted with darker colors like here.)
I finished by painting the lightsabers using the same colors as Anakin (see above). I did do some OSL lighting bouncing off the back of her head. To be honest, I don’t like how it turned out. A brighter blue may have been better. Or maybe it just looks weird when her head already has blue in it. It’s ok for a demo model, but I’ll have to rethink that for my own model for sure.
With Ahsoka done, I just have to base and I’m in the clear. That should be quick and painless, right?
Right?
Basing
The basing step wasn’t challenging or anything, but took way longer than I expected. The grey portions were based with Mechanicum Standard Grey. This was the real time killer, requiring two or three coats to get good coverage, across most of the 16 different models, in between feet, etc. The next step was quicker- drybrushing VGC Heavy Bluegrey over the basecoat. For my own models I’ll do a three step base here for more contrast, but for now I moved to the soil portions.
The soil was based with Deathclaw Brown, a nice almost orange color. I followed with a drybrush of Tau Light Ochre, then a very light drybrush of P3 Menoth White Base. Feel free to be a little messy with these steps, as a little soil getting onto the cement or whatever just helps tie the two together, and if it gets on feet/legs you’ve got instant weathering and more tying in of models. Win win! I wanted a little more color on the bases, so I added some where I could. First, all the recessed round divots on the walkways got a dot of P3 Arcane Blue to represent little lighted bits. Then, I noticed a few of the bases had these little glyph looking symbols on the walkways. I did those with a couple of coats of P3 Sulfuric Yellow, thinking of them almost like road or sidewalk markings.
Concluding Thoughts
And with the basing done, I could finally put down this project. It took me 6 evenings of painting which sounds like a lot, but for me this was an absolutely insanely fast session of painting. I learned a lot from this, and am confident my personal painting speed will improve quite a bit as a result. Despite burning through these so quickly, I’m still excited to get to my own stuff rather than being burnt out as I was worried about. I can’t wait to get my own painted models on the table very soon. Thanks for reading!
Don’t forget to check out Part 1 of this guide, the Dark Side models, and our Goonhammer review! For more information, including assembly guides, FAQs, and upcoming releases go to the Shatterpoint home page.


You must be logged in to post a comment.