If you’ve read any of our other articles, by now you will know how much we love recreating the epic clashes of the Titans in Adeptus Titanicus. Every game of Titancius will paint an epic story with highs and lows for each player. If you have a particular battle in mind you can use one the Narrative Play scenarios or write your own and see if you can change future history. But if you don’t have a particular battle in mind, the Core Rules can help you to quickly setup a relatively balanced game between two battlegroups using the Matched Play rules. In this article, we’re looking at the Matched Play Objectives, and how yours and your opponent’s might impact how you play.
Matched Play Objectives
Matched play pitches two battlegroups against one another on relatively equal footing and is great for pick up games. It’s worth underlining here that whilst these rules are the closest you’ll come to competitive play in Titanicus, a perfectly balanced game where the objective is to stomp your opponent is not the aim here. Instead, even the “Matched Play” objectives have narrative elements that help create the incredible gameplay that AT is known for. Think along the same lines as GW’s other specialist games, like Blood Bowl or Necromunda – while there’s definitely a set of rules here you can use to get a relatively balanced match, it’s primarily concerned with creating a fun play experience and not necessarily being perfectly balanced.
Before you assemble your battlegroup, you’ll need to agree on what scale of game you want to have with your opponent. There are three different battle levels you can choose from which will decide how many engines and tricks you’ll have at your disposal. Unlike other systems, where you try to squeeze every last point out of the upper limit as possible, you can instead choose to purposefully take a smaller force to gain some benefits. If your battlegroup is smaller than your opponent’s by at least the Underdog Margin, you get two benefits. First, you get an additional two stratagem points. The second benefit is that you get to choose your objectives after your opponent reveals theirs, which allows you to respond in kind and pick an objective that will complement yours – not to mention potentially hampering theirs.
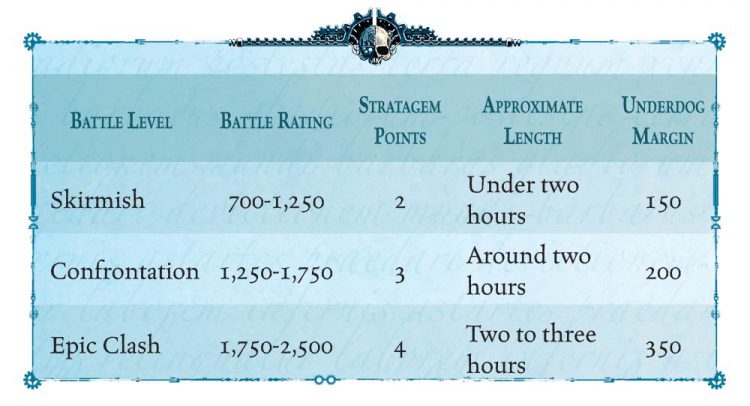
Unfortunately, this is almost never worth it. At the 1250-1750 point bracket, this means you’re giving up at least 200 points. That’s a banner of Questoris or Cerastus, or very nearly a Warhound or an Acastus. Essentially, not only are you giving up 200 points for 2 stratagem points, you’re also giving up an entire activation, pushing you further behind in the action economy and making your movement that much easier for your opponent to play around. However, if you’re looking for a challenge or just want to try something a bit different, this rule does make desperate last stands against impossible odds that much more interesting, as the extra stratagem points will help give your stalwart defenders their moment of glory before they’re brought low. Just keep in mind that it’s called the “underdog” bonus for a reason.
Once the size of the battle has been picked, both players secretly roll 2d6 and refer to the table of matched play objectives. This will leave you with two options to choose from, and you’ll want to choose one that works well for your list. Assuming there is no Underdog, both players will select one of their results to decide how their force will find victory. Each objective comes with two ways to score: a primary objective and a secondary objective. The primary typically offers the most points, so you’ll want to focus on it, but don’t ignore your secondary – if both you and your opponent are able to accomplish your primary objective and score it, the secondaries will usually be what makes the difference.
Once each player has selected an objective, each player chooses their stratagems secretly for the battle. Stratagems provide a plethora of tactical options and surprises for your opponent, we’ve gone into these in depth in another article however some of these are directly relevant to Matched Play.
If the objective dice were unkind to you and gave you an unfavourable result such as Vital Cargo twice with a slow maniple, you can use the stratagem Tactical Reassessment to mulligan and give yourself a fighting chance. Or you could spend your stratagem points to take tertiary objectives, which can either let you double up on scoring your current objective or help mitigate a weaker position by opening up new ways to pick up points. Essentially, you can pay a stratagem point or two to buy the opportunity to score some extra points.
Every game will play out differently as a result of different objectives for each player, terrain and battle group composition and loadout, allowing for a surprising amount of depth given the low model count of the system. Each objective favours different lists and legions, and we’ve provided some of our thoughts on how we would either play or defend against each of these below.
After you choose your objective and stratagems, you roll to determine the deployment map. We’ll cover deployment in a later article – it’s a crucial step toward victory in any game – but for now what’s important is that, if your list’s point value is lower than your opponent, you have a one-in-three chance of choosing the deployment zone. If you get that choice, one of the many factors you’ll want to consider is whether that type of deployment favors your objective or your opponents. To that end, we’ve included some brief thoughts on each objective here.

Engage and Destroy
This objective allows you to score points for each enemy Unit that is destroyed or Structurally Compromised at the end of the game. Knights and Reavers will generally give you an extra point or two for each unit you destroy, while Warhounds are 6VP regardless of whether you destroy it or merely put a point of critical damage on it. However, destroying a Warlord will net you a whopping 5VP over a Structurally Compromised one, so you’ll want to jump on the opportunity to destroy a Warlord if it presents itself.
The secondary objective is unusual, though: it can potentially score for both players. Since you’ll be focusing on destroying your enemy’s Titans without having to worry about any other objectives of your own, you’ll generally be able to leverage this to your benefit, but a canny opponent will do what they can to avoid slugfests and hold onto these points for themselves.
Generally speaking, this is a safe choice in most lists, as it gives you points for what you’re going to be doing regardless: shooting at enemy Titans. However, you have to be sure you score it, as not killing enough enemy Titans won’t just cost you VP, it’ll also score your opponent 5.
Condit: While you’ve got a one-in-six chance of getting any of the other objectives, you have a one-in-three chance of getting this one. That works out to about a 55.56% chance that this will be available to you in any given game, which is good, because if you don’t know which mission to pick, this is a solid default.
Stratagems
This is the most flexible of the objectives for stratagems, as you’ll really want to take strats that will play well into the game you’re already trying to play. Anything that makes your Titans deadlier or more resilient will directly impact your ability to score points and help deny your opponent access to your secondary. Look at Stratagems that bring damage from other areas as well like Quake Shells, Titan Hunter Infantry, or Thermal Mines.
As far as Tertiary Objectives go, stratagems that give you points for destroying or crippling units will give you even more points for each engine kill you score, which is what you are trying to achieve already.
Bair: A couple tertiaries I’m always looking at for kill points are A Quick Kill and Dark Pledge.
Playing Against It
This objective encourages your opponent to look for a straight up fight. Don’t give it to them. Every Titan you keep alive not only denies them points, but gets you closer to scoring 5VP in addition to your own objective. Stratagems like Obscuration Barrage or Blind Barrage which cut down on the amount of damage your opponent can put out will keep your Titans alive and scoring for you.
On the flip side, killing enemy Titans is beneficial to you, even if it doesn’t line up with your objectives, since every point of scale you remove brings you that much closer to denying them the ability to score the secondary. Take advantage of opportunities as they present themselves to try and remove them from the board.
You can also use tertiary objectives to mitigate the amount of benefit your opponent is able to pick up. For instance, Penance gives you 3VP for each of your surviving Titans that is Structurally Compromised, cutting into the lead your opponent is able to generate from them.
Retrieval
One of two missions that involves objective markers, you score this by picking up an objective marker in the center of the board and bringing it back to your deployment zone. You score 10 points for bringing it to within 12” of your battlefield edge, and an additional 10 if you bring it to within 1” and then remove the Titan carrying it from the board and the game. It doesn’t count as destroyed, so this will deny your opponent the ability to gain VP from killing it. The secondary gives you points for destroying your opponent’s units: 2 points for Knight banners and 4 points for Titans, regardless of scale. You won’t pick up as many points for killing Titans as you would from Engage and Destroy, but it’s a nice bonus.
This objective is worth considering on Close Quarters deployment, as it both gives you a forward model that can get to the objective quickly and limits the number of models your opponent can push forward to contest it. You’ll likely want to avoid it on Stand-Off because you’re further away from the center of the map, and Chance Engagement isn’t ideal as your opponent will know you need to deploy toward the center to minimize the time it takes to get to the objective.

Stratagems
The number one priority here is speed, so the usual stratagems such as Experimental Locomotors and Warp Displacement are strong picks. For Loyalists, Long Retreat is a great choice as this will allow you to withdraw once picking up the objective without presenting your weaker rear armour.
The second thing to consider is preservation of your objective carrier, and Concealment Barrage will help cover your retreat. If you’re playing a less agile force where every inch is significant, consider using False Intel to move it D6” towards you, out of rough terrain, or over a building to save you time getting to it.
Playing Against It
Denying your opponent their objective is the first half of the battle. A turn one Vox Blackout is great for preventing Full-Stride orders, making getting there more difficult for your opponent than they might like. Scatterable Mines is a good choice when playing against smaller engines, as it discourages them from making the most of their full movement by dealing damage to the legs. Pair it with Thermal Mines and you have a potentially dead Warhound turn 1 before you can even shoot at it, and can open up larger engines like a Reaver to do the initial damage that Dangerous Terrain wouldn’t.
If you’ve got a lighter maniple, movement tricks, or even a few knights, consider trying to hold the objective and box out your opponent’s Titans. If you can stop them from moving within range to pick up the objective, they can’t pick it up to score it. Even if they get off a charge and manage to destroy the model blocking them, they’ll have to burn some resource – whether it’s the Loyalists’ Adaptive Strategy or a stratagem like Warp Displacement – to pick it up that turn. That’ll make their return run that much more predictable, giving you the opportunity to stop them.
Glory and Honour
Kill the most expensive thing your enemy brought as fast as possible for a big chunk of points. If you can manage an engine kill on it turn 1, you get 20 points, which is a lot. However, the longer it takes, the fewer points you get, dropping to 15 on turn 2 and 10 on turns 3 or later. The secondary objective here is about controlling the board, and gives you 3 points for each 2’x2’ quarter of the table that has at least one of your units and none of your opponents’. This encourages both you and your opponent to spread out and cover as much of the table as possible, and will likely make the middle of the board a hotly contested area: being able to move into any of the 4 quarters to score or deny points as needed will be critical to ensuring success.
You’ll want to deploy in a way that will let you put as much firepower on your target as possible and turn one to focus them down. Do what you can to deny your opponent the ability to hide that unit, including forcing them to deploy first if you win command of the battlefield.
Chance Engagement and Stand-Off are your go-to choices here. The pre-determined locations on Chance Engagement will limit how your opponent can hide your target from you and give you an opportunity to outwit them during the deployment phase. It’s not perfect, but it does incentivize them to spread out their forces due to uncertainty over how you’ll deploy. Stand-Off is useful if you win the deployment roll-off since it’s the only deployment that doesn’t change depending on the number of models each player brings: you each deploy half your force in turns regardless of whether you brought an Extergimus or a pair of Lupercals. If you luck into winning the roll-off, you can force your opponent to deploy first, then save your heavy hitters until the end to line up a shot on your target wherever it winds up.

Stratagems
You’ve got a target, and you need to kill it. Take stratagems that will help you isolate and destroy that unit. Scatterable Mines and Thermal Mines will help you keep your prey from getting away from your guns, and weapons with the Quake trait can slow them down so that you can bring your heaviest guns to bear. If you’re confident, A Quick Kill will complement your primary by netting you additional VPs for achieving the same goal.
A lot of players will nominate their most expensive unit as their Princeps, which will allow you to score twice if you take the Decapitating Strike tertiary objective.
Traitors who like to live dangerously could opt to use Dark Pledge if their target is going to be a Warlord, turning the game into a massive gambit that easily swing either way.
Playing Against It
For starters, if you win the roll-off, force them to deploy first, then save your most expensive unit for last. This will let you see how their forces will be deployed before you place it, giving you the best chance of denying a quick kill. Keep it out of line of sight of your opponent’s long ranged weapons and out of range of their brawlers, and consider taking a few stratagems to keep its shields topped off and assist in repairing off critical damage. Ideally, you’ll keep it alive through the entire game, but if you can at least
Play for the center of the board. All you need to do to deny them their secondary objective is have a model in each quadrant of the board, something that’s easier to do when you can move in any direction. If you can take and hold the center with a Titan or two, you’ll be able to react to their positioning in the late game and deny them a few points.
Hold the Line
This objective gives you more points the further you’re able to keep your enemy away from your table edge, starting scoring if there are no enemy units within 12”, then giving you an additional 5 points for each 6” increment you can push them back, up to 30”. This can be difficult to score against aggressive players, who will be moving quickly up the board to try to attack you anyway. The secondary objective here is simple: you get points equal to half the scale of every Titan you destroy.
Consider this objective when playing into larger, heavier maniples. Those Titans are harder to destroy, but they’ll also have more difficulty crossing the board to deny you points – a Warlord that pushes for movement each turn but doesn’t Full Stride will take 3 full turns to reach the middle of the table, and every time a Warlord First Fires, it’s essentially giving up 5VP if it’s the forward-most unit. Smaller Titans may be easier to destroy, but it’s also easier to maneuver them into your flanks on your side of the table, making it harder to remove them and potentially losing you the ability to score any points at all.
The Stand-Off deployment map is practically made for this mission, with the distance between the two deployment zones being more than 30”. Failing that, Lines of Battle and Chance Engagement will work well with it as well. Lines of Battle is probably better for you, as you want the ability to react to your opponent’s deployment to plug gaps.
Avoid this on Close Quarters, though: a squadron of Warhounds deploying up front has the potential to get into your flank if you don’t destroy them immediately, denying you points. And if they’re running a heavier maniple, that’s just an even harder to kill engine with a good chance of dodging past the firing arcs of at least one of your Titans.
Stratagems
Again, Scatterable Mines and Vox Blackout are obvious easy choices here, denying the most of smaller Titan’s move and taking away a turn of Full Stride orders. However, killing enemy units is the most sure-fire way of keeping them away from your board edge, if they’re dead they can’t be there! Make sure to take shots at Knight Banners early and when possible, these are some of the faster units and dealing with them early won’t make them a headache later. Warhounds are your second priority target and so and so forth moving up with Scale.
Playing Against It
If you’ve got a lighter maniple, you’ll want to dodge between cover and move up the board to get into your opponent’s rear arc. The more Titans you can get into their backfield, the more pieces they’re going to have to remove in order to score anything. Make target priority as difficult as possible on your opponent, and consider Full Stride with Reavers and Warlords in the first and maybe even second turn to get them stomping across the table as quickly as possible.
On the other hand, if you can push a heavier Titan up the board, it’ll be that much harder to dislodge once it gets there. It’ll take some commitment to make it, but if you have access to abilities or stratagems that will increase its speed (Warp Displacement is excellent for this), you can get a solid brick of VP denial into a spot that is an absolute pain to deal with.
As you’ll be aggressively moving engines up the table, consider taking Break Through as a tertiary objective to maximise the rewards for aggressively moving up the table.
Vital Cargo
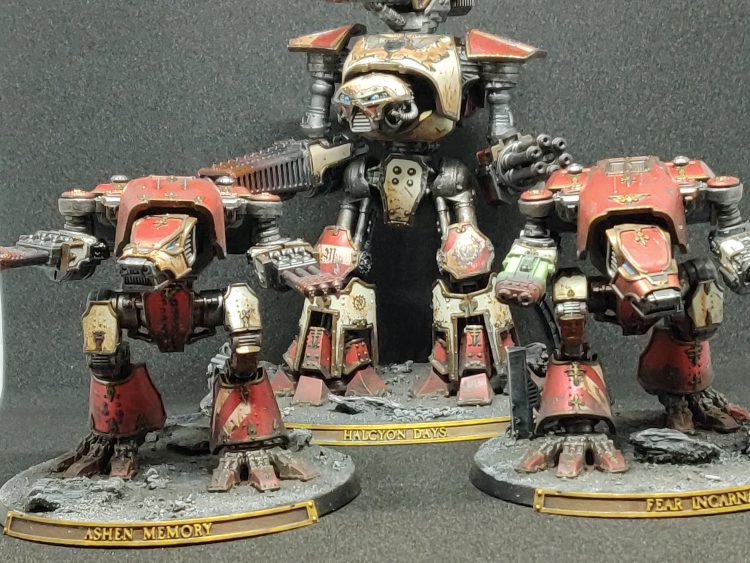
Bombing run, but for Titans: you secretly choose a Titan to carry the “Cargo,” and if it makes it off your opponent’s table edge you score 15 points. Otherwise, as long as no enemies are within 12” of that Titan at the end of the game, you get 5. Then, you score the scale of each of your Titans in your opponent’s deployment zone.
At first glance, you might think this objective favors lists that have smaller Titans, and you’re right to an extent. Not only do they have the mobility needed to consistently cross the board, the more Titans you have the more likely it is that your opponent is shooting at one that doesn’t have the cargo. However, lone Warhounds also go down fairly easily, making it difficult to safely deliver your payload to the other side of the table. Maniples with Reavers are probably the best off here – they’re fairly quick, and their decent heat capacity and 4+ Command stat will let them push for speed and Full Stride in a pinch to get those last few inches of movement. Plus, they’re not so expensive that moving it off the board in turn 3 or 4 will completely handicap you if you get the opportunity.
From our experience, this is one of the least taken objectives as it can be very challenging for some battlegroups like a Myrmidon or Extergiumus to achieve, and if your opponent gets a lucky shot in against a lighter maniple the game could be over before you really even get started.
This objective pairs particularly well with the Chance Engagement and Close Quarters deployment maps. It’s obvious why Close Quarters is a good fit – your lightest Titan will start a mere 30” away from your opponent’s board edge, making it that much easier to get across the table – but consider this on Chance Engagement as well. The blind deployment method limits your opponent’s ability to respond to your deployment and will often encourage them to be less bunched up, potentially creating gaps in their coverage of the board that you can exploit in your mad dash to their deployment zone. Just make sure you don’t get caught out in a killing field.
Condit: One thing to keep in mind: you won’t always want to put the cargo on your forward-most Titan on Close Quarters: while it will be closest to their table edge, it’s also going to be lighter than the rest of your maniple and easier to kill. Consider playing some mind games and nominating your Titan in zone B (or even C!) to throw your opponent off the scent. If they go for the “obvious” target to the exclusion of something else, that might give you the opportunity you need to get past them.
Stratagems
Traitors have a number of great options available to them here to help them across the table including the stratagems War Lust and Warp Displacement. In a pinch, you can also use the Unbridled Hatred allegiance ability to boost you over the line.
Loyalists have fewer options available – Only Forwards will allow you to Full Stride your entire maniple without command checks, potentially leaving your opponent unsure which target to prioritise. When things come down to the wire you can use Adaptive Tactics to push your cargo runner into a Full Stride order from something like Split Fire to try and get them to focus on the more obvious target with Full Stride orders from the get go.
Certain Legios can lean on their traits and stratagems, such as Legio Astorum’s War March trait or Legio Mortis’ March of the Dead. It is tempting to put Experimental Locomotors on your cargo Titan or your decoy, just bear in mind this is akin to a giant “KICK ME” sign on its back.
Playing Against It
This scenario resembles a shell game a bit, as you don’t know which Titan is carrying the crew and your opponent may try to double bluff you. Hold their advance with Quake Cannons or stratagems like Scatterable mines and if they get close enough, body block them and hit them with smash attacks. A well-timed Vox Blackout can be used to block Full Stride orders from covering too much ground, and called shots to the legs will impede their ability to make it across the board.
Push Forward to Victory
The various objectives in Titanicus will have a dramatic effect on how you play, and picking the one that best fits the matchup can make the difference between victory and defeat. As with everything else in Titanicus, you’ll want to think carefully about your list’s strengths and your opponent’s weaknesses as you decide which of your objectives you’ll try to complete.


You must be logged in to post a comment.