
In this first installment of a five-part series, Andrew “Pendulin” Haywood is talking about how you can personalize your digital model collections by turning your physical models into digital 3D models – a process called photogrammetry. This first article covers taking photogrammetry-quality photos.
As in-person gaming ground to a halt due the pandemic, we donned our masks and gloves like kids bundling up for the winter. We locked ourselves away, toiling over hobby desks, clipping and building and painting. Like so many of Santa’s Elves, we produced great and wonderful things, only to place them in “Soon” storage, waiting for that distant holiday when we could unwrap them and share what we made with the world.
But is there a way to share your in-person models with your in-person friends without in-person gaming? Is there a way to safely spend time with distant friends during these dark times? Is there a better theme for the introduction to this article series than Christmas, which is completely unrelated to the article itself?
Almost certainly yes, on all accounts. So let’s go ahead and turn our physical models into 3D models and import them into Tabletop Simulator..
Table of Contents
What is Photogrammetry?
According to Google, photogrammetry is “the use of photography in surveying and mapping to measure distances between objects“. However, we are only going to look at one particular application of photogrammetry: taking pictures of your minis and turning them into 3D models which can be used in software like Tabletop Simulator. This article series will cover the workflow I settled into when scanning my Umbra Legates, the snags I hit along the way, and how I worked around them.
First and foremost, I have to say I’m not an expert at this. While I’m fairly competent at Photoshop, I’ve only been coached into the rote steps for taking good looking pictures, I barely know 3DF Zephyr, and Blender is a stranger to me. However, much of this process is figuring out your own workflow. You can read as many articles on the subject of photogrammetry as you’d like, but until you set up your camera, snap pictures, and try it out for yourself, you’ll never know the precise steps that work for you.
Overview
Before we dig into specifics, here’s an overview of what this article series looks like.
- Taking Photos
This very article! There are countless ways of setting up photos for photogrammetry, and I’ll run you through what my setup looks like. - Cleaning Photos
While you can use photos straight from your camera, you’ll have better results if you clean them up a bit using Photoshop, Gimp, or Masquerade. - Creating Models
We need to turn these photos into 3D models, and 3DF Zephyr is the software that does the bulk of the work. Pictures goes in, model comes out. I’ll run you through the process, step by step, including all the things settings and touch-ups you need to make sure you get a good looking result. - Cleaning Models
There are likely going to be some small issues with the model that 3DF Zephyr generates. We’ll use Blender to fix them, as well as orient and scale the model correctly. If you’ve never used Blender before, buckle up for a crash course. - Tabletop Simulator
Once you have a good looking 3D model, you can do anything you want with it. I personally like using my models in Tabletop Simulator, and so I’ll run through the small set of steps necessary to get it working there.
Without further adieu, let’s dive in.
What Software Does This Series Use?
We’ll be using a lot of different pieces of software in this process from beginning to end. Some are optional, some aren’t. But for reference, here is rundown on each pieces of software we’ll be using throughout this series.
- Photoshop
https://www.adobe.com/creativecloud/photography.html
The golden standard for photo manipulation software. We’ll be using this to clean dust and hairs off our pictures, as well as masking out objects we don’t want to model. We’ll also be color correcting the background to make is pitch black, which will help speed things along.
Strictly speaking, this software is optional as your photos might be fine without touchups, but I’ll cover that in the next article. - 3DF Zephyr
https://www.3dflow.net/3df-zephyr-photogrammetry-software/
This is the software that does the bulk of the work turning the photos into a 3D model. While there is a paid version of this software, the free version lets you use it while limiting yourself to 50 or less photos-per-model, which is just fine for our purposes. - Blender
https://www.blender.org/
This is general purpose software for the entire 3D pipeline. However, we’re going to use it to clean rough edges, align and scale the model, smooth the base edges, and correct any mistakes. We won’t actually be using Blender until the next article, but it doesn’t hurt to install it now. - Tabletop Simulator
https://store.steampowered.com/app/286160/Tabletop_Simulator/
Lets you play tabletop games over the internet in a weird scriptable physics sandbox.
Of note, this first article in the series will use none of this software, and instead focusing on taking pictures. And speaking of taking pictures, we first need to talk about the type and quantity of picture we need to take.
How Many Photos and at What Angles?
All this begins with one simple picture. And by “one” I mean many. And by “simple” I mean surprisingly complex. And by “picture” I mean digitally cleaned, with dust and fibers removed. Each blue blip in the above clip represents a camera taking a single photo, and by combining all those photos we can build a 3D model. So buckle up, there’s some explaining to do.
The photogrammetry workflow I settled upon requires about 30 pictures at minimum, though the more you add (up to a cap of 50) the better the results. Half these photos should be taken at eye-level, at even intervals, covering a full circle around the model. The second half should be taken looking down at the model, at about a 30 degree angle, also at even intervals in a full circle around the model. A cheap, small lazy-susan and circle of shiny black acrylic makes these shots easy to pull off.
But now that I’m talking about specific components, let’s go over precisely what tools I use to take photogrammetry pictures.
How to Get Great-Looking Photos
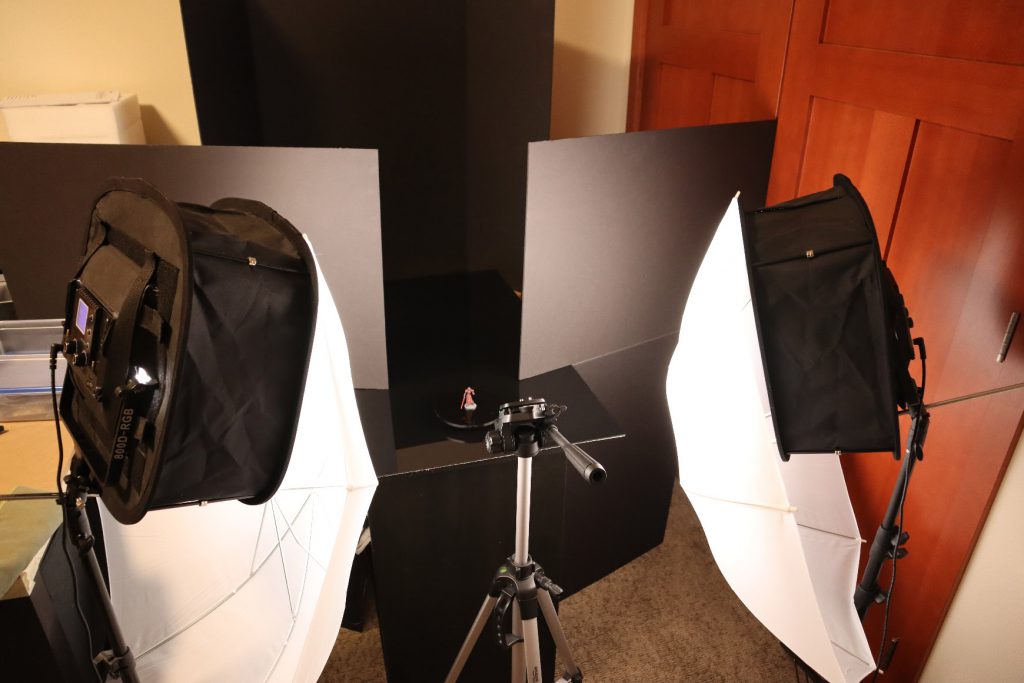
There are countless ways to get great looking pictures of your miniatures. When taking pictures for photogrammetry, there are seven I make sure to consider when setting things up:
- Camera and tripod
- Diffused lighting
- Surface the model stands on
- Black backdrop
- Light blockers
- Lazy susan
- Small circle of black acrylic
Before we dive in however, you should know that this isn’t a shopping list, nor are any components I listed absolutely required (though not having a camera will make it quite difficult). While I happen to have the above setup, you might find that an old, matte black spray-painted shoebox, a cheap stand for your camera phone, and some tenacity is all you need. Before you spend a dime on this, try taking pictures with what you have on hand and see how they turn out.
Camera and Tripod
I personally use a Canon EOS M6 Mark II with an EF-M 15-45mm lens to take photogrammetry pictures, and I use a cheap Amazon Basics 60-inch Lightweight Tripod. I’ve also got an off-brand corded remote switch shutter, so I don’t have to hunch over the camera for each picture. When taking pictures, my camera is set to ISO 100 with an F10 aperture and 1 second exposure.
That being said, this is overkill to an incredible degree for a project like this. If you have a decent camera phone, experiment with that before spending any money. Many modern phones have cameras that are astonishingly good at miniature photography if you just point and shoot. Additionally, they may have a Pro mode you can toggle on for greater control. If you have that option available, try using ISO 100 and slow the shutter speed down to 1/100 seconds or slower. Another option is if your phone has a Portrait mode, give that a shot. If you go down this route, you’ll want something to hold your phone steady, so look into getting a cheap phone stand or tripod. Or prop it up on some books, that could work too.
Regardless of your setup, here are some importing things to look for in the resulting pictures:
- Can my camera get the entire model in focus?
You want all parts of your model to be in focus in every picture. If parts of your model are blurry, then the photogrammetry software is going to have a rough time stitching together a 3D model. This might also throw off the texture mapping, which will cause ugly blurry lumps instead of smooth clean blade tips or barrel holes. While the software can handle a little bit of blur on the foremost and furthest-most parts of the picture, if large portions of the model are blurry, then you’re going to wind up with a blurry 3D model. - Is the picture quality high enough?
You need photos that not only are high enough quality to build 3D models with, but also look good when mapped as a texture on those 3D models. There’s no absolute metric on the quality of picture you need, so I’ll just include this one for reference.
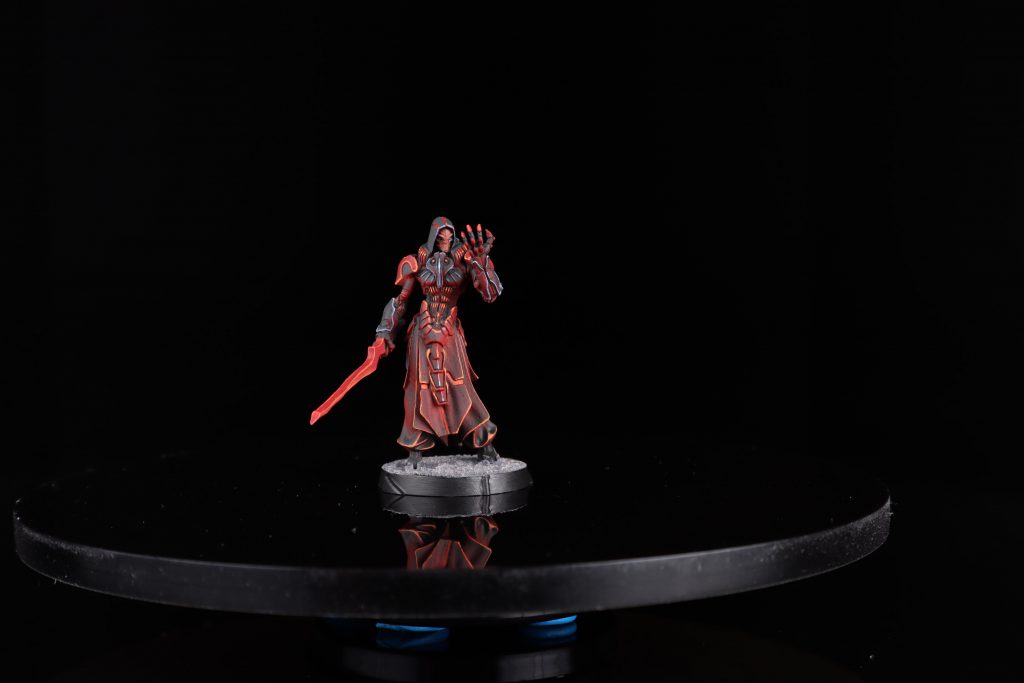
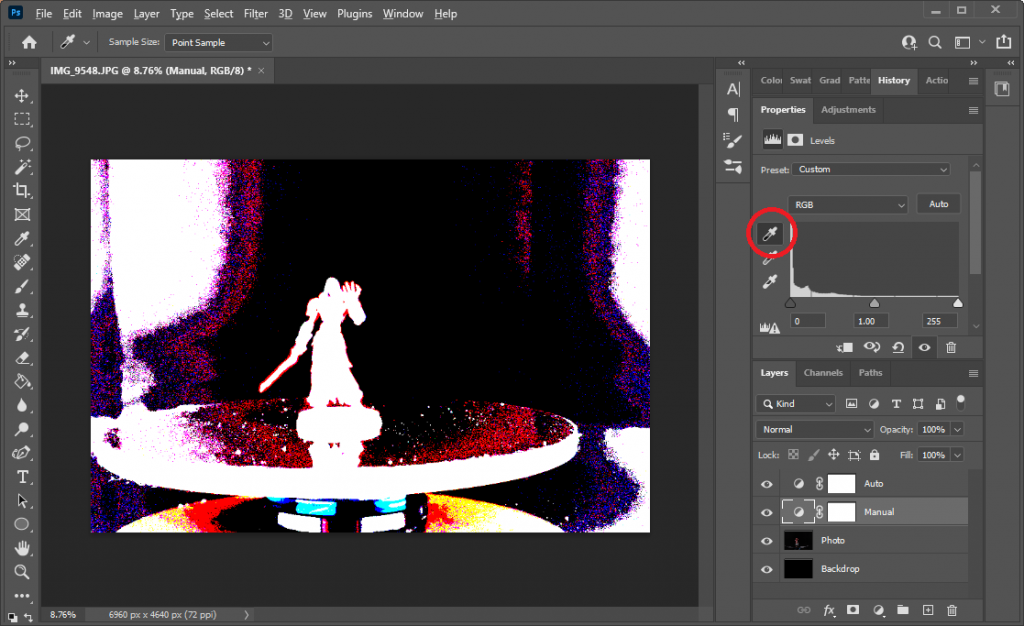
This is an untouched photo I used to build my Umbra Legates model, straight off my camera without alterations. For the sake of saving bandwidth, I shrunk it by 50%, but the quality is functionally unchanged. If your camera can produce pictures at this level of quality or higher, then you are absolutely fine. If your camera can produce pictures that look half as good, you’re still fine. When the photo starts getting grainy or blurry, that’s when the final product might start suffering in quality.
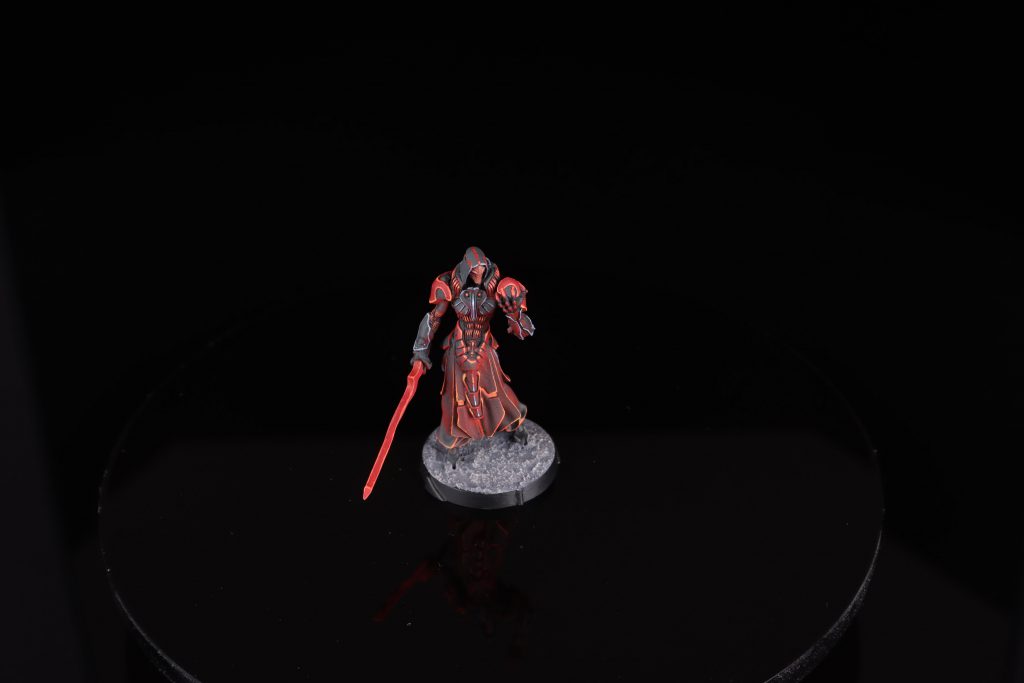
This too is an untouched photo, but this is one shot facing down at an approximate 30 degree angle. If you zoom in, and are on a well-calibrated display, you’ll notice a that there’s this weird horizontal line bisecting the black acrylic, where it’s pitch black above and dark grey below. This is because I mistakenly had my backdrop too far away, and the lighter area is the reflection of the white wall above my backdrop. Even I make mistakes! So, so many mistakes.
Diffused Lighting
If your only light source is a single bulb, shining directly on the model, then you’re going to have some problems. A direct source like that will create harsh shadows on the model as well drastically uneven lighting. Even if you use two light bulbs, you’re just reducing the number of harsh shadows, not getting rid of them.
We want something to diffuse the light over a large area. Spread it out so that it’s coming at the model from more than one angle. For photogrammetry, we want to gently bathe the model in light, rather than blast it in the face.
I use a pair of LED panel lights, light diffuser softboxes, and then a pair of big ol’ diffusion umbrellas. I have these set up both to the left and right of the model, maybe at 30-45 degree angles to the model (though you’ll want to play around with the lighting angle yourself, as your lighting will almost certainly be different than mine).
However, you don’t need a lighting setup that fancy in order to get even lighting. Before I got these fancy lights, I just used a pair of cheap LED hobby lamps. To diffuse the light I took a cardboard box, cut out most of the sides, taped paper towels over the holes, and set it in between the model and the light. The paper towels diffused the light, and the total cost was practically zero. Was it efficient? No. Did it work? Well enough for the cost!
Other options you have for diffusing the light include bouncing it off walls (i.e. point the lights at the wall and use the light reflected off the wall to illuminate your miniature) or use a cheap sheer curtain. Before you spend big money on lights, look around your house and see what you can use for free.
Surface the Model Stands On
You want the model and the surface it’s sitting on to be easy to distinguish. For this, I use a large sheet of glossy black acrylic. It’s a bit of a luxury purchase, however. I went to a local acrylic store, ordered a custom cut 2’x3′ sheet of glossy black acrylic, and I now use it for the floor of all my mini photography. I don’t recall the cost, but it was enough that it felt like a silly purchase (it was under $100 though). I can’t even count the number of times I’ve used it, so it was worth it for me.
If you’re looking for something on the cheaper side of things, you could try just a big sheet of black foamcore. You can find this at most hobby stores, and it’ll only run you a couple dollar. And speaking of foamcore, you should buy some anyways because …
Black Backdrop
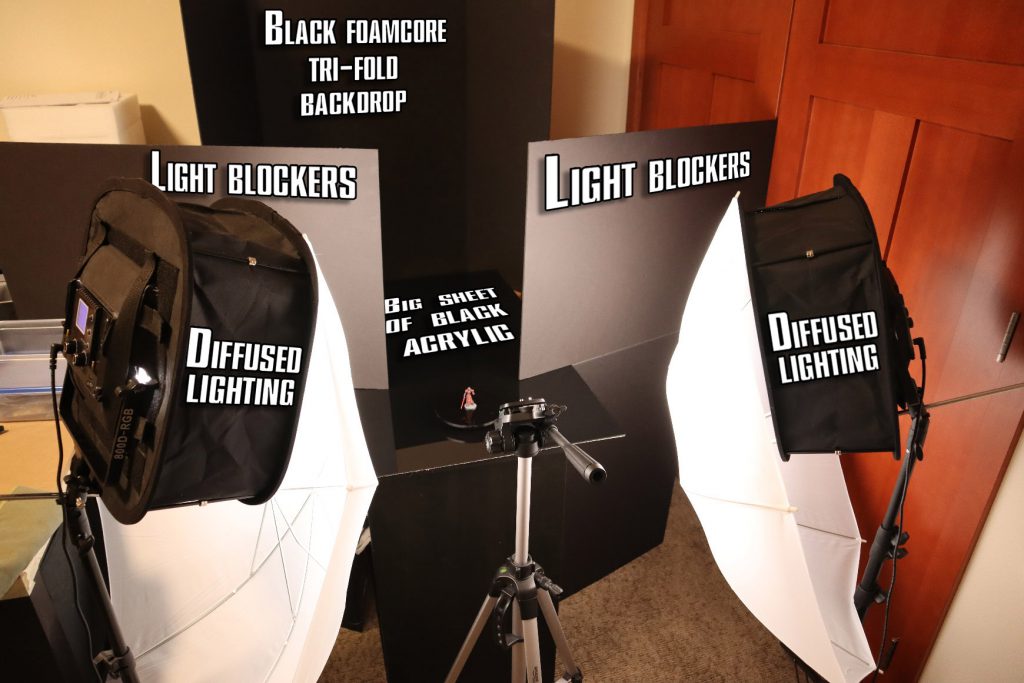
You want a nice solid background for miniature photographs and, in my experience, solid black works significantly better than solid white. The easiest and cheapest way of getting a black background is with black foamcore. If you can find big sheets of this at any hobby store. For the backdrop, look for a black foamcore tri-fold. If you don’t know what tri-fold foamcore looks like, imagine a stereotypical schoolkid science project presentation, and that’s basically it.
You could also use some large sheets of black construction paper or a large matte black blanket. Anything that’s large and won’t reflect light. You don’t have to worry if there’s some texturing on it, as it’ll be out of focus in your photos anyway.
You want to put this backdrop as far away from the model, and specifically your light sources, as you can. The idea is this backdrop should be as close to pitch black as you can get, and to help out with this, you want something to block light from hitting it.
Light Blockers
It’s funny that one step is getting diffuse lighting, and another is block that lightning, but stick with me. We want the model to be lit, but we want to minimize the amount of light hitting the backdrop. To do this, we’ll place light blockers directly between the light sources and the backdrop, and our old friend foamcore comes to the rescue once again.
You want to get a handful of large black foamcore sheets, and position them so they stand directly between your light sources and your backdrop. The closer you can get the backdrop to absolute black, the better, and this is a cheap way of accomplishing that.
Lazy Susan

Because you need to shoot photos in a circle around the model, you have two options:
- Keep the model still and orbit the camera around it
- Keep the camera still and rotate the model in a circle
I’m pretty sure the former will produce more accurate 3D models, as the lighting would remain fixed relative to the model; however, it’s just not practical without spending serious time and/or money. The latter is much easier, and works well enough. The easiest way of rotating a small object in place is to put it on top of a lazy susan, and I use a small 2″ lazy susan.
Now it’s not actually necessary to have a lazy susan to rotate the model. You can take a picture, pick the model up, rotate it by hand, put it back down, and repeat that 30-50 times. However, I found it to be a worthwhile purchase to spend a couple bucks on a cheap lazy susan, as hand rotating models winds up being a pain.
However, you might be thinking that a 2″ lazy susan is way too small. And you might quickly realize that cropping it out of of 30-50 pictures is going to be a pain. So what do we do to prevent the lazy susan from appearing in the pictures?
Small Circle of Black Acrylic
In my photogrammetry pictures, the model is sitting on a 6″ circle of glossy black acrylic that I bought on Amazon. The acrylic is attached to the lazy susan with blue sticky tack, and then the lazy susan is stuck to the large sheet of black acylic by some more sticky tack. I’ll be honest, I was a bit worried when I stuck sticky tack to my giant sheet of acrylic the first time, but it doesn’t appear to leave a mark. ¯\_(ツ)_/¯
Next Time
This is a long process, both creating a 3D model from scratch, as well as writing an article series. So while you prep an are for pictures and snap some shots with your camera, I’m going to get up, stretch, and walk around for a bit. When I sit back down for the next article tomorrow, I’ll cover how to clean and prepare these photos in Photoshop.
Have any questions or feedback? Drop us a note in the comments below or email us at contact@goonhammer.com.
