
Welcome back to Hammer of Math! I’m once again filling in for “Primaris” Kevin Genson this week and while normally that means meta stats, those will have to wait until next week. This week I’m looking at the math around the stinkest bois in the 41st Millennium, the Death Guard. In this article we’re looking at some key abilities for the Death Guard, examining the statistics around them, and talking about what it means for your games.
![]()
New Contagions
When the September dataslate released, Death Guard were one of the big winners, receiving a major overhaul with an improvement to their contagions. As a quick recap, before each game you now choose the following effects to have in addition to -1 Toughness:
- Skullsquirm Blight (Aura): While an enemy unit is within Contagion Range of this unit, worsen the BS and WS of weapons equipped by models in that enemy unit by 1.
- Rattlejoint Ague (Aura): While an enemy unit is within Contagion Range of this unit, worsen the Save characteristic of models in that enemy unit by 1.
- Scabrous Soulrot (Aura): While an enemy unit is within Contagion Range of this unit, worsen the Leadership and Objective Control characteristics of models in that enemy unit by 1 (to a minimum of 1).
Each of these is a powerful effect, with different advantages and disadvantages and it’s worth digging into them.
Skullsquirm Blight
The most defensive of the three abilities on offer, Skullsquirm blight reduces the combat effectiveness of incoming attacks from units in Contagion range. The usefulness of this can vary – for 30 bolter shots dropping their hit rolls from a 3+ to a 4+ amounts to about half a wound less of damage. That’s may not sound impressive, but the value here is more in producing variance on smaller pools of attacks. Consider this example: An Aeldari Warwalker shooting at one of your PBCs with two Brightlances. Dropping the Warwalker’s BS by 1 changes the changes you’ll take two Brightlance hits from 74% down to 50% after you factor in the re-roll to hit, while your chances of walking away with 0 hits increases from 7% to 12.5%. And the difference between taking one hit and two is pretty stark, since they can easily push through the damage needed to kill you with fate dice if those make it through your saves. Forcing an opponent to put one or two more shooting units into the same vehicle per shooting phase is a massive help.
The big thing here to note is that worsening a unit’s WS and BS is not a modifier to the roll, and so this ability will stack with modifiers to hit. This allows you to create some very nasty situations where an opponent is effectively at -2 to hit, a rarity in the edition. The key examples here are:
- The Cloud of Flies and Smokescreen Stratagems. Each of these grants a unit the [STEALTH] special rule, which gives them -1 to be hit by ranged attacks.
- Typhus’ The Destroyer Hive ability gives the unit he leads -1 to be hit by attacks in melee.
- Nurglings’ Mischief Makers aura gives non-Monster, non-Vehicle units -1 to hit with melee attacks while they’re within 6″ of the unit.
- The Miasmic Malignifier gives friendly Death Guard units wholly within 6″ a -1 to be hit.
- Just being in melee. Vehicles that shoot while they’re within engagement range of an enemy unit take a -1 penalty to their to hit rolls unless they’re shooting with PISTOL weapons, so you can tag those units in melee with a much bigger impact on their ability to just shoot out.
Going back to that 30 bolter attacks, when we drop the hit roll from 3+ to 5+ we halve the number of expected incoming wounds, from 2.2 to 1.1. Going back to our War Walker example, that puts the odds of taking two hits at only 26%, while our odds of taking no hits increases to 44%.

Rattlejoint Ague
The second option here is the ability to worsen the saves of enemy units by 1. In most cases, this is functionally the same as getting an extra AP on your attacks, though there are some key differences:
- Worsening a save is protected against by abilities like Mortarion’s aura and Trajann’s Leader ability, as those abilities prevent worsening characteristics. And while there is a carve-out for saving throws, that only refers to modifiers to the roll itself (this is to ensure that weapon AP works correctly when you’re shooting at Trajann’s unit).
- Worsening a save has different interactions with a unit in cover. If you’re shooting a unit with a 2+ save in cover in contagion range, their save will be worsened to 3+ before you apply the benefit of cover or any AP bonuses. This means that if you shoot that unit with AP 0 weapons, they’ll gain the benefit of cover, but because they still have a 3+ save, they can’t improve their save by 1, meaning they’ll be taking saves on a 3+ instead of a 2+. By contrast, if you merely shoot them with AP-1 weapons, they’ll ignore that and get 2+ saves. This has big implications for when you’re using weapons that ignore cover, like the plague sprayer.
That said in most cases you’re looking at functionally an extra AP. For an army that is heavily populated with AP 0 and AP-1 weapons, this is a huge help when it comes to pushing your lethality over the edge. Consider a pair of plague spewers shooting a unit of Terminators. On average rolls you’ll push through just under 2 wounds on the unit without this contagion (they’ll be saving on a 3+ with the AP), while worsening their save gives you an average of 3 wounds instead – the difference between leaving a model alive and killing it.
The other major factor here is the ability to push a unit’s AP even further using the Ferric Blight Stratagem, which improves the AP of your unit’s attacks by 1 for a phase. This allows you to massively improve the damage output of certain weapons and attacks, and just push through damage you wouldn’t otherwise get. A unit of 3 Deathshroud throwing their big attacks into a Land Raider will do an average of 8 damage without the contagion or Ferric Blight and 14 damage with both active.
Of course the Terminators highlight the big challenge here: Invulnerable saves are unaffected by this contagion effect, and so there will be times when you just don’t get much value out of it because you’re up against a lot of units with invulnerable saves that cap your maximum AP. Necrons are a great example, as you’ll frequently see Necron Warriors on a 4+ invulnerable save while Lychguard with a shield also have a 4+ invulnerable save. That said, if your enemy has a lot of 2+/4++ saves, you may still want to be worsening their saves to push damage through with AP0 and AP-1 weapons.
Scabrous Soulrot
The final option here drops the OC and Leadership of enemy units in Contagion rage by 1, to a minimum of 1. This is the most niche of the options, as it’s going to give you the best results when you are either up against an army heavily populated with OC 2+ units who are likely to tie you up on an objective but be hard to kill or when you’re going all-in on Leadership shenanigans. Chaos Knights are a potential target here, since dropping War Dogs to OC 7 and Ld 8+ is a big deal, but my gut says you’ll probably want one of the other two effects more often when dealing with those.
When it comes to the Leadership modifier, dropping an enemy’s Ld by 1 is a big deal, especially if you can force multiple battleshock tests per turn. This is most easily accomplished with your Plagueburst Crawlers, which force a battleshock test every time they hit an enemy unit in the shooting phase with their mortars. And while this effect wears off at the end of the turn, it can turn off both Overwatch and, more importantly, Genestealer Cults’ ability to pull units from the table with the Return to the Shadows Stratagem, significantly impairing their ability to do damage to your army. It can also stop the use of Stratagems like Protocol of the Vengeful Stars from Necrons and Vengeful Fallout from Adeptus Mechanicus to shoot back at you after being shot.
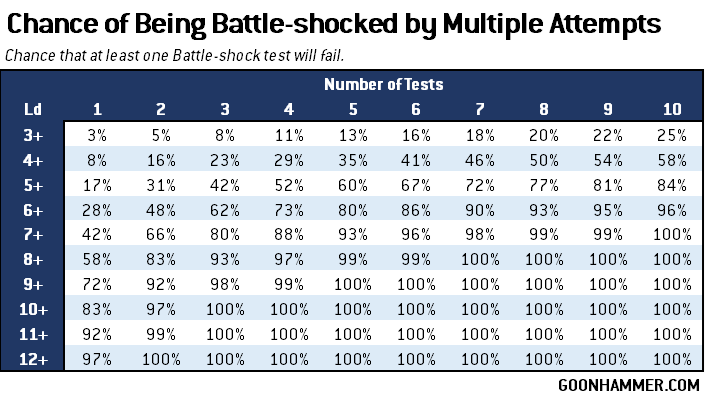
Your chances of forcing a fail improve as you force multiple tests, but they’re also heavily dependent on that ability to reduce enemy leadership. In this case, -1 is significant, but that’s not the only debuff you can apply: The Noxious Blightbringer is a stealthy pick here as his The Bell Tolls (Aura) ability gives enemy units in Contagion Range -2 to their Battle-shock and Leadership tests. Dropping a unit from a 6+ to a 9+ improves your chances of a failed test from 28% to 72%, and if you force two tests that improves to 92%. That’s massive, and if you have the 10 points left over for The Droning Enhancement, you can get some free extra mortal wounds out of the deal.
The Tallyman
A mainstay of 9th edition Death Guard lists, the Tallyman is no longer the must-take he used to be. In 10th edition the Tallyman only lets you roll to generate an extra CP in your own Command Phase (as opposed to each turn). This means that he only has half the chances of generating you an extra CP per game as he used to. That said, the odds of a Tallyman getting you some extra CP are still pretty good.
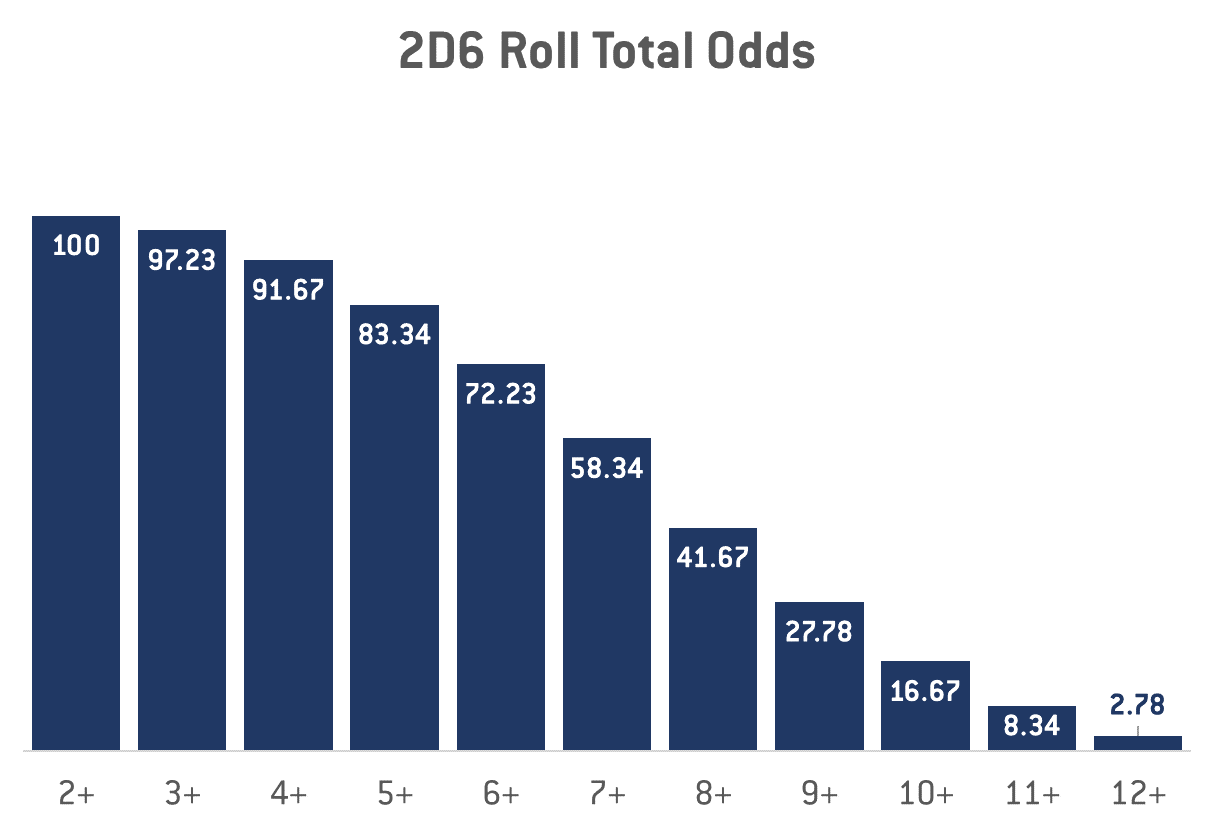
Each time you roll you have a 58% chance of rolling a 7+ and generating a CP. Over the course of the game, you have a 98.7% chance of generating at least one CP, and your odds are pretty good to generate 2+ (84%), though drop off rapidly after that, to 47% of 3+, and 16+ of 4+ CP. This is complicated by both needing to keep the Tallyman on the table, and that you can also just discard secondary objectives for extra CP instead. On the whole this gives the Tallyman less value, though he’s still a model worth considering.
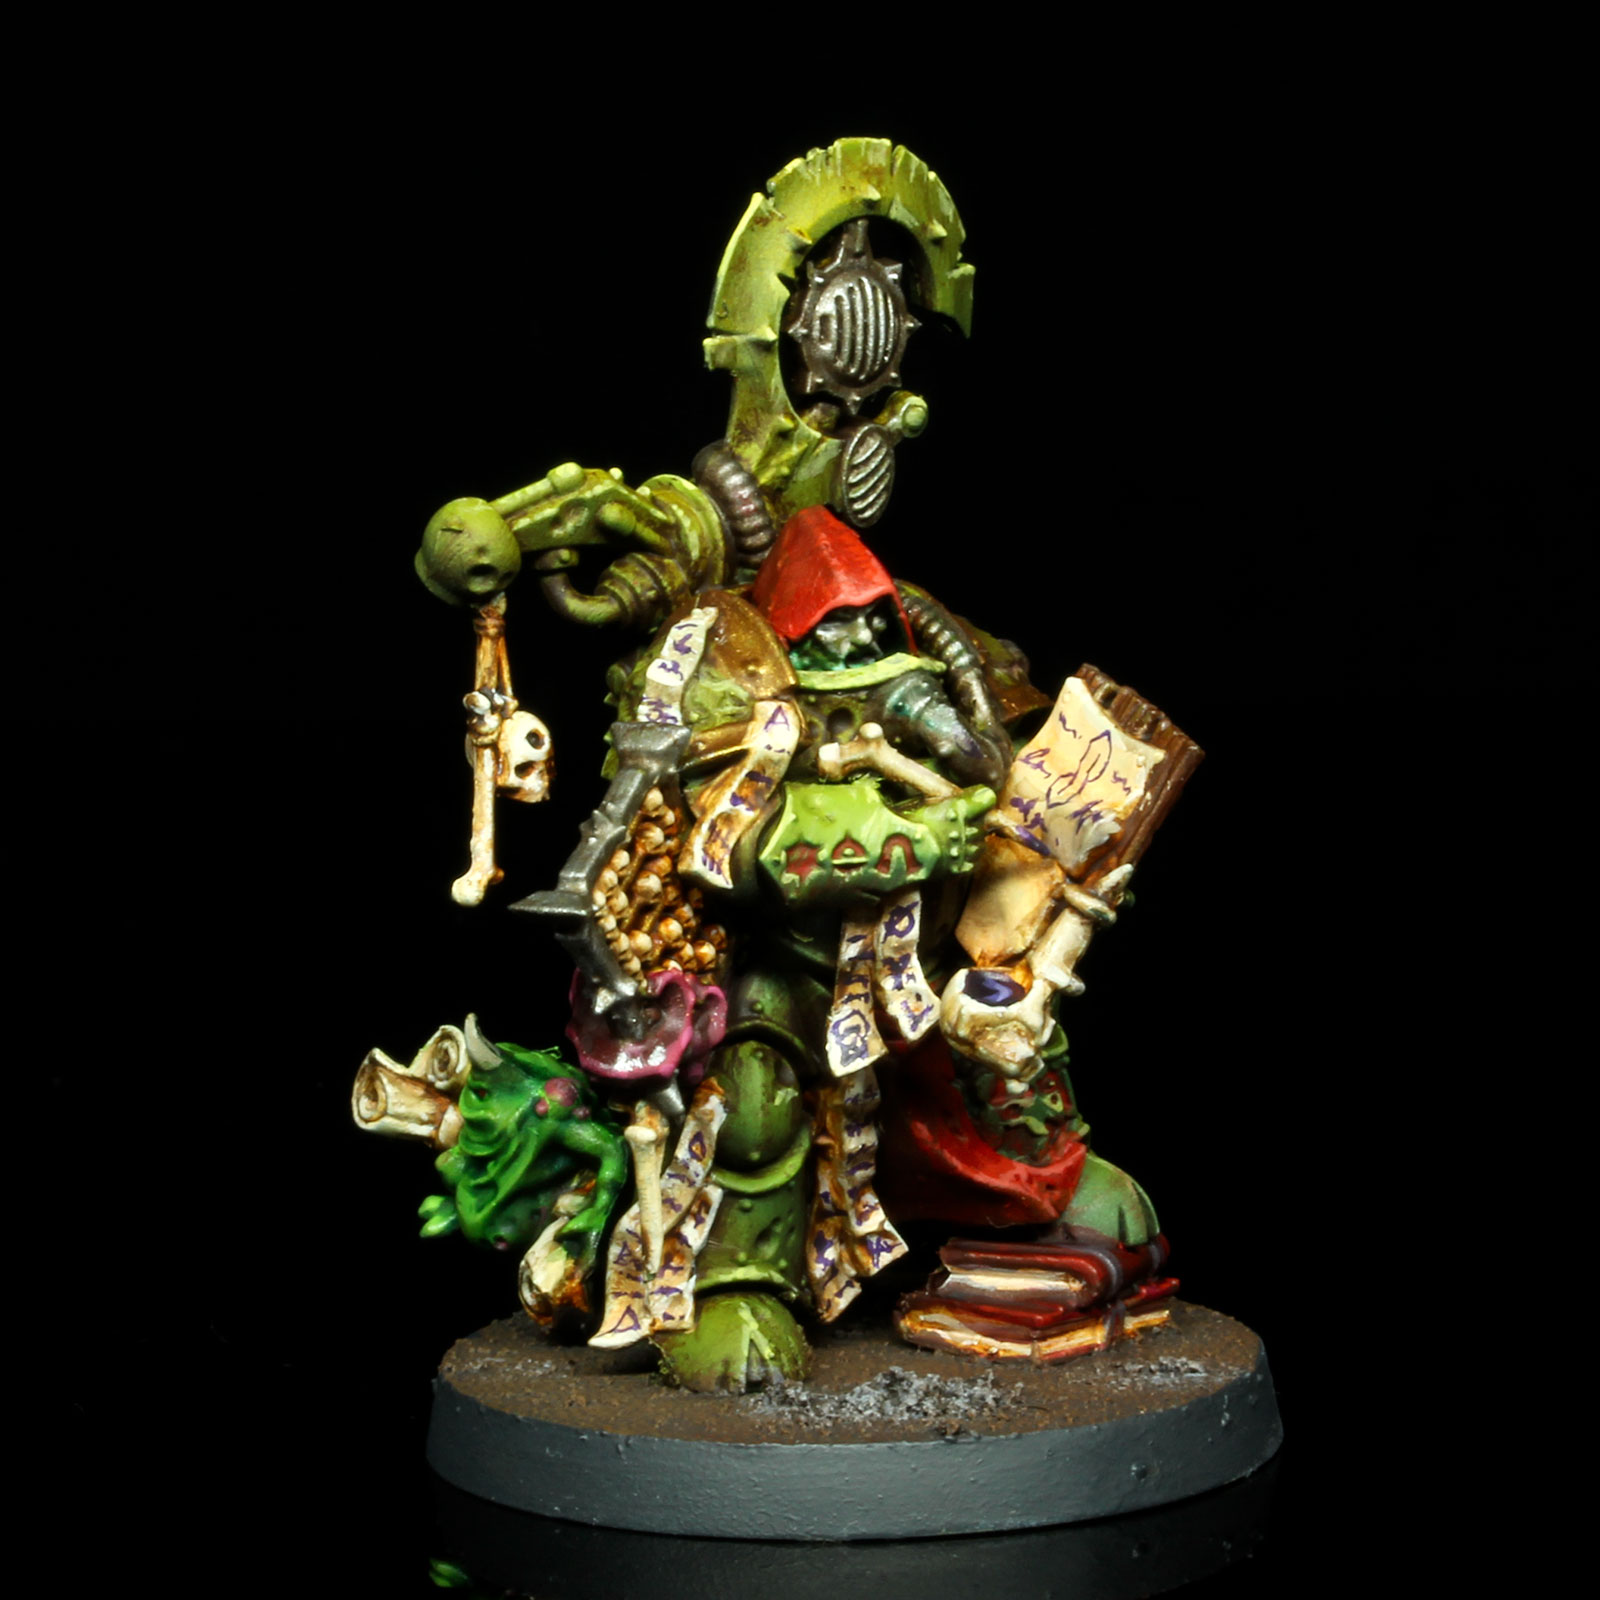
Chaos Lords
Finally let’s look at the humble Death Guard Chaos Lord. This little guy was madly underrated when Death Guard first released, overshadowed by the faction’s larger problems, but players have since seen his value. The Chaos Lord and his Terminator-Armoured variant share the Desiccation Conduit Aura ability, which goes off at the end of each turn and on a 4+ causes D3 mortal wounds. The expected value of this is only one wound per turn, but that’s for each unit in Contagion Range, meaning that late in the game you can easily fart out half a dozen mortal wounds per turn if you have 3-4 enemy units within 9″. That can change a lot of math, causing battleshock tests, finishing off wounded models, and putting vehicles on -1 to hit.
There’s one more question for the Chaos Lord to consider: The Plague fist vs. the Plague-encrusted exalted weapon. A Terminator Chaos lord must choose one of these, while the Power Armour lord can just take one of each (the superior option to a ranged weapon). Here the two weapons give similar profiles, but with slight differences:
- A Plague fist gives 5 attacks which hit on a 3+ at S8, AP-2, 2 damage.
- A Plague-encrusted exalted weapon gives 6 attacks which hit on a 2= at S5, AP-2, 1 damage.
Adding to this is the Lord’s ability to re-roll 1s to hit while leading a unit and the LETHAL HITS ability which will usually mean one auto wound each time you roll attacks, making the gap between the two options much less significant. Against standard 2-wound marine targets the fist is about half a wound better per activation, dealing an average of 4.7 unsaved wounds. Against guard and smaller 1-wound targets the exalted weapon does nearly double the output. Against targets with T11+ the fist does about a half wound more on average, thanks to wounding on a 5+ instead of a 6, and the fist also does substantially better against targets with T6 through T9, where it has better odds to wound and the chances are extremely high that the added damage per swing will matter.
The big surprise here is T10 targets – against these targets, where Nurgle’s Gift will reduce them to T9, the exalted weapon hits a sweet spot where, when both weapons roll a 5+ to wound, its damage output is marginally better (+0.09 expected wounds).
Final Thoughts
The Death Guard have a lot of tricks to work with now and if you haven’t played with their new rules yet it’s worth giving them a second look. The math behind most of their abilities and options isn’t too complicated but the faction has a few tricks for boosting each effect that can make them much nastier in the game. It’s an exciting time to dip into the faction.
Have any questions or feedback? Drop us a note in the comments below or email us at contact@goonhammer.com.

You must be logged in to post a comment.