
In our How to Paint Everything series we look at how to paint, well, everything! We look at the lore and heraldry around the models and talk about multiple techniques and methods for painting them. In today’s How to Paint Everything, we’re looking at how to paint the grim heroes of Warhammer Quest: The Cursed City.
Note: This article was originally published on June 24, 2021
Cursed City is filled to the brim with lovely models and if you were lucky enough to get a copy you may easily have found yourself stymied by the number of models in the box or the amount of detail on them. Well worry no more because today we’re talking about how to paint the heroes in the box, with multiple methods you can use for tackling this project. The heroes of Cursed City are a grim lot, with lots of cloaks and old leather. If you’re looking for some additional help with some of the materials you might have to paint, consider checking out our How to Paint articles on skin and leather:
Without further ado, let’s jump into methods for painting the individual models:
SRM’s Jelsen Darrock
I started with Mr. Darrock not only because he was my favorite model in the box, but because he’d establish so many of the textures I’d be working on. One of the great ways to can unify this set (or any disparate collection of miniatures like this) is by sharing techniques and colors for some of the various materials present. Jelsen presented me with brown leather, black leather, dark metal, silver, brass, multiple types of wood and cloth, skin and more, so I thought he’d be a great way to establish a tone for the set.
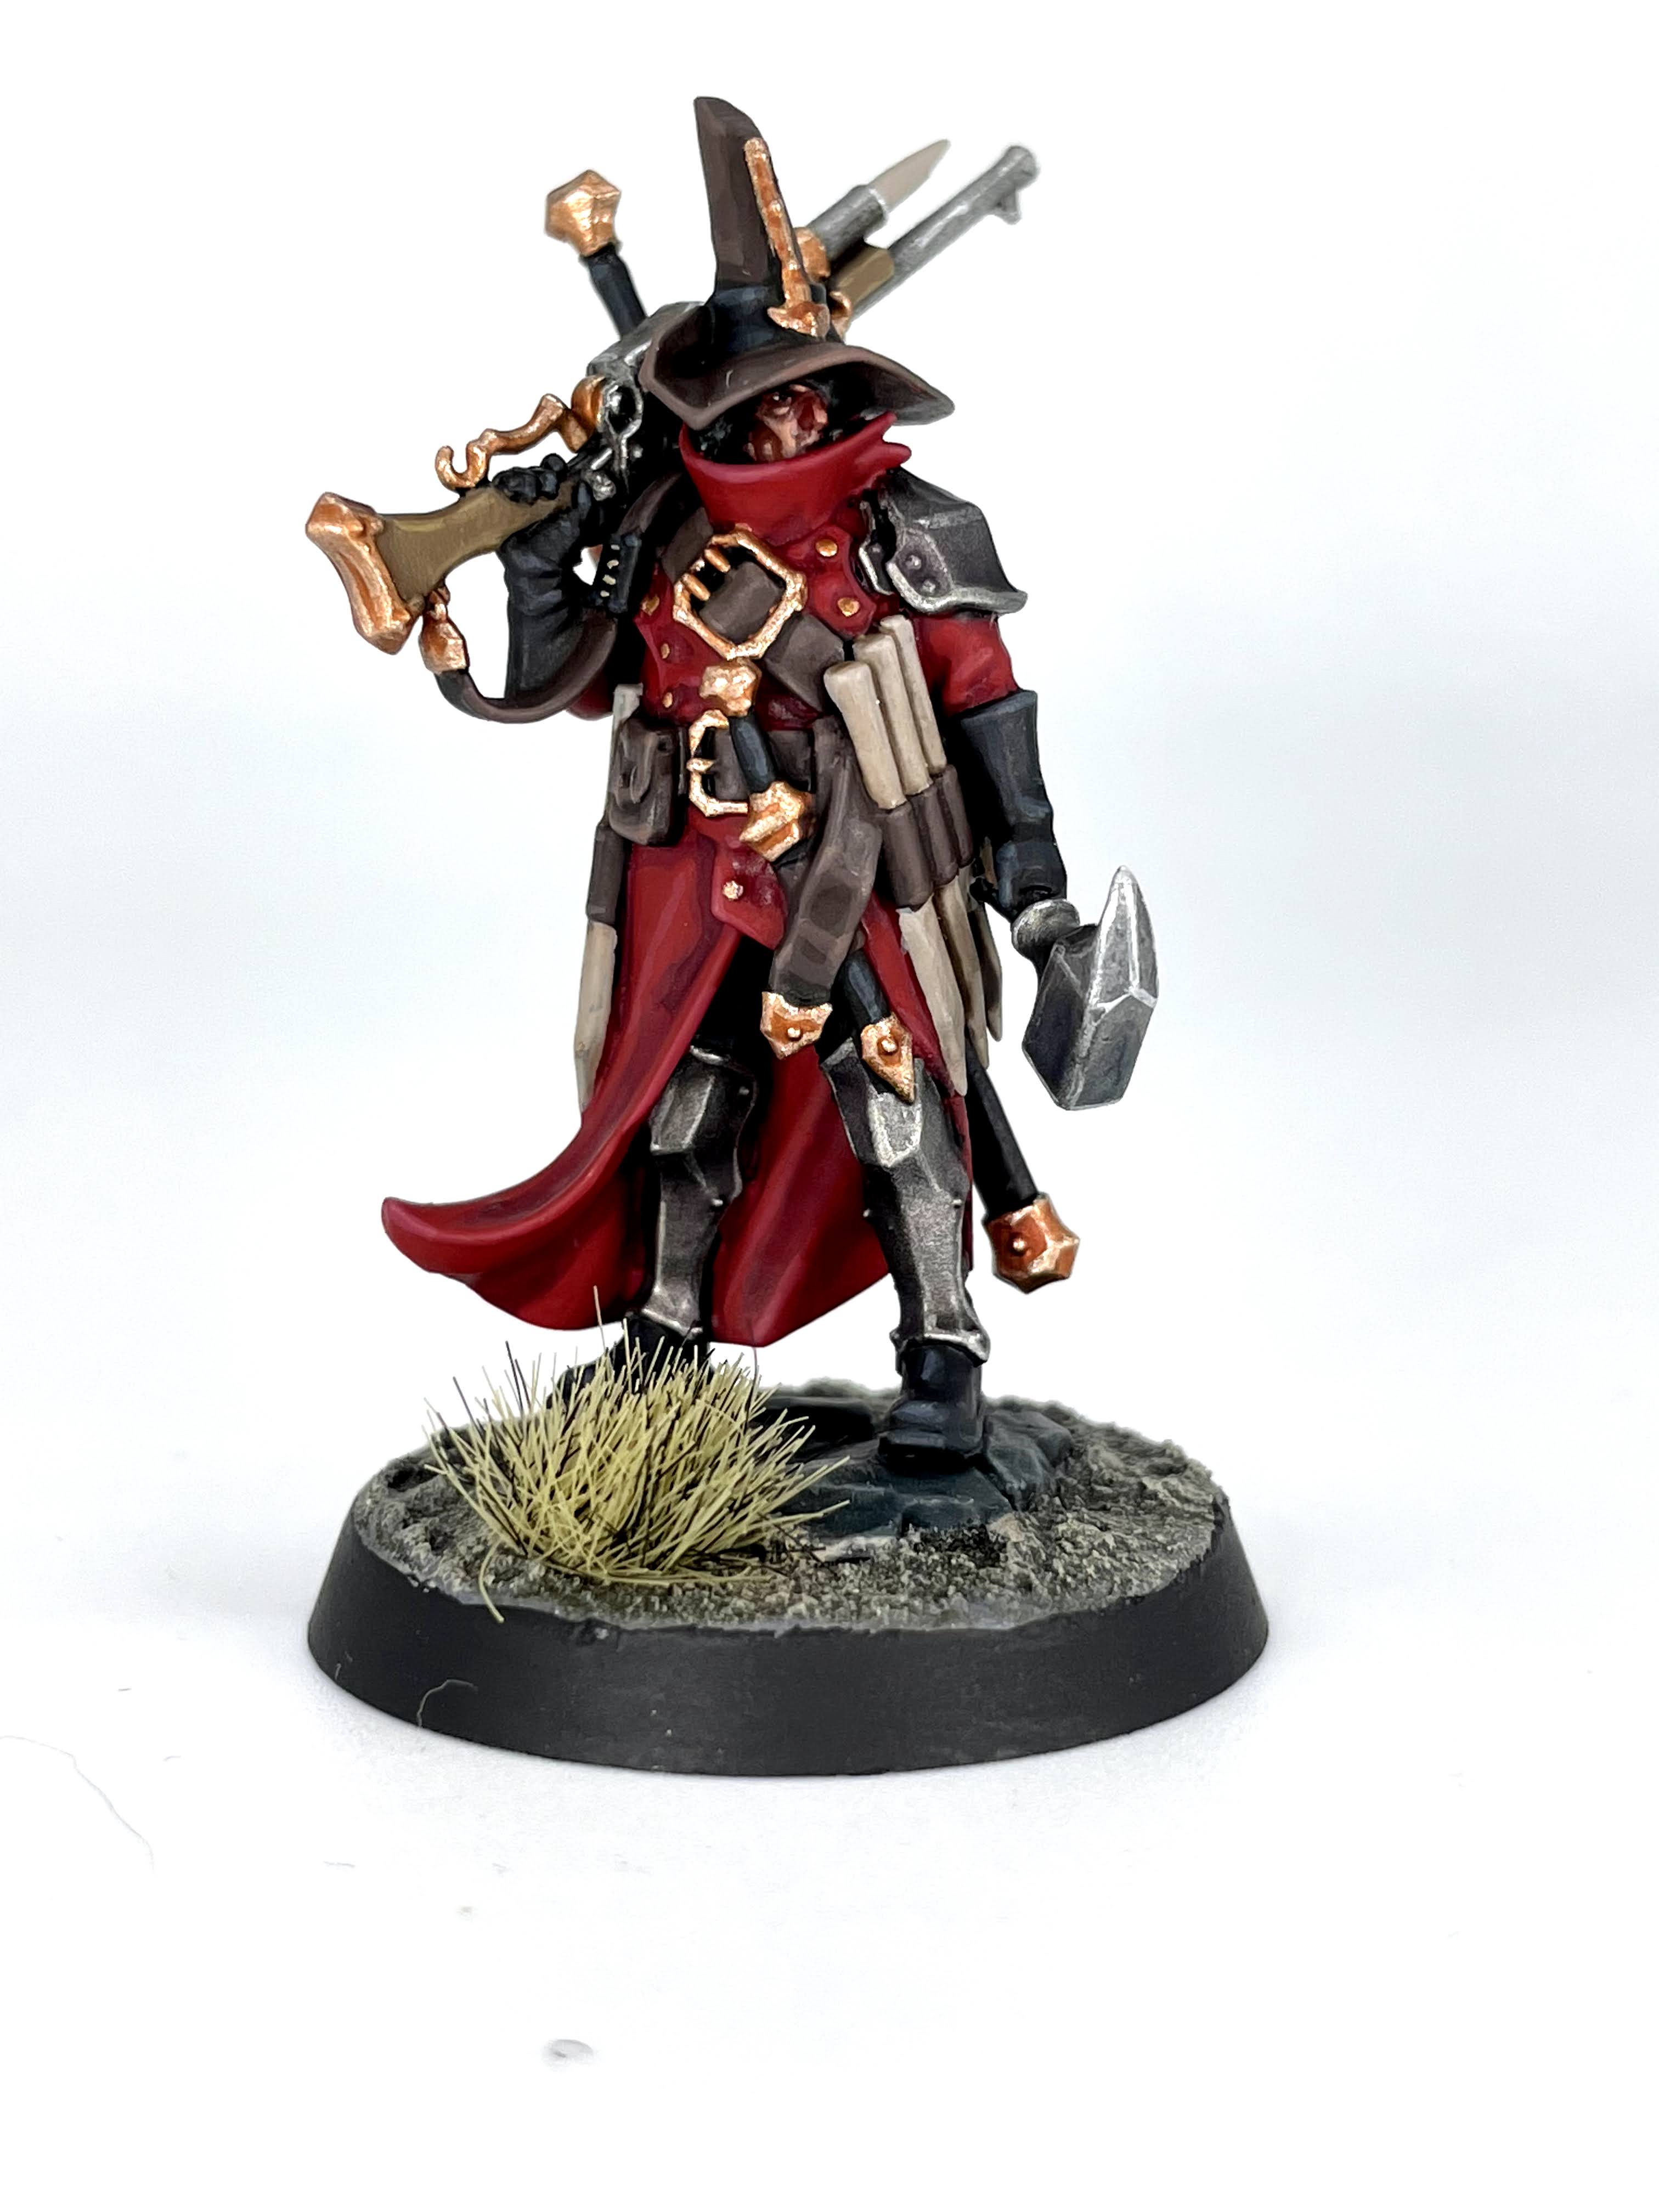
First off, I’m gonna go over my basing technique, as basing, even moreso than these shared textures, is a fantastic way to unite such varied schemes.
Cursed City Basing:
- Astrogranite
- Athonian Camoshade
- Drybrush Karak Stone
- Paint any rocks Eshin Grey
- Wash rocks Coelia Greenshade
- Wash rocks again with 50/50 Agrax Earthshade/Nuln Oil mix
- Drybrush Stormvermin Fur
- Drybrush Dawnstone
- Apply tufts to taste – in my case Army Painter’s Winter Tuft set
The basing goes by extremely fast; even though I’m painting one model at a time, I still knocked out the basing in one quick batch. Next we’re going to be working on the other materials here, but I’ll let you know my technique is pretty heavy on mixing colors and building up to volumetric highlights. There’s a lot of soft textures here, so a harsh edge highlighting style isn’t exactly the approach I wanted to go with. If you’re worried about mixing colors because they might not be uniform over a force – don’t sweat it! Gaggles of one-off characters like this are the perfect opportunity to experiment.
Red Fabric (Jelsen’s Coat):
- Khorne Red
- Recess shade with thinned down Druchii Violet
- Add a little Mephiston Red to the Khorne Red and layer up, leaving the darker red in the recesses
- Add in a little more Mephiston Red and layer up again, concentrating on raised areas where light would hit
- Add in a smidge of Rakarth Flesh and just highlight the very edges
- Add in a little more Rakarth Flesh and hit only the corners and sharpest parts of the cloth
With his (in hindsight, extremely Vash the Stampede-inspired) coat out of the way, it’s basically down to details. All of the following will be repeated on other models in the set, so take note! I’ll refer back to them further down the line.
Black Leather (Jelsen’s Boots, Gloves, Scabbards, Sword Handles):
- P3 Thamar Black, but GW’s Abaddon Black will do just fine.
- Add in a little Dark Reaper and layer up, leaving black in the recesses.
- Add in more Dark Reaper and layer up, concentrating on the outer edges and raised areas. This is subtle but will build up.
- Add in yet more Dark Reaper for a third highlight, just on the very edges
- Add in a little Fenrisian Grey to the previous mixture, something like 50/50, for the very sharpest parts of the leather
Brown Leather (Jelsen’s Belts, Straps, Pouches, Hat)
- Dryad Bark
- Recess shade with Agrax Earthshade
- Add a little Gorthor Brown to the Dryad Bark and highlight all the edges and folds
- Add a little more Gorthor Brown and do a second, thinner highlight on all said edges and folds, focusing on raised areas
- Add even more Gorthor Brown and just hit the nicks in the leather and highest raised edges
Medium Wood (Jelsen’s Gunstock,
- Steel Legion Drab
- Recess shade with Agrax Earthshade
- Tallarn Sand highlight
- Karak Stone highlight on the very sharpest edges
Light Wood (Jelsen’s Stakes)
- Rakarth Flesh
- Wash all over with Agrax Earthshade
- Highlight with Rakarth Flesh
Dark Steel (Jelsen’s Greaves, Shoulder Armor)
- Iron Warriors
- Wash all over with Nuln Oil
- Glaze with thinned Druchii Violet, about 1:1 wash to Lahmian Medium
- Highlight with Ironbreaker
Silver (Jelsen’s Gun, Hammer)
- Ironbreaker
- Recess shade with Nuln Oil
- Glaze with thinned Drakenhof Nightshade, about 1:1 wash to Lahmian Medium
- Highlight with Stormhost Silver
Brass (Jelsen’s Buttons, Buckles, Weapon Details)
- Hashut Copper
- Shade recesses and rivets with Reikland Fleshshade
- Highlight with Sycorax Bronze
Tanned Skin (Jelsen’s Face)
- Bugman’s Glow
- Shade recesses with Reikland Fleshshade
- Add a little Cadian Fleshtone to Bugman’s Glow and highlight all raised areas of the face
- Add more Cadian Fleshtone and highlight sharpest edges of the cheeks, nose, and eyebrow
- Cadian Fleshtone on the tip of the nose
- Recess wash eyes Druchii Violet
- Glaze lower lip and nose with thinned Carroburg Crimson, about 1:1 wash to Lahmian Medium
- Pick out eyes in P3 Thamar Black
- Pick out corners of eyes with White Scar
SRM’s Emelda Braskov
Emelda is my second favorite hero in the box, and probably the most “heroic” looking of the bunch. I went for a classically heroic color scheme based on the old Grey Knights schemes I remember reading about in White Dwarfs of years past.
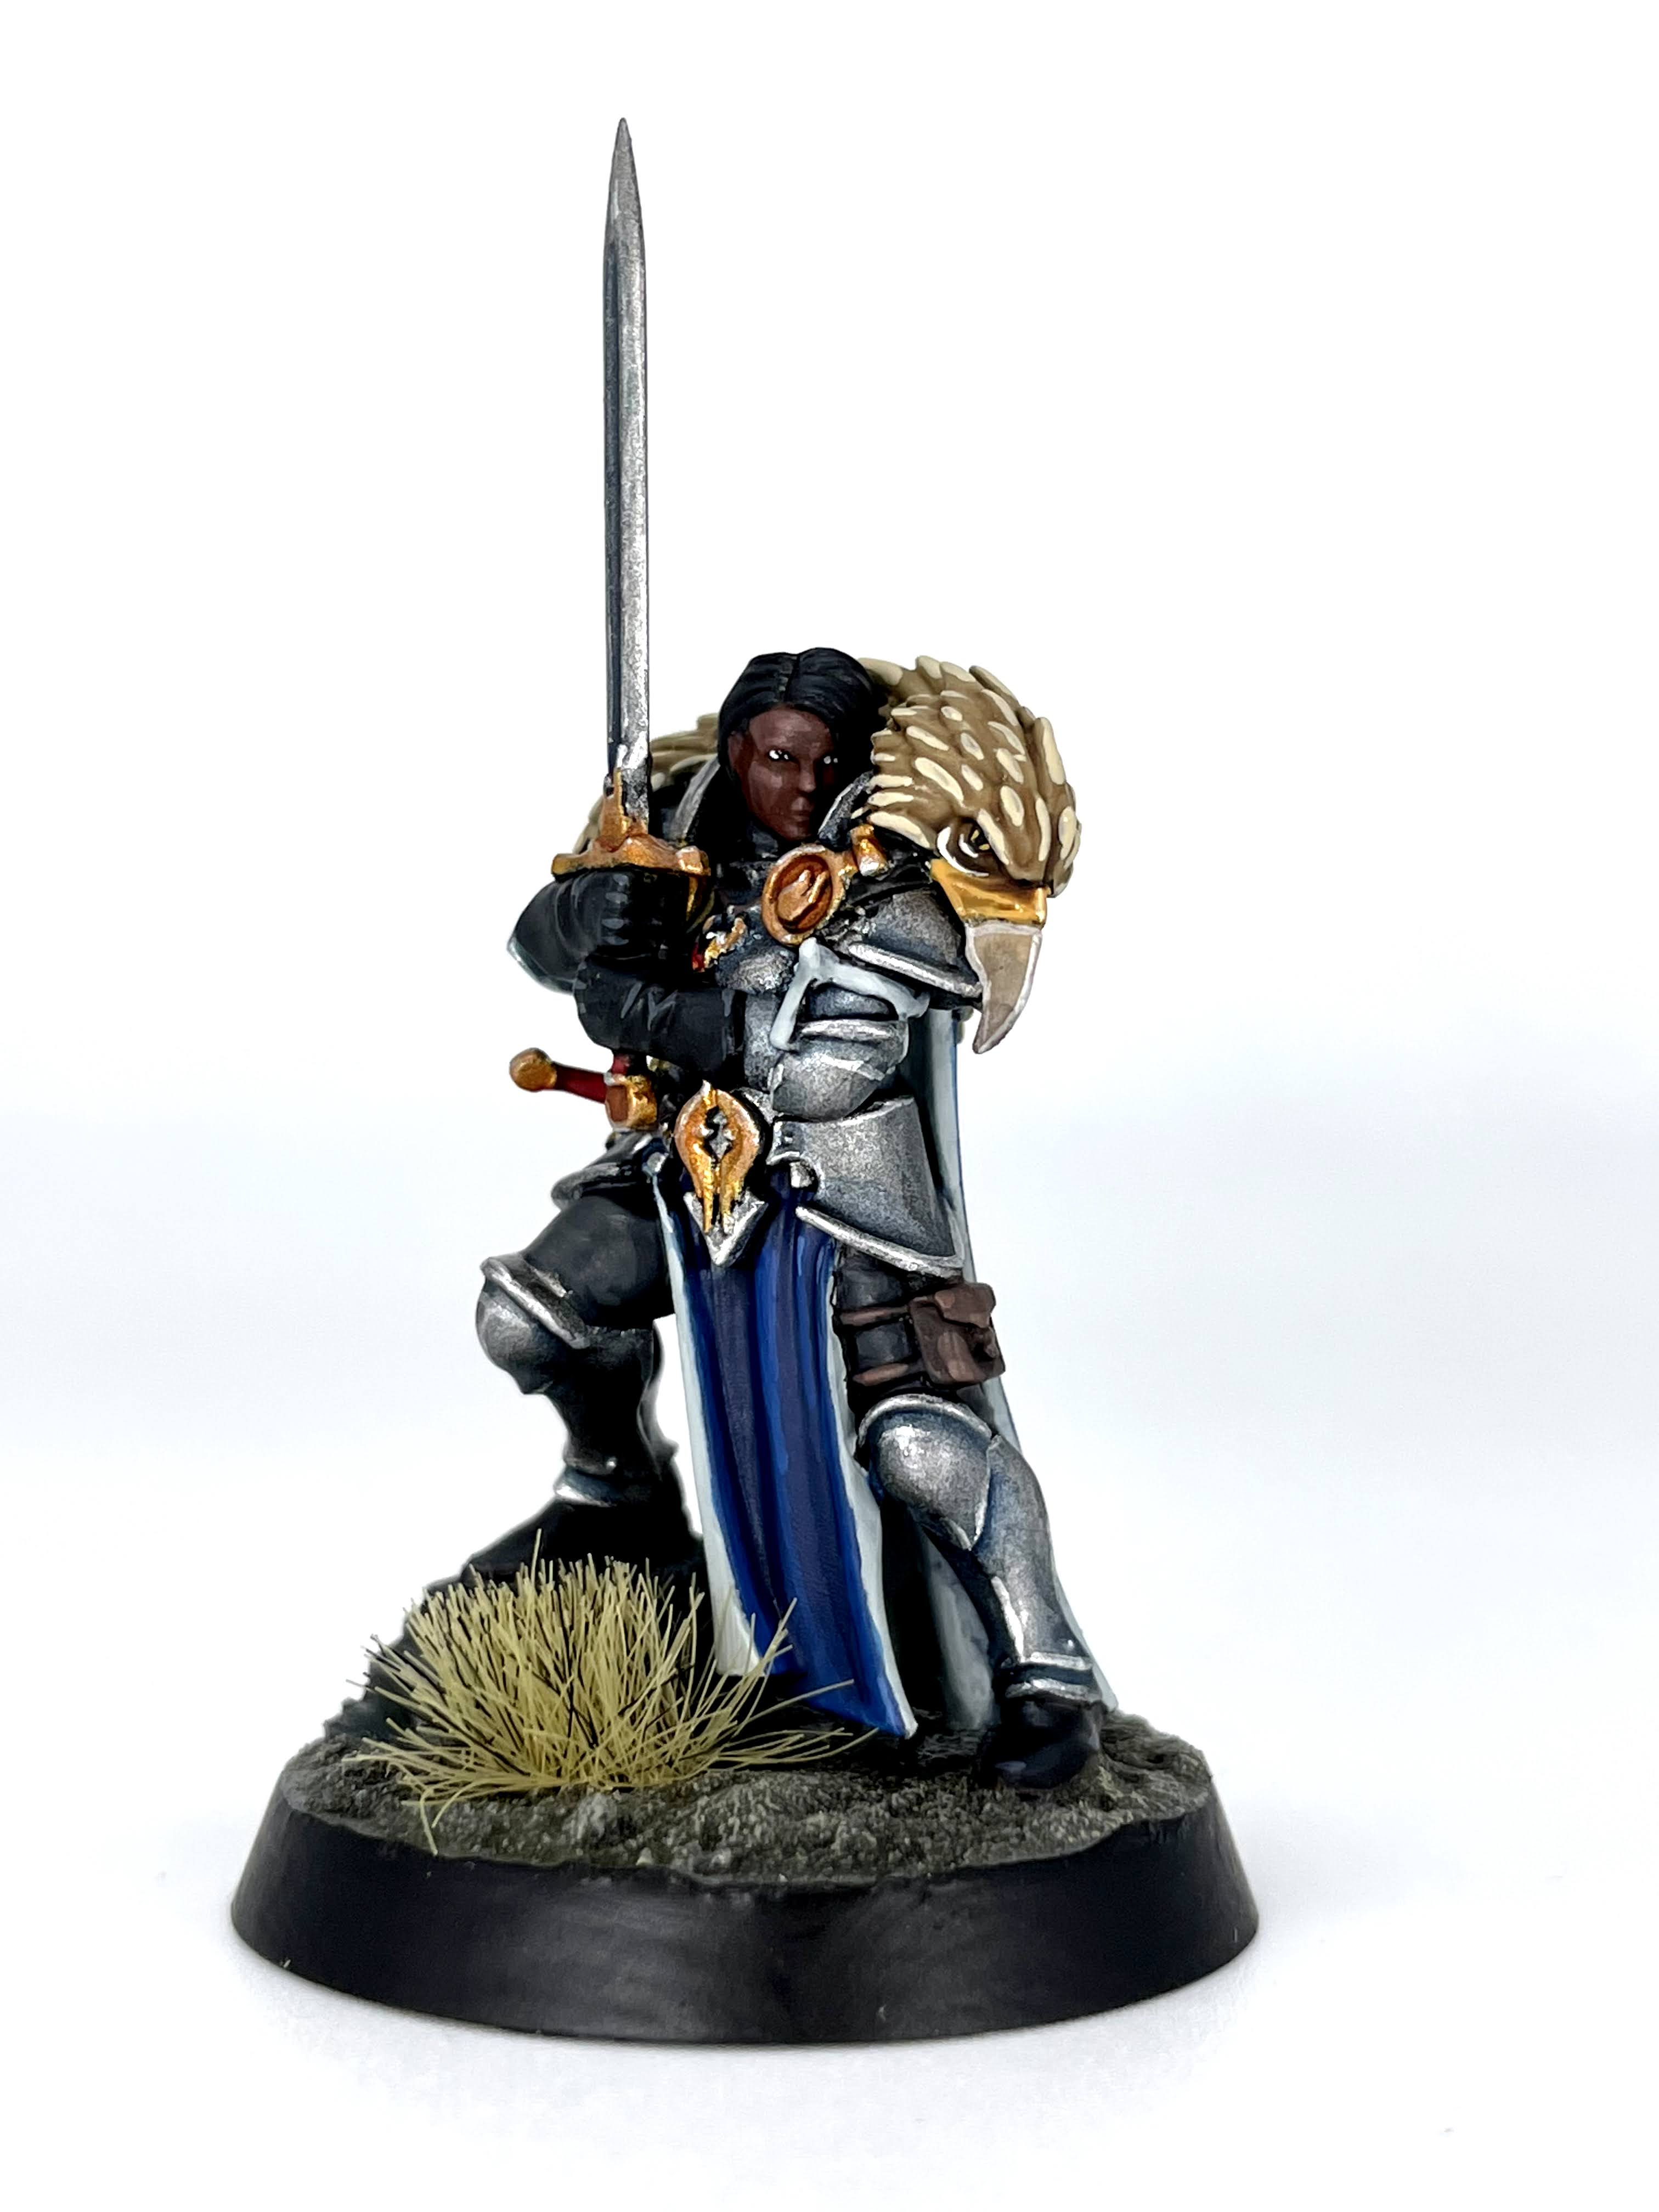
First I’ll go through the parts of her paintjob unique to her, then refer back to techniques that I used elsewhere. You’re good starting either with the armor or cloak on her, as they’re both pretty huge parts of the model and are without a doubt the dominant textures on display. I also use a more “heroic” gold on her, as befits her paladin vibe. I give a pretty vague instruction for how to paint gems here, for the real masterclass on that particular bugbear check out this Goonhammer article that goes way more in depth than I can go here.
Blue Steel (Emelda’s Armor)
- Leadbelcher
- Thinned recess wash of Drakenhof Nightshade, about 1:1 wash to Lahmian Medium
- Glaze all over with extremely thinned Guilliman Blue, about 1:4 glaze to Lahmian Medium (I understand this is an OOP color, Talassar Blue from the Contrast range would work as well, but probably thinned 1:6 due to the stronger color)
- Highlight with Stormhost Silver
Gold (Emelda’s Crests, Pommels, Crossguards, Belt Buckle)
- Retributor Armor
- Recess shade with Reikland Fleshshade
- Highlight Liberator Gold
- Highlight the sharpest edges and corners with Stormhost Silver
Blue (Cape and Tabbard Exterior)
- Regal Blue
- Recess shade with Drakenhof Nightshade
- Add a little Caledor Sky to the Regal Blue and layer up, leaving the darker colors in the recesses
- Add a little more Caledor Sky and focus on just the raised edges
- Add in a little Calgar Blue for a thinner highlight
- Highlight the very sharpest edges Calgar Blue
White (Cape and Tabbard Interior, Arm Wrap)
- Celestra Grey
- Recess shade with thinned Apothecary White, about 1:1 Contrast to Contrast Medium
- Add a little Ulthuan Grey to the Celestra Grey and layer up, leaving the darker color in the recesses
- Highlight Ulthuan Grey
Fur (Griffon Pelt)
- Zandri Dust
- All over wash with Agrax Earthshade
- Pick out each feather/fur strand with Ushabti Bone
Griffon Details
- Paint the eye black
- Pick out sides of eyes with Averland Sunset
- Highlight eyelids Pallid Wych Flesh
- Paint the front of the beak Averland Sunset
- Paint the rear of the beak Rakarth Flesh
- Wash beak with Agrax Earthshade
- Highlight front of beak with Averland Sunset
- Highlight rear of beak with Rakarth Flesh
- Hit the very highest edges of the front of beak with Dorn Yellow
- Hit the very highest edges of the rear of beak with Pallid Wych Flesh
Dark Grey (Emelda’s Pants)
- Corvus Black, leaving black basecoat in the recesses
- Add in a little Skavenblight Dinge and layer up, leaving the darker colors in the recesses
- Highlight the folds Skavenblight Dinge
Red Leather (Emelda’s Weapon Hilts, Scabbards)
- Mephiston Red
- Wash all over Carroburg Crimson
- Add a little Squig Orange to the Mephiston Red, highlighting the edges
Red Gem (Emelda’s Pendent)
- Paint the gem your choice of pure black
- Paint a crescent of Khorne Red 2/3 up the gem
- Paint a thinner crescent of Evil Sunz Scarlet in the bottom 1/3 of the gem
- Paint a thin crescent of Fire Dragon Bright at the very bottom
- Dot of White Scar in the corner where it is still black
Medium Dark Skin
- Bloodreaver Flesh
- Shade recesses with Reikland Fleshshade
- Add a little Knight Questor Flesh to Bloodreaver Flesh and highlight all raised areas of the face
- Add more Knight Questor Flesh and highlight sharpest edges of the cheeks, nose, and eyebrow
- Knight Questor Flesh on the tip of the nose
- Recess wash eyes Druchii Violet
- Glaze lower lip and nose with thinned Carroburg Crimson, about 1:1 wash to Lahmian Medium
- Pick out eyes in P3 Thamar Black
- Pick out corners of eyes with White Scar
Cool Black Hair (Emelda’s Hair)
- Black
- Add in a little Dark Reaper and pick out each individual strand
- Add more Dark Reaper and highlight the very bottom edges and roots
Now I’ll just map out my previous techniques onto the parts of the model which repeat textures found earlier in my tutorials:
Silver (Emelda’s Blade)
- Ironbreaker
- Recess shade with Nuln Oil
- Glaze with thinned Drakenhof Nightshade, about 1:1 wash to Lahmian Medium
- Highlight with Stormhost Silver
Brown Leather (Emelda’s Pouch, Necklace Cord)
- Dryad Bark
- Recess shade with Agrax Earthshade
- Add a little Gorthor Brown to the Dryad Bark and highlight all the edges and folds
- Add a little more Gorthor Brown and do a second, thinner highlight on all said edges and folds, focusing on raised areas
- Add even more Gorthor Brown and just hit the nicks in the leather and highest raised edges
Black Leather (Emelda’s Boots, Gloves):
- P3 Thamar Black, but GW’s Abaddon Black will do just fine.
- Add in a little Dark Reaper and layer up, leaving black in the recesses.
- Add in more Dark Reaper and layer up, concentrating on the outer edges and raised areas. This is subtle but will build up.
- Add in yet more Dark Reaper for a third highlight, just on the very edges
- Add in a little Fenrisian Grey to the previous mixture, something like 50/50, for the very sharpest parts of the leather
SRM’s Octren Glimscry
This dude is probably the most straightforward of the bunch; he’s basically all robes, wood, and bone, which you should get used to painting with this set.
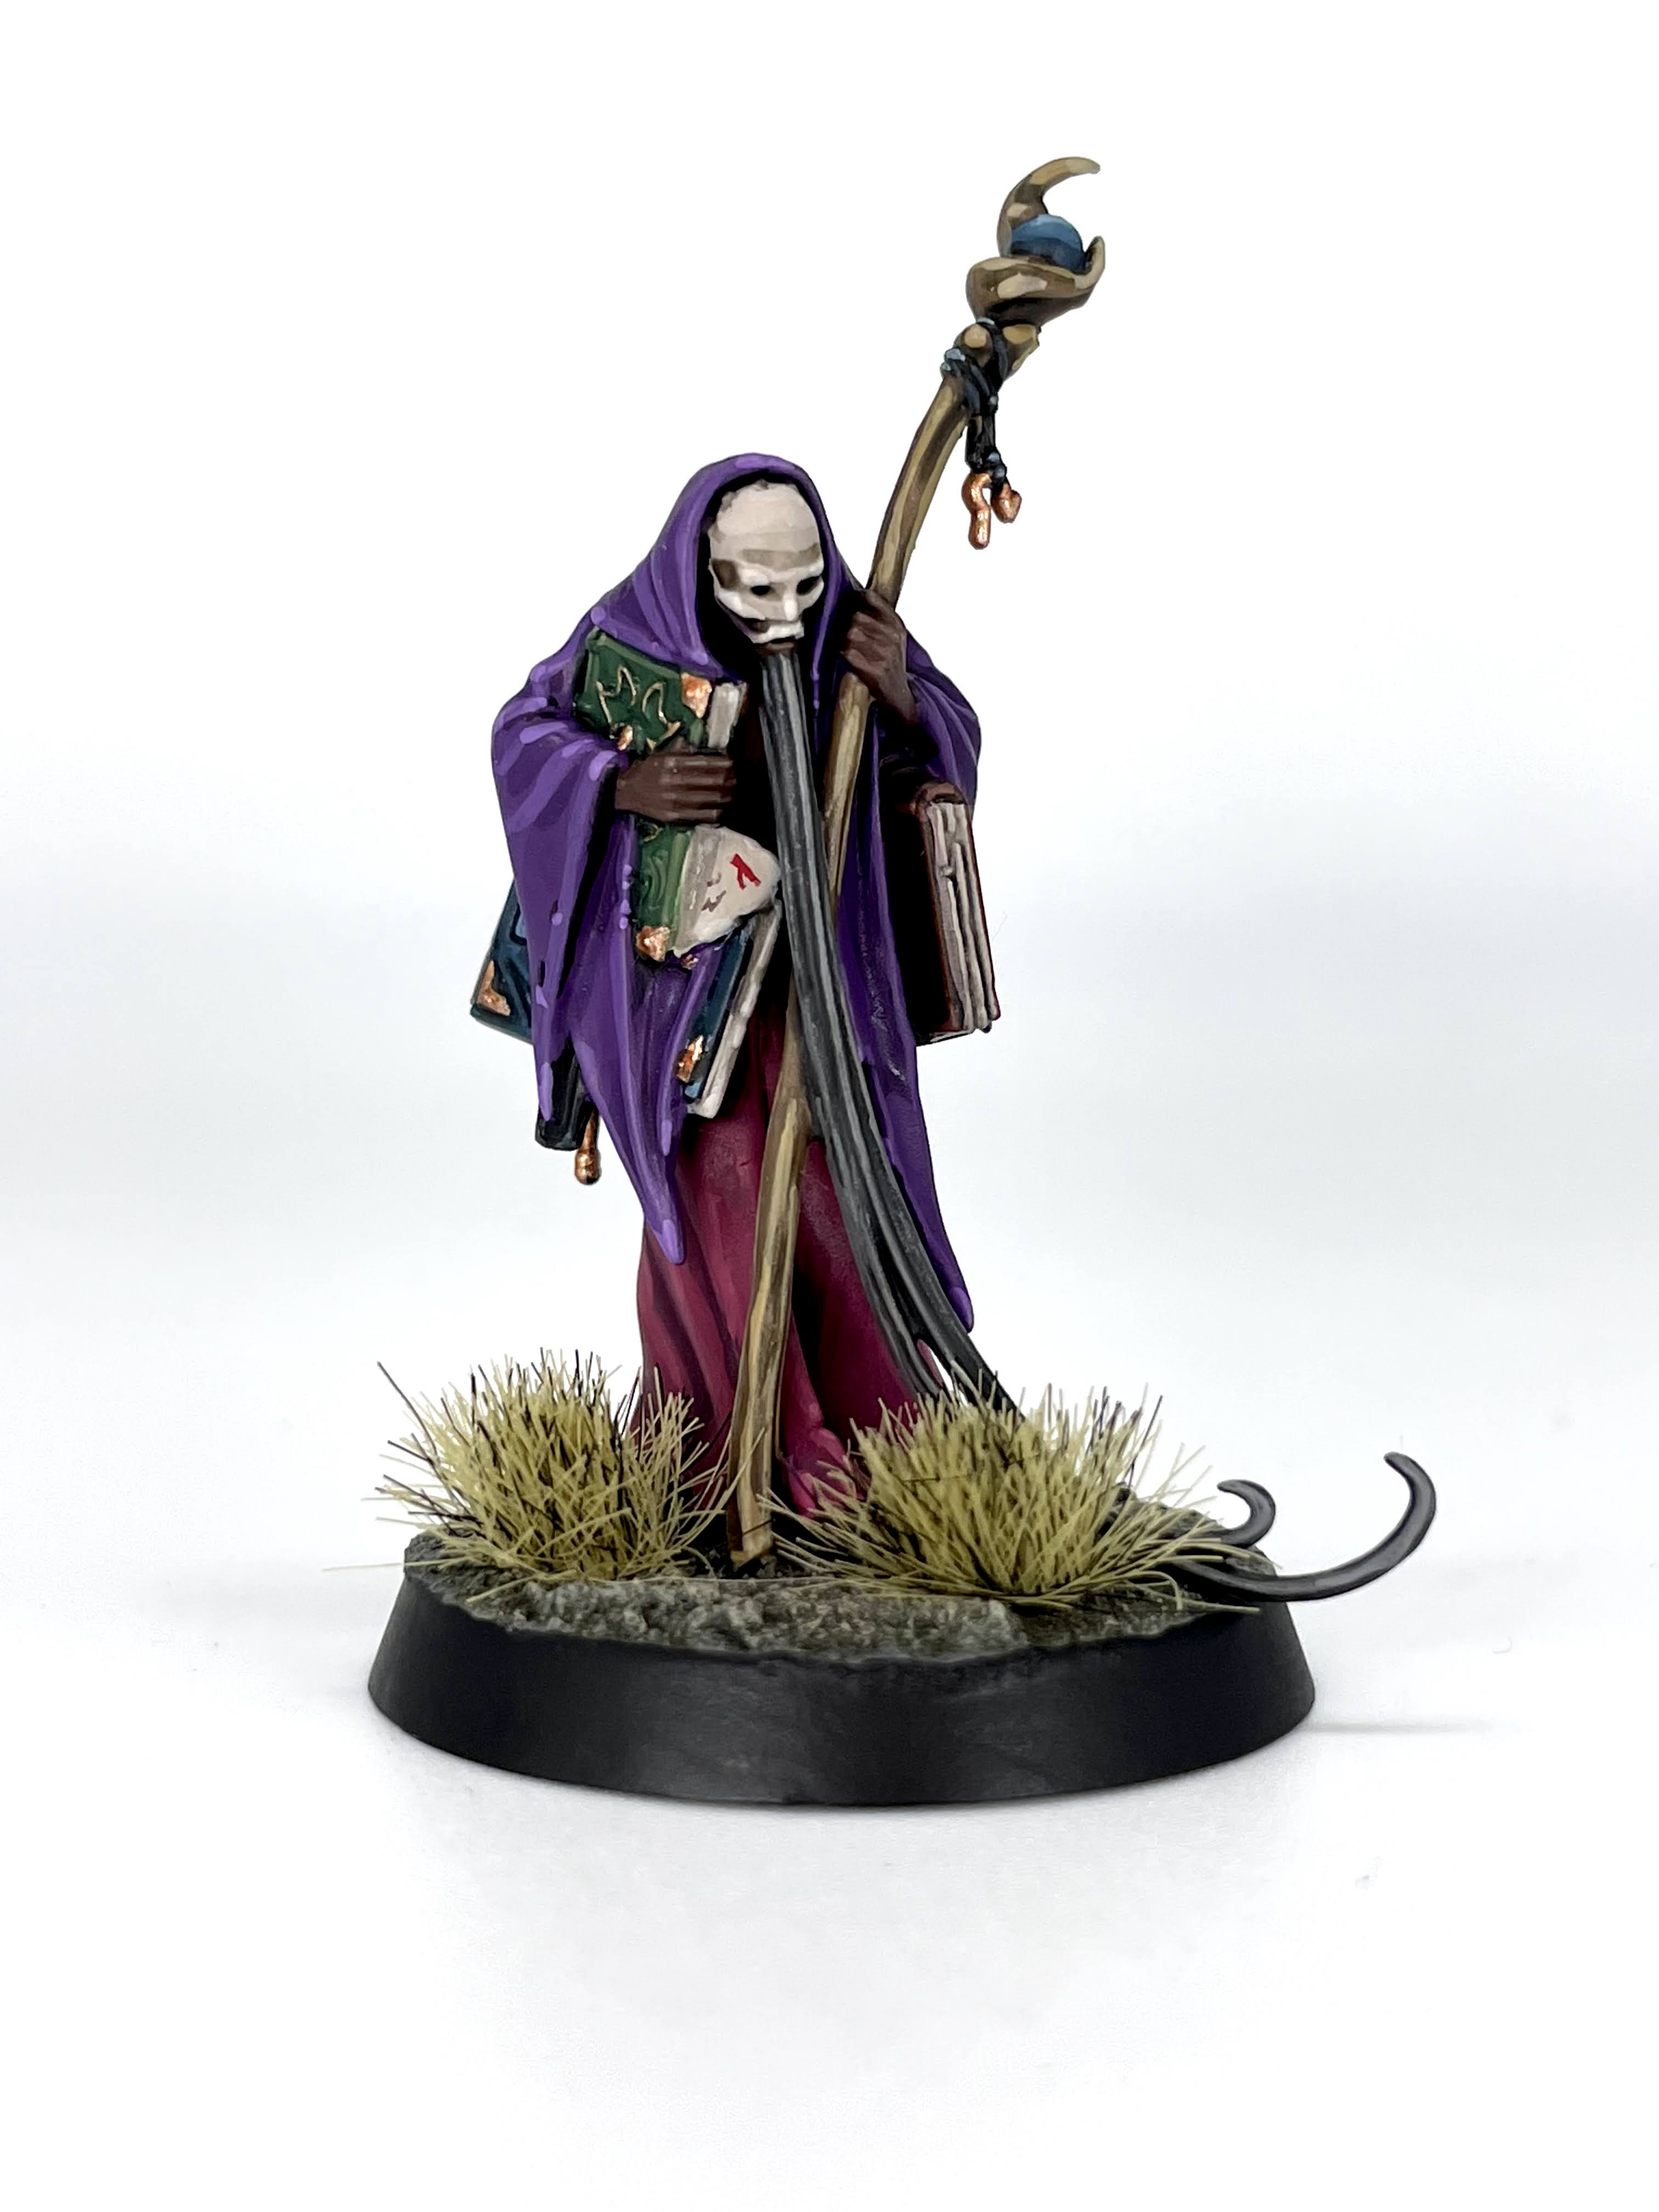
It’s a good idea to figure out three distinct colors for the books he’s carrying ahead of time as well, as they’re good opportunities for spot colors. You could also paint his robes all one color and it would look good and sensible, but I wanted to make this particular Amethyst Wizard a bit more colorful. By basing his scheme around purple, I got to play with a bunch of secondary colors for those, with some blue for the orb on his stick.
Purple Cloth (Octren’s Upper Robes)
- Xereus Purple
- Recess wash of Druchoi Violet
- Add in a little Genestealer Purple and layer up, leaving the darker purple in the recesses.
- Add in a little more Genestealer Purple and do thinner highlights on the raised edges
- Highlight the very ends of his robes and rim of his hood with Genestealer purple
Magenta Cloth (Octren’s Lower Robes)
- Screamer Pink
- Recess wash of Druchii Violet
- Add in a little Pink Horror and layer up, leaving the darker magenta in the recesses.
- Add in a little more Pink Horror and do thinner highlights on the raised edges
- Add in a little more Genestealer Purple and hit only the corners and sharpest parts of the cloth
Bone (Octren’s Mask, any bones on bases)
- Rakarth Flesh
- Recess wash with 50/50 Agrax Earthshade/Nuln Oil mix
- Add in a little Pallid Wych Flesh and layer up, leaving the darker bone colorthe recesses.
- Add in a little more Pallid Wych Flesh and highlight the raised edges
- Add in a little more Pallid Wych Flesh and highlight the very sharpest corners and edges, such as the cheek and browbones, and the tip of the nose
Paper (Octren’s Book Pages, Scrolls)
- Rakarth Flesh
- All over wash with Nuln Oil
- Highlight Rakarth Flesh
- Add in a little Ulthuan grey and highlight the raised edges
Teal Book Cover
- Stegadon Scale Green
- Wash Coelia Greenshade
- Add in a little Calgar Blue and highlight the edges and raised details
- Add in a little more Calgar Blue and highlight the corners
Green Book Cover
- Caliban Green
- Wash Biel-Tan Green
- Add in a little Loren Forest and highlight the edges and raised details
- Add in a little more Loren Forest and highlight the corners
Brown Book Cover
- Rhinox Hide
- Wash Carroburg Crimson
- Add in a little Mournfang Brown and highlight the edges and raised details
- Add in a little more Mournfang Brown and highlight the corners
Rotting Wood (Octren’s Staff)
- Steel Legion Drab
- Wash with 50/50 Agrax Earthshade/Nuln Oil mix
- Recess shade with Athonian Camoshade
- Highlight raised edges and details with Tallarn Sand
- Highlight very sharpest edges Karak Stone
ORB (Octren’s ORB)
- Stegadon Scale Green
- Mix in some Calgar Blue and paint the top 3/4
- Mix in some Fenrisian Grey and paint the top 1/2
- Mix in some Ulthuan Grey and paint the top 1/4
Brass (Octren’s Book Details)
- Hashut Copper
- Shade recesses and rivets with Reikland Fleshshade
- Highlight with Sycorax Bronze
Dark Aged Skin (Octren’s exposed hands and chin; I’ll write out the full details for how I’d paint a whole face here in case you’re interested)
- Catachan Flesh
- Shade recesses with Reikland Fleshshade
- Add a little Rakarth Flesh to Catachan Flesh and highlight all raised areas
- Add more Rakarth Flesh and highlight sharpest edges of the chin and knuckles
- Recess wash eyes Druchii Violet
- Glaze lower lip and nose with thinned Carroburg Crimson, about 1:1 wash to Lahmian Medium
- Pick out eyes in P3 Thamar Black
- Pick out corners of eyes with White Scar
Dark Grey Beard (Octren’s Comically Long Beard)
- Skavenblight Dinge
- Wash Nuln Oil
- Highlight edges with Stormvermin Fur
- Highlight very tip with Dawnstone
SRM’s Qulathis the Exile
I went with a really warm, 5th edition Warhammer Fantasy Wood Elves sort of vibe with Qulathis. Even the black hair was fairly warm when compared to Emelda Braskov’s.

While she’s got some new colors going on with her green and yellow clothes, you’re gonna get a ton of reused textures here from elsewhere – namely the fur, red leather, and gem from Emelda, the brown leather and wood from Darrock, the brass from basically everybody, and a greener take on the silver I’ve done a few times here.
Green Cloth (Qulathis’ Shirt)
- Loren Forest
- Recess wash Biel-Tan Green
- Add in a little Straken Green and layer up, leaving the darker green in the recesses
- Add in a little more Straken Green and highlight the raised edges
- Highlight the sharpest corners with Straken Green
Yellow Cloth (Qulathis’ Mask, Leggings)
- Averland Sunset
- Recess wash Fuegan Orange
- Add in a little Yriel Yellow to Averland Susnet and layer up, leaving the darker yellow in the recesses
- Add in a little more Yriel Yellow and highlight the raised edges
- Add in Flash Gitz Yellow and hit the very sharpest corners
Fletching (Qulathis’ Arrow Feathers)
- Mephiston Red
- Wash Agrax Earthshade
- Highlight Squig Orange
Antlers (Qulathis’ Headdress/horns)
- Rakarth Flesh
- Gradually add Rhinox Hide to Rakarth Flesh a tiny bit at a time until you have a fairly smooth blend 3/4 of the way up the antlers
- Add in a little Abaddon Black to the previous mixture for the very ends
- Pick out sharpest corners with Rakarth Flesh
Tanned Hide (Qulathis’ Skirt Lining, Pelt Interior)
- Rakarth Flesh
- Wash Reikland Fleshshade
- Highlight with Rakarth Flesh
Dull Brass (Qulathis’ Belt, Bow Details, Crown)
- Hashut Copper
- Shade recesses with Seraphim Sepia
- Highlight with Sycorax Bronze
Greenish Silver (Qulathis’ Loincloth Armor)
- Ironbreaker
- Wash Coelia Greenshade
- Highlight with Stormhost Silver
Fur (Qulathis’ Pelt, Boots)
- Zandri Dust
- All over wash with Agrax Earthshade
- Pick out each feather/fur strand with Ushabti Bone
Brown Leather (Qulathis’ Boots, Gloves, Straps, Quiver, and Skirt)
- Dryad Bark
- Recess shade with Agrax Earthshade
- Add a little Gorthor Brown to the Dryad Bark and highlight all the edges and folds
- Add a little more Gorthor Brown and do a second, thinner highlight on all said edges and folds, focusing on raised areas
- Add even more Gorthor Brown and just hit the nicks in the leather and highest raised edges
Medium Wood (Qulathis’ Bow)
- Steel Legion Drab
- Recess shade with Agrax Earthshade
- Tallarn Sand highlight
- Karak Stone highlight on the very sharpest edges
Light Wood (Qulathis’ Arrows)
- Rakarth Flesh
- Wash all over with Agrax Earthshade
- Highlight with Rakarth Flesh
Red Leather (Qulathis’ Shortsword Scabbard)
- Mephiston Red
- Wash all over Carroburg Crimson
- Add a little Squig Orange to the Mephiston Red, highlighting the edges
Red Gem (On Qulathis’ Crown and Scabbard)
- Paint the gem your choice of pure black
- Paint a crescent of Khorne Red 2/3 up the gem
- Paint a thinner crescent of Evil Sunz Scarlet in the bottom 1/3 of the gem
- Paint a thin crescent of Fire Dragon Bright at the very bottom
- Dot of White Scar in the corner where it is still black
Beanith’s How to Smoosh Brutogg Corpse-Eater
**Disclaimer** I will be eventually basing all of my Cursed City on 3D printed bases so the current bases are “temporary”… but if anyone asks, it’s snowing in the decaying city of Ulfenkarn.
I’m planning on linking all of my hereos using Contrast Talassar Blue as a spot colour somewhere on the model and the same for the Bad Guys using Contrast Flesh Tearers Red so this will be a common theme across my contribution to these articles. My wheel house is a quick and dirty paint job in a single sitting so I can smash through the box and get these lads on the table ready for the game so you may want to consider these techniques more for the rank and file. That said, have fun with it and as Badcast Greg put it recently, Just Paint
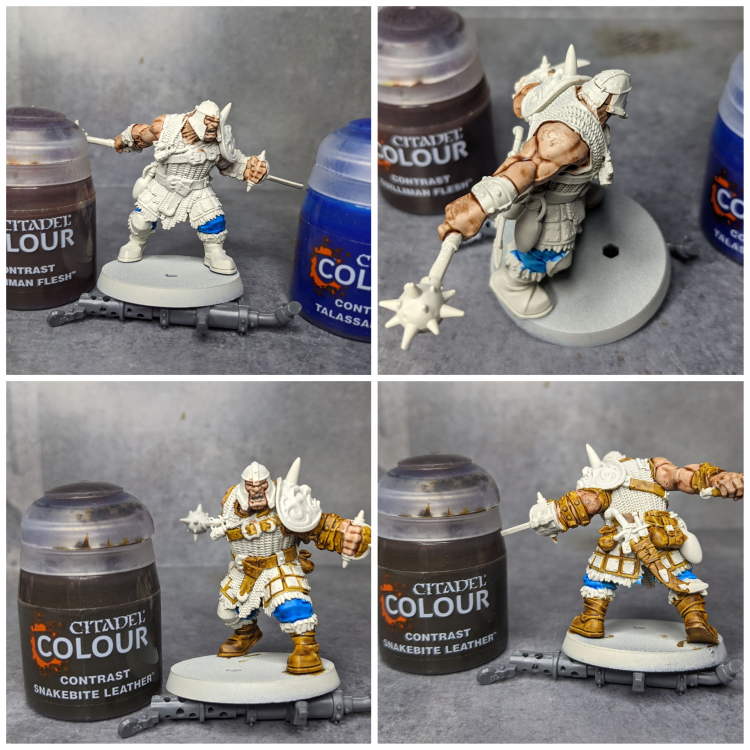
I started off with Contrast Talassar Blue on the pants and Contrast Guilliman Flesh for the skin. I then moved onto Contrast Snakebite Leather for all of the leather bits
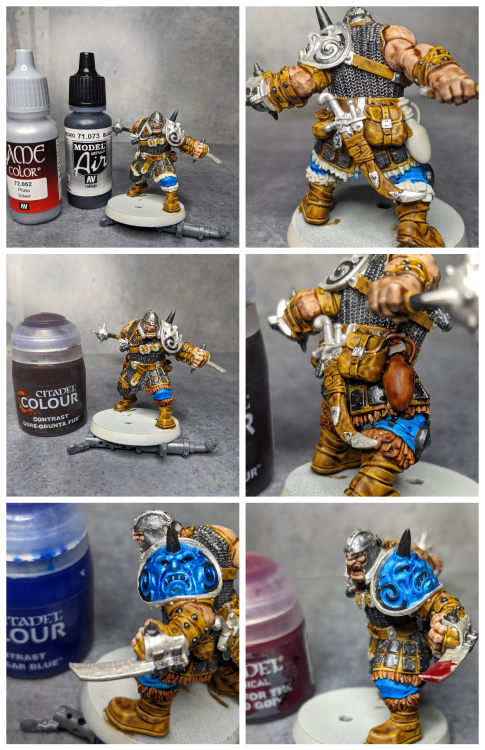
Here I have strayed from the Holy Contrasts and I am now dallying with Model Air Vallejo Black (Metallic) 71.073 and the Vallejo Game Color Silver 72.052. Both offer excellent coverage and I love the Black Metallic look currently over old favorites like GW Lead Blecher or Army Painter Plate Mail. The Silver is pretty bog standard but thanks to the dropper bottle, won’t become a congealed mess in the pot. Here I just smooshed it over the armor, weapons and dotted onto the studs in the leather.
After that, I came in with Contrast: Gore-grunta Fur and smoshed in the fur trim and jug. I wanted some more Contrast Talassar Blue on the model so I went straight over the silver on the pauldron for a quick metallic sheen. After that, I splashed on some GW Technical Blood For The Blood God on the weapons.
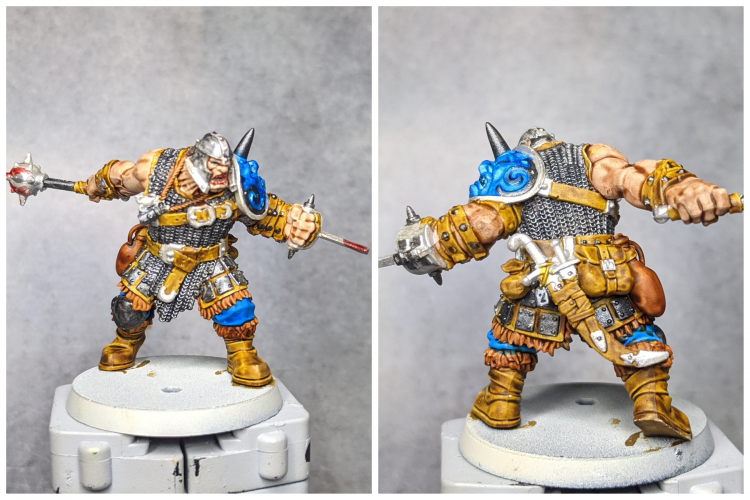
Normally at this point I’d splash on the Nuln Oil and call it a day but I’m actually after a cleaner bright look so I left this one as is. Next step is to hit it with some Varnish and call it done (for now).
Beanith’s How to Smoosh Cleona Zeitengale
**Different Disclaimer** Don’t do what Beanith did and don’t glue on her headpiece until after you’ve painted the model. Sub assembly here is your friend.
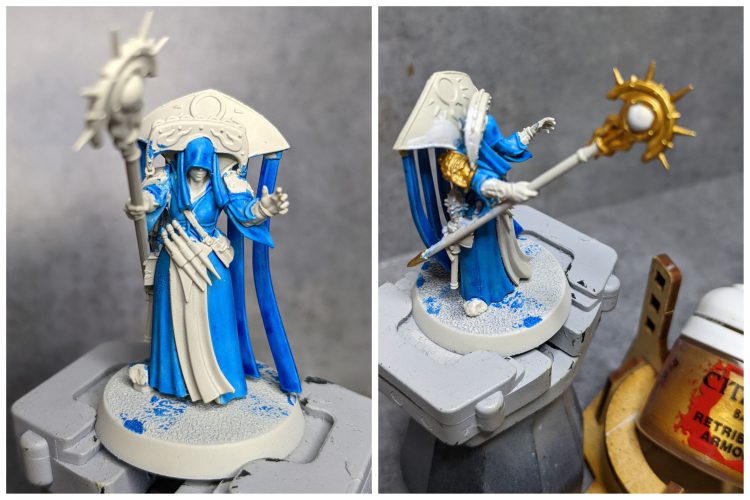
Since I’m planning on linking all of my hereos using Contrast Talassar Blue as a spot colour somewhere on the model and Cleona Zeitengale seems to me as one of the more good Good Guy, I decided to make the bulk of her cloth blue. After that I busted out some Base Retributor Armour on her staff, robe trim and shoulders.
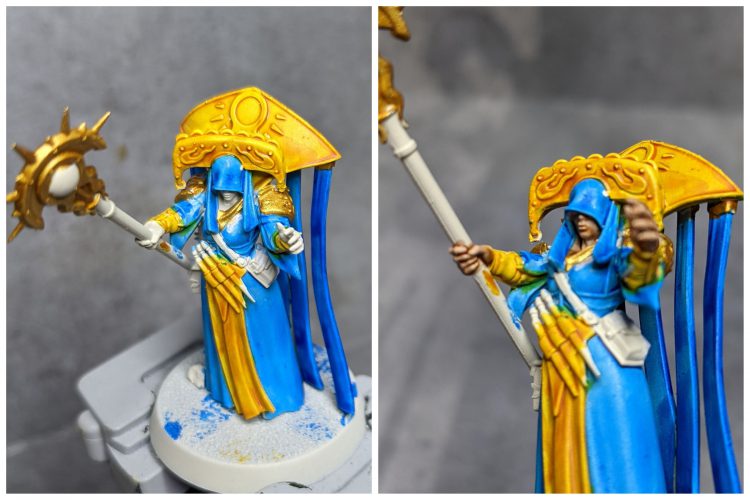
Next up is my favorite yellow, Contrast Iyanden Yellow followed up with me just tidying up some happy little accidents with some Corax White before breaking out the Contrast Guilliman Flesh for the face and hands.
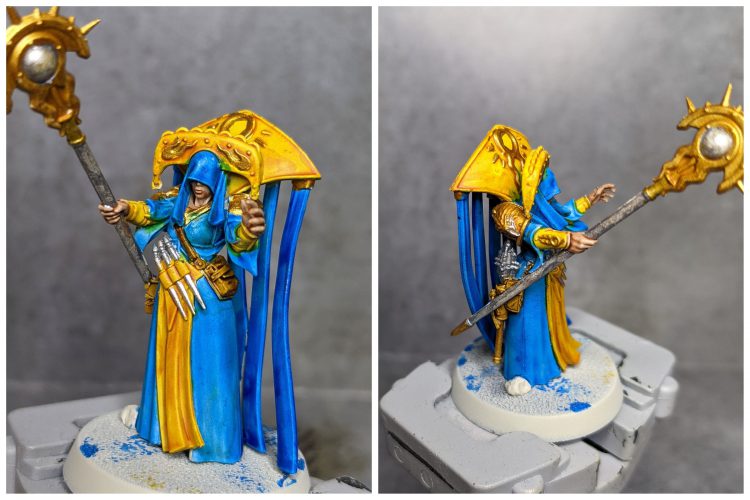
Out comes the Vallejo Game Color Silver 72.052 for the weapons and a dollop on the pauldron. Then I moved onto Contrast Snakebite Leather for all of the leather bits and then tried to pick out some fiddly details with Base Retributor Armour
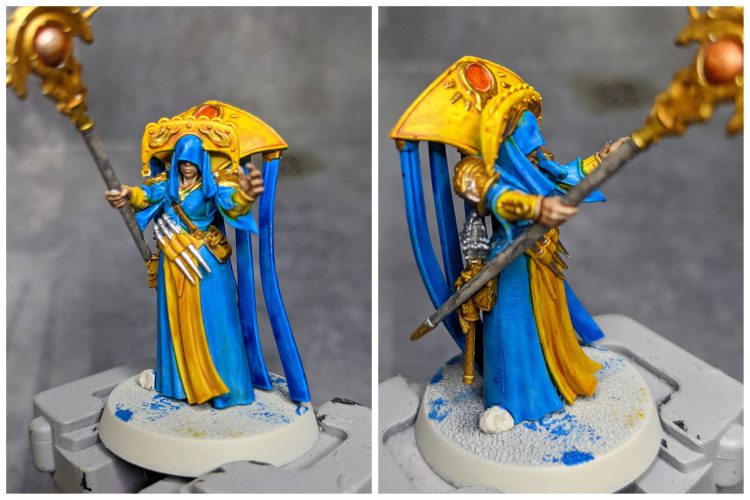
Lastly I went back again and cleaned up spots where I’ve ham fisted a colour blend with some Corax White and then going back with the Blue and Yellow. Lastly I added some Contrast Gryph-Hound Orange as a spot colour to break up the yellow. Next step is to hit it with some Varnish and call it done until my 3D printed bases show up.
Wrapping Up
That wraps up our look at painting the heroes of Cursed City. If you’re looking for the monsters in the set, check out our article on how to paint those models here. And as always, if you have any questions or feedback, drop us a note in the comments below or email us at contact@goonhammer.com.
