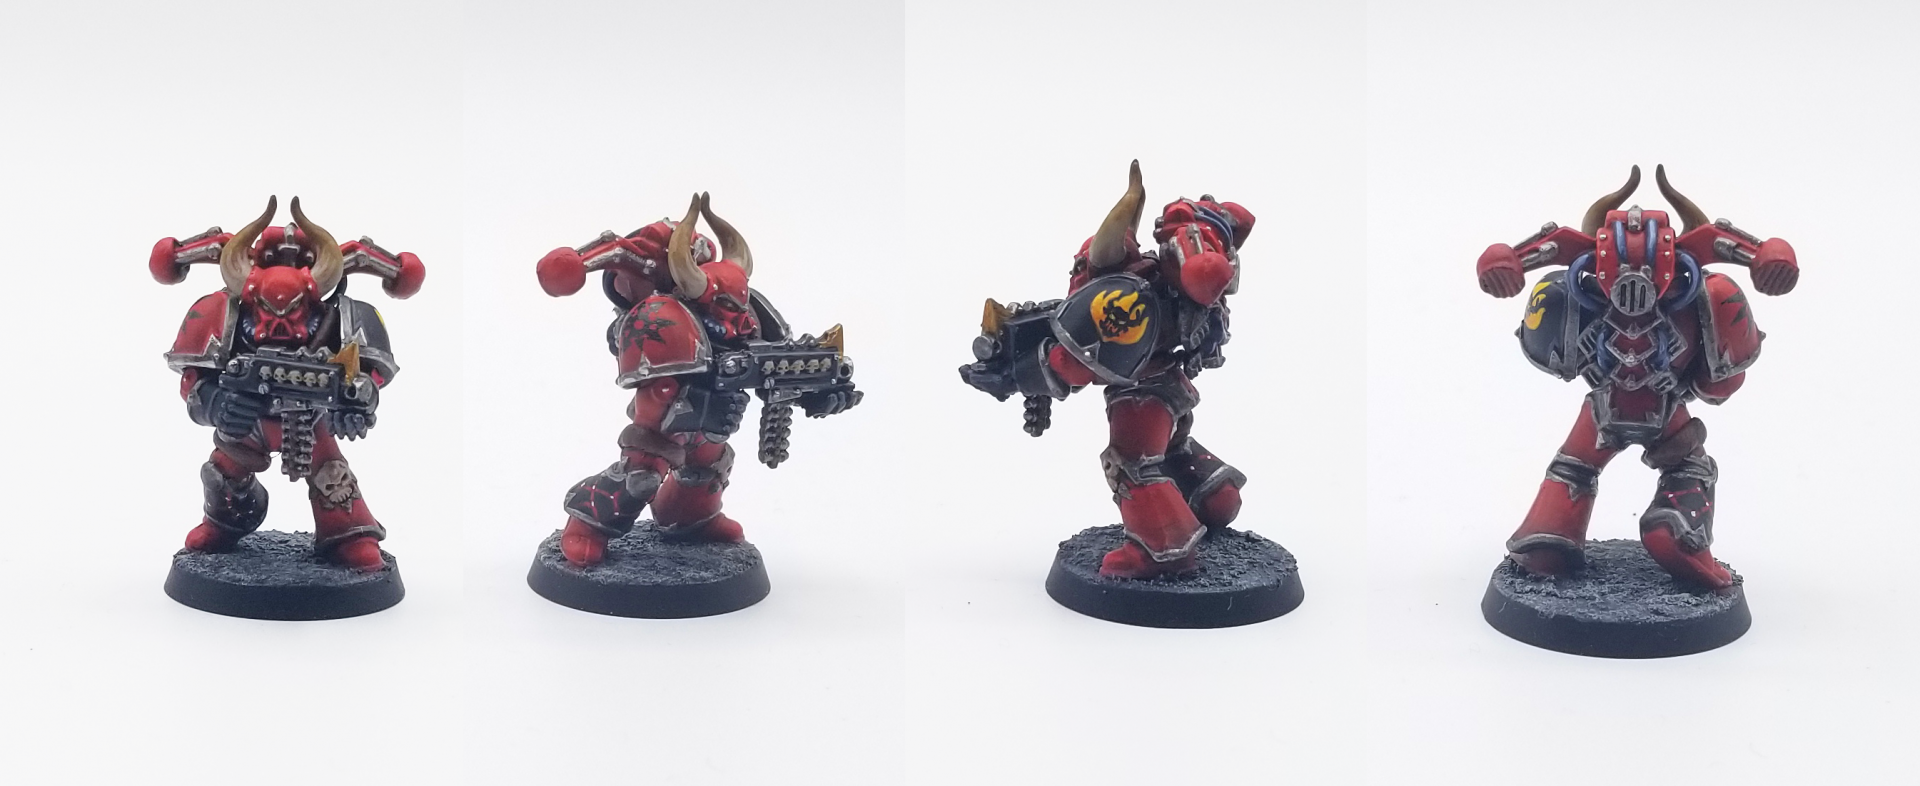
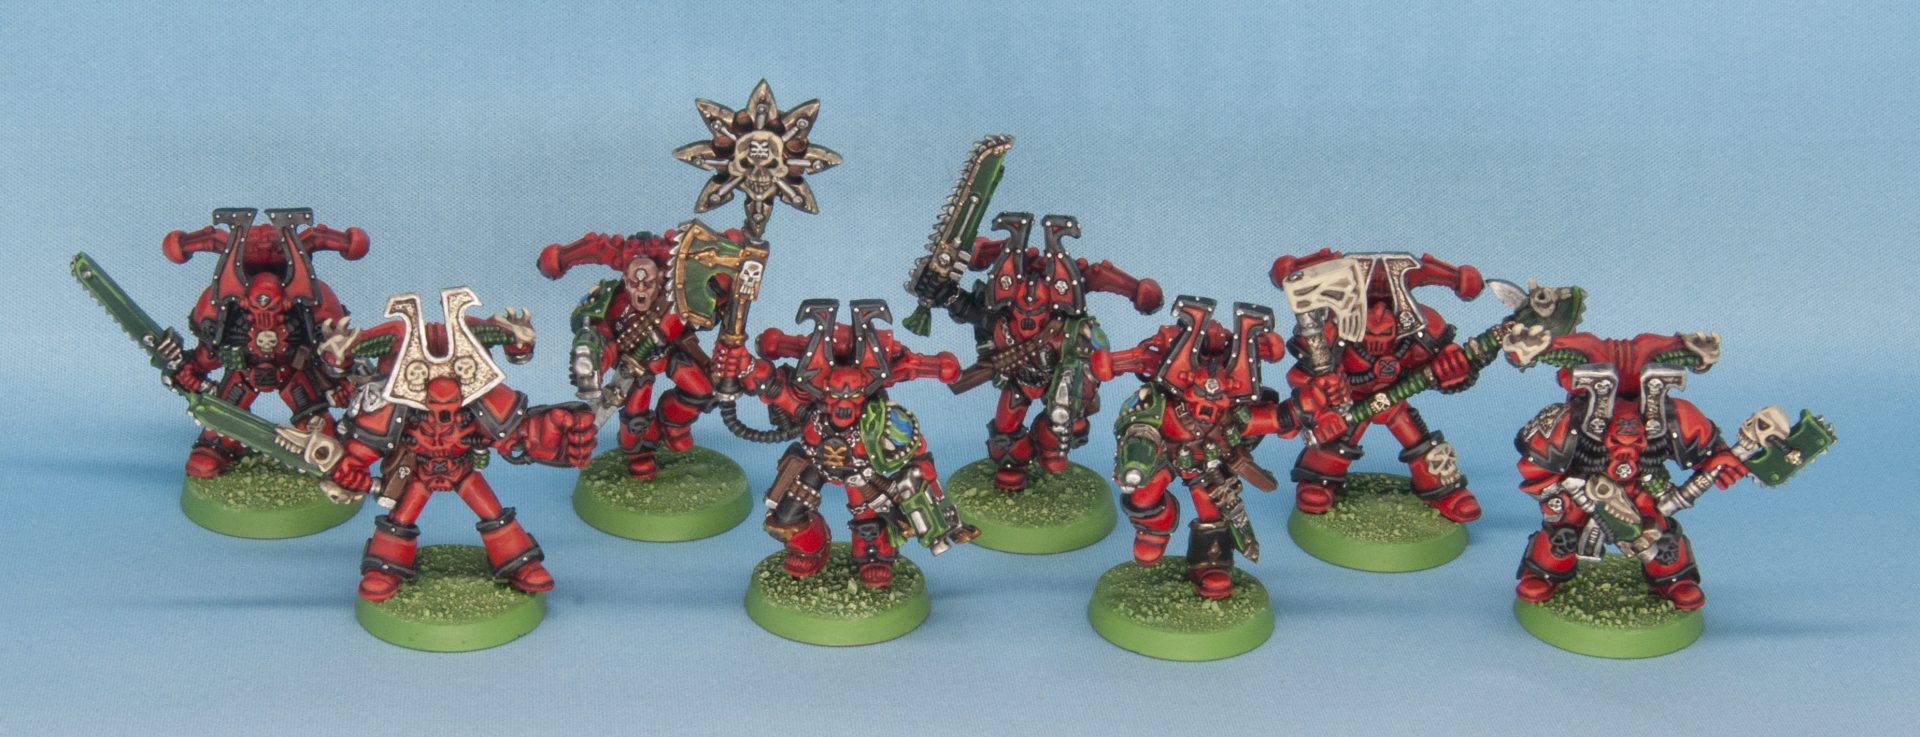
In our How to Paint Everything series we look at how to paint well, everything. We look at different techniques and approaches to achieving results and the lore behind some of the models we’re painting. As GOONHAMMER ’96 comes to a close, we’re looking at how to paint Chaos Space Marines with the bright schemes and styles of the 2nd edition ‘Eavy Metal schemes in Codex: Chaos.
We already reviewed Codex: Chaos earlier this week and talked about how great the books full color insert pages are. And we talked about Dylan Gould’s wonderful Chaos Space Marines army already. But if you’ve been wondering how to replicate the bright, clean color schemes from those books on your own models worry no more! In today’s How to Paint Everything we’re going to talk about painting these 2nd edition schemes and what you can do to replicate them with modern paints and techniques.
Some of these step-by-step images are small – you can see them in larger sizes by clicking on them.
Table of Contents
Alpha Legion
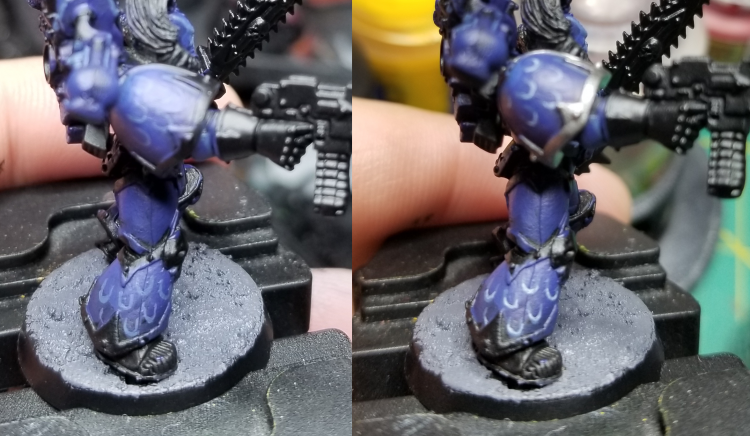
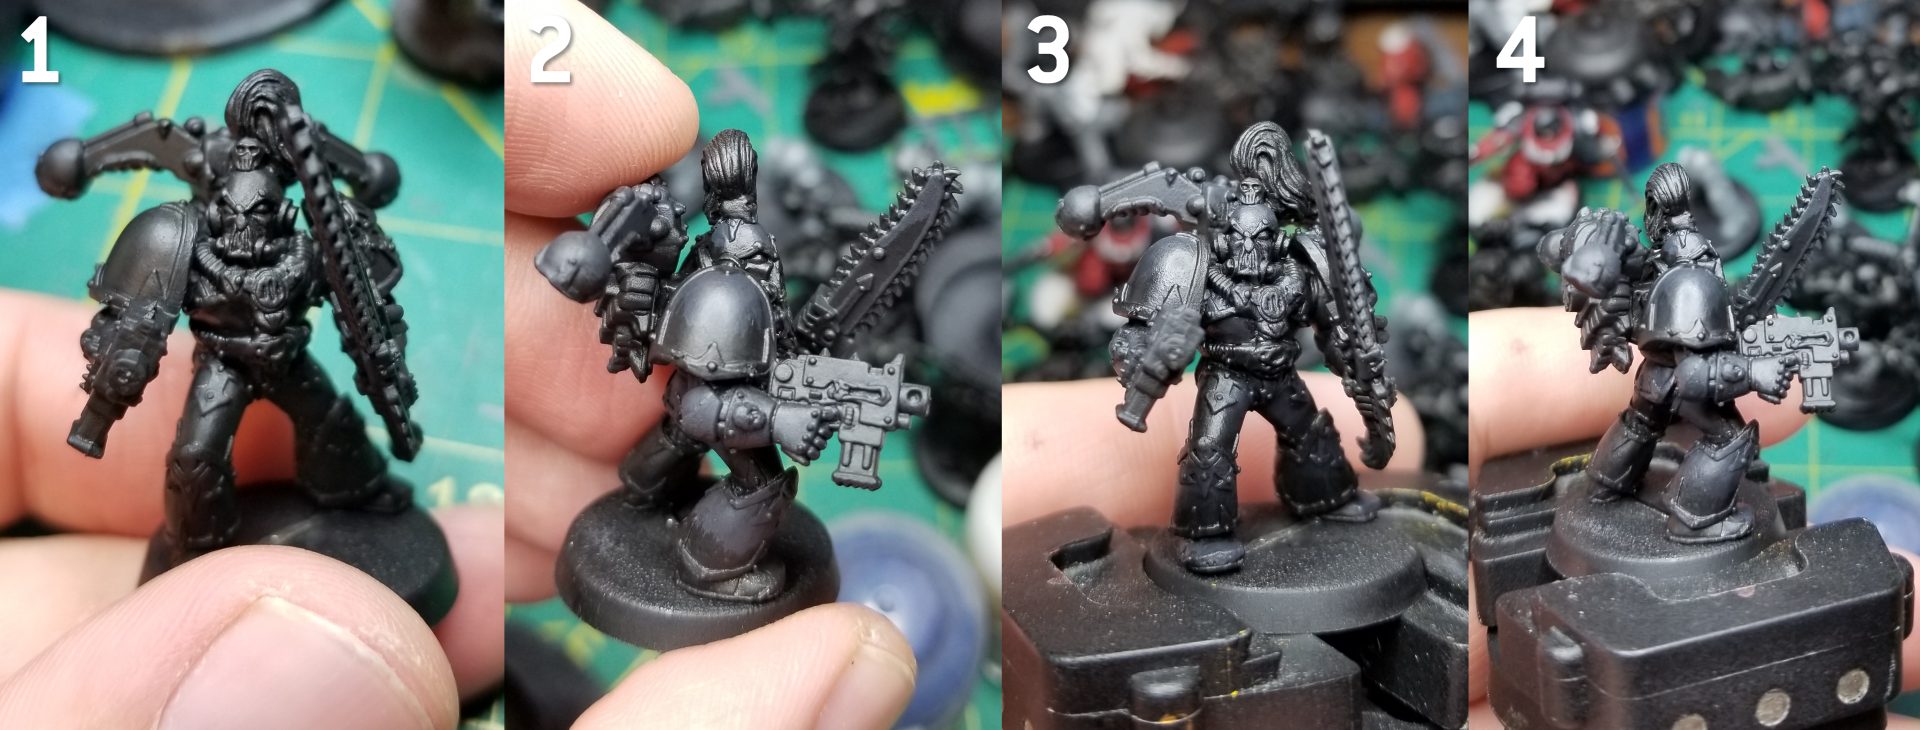
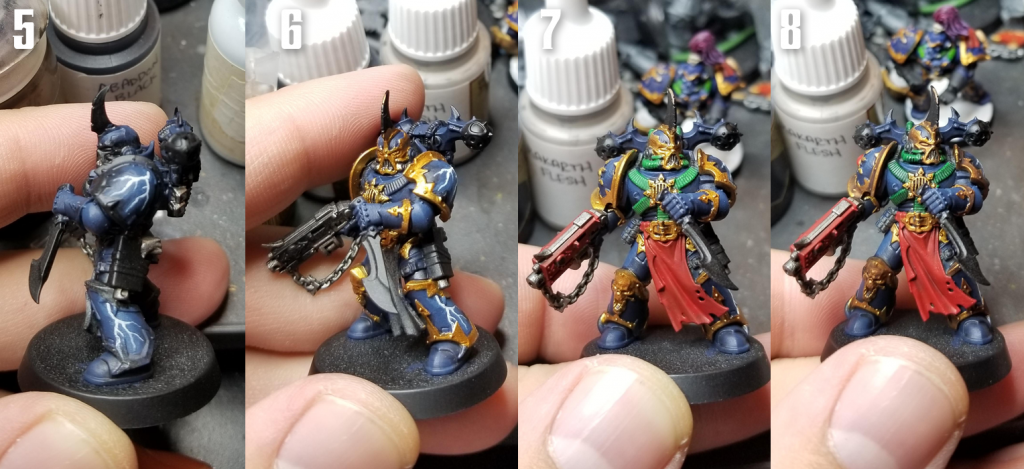
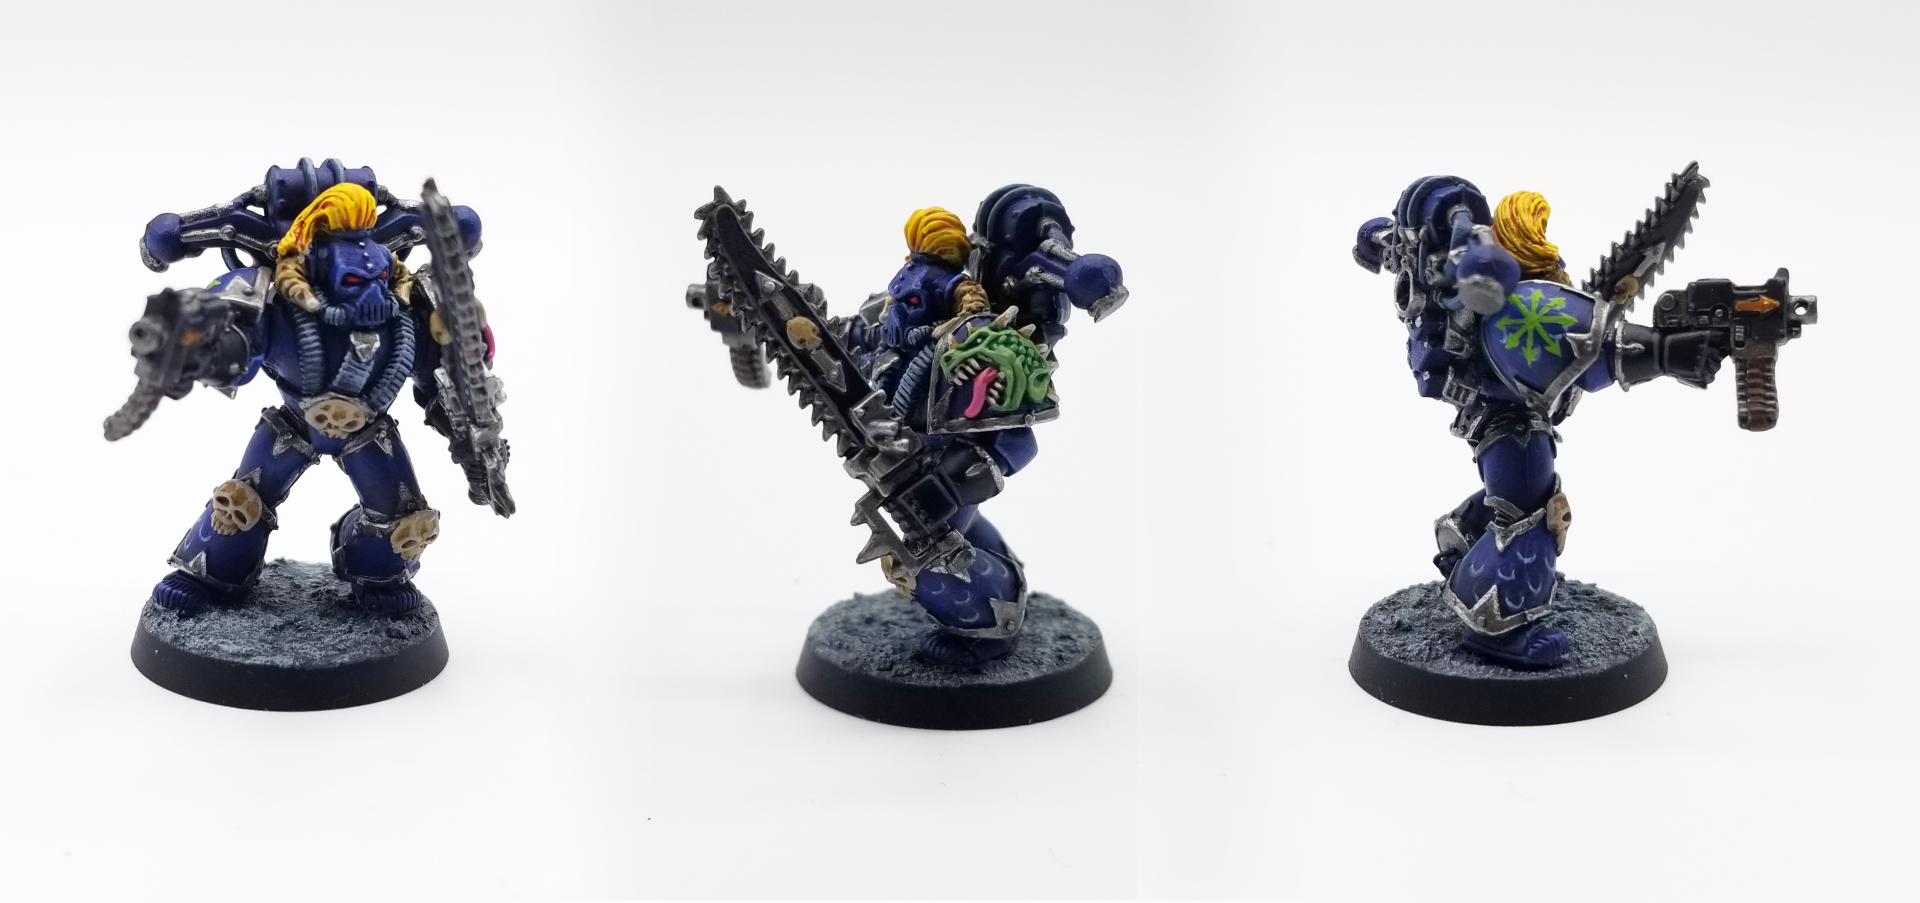
First introduced proper in the 2nd edition Codex: Chaos, the Alpha Legion have become a bit of a fan favorite since, thanks to some cool backstory elements and fluff establishing them as the sneakiest chaos marines, and some very good rules in the 8th edition Codex: Chaos Space Marines. Although newer schemes for them give them blue – green armor with a fade and green highlights, and the Horus Heresy variant uses metallic blue-green shades, the original paint scheme for the Alpha Legion was a much deeper blue – almost indigo. I’ve tried to replicate that here.
The model starts with a basecoat that’s mostly Kantor Blue with a healthy drop of Naggaroth Night in it. This gives it the more purplish tint I’m looking for and there isn’t really a GW paint that captures this color well. I shade this up a little bit with a speck or two of white and a second coat. Then it’s time to paint the metal trim – Leadbelcher, which gets shaded with Nuln Oil, and then the cabling – The Fang, washed with Drakenhof Nightshade and highlighted with the Fang and Reaper Snow Shadow.
In this step I also do the base colors for the bone and tufts. The bone is Rakarth Flesh washed with Seraphim Sepia while the tufts are Wraithbone that I’ll hit with Iyanden Yellow contrast paint for a quick and easy solution. I also edge highlight parts of the armor with The Fang and a mix of the Fang and Reaper Snow Shadow. The eyes are Mephiston Red with spots of Evil Sunz Scarlet.
The shoulder pad uses almost as many colors as the rest of the model – the Green is Warboss Green washed with Biel-Tan and then highlighted with Warboss Green and Skarsnik Green. The tongue is Pink Horror highlighted with Emperor’s Children. The horns are Rakarth Flesh washed with Agrax Earthshade and then highlighted with Reaper Polished Bone. And the eye is just a dot of Reaper Pure White. I miss those old metal shoulder pads – they had so much detail and they looked great.
The scales are one of the defining features of 2nd edition Alpha Legion army. I painted these by freehanding thin “U” shapes on the model’s greaves and shoulder pad with The Fang, then I highlight them a bit at the bottom of the U with Reaper Snow Shadow.
The Black Legion
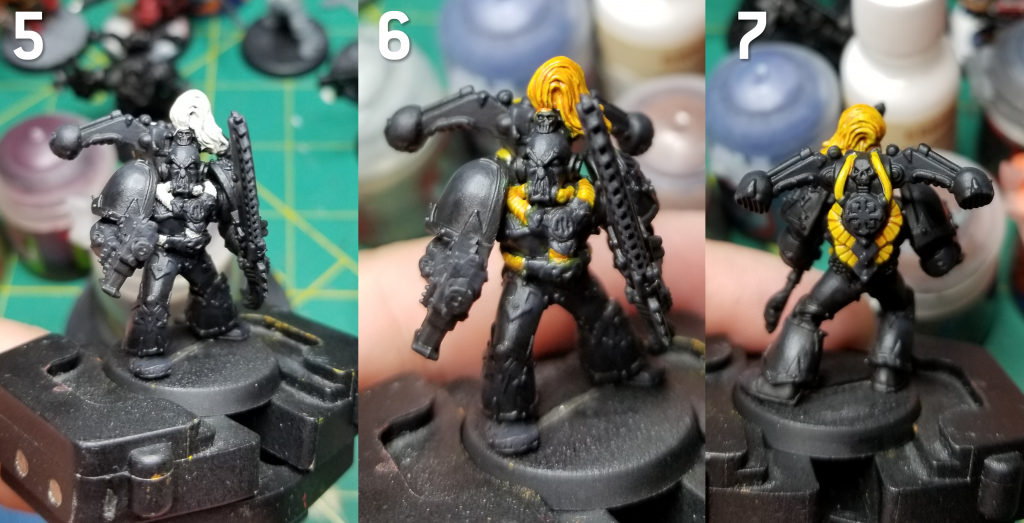
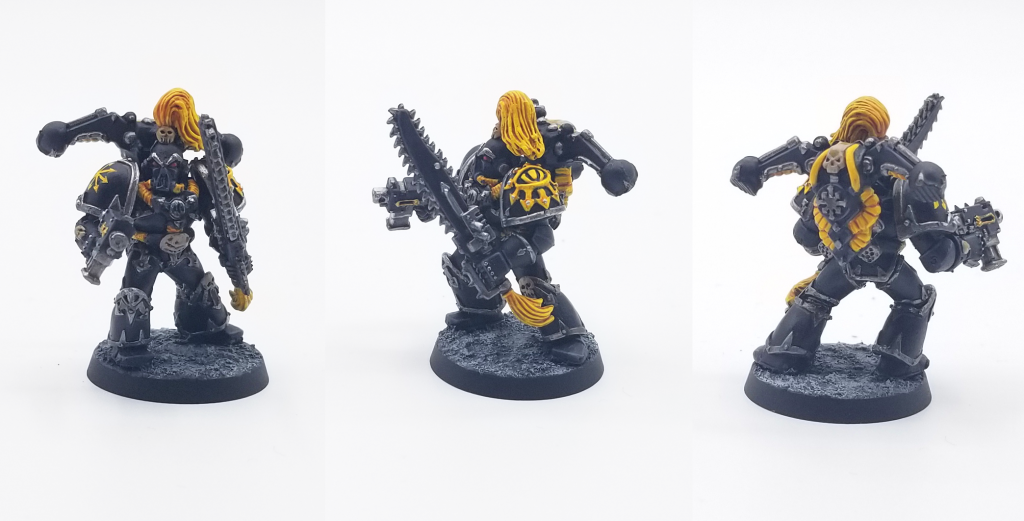
Clad in black armor, the 2nd edition black legion scheme gives the faction steel colored trim over gold, giving them a grungier, darker look compared to today’s black-and-gold styling. They’ve also got bright orange power cables that stand out against their armor. Traditionally, the ‘Eavy Metal team paints black by mixing a 50/50 mix of Chaos Black and Regal Blue, the closest analogs of which today are Abaddon Black and Kantor Blue. This gives you a dark color that you can use to shade your blacks and give them a bit more depth. What I’ve found however is that you can get a very similar effect by just using Corvus Black to get a lighter shade of black on your legion.
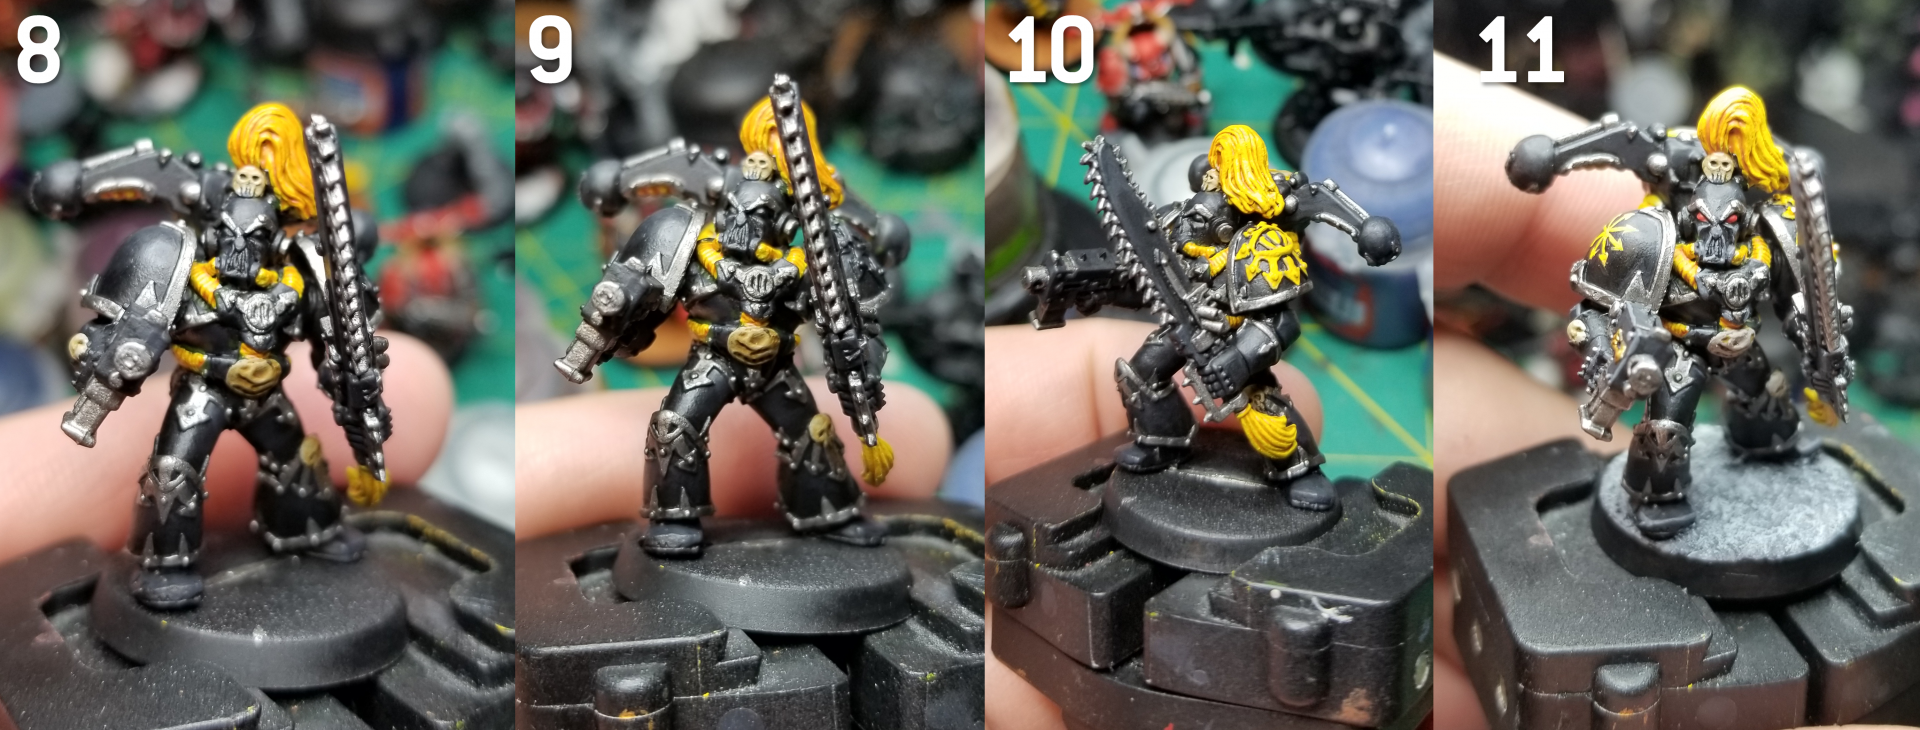
Painting these guys starts with getting the blacks right. I started by priming black and then coating them with a coat of Abaddon Black and then highlighted that with Corvus Black. Then I used Nuln Oil to blend the two, which is pretty quick and worked very nicely. This gives it a nice, blended bluish black look that matches the models in the codex well.
Next up are those distinctive orange/yellow tufts and cables. There’s a more involved way to do this where you start with orange and shade up but what I’ve found is that you can solve this same problem much easier and more quickly now using contrast paints. I painted the cables and tufts with Wraithbone and then slathered them in a few coats of Iyanden Yellow to get the bright yellow/orange coloring.
Time to finish this bad boy off. The codex Black Legionnaires have black weapons so I went with that but these days I paint red weapons on my marines because it gives them a spot of color. The metal trim is done with Leadbelcher and shaded with Nuln Oil while the skulls are done with Rakarth Flesh and shaded with Seraphim Sepia (normally I use Agrax but 2nd ed has much warmer skull colors). Then I went through and edge highlighted the black parts with Mechanicus Standard Grey and the Metal parts with Runefang Steel. The eyes are Mephiston Red and Evil Sunz Scarlet, while the shoulder insignia are done with Averland Sunset and Yriel Yellow.
The final model is one I’m very happy with, and that I think very effectively matches up with the 2nd edition codex style.
The Death Guard
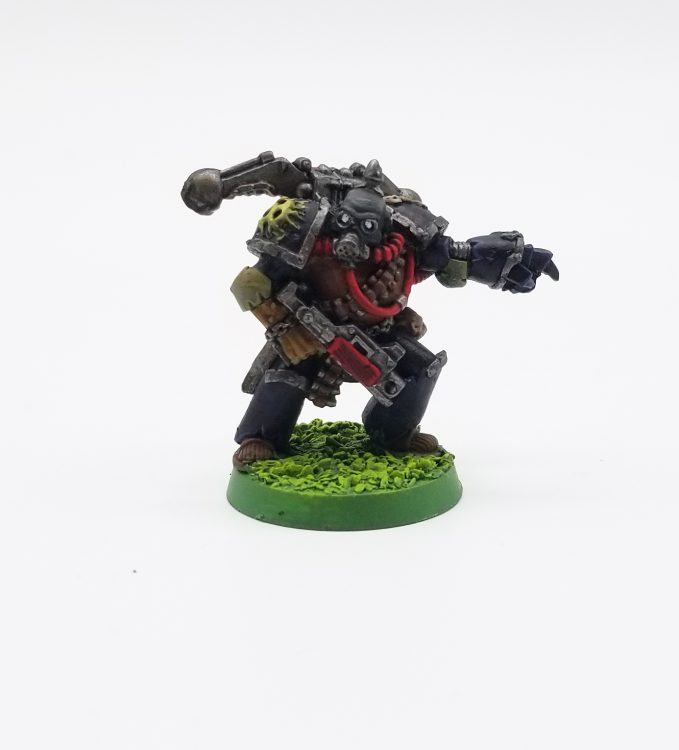
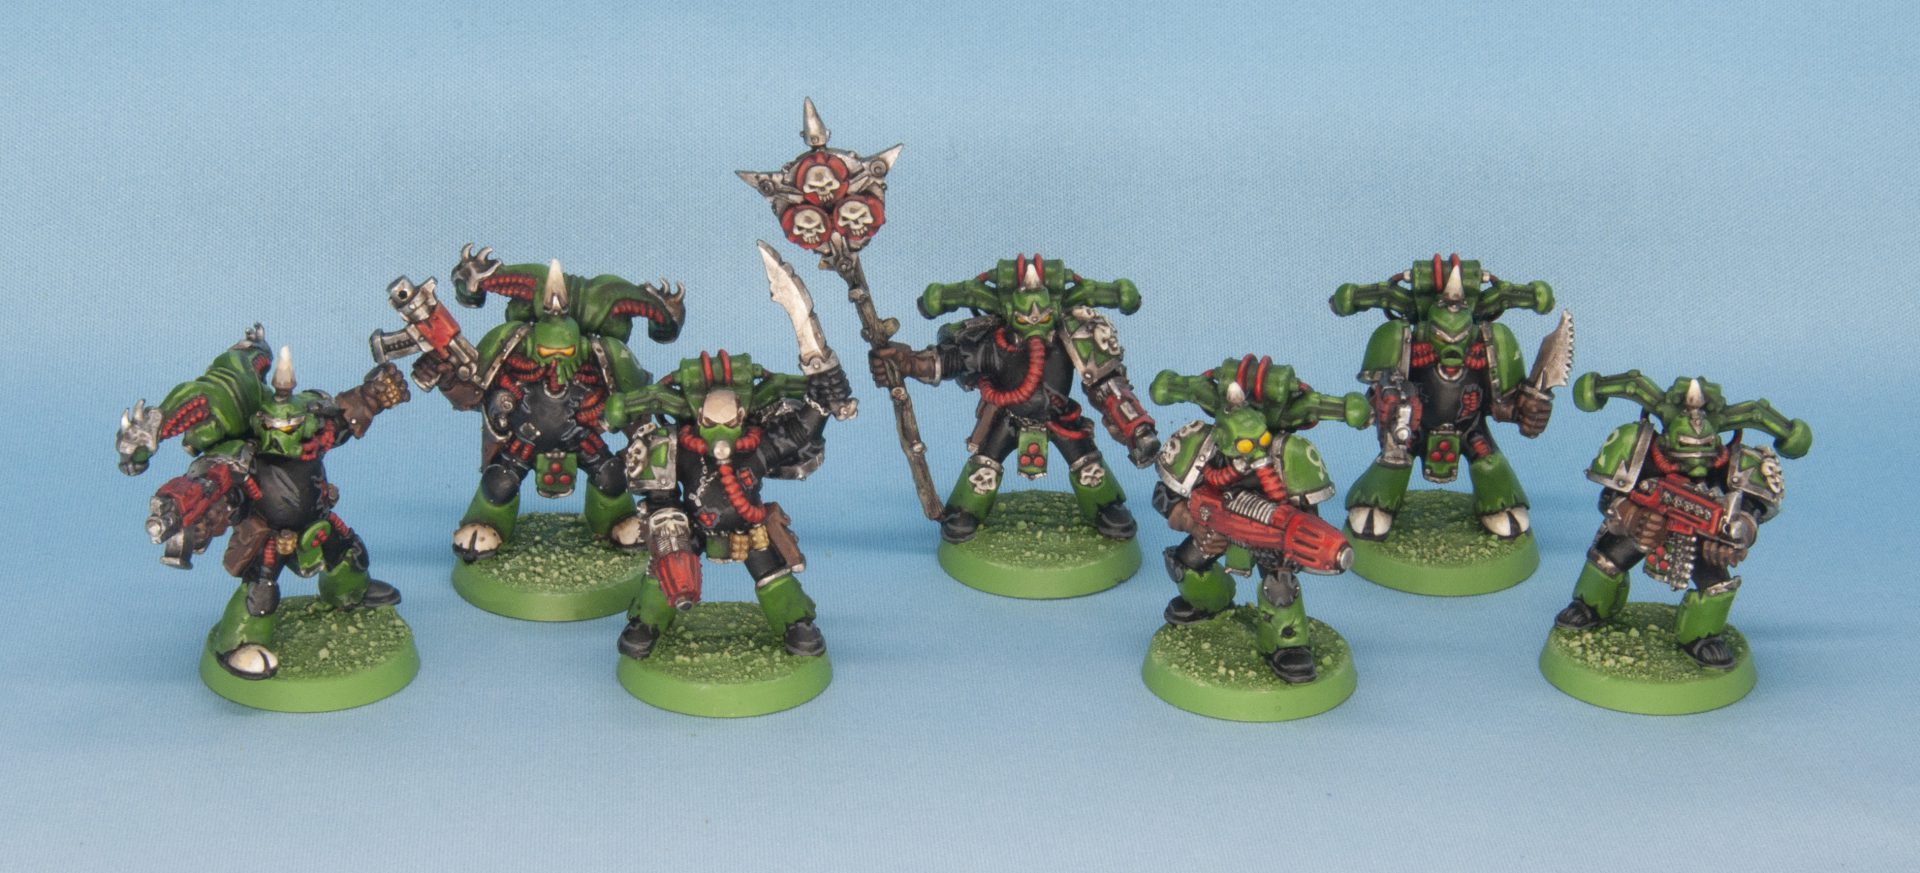
2nd edition Death Guard were a far cry from the modern schemes – sure, they had plenty of dedicated models, but they had a bit of an odd hodgepodge scheme combining browns, blacks, and greens in Codex: Chaos. There was also a distinction between Death Guard and Plague Marines – one of the few such distinctions they’d make.
Robert “TheChirurgeon” Jones’ Method
This one’s a rescue I already had sitting around. He’d been primed white and washed/painted with various greens and browns but the key thing here is that only the elbow pads and a few armor plates are actually going to end up green on the final model. I start by painting the midsection Gorthor Brown – that’ll be washed later with Agrax Earthshade and highlighted with a mix of Gorthor and Deathclaw Brown. The metal parts are Leadbealcher washed with Nuln Oil. The black on Death Guard is presented as even bluer in the ‘Eavy Metal section of Codex: Chaos so I work to replicate that by doing Abaddon Black and a highlight of Corvus black, then I wash/shade that with Drakenhof Nightshade instead of Nuln Oil. The effect is subtle, but it works. The edge highlights also work toward this – I used The Fang for them instead of Mechanicus Standard Grey.
The cabling on 2nd ed Death Guard is bright red, and I do that here by painting the cables Mephiston Red, then washing that with Carroburg Crimson and highlighting with Mephiston and Evil Sunz Scarlet. The exposed arm is just Rakarth Flesh with a few washes of Seraphim Sepia. I highlighted the mask with mixes of Corvus Black, Death Guard Green, and Mechanicus Standard Grey. The eyes are dots of Reaper Ghost White. Finally, the base followed SRM’s Goblin Green bases tutorial.
The final result pretty faithfully captures the codex look for this model, and the semi-slapdash scheme of 2nd edition Death Guard.
Dylan Gould’s Method
For these and the Thousand Sons I matched the paint schemes in the How to Paint Citadel Miniatures book. Famed for the 4 step paint process, these were fun.
- Prime Black
- Basecoat Green with Snot Green
- Wash Green with Brown Wash (AP Strong Tone)
- Highlight with Snot Green, then 1:1 Snot Green and Rotting Flesh, then pure Rotting Flesh
- Basecoat Red with Mephiston Red
- Highlight with Blood Red, then Wild Rider Red
- Highlight Black with Codex Grey and a little white for a final highlight
- Basecoat Silver with Mithril Silver
- Wash metals with Armor wash (AP Dark Tone)
- Paint yellow with Sunburst Yellow, then wash with Orange Wash
- Highlight with Sunburst and Bad Moon yellow
- Grenades are painted with Tausept Ochre and washed with Brown wash
- Leather is painted with Scorched Brown, then highlighted with Bleached Bone blended with the base color
- Base bone with Khemri Brown.
- Highlight with Khemri-Bleached Bine and add some White for the final highlight.
- The skin on the sergeant was done with Elf flesh mixed with a little Codex grey, highlight up with some bleached bone. Shaded with flesh wash.
- Freehand was done in Rotting Flesh.
- Paint bases Goblin Green
- Drybrush bases with Underhive Ash
Iron Warriors
Blessed with the easiest of the legion paint schemes to replicate, the Iron Warriors are probably the quickest to paint.
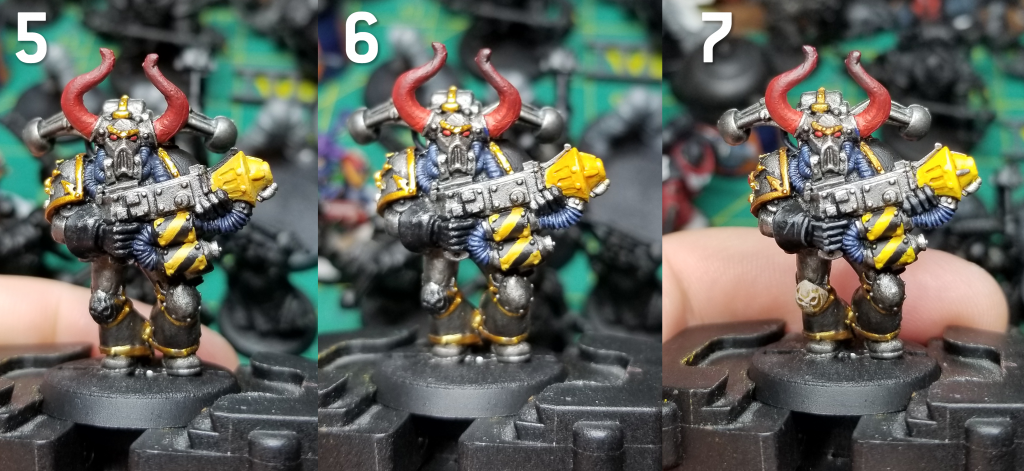
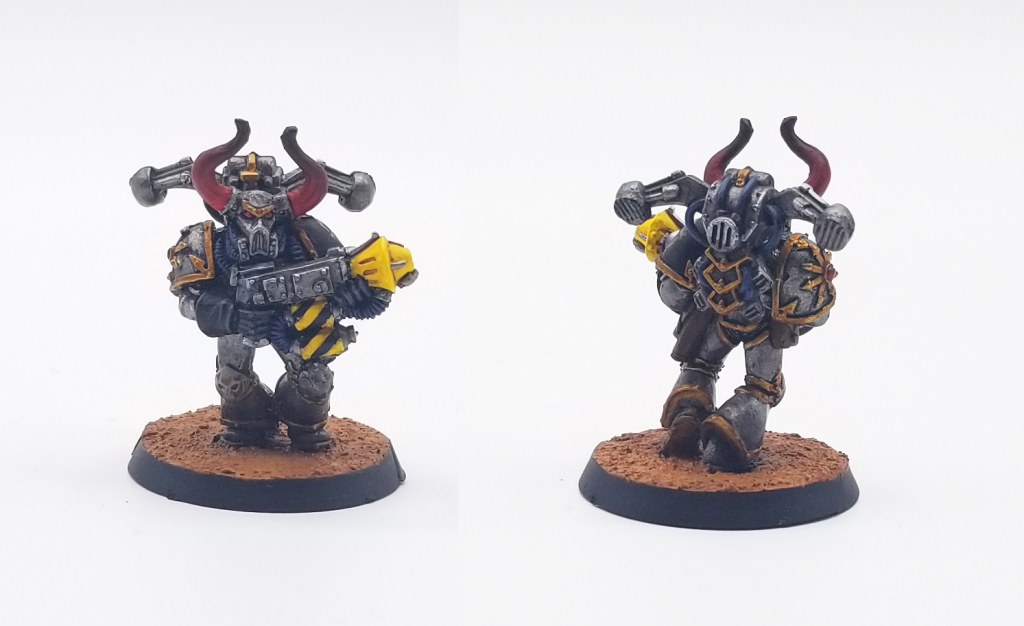
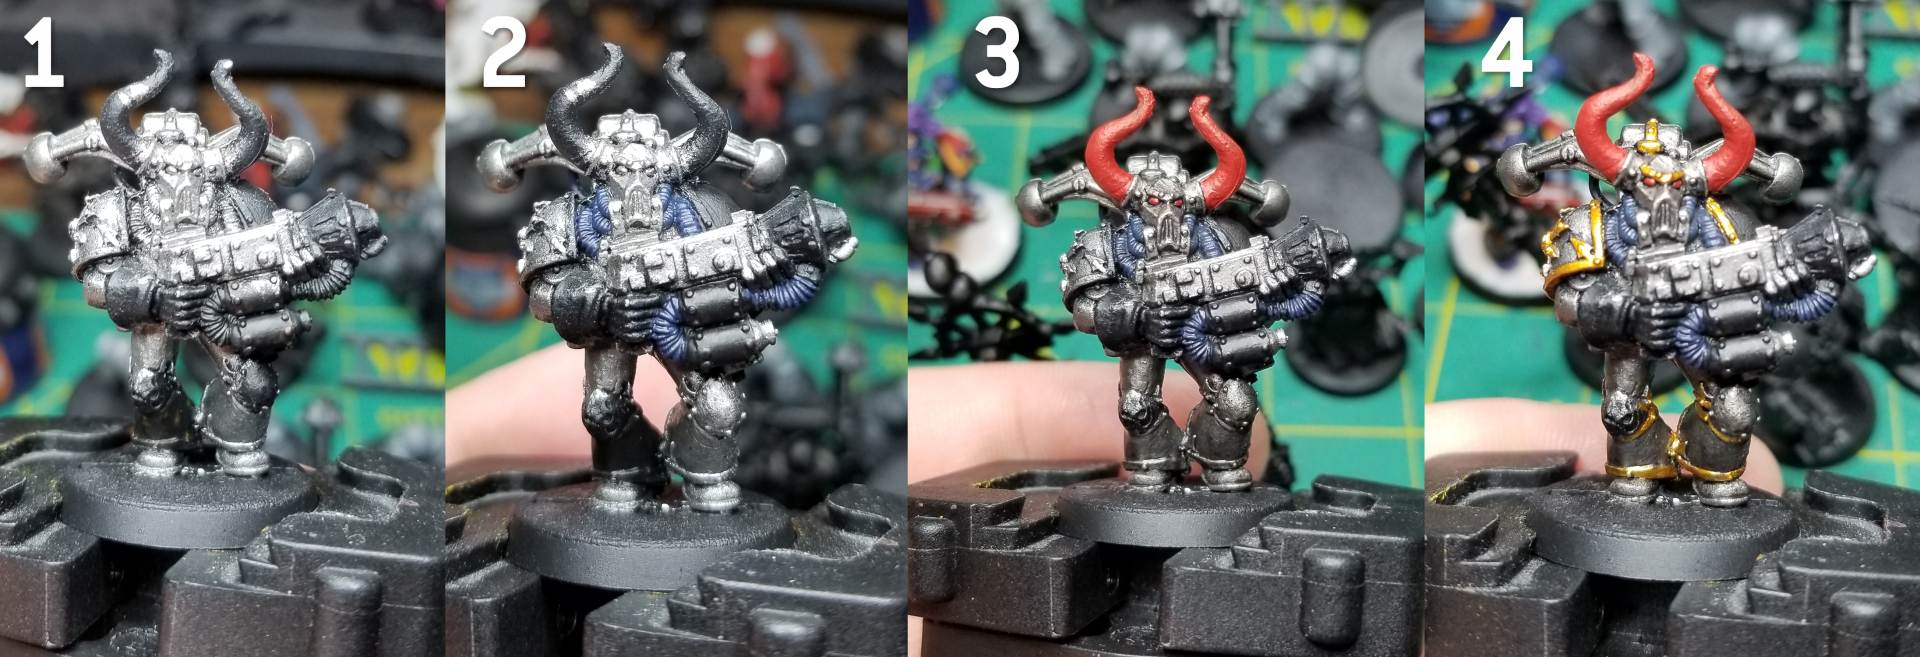 This one starts with a coat of Leadbelcher on the body, plus a coat of Kantor Blue on the cables. I’ve left one shoulder pad black, and you can leave black any parts you want to paint hazard stripes on at this time. I’m gonna put them on the flamer so I don’t need them elsewhere. Once the metal and blue are down, I wash the model in Nuln Oil. 2nd edition Iron Warriors have red horns (it’s a great look with the steel), so I start by painting the horns Mephiston Red along with the eyes. Then it’s time to lay down the gold, which here is Retributor Armour.
2nd edition flame weapons were frequently brightly colored and yellow or orange, so I go for that look here. The nozzle is Averland Sunset highlighted with Yriel Yellow and shaded with Fuegan Orange before being highlighted again with Yriel Yellow and Flash Gitz Yellow. The Hazard Stripes are freehand Averland Sunset with a highlight of Yriel. I shaded the horns with several layers of Carroburg Crimson before giving them a final tip of Nuln Oil. The gloves are edge highlighted with Mechanicus Standard Grey and the skulls are Rakarth Flesh washed with Seraphim Sepia. Finally the cables are highlighted with The Fang.
Night Lords
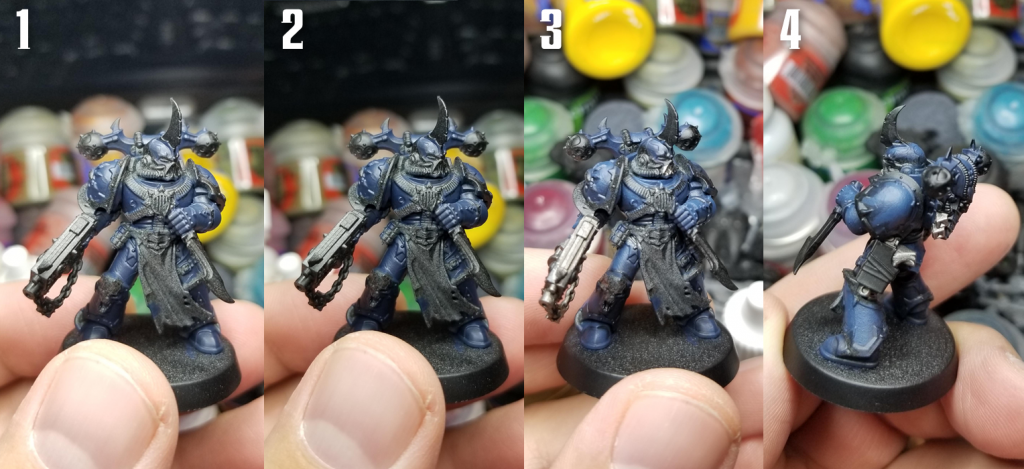
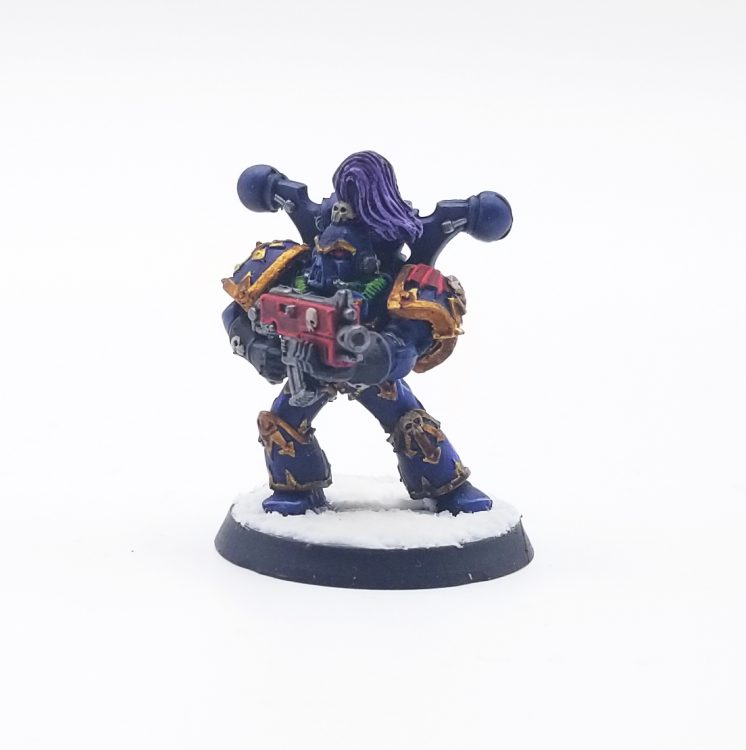
The Night Lords scheme has probably changed the least from the originals, since the “dark blue with lightning bolts” motif is an instant classic.
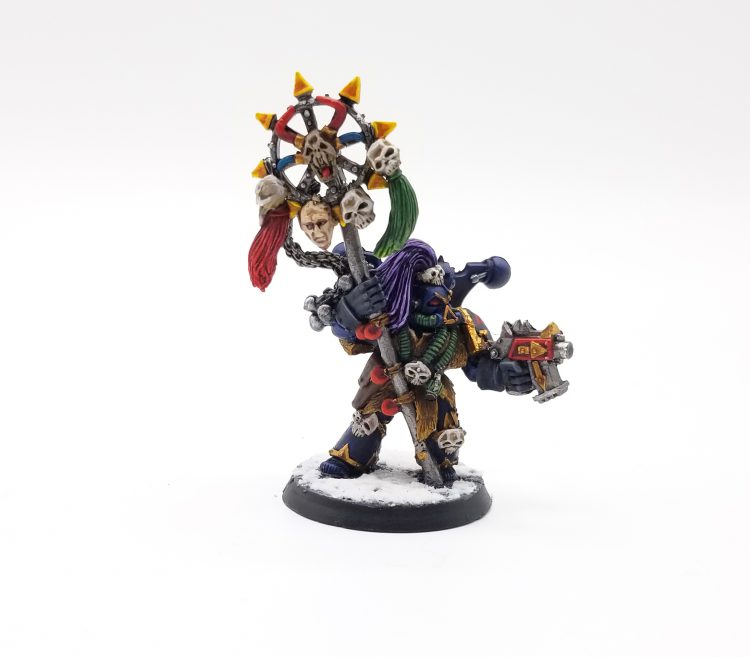
Start by priming the model black, then shading up to blue. For a more 2nd edition look, shade from Abaddon Black up to Kantor Blue – we’re not going much brighter than that. The process is very similar to the last time I talked about Night Lords, only without the base color of Night Lords Blue and going a bit darker. Work your way up to Kantor Blue and use it to create blue hazes around where your lightning bolts will go. Then block those in with a light blue like Reaper Snow Shadow and then hit them again with a pure white – I use Reaper Ghost White.
In similar fashion, I’m doing the gold here with Retributor Armour and shading it with Agrax Earthshade, while the piping is done by first painting Caliban Green then highlighting that with Waaagh Flesh. You could also start with Waaagh and shade with Coelia Greenshade if you were feeling so inclined. The final highlights are done with either Death Guard Green or Moot Green, depending on how bright I want to go.
I do my Night Lords’ guns red and so that means they’re painted Mephiston Red with a wash of Carroburg Crimson and edge highlighted with Evil Sunz Scarlet. The purple tuft is Naggaroth Night shaded with Druchii Violet and Nuln Oil then highlighted with Naggaroth and mixes of white to get lighter shades. The steel bits are Leadbelcher washed with Nuln Oil and the bone bits are Rakarth Flesh washed with Agrax Earthshade, though for something more era-appropriate you can use Seraphim Sepia instead.
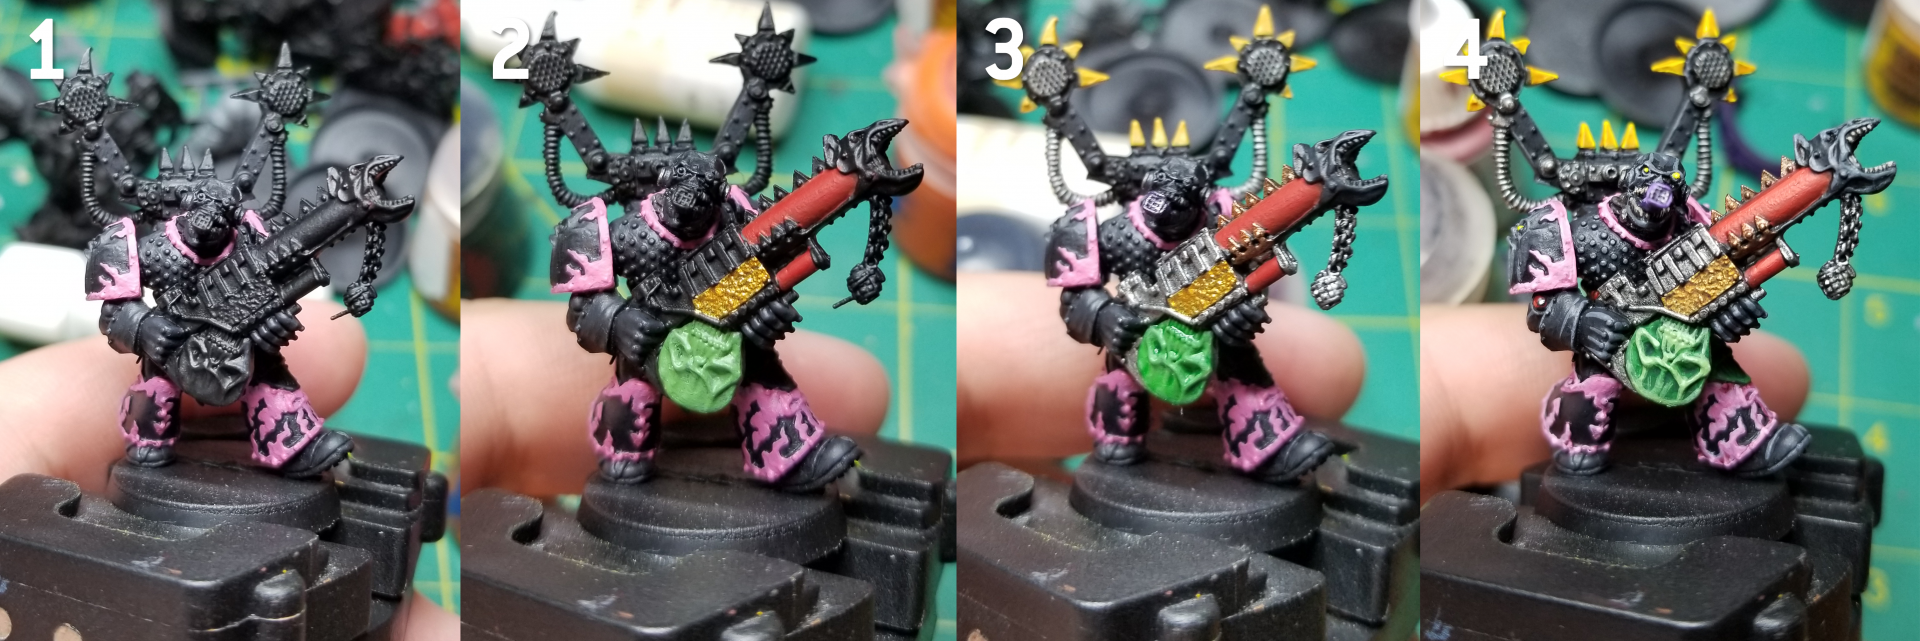
Noise Marines
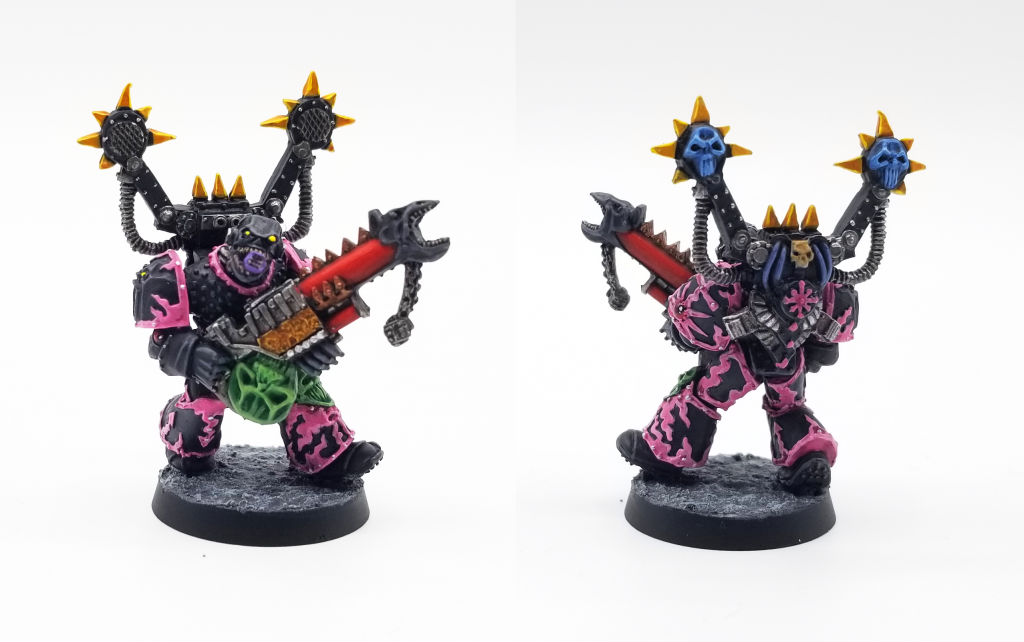
2nd Edition Noise Marines were a lot less uniform in color, using mostly dark armor with lots of bright pink, blue, and yellow trim to go with the metal models that came out about 6 months after Codex: Chaos released. They’re pretty wild models on the whole, and unlike nearly anything else in the Chaos range.
I started by priming the model black, then highlighting the black areas with Corvus Black and later a 50/50 mix of Corvus Black and Mechanicus Standard Grey, which I’d edge highlight with Mechanicus Grey. The pink trim is EMperor’s Children and Fulgrim Pink for edge highlights. The skulls on the knee and the sonic blaster are Warboss Green shaded with Biel-Tan Green and then edge highlighted with Skarsnik Green. The red parts on the gun are Mephistoon Red with some highlights of Evil Sunz Scarlet and Wild Rider Red. The mouth tube is Naggaroth Night highlighted with Xereus Purple.
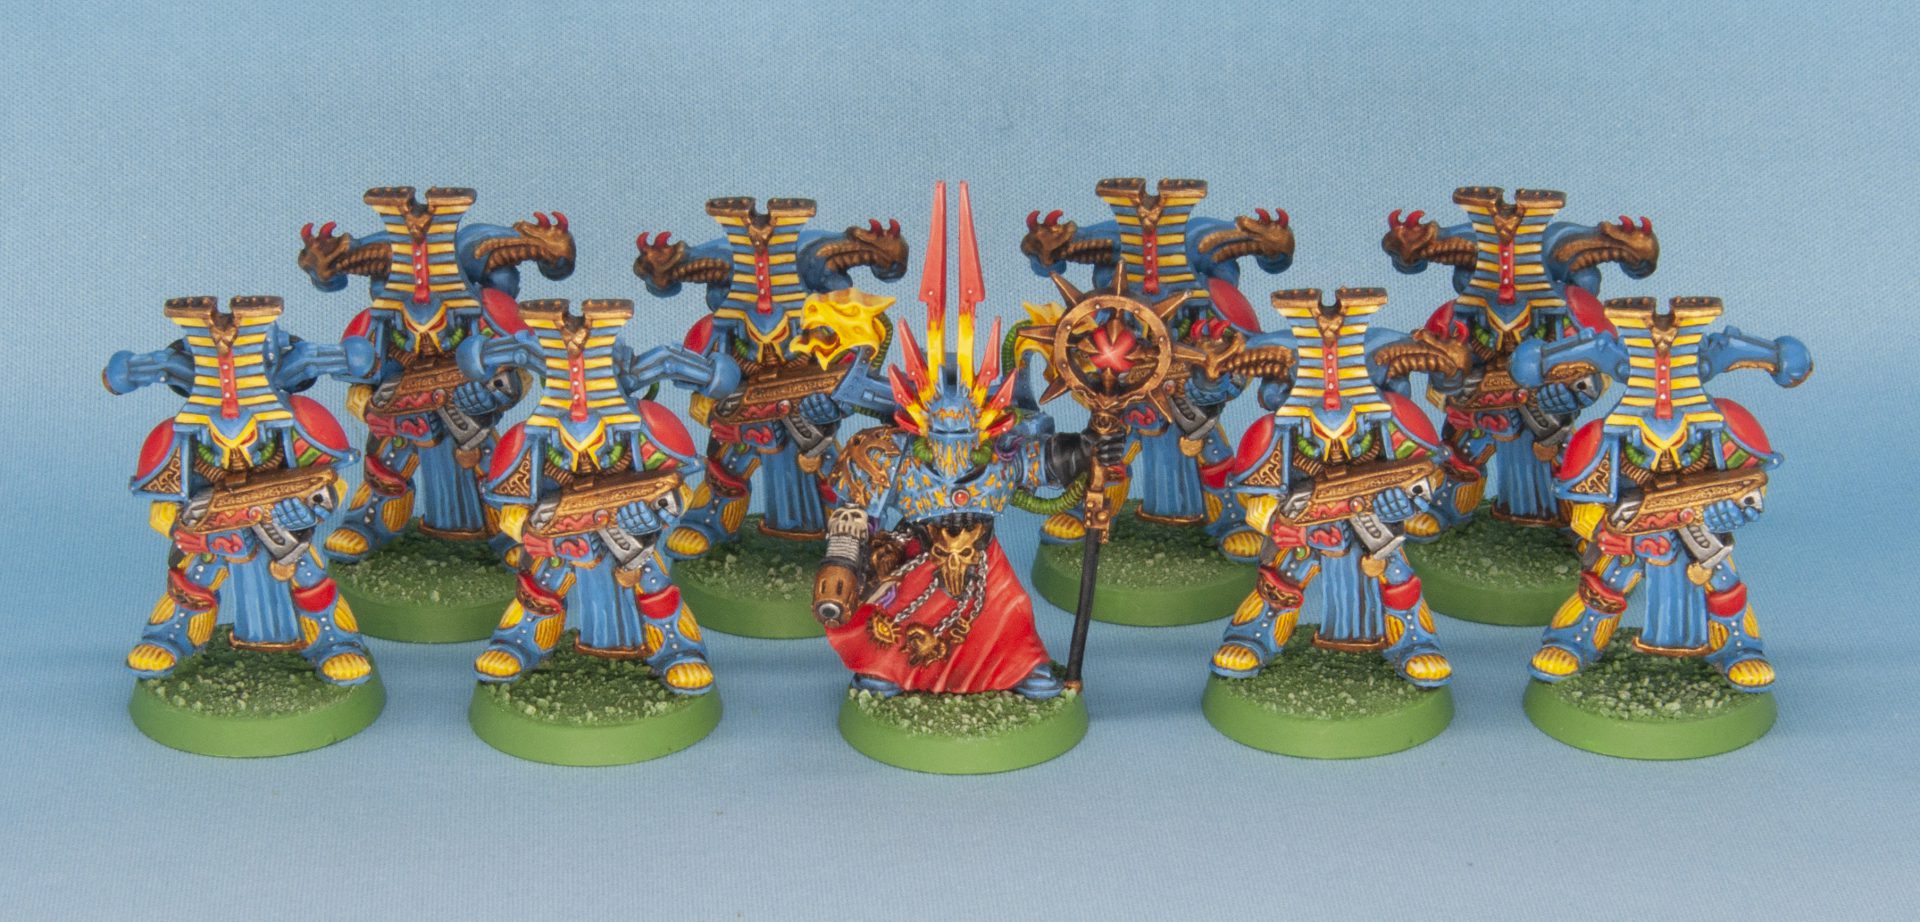
The Thousand Sons
Robert “TheChirurgeon” Jones’ Method
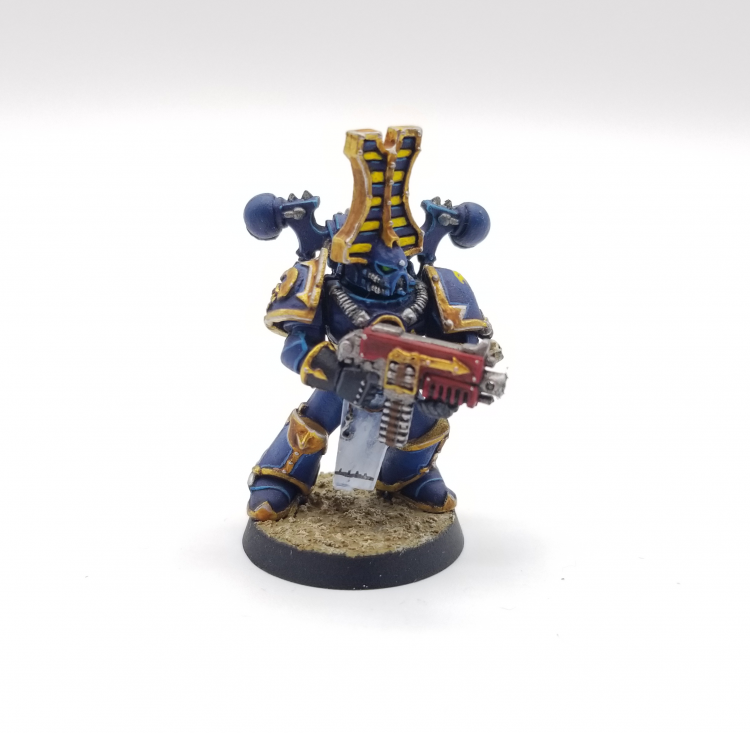
The blue is done with a basecoat of Kantor Blue shaded up with progressive mixes of Hoeth Blue to get a fade to a lighter shade. I start by laying this down across the model to get good fades before I do the gold trim and yellow stripes. The edge highlight is done with pure Hoeth Blue. The yellow stripes are Averland Sunset highlighted with Flash Gitz Yellow. The Gold parts are Retributor Armour shaded with Agrax Earthshade and edged with Runefang Steel. The piping is Leadbelcher washed with Nuln Oil and highlighted with Runefang. The white tabard is Celestra Grey highlighted with Reaper Pure White.
Dylan Gould’s Method
Like the Death Guard, these were also based off the four-step method in the How to Paint Citadel Miniatures guide. They were a much bigger challenge however – with so many colors next to each other, they took several hours each to paint up.
- Spray white.
- Basecoat all areas with the following colors: Enchanted Blue, Blood Red, Sunburst Yellow, Snot Green
- Wash the entire mini with the following wash: 1 part Sepia wash, 4 parts Orange wash, 1 part flow improver, some water
- Highlight blue with enchanted blue and a 1:1 mix of Enchanted and white
- Highlight Red with blood red, then Wild Rider rRed, the 1:1 Wild Rider and white
- Highlight yellow with Sunburst then Bad Moon Yellow
- Highlight Green with Snot Green, then Scorpion Green
- Paint metallics with Mithril Silver and Retributor Armor
- Wash metals with Armor wash (AP Dark Tone)
- Paint bases Goblin Green
- Drybrush bases with Underhive Ash
Word Bearers
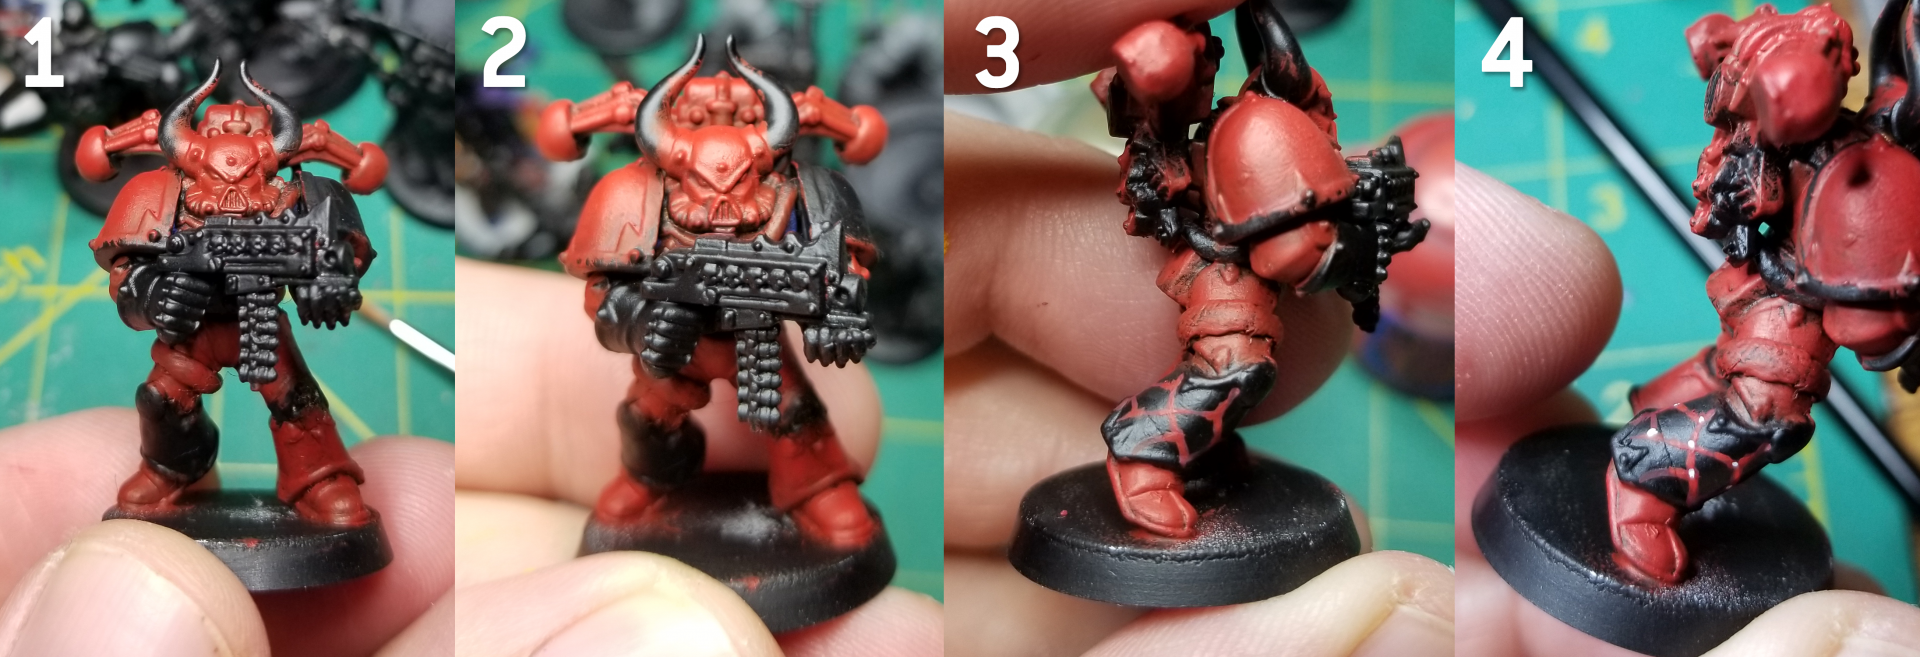
Forget the maroon scheme of modern Word Bearers or the “Gal Vorbak Red” shade you can get from Forge World – the Word Bearers of 2nd edition were a much brighter shade of red.
I’m not wasting a metal model on a Word Bearer; for this we’re rescuing an old 2nd edition plastic Chaos Space Marine. These models are awful by the way – they’re stunty, have bad details, and only have two poses. Also, they were the only plastic chaos marines you could buy from like, 1995 until the Plastic Berserkers came out in 1998 and everyone started converting those for use as regular CSMs. The greenstuff bands on the model are 14 year-old Rob’s attempts to make the model stand out a bit. They’re not great.
Anyways, at this point we start with Mephiston Red and then highlight that with a 50/50 mix of Mephiston Red and Evil Sunz Scarlet. I leave one greave and one shoulder pad black. On the greave we’re going to do something that you can see a lot of in the 2nd edition codex images for Word Bearers, which is this kind of cracking lava/coals effect. You can replicate it by drawing some lines with Khorne Red, then highlight the intersection points with Mephiston Red and dot them with white. I use Reaper Pure White for my white.
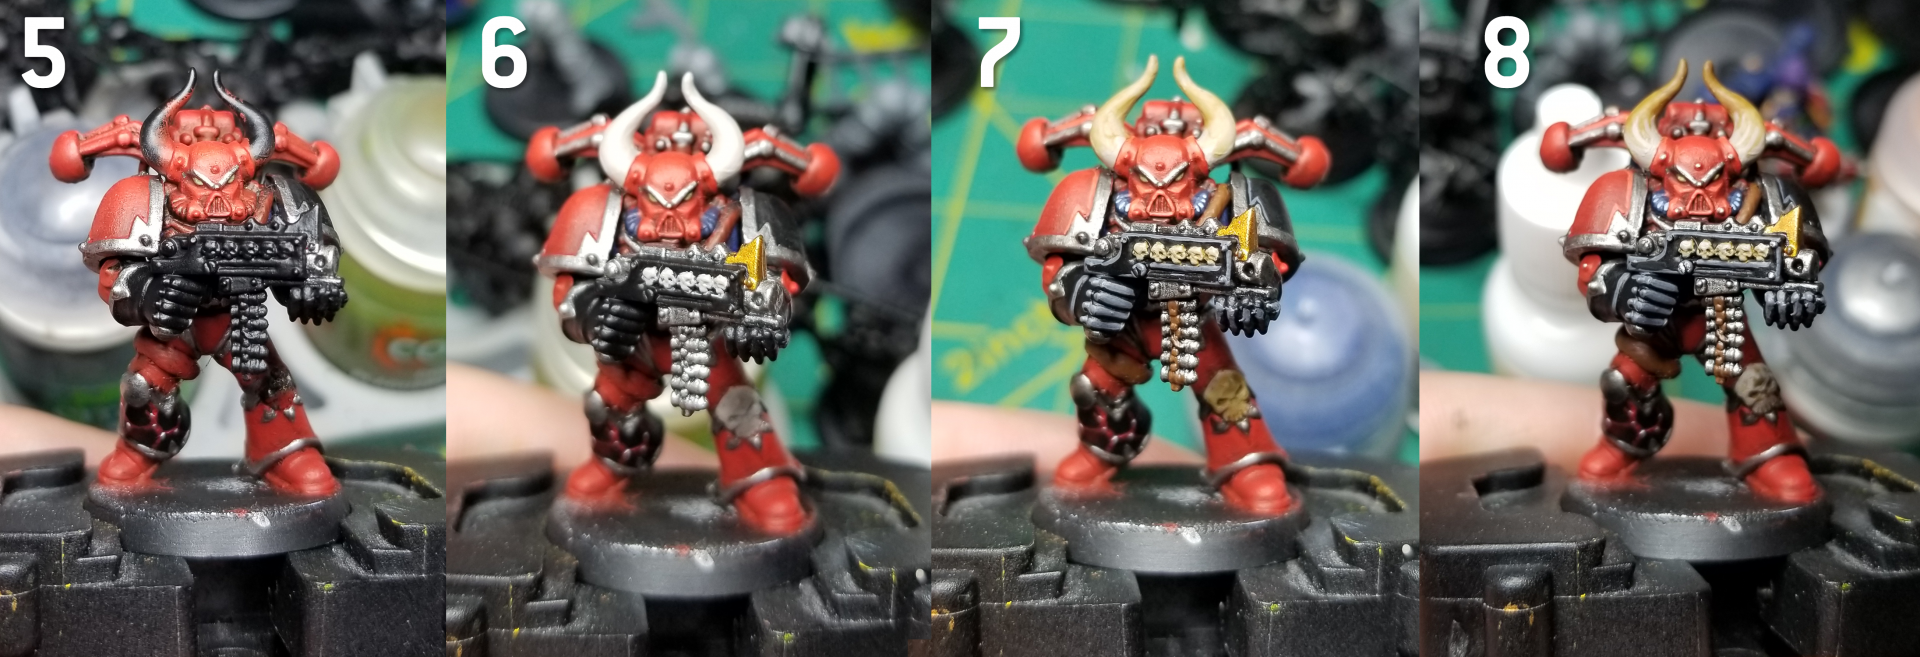 Next up is the trim. This gets painted Leadbelcher along with all the other metal parts of the model, then washed in Nuln Oil and edge highlighted with Runefang Steel. The Skulls and horns are Rakarth Flesh shaded with Seraphim Sepia. The eyes are Death Guard Green and Ogryn Camo. The Word Bearers had blue cables in the 2nd edition ‘Eavy Metal scheme, so those are painted Kantor Blue, shaded with Drakenhof Nightshade, then highlihgted with Kantor, the Fang, and Reaper Snow Shadow. The black parts get a highlight of Corvus Black and an edge highlight of Mechanicus Standard Grey while the Red parts get an edge highlight of Wild Rider Red.
Despite it being a crummy model I’m pretty happy with the overall result. it’s not too bad a paint scheme to do a full army of.
Worldeaters
The berserkers and World Eaters of 2nd edition had a much different scheme, emphasizing red and black over red and gold, and almost having a bit of a harlequin-like motif on models that checker in red and black armor parts.
Dylan Gould’s Method
- Prime White
- Spray Red (I used AP Daemonic Red spray)
- Wash entire model with Agrax Wash (I use AP Strong Tone)
- Highlight red armor with Blood Red
- Highlight with Wild Rider Red
- Paint all Black and Metallic areas with Black
- Highlight Black with Codex Grey and a 1:1 Mix of Codex and White
- Paint Green with Dark Angels Green
- Highlight Green with Snot Green and then Scorpion Green.
- Base bone with Khemri Brown.
- Highlight with Khemri-Bleached Bine and add some White for the final highlight.
- Paint metallics with Chainmail (AP Plate Metal) and Retributor Armor
- Wash metals with Armor wash (AP Dark Tone)
- Paint bases Goblin Green
- Drybrush bases with Underhive Ash
Bonus: Chaos Cultists
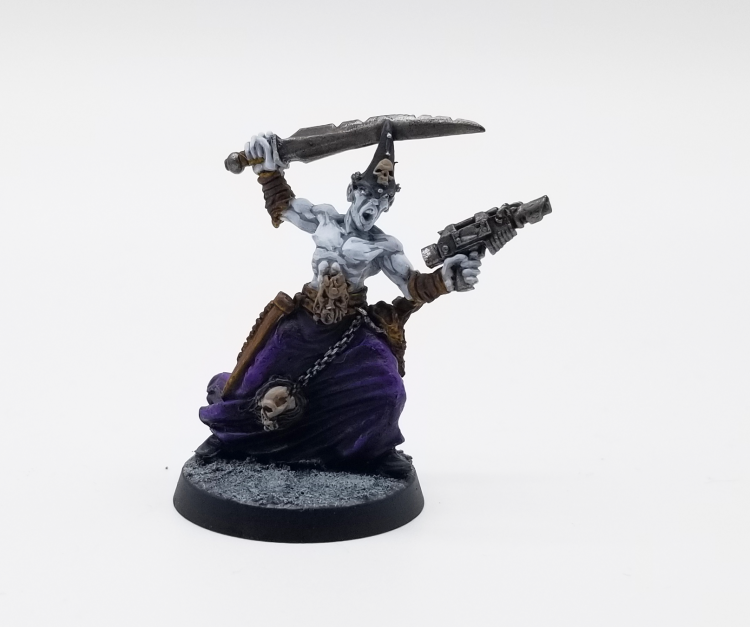
Released in late 1998 shortly before 3rd edition launched, the metal Chaos Cultists are a bit of a rarity among GW metal models. In their older paint schemes their flesh had a darker, grey and slightly purple tone. I’ve tried to replicate this by basecoating with Grey Seer and then painting the skin with Apothecary White and then highlight with Reaper Ghost White. The robes are painted with Naggaroth Night and highlighted with a mix of Xereus Purple and Reaper Pure White.
That wraps up our look at painting 2nd edition Chaos Space Marines and with it, our week of glorious retro content for Goonhammer. We hope you enjoyed reading it as much as we enjoyed making it. And as always, if you have any questions, drop us a note in the comments below or email us at contact@goonhammer.com.


