Welcome to Ruleshammer! This week is the first “episode” of a series I’m calling Ruleshammer Battle. A step by step explanation of a small game of warhammer 40k. Remember the banner below will take you to the Ruleshammer 9th Edition Compedium, for all the questions I’ve answered for the last few months!
First thing’s first, a few disclaimers: This series is intended for beginners and newer players but will not be a replacement for owning – and reading – a copy of the rules. In this series we will go through a lot of a game in a level of detail that intermediate level players may not require. In an effort to be as helpful as possible there will also be mention and use of some well accepted conventions (house rules) that are arguably not Rules As Written. They will be infrequent and will mostly relate to terrain as those interactions can escalate quickly.
Table of Contents
Building Armies – Steps 1 to 2
Building an army in Warhammer 40k probably could inspire an whole series of articles on its own. For this series I have built two roughly equal-sized armies for Tau and Death Guard. Now I say “roughly” equal because I’m not going to state any points costs as those are very liable to change in the months after this article is published. With that out of the way:
For this battle we’re using the Strike Force game size; this establishes a few things. It puts the points of the game between 1001 and 2000, inclusive. Most games of this size will be the full 2000 points but this series will be using smaller armies than that.
The game size also determines the number of CP that each side will have to start the game with, in this case that will be 12CP.
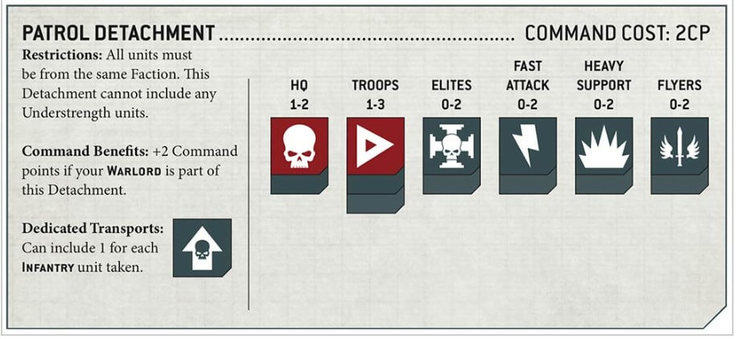
Both Forces are made up of a standard Patrol Detachment, so they must have at least one HQ and 1 Troop unit. You can read more about how army composition works in 9th edition here. I am not suggesting these lists are “good” or “competitive”, in fact my primary goal is to be able to showcase as many rules as I can with them, so they’re probably slightly horrific. If you want advice on building “competitive” lists then I whole heartedly suggest you read our Start Competing series, or take a look at the current meta in Competitive Innovations.
Death Guard
Death Guard are an army of horrific diseased guys in power armour that itself seems to have several diseases. They are known for being a tough army with lots of disease-based abilities and weapons. Their resilience has fluctuated over the last few editions; in 9th this aspect is mostly represented by Disgustingly Resilient, which reduces incoming damage by 1.
Death Guard Patrol Detachment
Plague Company: The Inexorable
Special Rules: Plague Weapon, Remorseless, Malicious Volleys, Contagions of Nurgle, Disgustingly Resilient, Armour of Contempt
Detachment Rules: Inexorable Advance, Diseased Minions
- HQ – Death Guard Chaos Lord – Warlord [Ferric Blight]
Plasma Pistol, Astartes Chainswrod, Blight/Krak Grenades - HQ – Malignant Plaguecaster
Bolt Pistol, Corrupted Staff, Bight/Krak Grenades
Smite, Miasma of Pestilence, Plague Wind - Troop – 9x Plague Marines, 1x Plague Marine Champion
Boltgun, Plague knife, Blight/Krak Grenades, Icon of Despair - Troop -9x Plague Marines, 1x Plague Marine Champion
Boltgun, Plague knife, Blight/Krak Grenades, Icon of Despair - Elite – Plague Surgeon
Bolt Pistol, Balesword, Bight/Krak Grenades - Elite – 4x Deathshroud Terminators, 1x Deathshroud Terminator Champion
Plaguespurt Gauntlet, Manreaper - Elite – Foul Blightspawn
Plague Sprayer, Blight/Krak Grenades, Unholy Death’s Grenade
Relic: Revolting Stenchvats - Heavy – Plague Burst Crawler
Plagueburst Mortar, Heavy Slugger, 2x Entropy Cannons
T’au Empire
Tau are the upstart faction of 40k, clocking in at a mere 20+ years since their introduction (the whipper snappers). They are known for being a faction with usually second to none shooting output and almost no melee output. Though this list might buck that trend slightly!
T’au Empire Patrol Detachment
Sept: Expanding Empire (Custom)
Special Rules: Battlesuits, Markerlights
Detachment Rules: Calm Under Pressure, Reinforced Armour
- HQ – Crisis Commander in Coldstar Battlesuit Warlord [Precision Hunter]
High Output Burst Cannon, 2 Burst Cannons, 1 Flamer
Prototype System: Thermoneutronic Projector (replaces Flamer)
Relic: Onager Gauntlet - Elite – 2x Crisis Bodyguards
Per Model 1x Plasma Rifle, 1x Missile Pod, 1x Shield Generator
All Models equipped the same - Troop – 10x Fire Warrior Breachers
Pulse Blasters, Pulse Pistols - Troop – 10x Fire Warrior Breachers
Pulse Blasters, Pulse Pistols - Transport – Devilfish
Accelerator Burst Cannon, 2x Gun Drones with 2x Pulse Carbines each, 2x Seeker Missile - Transport – Devilfish
Accelerator Burst Cannon, 2x Gun Drones with 2x Pulse Carbines each, 2x Seeker Missile - Elite – 5x Stealth Battlesuits 2x Marker Drone
Burst Cannon - Elite – 5x Stealth Battlesuits 2x Marker Drone
Burst Cannon - Heavy – Hammerhead Gunship
Railgun, 2x Accelerators Burst Cannons
Too many Elites?
Keen eyed readers may (did) notice that both of these lists have 3 Elite units but a Patrol detachment only has 2 Elite slots. The lists are in fact legal though due to special rules for each of the factions being used, many factions have rules like this other than Tau and Death Guard.
- Death Guard have a rule called Foetid Virion that allows them to include up to 3 units with the FOETID VIRION keyword in a Death Guard Detachment. Both the Foul Blight Spawn and the Plague Surgeon have this keyword, so they share a single Elite Slot between them.
- Crisis Bodyguards have a rule called Bodyguard Contingent that lets a Tau detachment include a unit of Crisis Bodyguards without using up any Battlefield Role slot for each Commander in that detachment. Leaving the two Elite slots of a Patrol open for the Stealth Suits.
The Mission – Steps 3 to 5
Now that we’ve mustered our armies we need a mission. A mission in Warhammer 40k defines a few things and keeps the game from just being a general meat grinder. The most prominent aspect of a mission is that it determines the deployment zones and objective placements that will be used for that game. Normally you would roll for the mission being used but for this series I have picked one out from the GT2022 Nachmund Pack.
31. Tide of Conviction
You can find this mission in the War Zone Nachmund: Grand Tournament rulebook, pages 50-51.
Objectives and Deployment
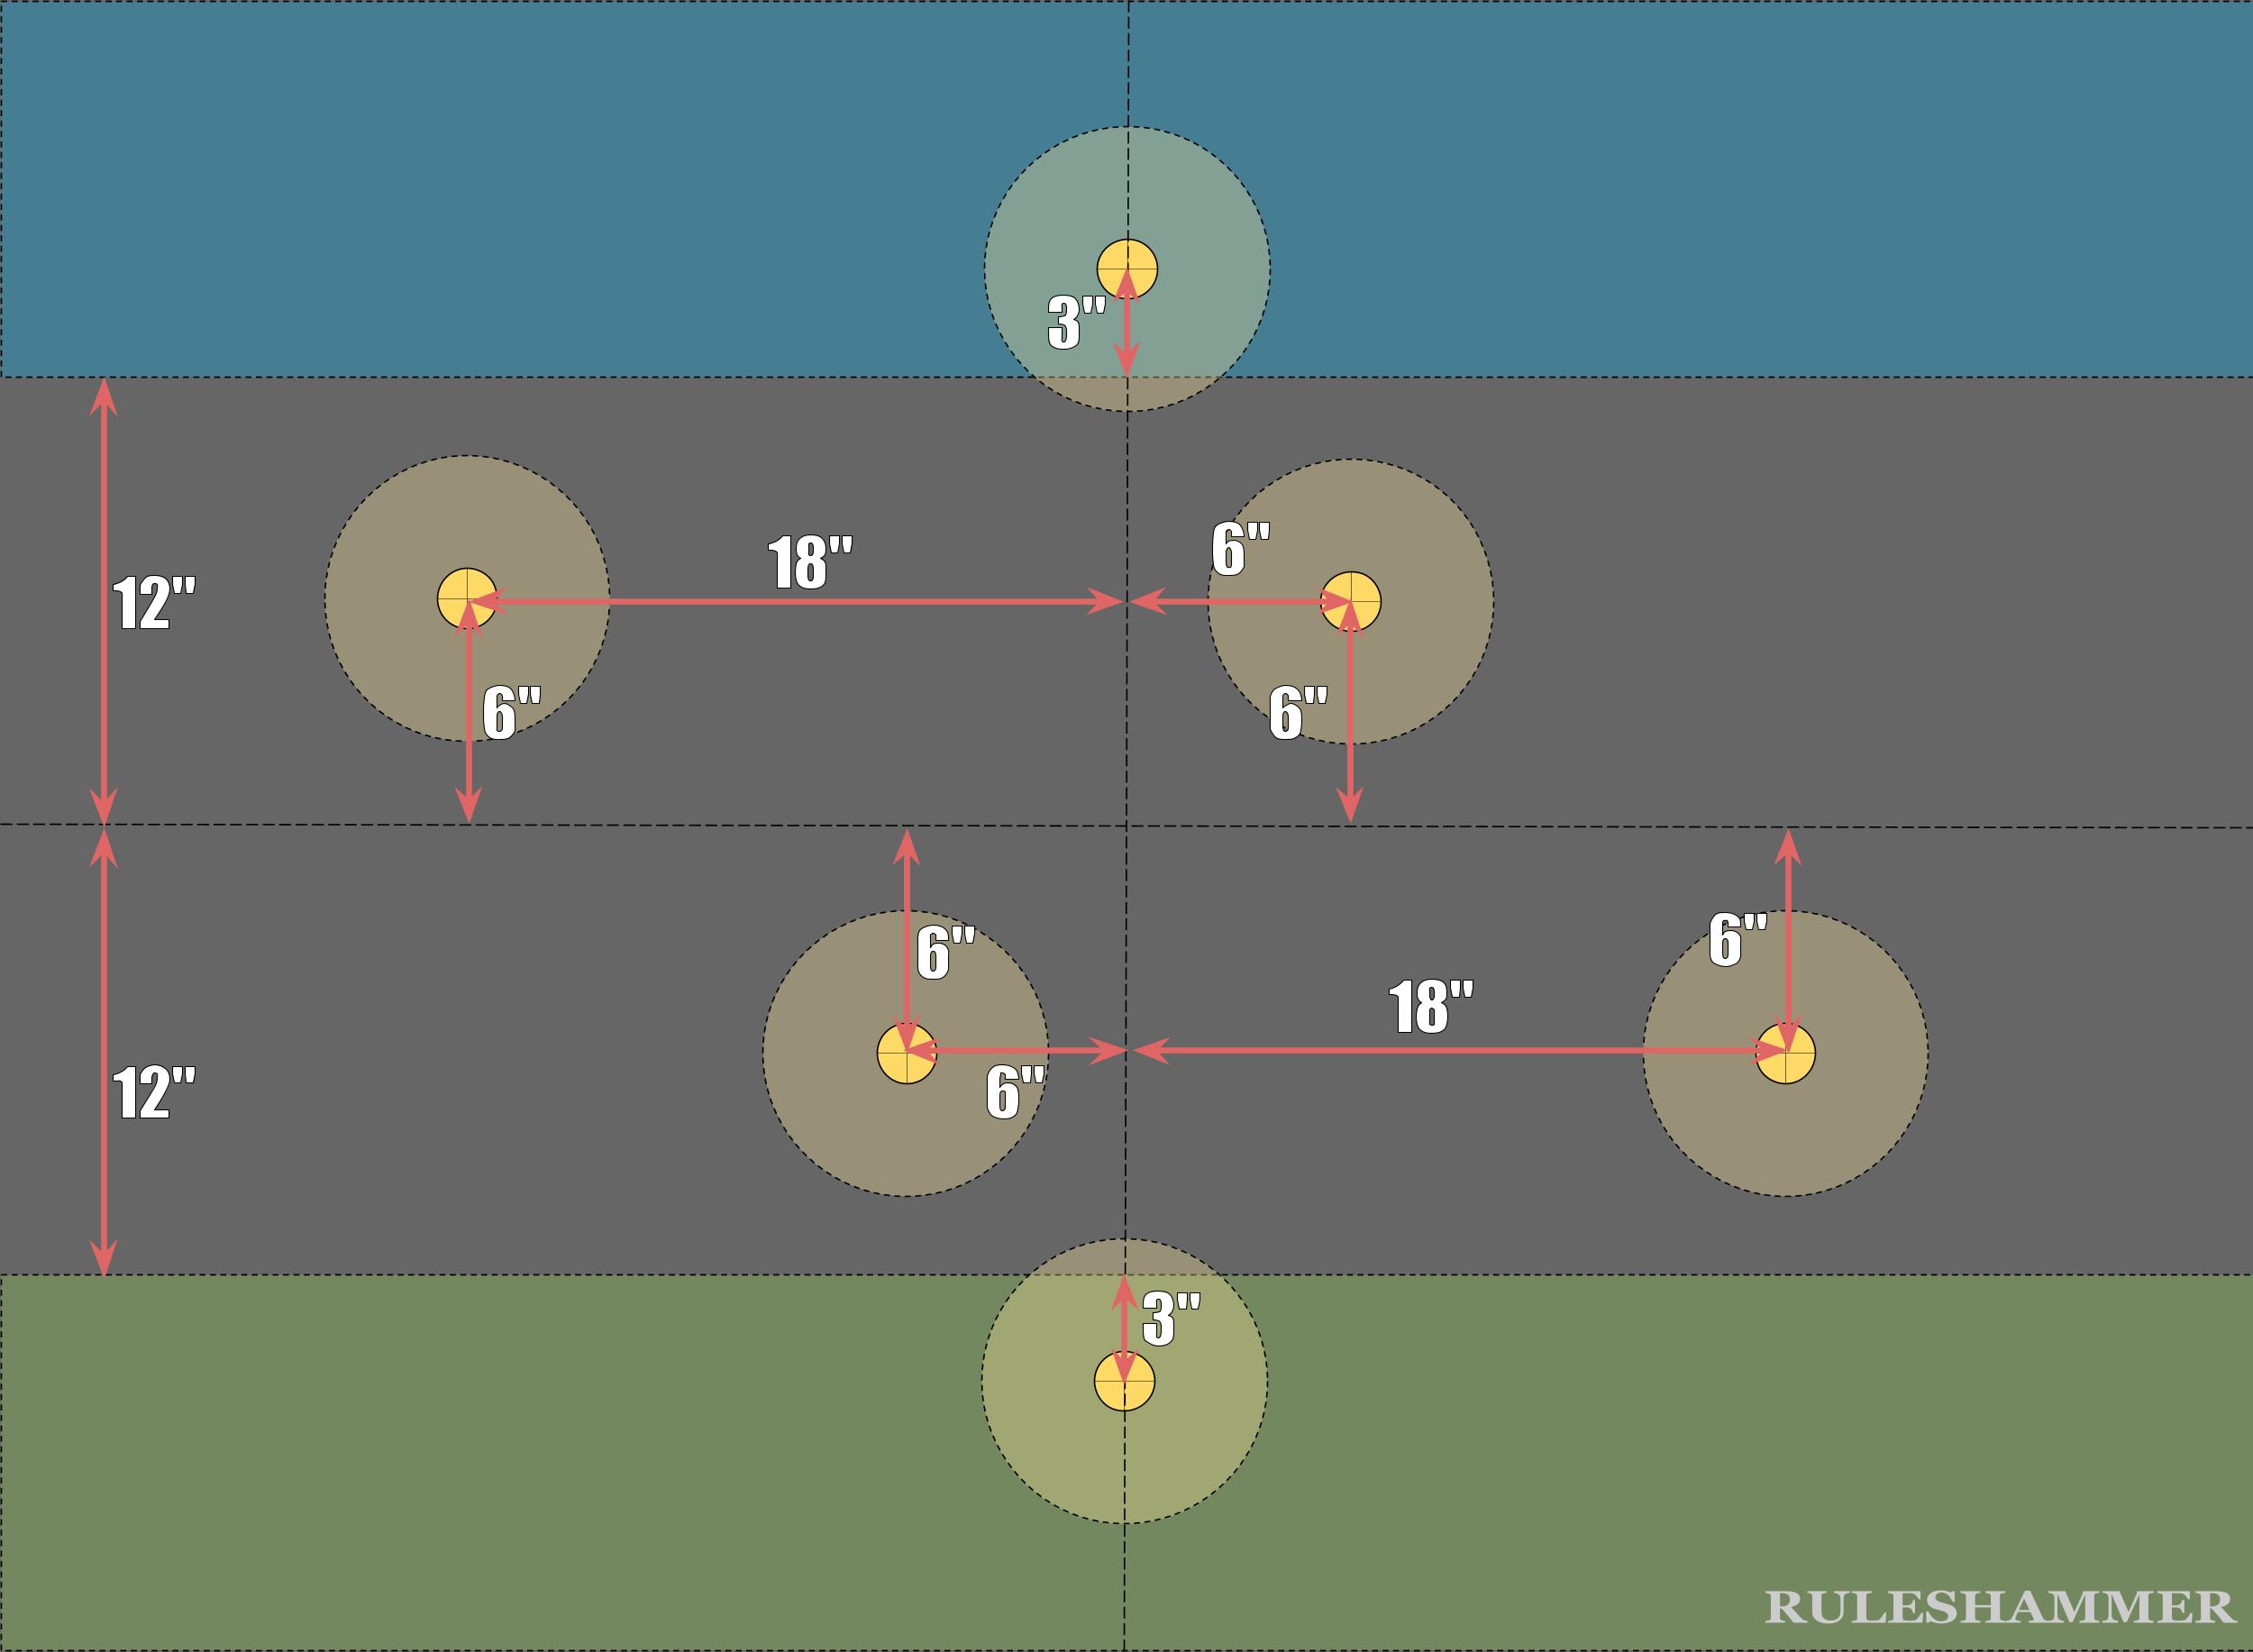
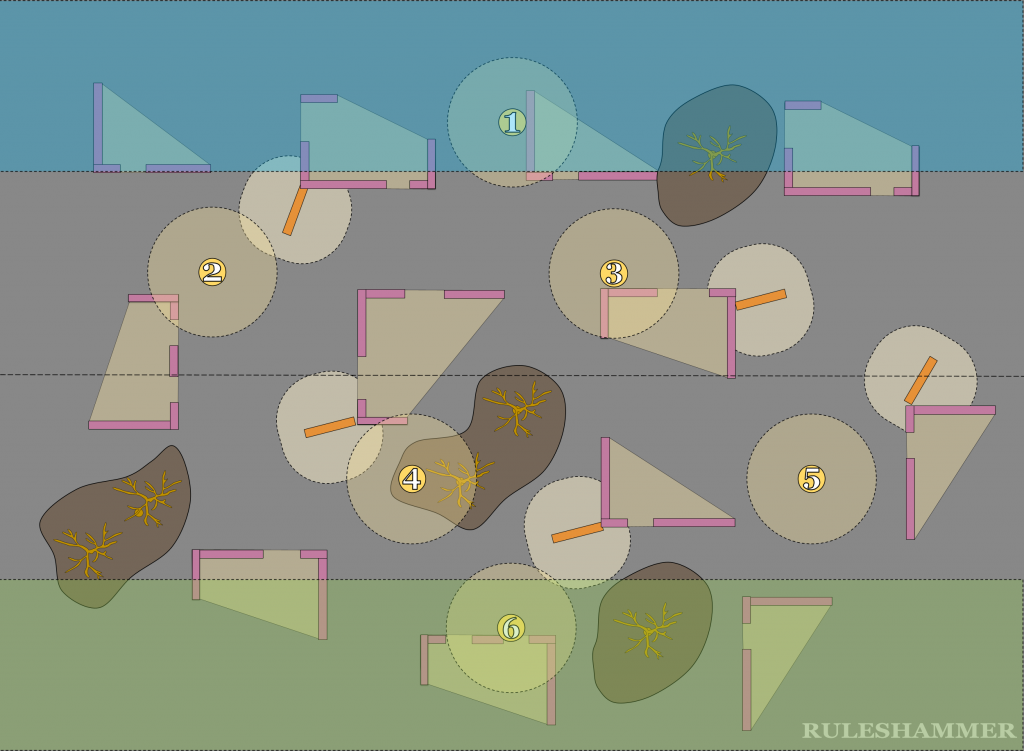
The first thing to note from the mission map is where the Objectives will be placed. The mission packs tend to presume you will be placing objectives on an empty board with terrain being placed after them; bear that in mind when we get to the board layout later on.
- This mission uses the Domination Primary Objective meaning that from the 2nd Battle Round onwards at the start of each player’s Command phases, that player will score:
- 4VP for holding 2+ Objectives
- 4VP for holding 3+ Objectives
- 4VP for holding more objectives than their opponent
- The Mission Primary is called Overrun and awards players VP for:
- 2VP at the end of their turns 1, 2, 3, and 4 if they control any points in Enemy Territory
- At the end of the battle they can score 4VP for controlling the point in Enemy Deployment zone, and 2VP for each Objective controlled in Enemy Territory (to a max of 8VP)
- The Mission also has a special rule that requires each player to control the objective in their own Deployment Zone to get the Battleforged CP bonus in their Command phase.
As missions go this one is pretty straight forward for 9th edition (we’re not rigging the place to blow like some of the missions). There’s a few terms to cover though that can get a little confusing.
Deployment Zone, Territory, and No Man’s Land
Some Warhammer missions in 9th split the board into two “territories” these areas are distinct from deployment zones which are within a players territory. It’s not something done for every mission though, especially not mission that use deployment zones like board quarters where splitting the board in half would be quite at odds with the Deployment Zones.
Each players “Territory” is simply the half of the board that has their deployment zone in it.
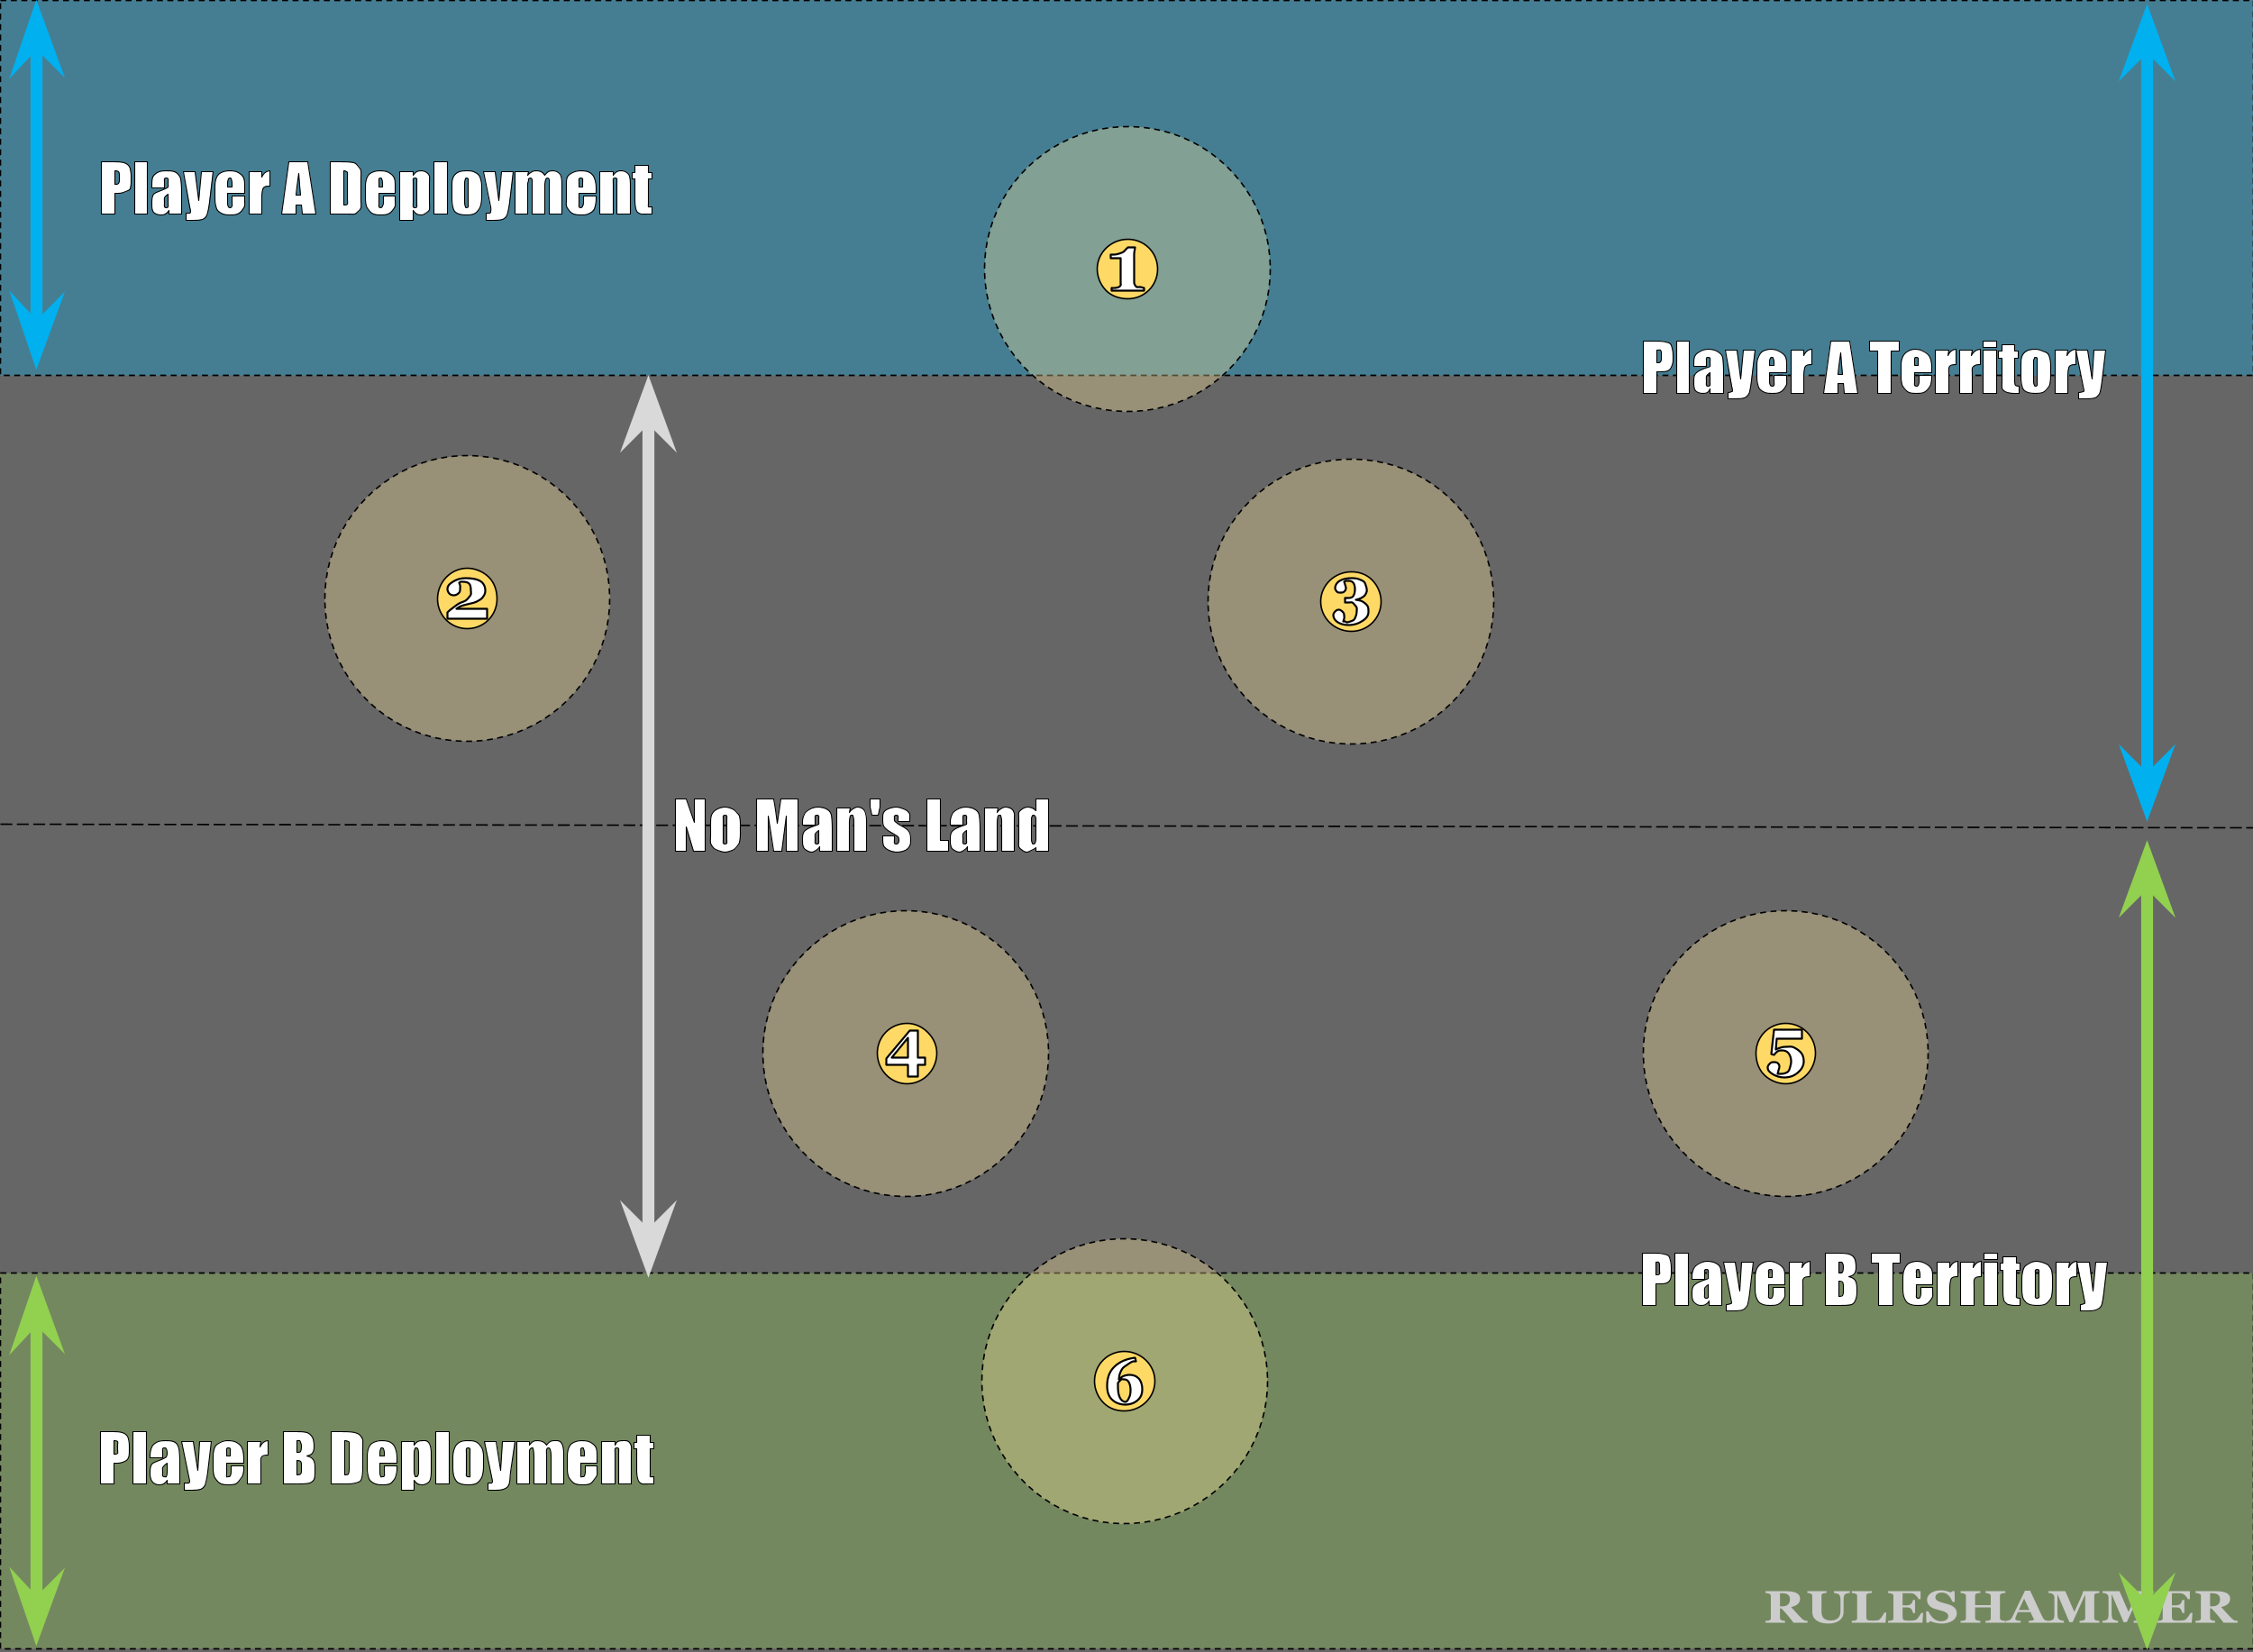 And No Man’s land is the space between deployment zones. The diagrams for each mission do have these areas noted when relevant so always check your mission pack.
The Board – Step 6
To play a game of Warhammer 40k you need terrain; without any terrain the game will be a slugfest where each army just unloads its entire output into each other and whom ever has goes first, has the most, or gets luckiest will win. Terrain adds a significant chunk of the tactical and strategic elements to the game; it creates and removes decisions. The board I have created for this series will look a little atypical to ones you might be used to seeing at your local tournaments; this is mostly so that I can demonstrate a variety of types of terrain and their layered interactions. However putting a board together is not an exact science and there’s a lot of decisions to take into account, how units will move about it and where they can move is a big factor. Some of the largest units in the game can be significantly restricted by terrain
Terrain Layout
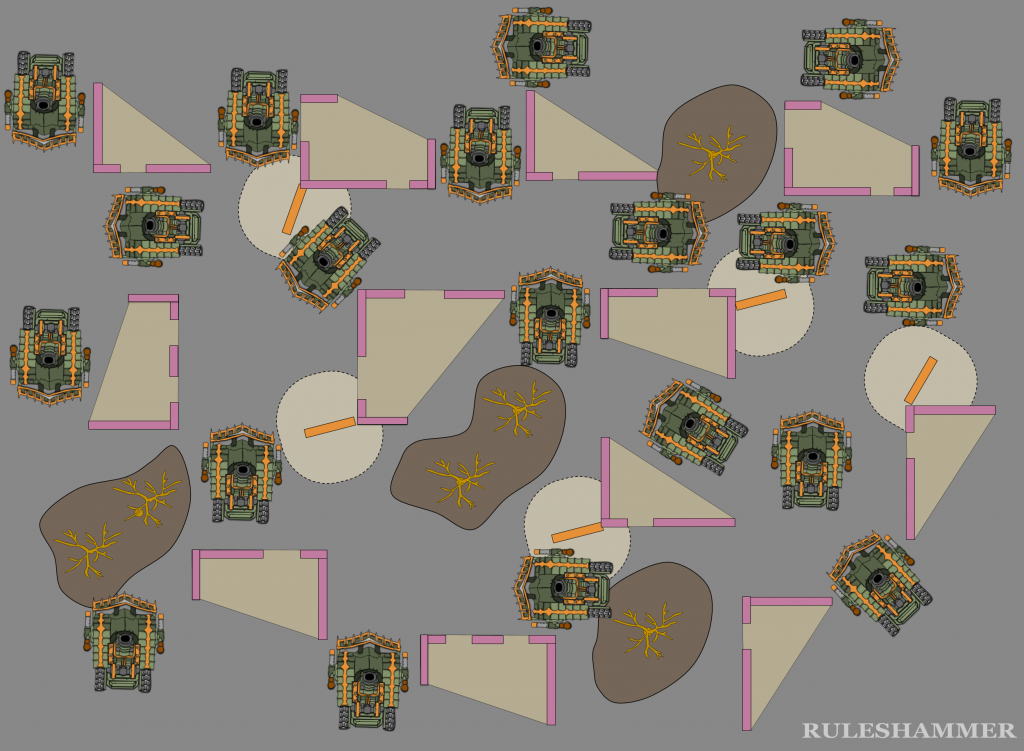
So for this series here’s our board!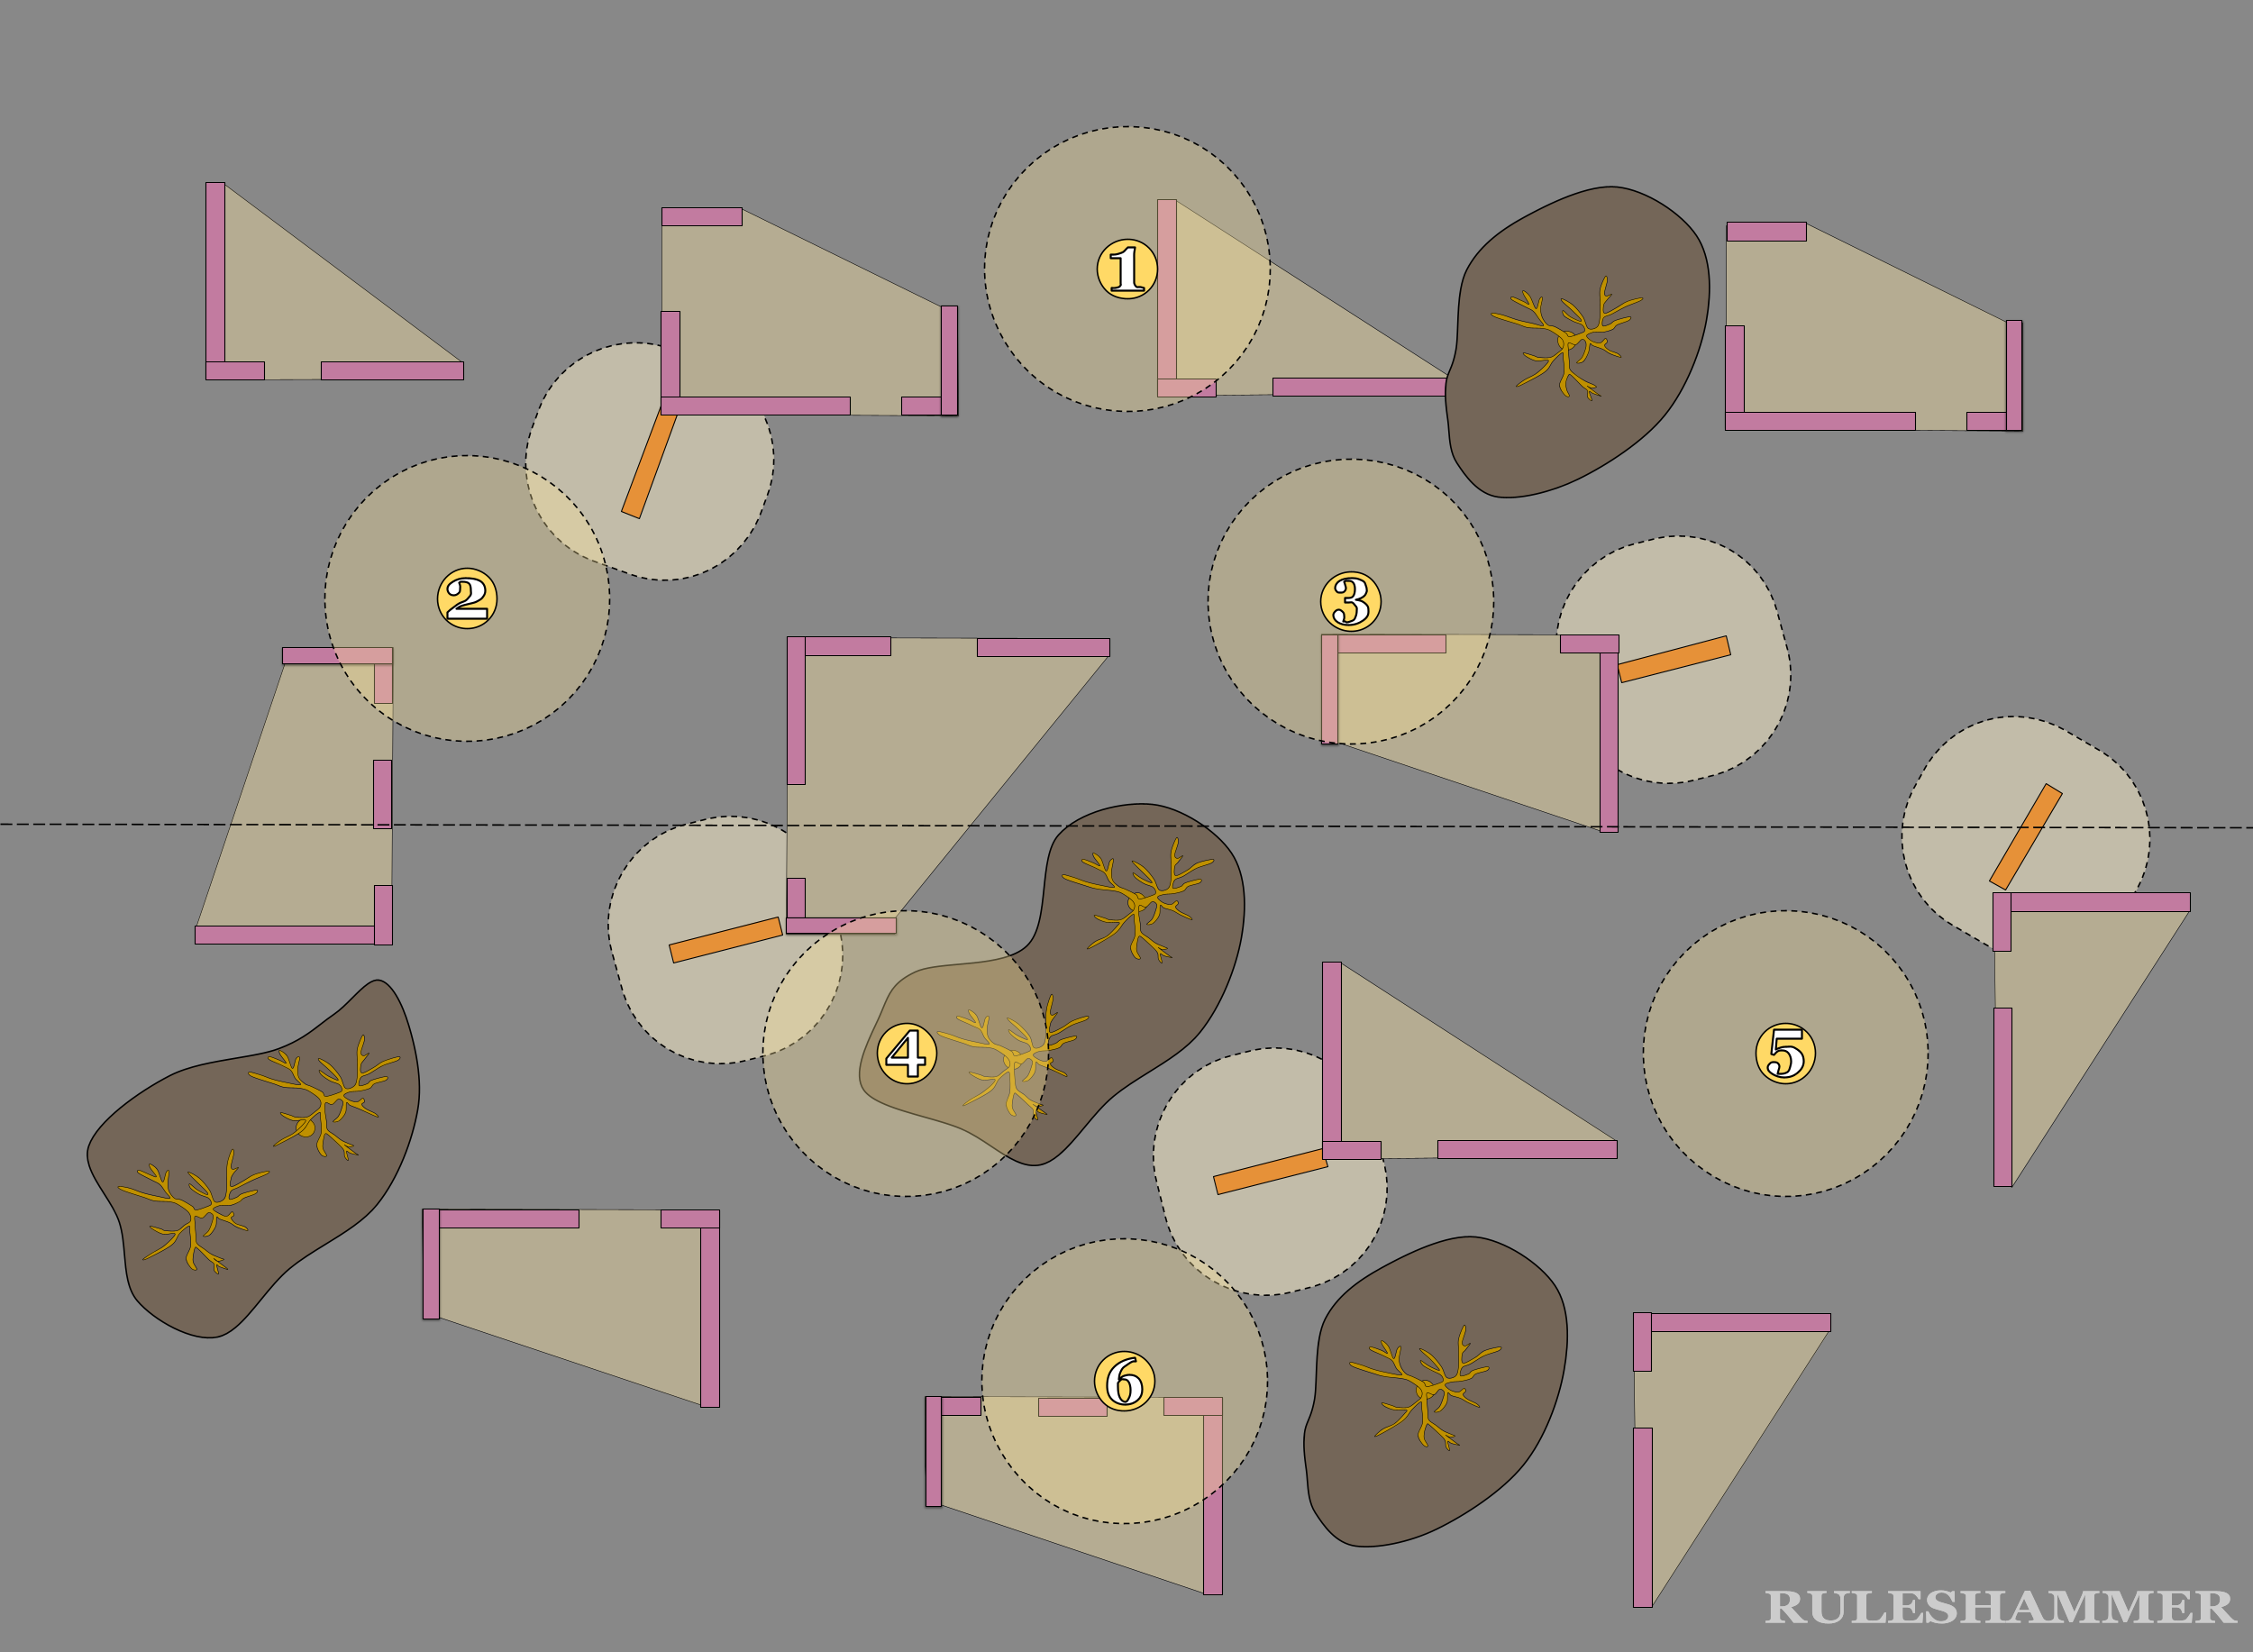
There is a rule about terrain on top of objectives, which some players might feel that Objective 4 doesn’t meet.
Terrain features cannot be set up on top of objective markers. Players must use the battlefield terrain rules for terrain features.
I’m not 100% sure either way on this but generally it’s accepted that this is OK if the “foot print” of the terrain is not on top of the Objective and that this rule is more about keeping objectives from being under walls or crates, rather than within a Ruin or Forest.
Types of Terrain
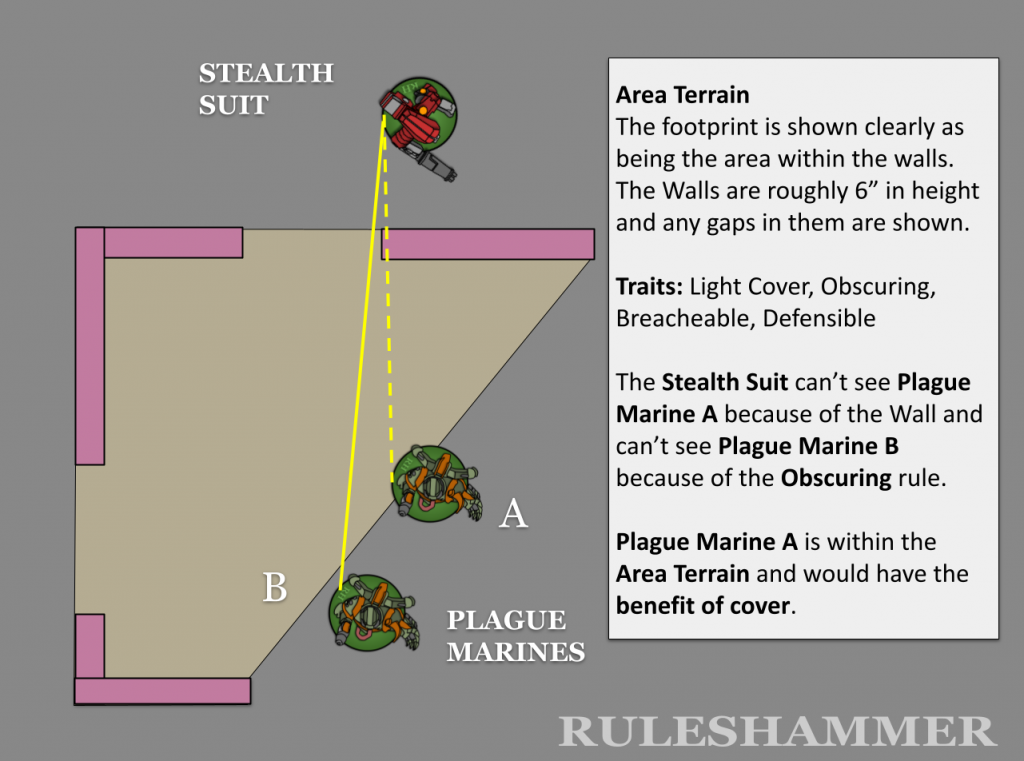
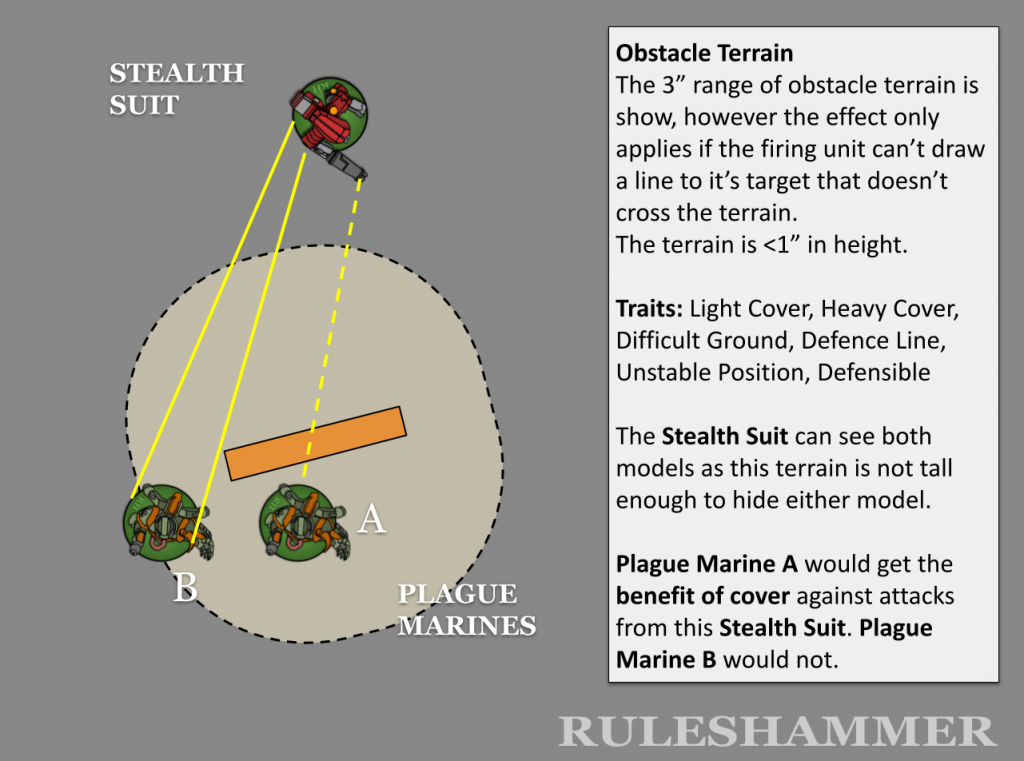
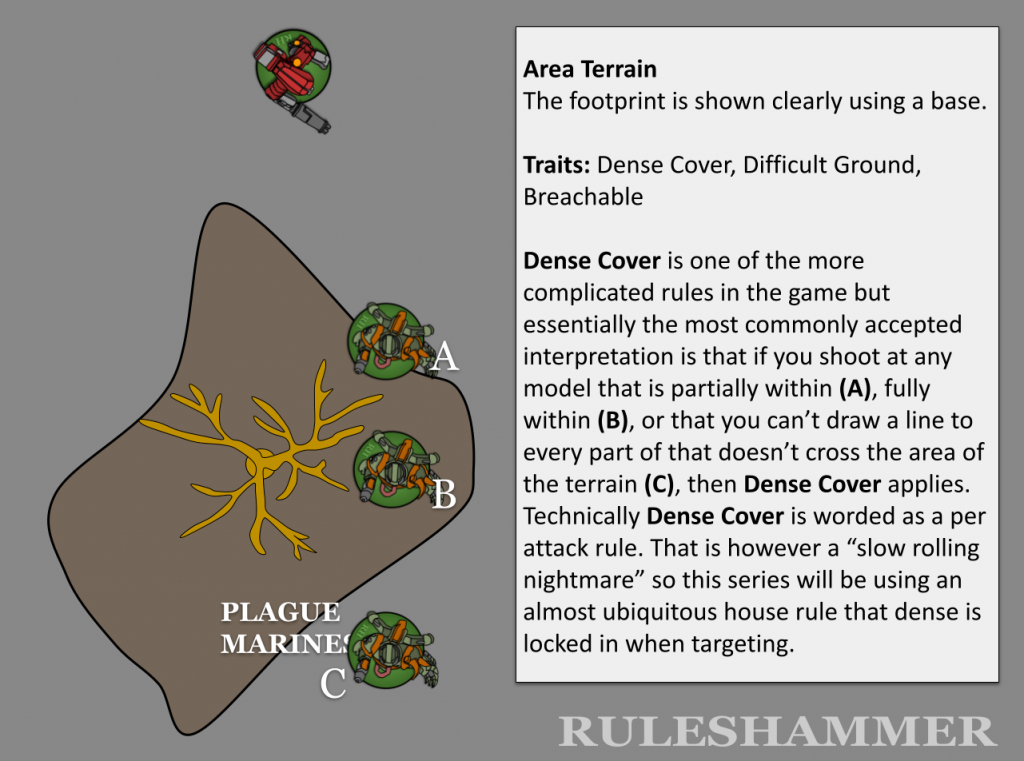
For this board I’m using a mixture of three key types of terrain, varying the shapes and size of some pieces. This section explain the basics of each type of terrain I’ll be using in this game, for more detail on the entire Terrain Rules system in 9th edition check out my Terrain Guide.
Ruins
Barricades
Dead Forests
You Can Move a Tank Through That Gap!
This is the name I’m giving to a house rule you will see in use in almost every game of Warhammer 40k in 9th edition, especially if you do go on to play at events. Simply put the trees modelled on a piece of Dense Terrain such as the forests I’m using in this series are usually removable and are often played as not being a barrier to movement even by larger models. The terrain still has the Difficult Ground terrain trait so these area terrain pieces are a hindrance to movement but including a reasonable amount of Dense Terrain without using this house rule (as Dense terrain must be more than 3″ in height to have an effect rules as written) is very difficult. A variant of this you might also encounter are “smoke stack” terrain pieces. Large vent grills that are to be treated as more than 3″ tall and provide the same Dense Cover traits as these forests, but with no trees to ignore and in their place the player is meant to imagine a large exhaust cloud. With that in mind we can now verify that our layout does sufficiently allow a large model to move around.
Pre Deployment – Steps 7 to 9
This is one of the sections that honestly I almost have to check again every time I play Warhammer 40k. It’s one of the areas GW often tweaks slightly to try and mitigate issues such as first turn advantage.
First we determine attack and defender with a dice roll. In Matched player missions these titles very rarely mean much at all, there a few missions where attackers do a thing and the defender but they are almost always only during game setup. The main thing this check decides in every mission is who choose deployment zones. Which leads us to our very first dice roll of the game (other than the mission roll). Both Players roll off and the winner decides which player is which.
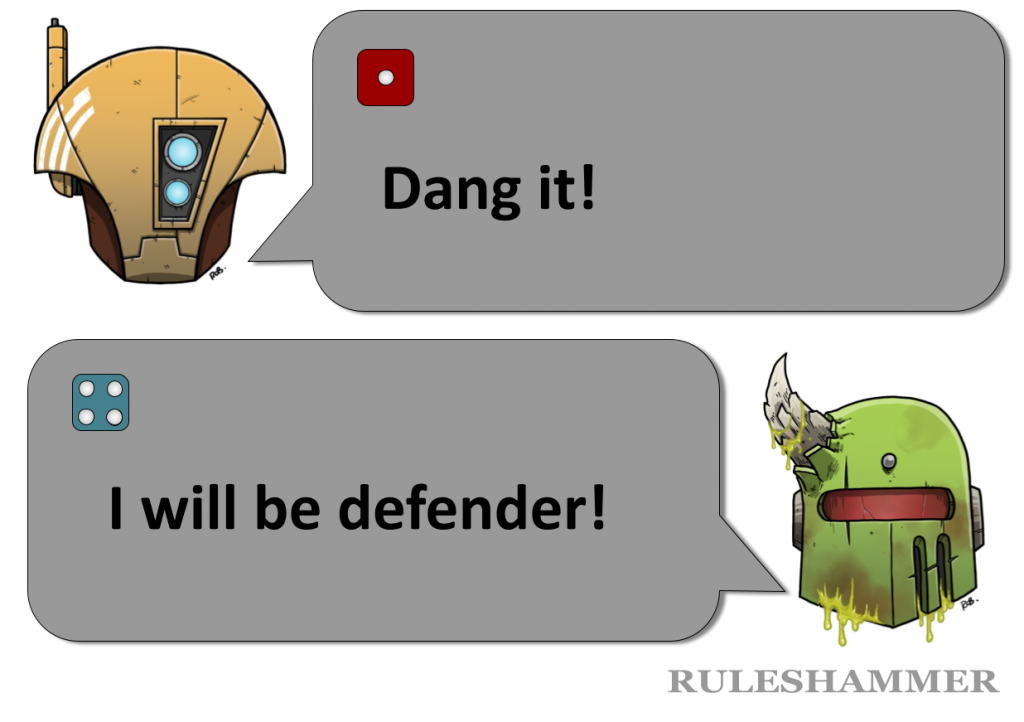 Now the Death Guard don’t have to be the defender for winning this roll off, but they have the choice. Considering the asymmetry of the board (something that might not be a factor in games you play) picking a deployment zone has some tactical power.
So which deployment do the Death Guard want?
There are pros and cons to either, but the top deployment zone has a bit more space for moving their Plague Burst Crawler around so they decide on that.
That’s all until next time!
That’s where this first episode will end, game set up is something that you get quicker at with practice. Next week I’ll cover picking secondaries, arguably one of the most important decisions of the game, declaring reserves and transports, pregame abilities, and getting some models on the board!
Ruleshammer Battle Index
Episode 1 – Game Set Up Part 1
Episode 2 – Game Set Up Part 2
Episode 3 – Pre-Battle Abilities, Tau Turn 1 Command, Movement, and Psychic Phases
Episode 4 – The Tau Turn 1 Shooting, Melee, and Morale Phases
Episode 5 – Tau VP and Death Guard Turn 1 Begins
Episode 6 – Death Guard Turn 1 Shooting Phase
Have any questions or feedback? Got a rules question you want answered? Drop us a note in the comments below, ask a question in our Ruleshammer form, or head over to r/ruleshammer to discuss.
