Welcome to Ruleshammer! This week is the second “episode” of a series I’m calling Ruleshammer Battle. A step by step explanation of a small game of warhammer 40k. Remember the banner below will take you to the Ruleshammer 9th Edition Compendium, for all the questions I’ve answered for the last few months!
Welcome back! If you missed last week’s Episode 2 I’d recommend having a read of that first to get caught up! We left off having just rolled for first turn and the upstart Tau won the roll and now must go first. One small note, every roll in this series is genuine, there’s zero fiddling with the results to make things more interesting… it’s as close to a real game as I can accurately draw!
Table of Contents
Pre Battle Abilities – Step 13
Some armies have abilities that happen BEFORE the first battle round but after determining who had the first turn. Unfortunately there’s not a consistent timing for these but “most” of them are resolved in this step. Notable exceptions to being resolved during this step are stratagems that upgrade a unit or allow a unit to be deployed somewhere other than the battlefield, and abilities that happen in the first battle round but before the first turn. As luck would have it (or subtle planning maybe) this battle has examples of a few different types.
The Tau army during this step must declare its “Philosophy of War” – choosing either Mont’ka or Kayon.
If every unit from your army (excluding T’AU AUXILIARY, SUPREME COMMANDER and UNALIGNED units) is from the same Sept, then at the start of the battle, when you have determined who has the first turn, you can select one of the Tactical Philosophies below. T’AU EMPIRE units (excluding T’AU AUXILIARY units) from your army gain the benefits of that Tactical Philosophy. If both players have a similar ability, the player who has the first turn chooses first.
In This Battle: The Tau army will be using the Mont’ka Philosophy, allowing units in turns 1 to 3 to count as stationary if they make a Normal Move or Advance. It also allows them to re-roll wound rolls of 1 if they target the closest enemy unit within a decreasing range band (18″ in Round 1, then 12″ in Round 2, and 9″ in Round 3). The Death Guard army has nothing to declare at this stage – its army ability is passive.
Step 13 does elaborate on what to do if both players have one or even multiple of these abilities though.
Players alternate resolving any pre-battle abilities units in their army may have, and resolving any Stratagems that are used before the battle (excluding those that upgrade their units or those that enable them to set up a unit in a location other than the battlefield), starting with the player who will take the first turn.
Oddly the alternating nature of these abilities is not duplicated in the next type of ability – this is something that catches players out and is just as often house-ruled to be consistent.
Battle Round 1 Begins
So we’re in the first battle round now, but it’s not yet Turn 1. You’d be forgiven for thinking this is not a moment that would have any rules in it, but alas it does. Once again the Tau have something to trigger, but the timing of them might seem a bit odd.
Tau Devilfish have a before-first-turn ability that depends on if they chose Mont’ka or Kauyon as their Tactical Philosophy. As the Tau chose Mont’ka the ability, the Devilfish can use its Armoured Aggression ability:
Armoured Aggression: At the start of the first battle round, before the first turn begins, if you selected the Mont’ka Tactical Philosophy at the start of the battle, this unit can make a Normal Move of up to 9″. It cannot end this move within 9″ of any enemy models.
Often referred to as “pregame moves,” abilities like this follow most of the rules that apply to normal movement phase moves, but they do not follow all of them (see this Necron example). The move is a Normal move, so it can’t be used to move within Engagement Range of any enemy units, and the ability also requires the Devilfish to end its move more than 9″ away from any enemy units.
The really confusing element of these rules is what order they should be resolved in if both players have them. In our game the Death Guard do not have any similar abilities, but if they did then without a clear order like the Pre Battle Abilities step we fall back to one of the most important rules of 9th Edition 40k:
SEQUENCING
While playing Warhammer 40,000, you’ll occasionally find that two or more rules are to be resolved at the same time – e.g. ‘at the start of the battle round’ or ‘at the end of the Fight phase’. When this happens during the battle, the player whose turn it is chooses the order. If these things occur before or after the battle, or at the start or end of a battle round, the players roll off and the winner decides in what order the rules are resolved.
It doesn’t automatically go to the first player, even arguably though perhaps somewhat pointlessly, if following Rules As Written to the letter, then the thing to do in our game is roll off and if the Death Guard wins the roll then they could decide which Devilfish has to move first. This wouldn’t really make any material difference so most players would ignore this. However if the Death Guard did have a similar ability then getting to resolve all of their moves before the Tau would be significant, you’ll notice I said “all” there. The Sequencing rules don’t establish that players alternate when doing this. The player that won the roll off can decide to do all of theirs first.
Note: This is a very specific Rules As Written issue, in my experience alternating is still often how players decide to resolve them regardless of the not having to do so.
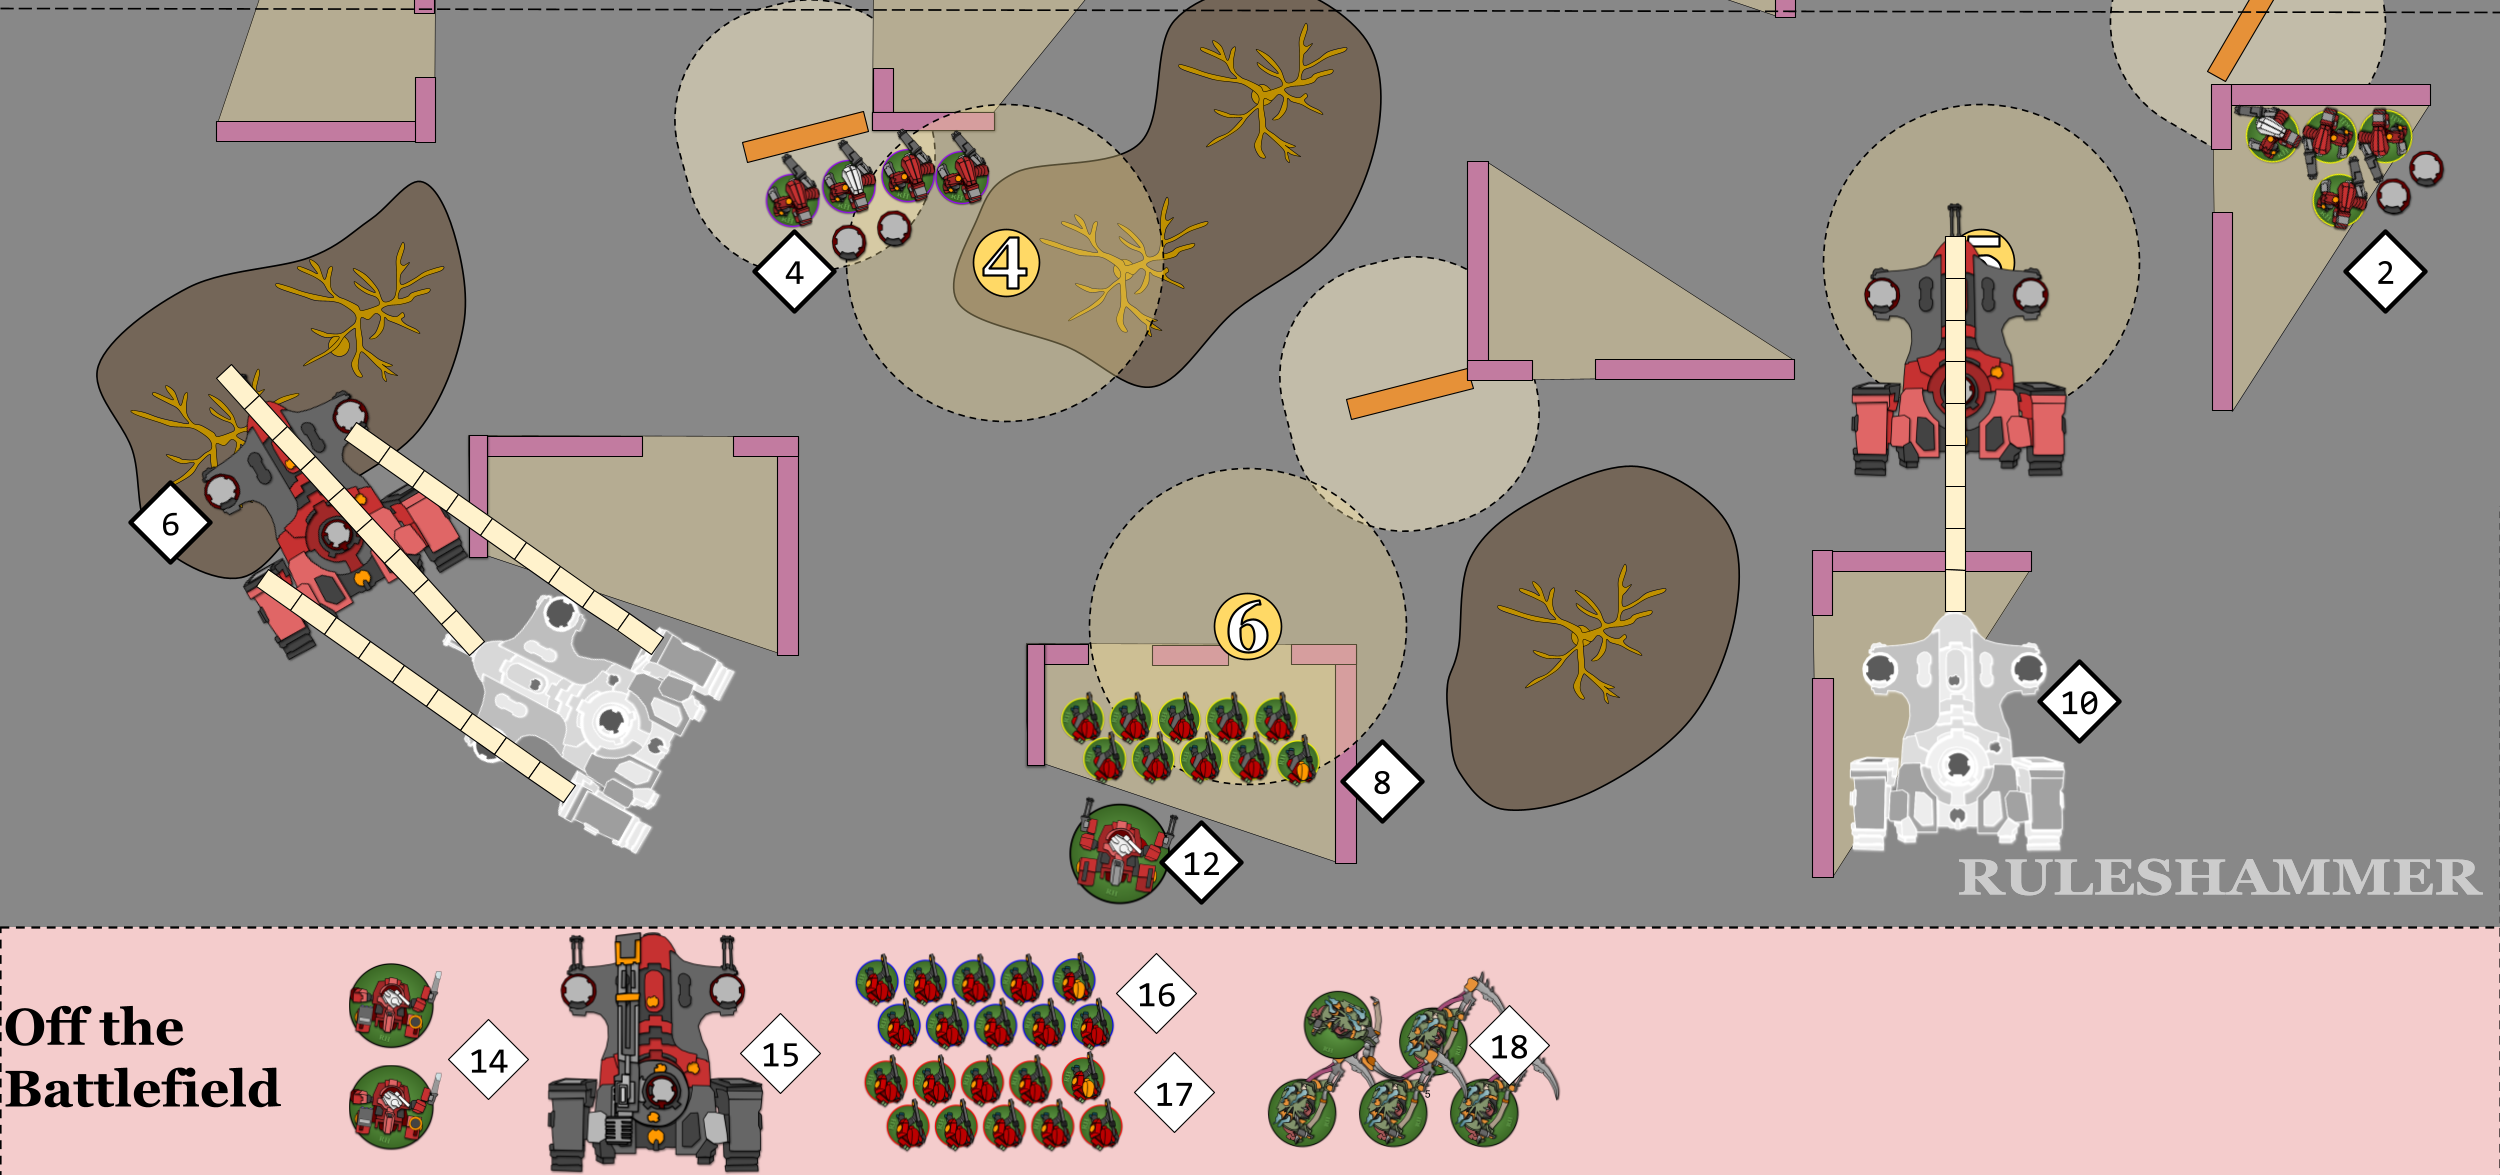
So lets move some Devilfish! The Tau vehicles numbered (6) and (10) on our battlefield.
Some elements to note about this movement. Devilfish have the FLY keyword so when moving through terrain any vertical movement required to clear such obstacles is ignored. This lets Devilfish (10) leap forward over the ruin ahead. Devilfish (6) has also made use of FLY not only to avoid the ruin in its way but to also ignore the -2″ movement penalty it would have otherwise received from moving through Difficult Ground. Devilfish (6) has also rotated slightly; in 9th edition rotating a model does use up movement. This can be tricky to measure, and you won’t have the advantage of a ghost-like image of where the tank use to be.
To account for rotation important part to remember is this line of the movement rules:
The distance a model moves is measured using the part of the model’s base (or hull) that moves furthest along its path (including parts that rotate or pivot).
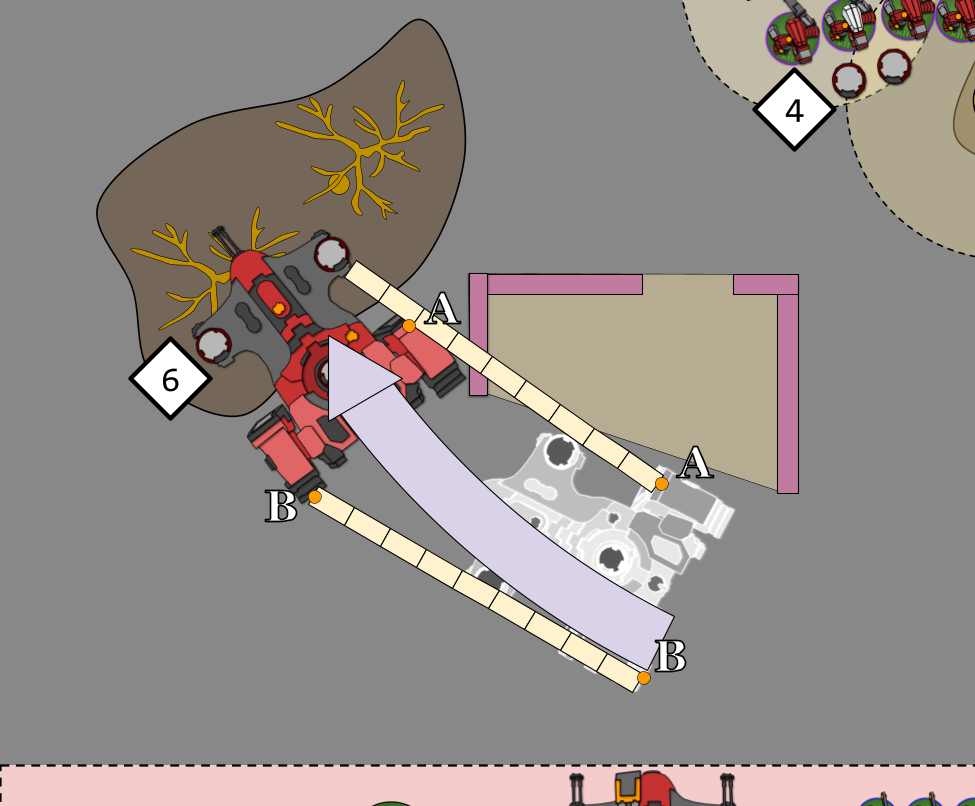
So you need to identify which part that is going to be, then we can accurately measure if that point has moved too far. To do this I recommend you look down on the model, and identify the direction it will rotate in. Every movement like this will be part of an arc. Now don’t worry, there’s no tricky geometry to do – just this basic fact. The outside edge of an arc is longer than in the inside edge. This is pretty evident, for instance the circumference of a donut is clearly longer than the circumference of the hole at its centre. So now we just need to know which point is the on that outer edge.
Point B here at the back is on that outer edge, and it’s the point that will swing out the furthest as we rotate. We can see how that worked because Point A has moved significantly less than the full 9″ while Point B has moved exactly 9″.
Whilst this might seem complicated – and to be fair it’s not simple – it’s something that you will get the hang of of with practice. I cover more aspects of this here. With those moves out of the way we can actually Start the Battle properly.
Tau – Turn 1
Command Phase
Each player’s turn starts with a Command Phase. As both our Armies are Battleforged and the Tau Army controls their objective marker in their Deployment Zone, they will gain 1 CP.
CP Update!
Tau: 12 + 1 = 13
Death Guard: 12
Remember the Deployment Zone Objective Requirement is a feature of the mission we are playing: Mission 31 Tide of Convictions from GT 2022 Warzone Nachmund, which I covered in Episode 01.
After resolving our CP gains we now need to consider any abilities we might want to use in this phase. The Tau army only has one Command Phase ability on the Coldstar Commander (12) but its target must be a <SEPT> CRISIS CORE unit, none of which are currently in range as the Crisis Bodyguards (14) are not on the Battlefield.
Tau have access to some Command Phase Stratagems as well but none of them are applicable to the current state of the battle. Although rare, now’s a good time to check that your opponent doesn’t have any “in the enemy Command phase” or “in the Command phase” abilities – for the Death Guard, the Tallyman lets them roll to gain CP in every Command phase, but our Death Guard list does not include one of these characters.
With the Command Phase concluded we move on!
Movement Phase
The Movement phase is a pretty significant phase for Tau; they have a lot of fast units and this is when a decent number of their abilities become usable. Here’s how the Battlefield looks as we enter the phase: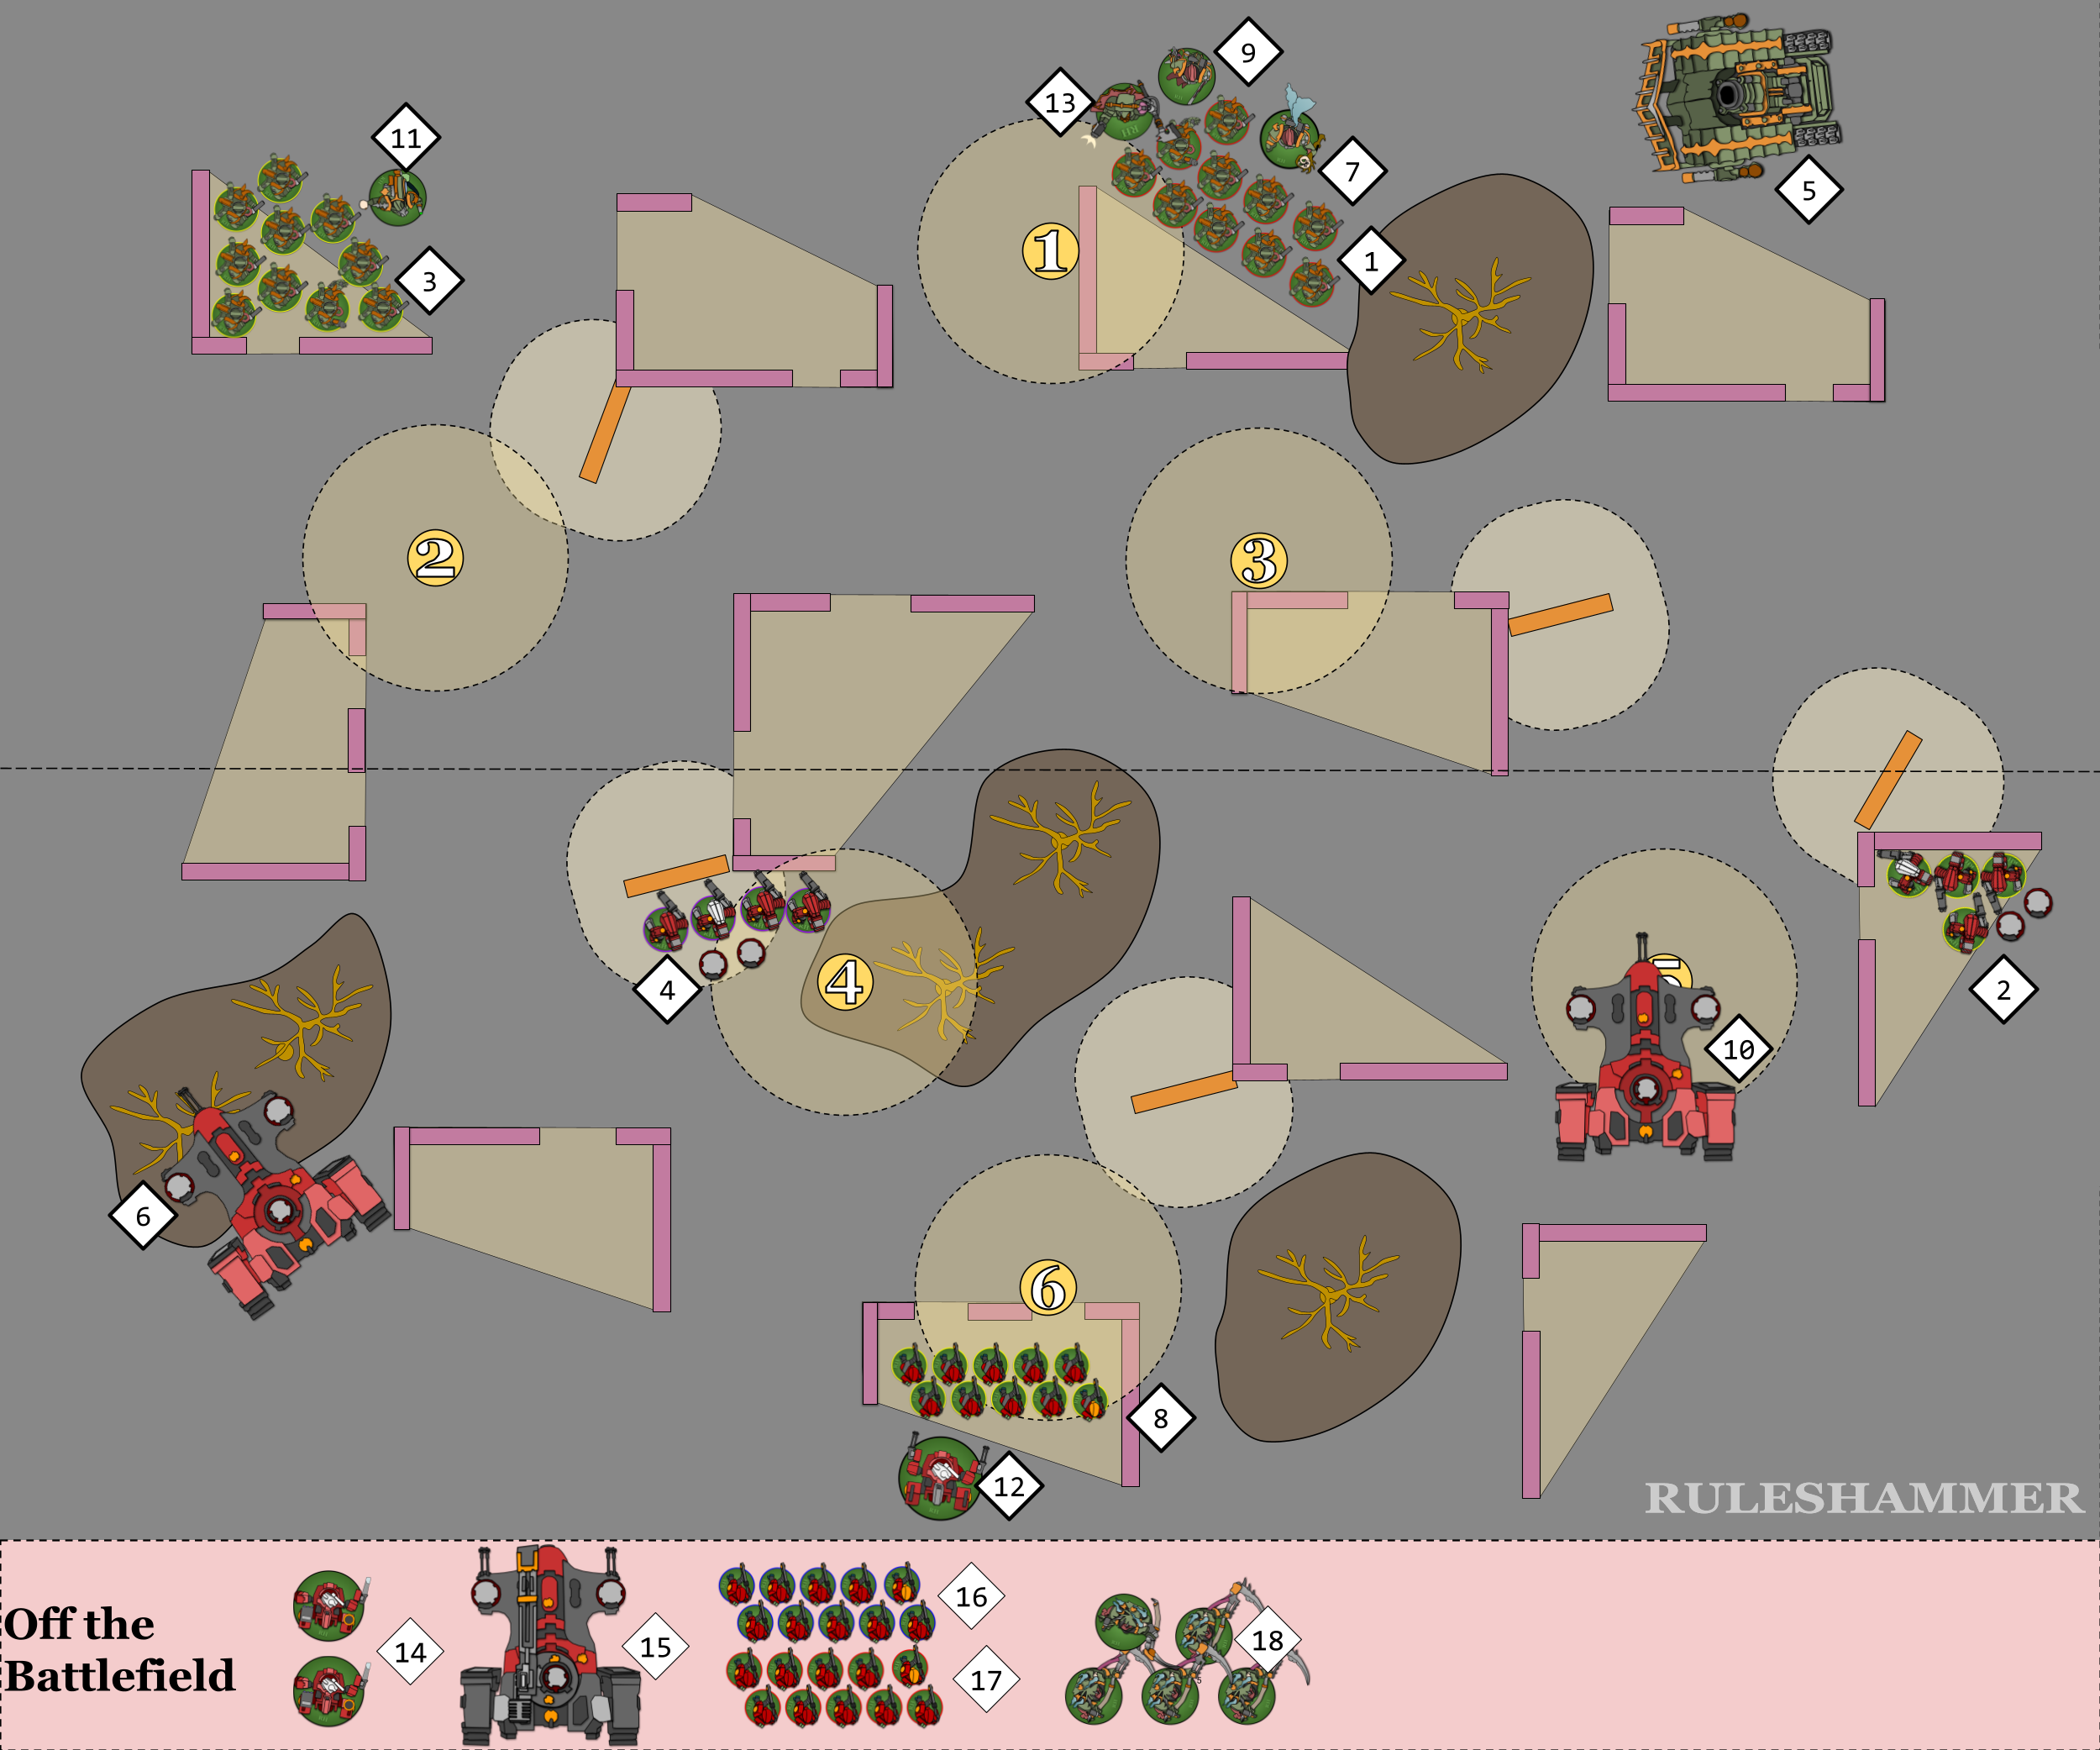
STOP AND HAVE A PLAN!
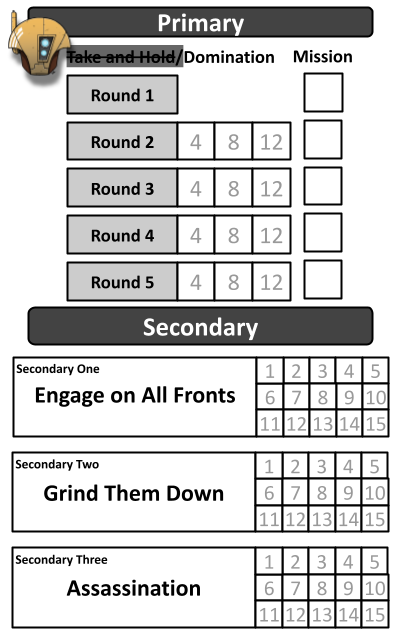
Before you move anything, this is a good time to remember to have something resembling a plan for the turn. Let’s looks at our secondaries again:
The best advice I’ve been given for planning a turn is to ask yourself “how do I score 10VP this turn?” Some adjustments might be necessary for a smaller game like this but that question has always helped me focus. Here’s what the Tau player identifies:
- The Primary Objective for the mission awards 2VP at the end of the Turn for controlling an Objective in Enemy territory. That’s Objectives 1, 2, or 3 in the diagram above. 1 is going to be pretty hard to reach, but 2 is very much in reach of either the Devilfish (6) (and its embarked unit) or the Stealth Suits (4). The Stealth suits could also likely reach 3 with a good advance roll, but doing so would leave them very exposed.
- The Engage on All Fronts Secondary could easily score 3VP for them this turn. The Tau have units multiple units – (6), (4), (10), or (2) – that could move forward to secure the left and right opposing table quarters.
- The Grind them Down Secondary is trickier to plan for; it’s plausible that enemy units Plague Marines (3) and Foul Blightspawn (11) could be destroyed this turn, but just 2 units is not an insurmountable challenge for the Death Guard to respond to. Committing too many forces forward at this point as well will leave the Tau’s deployment zone exposed to the Deathshroud when they arrive in either Turn 2 or Turn 3.
- While technically scored at the end of the battle, the Assassination secondary would score 3VP if the Foul Blightspawn (11) was killed this turn. Remember though, that only Characters which have been destroyed at the end of the battle award VP. If the enemy has an ability that resurrects a character and it is not destroyed again before the end of the battle then it won’t count for scoring.
All told, that plan adds up to between 5 and 12 VP; some elements are pretty much definite but some rely on seeing what happens in the enemy turn. Now we can move forward and enact our plan!
Start Of Movement Phase
Before anything moves, we have some actions to declare. Actions in 9th edition 40k state when they are started, when they are completed, which units can do them, and how many units can attempt them. The Tau Markelight action can be attempted by any model that has a Markerlight. In our battle that’s the 4 Marker Drones in Units (4) and (2) and the Pathfinders (8). The Tau player declares that the Marker Drones will start the Markerlight action now; they have an exception in the Markerlight rule that lets DRONE and VEHICLE units move without failing the Action. On the other hand, the Pathfinders don’t start the action until the end of the Movement Phase due to an ability they have, allowing them to move and then perform the action.
The Tau player declares that they will use the Combat Debarkation stratagem. This costs 1CP and has the following effect (I’ve omitted the bits for Kauyon):
Use this Stratagem at the start of your Movement phase.
– If you selected the Mont’ka Tactical Philosophy at the start of the battle and it is the first, second or third battle round, select up to three DEVILFISH models from your army.
…
Until the end of the phase, each time one of those models makes a Normal Move, after it has moved, any units embarked within that transport can disembark. Any units that do so cannot charge this turn.
CP Update!
Tau: 13 – 1 = 12
Death Guard: 12
The Tau player also declares that the Coldstar Commander (12) will use their once-per-Battle Ability to leave the battlefield:
High-altitude Manoeuvres: Once per battle, at the start of your Movement phase, you can remove this unit from the battlefield. If you do, then in the Reinforcements step of that phase, you can do one of the following:
– Set this unit back up on the battlefield, anywhere that is more than 9″ away from any enemy models.
– If the mission you are playing is using the Strategic Reserves rule, place this unit into Strategic Reserves.
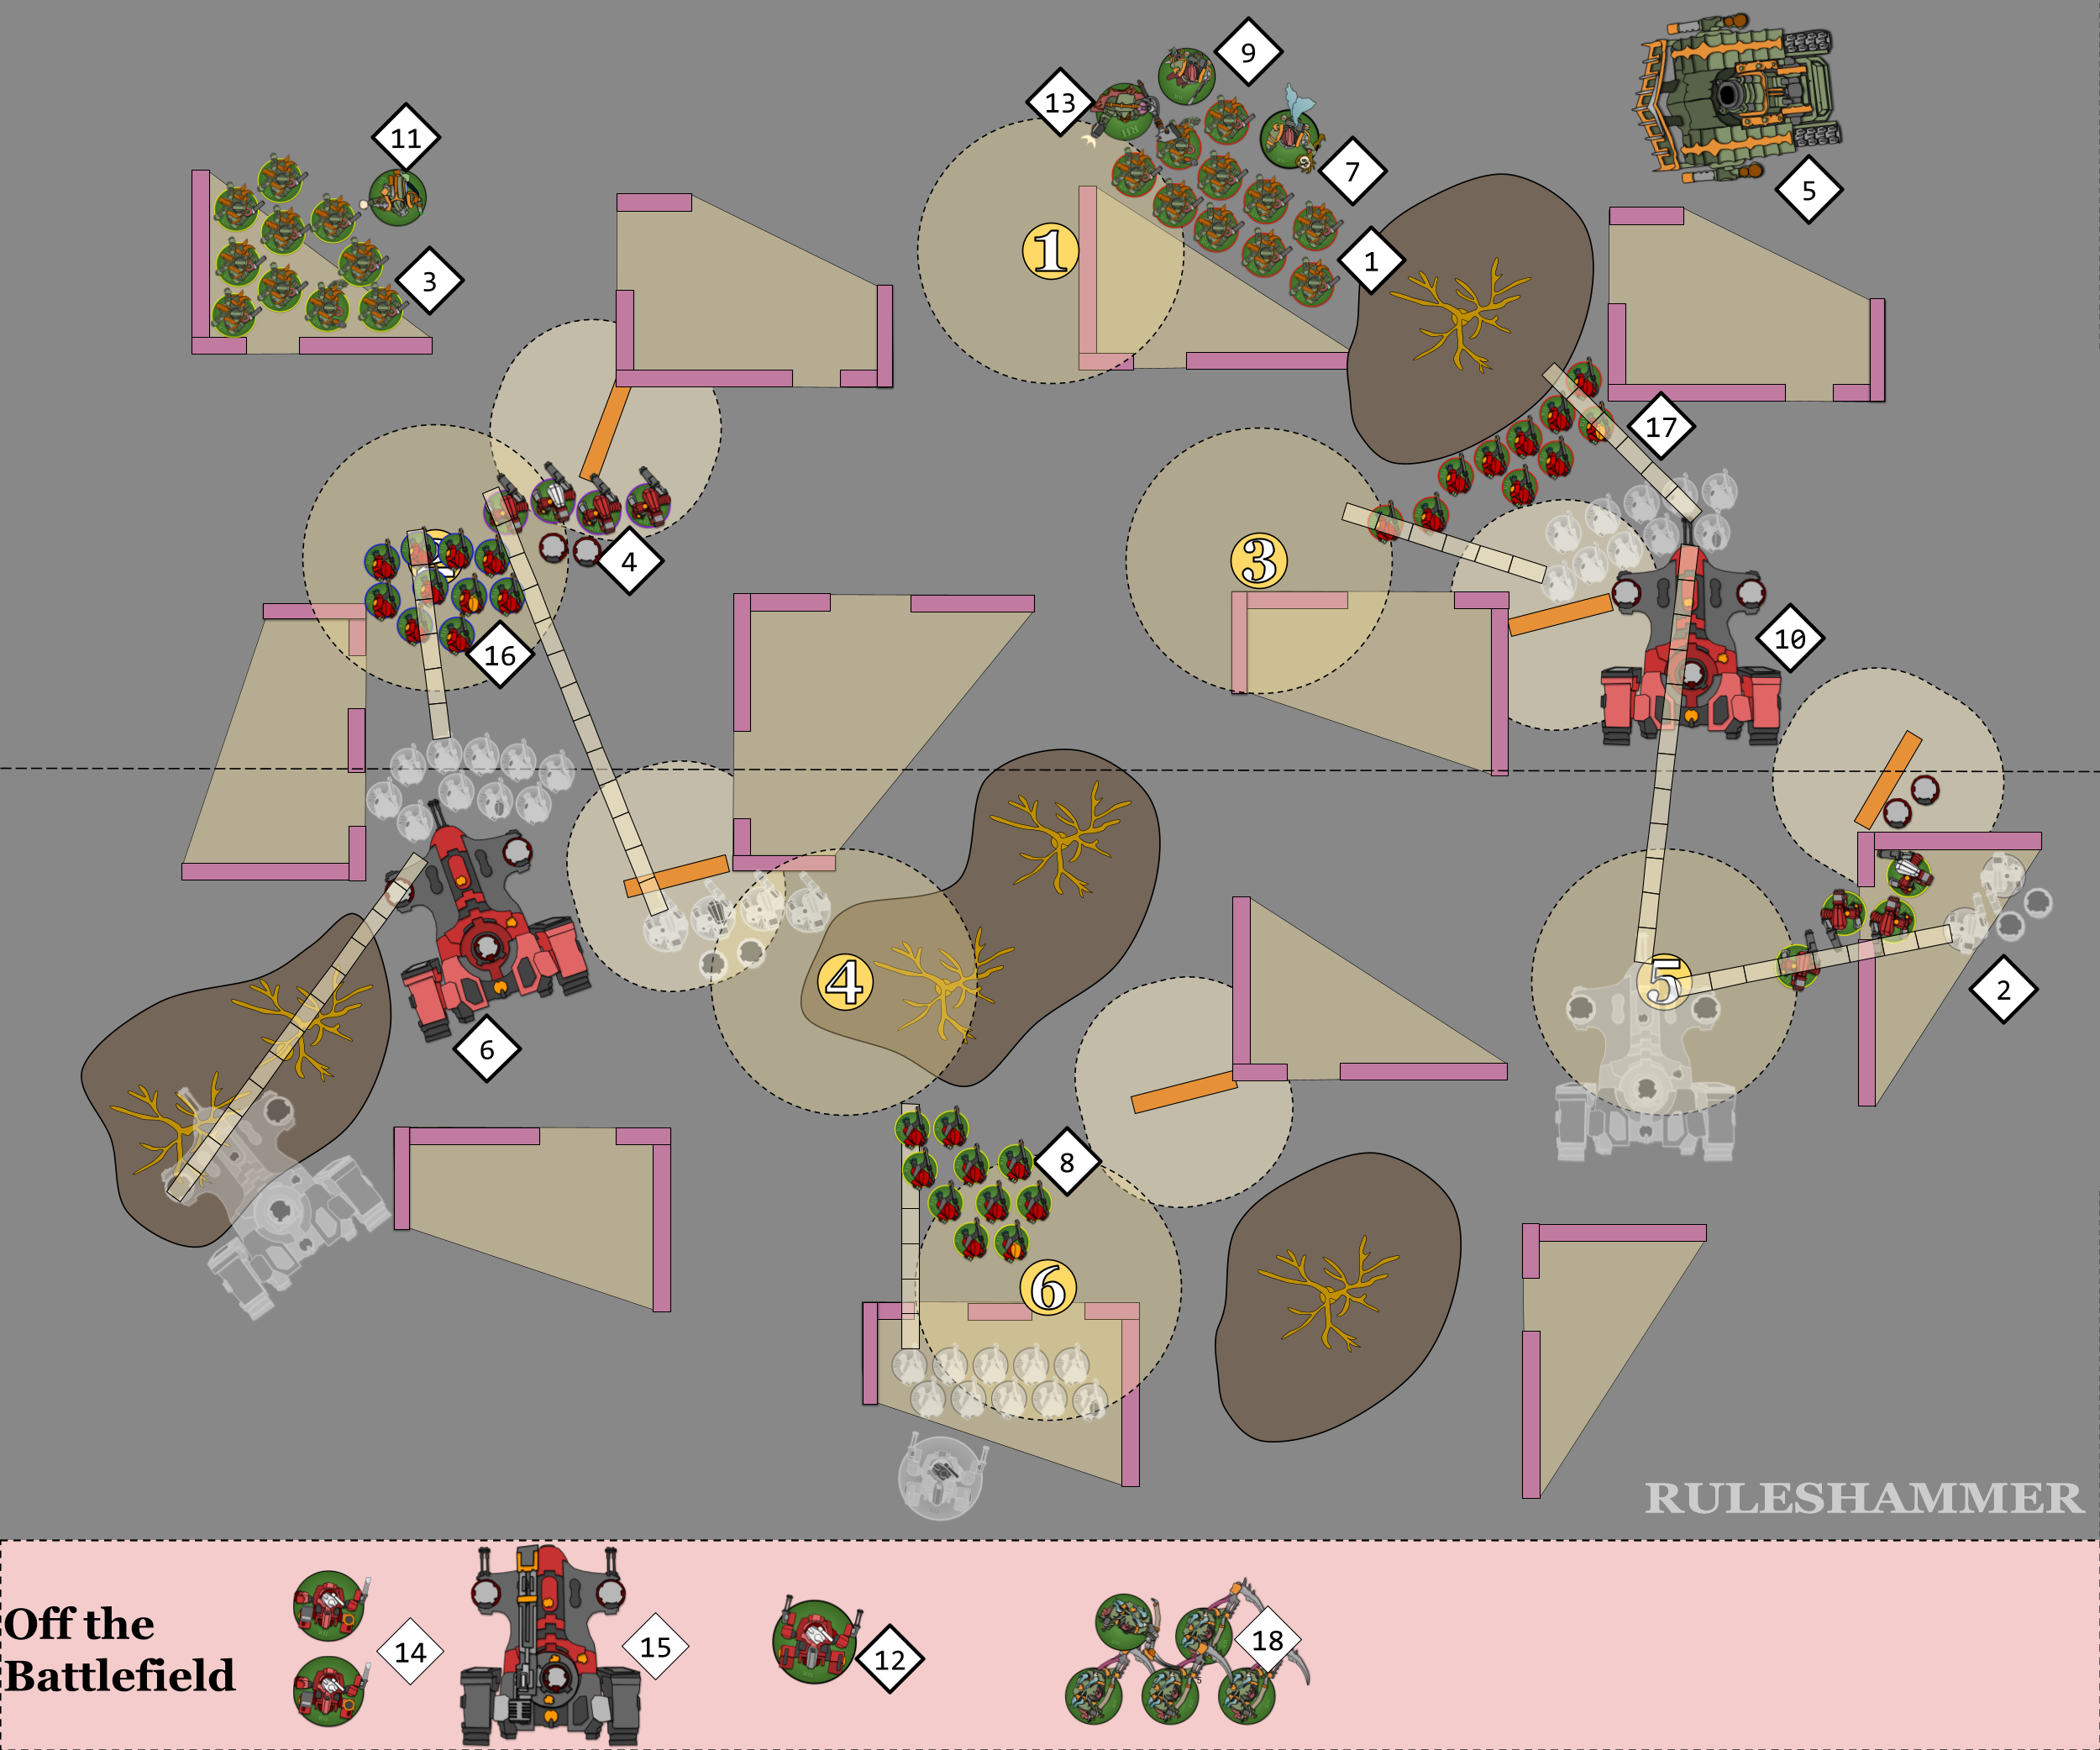
During the Movement Phase
- Stealth Unit (4) Advanced, rolling a 6. Max movement 14″. This allows them to take Objective 3, be within the top left Quarter for Engage on all Fronts and be within Range of the Plague Marines (3) or Foul Blight Spawn (11).
- Stealth Unit (2) moves to control Objective 5. As a unit of 6 models, every model with in the unit must be within 2″ of 2 other models for Coherency. The Marker Drones move to be able to see targets for when the Marker Light action completes.
- Devilish (6) moves just under it’s 12″ max. It can’t Advance because Combat Debarkation requires a Normal Move to function.
- Devilfish (10) does the same.
- The Pathfinder Unit (8) moves just under it’s 7″ max. It can’t Advance because units that Advance can not start actions that turn, they want to do the Markelight action at the end of the phase.
- The Breacher Units (16) and (17) Disembark within 3″ of their Devilfish and the move up to 6″. Breacher Unit (17) doesn’t move their full 6″ because if any single model in the unit enters the Forest Terrain then the Difficult Ground rule will reduce the entire unit’s movement by 2″. This gives them control of Objectives 2 and 3, though 3 is very weakly held.
Here’s all the moves in diagram form.
The Reinforcements Step
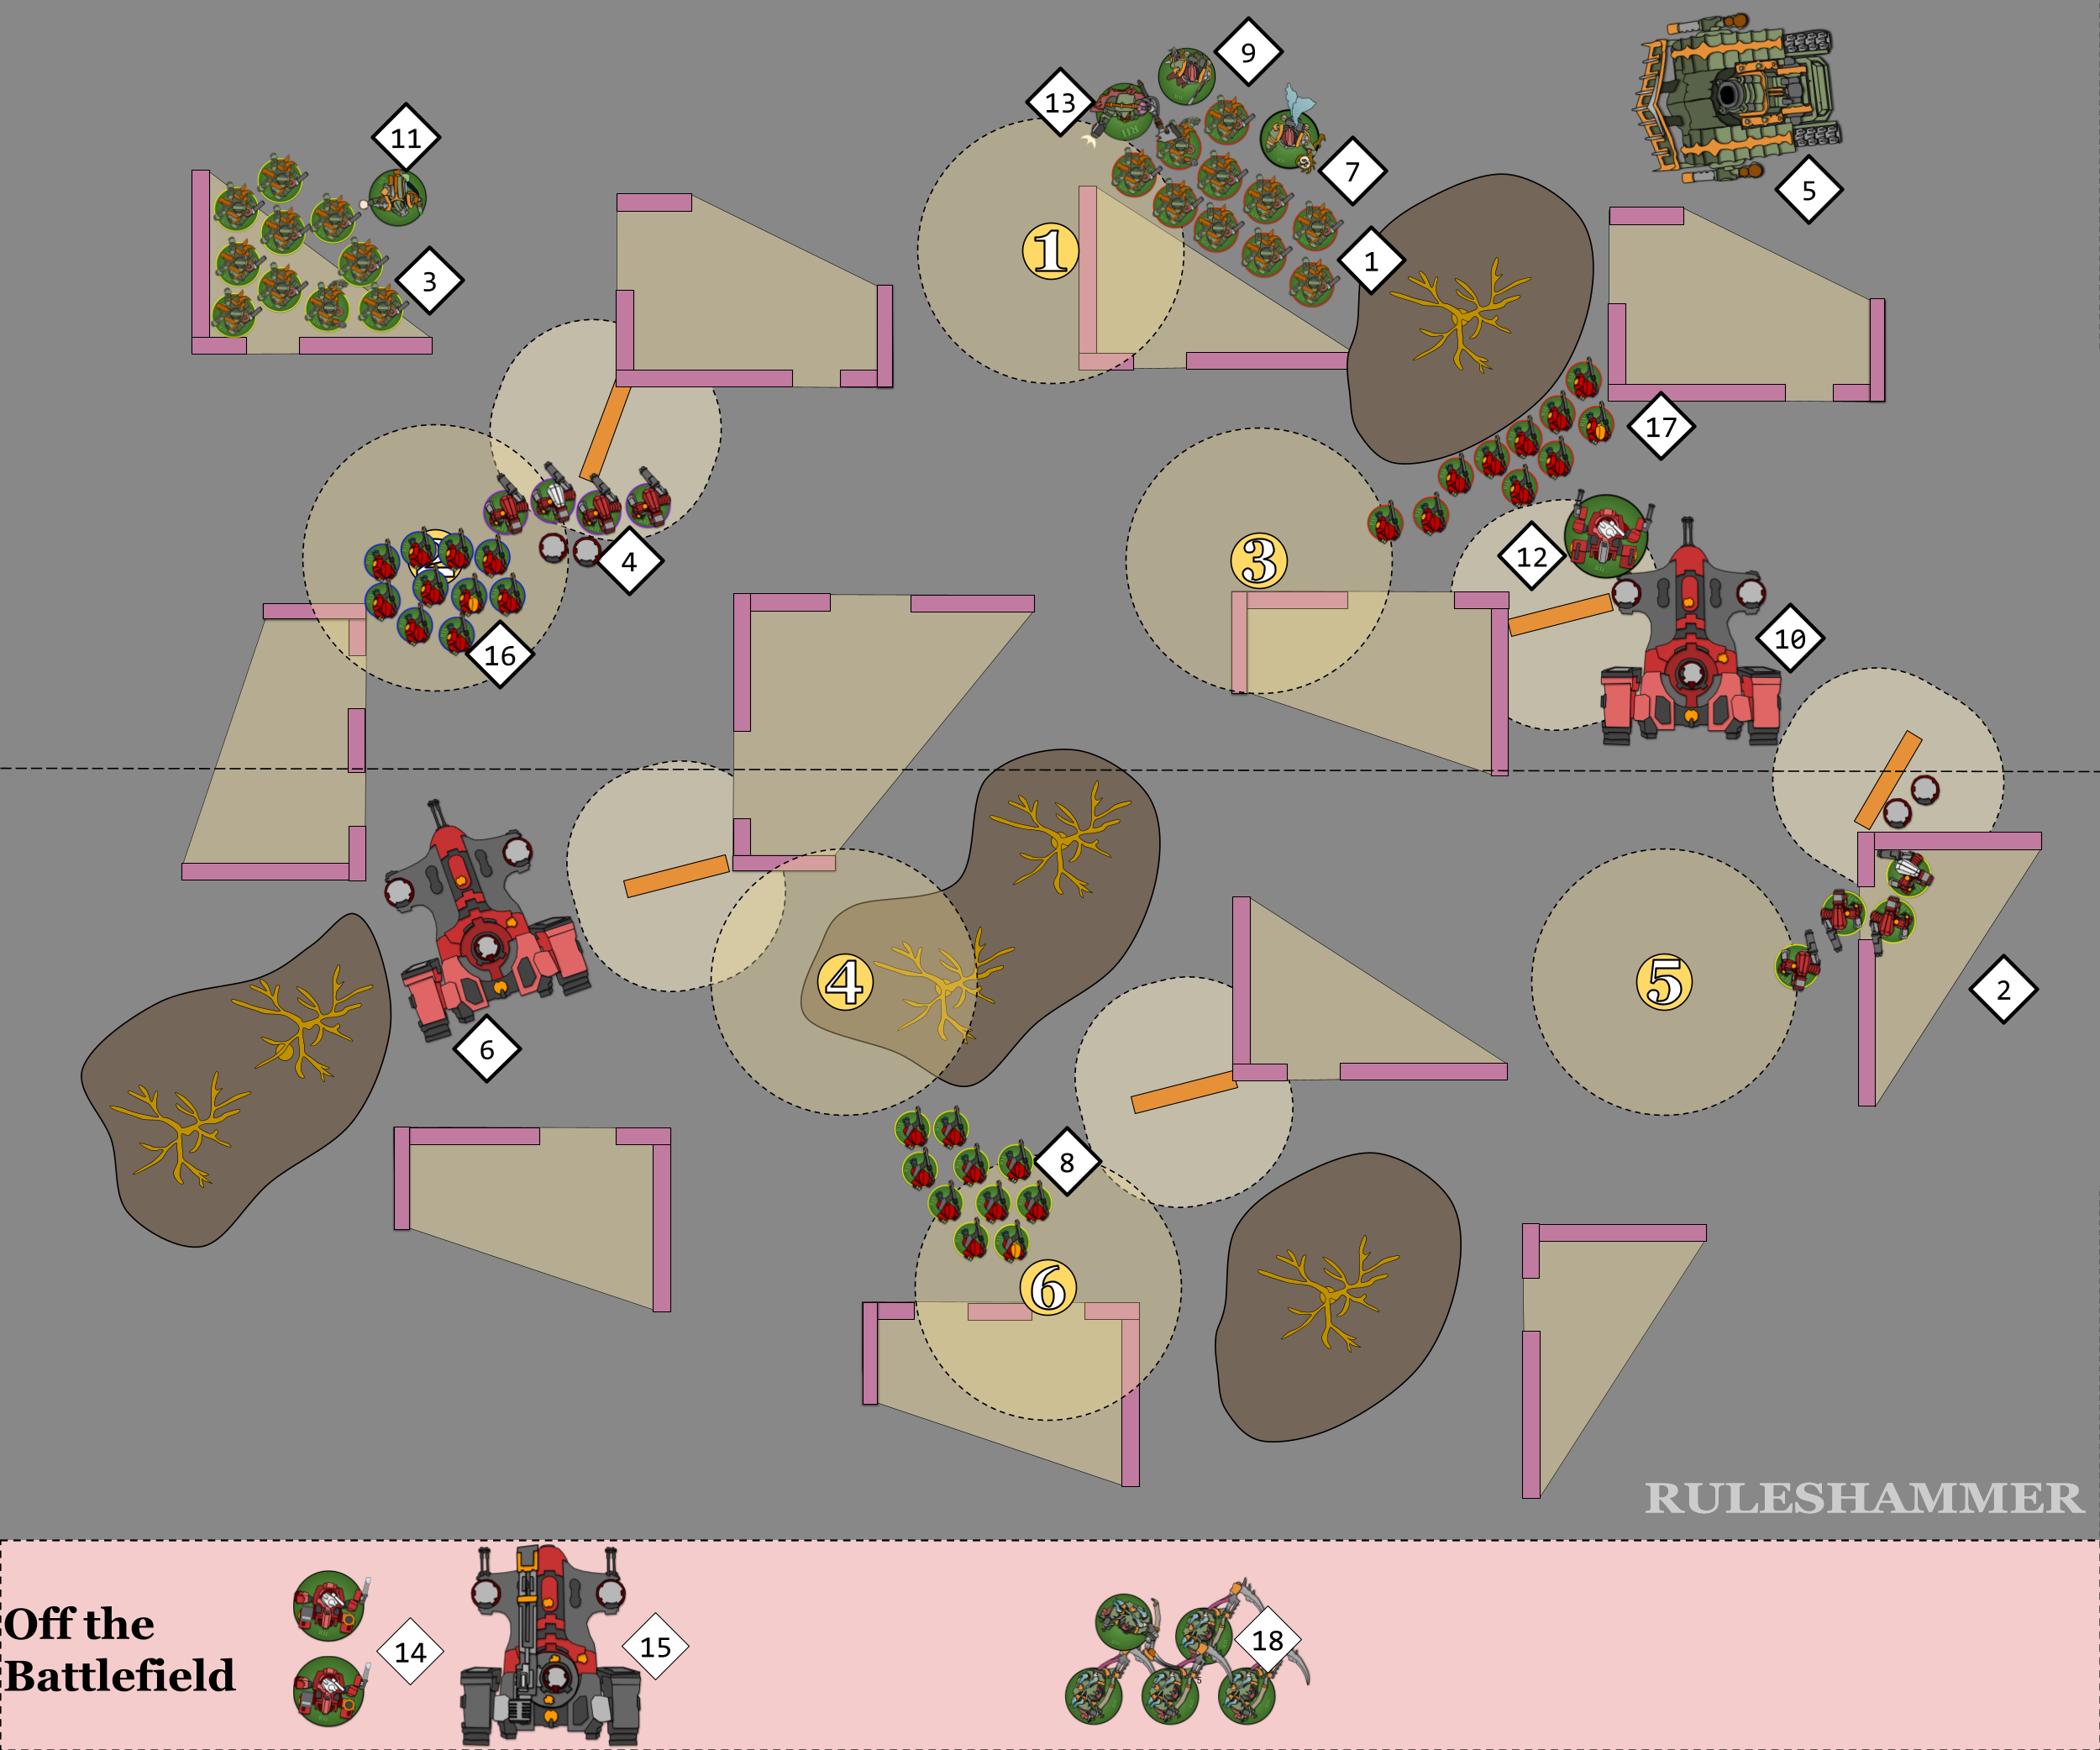
Normally in Turn 1 of a game nothing would happen in this step. However we need to resolve the ability that the Coldstar Commader (12) used earlier. The Tau player decides to bring the Commander back in to support the forces on the right-hand side of the table.
Remember that the distance specified has to be more than 9″, so the Coldstar Commander is can’t be at exactly 9″. This is important for the charge phase.
End of the Movement Phase
Finally… the only remaining thing for the Tau Player to do is confirm that the Pathfinders are doing the Markerlight action at the end of the Movement phase.
That’s all for this phase. Here’s the board after all of that movement.
Psychic Phase
It’s a Tau Army so this phase is nice and easy – Nothing happens and we move on!
That’s all until next time!
That’s almost half the turn wrapped up! Next week we’ll get stuck into the Tau turn for real with some shooting! Maybe even some charging and fighting?!?
Ruleshammer Battle Index
Episode 1 – Game Set Up Part 1
Episode 2 – Game Set Up Part 2
Episode 3 – Pre-Battle Abilities, Tau Turn 1 Part 1
Episode 4 – The Tau Turn 1 Part 2
Episode 5 – Tau VP and Death Guard Turn 1 Begins
Episode 6 – Death Guard Turn 1 Shooting Phase
Have any questions or feedback? Got a rules question you want answered? Drop us a note in the comments below, ask a question in our Ruleshammer form, or head over to r/ruleshammer to discuss.




You must be logged in to post a comment.