
Welcome to Ruleshammer! This week is the fourth “episode” of a series I’m calling Ruleshammer Battle. A step by step explanation of a small game of warhammer 40k. Remember the banner below will take you to the Ruleshammer 9th Edition Compendium, for all the questions I’ve answered for the last few months!

Welcome back! If you missed last week’s Episode (3), I’d recommend having a read of that first to get caught up! Last week we went through all the pregame abilities, and the Tau army was about to start its Shooting Phase.
Robert “TheChirurgeon” Jones: I’m also back this week, with some strategic commentary on the game.
Tau Turn 1, Continued
Shooting Phase
It’s time to do what the Tau are known for. But where to start? Resolving shooting in the best order is something that will come with practice, but a good habit in my opinion is to think “when they remove models, can they prevent one of my other units from shooting?” Rob: Archon Skari wrote a wonderful article about Drukhari that touches on this – check out Keys to the Spire, Part 2 for more on target priority.
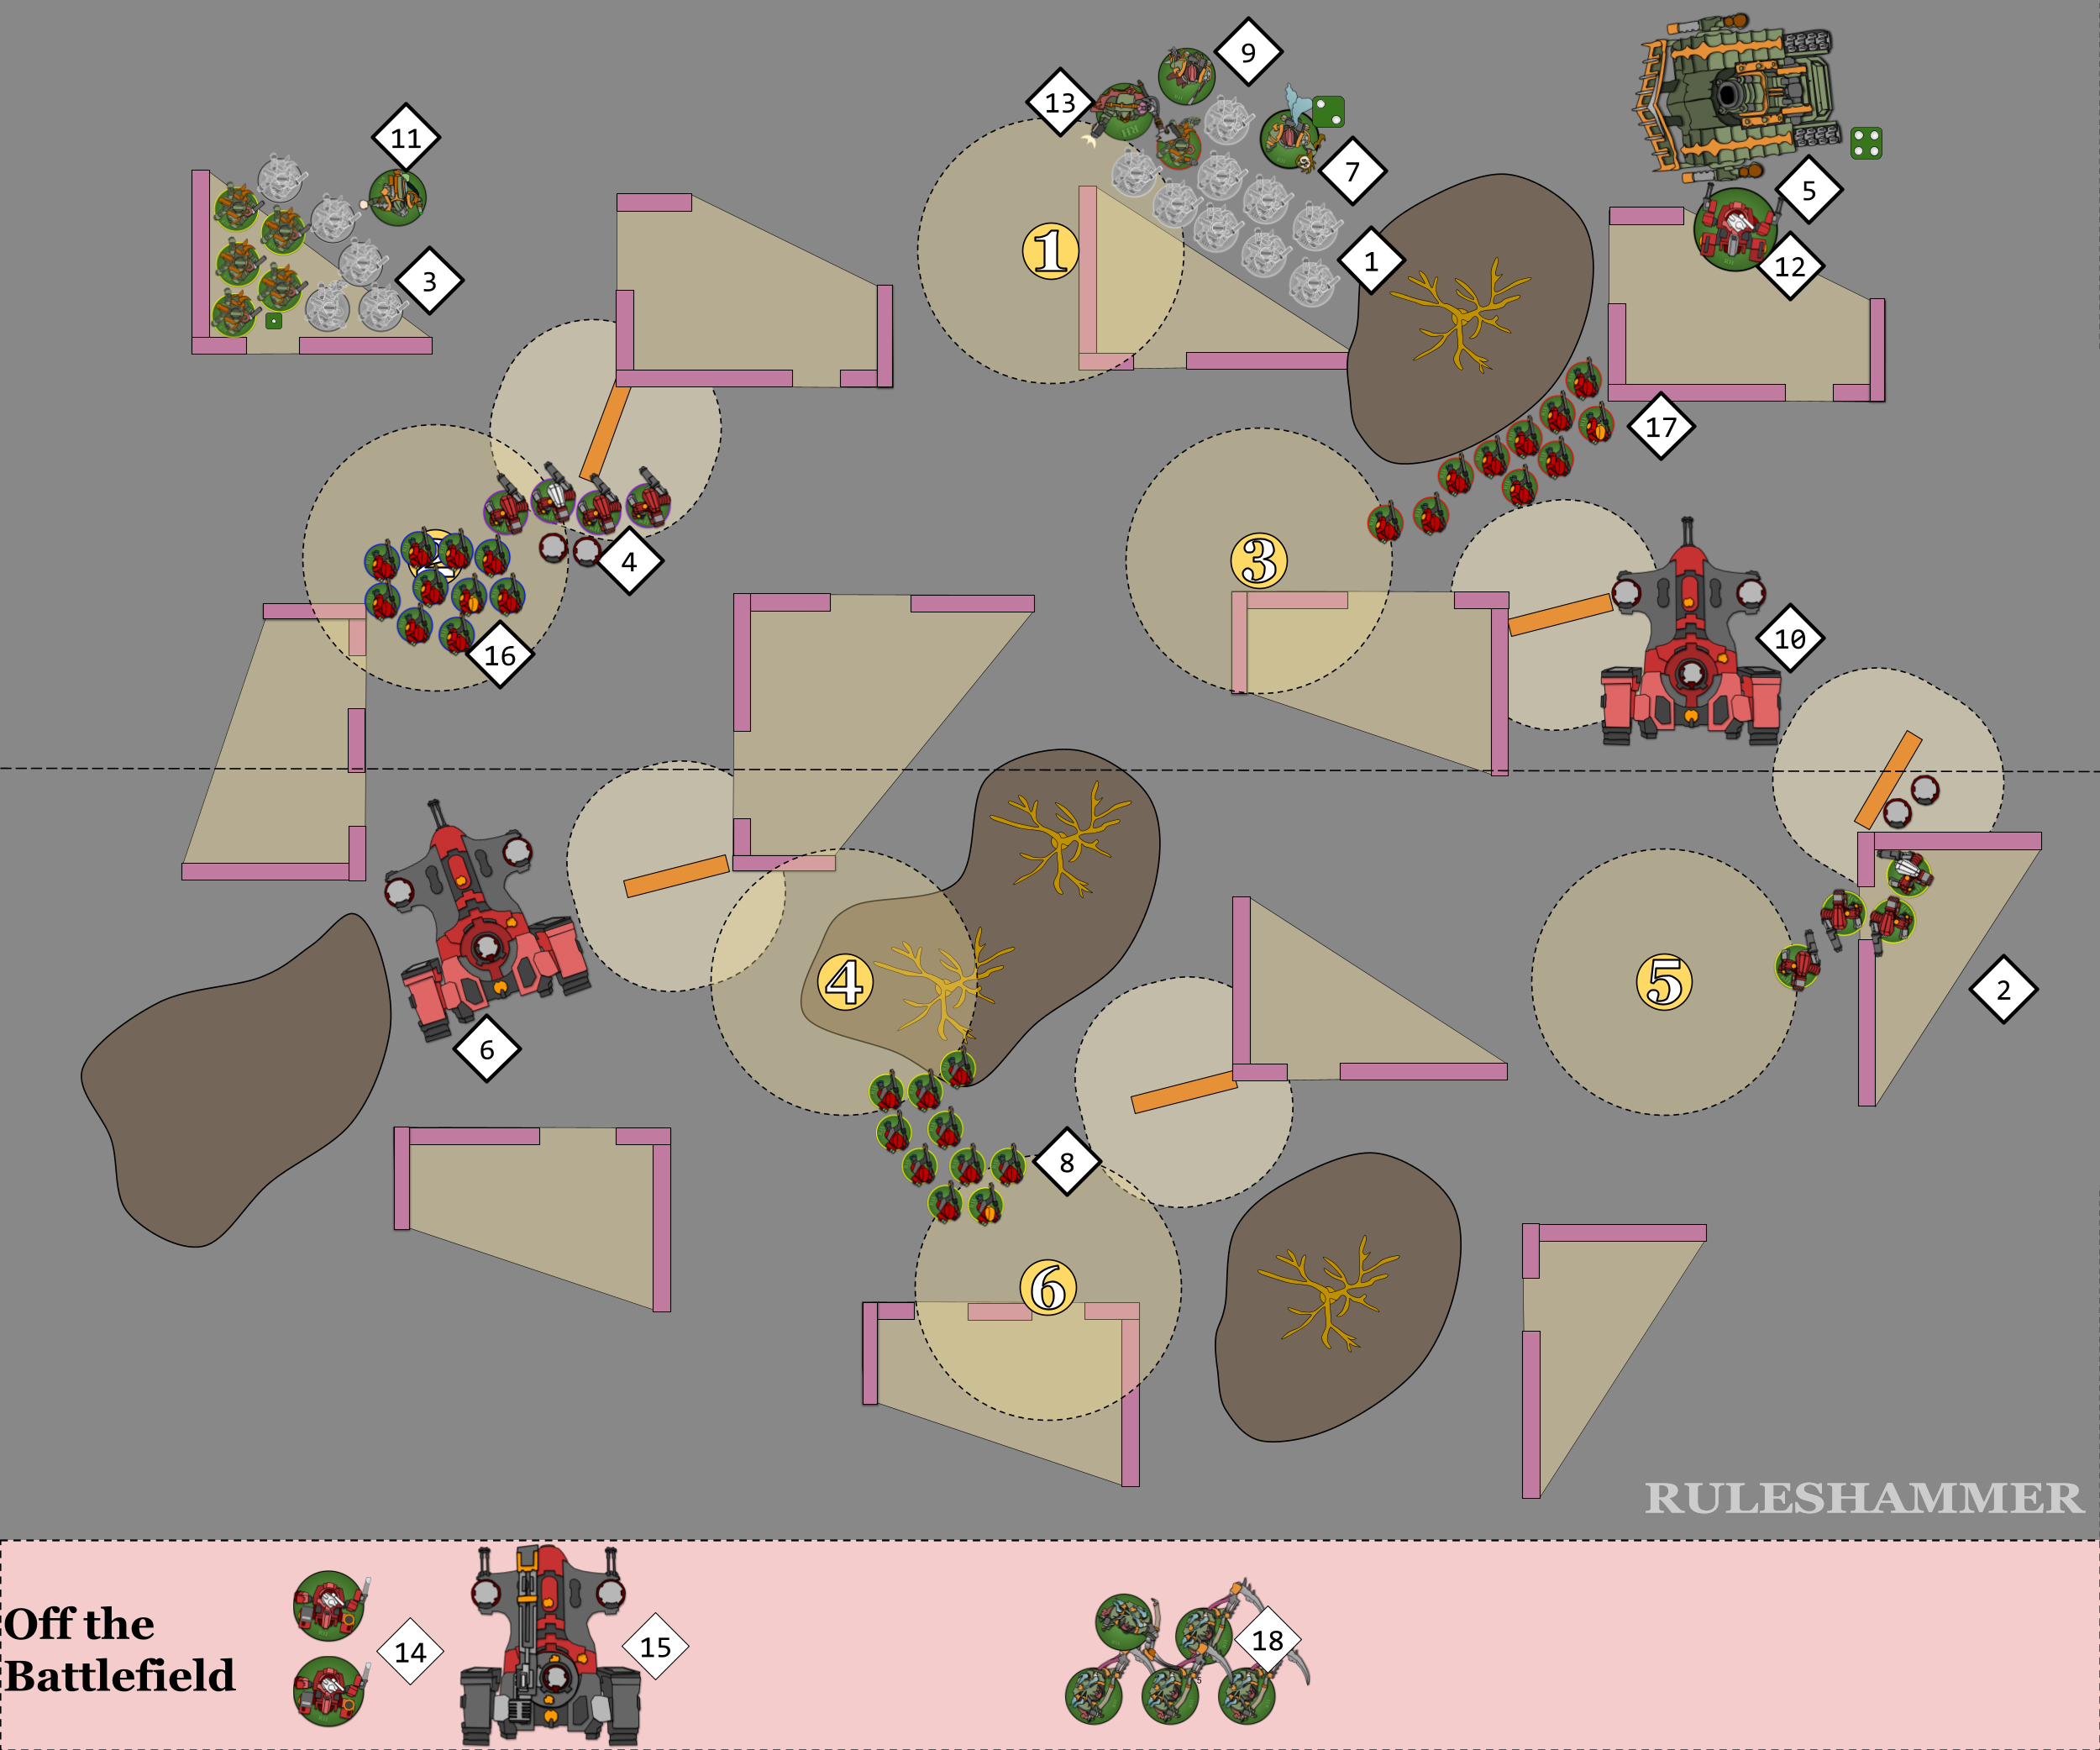
Lets look at the board for a moment:
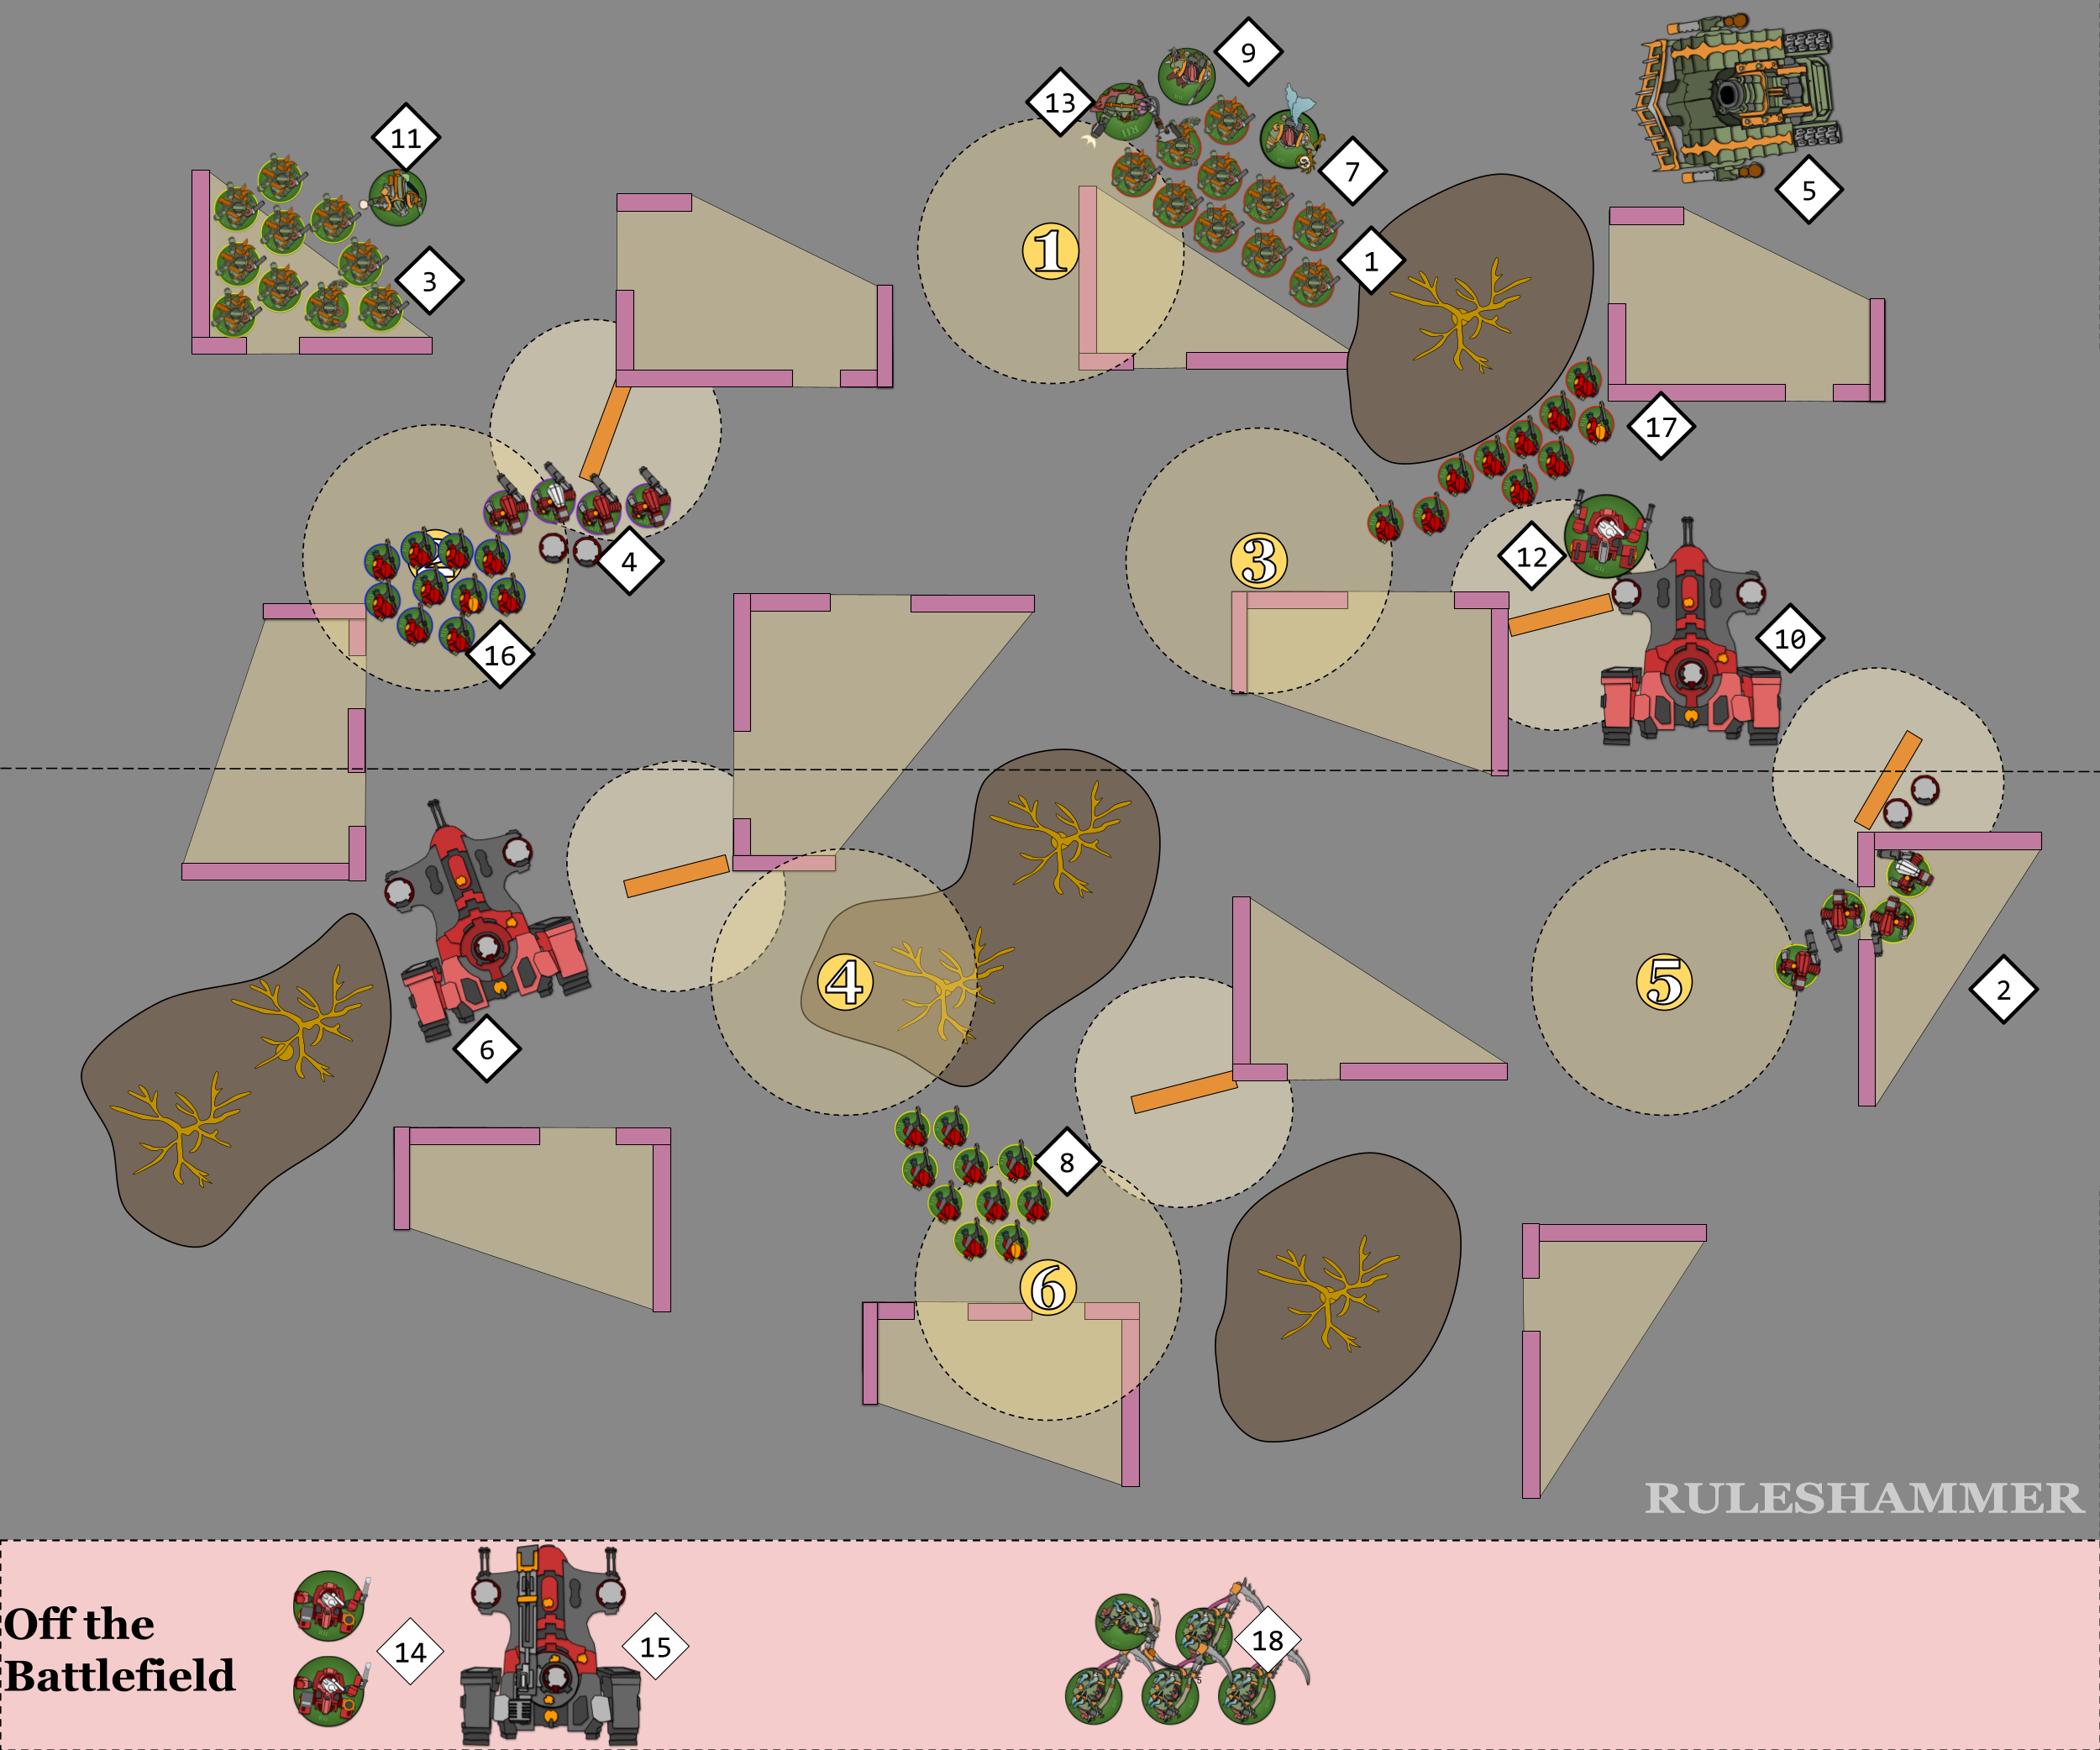
It might be tempting for the Tau player to start with their Coldstar Commander (12), but if they were to shoot at the Plague Marines (1), then the Death Guard could remove models from that unit such that fewer Breachers (17) are within the 8″ range of their Close Range Profile, reducing the overall effectiveness of our shooting. With practice this will become easier to see at a glance.
Start of the Shooting Phase
With that in mind, note that Tau actually start their shooting phase by resolving the Markerlight actions that just completed:
If this action is successfully completed, for each model in that unit that is equipped with one or more markerlights, for each markerlight that model is equipped with, select one enemy unit within 36″ of that model that would be an eligible target for that model if its unit had been selected to shoot, and roll one D6: on a 3+, that enemy unit gains one Markerlight token.’
To start us off, the Pathfinder unit will make use of the Recon Sweep Stratagem, which costs 1 CP.
RECON SWEEP
Use this Stratagem in your Shooting phase, when a PATHFINDER TEAM unit from your army successfully completes the Fire Markerlights action. Each time you roll to see if an enemy unit gains a Markerlight token as a result of that action completing, add 1 to the roll. That unit can make a Normal Move.
CP Update!
Tau: 12 – 1 = 11
Death Guard: 12
So now the Pathfinders’ target will get Markerlight tokens on a 2+ and after resolving those Markerlights the unit can then make a Normal move. The choice of targets for these Markerlights is pretty limited – they can only see a unit of Plague Marines (3) so all of the markerlights will go into that unit. One Pathfinder doesn’t have line of sight to any targets, so the unit makes 9 rolls, needing a 2+ to hit. The result is 7 Markerlight tokens on the Plague Marines(3). Then the Pathfinders make their normal move to have models in two objectives. Rob: It will often be worth using this Stratagem more for the ability to move a unit into hiding than for the Markerlight bonus. Generally, Movement is incredibly powerful and important in 40k – and often underrated by newer players.
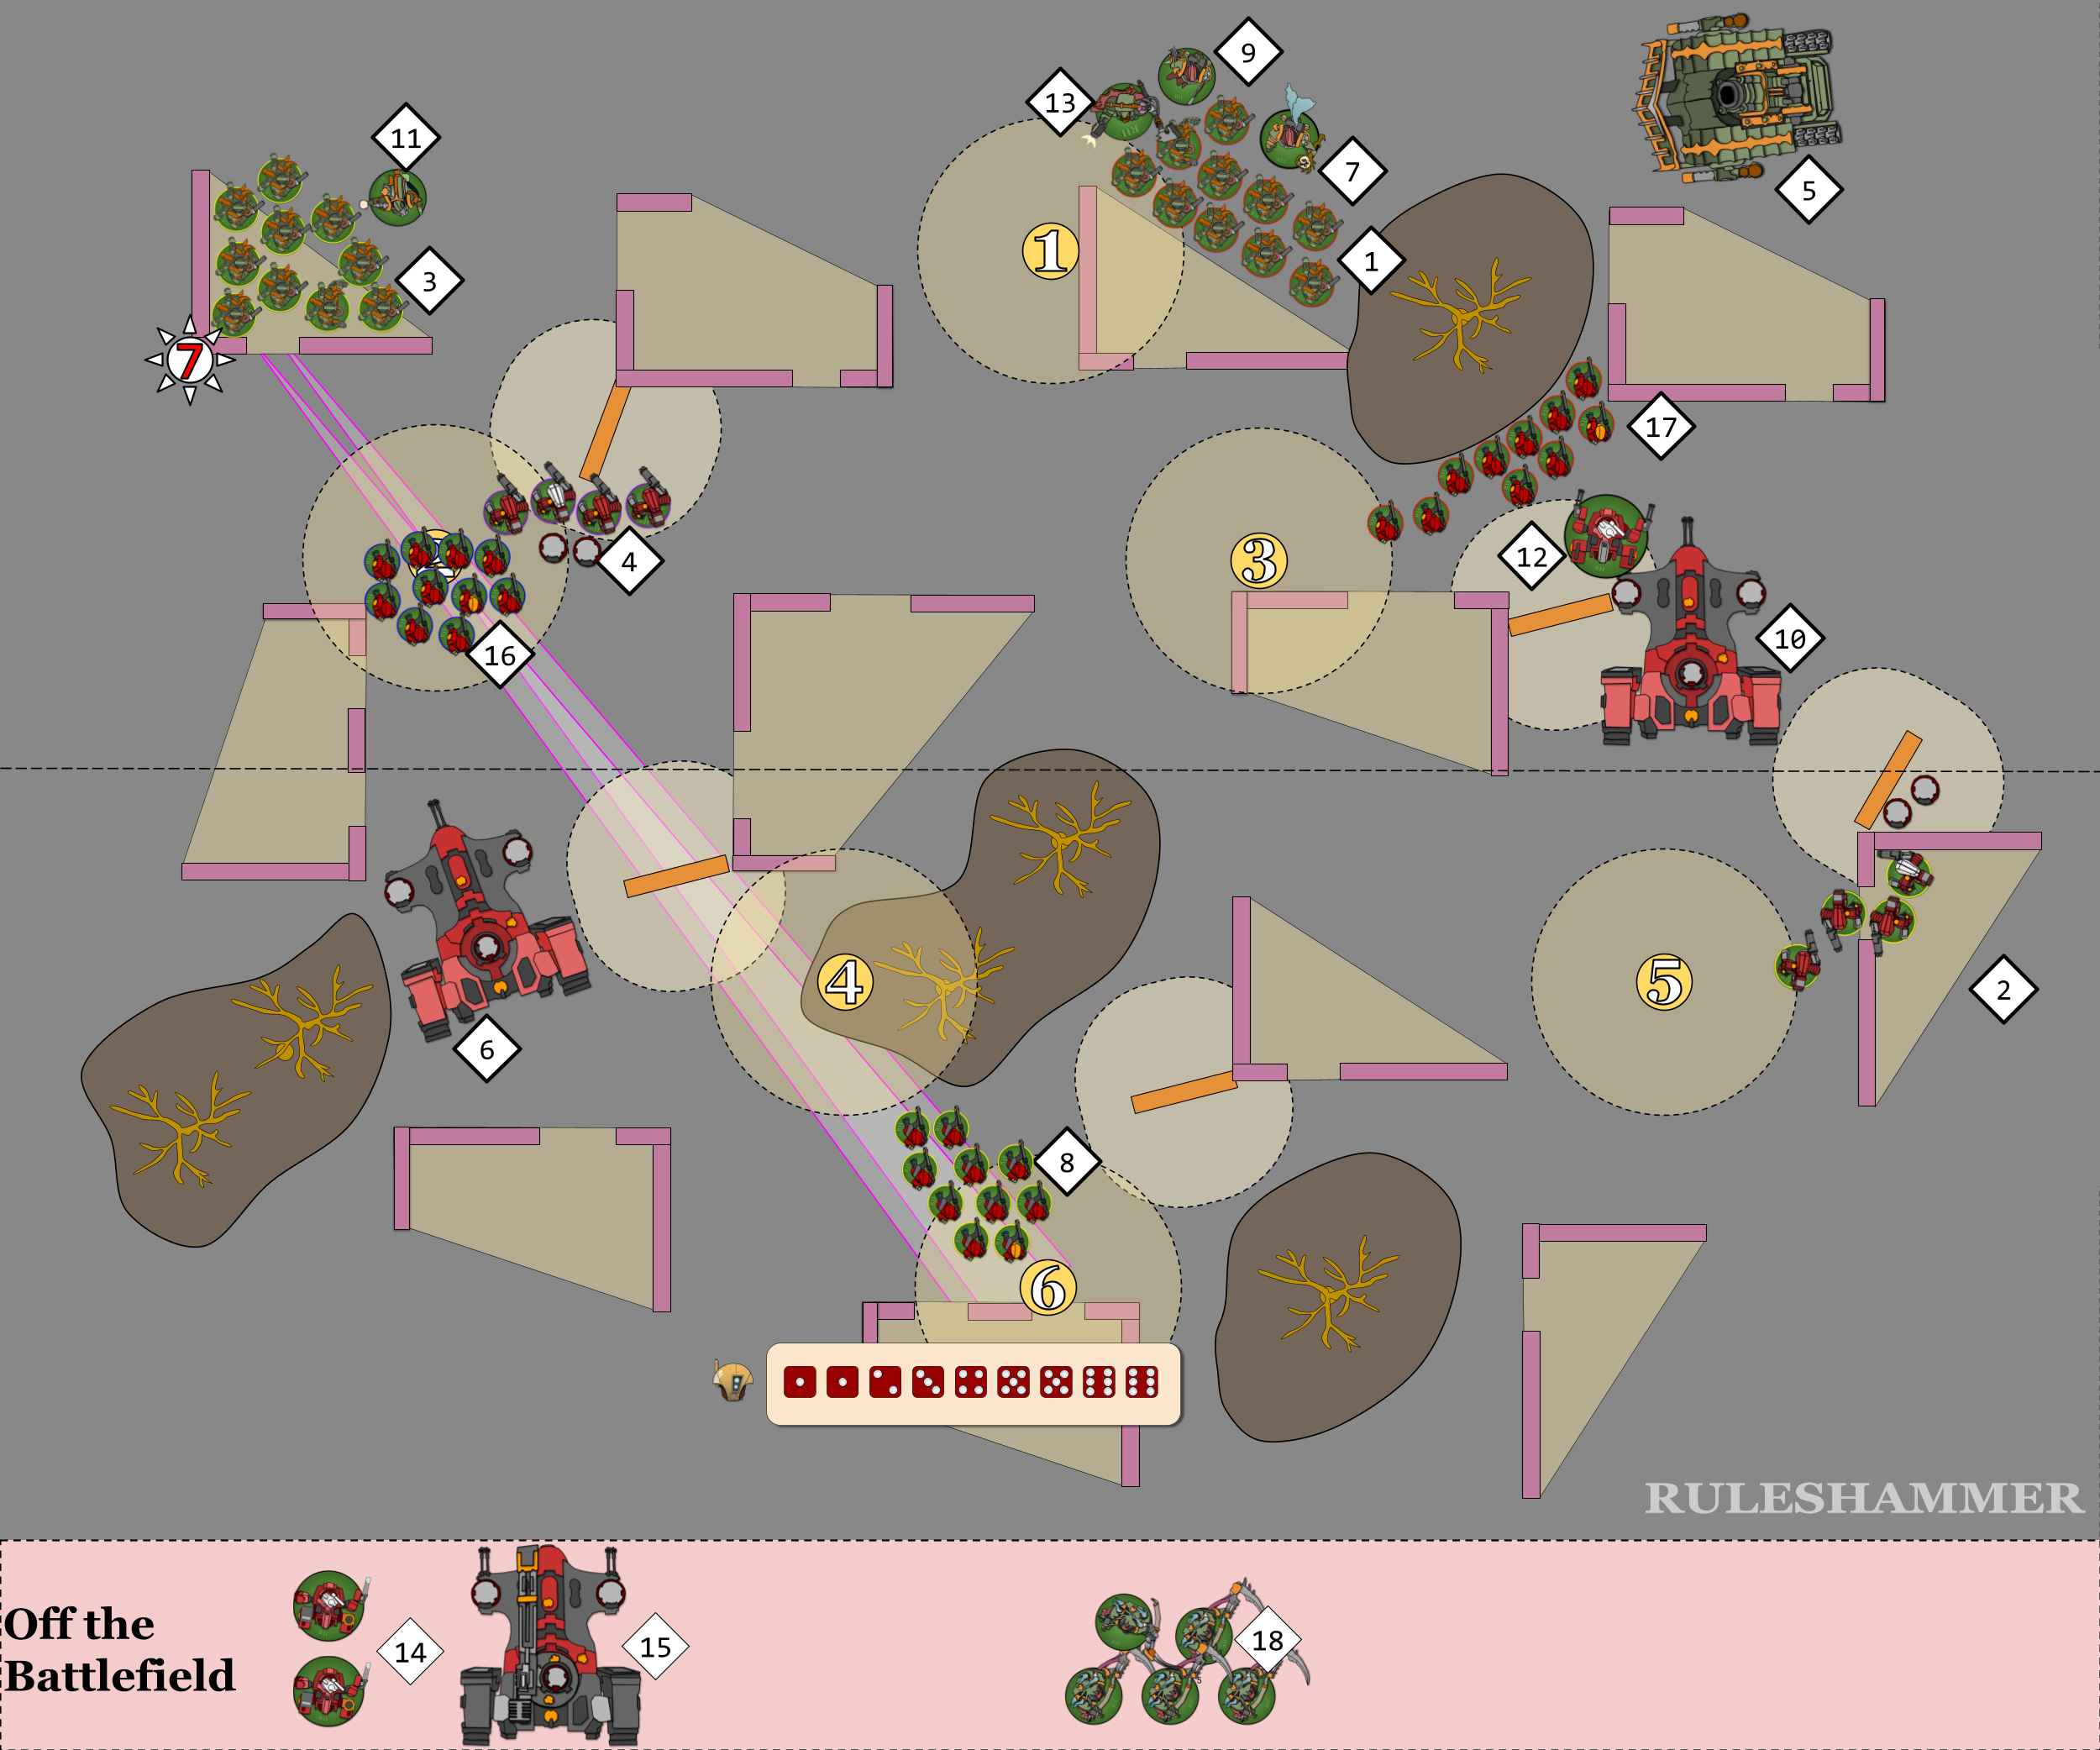
Now the Marker Drones. The drones with Stealth Suits (4) are essentially pointless here; they can’t target the Foul Blightspawn (11) because despite markerlights not being “shooting attacks” they still have to choose targets which would be eligible to shoot, and thanks to Look Out Sir the Blightspawn is not eligible. Additionally, we’ve already got 7 markerlight son that Plague Marines unit, and we don’t even have seven units in range with the weapons to use all of the ones we’ve already placed. The Markerlight drones with the other unit of Stealth Suits (2) can only target the Plague Marines (1) for the same reason – while there are friendly units between the Plague Marines (1) it’s very rare for models to actually block line of sight, especially not hover tanks like a Devilfish. The result is 2 Markerlights on the Plague Marines (1)!

With Markerlights resolved we can move on to actual shooting.
During the Shooting Phase
I’m going to go through the first unit of shooting in detail but I’ll then resolve most of the remaining shooting without boring you with every bit of detail unless there’s a new concept to explain.
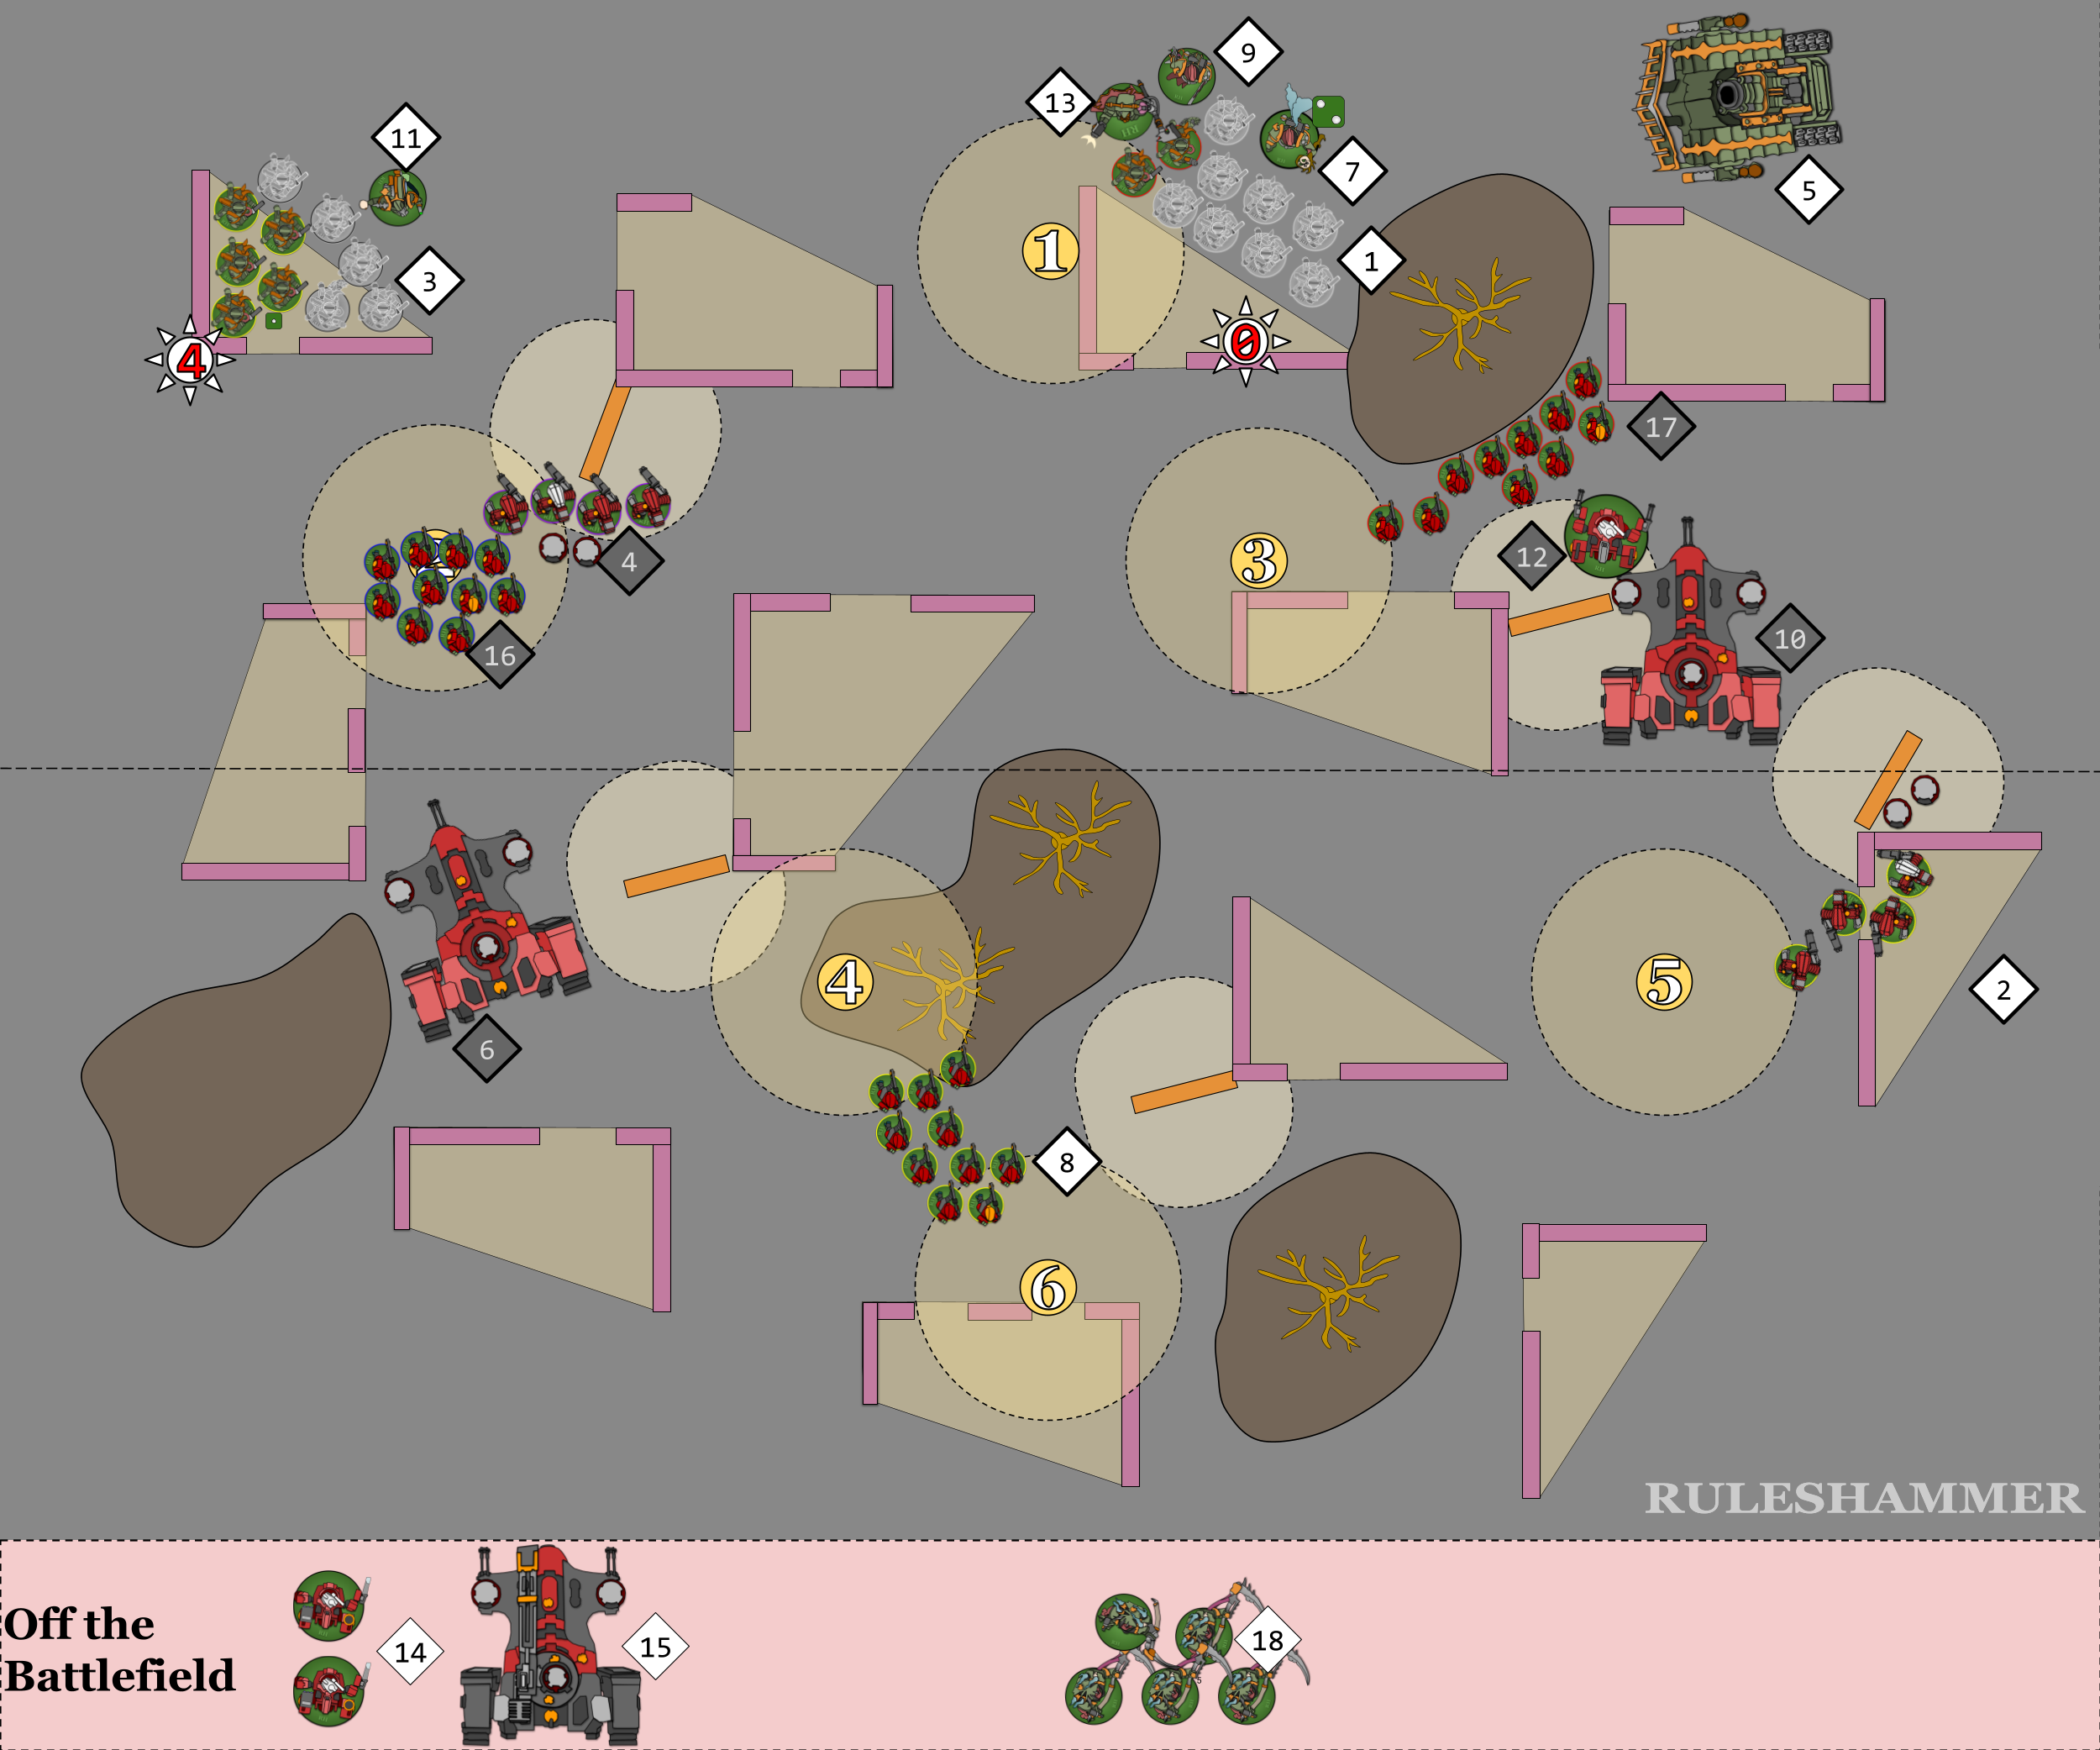
The Breacher Unit (16) activates and chooses to shoot at the Plague Marines (3). They use the Breach and Clear Stratagem; this costs 1CP and means the Plague Marines don’t get the benefit of cover from the Ruins, and in addition the Breachers Can Re-roll their Wound rolls. Only two of the Breachers are within Range for their Close Range Profile, but every model in the unit is within 12″ so the Calm Under Pressure Sept tenet that I mentioned in Episode 1 will take effect here, increasing the Strength of their guns by 1.
CP Update!
Tau: 11 – 1 = 10
Death Guard: 12
So what does all that mean? It means was have
- 2 Breachers firing Pulse Blasters with an Assault 2 Strength 7 AP-2 profile
- 8 Breachers firing Pulse Blasters with an Assault 2 Strength 6 AP-1 profile
Now the Breachers can only see a small number of models through this gap, so you might wonder if we stop shooting when we can’t see any more models. There’s a rule that covers this:
Note that so long as at least one model in the target unit was visible to the shooting model and in range of its weapon when that unit was selected as the target, that weapon’s attacks are always made against the target unit, even if no models in the target unit remain visible to or in range of it when you come to resolve them (this can happen because of models being destroyed and removed from the battlefield as the result of resolving the shots with other weapons in the shooting model’s unit first).
So even if the enemy does remove models such that the unit no longer has any models within line of sight to the firing unit, the attacks still continue declared as part of this unit’s shooting activation. This means we can actually fast roll these attacks, but because the profiles do differ we can either roll those weapons separately or use a different colour of dice to represent them. In my example we’ll use the latter. Rob: Note that this is primarily important because of the AP difference – there’s otherwise no difference between S7 and S6 shooting a T5 target.
Due to the Plague Marines having a Markerlight (or 7) on them, the Breachers will get +1 to their hit rolls. This is technically worded in the rules as a modifier to the actual dice, as in if the BS of the model is 4+ and you roll a 3, it is modified to a 4. In practice though, +1 essentially means we’ll now hit on 3+. Hit Rolls can’t be modified by more than +1/-1.
For wound rolls we’ll need to compare the Strength of our weapons to the Toughness of their target. In our case the Plague Marines are toughness 5.
Is the Strength TWICE (or more) than the Toughness? 2+ to wound.
Is the Strength GREATER than the Toughness? 3+ to wound.
Is the Strength EQUAL to the Toughness? 4+ to wound.
Is the Strength LOWER than the Toughness? 5+ to wound.
Is the Strength HALF (or less) than the Toughness? 6+ to wound.
The Tau weapons are S6 and S7. Both of these are greater than 5 but neither is double 5, so they will wound on 3+. Remember that due to the Breach and Clear Stratagem they can re-roll the wound roll until the end of the phase.
Just for the sake of piling all of this into one diagram, we should also consider what the Plague Marines will save on. Due to Armour of Contempt they will reduce the Pulse Blasters’ AP by 1, so the AP-2 attacks will become AP-1 and the AP-1 attacks will become AP0. Most of the Plague Marines are in cover – this could potentially allow them to modify their saves by +1 if they allocate the attacks to models in cover. However the other effect of Breach and Clear is that the target can’t benefit from cover, so this is moot. So as a result of that our attacks change to:
- 2 Breachers firing Pulse Blasters with Assault 2 Strength 7 AP-1, totalling 4 attacks. The plague marines will save on 4+ against these attacks.
- 8 Breachers firing Pulse Blasterswith Assault 2 Strength 6 AP-0, totalling 16 attacks. The plague marines will save on 3+ against these attacks.
All that’s left to do now is roll!
Each Plague Marine has 2 wounds. Their Disgustingly Resilient rule doesn’t help against these attacks at they are only 1 damage. They lose two Models from the unit, plus one more model is now wounded. Once you allocate a wound to a model, even if the model saves you have to keep allocating to that model for the rest of the phase. It’s common practice to track remaining wounds by putting a dice or some form of marker next to the model with it’s remaining wounds. Rob: For god’s sake, make sure you count down when doing this and not up, i.e. show the wounds remaining and not the wounds taken – it does your opponent no good to know how many wounds they’ve done to a target!
If a model in the target unit has already lost any wounds or has already had attacks allocated to it this phase, the attack must be allocated to that model.
Rob: Normally you’d want to allocate attacks like this to the models in cover first, in order to get the +1 to your save. Because that’s not an option here, the Death Guard Player should allocate all of the attacks to his models out of cover first, as long as they can keep a model within 3″ of the nearby character.
Finally, we remove a markerlight token from the Plague Marines. Now we can move on to the next unit. Because Breach and Clear only applies to the first unit of Breachers, the Plague Marines (3) can benefit from cover for their saves here, giving them a 2+ against many of these attacks.
- Stealth Suits (4) shoot at the Plague Marines (3). They cause 3 unsaved Wounds, each at 1 Damage. 2 Models are destroyed. One Markerlight is removed.
- Devilfish (10) into Plague Marines (3). They cause 3 unsaved Wounds, each at 1 Damage. 1 Model destroyed, 1 wounded. One Markerlight is removed.
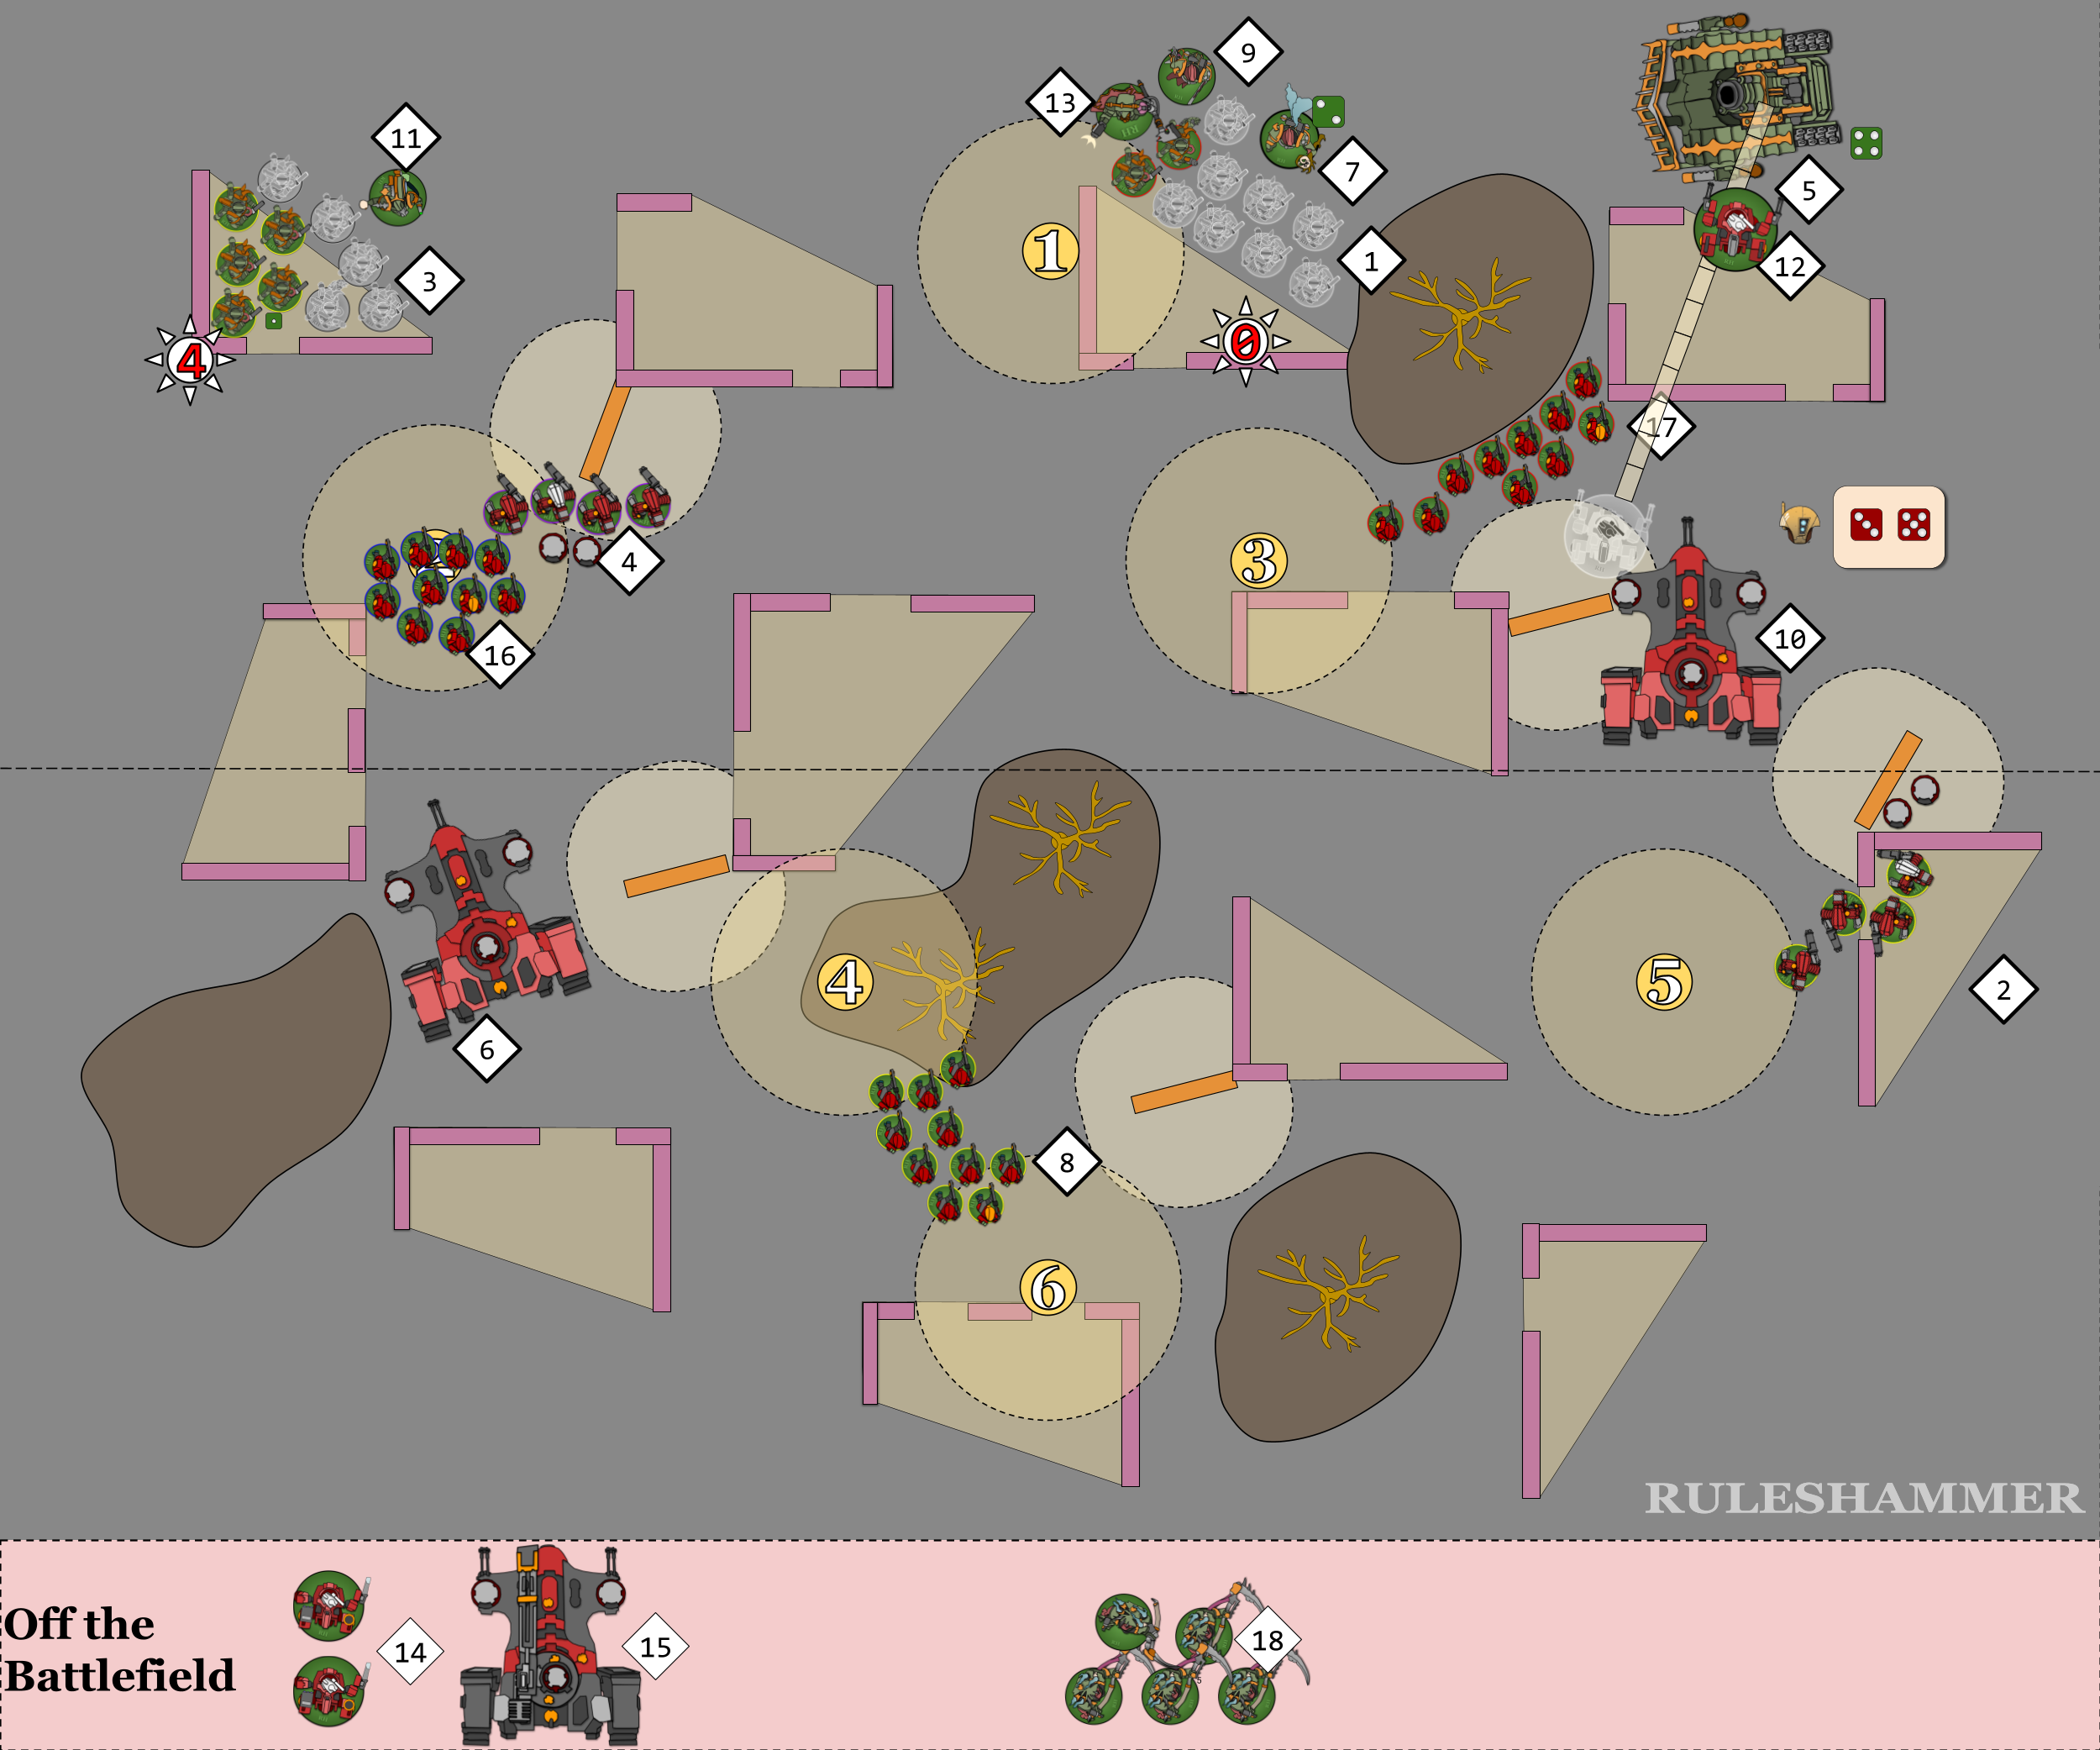
- Breachers (17) and Coldstar Commander (12) use the Coordinated Engagement Stratagem to increase their AP by 1. They target Plague Marines (1).
CP Update!
Tau: 10 – 1 = 9
Death Guard: 12
Going to explain this next one in a bit more detail.
The Breachers (17) activate, targeting the Plague Marines (1). We’ve just used a Stratagem to increase the AP of their attacks but resolving that is no more complex than the first time we resolved a shooting attack. What makes this one different is the Plague Surgeon’s Aura:
Tainted Narthecium (Aura): While a friendly BUBONIC ASTARTES INFANTRY unit is within 3″ of this model, each time a model in that unit would lose a wound, roll one D6: on a 6, that wound is not lost.
As the Breachers’ attacks are 1 damage, this will simply become an extra dice roll after the failed saves. If the attack did multiple damage though, after rolling the single save against that attack if it fails the Death Guard player would roll a D6 per damage inflicted, with 6s causing that damage to be ignored and the wound not lost. Damage from attacks does not spill over other other models.
One last effect in play here is that the unit is shooting through Dense Cover, so their shots will have -1 to hit. This is mitigated by the +1 to hit from the Markerlights.
That explained we can carry on with the shooting:
- Breachers (17) into Plague Marines (1). They cause 4 unsaved Wounds, each at 1 Damage. 0 damage Ignored via plague surgeon. Two models are destroyed. One markerlight is removed from the unit.
- Coldstar Commander (12) into Plague Marines (1).
Burst Cannons (both types) cause 6 unsaved wounds, each at 1 damage. 0 are ignored. 3 Models are destroyed.
Thermoneutronic Projector – rolled a 2 for the number of attacks, the T’au Player used the Command re-roll Stratagem to re-roll at a cost of 1CP, and got a 6. This caused 8 unsaved wounds doing 2 damage each (the Crisis Commander can re-roll wound rolls), reduced to 1 damage each by Disgustingly Resilient. 2 of 8 damage ignored via plague surgeon. Three Models destroyed. One markerlight is removed from the unit.
Once again I think some extra elaboration is helpful on this next one. First let’s look at the board as it stands after all of that shooting. The greyed out unit numbers have already shot this turn, we’re nearly at the end.

Devilfish (10) into Malignant Plague Caster (7). Characters models as I have mentioned previously are often not targetable. This is because of the Look Out Sir rule.
LOOK OUT, SIR
Models cannot target a unit that contains any CHARACTER models with a Wounds characteristic of 9 or less with a ranged weapon while that CHARACTER unit is within 3″ of any of the following:
– A friendly unit that contains 1 or more VEHICLE or MONSTER models with a wounds characteristic of 10 or more.
– A friendly non-CHARACTER unit that contains 1 or more VEHICLE or MONSTER models.
– A friendly non-CHARACTER unit that contains 3 or more models.
In all cases, if that CHARACTER unit is both visible to the firing model and it is the closest enemy unit to the firing model, it can be targeted normally. When determining if that CHARACTER unit is the closest enemy unit to the firing model, ignore other enemy units that contain any CHARACTER models with a Wounds characteristics of 9 or less.
Because the Plague Marines have been reduced to 2 models, the Malignant Plague Caster (7) is now exposed. So lets resolve that!
- Devilfish (10) into Malignant Plague Caster (7). -1 to Hit due to Dense Cover. Causes 3 unsaved wounds, each at 1 damage. 1 Ignored vis Plague Surgeon. 2 of 4 wounds remaining.
And with that the Shooting phase is over. Here’s the final state of the board!
Now onto the charge phase.
Charge Phase
Tau are not known for charging, however our Coldstar Commander (12) is actually packing some reasonable Melee output in this battle between the Thermoneutronic Projector and the Onager Gunatlet. So with that in mind, they’re going to try for the charge into the Plague Burst Crawler (5). Because they had to arrive in the Reinforcements step more than 9″ away, the minimum roll for this charge to succeed will be 9.
Rob: Note that here the Ruins have the Breachable keyword, and the Coldstar Commander has the INFANTRY keyword, which means the Commander can burst right through those walls during its charge en route to the Plagueburst Crawler.
At this point, the Death Guard player gets to turn on their Stratagems. Because they’re using the Inexorable Plague Company, they have access to the Ferric Miasma Stratagem, which they spend 1 CP to use here.
Ferric Miasma (1 CP)
Use this Stratagem in your opponent’s Charge phase, when an INEXORABLE unit from your army is selected as the target of a charge. Until the end of the phase, subtract 2 from charge rolls made for any unit that declares a charge against that INEXORABLE unit (to a minimum of 1).
This makes things significantly more difficult. The T’au player rolls and the result is an 8. Not good enough. They really want to make that charge though – tagging the PBC is a big benefit, so they will use the Command Re-roll Stratagem to re-roll that charge. Costing them 1CP.
CP Update!
Tau: 9 – 1 = 8
Death Guard: 12 – 1 = 11
The T’au player re-rolls and the result is: 11 – they make the charge!
Rob: For the record, this is bullshit and it happens 100% of the time I use the Ferric Miasma Stratagem. It happened to me three times in one game against my buddy Garrett’s Grey Knights and I just told him to get out of my house.
With no other charges to declare, the enemy can now Heroically Intervene if they have any eligible units to do so with. I have covered this here.
With no Models eligible, we move onto the Fight phase.
Fight Phase
Wow we’re almost done with this turn. I’m going to give the Fight Phase as much attention as I’ve given the Shooting Phase in this article, but in a future Episode. For this episode here are the highlights of the epic fight between Tank and Battlesuit!
- The Coldstar Commander (12) activates, targeting the Plagueburst Crawler (5).
The Onager Gauntlet causes 3 unsaved wounds of 3 damage each, reduced to 2 damage each by Disgustingly Resilient. The PBC has 6 of 12 wounds remaining.
The Thermoneutronic Projector causes 2 unsaved wounds of 2 damage each, reduces to 1 damage each Disgustingly Resilient. 4 of 12 wounds remaining. - The Plagueburst Crawler (5) activates, targeting the Coldstar Commander (12). Inflicts 0 wounds.
Ouch – that Commander did quite a bit, but Disgustingly Resilient really proved its worth reducing a lot of the damage taken. With all combat resolved we now move on to the Morale Phase!
The Morale Phase
One phase left. We have two units that require morale checks. Like the Fight phase I’m going to dedicate a larger chunk of a future episode to explaining it in detail, but here are the key highlights:
- Plague Marines (3). In a slight rookie error they have lost the Plague Marine Champion. So their Leadership is now 7 rather than 8. They’ve lost 5 models this turn and roll a 2. 5 + 2 = 7, this not greater than their Leadership state so the Morale Check is passed.
- Plague Marines (1) still have their Plague Champion so their leadership is 8. They lost 8 models though, so the only passing roll is a 1. They roll a 2. They lose one model to the failed check and because the unit is below half strength they will lose the last model on a 1 or a 2 for the Combat Attrition check. However thanks to the Remorseless special rule, Plague Marines ignore Attrition modifiers, so they only lose their last model on a 1 here. They roll a 4 – the Champions Fights on!
And at last the state of the board after Tau Turn 1:
Next Time: The Death Guard Strike Back
That’s almost half the turn wrapped up! In episode 5 we’ll go over what the Tau army achieved it terms of winning some VP, and start the Death Guard payback operation with their Turn 1.
Ruleshammer Battle Index
Episode 1 – Game Set Up Part 1
Episode 2 – Game Set Up Part 2
Episode 3 – Pre-Battle Abilities, Tau Turn 1 Part 1
Episode 4 – The Tau Turn 1 Part 2
Episode 5 – Tau VP and Death Guard Turn 1 Part 1
Episode 6 – Death Guard Turn 1 Shooting Phase
Have any questions or feedback? Got a rules question you want answered? Drop us a note in the comments below, ask a question in our Ruleshammer form, or head over to r/ruleshammer to discuss.

You must be logged in to post a comment.